Westinghouse WES31-15110BLK User manual

Instruction Manual
Guide d’utilisation

1
Please read instructions carefully before assembly
Veuillez lire attentivement les instructions avant l'assemblage
Retain this manual for reference
Conservez ce manuel pour référence
CONTENT
1. Components
2. Assembly
3. Operation
4. For your safety
5. Cleaning and storage
6. Specifications
7. Grounding instructions
8. Warranty
Français
1. COMPONENTS
1. Please empty the packing box thoroughly, and make sure that there are no missing parts.
2. DO NOT PLUG THE UNIT IN UNTIL THE UNIT IS COMPLETELY ASSEMBLED. MAKE SURE THERE IS NO DAMAGE
TO THE UNIT AND POWER CORD.
IF THERE IS ANY DAMAGE OR IF THERE ARE MISSING PARTS, PLEASE CONTACT 1-866-967-7333.
2. ASSEMBLY
Parts: 1 X Allen key
2 X M6*50 screws
2 X M4*35 screws
2 X round washers
1 X cord holding plate

2
Place the radiator and its components on a non-marking and non-scratching surface.
Have a Phillips screwdriver at hand (not supplied). Remove the Allen key Package
Read this manual before installation and use. Keep this manual in a convenient place for future use if needed.
Installation:
1. Put the radiator upside down. Insert the AC power cord through the base cover (#3) and then through the base
(#2).
2. Insert the base cover (#3) on the radiator (#4). Insert the base (#2) into the base cover (#3). Put the two round
washers (#6) onto the base (#3). Insert the two M6*50 screws (#1). Screw on tight.
3. Pull on the AC power cord and insert it into the grooves on the base (#2). Put the square washer (#5) on the
base and then fix it with the two M4*35 screws (#5) to secure the AC power cord onto the base (#2) with a
Phillips screwdriver.
4. Turn the radiator right side up.
REMEMBER: Portable electric radiators are designed for spot heating or as a supplementary heat source. They are
not intended to be the main source of heat during cold months.
Caution: If you must use an extension cord, the cord should be at least No. 14 AWG and rated for no less
than 1875 W.
You must always make sure that there is at least 1’ 6” (50 cm) of empty space above the radiator,
9” (25 cm) from the side and 5’ (1.8 m) below the radiator.
3. OPERATION
Should the Westinghouse infrared radiator fall, a hidden switch will automatically switch it off: correct operation
of the switch is conditioned by the evenness of the surface the radiator is placed on. Once the radiator is back up
on a plane surface it will be ready to work again.
Press of the On button to activate the radiator. Press on the Off button to deactivate it.

3
4. FOR YOUR SAFETY
IMPORTANT INSTRUCTIONS
1. ONLY USE THE UNIT ON A SECURED AND SOLID FLAT SURFACE.
2. This radiator is not intended for use in bathrooms, laundry areas or similar indoor locations where there may
be moisture. Never place radiator where it may fall into a pool, bathtub or other water receptacle.
3. This unit is intended for household use only. DO NOT use the unit in such areas as construction sites,
greenhouses, barns or stables or any place that has flammable materials.
4. Use this radiator in a well-ventilated area.
5. This radiator has hot, arcing and sparking parts inside. DO NOT use it in areas where gasoline, paint or
flammable liquids are used or stored.
6. DO NOT move the unit when it is still connected to an electrical outlet, and always wait for the unit to cool
down before moving, cleaning and storing it.
7. DO NOT touch the radiator when in use. Please wait at least 10 minutes after it has been turned off before
touching it.
8. Extreme caution is necessary when any radiator is used near a child or someone physically disabled.
9. DO NOT LEAVE THE UNIT UNATTENDED WHEN IN OPERATION.
10. This radiator is hot when in use. To avoid burns, do not let bare skin touch hot surfaces. Use handles (not
provided) when moving this radiator. Keep combustible materials such as furniture, pillows, bedding, papers,
clothes and curtains at least 3’ (0.9 m) from the front of the radiator.
11. DO NOT cover the unit with any type of clothing while in operation or a short time after turning the unit off.
12. DO NOT wrap the power cord around the unit.
13. DO NOT insert or allow foreign objects to enter any ventilation or exhaust opening of the unit as this may
cause electric shock, fire or damage to the radiator.
14. PLEASE HANDLE THE UNIT WITH CARE.
15. DO NOT operate the radiator with a damaged power cord or a damaged AC wall outlet. DO NOT operate the
radiator if it has been dropped or damaged in any manner.
16. DO NOT USE THE UNIT AS A ROOM RADIATOR.
17. DO NOT run the power cord under carpeting. DO NOT cover the cord with throw rugs, runners or the like.
Position the cord away from traffic areas where it may be tripped over.
18. To disconnect the radiator, turn the power switch to off, then unplug the unit.
19. To prevent the possibility of fire, DO NOT block air intakes or exhaust openings in any manner. DO NOT use
on soft surfaces such as a bed where openings may become blocked.
20. Use this radiator only as described in this manual; any other use not recommended by the manufacturer may
cause fire, electric shock or injury.
SAVE THESE INSTRUCTIONS.
5. CLEANING AND STORAGE
1. Turn the unit OFF and unplug the unit before cleaning.
2. Use only a soft cloth to clean the exterior. An air compressor or a vacuum cleaner can be used to clean the
interior.
3. Do not use gasoline, paint thinner or other chemicals to clean the radiator
4. Store the radiator in its original box and keep in a cool, dry place.
6. SPECIFICATIONS
Power supply: 120 V/60 Hz
Maximum wattage: 1500 W
7. GROUNDING INSTRUCTIONS
This product is for use on a nominal 120 V circuit with a grounding plug that looks like the plug illustrated below. Make
sure that the product is connected to an outlet having the same configuration as the plug. If you use an extension cord,
make sure it also has a grounding plug. No adaptor should be used with this product.

4
DANGER
Improper connection of the equipment-grounding conductor may result in a risk of electrocution. Check with a
qualified electrician or other service personnel if you doubt the outlet is properly grounded. Do not modify the
power cord provided with the product. If it does not fit the wall outlet, have a proper outlet installed by a
qualified electrician. Do not use any type of adaptor with this product.
8. WARRANTY
LIMITED ONE (1) YEAR WARRANTY
This product is guaranteed against all manufactured faults and defects for a period of one (1) year from the date of
purchase. For repairs or product defects, please call our customer service department at: 1-866-967-7333. Please have
your proof of purchase on hand. We will repair or replace defective units at our discretion.
Important notes: Any damage caused by an accident or an abusive usage is NOT covered under warranty. We also
decline all responsibility concerning indirect or consecutive damages. In certain Canadian provinces or USA States, it is
not permitted to limit indirect or consecutive damages. Therefore it is possible these limitations are not applicable to
you. This warranty gives you specific legal rights. You may also have other legal rights which vary from one province or
State to another.
CUSTOMER SERVICE: 1-866-967-7333 ext 227
TABLE DES MATIÈRES
1. Composantes
2. Assemblage
3. Fonctionnement
4. Pour votre sécurité
5. Nettoyage et rangement
6. Spécifications
7. Instructions de mise à la terre
8. Garantie

5
1. COMPOSANTES
1. Videz complètement la boîte d’emballage et assurez-vous qu’il ne manque aucune pièce.
2. NE BRANCHEZ PAS L'APPAREIL AVANT QU’IL NE SOIT COMPLÈTEMENT ASSEMBLÉ. ASSUREZ-VOUS QUE
L’APPAREIL ET LE CORDON D’ALIMENTATION NE SONT PAS ENDOMMAGÉS.
SI L’APPAREIL EST ENDOMMAGÉ OU S’IL MANQUE DES PIÈCES, VEUILLEZ COMMUNIQUER AVEC LE SERVICE
D’ASSISTANCE TÉLÉPHONIQUE SANS FRAIS : 1-866-967-7333.
2. ASSEMBLAGE
Pièces:
1 X clé Allen
2 X vis M6*50
2 X vis M4*35
2 X rondelles
1 x plaque de maintien
Ayez un tournevis Phillips (+) sous la main (non fourni).

6
1. Mettez le radiateur à l'envers et placez-le sur une surface non marquante. Insérez le cordon d'alimentation
du radiateur à travers le couvercle de la base (#3) et ensuite à travers la base (#2).
2. Insérez le couvercle de la base (#3) sur le radiateur. Insérez la base (#2) dans le couvercle de la base. Placez
les deux rondelles rondes (#6) sur la base (#2). Insérez les deux vis M6 *50 (#1) dans les rondelles. Vissez
serré.
3. Tirez sur le cordon d'alimentation et fixez-le sur la base (#2). Placez la plaque de maintien (#5) sur le cordon
et vissez-la avec les deux vis M4*35 (#7) afin que le cordon ne bouge plus.
4. Tournez le radiateur à l'endroit.
REMARQUE: Attendez que l’élément chauffant du radiateur ait refroidi avant de le déplacer.
IMPORTANT : Les radiateurs électriques portatifs sont conçus pour le chauffage d’appoint ou comme source de
chaleur supplémentaire. Ils ne sont pas destinés à être la principale source de chaleur durant les mois froids.
Attention : Si vous devez utiliser une rallonge, celle-ci doit être au moins de taille No. 14 AWG et calibrée
à au moins 1 875 W.
Assurez-vous d’avoir toujours un minimum de 1 pi 6 po (50 cm) d’espace libre au-dessus du
radiateur, soit 9 po (25 cm) sur les côtés et 5 pi (1,80 m) sous le radiateur.
3. FONCTIONNEMENT
En cas de chute, un interrupteur caché s’occupera d’éteindre automatiquement le radiateur. Le fonctionnement
correct de cet interrupteur est conditionné par la régularité de la surface d’appui. Une fois le radiateur de
nouveau debout sur une surface plane, il fonctionnera de nouveau.
Appuyez sur l'interrupteur de mise en marche ‘On’ au-dessus du radiateur pour le mettre en marche.
Appuyez sur le bouton ‘Off’(mise hors fonction) pour éteindre le radiateur.

7
4. POUR VOTRE SÉCURITÉ
INSTRUCTIONS IMPORTANTES
1. N’UTILISEZ CET APPAREIL QUE SUR UNE SURFACE PLANE ET SOLIDE.
2. Ce radiateur n’est pas conçu pour être utilisé dans une salle de bain, une aire de lavage ou tout autre
espace intérieur humide. Ne placez jamais le radiateur dans un endroit où il pourrait tomber dans une piscine,
une baignoire ou tout autre récipient d'eau.
3. Cet appareil est destiné à un usage domestique seulement. N’UTILISEZ PAS l'appareil dans des endroits tels
que des chantiers de construction, des serres, des granges, des étables ou tout autre endroit contenant
des matériaux inflammables.
4. N’UTILISEZ PAS l'appareil dans une zone non aérée.
5. Les radiateurs contiennent des pièces chaudes qui produisent des arcs électriques et des étincelles. NE
L’UTILISEZ PAS dans les endroits où de l'essence, de la peinture ou des liquides inflammables sont utilisés ou
entreposés.
6. NE DÉPLACEZ PAS l'appareil lorsqu’il est encore branché à une prise électrique et attendez toujours qu’il
refroidisse avant de le déplacer, le nettoyer et le ranger.
7. NE TOUCHEZ PAS l’appareil lorsqu’il chauffe. Avant de le toucher, attendez au moins 10 minutes après l’avoir
mis hors tension.
8. Une extrême prudence est de mise lors de l’utilisation de tout radiateur à proximité d'un enfant ou d’une
personne physiquement handicapée.
9. NE LAISSEZ PAS L’APPAREIL SANS SURVEILLANCE LORSQU'IL EST EN USAGE.
10. Ce radiateur devient chaud en cours d'utilisation. Pour éviter les brûlures, ne touchez pas les surfaces
chaudes à mains nues. Utilisez des poignées (non fournies) pour déplacer cet appareil. Tenez les matériaux
combustibles, tels que meubles, coussins, literie, papiers, vêtements et rideaux à au moins 3 pi (0,9 m) du
devant du radiateur.
11. NE COUVREZ PAS le radiateur lorsqu’il est en marche ou peu après l’avoir mis hors tension.
12. N’enroulez pas le cordon d'alimentation autour de l'appareil.
13. N’insérez pas ou ne laissez pas de corps étrangers pénétrer dans les bouches de ventilation ou de sortie d’air
de l'appareil, car ceci pourrait causer une décharge électrique, un incendie ou endommager l'appareil.
14. VEUILLEZ MANIPULER CE RADIATEUR AVEC SOIN.
15. N’UTILISEZ PAS le radiateur si le cordon électrique ou la prise murale CA sont endommagés, si l’appareil est
tombé ou s’il est endommagé de quelque manière.
16. N’UTILISEZ PAS L'APPAREIL COMME RADIATEUR POUR UNE PIÈCE.
17. Ne placez pas le cordon d'alimentation sous une moquette. Ne le recouvrez pas de carpettes, de chemins de
table ou équivalent. Éloignez le cordon des zones de circulation où il pourrait faire trébucher quelqu'un.
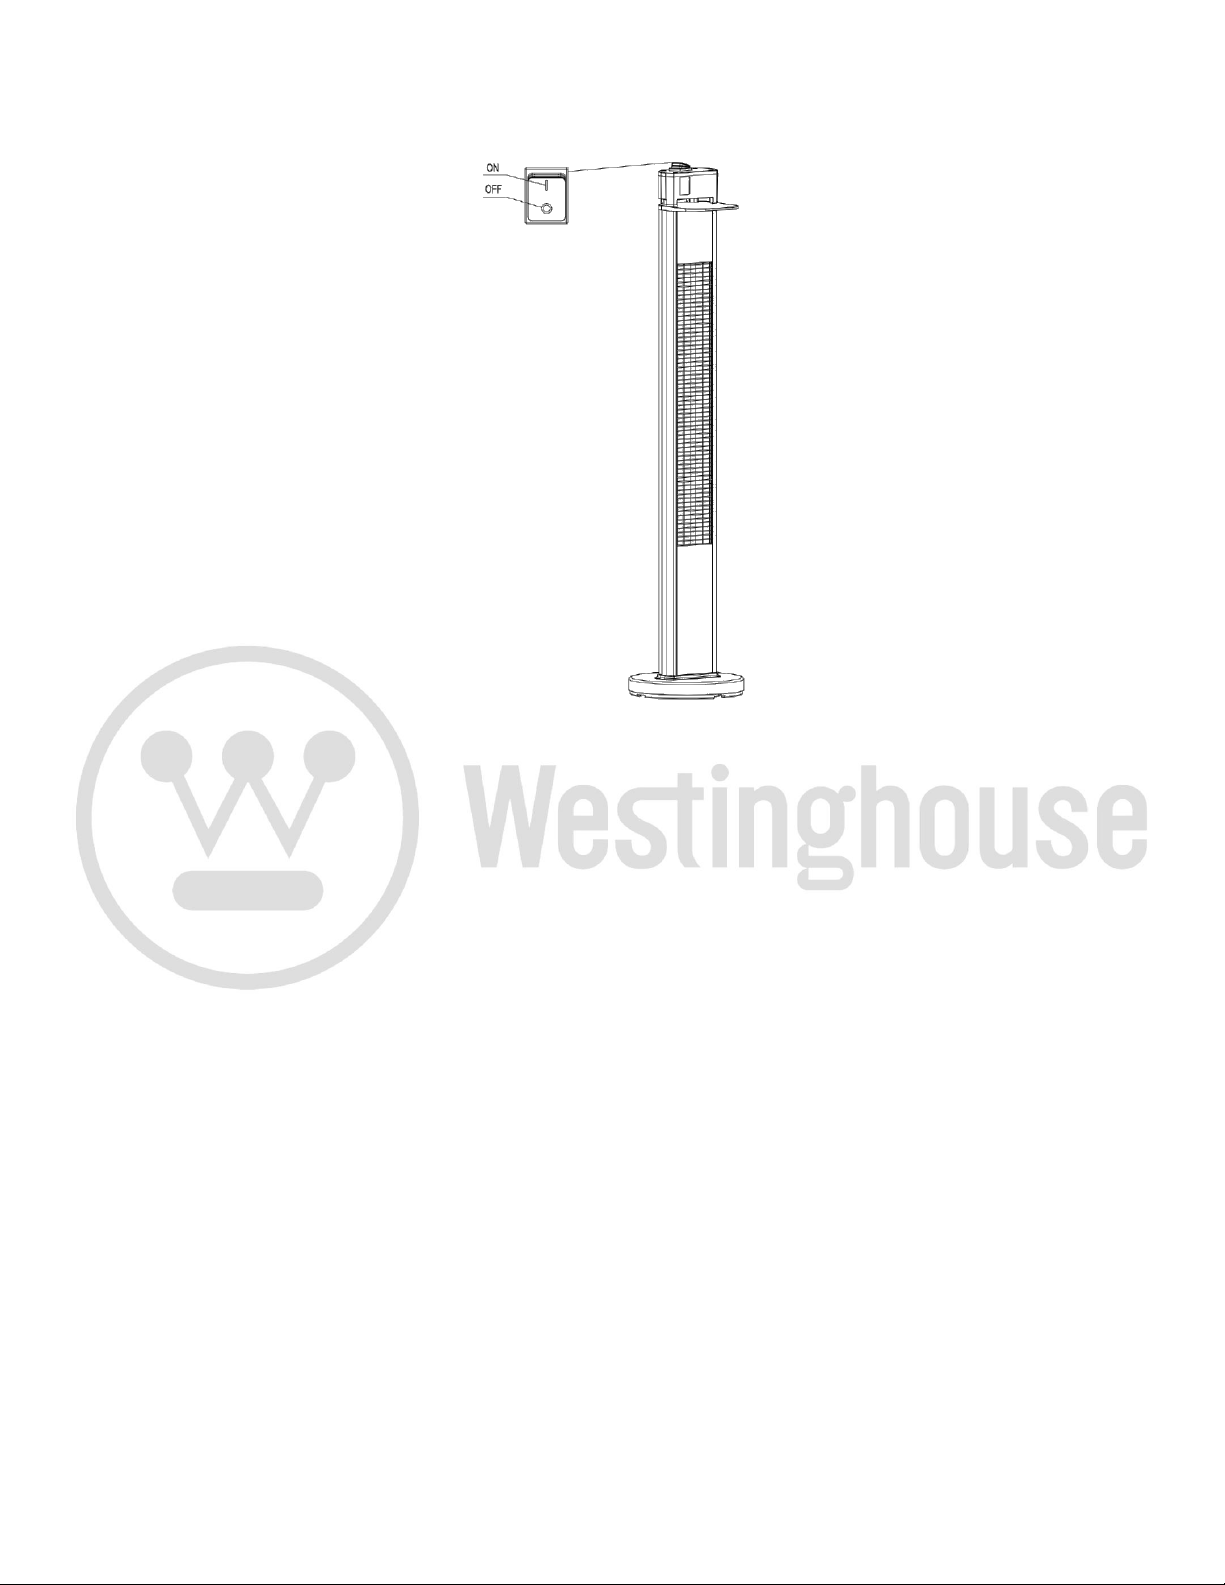
18. Pour débrancher le radiateur, tournez l’interrupteur en position d’arrêt, puis débranchez l’appareil.
19. Pour éviter tout risque d’incendie, NE BLOQUEZ en aucune façon les prises ou les sorties d’air du radiateur.
Ne l’utilisez pas sur des surfaces molles telles qu’un lit, car cela pourrait boucher les prises d’air.
20. Utilisez cet appareil tel que décrit dans ce guide; toute autre utilisation non recommandée par le fabricant
peut provoquer un incendie, une décharge électrique ou des blessures.
CONSERVEZ CES INSTRUCTIONS.
5. NETTOYAGE ET RANGEMENT
1. Éteignez et débranchez l'appareil avant de le nettoyer.
2. Utilisez uniquement un chiffon doux pour nettoyer l'extérieur. Un compresseur d'air ou un aspirateur peut
être utilisé pour nettoyer l'intérieur.
3. N’utilisez pas d'essence, de diluant à peinture ou autres produits chimiques pour nettoyer le radiateur.
4. Rangez le radiateur dans sa boîte d'origine et placez-le dans un endroit frais et sec.

8
6. SPÉCIFICATIONS
Alimentation : 120 V/60 Hz
Puissance maximum : 1500 W
7. INSTRUCTIONS DE MISE À LA TERRE
Ce produit est destiné à une utilisation sur une tension de circuit nominale de 120 V et à une fiche de terre
semblable à celle illustrée ci-dessous. Assurez-vous que l'appareil est branché à une prise ayant la même
configuration que la fiche. Si vous utilisez une rallonge, veillez à ce que celle-ci ait aussi une fiche de terre. Aucun
adaptateur ne doit être utilisé avec cet appareil.
DANGER
Un mauvais branchement du conducteur de protection peut entraîner un risque d’électrocution. Renseignez-
vous auprès d’un électricien qualifié ou autre personnel de service si vous doutez que la prise soit bien mise à la
terre. Ne modifiez pas le cordon électrique fourni avec l’appareil. S’il ne convient pas à la prise murale, faites
installer une prise appropriée par un électricien qualifié. N’utilisez pas n’importe quel type d’adaptateur avec cet
appareil.
8. GARANTIE
GARANTIE LIMITÉE DE UN (1) AN
Ce produit est garanti contre tout vice de matières et de fabrication pour une durée d’un (1) an à compter de la
date d’achat. En cas de défectuosité, veuillez communiquer avec notre service à la clientèle au 1-866-967-7333.
Ayez à portée de la main votre preuve d’achat. Nous allons réparer ou remplacer le produit à notre discrétion.
Notes importantes : Tout dommage causé à l’une des pièces de produit et attribuable à un accident, une
utilisation abusive ou une installation inadéquate n’est PAS couvert par la garantie. En vertu de notre politique,
nous déclinons toute responsabilité concernant les dommages consécutifs ou indirects. Dans certaines
provinces, il est interdit d’exclure ou de limiter les dommages consécutifs ou indirects. Par conséquent, il est
possible que l’exclusion ci-dessus ne s’applique pas dans votre cas. La présente garantie vous accorde des droits
juridiques spécifiques; vous pouvez également bénéficier d’autres droits, lesquels varient d’une province à
l’autre.
SERVICE À LA CLIENTÈLE: 1-866-967-7333 ext 227
Table of contents
Languages:
Other Westinghouse Patio Heater manuals
Popular Patio Heater manuals by other brands

AZ Patio Heaters
AZ Patio Heaters HLDS01-GTSS Assembly and operation instructions

Heat Outdoors
Heat Outdoors SHADOWFB2400 Safety instructions and operation manual

Paramount Fitness
Paramount Fitness KLD7002SSBN quick start guide

Alice's Garden
Alice's Garden SIBERIA PC12KD manual

Changzhou Gardensun Furnace
Changzhou Gardensun Furnace HLS01-CGT owner's manual

Bond
Bond HYPH4601-12 owner's manual