Westpac Presto Smart VX690 User manual

Presto Smart
VX690.
Quick Reference Guide.
Connected to
‘YOUR POS NAME’
Presto

1
Getting started.
Power terminal up.
To power up the terminal, press and hold the key for 5 seconds.
Getting your terminal started.
1. Press the Go button on the screen or the key on the terminal
togetstarted.
2. Please select the method of connecting to the internet that you will be
using with your Presto terminal.
3. For Wifi press 1 on the terminal key pad, or touch the Wifi button on
the terminal screen (continue to step 4) or for Ethernet press 2 on the
terminal key pad, or touch the Ethernet button on the terminal screen
(continue to step 6).
4. Please select your Wifi network or search for your network name. If you
cannot find your Wifi network, make sure you refresh and try again.
5. Enter your Wifi password using the keypad.
6. If connecting via Ethernet, please refer to the FAQ’s at
westpac.com.au/prestosupport.

2
Activation.
Activating your terminal.
Your Presto Terminal will need to be activated prior to use.
If a technician has attended your premises, they will ensure your terminal
isactivated and ready to pair with your POS.
If you have received your terminal via satchel, for security reasons you
will need to activate it first by simply calling our Merchant Helpdesk on
1800 029 749, 24 hours a day, 7 days a week.
When you call, you will need the serial number of your new terminal handy.
This is displayed on the activation screen on the terminal along with your
Merchant ID and Terminal ID numbers.
Do not continue until instructed to do so by the banker on the phone

3
Connectivity
– network & pairing.
Connectivity
– connect to local network.
Connecting your EFTPOS terminal to your Point of Sale
(POS) system.
1. The technician will connect your new terminal to your local network
(the same network your POS is on) via WiFi or direct Ethernet cable.
Alternatively, you can connect your new terminal to your local network
by following the steps in the ‘Connect to Local Network’ section below.
2. From your POS follow the steps outlined in your POS Pairing Guide and
configure your POS to pair with your Presto Smart vx690 terminal.
You can find a step by step guide to pairing at
westpac.com.au/prestosupport or by contacting your POS Provider.
3. Once paired successfully your terminal will display ‘Connected’.

4
Processing transactions
– integrated mode.
Processing a purchase.
1. Initiate a ‘Purchase’ transaction via the POS.
2. The terminal will prompt you to Tap, Insert or Swipe the customer’scard.
3. If a contactless card is presented, position the card above the terminal
screen for processing.
4. The terminal will advise if the transaction has been approved or
declined.
5. Alternatively, for Insert or Swipe card processing, select the account
type on the terminal.
6. The terminal will prompt the customer to enter their PIN (ifrequired)
and then press the key.
7. The terminal will advise if the purchase has been approved ordeclined.

5
Processing transactions
– integrated mode continued.
Processing a refund.
1. Initiate a ‘Refund’ transaction via the POS.
2. Next you’ll be prompted to enter your merchant password on the
terminal. Type in your password and press the key.
3. If a contactless card is presented, position the card above the terminal
screen for processing.
4. The terminal will advise if the refund has been approved or declined.
5. Alternatively, for Insert or Swipe card processing, select the account
type on the terminal.
6. Next you’ll be prompted to enter your merchant password on the
terminal. Type in your password and press the key.
7. The terminal will advise if the refund has been approved or declined.
Receipts.
Note: In Integrated mode all receipt information for the EFTPOS transaction is sent to
your POS for printing.

6
Processing a settlement
– integrated mode.
Connectivity
– switching to standalone mode.
Manual settlement.
You have the option to perform a manual settlement anytime
throughout the day. This function allows you to manually settle
thecurrent trading day.
Steps:
1. Initiate a ‘Settlement’ transaction via the POS.
2. The terminal will connect to the bank and begin settlement.
Note: A settlement can only be performed once in a 24 hour period. You will
receive a (000) APPROVED response with the previous totals response if you
have attempted to settle more than once. You cannot settle between 9:30pm and
12:00am (AEST).
1. Press the key and the key down for ten seconds.
2. Next you will be prompted to enter your merchant password.
Typeinyour password and press the key.
3. You will now be able to process functions on the terminal using
thepinpad in standalone mode.

7
Processing transactions
– standalone mode.
Processing a purchase in standalone.
1. Enter the purchase amount for example $45 = 4500 and press accept
amount on screen or the key to proceed.
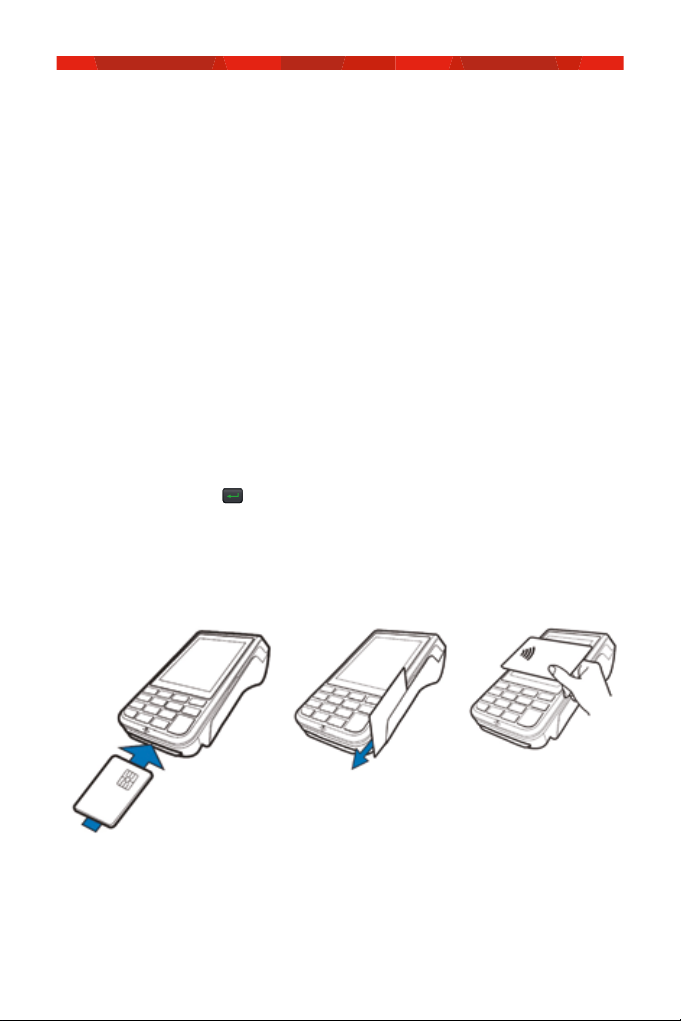
2. The terminal will now prompt you to either Tap, Swipe or Insert the
customer’s card depending on the card’s capabilities.
3. For contactless transactions, ask the customer to hold their card to the
screen for processing. The screen will advise if the transaction has been
‘Approved’ or ‘Declined’ and the terminal will print a receipt.
4. If the customer has chosen to swipe or insert their card, the terminal will
prompt you to select the account type the customer want to use.
5. The cardholder can now enter their Personal Identification Number (PIN)
or sign (where available) and press key to complete the transaction.
1. The screen will advise if the transaction has been ‘Approved’
or ‘Declined’ and the terminal will print a receipt.
Processing a refund in standalone.
1. Select ‘Menu’ on the idle screen.
2. Select ‘Refund’ on the main menu.
3. Key in the refund amount – i.e $45 = 4500.
4. The terminal will prompt you to enter your Merchant Password.
5. Tap, insert or swipe the customer’s card.
6. Select the required account and accept on screen or press
the key to proceed.
7. The cardholder can now enter their PIN (if required) and/or
press the key to proceed.
8. If signature is required, have the customer sign the receipt. If the
signature matches the signature on the card, select the key to
confirm. Otherwise press the key to cancel the refund transaction.
9. Check the receipt to ensure the refund has been approved.

8
Processing a settlement
– standalone mode.
Manual settlement.
You have the option to perform a manual settlement anytime throughout
the day prior to the auto settlement. This function allows you to manually
settle the current trading day.
1. Initiate settlement from the main menu by selecting ‘Settlement’ and
then select ‘Cutover’.
2. The terminal will connect to the bank and begin settlement.
Note: A settlement can only be performed once in a 24 hour period. You will receive
a(000) APPROVED response with the previous totals response if you have attempted
to settle more than once. You cannot settle between 9:30pm and12:00am (AEST).

9
Connectivity – unpair the
terminal from the POS.
Unpair your terminal from the POS.
1. Press the key and the down at the same time.
2. The terminal will now display the Unpair terminal menu.
Select“1.Unpair terminal” to continue
3. The terminal will now display a confirmation prompt for unpairing.
Select “Yes” to proceed and you’re done.
Note: Your terminal is now unconfigured and unable to process Integrated transactions.
The terminal must be paired again with the POS in order to acceptIntegrated.
Charging your terminal.
1. Ensure your terminal base is connected to a power source and place
your terminal on the base to charge. The symbol will display on screen
once charging and your terminal will turn on automatically.
2. Turning your terminal on and o.
i. To turn the terminal on, press the key down for 10 seconds.
ii. To turn the terminal o, press the key down for 10 seconds.

10
Troubleshooting.
If no response is received from the terminal.
1. Ensure that the power cable is securely connected to the terminal.
2. Power o the terminal for 10 seconds.
3. Power on the terminal.
4. Retry the transaction.
5. Call the Westpac Merchant Helpdesk if the problem persists.
If the terminal is not reading cards.
1. Re- tap/insert or swipe the card.
2. If there is still no response from the card reader power o the terminal
for 10 seconds.
3. Power on the terminal.
4. Attempt transaction again.
5. Call the Westpac Merchant Helpdesk if the problem persists.

11
Paper/printing faults (in standalone mode only).
1. Remove the paper roll from the printer to ensure that there is no
papercaught.
2. If the existing paper roll is damaged in any way then replace this with
anew roll.
3. If the problem continues, power o the terminal for 10 seconds.
4. Power on the terminal.
5. To print a sample receipt, navigate through the main menu to the reprint
receipt option.
6. If the problem persists, call the Westpac Merchant Helpdesk.
Loading paper.
1. On the top of your terminal, lift and open the black receipt
compartmentlatch
2. Position the paper roll with the end of the roll protruding
fromunderneath the roll towards the terminal screen
3. Pull paper out slightly and close the cover
4. To print a sample receipt, navigate through the main menu
tothe‘Reprint Receipt’ option. (Only available after a transaction
hasbeenprocessed).

12
Secret Menus.
The following shortcuts can be used to display further information
whennecessary.
[ENTER + 1] to access Standalone mode. This will allow you to continue
transacting with the payment terminal if there are any issues
with the POS solution.
[ENTER + 3] to access the extra function menu. This will allow you
tounpair the terminal from the currently paired POS,
setupthe communication interface which will be used
bytheVAA.
[ENTER + 5] to access Merchant details (Merchant ID, Terminal
ID, Merchant Name). This will provide the necessary
informationwhich you will need to provide when talking
tothe support team.
[ENTER + 8] to access advanced terminal information e.g. terminal
model, terminal IP address, comms currently enabled,
Terminal S/N, VAA software version, PA software version,
POS information.

13
This page has been left blank intentionally.


The Bluetooth word mark and logos are registered trademarks owned by Bluetooth SIG, Inc. and any use
of such marks by Westpac is under license. © 2019 Westpac Banking Corporation ABN 33 007 457 141
AFSL and Australian credit licence 233714. WBCPSVX690 0619
We’re here to help.
Westpac Merchant Helpdesk.
1800 029 749
Open 24 hours a day, 7 days a week.
Cardholder behaving suspiciously.
132 415
Extension 500
Other manuals for Presto Smart VX690
1
Table of contents
Other Westpac Payment Terminal manuals