Wiseup WIFI33 User manual

WIFI33
User Guide
I. Product Overview
1. Antenna
2. Electrode
3. Battery Life LEDs
4. Power Switch
5. Reset Button
6. Power Input
7. Indicator Light
8. Camera Lens
9. IR LEDs
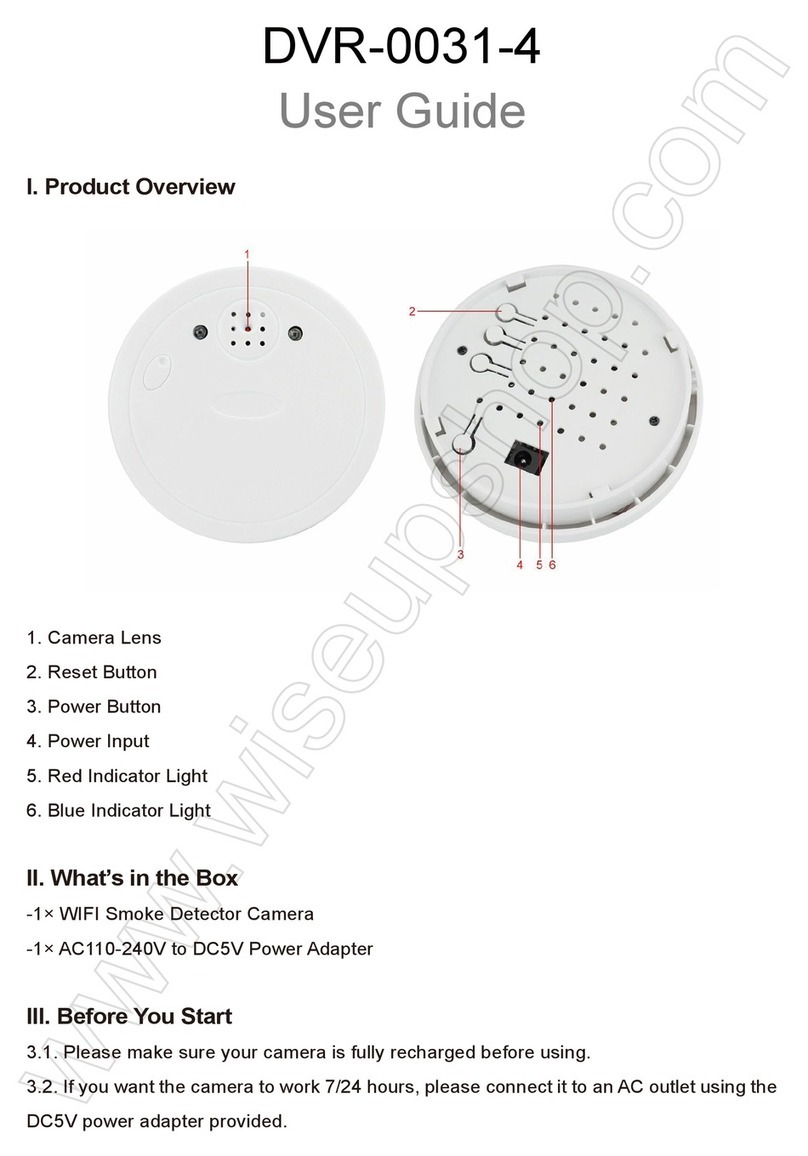
II. What’s in the Box
-1× WIFI Camera Toy Car
-1× DC5V Power Adapter
-1× Charging Base
III. Getting Started
3.1. Please make sure your toy car camera is fully recharged before using.
3.2. Scan the QR code below to install the “CloudRover4” application on your Android or
IOS device.
3.3. Slide the Power Switch to the ON position to turn on the camera. The indicator light will
keep flashing green.
IV. Network Setup
4.1. P2P Connection Setup (LAN Mode)
4.1.1. Go to the WIFI or WLAN Setting page on your phone or mobile device, connect to
the camera’s WIFI signal named “CC-*****”. Wait for the WIFI to be connected and your
phone status bar will appear WIFI symbol as below:
4.1.2. Launch the application and the camera’s UID will show up automatically. Click the
car icon, input default password “admin” and tap “Connect” to connect to the camera.
4.1.3. It will take a moment to enter into the live video page. Now P2P (LAN) mode is
complete and you can view video locally, within 15 meters (49 feet) open range. Check the
screenshot below to see an explanation of the live video page.
4.2. Remote View Setup (WAN Mode)
>> Before remote view setup, please make sure that the camera is successfully added to
the APP in P2P (LAN) mode.
4.2.1. Launch the “CloudRover4” APP.
4.2.2. Click “Configure the Cloud Companion”. On the next page, select a desirable WIFI
hotspot to enroll the camera in and then tap “Next”.
4.2.3. When the configuration is completed, the camera will say “Configure Completed”.
4.2.4. You will be prompted to the home page and the camera icon will be found orange. Click
the camera icon and then input the default password “admin” to login the camera. The indicator
light will remain solid green.
[Note]:
1). When the configuration is complete, the camera’s WIFI signal named “CC-*****” will be gone on
the WIFI settings page.
2). If the remote view setup failed and you need to reset the camera (See VI) and set up all over
again.
V. Motion Detection & Continuous Video Recording
>> Before motion detection setup, please make sure that the camera is successfully added
to the APP and it's online in the P2P (LAN) mode.
5.1. Launch the application and then login your camera.
5.2. Go to the live video page, then tap the gear icon and choose “Motion Detection
Recording” on the next page. When motion is detected, the camera will record a video to the
built-in 8GB internal memory automatically.
5.3. Go back to the settings page and then click “PLAYBACK”. On the next page, tap a video
clip and then it will start recording. You can also download the video files and click to check
out the video clip.
5.4. For continuous video recording, go back to settings page and then choose “Continuous
Recording” mode. The camera will start recording video continuously to the internal memory.
You can follow 5.3. to check out the video clips.
VI. Resetting to Factory Default
If the camera fails to login or doesn’t work properly, a quick reset will restore it back to
normal operation.
Operation: When the camera is powered on, use a pin or paper clip to press and hold the
Reset Button (on the bottom of the camera) for 10 seconds until the camera says “Waiting
for configuration”.
VII. Changing Password
>> Before changing password, please make sure that the camera is online in the application.
7.1. Launch the application and login the camera.
7.2. Go to the live video page, then click the gear icon. On the settings page, locate
“Change password” section and then input a new password. Next time you login the
camera, please enter the new password.
VIII. Charging
8.1. Slide the Power Switch to the OFF position and connect the camera to an outlet AC power
supply through the DC5V power adapter and the charging base or using the DC5V power
adapter directly.
8.2. It will take 4-5 hours to obtain a full charge. When the camera is fully charged, all
Battery Life LEDs at the back of the camera will remain solid red.
Frequently Asked Questions
Q1: Why can’t I find the camera’s WIFI signal on my phone?
A1: There are 4 solutions to this problem:
1. The camera is running low on batteries and please recharge it before using.
2. Reset the camera (See VI) and wait for the WIFI signal SSID to show up.
3. Keep your phone or mobile device within the camera’s WIFI hotspot range, refreshing
the WIFI signal page. It may take up to 2 minutes for the hotspot to become recognizable
on your phone or mobile device's WIFI setting page.
4. Shut off your phone or mobile device’s WIFI function for a while, then turn it on to search
again.
Q2: Why does the WAN mode setup fail?
A2: Please make sure your network is in a good condition. Plus, the WIFI network the
camera is configured with can’t be the same with one you connect your phone to.
Q3: What can I do if I forget the password?
A3: Please reset the camera. (See VI)
Q4: Why live video screen shows up black and a searching circle spins in center but
nothing ever displays?
A4: If your camera is connected to a slow WIFI network, wait 10-30 seconds for live video
to re-appear.

WIFI33
Benutzerhandbuch
I. Produktübersicht
1. Antenne
2. Elektrode
3. Batterielebensdauer LEDs
4. Netzschalter
5. Reset-Taste
6. Leistungsaufnahme
7. Kontrollleuchte
8. Kameraobjektiv
9. IR-LEDs
II. Was ist in der Box
-1 × WIFI Kamera Spielzeugauto
-1 × DC5V Netzteil
-1 × Ladestation
III. Anfangen
3.1. Bitte stellen Sie sicher, dass Ihre Spielzeugauto-Kamera vor der Benutzung vollständig
aufgeladen ist.
3.2 Scannen Sie den QR-Code unten, um die "CloudRover4" -Anwendung auf Ihrem
Android- oder IOS-Gerät zu installieren.
3.3. Schieben Sie den Netzschalter auf ON, um die Kamera einzuschalten. Die Kontrollleuchte
blinkt grün.
IV. Netzwerkeinrichtung
4.1. P2P-Verbindungsaufbau (LAN-Modus)
4.1.1. Gehen Sie auf die WIFI- oder WLAN-Einstellungsseite auf Ihrem Telefon oder Mobilgerät,
verbinden Sie das WIFI-Signal der Kamera mit dem Namen "CC - *****". Warten Sie, bis das
WIFI angeschlossen ist und Ihre Telefonstatusleiste erscheint als WIFI-Symbol wie folgt:
4.1.2. Starten Sie die Anwendung und die UID der Kamera wird automatisch angezeigt.
Klicken Sie auf das Autosymbol, geben Sie das Standardpasswort "admin" ein und tippen
Sie auf "Verbinden", um eine Verbindung zur Kamera herzustellen.
4.1.3. Es wird einen Moment Zeit nehmen, um in die Live-Videoseite einzutreten. Jetzt ist
der P2P (LAN) Modus komplett und man kann das Video lokal, innerhalb von 15 Metern
(49 Fuß) offenen Bereich ansehen. Überprüfen Sie den Screenshot unten, um eine
Erklärung der Live-Videoseite zu sehen.
4.2. Remote View Setup (WAN-Modus)
>> Bevor Sie das Setup der Fernbedienung vornehmen, stellen Sie bitte sicher, dass die
Kamera der APP im P2P-Modus (LAN) erfolgreich hinzugefügt wurde.
4.2.1. Starten Sie die "CloudRover4" APP.
4.2.2. Klicken Sie auf "Configure the Cloud Companion". Wählen Sie auf der nächsten Seite
einen gewünschten WIFI-Hotspot aus, um die Kamera einzuschreiben und dann auf "Weiter"
zu tippen.
4.2.3. Wenn die Konfiguration abgeschlossen ist, wird die Kamera "Configure Completed"
sagen.
4.2.4. Sie werden zur Startseite gefragt und das Kamerasymbol wird orange gefunden.
Klicken Sie auf das Kamerasymbol und geben Sie dann das Standardpasswort "admin"
ein, um die Kamera anzumelden. Die Kontrollleuchte bleibt grün.
[Hinweis]:
1). Wenn die Konfiguration abgeschlossen ist, wird das WIFI-Signal der Kamera mit dem Namen
"CC-*****" auf der Seite WIFI-Einstellungen verschoben.
2). Wenn das Remote-View-Setup fehlgeschlagen ist und Sie die Kamera zurücksetzen müssen
(siehe VI) und wieder einrichten.
V. Bewegungserkennung & Kontinuierliche Videoaufnahme
>> Vor der Erkennung der Bewegungserkennung ist darauf zu achten, dass die Kamera
der APP erfolgreich hinzugefügt wurde und im P2P (LAN) Modus online ist.
5.1. Starten Sie die Anwendung und melden Sie sich dann Ihre Kamera an.
5.2. Gehen Sie auf die Live-Videoseite, dann tippen Sie auf das Zahnrad-Symbol und wählen
Sie "Motion Detection Recording" auf der nächsten Seite. Wenn die Bewegung erkannt wird,
nimmt die Kamera automatisch ein Video auf den internen internen Speicher 8GB auf.
5.3. Gehen Sie zurück zur Einstellungsseite und dann auf "WIEDERGABE". Tippen Sie auf
der nächsten Seite auf einen Videoclip und dann beginnt die Aufnahme. Sie können auch
die Videodateien herunterladen und klicken , um den Videoclip auszuprobieren.
5.4 Für die kontinuierliche Videoaufnahme gehen Sie zurück zur Einstellungsseite und wählen
dann den Modus "Kontinuierliche Aufnahme". Die Kamera startet die Aufnahme von Video
kontinuierlich in den internen Speicher. Sie können folgen 5.3. Um die Videoclips
auszuprobieren.
VI. Rücksetzen auf Werkseinstellung
Wenn sich die Kamera nicht anmeldet oder nicht ordnungsgemäß funktioniert, wird ein
schneller Reset wieder in den normalen Betrieb zurückgesetzt.
Bedienung: Wenn die Kamera eingeschaltet ist, verwenden Sie einen Stift oder eine
Büroklammer, um die Reset-Taste (auf der Unterseite der Kamera) für 10 Sekunden zu drücken,
bis die Kamera "Warten auf Konfiguration" sagt.
VII. Passwort ändern
>> Bevor Sie das Passwort ändern, stellen Sie bitte sicher, dass die Kamera online in der
Anwendung ist.
7.1. Starten Sie die Anwendung und melden Sie sich die Kamera an.
7.2 Gehen Sie auf die Live-Videoseite und klicken Sie dann auf das Zahnradsymbol. Suchen
Sie auf der Einstellungsseite den Abschnitt "Passwort ändern" und geben Sie dann ein neues
Passwort ein. Wenn Sie das nächste Mal die Kamera anmelden, geben Sie bitte das neue
Passwort ein.
VIII. Aufladen
8.1. Schieben Sie den Netzschalter in die AUS-Position und schließen Sie die Kamera an
eine Steckdose an. Stromversorgung über den DC5V Netzadapter und die Ladebasis oder
direkt mit dem DC5V Netzteil.
8.2. Es dauert 4-5 Stunden, um eine volle Ladung zu erhalten. Wenn die Kamera vollständig
aufgeladen ist, bleiben alle Batterielebensdauer-LEDs auf der Rückseite der Kamera fest rot.
Häufig Gestellte Fragen
Q1: Warum kann ich das WIFI-Signal der Kamera nicht auf meinem Handy finden?
A1: Es gibt 4 Lösungen für dieses Problem:
1. Die Kamera läuft auf Batterien und lädt sie bitte vor dem Gebrauch auf.
2. Setzen Sie die Kamera zurück (siehe VI) und warten Sie, bis das WIFI-Signal SSID
angezeigt wird.
3. Halten Sie Ihr Telefon oder Mobilgerät in der WIFI-Hotspot-Reihe der Kamera und
erfrischen die WIFI-Signalseite. Es kann bis zu 2 Minuten dauern, bis der Hotspot auf der
Telefon- oder Mobiltelefon-WIFI-Einstellungsseite erkennbar wird.
4. Schalten Sie die WIFI-Funktion Ihres Telefons oder des Mobilgeräts für eine Weile aus,
und schalten Sie es dann wieder ein.
Q2: Warum funktioniert das WAN-Modus-Setup?
A2: Bitte stellen Sie sicher, dass Ihr Netzwerk in einem guten Zustand ist. Plus, das
WIFI-Netzwerk die Kamera ist konfiguriert mit kann nicht das gleiche mit einem Sie Ihr
Telefon zu verbinden.
Q3: Was kann ich tun, wenn ich das Passwort vergessen habe?
A3: Bitte die Kamera zurücksetzen (Siehe VI)
Q4: Warum Live-Video-Bildschirm zeigt sich schwarz und ein Suchkreis dreht sich in
der Mitte, aber nichts zeigt jemals?
A4: Wenn Ihre Kamera an ein langsames WIFI-Netzwerk angeschlossen ist, warten Sie
10-30 Sekunden, bis das Live-Video erneut angezeigt wird.
WIFI33
Mode d'emploi
I. Aperçu du Produit
1. Antenne
2. Electrode
3. LED Indicateur de la Batterie
4. Interrupteur d’Alimentation
5. Bouton de Réinitialisation
6. Entrée de Puissance
7. Voyant Lumineux
8. Lentille de Caméra
9. Voyants Infrarouges
II. Qu'y a-t-il dans la Boite
-1 × WIFI Camera Toy Car
-1 × Adaptateur secteur DC5V
-1 × Base de recharge
III. Commencer
3.1. Assurez-vous que votre caméra de voiture jouet est entièrement rechargée avant de
l'utiliser.
3.2. Scannez le code QR ci-dessous pour installer l'application "CloudRover4" sur votre
appareil Android ou IOS.
3.3. Faites glisser l'Interrupteur d’Alimentation sur la position ON pour allumer l'appareil
photo. Le voyant continuera à clignoter en vert.
IV. Configuration du Réseau
4.1. Configuration de la Connexion P2P (Mode LAN)
4.1.1. Accédez à la page WIFI ou WLAN Setting sur votre téléphone ou votre appareil mobile,
connectez-vous au signal WIFI de l'appareil photo appelé "CC-*****". Attendez que le WIFI soit
connecté et que votre barre d'état du téléphone apparaîtra comme symbole WIFI comme suit:
4.1.2. Lancez l'application et l'UID de l'appareil photo s'affiche automatiquement. Cliquez sur
l'icône de la voiture, entrez le mot de passe par défaut "admin" et appuyez sur "Connecter"
pour vous connecter à la caméra.
4.1.3. Il faudra un moment pour entrer dans la page vidéo en direct. Maintenant, le mode
P2P (LAN) est terminé et vous pouvez visualiser la vidéo localement, dans une plage
ouverte de 15 mètres (49 pieds). Vérifiez la capture d'écran ci-dessous pour voir une
explication de la page vidéo en direct.
4.2. Configuration de la Vue à Distance (Mode WAN)
>> Avant la configuration de la vue à distance, assurez-vous que l'appareil photo a été
ajouté avec succès à l'APP au mode P2P (LAN).
4.2.1. Lancez l'application "CloudRover4".
4.2.2. Cliquez sur "Configure the Cloud Companion". Sur la page suivante, sélectionnez un
point d'accès Wi-Fi souhaitable pour inscrire la caméra, puis appuyez sur "Suivant".
4.2.3. Lorsque la configuration est terminée, la caméra dira "Configure Completed".
4.2.4. Vous serez invité à la page d'accueil et l'icône de la caméra sera trouvée orange.
Cliquez sur l'icône de la caméra, puis entrez le mot de passe par défaut "admin" pour vous
connecter à la caméra. Le témoin lumineux reste vert.
[Note]:
1). Lorsque la configuration est terminée, le signal WIFI de la caméra nommé "CC-*****" se
déroule sur la page de configuration WIFI.
2). Si la configuration de la vue à distance a échoué et que vous devez réinitialiser la caméra (voir
VI) et la configurer à nouveau.
V. Détection de Mouvement et Enregistrement Vidéo Continu
>> Avant la configuration de détection de mouvement, assurez-vous que l'appareil photo a
été ajouté avec succès à l'APP et qu'il est en ligne en mode P2P (LAN).
5.1. Lancez l'application, puis connectez-vous à votre appareil photo.
5.2. Accédez à la page vidéo en direct, puis appuyez sur l'icône de l'engrenage et choisissez
"Enregistrement de détection de mouvement" sur la page suivante. Lorsque le mouvement est
détecté, l'appareil photo enregistre automatiquement une vidéo sur la mémoire interne intégrée
de 8 Go.
5.3. Revenez à la page de paramètres, puis cliquez sur "LECTURE". Sur la page suivante,
appuyez sur un clip vidéo, puis lancer l'enregistrement. Vous pouvez également télécharger les
fichiers vidéo et cliquer pour regarder le clip vidéo.
5.4. Pour l'enregistrement vidéo continu, revenez à la page des paramètres, puis choisissez le
mode "Enregistrement continu". L'appareil photo va commencer à enregistrer la vidéo en
continu sur la mémoire interne. Vous pouvez suivre 5.3. Pour consulter les clips vidéo.
VI. Réinitialisation en Usine par Défaut
Si l'appareil photo ne parvient pas à se connecter ou ne fonctionne pas correctement, une
réinitialisation rapide le rétablira à son fonctionnement normal.
Fonctionnement: Lorsque l'appareil photo est sous tension, utilisez une épingle ou un
trombone pour appuyer sur le Bouton de Réinitialisation (en bas de l'appareil photo) pendant
10 secondes jusqu'à ce que l'appareil photo indique "en attente de configuration".
VII. Modification du Mot de Passe
>> Avant de changer de mot de passe, assurez-vous que l'appareil photo est en ligne dans
la demande.
7.1. Lancez l'application et connectez-vous à la caméra.
7.2. Accédez à la page vidéo en direct, puis cliquez sur l'icône de l'engrenage. Dans la page
des paramètres, recherchez la section "Modifier le mot de passe" puis saisissez un nouveau
mot de passe. La prochaine fois que vous vous connectez à la caméra, entrez le nouveau mot
de passe.
VIII. Charger
8.1. Faites glisser l'Interrupteur d’Alimentation sur la position OFF et connectez l'appareil
photo à une alimentation secteur de sortie via l'adaptateur secteur DC5V et la base de
chargement ou à l'aide de l'adaptateur secteur DC5V directement.
8.2. Il faudra 4-5 heures pour obtenir une charge complète. Lorsque l'appareil photo est
complètement chargé, toutes les LED de vie de batterie à l'arrière de l'appareil restent
rouges.
Questions Fréquemment Posées
Q1: Pourquoi ne puis-je pas trouver le signal WIFI de l'appareil photo sur mon téléphone?
A1: Il existe 4 solutions à ce problème:
1. L'appareil photo utilise de faibles batteries et rechargez-les avant d'utiliser.
2. Réinitialisez l'appareil photo (voir VI) et attendez que le SSID du signal WIFI s'affiche.
3. Conservez votre téléphone ou votre appareil mobile dans la plage de points chauds
Wi-Fi de la caméra, en actualisant la page du signal WIFI. Il peut prendre jusqu'à 2 minutes
pour que le point d'accès soit reconnaissable sur la page de configuration de votre
téléphone ou du WIFI de votre appareil mobile.
4. Éteignez votre téléphone ou la fonction WIFI de votre appareil mobile pendant un certain
temps, puis allumez-le pour effectuer une nouvelle recherche.
Q2: Pourquoi l'installation du mode WAN échoue-t-elle?
A2: assurez-vous que votre réseau est en bon état. De plus, le réseau WIFI avec lequel la
caméra est configurée ne peut pas être le même avec celui auquel vous connectez votre
téléphone.
Q3: Que puis-je faire si j'oublie le mot de passe?
A3: Réinitialisez la caméra. (Voir VI)
Q4: Pourquoi l'écran vidéo en direct apparaît noir et un cercle de recherche tourne au
centre mais rien ne s'affiche jamais?
A4: Si votre caméra est connectée à un réseau WIFI lent, attendez 10 à 30 secondes pour
que la vidéo en direct apparaisse à nouveau.
Table of contents
Languages:
Other Wiseup Security Camera manuals

Wiseup
Wiseup P9000 User manual

Wiseup
Wiseup WIFI39 User manual

Wiseup
Wiseup U11 User manual

Wiseup
Wiseup BC303 User manual

Wiseup
Wiseup MT-V8 User manual

Wiseup
Wiseup T183 User manual

Wiseup
Wiseup WIFI04S User manual

Wiseup
Wiseup P3021 User manual

Wiseup
Wiseup T186 User manual

Wiseup
Wiseup WIFI40 User manual

Wiseup
Wiseup CUP200 User manual

Wiseup
Wiseup DV-07-WIFI User manual

Wiseup
Wiseup WIFI28 User manual

Wiseup
Wiseup WIFI08 User manual

Wiseup
Wiseup H200 User manual

Wiseup
Wiseup WIFI37 User manual

Wiseup
Wiseup DVR-0031-4 User manual

Wiseup
Wiseup WI-FI 21 User manual

Wiseup
Wiseup CK6000 User manual

Wiseup
Wiseup W8200 User manual