Wittenborg IN 7100 User manual

175528700
Quick Reference Guide
IN 7100
08.01

2
Description of the Machine Components
Cabinet
Door lock
Cup station
Cup carrier
Pot platform
Cabinet door
Display
Operator panel
Outlet spout
Mixing funnel
Retaining pin
for cup carrier
Lock for
drip tray
Drip tray
Ingredient
canister
Hood for
mixing funnel
Dispensing
hoses
Dispense head
Main switch
Base tray

3
Reference Card Error Types
Display Possible cause Possible action
message
Drip tray
full
Base tray
full
Temperature
low
Rinse in
progress..
Drip tray is full.
Liquid in base tray.
The machine has been turned on
recently.
Rinse function.
If it was impossible to remedy the fault, or other type of display message is shown,
please contact the service.
Empty the drip tray and wipe dry the
sensor.
Remove the base tray, wipe it off and
insert the drip tray.
Wait until the water is heated sufficiently
(maximum 13 minutes).
Wait until machine has finished the
automatic rinse function.

4
Reference Card ErrorTypes (continued)
Error Possible cause Possible action
types
No display
or machine
not
operating
No
ingredient
Leak in
mixing
system
or
Mixing
system
overflows
Drip tray
full
Machine
does not
shut down
when drip
tray is full
Poor
flavour of
drink
Inadequate
quantity of
drink
Coins
sticking
Machine
dispenses
free drinks
Empty drip tray and dry sensor.
Check fuses outside of machine/power
cord.
Close door properly.
Refill canister.
Reinsert canister correctly.
Remove canister, clean auger drive
mechanism and reinsert. Open spout.
Reinstall and reconnect components.
Replace whipper seal.
Replace / clean blocked part/s.
Water tank and valves must be descaled
/ replaced.
Empty drip tray.
Clean mixing funnels
Clean sensor.
Use corrrect ingredients.
Place canisters in correct places.
Replace/clean clogged component/s.
Install hose of correct length.
Press coin return button.
Cf. manual of supplier.
Wait for 10 seconds.
Set correct price.
Switch off free vend.
Sensor in drip tray is wet.
No power.
Check if door is properly closed.
Canister empty.
Canister not correctly connected.
Ingredient sticking to auger drive
mechanism. Closed spout.
Mixing funnels/hoses not correctly
connected.
Whipper seal leaking or not installed.
Blockage in mixing funnels or
dispensing tubes.
Water dripping from hoses.
Drip tray full
Mixing funnels blocked
Foreign body clogging sensor
Wrong ingredients.
Canisters not located in their correct
places.
Ingredient residues clogging dispensing
outlet system.
Kink in outlet hose.
Coin mechanism sticking
Price set to 0.00.
Price set to free vend.

5
Regular Cleaning *)
1
2
3
Opening and disconnecting
• Open the door by turning key clockwise
(1)
.
Ingredient canisters
• Pull base tray
(2)
forward.
• Push the outlet tubes upwards to close the
outlet spouts of the canisters
(3)
.
• Take the canisters by the handles and pull
them forward to the end stop in guiding rails
(4)
. The lids are automatically triggered open.
• If required, the canisters can be removed by
lifting canisters upwards and pulling forwards
over the end stops in guiding rails
• Fill canisters with ingredients.
• Press lid slightly down and push back
canisters.
• Push the outlet tubes downwards to open the
outlet spouts of the canisters
(5)
.
Cleaning parts
Base Plate
• Wipe the base plate clean and push it back
in place.
Cup carrier
It is recommended to have the cup carrier as
an exchange kit (hygiene kit).
• Remove cup carrier: Take hold of the cup
carrier with your right hand
(6)
and remove
the corresponding retaining pin
(7)
, situated
on the rear side of the cup station, with your
left hand.
• Clean the drip grid
(8a)
and tray
(8b)
in hot
water with cleaning agent and dry parts.
4
*) All parts to be cleaned regularly are
designed in a light blue colour. All parts
of action are supplied in a green colour.
(see overleaf)
8
7
a
b
6
5

6
-----SHORTCUTS-----
*(1)=Rinse (3)=Counter
(2)=Test (4)=Menu
(1) (2) (3) (4)
Regular Cleaning (continued)
9
10
Drip tray
•Pull upwards lock for drip tray
(9)
.
• Take out drip tray
(10)
. Remove lid and
empty tray. Remove grid from lid and clean
parts in hot water with cleaning agent, and
wipe parts dry.
Wipe sensor in lid dry.
Cleaning inside and outside
• Clean the door and housing inside and
outside, and finally the bottom with a clean,
damp cloth.
Mounting the cleaned parts
• Remount all parts.
There is the risk of being scalded by
hot water.
Observe the safety precautions in
the operator manual.
• Have an empty pot (min. 1.5 l) ready to
place on the pot platform.
• Turn to the display and perform a machine
rinse using the preselection buttons
(11)
.
- Press button '1' to enter [Rinse]-function.
- Close door and place pot on pot platform
(12)
.
- Press 'Sel' to start the rinse function.
Follow the information on display.
• Repeat the rinse procedure min. once
more.
• Press the button 'Esc' until the machine
leaves programming mode.
• Remove and empty the pot.
Last check
• Clean the machine with a damp cloth on
the outside. Clean also the pot platform.
• Perform a test dispensing with a drink with
milk and sugar.
12
11

7
Deep Cleaning *)
4
5
(see overleaf)
Opening and disconnecting
• Open the door by turning key clockwise
(1)
.
Ingredient canisters
• Pull base tray
(2)
forward.
• Push the outlet tubes upwards to close
the outlet spouts of the canisters
(3)
.
• Fill ingredient canisters with ingredients
(4)
and push canisters back in place
(see
Regular Cleaning)
.
• Leave the outlet spouts closed.
Cleaning
It is recommended to have an exchange
kit (hygiene kit), cf. operator manual.
Soak all parts, which will be
disassembled, at least for 15 minutes in
a bucket with hot water with cleaning
agent*.
• Turn machine off at the main switch
(5)
.
Ingredient mixers
• Remove and clean the ingredient waste
tray
(6)
.
• Relocate undertray.
• Remove the mixing hoods
(7a)
.
• Remove mixing units: Loosen locking ring
by pressing release lever
(7b)
anti-
clockwise, and pull out mixing funnel
leaving the hoses back on.
• Pull off the whipper wheels
(8a).
• Remove and clean the powder traps
(8b)
.
• Disassemble mixing funnels, hoses and
dispense head before soaking the parts.
*) All parts to be deep cleaned are designed in
a light and dark blue colour. All parts of
action are supplied in a green colour.
2
1
3
7
6
a
b
a
b
8

8
Deep Cleaning (continued)
(see overleaf)
Cleaning parts
Dispense head
• Remove hoses from dispense head: turn
each hose spout until its locking tab can be
released through the notch of the
corresponding hole in dispense head
(9)
.
• Remove the dispense head by pulling it
forwards
(10)
.
Base tray
• Remove and clean the base tray
(11)
.
Cup carrier
• Remove the cup carrier
(12)
.
• Clean the complete cup carrier
(13a,b)
(
see Regular Cleaning
).
Drip tray
•Release lock for drip tray
(14)
(
see Regular
Cleaning
).
• Remove the drip tray
(15)
and empty it.
clean and dry parts.
(see Regular Cleaning)
.
Wipe sensor in lid dry.
Cleaning inside and outside
• Clean the door and housing inside and
outside, and finally the bottom with a clean,
damp cloth.
• Flush all parts, which have been soaking,
thoroughly with clean and warm water.
Check that no dirt or cleaning agent
remains on the parts.
• Dry all parts with a dry cloth.
12
13
15
a
b
14
9
10
11

9
Mounting the cleaned parts
• Remount all parts.
• Turn the main switch of machine
on
(16)
.
• Push the outlet tubes downwards to open the
outlet spouts of the canisters
(17)
.
Rinsing and last check
There is the risk of being scalded by hot
water. Observe the safety precautions in
the operating instructions.
• Rinse machine twice (see
Regular Cleaning
).
• Clean exterior of the machine (damp cloth).
• Perform a test dispensing by pressing a
selection button e.g. coffee with milk and
sugar.
16
Deep Cleaning (continued)
17

10
(see overleaf)
2
13
xxxxx
xx
Ingredient
HACCP Guidelines
Directives
• For correct operation of the machine, at least the
mentioned guidelines must be taken into
consideration. The operator is held responsible for
the correct operation.
HACCP guidelines
Handling of ingredients
• Ensure hygienic handling:
- wash hands, preferably with a disinfectant
(1)
- use hygienic gloves
- after cleaning, do not touch surfaces of parts that
may come into contact with food
- always use a clean cloth when cleaning
- keep the working area tidy.
• Check the package for integrity and damage
(2)
.
• Store the ingredients dry, cool and dark.
• Use the packages within the recommended time
period (see the "best before"-date on the package).
• Always use packages according to the "first-in-first-
out"-principle.
• Thoroughly close an opened package to keep the
quality and preventing contamination.
• Ingredients should be stored separated from
cleaning products.
• The ingredient container should be cleaned
occasionally (see operating instructions).
• Do not fill more ingredients than needed until the
next cleaning.
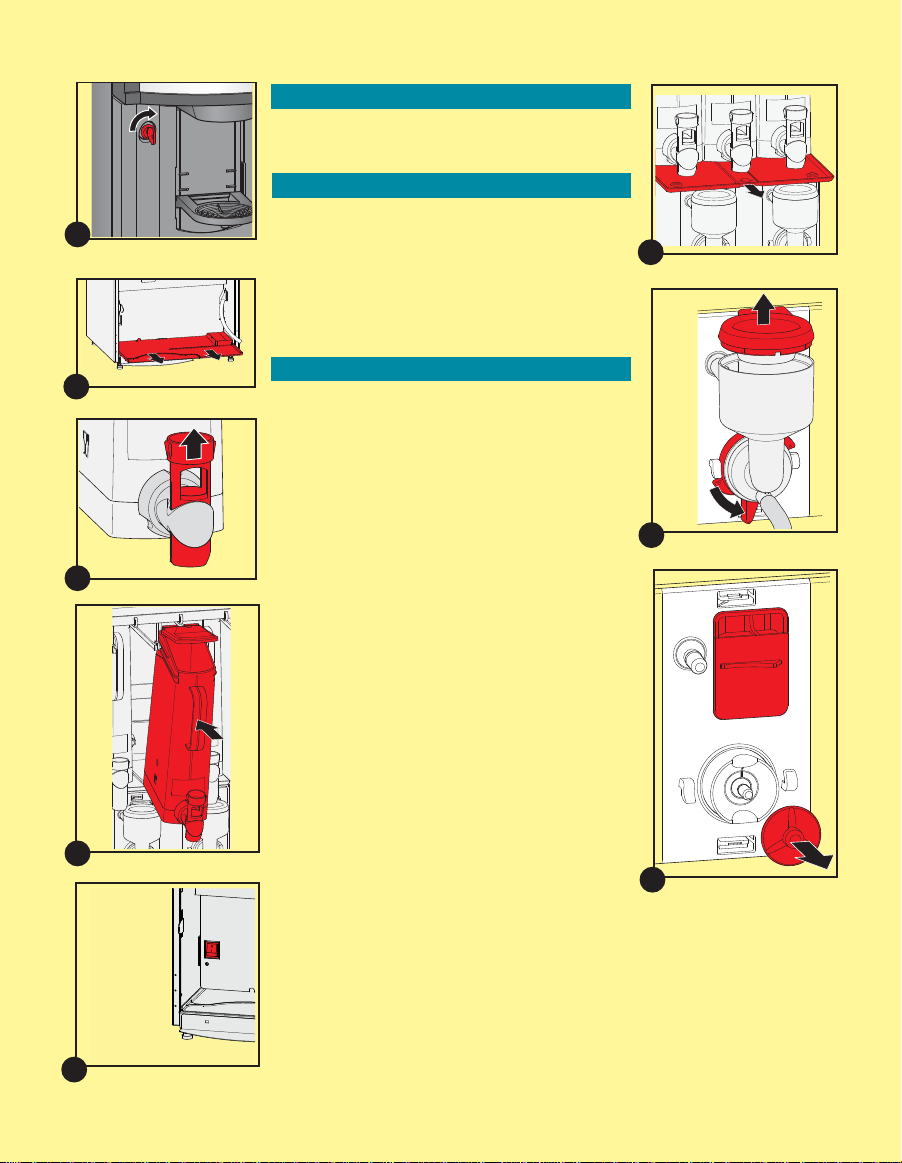
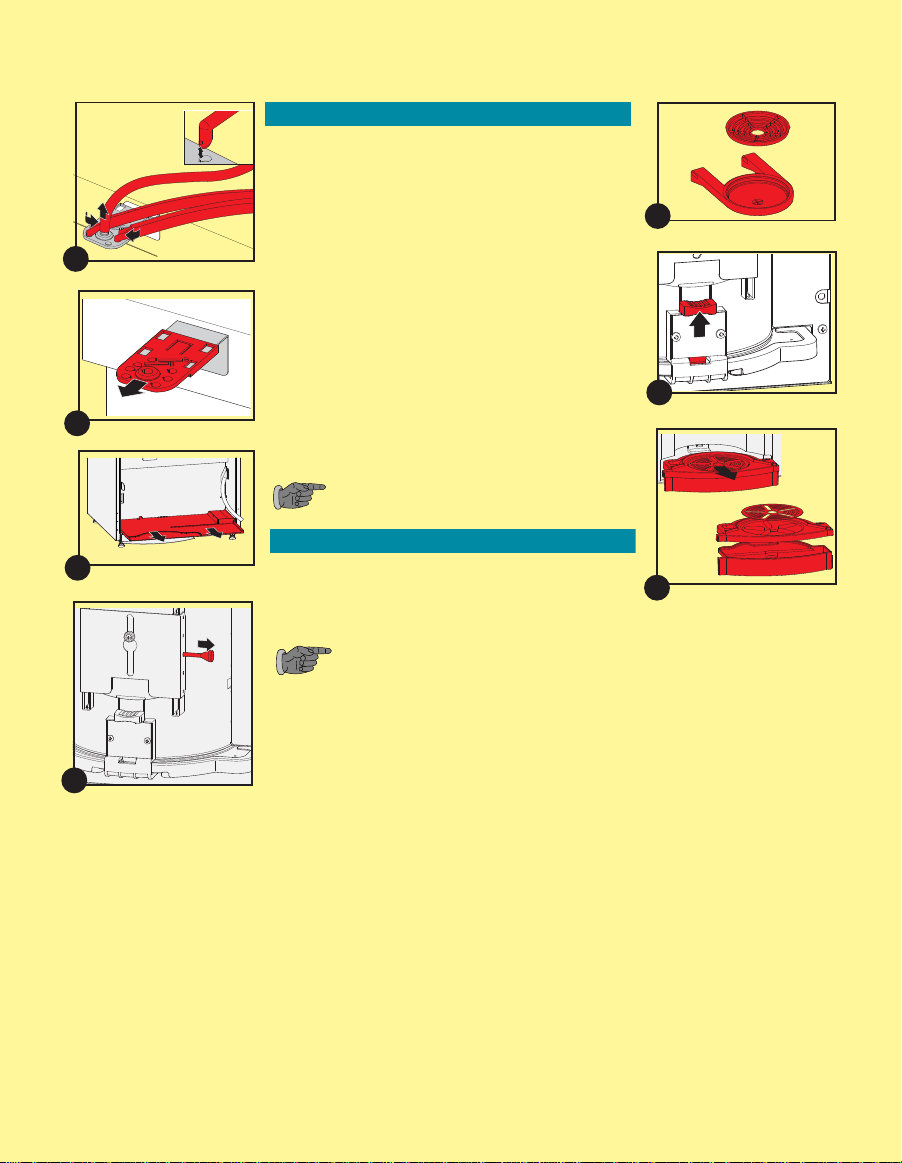
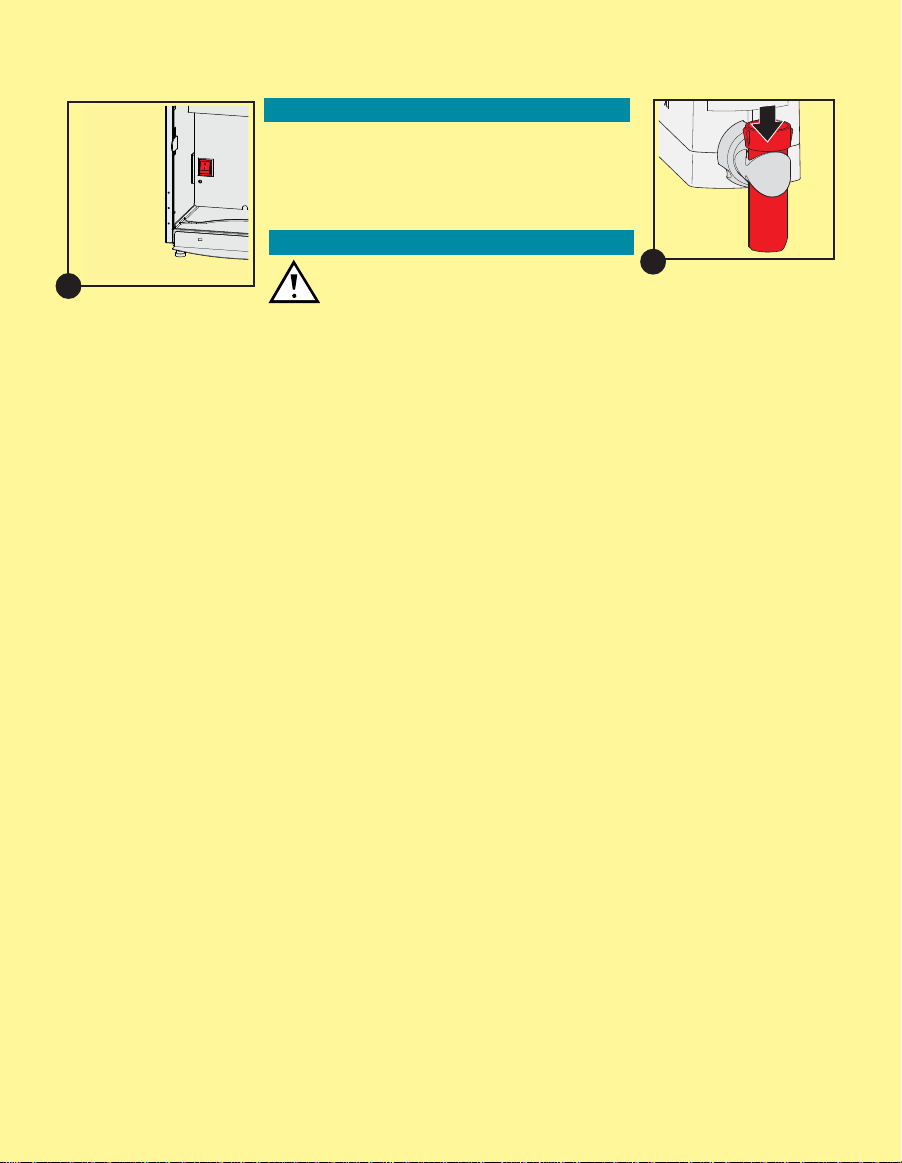
Cleaning the machine
• Observe the cleaning instructions.
• Clean the machine preferably at the end of the day
• After cleaning, dispense and check a drink (see
"Last check").
• Fill in the cleaning record card.
• When the display indicates an error message
(3)
,
observe the display messages on the reference
card.
• Only use the recommended cleaning agents that
have been approved for the food industry (slightly
disinfecting, preferably liquids, tabs, possibly grains.
Avoid powders).

11
HACCP Guidelines (continued)
Filing
• After opening, write the date of opening on the
package.
• File the "best before"-date of the package used to
fill the machine.
• File service and maintenance reports.
Training
• Train staff on HACCP guidelines
(4)
.
• Implement the activities in the work schedules.
• For further questions please contact your service
representative.
4

12
Cleaning Record Card
Declaration: This machine has been cleaned in compliance with the cleaning instructions.
Signature
Date Time Regular cleaning Weeky cleaning
Monthly management check
Date
Signature
Comment
KEEPTHIS CARD WITHTHE IN 7100 MACHINE
(and file when completed)
Other Wittenborg Vending Machine manuals
Popular Vending Machine manuals by other brands

Vendors Exchange
Vendors Exchange REVISION installation guide

Saeco
Saeco ATLANTE Use and maintenance

Automatic Products
Automatic Products SNACKSHOP LCM1 Series instruction manual

Automatic Products
Automatic Products PREMIER 937 SATELLITE Setup and installation

BIANCHI VENDING
BIANCHI VENDING Gaia Fresh Milk Use and maintenance manual

Crane
Crane 721 parts manual