WMF PerfectUltra User manual

Perfect Ultra
Design Metz & Kindler
WMF AG D-73309 Geislingen
www.wmf.de
64 1066 0790 printed 0409 version 0409
PerfectUltra PerfectUltraPerfectUltra PerfectUltra
30a
24
232526
20 21 22
Käufer Purchaser
Name Name
Straße Street
Land State PLZ Postal code Ort Town
WMF Fachgeschäft WMF Retailer
Verkaufsdatum Date of sale
Stempel WMF Fachgeschäft WMF retailer’s stamp
PerfectUltra
DEGarantieabschnitt
GBGuarantee voucher
ES Cupón de garantía
BG Гаранционна карта
DK Garantibevis
FI Takuukortti
FR Bon de garantie
GR Αποκοччα εγγυηοηζ
IT Tagliando di garanzia
NL Garantiebewijs
NO Garantibevis
PL Dowód gwarancji
PT Cupão de garantia
RU Гарантийный талон
SE Garantisedel
SK Záručný ústrižok
SI Grancijski list
CZ Záruční list
TR Garanti kuponunum
HU Garanciaszelvény
HR Garancijski obrazac
PerfectUltra
WMF AG
Eberhardstrasse
D-73309 Geislingen
www.wmf.de
*
30b
*
30c
*
30d
*
Perfect Ultra
PerfectUltra-BAL-21s_Umschlag_0309.qxd:692x210 20.04.2009 14:04 Uhr Seite 1

19
DEGBESBGDKFIFRGRITNLNOPLPTRUSESKSICZTRHUHR
Operating instructions
GB
Contents
1. Safety Notes
2. Operation of the timer
3. How to use the pressure cooker
4. Notes on operation
5. Cooking using your pressure cooker
6. Four methods for pressure reduction
7. Care and maintenance of the
pressure cooker
Cleaning, storage, maintenance
8. Versatile use
9. Guarantee statement
10. Preclusion of liability
11. Troubleshooting
12. Table of cooking times
Accessories and spare parts
See cover
*) Colour deviations possible
1. Safety Notes
1. Please carefully read the operating manual
and all the instructions before using the
WMF pressure cooker. Improper use may
result in damage.
2. Do not allow anyone to use the pressure
cooker unless they have first read the
operating manual.
3. Keep children away from the pressure cooker
while it is in use.
4. Never use your pressure cooker in the oven.
The high oven temperatures could damage
handles, valves and safety devices.
5. Move the pressure cooker very carefully
while it is pressurised. Do not touch hot
surfaces. Use the handles and buttons
provided. Use gloves if necessary.
6. Only use the pressure cooker for the purpose
intended.
7. This appliance cooks with the aid of
pressure. Improper use may result in burns.
Take care to ensure that the appliance is
properly closed before heating it up. You will
find information on this in the operating
manual.
8. Never use force to open the pressure cooker.
Never open it before you are sure that the
interior is fully depressurised. You will find
information on this in the operating manual.
9. Never heat the pressure cooker without any
water inside; this would cause serious
damage to the pressure cooker.
Minimum: 1/4 l water.
PerfectUltra-BAL-GB_1008.qxd:A5 09.10.2008 16:30 Uhr Seite 19

20
Important note:
Take care to ensure that the liquid never fully
evaporates. This could result in food burning
onto the pot and the pot being damaged by
melting plastic parts. The hob could also be
damaged by the aluminium in the base melt-
ing. If this should occur then switch off the
heat source and do not move the pot until it
has cooled down completely.
10. Never fill the pressure cooker to more than
2/3 of its capacity. If using foodstuffs
which expand during the cooking process,
such as rice or dried vegetables, fill the
pressure cooker to a maximum of half its
capacity and observe any instructions de-
tailed in the operating manual with regards
to this.
11. Never leave your pressure cooker
unattended. Regulate the heat to ensure
that the cooking indicator does not rise
above the corresponding orange ring. If the
heat is not turned down, steam will escape
through the valve. Cooking times may
change and the loss of liquid may result in
function faults.
12. Only use the heat sources listed in the
operating manual.
13. If you have cooked meat with the skin
attached (such as ox-tongue), which may
expand under the influence of pressure,
take care not to pierce the meat while the
skin remains expanded. This could result in
burns.
14. In principle, always shake the pressure
cooker before opening it to avoid pockets
of steam spitting out; this could result in
scalding. This is particularly important
when releasing steam quickly or
depressurising the pressure cooker under
running water.
15. When releasing steam quickly or depressu-
rising under running water, always keep
your hands, head and body away from the
danger area. You could otherwise be inju-
red by escaping steam.
16. Before each use of your pressure cooker,
check that the safety devices, valves and
seals are working properly. Only then can
the safe functioning of your pressure
cooker be guaranteed. You will find
information on this in the operating
manual.
17. Do not use your pressure cooker to fry food
in oil under pressure.
18. Never interfere with the safety systems,
except when carrying out the maintenance
work specified in the operating manual.
19. Replace the wear parts (see warranty
statement) at regular intervals. Parts
showing apparent discolouration, cracks
or other damage, or which no longer sit
correctly, must be replaced with original
WMF spare parts.
20. Only use original WMF spare parts.
In particular, always use pots and lids of
the same model.
21. Do not use the pressure cooker if it or its
parts are damaged or distorted, or if their
functionality does not correspond to that
described in the operating manual. If that
is the case, please consult your nearest
WMF dealer or WMF AG's Customer Service
Department in Geislingen/Steige.
PerfectUltra-BAL-GB_1008.qxd:A5 09.10.2008 16:30 Uhr Seite 20

21
Important safety notes on timer and battery:
The timer is not suitable for children under
3 years of age as it contains small parts that
may be swallowed or inhaled by children
(battery lid, sealing ring, battery).
If the LCD display should become damaged,
make sure not to injure yourself on the glass
splinters. Ensure that the liquid crystals do not
come into contact with your skin or find their
way into your eyes and mouth. The battery
supplied is not rechargeable. When changing
the battery, make sure that you do not injure
yourself on the battery contacts.
Batteries may leak. If battery fluid should come
into contact with your hands or clothing, im-
mediately wash the affected areas with water.
If battery fluid should come into contact with
your eyes, rinse immediately with plenty of
water and then seek medical treatment.
Batteries must never be damaged, drilled open
or thrown into naked flames. Only replace the
battery by a battery of the type as specified by
these operating instructions. Never dispose of
used batteries in your household waste but
take them to a municipal recycling centres.
Please keep this operating manual in a safe
place.
2. Operation of the timer
You can use your pressure cooker to cook with
or without the use of the timer.
Important note:
Do not place the timer anywhere near any
magnets.
The timer is matched exactly to your lid
handle and cannot be exchanged. If you own
several WMF Perfect Ultra pressure cookers
with timer, any interchanging of the timers
may lead to an incorrect display.
2.1. Switching the pressure cooker on and
programming
In principle, the timer (12) can only be switched
on and operated, if it is positioned on the lid
handle (5).
The timer (12) is switched on if the plus button
(25) is pressed. After approximately 2 seconds
the display (20) shows »00«. Now you can use
the plus and minus key (25)/(26) to set the re-
quired cooking time (max. 99 minutes). If the
key is kept pressed down, a rapid run-through is
activated. When you heat your pressure cooker,
pressure builds up. The indication on the timer is
illuminated in red (24). Now you can no longer
open the pot. If the preset heat setting has been
reached, the cooking time commences. The
timer (12) responds by sounding 3 short bleeps
and the indicator counts backwards in minutes.
The running seconds indicator (22) in the dis-
play (20) shows that the cooking time is expi-
ring (V).
During the cooking time you can correct the
programmed time with the plus or minus keys
(25)/(26). This is only possible if the timer is lo-
cated on the handle. The timer can be switched
off at any time (12) by keeping the plus and
minus keys (25)/(26) pressed simultaneously
until the indication extinguishes.
2.2. On expiry of the cooking time
When the preset time has expired, a signal of
5 short bleeps is sounded. You can switch off
the sound by briefly pressing the plus or minus
DEGBESBGDKFIFRGRITNLNOPLPTRUSESKSICZTRHUHR
PerfectUltra-BAL-GB_1008.qxd:A5 09.10.2008 16:30 Uhr Seite 21

22
keys (25)/(26). Otherwise the signal is sounded
another four times.
The pressure cooker can only be opened if it has
been fully depressurized. Only then the indicator
(24) on the timer (12) will change from red to
green (W). The indicator flashing in green (24)
will extinguish automatically after approxima-
tely 1 minute.
2.3. Removal of the timer
In order to remove the timer (12) simply
withdraw it in an upward direction from the
handle (X).
The earliest that you can remove the timer (12)
is at the start of the cooking time, that is, when
the preset heat setting has been reached and
the minute time display (21) is running. When
you remove the timer (12), the red indicator
extinguishes (24), but the minute display (21)
continues to run on.
On expiry of the preset time period, even with
the timer (12) removed, the signal is sounded
up to 5 times (see above). Then the indication
extinguishes.
During the cooking time the timer can be remo-
ved (12) and also replaced at any time.
A correction of the preset cooking time is only
possible, if the timer (12) is positioned on the
lid handle (5).
2.4. Notes on care and maintenance
Only use a moist cloth to wipe down the timer
(12) for cleaning.
Do not immerse in water and do not clean in
the dishwasher.
2.5. Battery change
The battery compartment is located to the rear
of the timer (12). Use a coin to open the com-
partment (Y). Place a battery into the battery
compartment in accordance with the polarity
specifications (Z). Lithium batteries of type
CR 2450, 3 volt, are required.
Use a coin to re-close the battery compart-
ment (Y).
3. How to use the pressure cooker
Before first use
3.1. Open the pot
Turn the rotary knob (8) to the position
»open/close« (30a) and pull it backwards (30b).
Pivot the lid handle (5) to the right until the in-
dicators on the lid and on the long handle are
aligned (B). Lift off the lid.
3.2. Cleaning the pot
Before first use, you should remove the labels
and wash all parts of your pressure cooker (see
Section on »Cleaning«).
Turn the lid over and detach the lid handle (5)
from the lid by pulling the orange slide (7) on
the underside of the handle (5) towards the end
of the handle as indicated by the arrow and
then lift off (C).
Remove the sealing ring (10) from the lid.
3.3. Closing the pot
Insert the handle (5) into the lid (D) and move
the orange slide (7) across the lid rim until it
audibly engages.
Insert the sealing ring (10) into the rim of
the lid.
Replace lid (see marking on lid and pot handle)
and turn lid handle (5) to the left until the stop
position has been reached (B).
Press rotary knob forwards (8) (A) and set to
the required heat setting 1 or 2 (30c)/(30d).
PerfectUltra-BAL-GB_1008.qxd:A5 09.10.2008 16:30 Uhr Seite 22

23
4. Notes on operation
4.1. Checking the safety devices
before each use
Ensure that the sealing ring (10) and lid edge are
clean. Check that the ball is sitting visibly in the
safety valve (4) on the underside of the lid (E).
If the balls are in the upper chamber of the sa-
fety valve (4), remove the handle (5) and press
the ball into the lower chamber.
Test the main valve (3) for ease of movement by
pressing gently with your finger (G). Check the
cooking indicator seal (2), the seal of the resi-
dual pressure safety device (13) and the seal of
the steam outlet aperture (14) for secure posi-
tioning and any damage. Insert the handle (5)
into the lid. Replace lid and close.
4.2. Liquid volumes
To ensure that the correct amount of liquid is
used, the pot has an internal scale (H).
At least 1/4 l of liquid is required to generate
steam, regardless of whether you are cooking
with or without inserts.
To ensure that your pressure cooker’s functiona-
lity is not impaired, do not fill it to more than
2/3 of its capacity.
When cooking foodstuffs which foam or expand
heavily (e.g. stock, pulses, innards, compotes),
only fill the pot to half its capacity. (See the
section on »Preparing wholefood« for further in-
formation).
If you want to brown your food before cooking
(e.g. onions, meat pieces etc.); you can use your
WMF pressure cooker as a conventional pot. In
order to complete the cooking, remove the
browning residue and add the requisite amount
of liquid (at least 1/4 l) before closing the pres-
sure cooker.
Caution!
Never cook without sufficient liquid and take
care to ensure that the cooking liquid never
evaporates fully. Failure to observe this in-
struction may result in food burning, damage
to the pot or its plastic handles (see Safety
Notes 9.).
5. Cooking using your pressure
cooker
5.1. General
Your pressure cooker cooks food under pres-
sure, i.e. at temperature above 100 °C. This re-
duces cooking times by up to 70 %, a
significant energy saving. Due to the short co-
oking time in steam the food's flavour, taste
and vitamins are largely preserved.
5.2. Cooking with inserts
Depending on the size of your pressure cooker
you can cook with inserts or a trivet. Inserts
and trivets are available as accessories from
your WMF dealer (see »Accessories and Spare
Parts« inside the cover).
5.3. Heating
Close pot and turn rotary knob to (8) the heat
setting recommended in the cooking time table
(30c)/(30d):
Heat setting 1 (slow cooking setting)
first orange-coloured ring
Use heat setting 1 for preparing delicate foods
such as vegetables, fish or fruit. With this heat
setting, cooking is particularly slow and gentle;
flavour and nutrients are better preserved.
At heat setting 1 the cooking signal only rises
to the first cooking ring.
Excessive pressure is automatically regulated
via the main valve (see Section 5.4 Cooking
Times).
Heat setting 2 (fast cooking setting)
second orange-coloured ring
Use heat setting 2 for preparing all other foods
(see also Section 8 Versatile Use). With this
heat setting you save a great deal of time and
thus energy. At heat setting 2 the cooking
DEGBESBGDKFIFRGRITNLNOPLPTRUSESKSICZTRHUHR
PerfectUltra-BAL-GB_1008.qxd:A5 09.10.2008 16:30 Uhr Seite 23

24
signal rises to second cooking ring. Excessive
pressure is automatically regulated via the
main valve (see Section 5.4 Cooking Times).
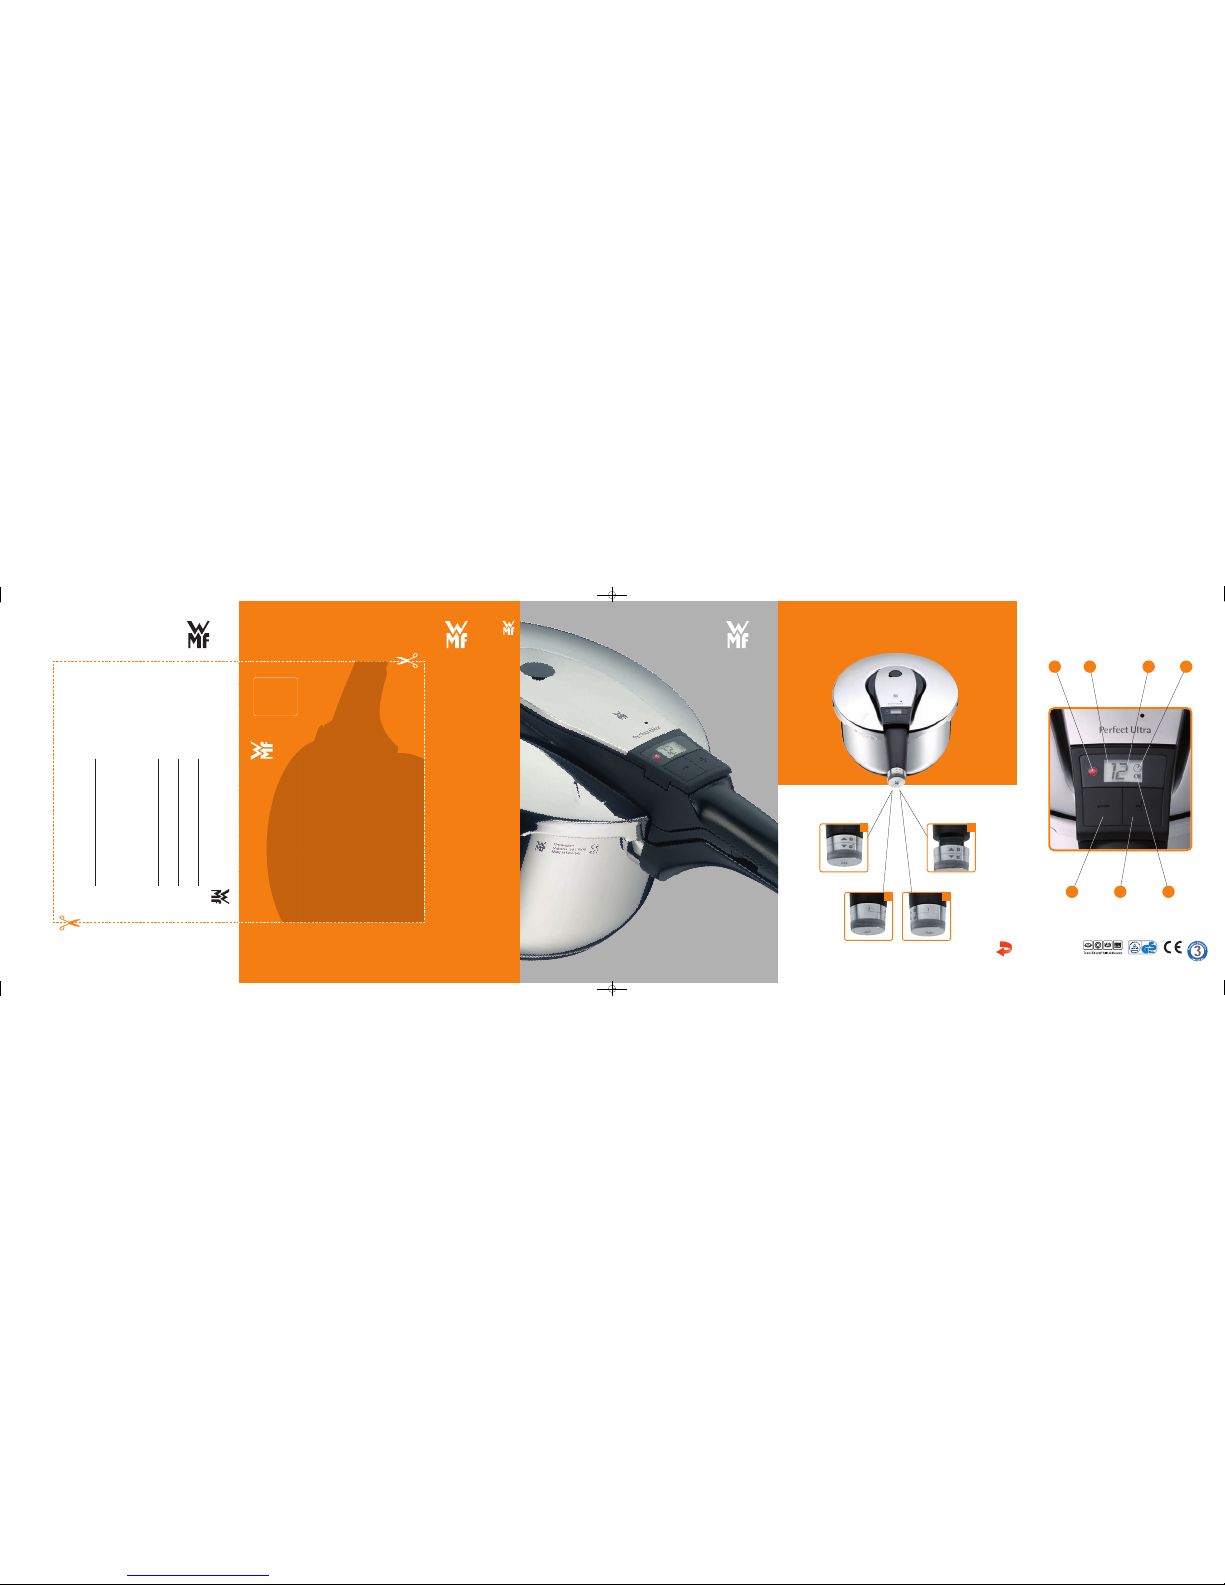
Switch on timer (12) on the lid handle (5) and
enter the required cooking time. Heat pressure
cooker to the highest energy setting.
During this heating phase air escapes via the sa-
fety valve (4), until the valve closes audibly and
pressure can build up.
The red indicator (24) on the timer (12) signals
that you can now no longer open the pot (W).
The cooking indicator (1) begins to rise. You can
observe this through the recess next to the coo-
king indicator (I) and regulate in good time the
actual energy supply.
When the preset heat setting has been reached
the timer (12) sounds 3 short bleeps. From now
on the preset heat setting will start to count
backwards (V).
5.4. Cooking times
The timer (12) signals that cooking time has
commenced. Take care to ensure that the ring
position on the cooking indicator (1) remains
stable. Regulate the heat accordingly.
If the cooking indicator (1) falls below the re-
quired orange ring, you will have to turn up the
heat again slightly. This will slightly prolong the
cooking time.
If the cooking indicator (1) rises above the pre-
set heat setting (30c)/(30d), excess steam pres-
sure will result. This will escape audibly via the
main valve (3) on the lid handle (5). Remove the
pot from the hob, wait until the cooking indica-
tor (1) has fallen to the corresponding ring, and
then replace on the hob with a reduced heat
setting.
Pressure cooking facilitates shorter cooking
times because the steam pressure in the pot re-
sults in higher temperatures.
First ring, approximately 110 °C
(operating pressure 45 kPa, regulating
pressure 90 kPa) for delicate foods such as
fish or compote
Second ring, approximately 119 °C
(operating pressure 95 kPa , regulating
pressure 130 kPa, max. 150 kPa) for all
other foods
Energy-conscious users will want to turn off
the heat even before the end of the cooking
time, since the heat stored in the pot will suf-
fice to finish the cooking process.
Cooking times may differ for same foodstuffs
depending on quantity, form, and composition.
5.5. Information on induction hobs
The TransTherm® universal base (11) is suitable
for all hob types, including induction hobs.
When cooking on induction hobs a humming
noise may develop if on a high heat setting.
This noise has technical causes and does not
indicate that either your hob or your pressure
cooker is defective. The pot size must corres-
pond to the size of the cooking zone. Other-
wise – especially in the case of small diameters
– the cooking zone (magnetic zone) may not
respond to the pot base.
5.6. Opening the pot
The timer (12) signals the end of the cooking
time by sounding 5 short bleeps which – if you
do not switch it off – is repeated up to four
times. You can switch off the sound by briefly
pressing the plus or minus keys (25)/(26).
You have four ways to depressurize the pot (see
next page).
In principle, the lid should only be opened and
removed from the pot once the pot is depressu-
rised. This can be recognized by the display (24)
on the timer (12) changing from red to green
(flashing) (W). Also this means that the cooking
indicator (1) must have fully disappeared into
the handle (5) (J).
If the red indication (24) lights up in the timer
(12), although the cooking indicator (1) has
fully disappeared in the pot, the so-called
residual pressure safety device is effective.
PerfectUltra-BAL-GB_1008.qxd:A5 09.10.2008 16:30 Uhr Seite 24

25
Release the same by pushing forward again the
rotary knob (8) and then pulling the same back-
ward again (A).
Always shake briefly before opening the pot.
This will release any pockets of steam from the
food. These may form especially when cooking
liquid or viscous foods which can spit when re-
moving the lid. Now turn the lid handle (5) to
the right as described previously, and lift off the
lid in an upward direction.
6. Four methods for
depressurization
Important note:
If you have cooked foaming or expanding
foods (e.g. pulses, stock, grains), you should
not depressurise the pot using methods 2, 3
or 4. Jacket potatoes will burst if you release
steam from the pressure cooker using
Method 2, 3 or 4.
When quickly releasing steam using the
rotary knob or under running water, always
keep your hands, head and body away from
the danger area. You could otherwise be
injured by escaping steam.
Method 1
Remove the pot from the heat source. After a
short time, the cooking indicator (1) will fall.
When it has disappeared completely inside the
handle (J) and the indication on the (24) timer
(12) has changed from red to green (W), turn
the rotary knob (8) to the position »open/close«
(30a) and pull it backwards (30b).
During this procedure any remaining residual
steam will escape from under the lid handle (5).
When all the steam has escaped, briefly shake
the pot and open.
We recommend this method in particular for
extended cooking times as you can use the exis-
ting residual heat.
Method 2
If you wish to release the steam slowly and
softly, then select automatic steam-off. Turn the
rotary knob (8) to the position »open/close«
(30a). The steam will escape slowly from under
the lid handle.
When the red indicator (24) on the timer (12)
has changed from red to green (W) and the co-
oking indicator has disappeared fully into the
pot (J), briefly shake the pot and open.
Method 3
If you wish to release the steam as quickly as
possible, turn the rotary knob (8) to the position
»open/close« and pull it backwards for a fast
steam-off (A).
When the red indicator (24) on the timer (12)
has changed from red to green (W) and the co-
oking indicator has disappeared fully into the
pot (J), briefly shake the pot and open.
Method 4
If you are worried by the escaping steam, simply
place the pot in the sink and run cold water
over the lid (K). Take care to ensure that the
timer (12) does not get wet, otherwise it might
become damaged.
When the red indicator (24) on the timer (12)
has changed from red to green (W) and the co-
oking indicator has disappeared fully into the
pot (J), briefly shake the pot and open.
DEGBESBGDKFIFRGRITNLNOPLPTRUSESKSICZTRHUHR
PerfectUltra-BAL-GB_1008.qxd:A5 09.10.2008 16:30 Uhr Seite 25

26
7. Care and maintenance of the
pressure cooker
7.1. Cleaning
Remove timer (12) from the lid handle (5) and
(X) wipe with a moist cloth. Remove the lid
handle (5) and (C) rinse under running water (L).
Remove the sealing ring (10) from the lid and
rinse by hand.
The pot, lid and inserts can be washed in the
dishwasher.
Food residues should not be scraped off but
soaked in water. Simmer a vinegar and water
solution to remove lime scale deposits. The base
of the pot should also be cleaned regularly.
7.2. Storage
Store the sealing ring (10) separately after
cleaning in order to protect it.
7.3. Maintenance
Your pressure cooker is a technical appliance
and its individual parts may be subject to wear-
and-tear. Therefore, after prolonged use, you
should check all the individual parts in accor-
dance with the spare parts list. If any changes
are apparent, the parts in question must be re-
placed. Only use original spare parts produced
by the manufacturer.
Note:
Any damage to the lid handle (5) will require
a factory repair by WMF.
8. Versatile use
The advantages of pressure cooking do not only
apply to standard methods of food preparation:
8.1. Cooking frozen food
Frozen food can be placed in the pot directly
from the freezer. Meat must be defrosted
slightly before browning. Vegetables can be
placed in the insert straight from the packet.
While the heating up times will be prolonged,
cooking times will remain the same.
8.2. Cooking wholefood
Wholefood often involves grains and pulses.
Grains and pulses need not necessarily be soa-
ked before cooking them in a pressure cooker.
If they are not soaked, cooking times will be
prolonged by about 50 %.
As well as the minimum liquid volume of 1/4 l,
at least 2 parts liquid must be added to 1 part
grain/pulses . The residual heat from the hob
can be used for final swelling. Remember that,
when cooking foaming or expanding foods
(grains, pulses), the pot can only be filled to
half its capacity.
8.3. Making preserves
1 l preserving jars should be cooked in a 6.5 l or
8.5 l pressure cooker, while smaller jars should
be cooked in a 4.5 l pressure cooker. Prepare the
food to be bottled as normal. Pour 1/4 l water
into the pot. Place the preserving jars into the
perforated insert.
Cook vegetable /meat on the second orange
indicator for approximately 20 minutes.
Cook stoned fruit on the 1st orange indicator
for approximately 5 to 10 minutes.
For releasing steam allow the pot to cool down
slowly (Method 1) – do not depressurize by
means of the rotary knob (8) or under running
water, as otherwise the juice will be spill out of the
jars.
8.4. Juicing
You can use your pressure cooker to juice small
quantities of fruit.
PerfectUltra-BAL-GB_1008.qxd:A5 09.10.2008 16:30 Uhr Seite 26

27
Pour 1/4 l water into the pot. Place the fruit
in the perforated insert on top of the un-
perforated insert; add sugar to taste. Cook
using the 2nd orange ring. The cooking time will
be between 10 and 20 minutes, depending on
the type of fruit.
Depressurise the pot under running water (Me-
thod 4). Shake briefly before opening.
8.5. Sterilising
Baby bottles, preserving jars etc. can be quickly
sterilised.
Place them in the perforated insert with the
opening facing downwards. Add 1/4 l water
and sterilise for 20 minutes using the 2nd orange
ring. Allow to cool down slowly (Method 1).
8.6. Cooking with inserts
Depending on the size of your pressure cooker,
you can cook with inserts or a trivet. Inserts
and trivets are available as accessories from
your WMF dealer.
You can also cook several foods simultaneously
in your pressure cooker. The inserts are used to
separate the individual foods. First, place the
food requiring the longest cooking time in the
pot (without insert).
Examples
Roasts (20 min) – pot base
Potatoes (8 min) – perforated insert
Vegetables (8 min) – unperforated insert
First cook the roast for around 12 minutes.
Then open the pot according to the instruc-
tions. Place the potatoes in the perforated
insert on the trivet, place the vegetables in the
unperforated insert, close the pot and cook for
a further 8 minutes.
If there is no major difference in cooking
times, all inserts can be placed in the pot at
the same time.
Opening the pot during use allows steam to es-
cape. Therefore, add a little more liquid to the
pot than required.
9. Guarantee statement
We guarantee the full functionality of the pro-
duct and all its parts during the guarantee pe-
riod. The guarantee period is 3 years. It starts
on the date the product is bought from the
WMF dealer; this must be documented by a
guarantee slip fully completed by the WMF de-
aler.
If the product becomes defective during the
guarantee period, we will remedy the defect
free of charge, replacing the defective parts
with new ones. Defective parts can only be
replaced by a WMF dealer or by the WMF AG
Customer Service Department in
Geislingen/Steige.
The guarantee claim extends exclusively to this
claim. Any further claims deriving from the
guarantee are ruled out.
The guarantee slip must be submitted when
claiming under guarantee. This guarantee slip
must be given to the WMF dealer together
with the WMF pressure cooker. The guarantee
entitlement only exists upon presentation of
the fully completed slip.
Of course, this guarantee statement does not
affect your statutory warranty rights. Within
the warranty period, you have statutory
warranty rights to retrospective performance,
abatement, repudiation and damage compen-
sation to the extent prescribed by law.
The guarantee obligation does not cover the
following:
– Cooking indicator seal
– Seal, residual pressure safety device
– Seal, steam-off aperture
– Safety valve
– Sealing ring
– Batteries
These parts are subject to natural wear-
and-tear. 10 year supply guarantee on the
corresponding spare parts
DEGBESBGDKFIFRGRITNLNOPLPTRUSESKSICZTRHUHR
PerfectUltra-BAL-GB_1008.qxd:A5 09.10.2008 16:30 Uhr Seite 27

28
10. Preclusion of liability
No guarantee is assumed for damage caused by
the following:
– Inappropriate and improper use
– Incorrect or careless handling
– Improperly implemented repairs
– The fitting of spare parts which do not
correspond to the original design
– Chemical or physical effects on the pot
surfaces
– Non-compliance with these operating
instructions
Name and address of the warranty provider
WMF AG
Eberhardstraße
D-73309 Geislingen/Steige
The guarantee claim must be filed either
directly with the guarantee provider or with
an authorised WMF dealer.
11. Troubleshooting
Pressure cooker problems
Excessive heating-up period or the cooking
indicator (1) does not rise.
Steam escapes from the lid.
PerfectUltra-BAL-GB_1008.qxd:A5 09.10.2008 16:30 Uhr Seite 28

29
DEGBESBGDKFIFRGRITNLNOPLPTRUSESKSICZTRHUHR
Cause
Diameter of the hob is unsuitable.
Inappropriate heat level
Lid incorrectly positioned.
The ball in the safety valve (4) is not positioned
correctly.
Inadequate liquid (at least 1/4 l).
Sealing ring (10) and/or pot edge are not clean.
Rotary knob (8) is not set to heat setting 1 or 2.
Sealing ring (10) is damaged or hard
(due to wear).
The cooking indicator seal (2) or the seal of the
residual pressure safety device (13) are not
correctly seated or damaged.
If there is a problem, always remove the
pressure cooker from the hob.
Never use force to open!
Rectification
Select hob which is suitable for the pot diameter.
Set to the highest heat level.
Fully depressurise the pot, open the lid. Check
that the sealing ring (10) is positioned properly
and close the pot again.
Fully depressurize the pot, open, remove handle,
check the safety valve (4) , check that the metal
ball is positioned properly in the lid (E) and (F)
close the pot again.
Fully depressurise the pot, open the lid.
Add liquid and close the pot again.
Fully depressurise the pot, open the lid. Clean
sealing ring (10) and pot edge and close the pot
again.
Set rotary knob (8) to heat settings 1 or 2
(30c)/(30d).
Replace sealing ring (10) by an original WMF
sealing ring.
Correct the seating of the seals or replace by
original WMF spare parts.
PerfectUltra-BAL-GB_1008.qxd:A5 09.10.2008 16:30 Uhr Seite 29

30
11. Troubleshooting
Pressure cooker problems
Steam emerges continuously from
the safety valve (4) (does not apply to the
heating-up phase).
The rotary knob (8) cannot be pulled
backwards and pot cannot be opened.
Faults on the timer
No indication on the display (20).
The display (20) shows »E1«, »E6« or »E7«.
PerfectUltra-BAL-GB_1008.qxd:A5 09.10.2008 16:30 Uhr Seite 30

31
Cause
The ball does not sit correctly in the valve (E).
The ball was forced into the upper chamber.
Residual pressure safety device is blocked.
The timer (12) was removed too early, that is
before the start of the cooking stage.
Timer (12) is not active.
Battery is empty (see battery indicator (23)).
Software fault, requires factory repair by WMF.
If there is a problem, always remove the
pressure cooker from the hob.
Never use force to open!
Rectification
Fully depressurise the pot, open the lid and
remove the handle. Force the ball into the
lower chamber (F) Check the main valve (3)
for moveability (G) and close the pot again.
Using a needle or toothpick, exert downward
pressure into the opening of the residual pres-
sure safety device (15) on the lid cover until the
rotary knob (8) can be pulled backwards.
Place timer (12) on the lid handle (5) and
re-enter the required cooking time.
Switch on timer (12) by means of the plus key
(25).
Replace battery according to the instructions
Hand in timer (12) at an authorized dealership
or send it directly to WMF AG.
DEGBESBGDKFIFRGRITNLNOPLPTRUSESKSICZTRHUHR
PerfectUltra-BAL-GB_1008.qxd:A5 09.10.2008 16:30 Uhr Seite 31

32
Pork and Veale
Cooking temperature is at
2nd ring. Make sure there
is at least 1/4 l of liquid.
Special insert is not re-
quired with any dish.
Beef
Cooking temperature is at
2nd ring. Make sure there
is at least 1/4 l of liquid.
Perforated insert required
for beef tongue.ötigt.ötigt.
Chicken
Cooking temperature is at
2nd ring and amount of
at least 1/4 l. remain the
same. Perforated insert
needed for boiling fowl.
Game
Cooking temperature is at
2nd ring. Make sure there
is at least 1/4 l of liquid.
No special insert needed.
Lamb
Cooking temperature is at
2nd ring. Make sure there
is at least 1/4 l of liquid.
Fish
Cooking temperature is at
1st ring. Make sure there
is at least 1/4 l of liquid.
No insert needed for
ragout or stew. Otherwise
use solid insert.
Minutes
Pork cut in strips 5–4
Ragout of pork 10–15
Joint of pork 20–25 Time depends on size and shape
Veal cut in strips 5–7
Ragout of veal 10–15
Knuckle of veal 25–30
Veal tongue 15–20 Cover with water
Joint of veal 20–25 Time depends on size and shape
Meat loaf 10–15
Marinated joint 30–35
Tongue 45–60
Strips of beef 6–8
Goulash 15–20
Roulades 15–20
Joint of beef 35–45 Time depends on size and shape
Boiling fowl 20–25 Max. 1/2 capacity
Chicken pieces 6–8
Turkey leg 25–30 Depending on size
Turkey ragout 6–10
Turkey escalope 2–3
Rabbit 15–20
Loin of rabbit 10–12
Venison 25–30
Venison stew 15–20
Lamb stew 20–25 Mutton requires longer cooking time
Joint of lamb 25–30 Depends on size and shape
Fillet of fish 2–3 Steamed in own juice
Whole fish 3–4 Steamed in own juice
Ragout or stew 3–4
12. Cooking time chart
PerfectUltra-BAL-GB_1008.qxd:A5 09.10.2008 16:30 Uhr Seite 32

DEGBESBGDKFIFRGRITNLNOPLPTRUSESKSICZTRHUHR
33
Soups
Cooking temperature is at
2nd ring. Make sure there
is at least 1/4 l to a maxi-
mum of 1/2 capacity of
cooker. Special insert not
required.
Vegetables
Cooking temperature is at
1st ring. Make sure there
is at least 1/4 l of liquid.
For sauerkraut and beet-
root, no insert required.
For other dishes the per-
forated insert is required.
From the beans onwards
the cooking temperature
increases (2nd ring).
Pulses, Cereals
Cooking temperature is at
2nd ring. Make sure there
is at least 1/4 l to a maxi-
mum of 1/2 capacity of
cooker. Using 2 parts water
to 1 part cereal. Cereal not
soaked in advanced needs
20 – 30 min. longer.
Fruit
Cooking temperature is at
1st ring. Make sure there is
at least 1/4 l of liquid.
Cooking tipps
and tricks
Minutes
Peas, lentils 12–15 Soaked pulses
Beef broth 25–30 Correct for all meats
Vegetable soup 5–8
Goulash soup 10–15
Chicken soup 20–25 Cooking time dependent on size
Oxtail soup 35
Potato soup 5–6
Aubergines, cucumbers, 2–3 Steamed vegetables keep their colour
tomatoes better
Cauliflower, peppers, leek 3–5
Peas, celeriac, kohlrabi 4–6
Fennel, carrots, 5–8
Savoy cabbage
Beans, curly kale, 7–10
red cabbage
Sauerkraut 10–15
Beetroot 15–25
Potatoes 6–8
Potatoes, cooked 6–10 Potatoes cooked in their skins burst
in their skins if in their skins steam is released fast
Peas, beans lentils 10–15 Cook large beans 10 min longer
Buckwheat, millet 7–10 Cooking time for soaked cereal
Maize, spelt grain 6–15 Cooking time for soaked cereal
Pudding rice 20–25 Cooking temperature at 1st ring
Long-grain rice 6–8
Brown rice 12–15
Wheat, rye 10–15 Cooking time for soaked cereal
Cherries, plums 2–5 It is advisable to use the
perforated insert
Apples, pears 2–5 It is advisable to use the
perforated insert
Cooking time begins as soon as the required cooking
indicator ring is visible
Times given are guides
Choose preferably shorter times as food can always be cooked longer
Times given result in firmly cooked vegetables
The cooking temperature at 1st ring is 109°C and at 2nd ring is 117°C
Recipes are to be found at www.wmf.com
PerfectUltra-BAL-GB_1008.qxd:A5 09.10.2008 16:30 Uhr Seite 33

34
PerfectUltra-BAL-GB_1008.qxd:A5 09.10.2008 16:30 Uhr Seite 34

35
DEGBESBGDKFIFRGRITNLNOPLPTRUSESKSICZTRHUHR
Instrucciones de manejo
ES
Contenido
1. Indicaciones de seguridad
2. Utilización del Timer/temporizador
3. Utilización de la olla rápida
4. Indicaciones de uso
5. Cocinar con la olla rápida
6. Cuatro métodos para liberar la presión
7. Cuidados de la olla rápida
Limpieza, conservación, mantenimiento
8. Múltiples aplicaciones
9. Declaración de garantía
10. Exención de responsabilidad
11. Solución de averías
12. Tabla de tiempos de cocción
Consultar numeración en el interior
de las dos contraportadas.
*) Es posible que los colores presenten
divergencias
1. Indicaciones de seguridad
1. Lea detenidamente las instrucciones y todas
las indicaciones antes de empezar a utilizar
la olla rápida WMF. La incorrecta utilización
de la olla podría dañarla.
2. No deje la olla rápida a nadie que no haya
leído antes las instrucciones.
3. Mantenga a los niños alejados de la olla
cuando la esté utilizando.
4. No utilice nunca la olla rápida en el horno.
Las altas temperaturas dañarán los mangos,
las válvulas y los dispositivos de seguridad.
5. Cuando esté bajo presión, tenga mucho
cuidado al mover la olla. No toque ninguna
superficie caliente. Utilice los mangos y los
botones. En caso necesario, utilice guantes.
6. Utilice la olla rápida sólo para los fines
previstos.
7. Esta olla cocina por presión. La utilización
de la olla para otros fines podría ocasionar
quemaduras. Asegúrese de haber cerrado
la olla correctamente antes de ponerla
en la fuente de calor. En el manual de
instrucciones encontrará información al
respecto.
8. No fuerce nunca la olla para abrirla.
Antes de abrirla, asegúrese siempre de que
la presión ha sido completamente liberada.
En el manual de instrucciones encontrará
información al respecto.
9. No utilice nunca la olla sin haber echado
antes agua, de hacerlo, le ocasionaría graves
daños. Mínimo: 1/4 l de líquido.
PerfectUltra-BAL-ES_1008.qxd:A5 09.10.2008 16:32 Uhr Seite 35

36
Observación importante:
Asegúrese de que no se evapore todo el líquido.
Las piezas de plástico podrían derretirse y
dañar la olla. También podrían quemarse los
alimentos o derretirse el aluminio del fondo
y dañar la placa. Si esto sucediera, apague
la fuente de calor y no mueva la olla hasta
que se enfríe completamente.
10. No llene la olla nunca más de 2/3 de su
capacidad. Cuando cocine alimentos que
se expandan durante la cocción, como
arroz o verduras secas, llene la olla, como
máximo, hasta la mitad de su capacidad y
observe las instrucciones complementarias
del fabricante de la olla.
11. Mantenga la olla controlada en todo
momento. Regule la potencia de calor
para que el indicador no suba del
correspondiente anillo naranja. Si no se
reduce la potencia del calor, saldrá vapor
por la válvula. Los tiempos de cocción
serán diferentes y la pérdida de líquido
puede ocasionar averías.
12. Utilice sólo las fuentes de calor indicadas
en el manual de instrucciones.
13. Cuando cocine carne que tenga piel (como
lengua), que pueda inflarse bajo el efecto
de la presión, no pinche la carne mientras
la piel esté hinchada, puesto que podría
quemarse.
14. Agite la olla antes de abrirla, para que las
burbujas de vapor no salpiquen y usted
no se queme. Esto resulta especialmente
importante cuando efectúe una descom-
presión rápida o sosteniendo la olla bajo
un chorro de agua corriente.
15. Cuando efectúe una descompresión rápida
o poniendo la olla bajo un chorro de agua
corriente, mantenga las manos, la cabeza
y el cuerpo fuera de la zona de peligro.
Podría dañarse con el vapor que sale.
16. Antes de utilizar la olla, compruebe que
los dispositivos de seguridad, las válvulas
y las juntas están en perfectas condiciones
de funcionamiento. Sólo así se podrá
garantizar el funcionamiento seguro de
la olla. En el manual de instrucciones en-
contrará información al respecto.
17. No utilice la olla para freír alimentos
a presión con aceite.
18. No manipule los sistemas de seguridad.
Limítese a cumplir las instrucciones
de mantenimiento indicadas en las
instrucciones de uso.
19. Cambie periódicamente las piezas que su-
fran desgaste (véase la garantía). Las piezas
que se decoloren, se agrieten o presenten
otros daños o bien que no asienten correc-
tamente, deberán cambiarse por piezas de
repuesto originales WMF.
20. Utilice siempre piezas de repuesto origina-
les WMF. Utilice especialmente siempre
ollas y tapas del mismo modelo.
21. No utilice la olla rápida si está dañada o
deformada completamente o sólo en parte,
o bien, cuando no funcione tal y como se
indica en el manual de instrucciones. En
este caso, acuda a su tienda especializada
WMF más cercana o a uno de los servicios
técnicos indicados en este manual.
PerfectUltra-BAL-ES_1008.qxd:A5 09.10.2008 16:32 Uhr Seite 36

37
Indicaciones de seguridad importantes para
el Timer/temporizador y las pilas:
El Timer/temporizador no es apto para niños
menores de 3 años porque contiene piezas
pequeñas que los niños pueden tragarse o
aspirar (la tapa de las pilas, la junta, las pilas).
Si la pantalla LCD se rompe, tenga cuidado
para no lesionarse con el cristal. Tenga cuidado
para que el cristal líquido no entre en contacto
con la piel, los ojos o la boca. La pila que se
entrega no es recargable. Al cambiar las pilas,
tenga cuidado para no dañarse con los contactos.
Las pilas pueden soltar líquido. Si el líquido
de las pilas entra en contacto con las manos
o con la ropa, lave los puntos afectados inme-
diatamente con agua. Si el líquido de las pilas
entra en contacto con los ojos, deberá aclarar-
los con abundante agua y acudir a un médico.
No se puede dañar, perforar, ni tirar al fuego
las pilas. Cambie las pilas siempre por otras
del tipo que se indica en este manual de
instrucciones. No elimine nunca el Timer/
temporizador y las pilas gastadas tirándolas
a la basura doméstica, sino en los lugares de
recogida de basura municipales previstos
específicamente para ello.
Guarde estas instrucciones de uso.
2. Utilización del Timer/Temporizador
La olla rápida se puede utilizar con o sin
Timer/temporizador.
Observación importante:
No coloque el Timer/temporizador cerca de
ningún imán.
El Timer/temporizador está ajustado al
mango y no se puede cambiar. Si tiene varias
ollas rápidas WMF Perfect Ultra con
Timer/temporizador y los intercambia, éstos
podrían fallar.
2.1. Conectar y programar
El Timer/temporizador (12) sólo se puede conec-
tar y utilizar cuando está colocado en el mango
de la tapa (5).
El Timer/temporizador (12) estará conectado
cuando la tecla »+« (25) esté pulsada. En la
pantalla (20) se mostrará tras aproximadamente
2 segundos »00«. Utilizando las teclas »+« y »-«
(25)/(26) podrá ajustar ahora el tiempo de coc-
ción deseado (máx. 99 minutos). Manteniendo la
tecla pulsada la olla rápida se activa. Cuando la
olla se calienta, se forma presión. El indicador
del Timer/temporizador se pone rojo (24). Ahora
ya no se puede abrir la olla. Cuando se alcance
el nivel de cocción seleccionado, empezará el
tiempo de cocción. El Timer/temporizador (12)
emite una señal acústica (3 veces rápidas) y el
indicador cuenta los minutos hacia atrás. El
segundero (22) de la pantalla (20) indica que
el tiempo de cocción ha finalizado (V).
Durante el tiempo de cocción se puede corregir
el tiempo programado pulsando las teclas »+«
o »-« (25)/(26). Esto sólo es posible si el Timer/
temporizador está colocado en el mango. El Timer/
temporizador se puede desconectar (12) en cual-
quier momento manteniendo pulsadas al mismo
tiempo las teclas »+« y »-« (25)/(26) hasta que se
apaga el indicador.
2.2. Transcurrido el tiempo de cocción
Cuando el tiempo programado finaliza se emite
una señal acústica (5 veces rápidas). Se puede
DEGBESBGDKFIFRGRITNLNOPLPTRUSESKSICZTRHUHR
PerfectUltra-BAL-ES_1008.qxd:A5 09.10.2008 16:32 Uhr Seite 37
Other manuals for PerfectUltra
1
Table of contents
Languages:
Other WMF Kitchen Utensil manuals

WMF
WMF Fusiontec Assembly instructions

WMF
WMF Fusiontec Assembly instructions

WMF
WMF Hello FUNctionals 3201002920 Assembly instructions

WMF
WMF Cromargan protect 3201001931 User manual

WMF
WMF PERFECT PLUS User manual

WMF
WMF Wok Guide

WMF
WMF SELECT it! Assembly instructions

WMF
WMF Signature FusionTec Installation guide

WMF
WMF 07.6130.6381 Assembly instructions
Popular Kitchen Utensil manuals by other brands

Wolfgang Puck
Wolfgang Puck BISTRO BEWK0030 Use and care

PEUGEOT
PEUGEOT Saveur de vins Series manual

Calphalon
Calphalon Signature Nonstick 12-in quick start guide

Vollrath
Vollrath 47713 Operator's manual

DS Produkte
DS Produkte Z 05496 operating instructions

HAEGER
HAEGER Arezzo WO-0SB.002A User instructions