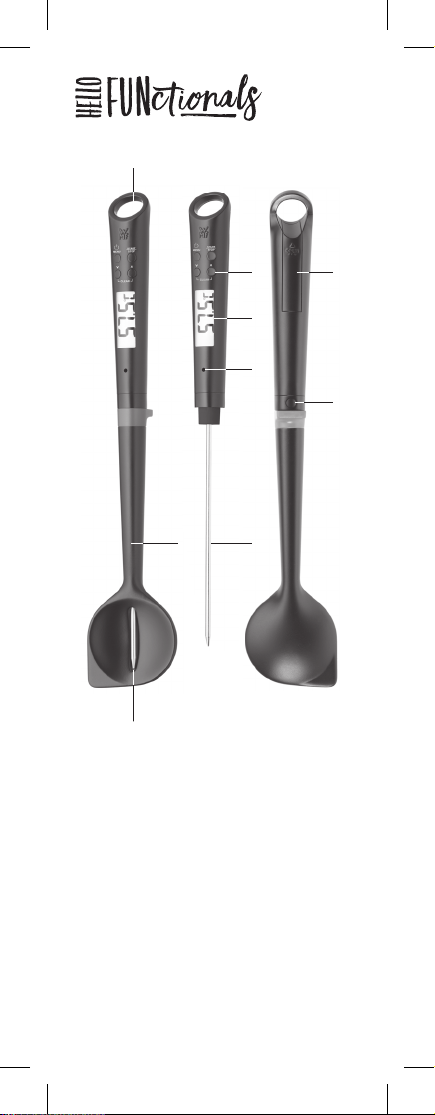
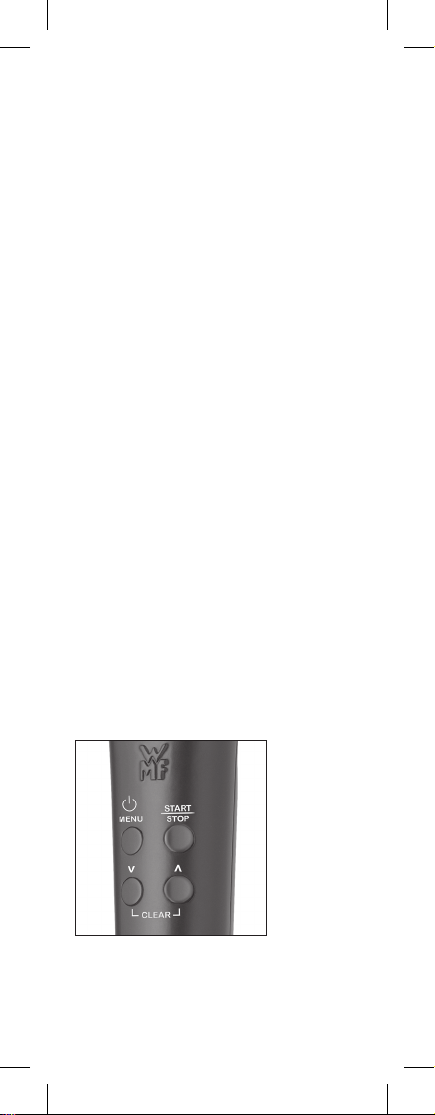
WMF Hello FUNctionals 3201002920 Assembly instructions

Thermo-Kochlöffel
Bedienungs- und Pflegehinweise
Thermo-spoon
Instructions for use and care
Cuillère thermomètre
Conseils d’utilisation et d’entretien
Cucharón de cocina térmico
Indicaciones de manejo y cuidado
Cucchiaio con thermometro da cucina
Istruzioni per l’uso e la manutenzione
温度计烹饪勺
操作和保养指南

1| DE Aufhängeöse
EN Hanging loop
FR Œillet de suspension
ES Orificio para colgar
IT Occhiello
ZH 挂环
2| DE Silikon-Löffel, abnehmbar
EN Silicone spoon, removable
FR Cuillère en Silicone, amovible
ES Cuchara de silicona, extraíble
IT Cucchiaio in Silicone, rimovibile
ZH 硅 胶 勺( 可 取 下 )
5
4 8
9
6
3
27
1
2

3| DE Temperatur-Sensor
EN Temperature sensor
FR Capteur de température
ES Sensor de temperatura
IT Sensore di temperatura
ZH 温度传感器
4| DE Bedienfeld
EN Control panel
FR Panneau de commande
ES Panel de control
IT Pannello di comando
ZH 操作区
5| DE LC-Display
EN LC Display
FR Écran LCD
ES Pantalla de cristal líquido
IT Display LCD
ZH 液晶显示屏
6| DE Lautsprecher
EN Loudspeaker
FR Haut-parleur
ES Altavoz
IT Altoparlante
ZH 扬声器
7| DE Messfühler
EN Probe
FR Sonde de mesure
ES Sensor
IT Sensore di misurazione
ZH 测温器
8| DE Batteriefach | °C / °F
EN Battery compartment | °C / °F
FR Compartiment des piles | °C / °F
ES Compartimento de la pila | °C / °F
IT Vano batterie | °C / °F
ZH 电池槽 | °C / °F
9| DE Entriegelung
EN Release mechanism
FR Déverrouillage
ES Desbloqueo
IT Sblocco
ZH 解锁按钮
3

Hello FUNctionals
Thermo-Kochlöffel
Herzlichen Glückwunsch, Ihr WMF Ther-
mo-Kochlöffel der Serie Hello FUNctionals ist
ein WMF Qualitätsprodukt für den modernen
Haushalt.
Lesen Sie die folgenden Bedienungs- und
Pflegehinweise vor dem ersten Gebrauch bitte
sorgfältig durch. Beachten Sie insbesondere
die Sicherheitshinweise.
Überlassen Sie den Thermo-Kochlöffel nie-
mandem, der sich nicht zuvor mit der Bedie-
nungsanleitung vertraut gemacht hat.
Bewahren Sie diese Bedienungsanleitung zum
Nachschlagen sorgfältig. Falls Sie den Ther-
mo-Kochlöffel an einen anderen Benutzer
weitergeben, fügen Sie die Bedienungshin-
weise dazu.
Technische Daten
• Reaktions- und Messzeit: 4-10 Sekunden
• Messbereich: -45 °C bis +200 °C (-49 °F
bis +392 °F)
• Messgenauigkeit: -20-100 °C ± 1 °C, an-
dere ± 2 °C
• Auflösung: 0,1 °C / 0,1 °F
• Anzeige wählbar °C/°F
• Numerisches LC-Display
• Messfühler aus rostfreiem Edelstahl 18/10
• Sensor ø 3,8 x 157 mm
• Batterie 1 x 1,5 V AAA (LR03) im Lieferum-
fang enthalten
Sicherheitshinweise
• Halten Sie das Gerät und die Verpa-
ckungsfolie von Babys und Kleinkindern
fern, es besteht Erstickungsgefahr durch
verschluckbare Kleinteile und die Verpa-
ckungsfolie.
• Der Messfühler ist spitz! ACHTUNG, es be-
steht Verletzungsgefahr.
• Verwenden Sie den Thermo-Kochlöffel
nicht zur Bestimmung der Körpertempera-
DE
4

tur. Er ist nicht als medizinisches Produkt
zugelassen. Durch die Spitze des Messfüh-
lers besteht Verletzungsgefahr.
• Gehen Sie sorgsam mit dem Thermo-Koch-
löffel um. Vermeiden Sie Stöße oder Schlä-
ge, und lassen sie ihn nicht auf den Boden
fallen.
• Verwenden Sie den Thermo-Kochlöffel nie-
mals im geschlossenen Backofen! Die Elek-
tronik und die Batterien im Griffteil sind
für diese Temperaturen nicht geeignet.
• Den Thermo-Kochlöffel niemals in Mikro-
wellengeräten verwenden!
• Bitte beachten Sie auch die Hinweise zu
den Batterien.
• Dieses Gerät ist nicht dafür bestimmt,
durch Personen (einschließlich Kinder) mit
eingeschränkten physischen, sensorischen
oder geistigen Fähigkeiten oder mangels
Erfahrung und/ oder Wissen benutzt zu
werden, es sei denn, sie werden durch
eine für ihre Sicherheit zuständige Person
beaufsichtigt oder erhalten von ihr Anwei-
sungen, wie das Gerät zu benutzen ist.
• Kinder sollten beaufsichtigt werden, um
sicherzustellen, dass sie nicht mit dem
Gerät spielen.
Inbetriebnahme
Überprüfen Sie die Vollständigkeit des Ver-
packungsinhaltes vor Inbetriebnahme.
Lieferumfang:
1 x WMF Thermo-Kochlöffel
1 x Batterie Typ AAA (LR03)
1 x Bedienungsanleitung
Um das Produkt vor auslaufenden Batterien
zu schützen, ist die Batterie separat beigelegt.
Entnehmen Sie die Batterie aus dem Poly-
beutel und setzen Sie sie in das rückseitige
Batteriefach ein, bevor das Gerät zum ersten
Mal benutzen.
5

Achten Sie beim Einsetzen der Batterie auf die
korrekte Polarität.
Die Polaritätszeichen sind im Batteriefach
gekennzeichnet.
Über dem Batteriefach befindet sich ein klei-
ner Schiebeschalter, mit dem Sie die Tempera-
tureinheit °C oder °F wählen können.
Sobald die Batterie korrekt eingelegt wurde,
wird die Anzeige aktiv. Sie befinden sich im
Modus 1. Das LC-Display zeigt die Umgebungs-
temperatur an.
Hinweise zur Bedienung
Reinigen Sie Kochlöffel und Messfühler mit
einem feuchten Tuch und trocknen Sie sie ab,
bevor Sie das Gerät zum ersten Mal benutzen.
Ihr Thermo-Kochlöffel hat vier verschiedene
Funktionen:
• Er misst die Temperatur beim Rühren im
Topf
• Er gibt Signal, wenn die voreingestellte
Temperatur erreicht ist
• Sie können die Timer- und Stoppuhr-Funk-
tion nutzen
• Ohne Silikon-Kochlöffel können Sie den
Messfühler wie ein Bratenthermometer
nutzen.
Temperaturanzeige
Drücken Sie die Menutaste (ca. 1 sec.), um das
Gerät einzuschalten. Sie befinden sich im Mo-
6

dus 1. Das LC-Display zeigt die Umgebungs-
temperatur. Sobald die Temperatur 70 °C
überschreitet, reagiert die Signalfunktion.
Diese Einstellung ist standardmäßig in Modus
2 aktiviert.
Signal mit Ton
Wenn Sie die Signalfunktion nutzen wollen,
drücken Sie erneut die Menutaste. Sie be-
finden sich jetzt in Modus 2. Die Anzeige im
LC-Display blinkt. Mit den Pfeiltasten können
Sie die gewünschte Temperatur einstellen.
Drücken Sie zum Bestätigen erneut die Start/
Stop Taste.
Im LC-Display erscheint wieder die Umgebungs-
temperatur. Sobald die gewünschte Tempe-
ratur erreicht ist, gibt Ihr Thermometer ein
akustisches Signal und die Anzeige im Display
blinkt. Den Signalton können Sie durch Drü-
cken einer beliebigen Taste beenden.
Standardmäßig ist Ihr Thermo-Kochlöffel da-
rauf eingestellt, bei 70°C Signal zu geben.
Zu dieser Einstellung kann durch gleichzei-
tiges Drücken beider Pfeiltasten zurückge-
kehrt werden.
Signal ohne Ton
Sie befinden sich im Modus 2, die Anzei-
ge blinkt. Drücken Sie erneut die Menuta-
ste ohne* die Temperatur zu verstellen, Sie
befinden sich jetzt in Modus 3. Im Display
erscheinen die Umgebungstemperatur und ein
durchgestrichener Lautsprecher. Bei Erreichen
der gewünschten Temperatur fängt die Anzei-
ge an zu blinken - ohne akustisches Signal.
(* sollten sie in Modus 2 Temperatureinstel-
lungen vorgenommen haben, müssen Sie
über weiteres drücken der Menutaste erneut
über Modus 1 in Modus 3 navigieren – 4 x
drücken).
Timer- und Stoppuhr-Funktion
Schalten Sie das Gerät ein. Sie befinden sich
im Modus 1. Drücken Sie dreimal die Menuta-
7

ste im Display erscheint die Anzeige 00:00.
Timer-Funktion: Stellen Sie mit den Pfeil-
tasten die gewünschte Zeit ein (maximal 99
Minuten 59 Sekunden) und bestätigen Sie mit
der Start/Stop Taste.
Der Timer zählt rückwärts und nach Ablauf
der eingestellten Zeit ertönt der Alarm.
Den Alarmton können Sie durch Drücken einer
beliebigen Taste beenden.
Stoppuhr-Funktion: Drücken Sie bei 00:00 die
Start/Stop Taste. Die Uhr zählt vorwärts.
Mit der Start/Stop Taste können Sie die Uhr
jederzeit unterbrechen.
Durch gleichzeitiges Drücken der Pfeiltasten,
setzen Sie die Zeit wieder auf 00:00 zurück.
Wenn Sie z.B. eine Weinschaumcreme rühren
wollen, können Sie Temperaturkontrolle und
Timer gleichzeitig nutzen. Sobald die einge-
stellte Temperatur erreicht ist, meldet sich das
Signal. Der Timer sagt Ihnen dann, wie lange
Sie rühren müssen.
Signal- und Alarmton unterscheiden sich.
Verwendung als Bratenthermometer
Auf der Rückseite des Kochlöffels befindet
sich ein kleiner Knopf zum Entriegeln. Da-
mit können Sie das Thermometer vom Sili-
kon-Kochlöffel lösen und den Messfühler als
Bratenthermometer nutzen.
Alle Funktionen bleiben erhalten.
Ausschalten
Sie können den Thermo-Kochlöffel jeder-
zeit abschalten, indem Sie die Menutaste
für ca. 2 sec. gedrückt halten. Sofern keine
Timer-Funktion aktiviert ist, schaltet er sich
nach einiger Zeit selbstständig ab.
Bitte beachten Sie:
Die Alarmfunktion des Timers kann nicht de-
aktiviert werden.
Timer und Stoppuhr müssen auf 00:00 zu-
rückgesetzt werden.
8

Der Timer zählt weiter, auch wenn in einen
anderen Modus umgeschaltet wird.
Sobald ein Signal- oder Alarmton ertönt,
wechselt die LC-Anzeige in den entspre-
chenden Modus.
Hinweise zur Reinigung
Achtung! Das Gerät niemals vollständig in
Wasser tauchen und nicht in der Spülmaschi-
ne reinigen!
Reinigen Sie den Messfühler nach jedem Ge-
brauch mit einem feuchten Tuch und ggf. mit
etwas Spülmittel.
Reinigen Sie das Gehäuse mit einem ange-
feuchteten Tuch und reiben Sie es anschlie-
ßend trocken. Achten Sie darauf, dass kein
Wasser in das Gehäuse eindringt.
Den abnehmbaren Silikon-Löffel können Sie
in der Spülmaschine reinigen.
Hinweise zur Batterie
Wechseln Sie die Batterie rechtzeitig, sobald
die Anzeige im LC-Display schwach wird.
Öffnen Sie dazu das Batteriefach auf der
Rückseite in Pfeilrichtung und setzen Sie die
neue Batterie entsprechend der Polaritätszei-
chen ein.
Verwenden Sie nur die Batterie, die in der Be-
dienungsanleitung angegeben ist:
Typ AAA (LR03).
• Batterien niemals wieder aufladen! Explo-
sionsgefahr!
• Batterien von Kindern fernhalten, nicht
ins Feuer werfen, kurzschließen oder
auseinander nehmen. Sofort einen Arzt
aufsuchen, wenn eine Batterie verschluckt
wurde.
• Batterien keinen extremen Bedingungen
aussetzen, z. B. auf Heizkörpern, unter di-
rektem Sonnenschein. Erhöhte Auslauf-
gefahr!
• Erschöpfte Batterien umgehend aus dem
Gerät entfernen. Erhöhte Auslaufgefahr!
• Kontakt der Batteriesäure mit Haut, Augen
9

und Schleimhäuten vermeiden. Bei Kontakt
mit Batteriesäure die betroffenen Stellen
sofort mit reichlich klarem Wasser spülen
und umgehend einen Arzt aufsuchen.
• Batterie- und Gerätekontakte vor dem Ein-
legen und bei Bedarf reinigen.
• Entfernen Sie die Batterie bei längerer
Nichtverwendung aus dem Gerät
Hinweise zur Entsorgung
Verpackung:
Die Verpackungsmaterialien können
wiederverwertet werden. Entsorgen
Sie diese bitte umweltgerecht.
Altbatterien:
Batterien dürfen nicht über den
Hausmüll entsorgt werden. Jeder
Verbraucher ist gesetzlich dazu ver-
pflichtet, Batterien ordnungsgemäß
an den vorgesehen Sammelstellen
im Batterie vertreibenden Handel zu
entsorgen.
Gerät:
Werfen Sie das Gerät am Ende seiner
Lebensdauer keinesfalls in den nor-
malen Hausmüll. Erkundigen Sie sich
bei Ihrer kommunalen Verwaltung
oder Ihrem örtlichen Entsorgungsbe-
trieb nach Möglichkeiten einer um-
weltgerechten Entsorgung.
Garantie
Wenden Sie sich bei Problemen und Bean-
standungen an nachfolgende Serviceadresse,
bevor Sie das Gerät einsenden.
10

WMF Group GmbH
Eberhardstr. 35
73312 Geislingen
Tel.: +49 (0) 7331 – 256 256
Mo–Fr: 08:00 – 18:00 Uhr
Sa: 10:00 – 14:00 Uhr
Email: servic[email protected]m
Webseite: www.wmf.com/de
11

Hello FUNctionals
Thermo-spoon
Congratulations! Your WMF thermo-spoon
from the Hello FUNctionals range is a WMF
quality product for the modern household.
Please read the following use and care in-
structions carefully before using this product
for the first time. Please take note of the
safety information in particular.
Do not leave anyone in charge of the ther-
mo-spoon who has not familiarised himself/
herself with the instructions for use before-
hand.
Keep these operating instructions in a safe
place for future reference. If you give the
thermo-spoon to another user, please also in-
clude the instructions for use.
Technical data
• Reaction and measurement time: 4-10
seconds
• Temperature range: -45°C to +200°C
(-49°F to +392°F)
• Measuring accuracy: -20-100°C ± 1°C,
otherwise ± 2°C
• Resolution: 0.1°C / 0.1°F
• Available display °C/°F
• Numerical LC display
• Stainless steel 18/10 probe
• Sensor ø 3.8 x 157 mm
• Battery 1 x 1.5 V AAA (LR03) included
Safety information
• Keep the device and package out of the
reach of babies and small children as there
is a risk of suffocation due to the small
parts and packaging.
• The probe is sharp! CAUTION, there is a risk
of injury.
• Do not use the thermo-spoon to take your
body temperature. It is not approved as a
medical product. There is a risk of injury
from the tip of the probe.
EN
12

• Take care when using the thermo-spoon.
Avoid shocks or impact and do not drop
on the floor.
• Never use the thermo-spoon in a closed
oven! The electronics and batteries in the
handle are not suitable for those temper-
atures.
• Never use the thermo-spoon in the mi-
crowave.
• Please also note the battery information.
• This appliance is not intended for use by
persons (including children) who are phys-
ically or mentally handicapped or have
sensory disabilities, nor is it to be used by
persons without sufficient experience and/
or knowledge, unless these persons are
supervised by persons responsible for their
safety or unless they have been instructed
how to use the appliance.
• Children should be supervised in order
to ensure that they do not play with the
device.
Before using for the first time
Check all the contents of the packaging are
present before use.
Included:
1 x WMF thermo-spoon
1 x AAA battery (LR03)
1 x instructions for use
The battery is enclosed separately to protect
the product from leaking batteries.
Before using the product for the first time,
remove the battery from the polythene bag
and insert it into the battery compartment
on the rear.
When inserting the battery, make sure that
the polarity is correct.
The polarity indicators are shown in the bat-
tery compartment.
Above the battery compartment there is a
13

small sliding switch with which you select the
temperature unit °C or °F.
As soon as the battery has been inserted cor-
rectly, the display is active. You are in mode 1.
The LC display shows the ambient tempera-
ture.
Operating instructions
Clean the spoon and probe with a damp cloth
and dry before using them for the first time.
Your thermo-spoon has four different func-
tions:
• It measures the temperature when stirring
a pan
• It emits an acoustic signal when the preset
temperature is reached
• You can use the timer and stopwatch
function
• Without the silicon spoon, you can use the
probe as a meat thermometer.
Temperature display
To switch on the product, press the menu
button (for approx. 1 second). You are in
mode 1. The LC display shows the ambient
temperature. As soon as the temperature
exceeds 70°C, the signal function reacts. This
setting is activated as standard in mode 2.
Signal with sound
If you want to use the signal function, press
14

the menu button again. You are now in mode
2. The LC display flashes. You can set the re-
quired temperature using the arrow buttons.
To confirm, press the Start/Stop button again.
The ambient temperature is displayed again in
the LC display. As soon as the required tem-
perature has been reached, your thermome-
ter emits an acoustic signal and the display
flashes. You can stop the signal by pressing
any button.
The standard setting for your thermo-spoon
is to emit a signal at 70°C.
You can return to this setting at any time by
pressing both arrow keys at the same time.
Signal without sound
You are in mode 2, the display is flashing.
Press the menu button again without* setting
the temperature, you are now in mode 3. The
display shows the ambient temperature and a
crossed-out loudspeaker. When the required
temperature is reached, the display flashes -
there is no acoustic signal.
(* if you have set the temperature in mode
2, you must press the menu button again to
navigate back to mode 3 via mode 1 - press
4 times).
Timer and stopwatch function
Switch on the appliance. You are in mode 1.
Press the menu button three times and 00:00
will appear on the display.
Timer function: Set the required time using
the arrow buttons (maximum of 99 minutes
and 59 seconds) and confirm with the Start/
Stop button.
The timer counts backwards and when the
preset time has expired, the alarm sounds.
You can stop the alarm by pressing any button.
Stopwatch function: Press the Start/Stop
button when it is at 00:00. The clock counts
forwards.
You can interrupt the clock at any time using
the Start/Stop button.
15

To reset the time to 00:00, press the arrow
keys at the same time.
If, for example, you want to stir egg foam,
you can use the temperature control and the
timer at the same time. The signal sounds as
soon as the preset temperature is reached.
The timer then tells you how long to stir for.
The signal and the alarm are different sounds.
Use as a meat thermometer
On the rear side of the spoon, there is a small
release button. You can release the ther-
mometer from the silicone spoon and use the
probe as a meat thermometer.
All functions remain the same.
Switching off
You can switch off the thermo-spoon at any
time by holding down the menu button for
approx. 2 seconds. If no timer function has
been activated, it switches off independently
after a short time.
Please note:
The alarm function on the timer cannot be
deactivated.
The timer and stopwatch must be reset to
00:00.
The timer continues to count, even if you
have switched to another mode.
As soon as a signal or alarm sounds, the LC
display switches to the corresponding mode.
Instructions for cleaning
Caution! Never immerse the product com-
pletely in water and do not clean in the dish-
washer.
Clean the probe after each use with a damp
cloth and, if necessary, washing-up liquid.
Clean the housing with a damp cloth and rub
dry. Make sure that no water penetrates the
housing. The removable silicone spoon is dish-
washer safe.
16

Battery instructions
Replace the battery as soon as the LC display
becomes faint. To do this, open the battery
compartment on the rear in the direction of
the arrow and insert the new battery in ac-
cordance with the polarity indicators.
Only use the batteries that are listed in the
operating instructions:
AAA (LR03).
• Never recharge the batteries! There is a
risk of explosion!
• Keep batteries out of the reach of children,
do not throw into a fire, short-circuit or
take apart. See a doctor immediately if a
battery has been swallowed.
• Do not expose batteries to extreme con-
ditions, e.g. leave on radiators or in direct
sunlight. There is an increased risk of
leakage!
• Remove empty batteries immediately.
There is an increased risk of leakage!
• Avoid battery acid coming into contact
with the skin, eyes and mucous mem-
branes. In the event of contact with bat-
tery acid, rinse the affected area with lots
of fresh water immediately and seek med-
ical attention.
• Clean battery and product contacts before
inserting the battery and when required.
• If the product is not to be used for a long
period of time, remove the battery from
the product.
Disposal information
Packaging:
The packaging material can be reused.
Please dispose of in an environmen-
tally friendly manner.
Used batteries:
Batteries must not be disposed of in
the domestic waste. Consumers are
legally obliged to dispose of batteries
17

correctly at the designated collec-
tion points in stores where batteries
are sold.
Product:
At the end of its service life, never
dispose of the appliance in the do-
mestic waste. Check with your local
authority or your local waste disposal
services for options regarding envi-
ronmentally-friendly disposal.
Guarantee
In the case of problems and complaints,
please contact the following service address
before sending in the product.
WMF Group GmbH
Eberhardstr. 35
73312 Geislingen
Tel.: +49 (0) 7331 – 256 256
Mon–Fri: 8 am – 6 pm
Sat: 10 am – 2 pm
Email: servic[email protected]m
FR
18

FR
Hello FUNctionals
Cuillère thermomètre
Toutes nos félicitations, votre cuillère thermo-
mètre de WMF, de la série Hello FUNctionals
est un produit de qualité WMF pour les mé-
nages modernes.
Veuillez lire avec attention les consignes d’uti-
lisation et d’entretien avant la première utili-
sation. Respectez en particulier les consignes
de sécurité.
Ne confiez en aucun cas la cuillère thermo-
mètre à une personne qui n‘a pas au préalable
pris connaissance du mode d‘emploi.
Veuillez conserver précieusement ce mode
d’emploi à des fins de consultation. Si vous
transmettez la cuillère thermomètre à un autre
utilisateur, veillez à lui fournir également les
consignes d‘utilisation.
Caractéristiques techniques
• Durée de mesure et de réaction : 4-10 se-
condes
• Plage de mesure : -45 °C à +200 °C (-49 °F
à +392 °F)
• Précision de mesure : -20-100 °C ± 1 °C,
autrement ± 2 °C
• Résolution : 0,1 °C / 0,1 °F
• Affichage au choix °C/°F
• Écran LCD numérique
• Sonde de mesure en acier inoxydable 18/10
• Capteur ø 3,8 x 157 mm
• Pile 1 x 1,5 V AAA (LR03) comprise dans la
livraison
Consignes de sécurité
• Tenez l‘appareil et le film d‘emballage hors
de portée des bébés et petits enfants, il
existe un risque d‘étouffement en raison
des petites pièces pouvant être avalées et
du film d‘emballage.
• La sonde de mesure est pointue ! ATTEN-
TION, elle peut occasionner des blessures.
• N‘utilisez pas la cuillère thermomètre pour
19

mesurer la température du corps. Elle n‘est
pas autorisée en tant que dispositif médical.
La pointe de la sonde de mesure peut occa-
sionner des blessures.
• Manipulez la cuillère thermomètre avec
précaution. Évitez les chocs ou les coups et
ne la laissez pas tomber sur le sol.
• N‘utilisez jamais la cuillère thermomètre
dans le four fermé ! L‘électronique et les
piles dans la partie poignée ne sont pas
adaptées à résister à ces températures.
• N‘utilisez jamais la cuillère thermomètre
dans les appareils à micro-ondes !
• Veuillez également suivre les instructions
pour les piles.
• Cet appareil n‘est pas destiné à être utilisé
par des personnes (y compris des enfants)
ayant des capacités physiques, senso-
rielles ou mentales restreintes ou ayant un
manque d‘expérience et/ou de connais-
sance, sauf si elles sont surveillées par une
personne chargée de leur sécurité ou si elle
les a instruites pour utiliser cet appareil.
• Les enfants devraient être surveillés pour
s‘assurer qu‘ils ne jouent pas avec l‘appareil.
Mise en service
Vérifiez que le contenu de l‘emballage est com-
plet avant la mise en service.
Contenu :
1 x cuillère thermomètre WMF
1 x Pile de type AAA (LR03)
1 x mode d‘emploi
Pour protéger le produit contre toute fuite des
piles, celles-ci sont livrées hors de l‘appareil.
Retirez les piles du sachet en polyéthylène et
placez-les dans le compartiment à piles sur le
côté arrière avant d‘utiliser l‘appareil pour la
première fois.
Veillez à bien insérer les piles avec la bonne
polarité.
Les signes de polarité sont marqués dans le
20
This manual suits for next models
1
Table of contents
Languages:
Other WMF Kitchen Utensil manuals

WMF
WMF PERFECT PLUS User manual

WMF
WMF Fusiontec Assembly instructions

WMF
WMF PerfectUltra User manual

WMF
WMF Fusiontec Assembly instructions

WMF
WMF Signature FusionTec Installation guide

WMF
WMF SELECT it! Assembly instructions

WMF
WMF 07.6130.6381 Assembly instructions

WMF
WMF Wok Guide

WMF
WMF Cromargan protect 3201001931 User manual