WOLFMAC H10X User manual

H10X E-SCOOTER
USER MANUAL

PAGE 1
PRODUCT SAFETY
PLEASE READ THESE INSTRUCTIONS BEFORE OPERATING THE E-SCOOTER
As with any vehicle, you must take care when using to prevent injury or
damage. Please read the below safety instrucons carefully before operang
the e-scooter.
This product is not suitable for use by children (18+ only) and may not be
suitable for persons with a disability that would hinder their ability to operate it.
Never use this e-scooter for anything other than its intended use.
Before riding, ensure all parts (tyres, bolts, locking) are intact and secure.
Do not immerse in water or spray with water such as jet wash.
Do not modify or change any parts of the e-scooter such as the tyres /
bolts / baery.
Safety precauons should be taken before riding such has wearing a
helmet, knee pads, elbow pads and so on.
Do not exceed the max load weight of the e-scooter (120KG).
Do not ride with more than one person on the e-scooter.
Take care in poor weather condions. We strongly advise not to ride
in extreme wind or ice / snow. Take extra care in wet condions.
Do not ride if you are pregnant or have an exisng injury that would limit
your ability to control the e-scooter.
Do not ride aer consuming alcohol or taking a medicaon that can
eect your awareness and ability.
Do not use your mobile phone or listen to music while riding.
Use the mode control (1, 2, 3) to help control your speed in
dierent environments and situaons. e.g 1 or 2 for more control.
Pracce thoroughly e.g in your garden before fully using outdoors.

PAGE 2
PRODUCT SAFETY
Watch out for overhead obstacles DO NOT pass irregular surfaces too fast
DO NOT ride at 35%+ gradient to
prevent motor / controller damage
DO NOT accelerate while riding downhill
DO NOT use the front brake while riding
DO NOT go up / down steps or cross
obstacles
DO NOT stand on the standing deck aer
the scooter has stopped / is staonary

PAGE 3
PRODUCT SAFETY
DO NOT ride in the rain Avoid obstacles while riding
DO NOT ride with single hand or foot DO NOT ride on a motorway
DO NOT ride with 2 people. This can
damage the motor / controller
DO NOT ride in water deeper than 2cm.
This can damage the motor / controller

Page 2
COMPONENT DIAGRAM
BEFORE RIDING, FAMILIARISE YOURSELF WITH THE COMPONENTS OF THE
E-SCOOTER SHOWN BELOW.
Safety Note: Ensure the ‘folding lock’ shown below is pulled up and secured
before riding. Not doing so can damage the mechanism and cause injury.
PAGE 4

PAGE 5
SETUP
FOLLOW THE BELOW STEPS TO FIRST SETUP THE E-SCOOTER
Step 1: Pull the folding latch to release the folding lock.
Step 2: Li the handle bar spine upwards unl it clicks to secure.
Step 3: Pull the red folding lock upwards unl it is secure.
Step 4: Using the tools provided, posion and ghten the controls.
Step 5: Secure the LED light by screwing to the frame with the bolt.
FOLLOW THE BELOW STEPS TO FOLD THE E-SCOOTER
Pull the red folding lock fully down (3)
Pull the folding latch to allow the handle bar spine to lower and fold (1)
PAGE 6
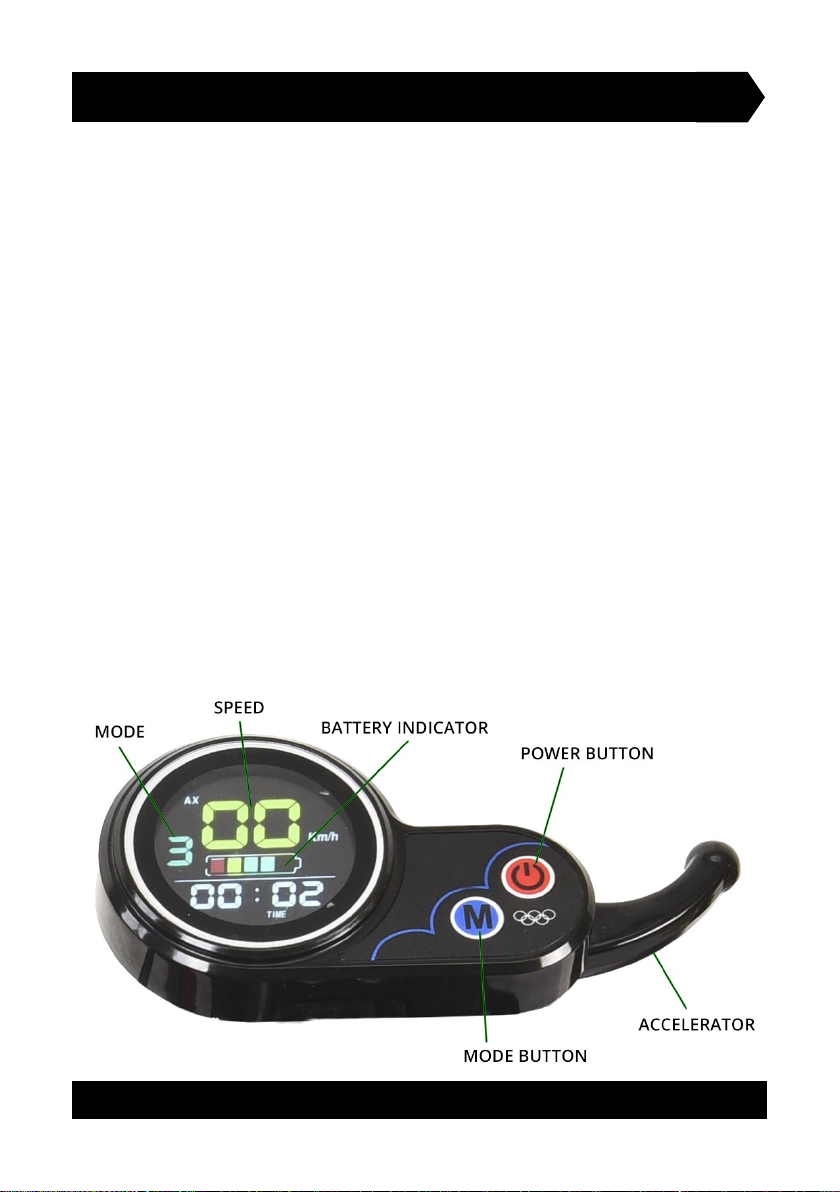
CONTROLS
SEE BELOW DIAGRAM TO UNDERSTAND THE CONTROLS AND OPERATION
POWER BUTTON: Long press the power buon to turn on the
e-scooter on. You must rst insert and turn the key to acvate.
MODE: Quick press the mode buon to change the mode (1,2,3)
Long press the model buon to toggle between display readings.
ACCELLERATOR: Apply pressure to drive the e-scooter. Increase the
pressure to increase the speed. Whilst riding at a consistent speed, if
cruise control is acvated, you can release the accelerator and
automacally maintain the speed. To regain manual control of the speed
(cancel cruise control), fully pull back once on the accelerator and
release. You can now manually control the speed.
BATTERY INDICATOR: The baery indicator will give an approximate
representaon of the current charge held in the baery.
SPEED: As you ride, your current speed will be displayed here.
MODE: The selected mode is displayed. 1 = slow, 2 = medium, 3 = fast.

PAGE 7
CHARGING & BATTERY GUIDANCE
FOLLOW THE BELOW INSTRUCTIONS TO CHARGE AND MAINTAIN BATTERY
Your e-scooter is equipped with a unique lithium baery with a custom built
charging unit specic for this baery. Do not use any other charging unit.
Do not charge the e-scooter in the outdoors (exposed to water).
Do not turn on or operate whilst charging.
Fully charge at least once per month to prevent the baery dying.
Do not charge if the surrounding temperature is below 0c.
Do not open the baery box or aempt to remove the baery.
HOW TO CHARGE THE E-SCOOTER USING THE CHARGING UNIT
STEP 1: First, connect the wire from the charging unit into the charging
port located on the side of the standing deck (remove the cap)
STEP 2: Plug into the wall socket and turn on
IMPORTANT NOTE: MUST BE IN THIS ORDER TO PREVENT DAMAGE TO THE
CHARGING PORT OR BATTERY.
USEFUL INFORMATION
The light on the charging unit will display red whilst charging the e-scooter.
Once fully charged, the light will change to green.
The total me to fully charge the e-scooter is approximately 5-8 hours. We
suggest leaving to fully charge over night.
We recommend leaving the charger plugged in for an addional 2 hours once
it has turned green, if possible, to maximise the charge.
The charging unit is 100-240v.

ADVANCED SETTINGS MENU
THE SETTINGS OF THE E-SCOOTER CAN BE ACCESSED AND CHANGED USING
THE DISPLAY CONTROL. WE ADVISE AGAINST CHANGING THE SETTINGS.
ACCESSING THE SETTINGS : Press and hold the
POWER and MODE buons together unl the
screen changes. You are now in the sengs.
TOGGLE THROUGH SETTINGS: Sengs range from P01 to P20. Toggle
through them by short pressing the POWER buon.
CHANGE A SETTING: Once you are on the desired seng e.g P05,
short press the MODE buon to change the value.
SAVE SETTINGS AND EXIT MENU: Press and hold the POWER and
MODE buons together unl the screen reverts back to original.
SETTINGS
P01 Display Backlight Brightness: 1 = darkest, 3 = brightest
P02 Mileage Unit: 0 = km, 1 = miles
P03 Voltage Class: 24V, 36V, 48V, 52V, 60V - default 52V (do not change)
P04 Display Control Sleep Time: 0 = always on, 1-60 minutes before sleep
P05 Not Used
P06 Wheel Diameter: Measured in inches. default 10 (do not change)
P07 Speed Measuring Magnets: range 0-255. default 28 (do not change)
P08 Speed Limiter: 0-100km/h. default 100
P09 Zero Start: 0 = Disabled, 1 = Enabled (scooter must be moving for accelerator to work)
P10 Not Used
P11 EABS (Electronic Anlock Break System) 1 = weakest, 5 = strongest
P12 Power Assisted Starng Intensity: 1 = progressive, 5 = instant
P13 Not Used
P14 Not Used
P15 Controller Undervoltage Value: (do not change)
P16 Total Mileage Reset: Long press MODE to reset mileage back to 0
P17 Cruise Control: 0 = Disabled, 1 = Enabled. default 0
P18 Not Used
P19 Not Used
P20 Not Used
PAGE 8
PAGE 9
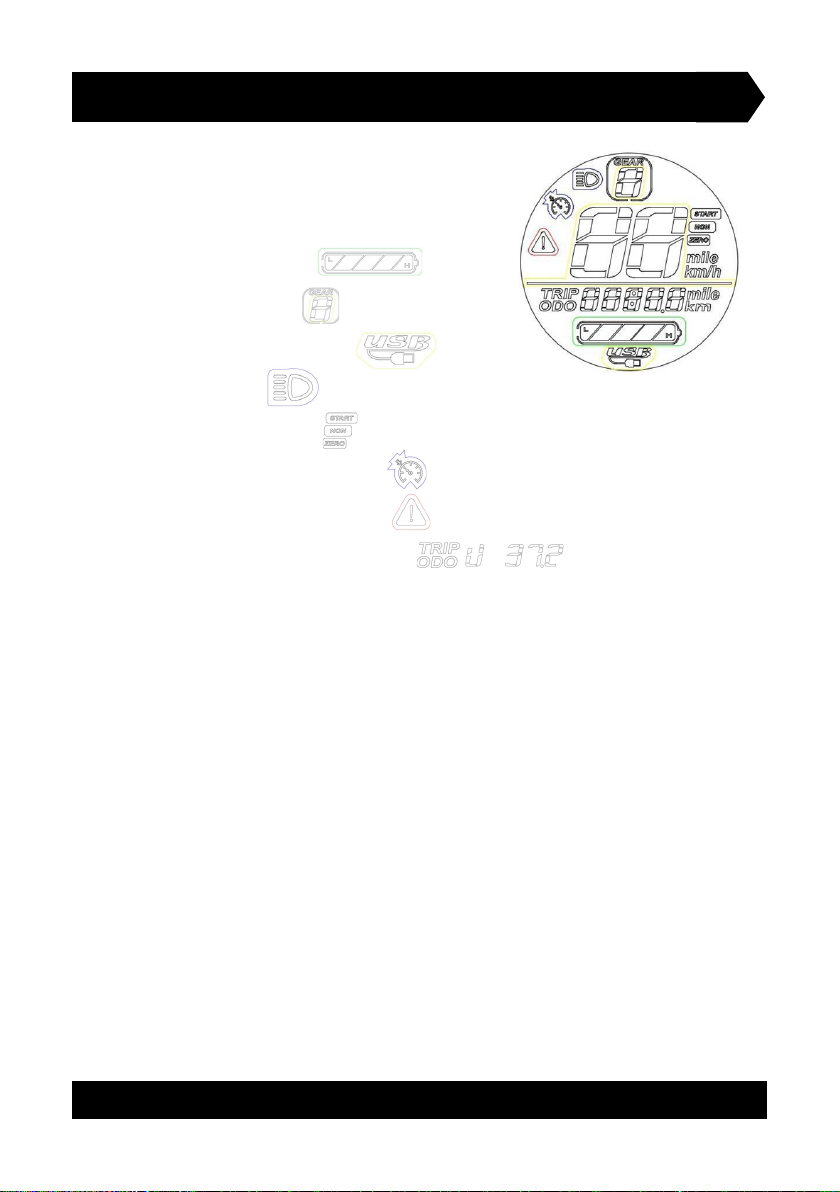
DISPLAY ICONS & ERROR CODES
THE DISPLAY CONTROL HAS VARIOUS ICONS AND
ERROR CODES WHICH CAN SHOW WHILE USING.
SEE ILLUSTRATIONS AND CODES BELOW.
BATTERY CHARGE:
CURRENT GEAR:
USB DEVICE DETECTED:
LIGHTS ON:
START NON ZERO:
CRUISE CONTROL ACTIVE:
COMMUNICATION FAULT:
MULTIFUNCTIONAL DISPLAY:
ERROR CODES
0: Normal state
1: Reservaons
2: Brake
3: Power sensor failure (riding mark)
4: 6KM/H cruises
5: Real-me cruise
6: Baery under voltage
7: Motor malfuncon
8: Handle fault
9: Controller fault
10: Communicaon recepon failures
11: Communicaon failure
12: BMS communicaon failure
13: Headlight failure
Table of contents


