manuals.online logo
Brands
  1. Home
  2. •
  3. Brands
  4. •
  5. Woodendot
  6. •
  7. Indoor Furnishing
  8. •
  9. Woodendot Alba Headboard User manual

Woodendot Alba Headboard User manual

Alba Headboard
ASSEMBLY INSTRUCTIONS
140cm / 55in 150cm / 59in 160cm / in 180cm / 71in
4DIFFERENT POSSIBILITIES
13x
14x
(G)
(B) (C)
(A)
2x
1x 1x
1x 1x
1x3x
2x (D) 8x
11x
(F)
We recommend
two people for
the installation
You will need a
manual drill for
the wall holes
The drill bit required is Ø 6mm or 15/64”
Depth of the hole in wall: 50 mm/1.96”
For the hole to be the exact depth, measu-
re 50mm/1.96” on the drill bit and place
tape around it to mark the distance. Stop
drilling when it reaches that depth.
1x (E)
(H) (I)
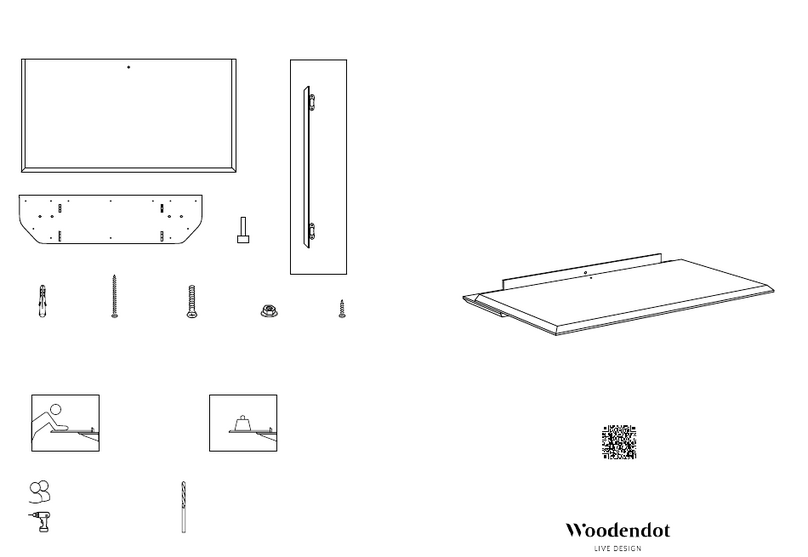
Place the back panel on the right or left side depending on the headboard you
purchased (option 1 or 2 below). Later on, the back panel will be attached to the
shelf which will have the curved corner facing forward.
For Alba Headboard S (140 cm/55 in), M (150 cm/59 in) and L (160 cm/63 in)
Attach each panel to its corresponding shelf, using x2 screws for each panel.
1
2a
(F)
OPTION 1
OPTION 2
wall
wall
(D)
Back panel right
Back panel left
For Alba Headboard XL (180 cm/71 in)
Attach each panel to its corresponding shelf, using x3 screws.
(F)
(D)
3a
(F)
(D)
For Alba Headboard S (140 cm/55 in), M (150 cm/59 in) and L (160 cm/63 in)
Now we will join the 2 shelves (that we have attached to their respective panels on
step 2a) together. Screw the back panel’s shelf to the front panel’s shelf using x4
screws.
2b
3b For Alba Headboard XL (180 cm/71 in)
Now we will join the 2 shelves (that we have attached to their respective panels on
step 2b) together. Screw the back panel’s shelf to the front panel’s shelf using x2
screws.
(F)
(D)
Screw the U-shaped bracket (I) to the front panel frame (x2 screws) on the center
area (if you place it lower you won’t be able to access the shelf storage below).
4
(C)
(I)
5The angle brackets that support the headboard will be located about 5 cm below
the mattress. From there, mark the screw holes (9 holes) of the angle brackets with
a pencil 15 cm inward from each end, and mark the midpoint to center where the
headboard will go.
6Screw the angle brackets (H) to the wall (x9 wall plugs and x9 screws).
15 cm 15 cm
5 cm
mattress
(B)
(A)
(H)
= =
(I)
7º Place the headboard on top of the angle brackets so that it is centered. Mark with
a pencil where to place the screws for the wall fitting (G) and the U-shaped bracket
(I) already attached to the front panel frame.
x5 points
8º Put the headboard on the floor to make the 5 holes marked in the previous step and
screw the fitting to the wall (x5 wall plugs and x4 screws).
Put the headboard back on top of the angle brackets and hook it to the wall
fittings, then screw the U-shaped bracket (I) to the wall hole made in the
previous step (x1 screws) with the allen wrench (D).
9º
(G)
(B)
(A)
(G)
(B)
(A)
(G)
(I)
(E)
(D)
Screw the headboard’s shelves to the angle brackets (x9 screws).
10º
(C)
Alba Headboard
ASSEMBLY INSTRUCTIONS
140cm / 55in 150cm / 59in 160cm / in 180cm / 71in
2DIFFERENT POSSIBILITIES
13x
14x / 15x*
(G)
(B) (C)
(A)
2x
1x 1x
1x 1x
1x / 2x*3x
2x (D) 8x
11x / 13x*
(F)
We recommend
two people for
the installation
You will need a
manual drill for
the wall holes
The drill bit required is Ø 6mm or 15/64”
Depth of the hole in wall: 50 mm/1.96”
For the hole to be the exact depth, measu-
re 50mm/1.96” on the drill bit and place
tape around it to mark the distance. Stop
drilling when it reaches that depth.
1x / 2x* (E)
(H) (I)
*Depending on the selected size: S / M, L, XL
Place the back panel on the right or left side depending on the headboard you
purchased (option 1 or 2 below). Later on, the back panel will be attached to the
shelf which will have the curved corner facing forward.
For Alba Headboard S (140 cm/55 in), M (150 cm/59 in) and L (160 cm/63 in)
Attach each panel to its corresponding shelf, using x2 screws for each panel.
1
2a
(F)
OPTION 1
OPTION 2
wall
wall
(D)
Back panel right
Back panel left
For Alba Headboard XL (180 cm/71 in)
Attach each panel to its corresponding shelf, using x3 screws.
(F)
(D)
3a
(F)
(D)
For Alba Headboard S (140 cm/55 in), M (150 cm/59 in) and L (160 cm/63 in)
Now we will join the 2 shelves (that we have attached to their respective panels on
step 2a) together. Screw the back panel’s shelf to the front panel’s shelf using x4
screws.
2b
3b For Alba Headboard XL (180 cm/71 in)
Now we will join the 2 shelves (that we have attached to their respective panels on
step 2b) together. Screw the back panel’s shelf to the front panel’s shelf using x2
screws.
(F)
(D)
Screw the U-shaped bracket (I) to the front panel frame (x2 screws) on the curved
area (if you place it lower you won’t be able to access the shelf storage below).
If you purchased Alba Headboard M, L or XL, you would have received two
U-shaped brackets (instead of one). Place the second one in the same way on the
upper area of the frame to reinforce the front panel.
4
(C)
(I)
5The angle brackets that support the headboard will be located about 5 cm below
the mattress. From there, mark the screw holes (9 holes) of the angle brackets with
a pencil 15 cm inward from each end, and mark the midpoint to center where the
headboard will go.
6Screw the angle brackets (H) to the wall (x9 wall plugs and x9 screws).
15 cm 15 cm
5 cm
mattress
(B)
(A)
(H)
= =
7º Place the headboard on top of the angle brackets so that it is centered. Mark with
a pencil where to place the screws for the wall fittings (G) and the U-shaped
bracket (I) already attached to the front panel frame.
You would have received one or two U-shaped brackets depending on the size
you purchased (x1 for Alba Headboard S or x2 for Alba Headboard M, L and XL).
x5 / x6 points
(I)
(G)
8º Put the headboard on the floor to make the holes marked in the previous step and
screw the fitting to the wall (x5 / x6 wall plugs and x4 screws).
(B)
(A)
(G)
(B)
(A)
(G)
Put the headboard back on top of the angle brackets and hook it to the wall
fittings, then screw the U-shaped bracket (I) to the wall hole made in the
previous step (x1 or x2 screws) with the allen wrench (D).
9º
(E)
(I)
(D)
Screw the headboard’s shelves to the angle brackets (x9 screws).
10º
(C)
Alba Headboard
ASSEMBLY INSTRUCTIONS
140cm / 55in 150cm / 59in 160cm / in 180cm / 71in
2DIFFERENT POSSIBILITIES
11x
12x
(G)
(B) (C)
(A)
1x
1x 1x
1x 1x
1x3x
2x (D) 8x
11x
(F)
We recommend
two people for
the installation
You will need a
manual drill for
the wall holes
The drill bit required is Ø 6mm or 15/64”
Depth of the hole in wall: 50 mm/1.96”
For the hole to be the exact depth, measu-
re 50mm/1.96” on the drill bit and place
tape around it to mark the distance. Stop
drilling when it reaches that depth.
1x (E)
(H) (I)
Place the back panel on the right or left side depending on the headboard you
purchased (option 1 or 2 below). Later on, the back panel will be attached to the
shelf which will have the curved corner facing forward.
1º
OPTION 1
OPTION 2
wall
wall
Back panel right
Back panel left
(F)
(D)
Place the back panel on the right or left side depending on the headboard you
purchased (option 1 or 2 below). Later on, the back panel will be attached to the
shelf which will have the curved corner facing forward.
1º
(F)
OPTION 1
OPTION 2
wall
wall
(D)
Back panel right
Back panel left
(F)
(D)
(F)
(D)
For Alba Headboard S (140 cm/55 in), M (150 cm/59 in) and L (160 cm/63 in)
Attach each panel to its corresponding shelf, using x2 screws for each panel.
2a
For Alba Headboard XL (180 cm/71 in)
Attach each panel to its corresponding shelf, using x3 screws.
2b
3a For Alba Headboard S (140 cm/55 in), M (150 cm/59 in) and L (160 cm/63 in)
Now we will join the 2 shelves (that we have attached to their respective panels on
step 2a) together. Screw the back panel’s shelf to the front panel’s shelf using x4
screws.
3b For Alba Headboard XL (180 cm/71 in)
Now we will join the 2 shelves (that we have attached to their respective panels on
step 2b) together. Screw the back panel’s shelf to the front panel’s shelf using x2
screws.
(F)
(D)
Screw the U-shaped bracket (I) to the front panel frame (x2 screws) on the center
area (if you place it lower you won’t be able to access the shelf storage below).
4
(C)
(I)
5The angle brackets that support the headboard will be located about 5 cm below
the mattress. From there, mark the screw holes (9 holes) of the angle brackets with
a pencil 15 cm inward from each end, and mark the midpoint to center where the
headboard will go.
6Screw the angle brackets (H) to the wall (x9 wall plugs and x9 screws).
15 cm 15 cm
5 cm
mattress
(B)
(A)
(H)
7º Place the headboard on top of the angle brackets so that it is centered. Mark with
a pencil where to place the screws for the wall fitting (G) and the U-shaped bracket
(I) already attached to the front panel frame.
x3 points
(I)
8º Put the headboard on the floor to make the 3 holes marked in the previous step and
screw the fitting to the wall (x3 wall plugs and x2 screws).
(B)
(A)
(G)
Put the headboard back on top of the angle brackets and hook it to the wall
fittings, then screw the U-shaped bracket (I) to the wall hole made in the
previous step (x1 screws) with the allen wrench (D).
9º
(E)
(I)
(D)
(G)
Screw the headboard’s shelves to the angle brackets (x9 screws).
10º
(C)
ANNEX: LIGHTING INSTALLATION
As you may have noticed, there is a LED strip attached to the frame of each panel,
one on the front panel and another on the back one. The ends of the strips should
pass under the shelves through the holes provided for this purpose.
On the back panel you´ll find the switch attached to the hanging cable (the illustra-
tion shows the back panel on the left). In order to proceed, make sure the cable
goes through the space indicated below.
1º
1x (J)
Now we will link the LED strips of the back and front panels together using piece J.
On piece J, flip open the top part of one of its connector boxes. Take the end of the
front panel’s LED strip (1) and place it inside de connector box we oppened in the
previous step.
Make sure the copper tip of the connector touches the two contacts of the light bar
and that the + sign of the LED strip corresponds with the side where the red cable is
on the box.
Finally, close the top of the connector box. Repeat these steps for the back panel’s
LED strip (2).
2º
3º Lastly, connect the end of the cable to the wall socket. This lighting system includes
a EU or Type C plug, an adapter is not included so please find one if needed. Use the
switch to turn the light on/off.
(J)
(1) (2)
red cable
black cable
connector box
Important: This annex only applies if you have purchased the Alba headboard with light.
(K)1x

Other Woodendot Indoor Furnishing manuals
Woodendot Alada User manual

Woodendot

Woodendot Alada User manual

Woodendot Cielo Shelf User manual

Woodendot

Woodendot Cielo Shelf User manual

Woodendot Alba L User manual

Woodendot

Woodendot Alba L User manual

Woodendot Alba Floating nightstand User manual

Woodendot

Woodendot Alba Floating nightstand User manual

Woodendot Duna User manual

Woodendot

Woodendot Duna User manual

Woodendot Alba M User manual

Woodendot

Woodendot Alba M User manual

Woodendot Alada User manual

Woodendot

Woodendot Alada User manual

Woodendot Cielo User manual

Woodendot

Woodendot Cielo User manual

Woodendot Alba Floating nightstand User manual
Woodendot

Woodendot Alba Floating nightstand User manual

Woodendot Alba Floating nightstand User manual

Woodendot

Woodendot Alba Floating nightstand User manual
Popular Indoor Furnishing manuals by other brands

Monarch Specialties I 7056 Assembly instructions

Monarch Specialties

Monarch Specialties I 7056 Assembly instructions

DANDELION Dowel DBRDPBTL user guide

DANDELION

DANDELION Dowel DBRDPBTL user guide

MAGIS Stefan Diez COSTUME instructions

MAGIS

MAGIS Stefan Diez COSTUME instructions

Furniture of America CM6778-CH Assembly instructions

Furniture of America

Furniture of America CM6778-CH Assembly instructions

Ironwood DMS manual

Ironwood

Ironwood DMS manual

BLACK RED WHITE POP System kpb/12/7 Fitting-Up Instruction

BLACK RED WHITE

BLACK RED WHITE POP System kpb/12/7 Fitting-Up Instruction

Habitat Austin Dining Table Extension AUST-ET-SS20-A Assembly instructions

Habitat

Habitat Austin Dining Table Extension AUST-ET-SS20-A Assembly instructions

U-Line H-3616 Assembly instructions

U-Line

U-Line H-3616 Assembly instructions

Robern PL PORTRAY Series Mounting instructions

Robern

Robern PL PORTRAY Series Mounting instructions

Dorel Asia DA94490-LS Instruction booklet

Dorel Asia

Dorel Asia DA94490-LS Instruction booklet

Stryker Contemporary 4400-803-000 quick start guide

Stryker

Stryker Contemporary 4400-803-000 quick start guide

Habitat HANA BED 1400 Assembly instructions

Habitat

Habitat HANA BED 1400 Assembly instructions

Hooker Furniture 1595-90151-LTBK Assembly instruction

Hooker Furniture

Hooker Furniture 1595-90151-LTBK Assembly instruction

VECELO KHD-XJM-FH01 Assembly instructions

VECELO

VECELO KHD-XJM-FH01 Assembly instructions

Crate&Barrel Apex manual

Crate&Barrel

Crate&Barrel Apex manual

Walker Edison W58BDHB Assembly instructions

Walker Edison

Walker Edison W58BDHB Assembly instructions

Rauch MD143 Assembly instructions

Rauch

Rauch MD143 Assembly instructions

Pier 1 Imports HO2744 Assembly

Pier 1 Imports

Pier 1 Imports HO2744 Assembly

manuals.online logo
manuals.online logoBrands
  • About & Mission
  • Contact us
  • Privacy Policy
  • Terms and Conditions

Copyright 2025 Manuals.Online. All Rights Reserved.