Worlde TUNA MINI User manual

HANGZHOU WORLDE DIGITAL PIANO CO.,LTD HANGZHOU WORLDE MUSIC ELECTRONIC CO., LTD
- 1 -
Worlde TUNA MINI MIDI Controller
User’s Manual

HANGZHOU WORLDE DIGITAL PIANO CO.,LTD HANGZHOU WORLDE MUSIC ELECTRONIC CO., LTD
- 2 -
Contents
1. INTRODUCTION ............................................................................................................................................................. 3
2. FEATURES ...................................................................................................................................................................... 3
3. PARTS AND THEIR FUNCTIONS ..................................................................................................................................... 5
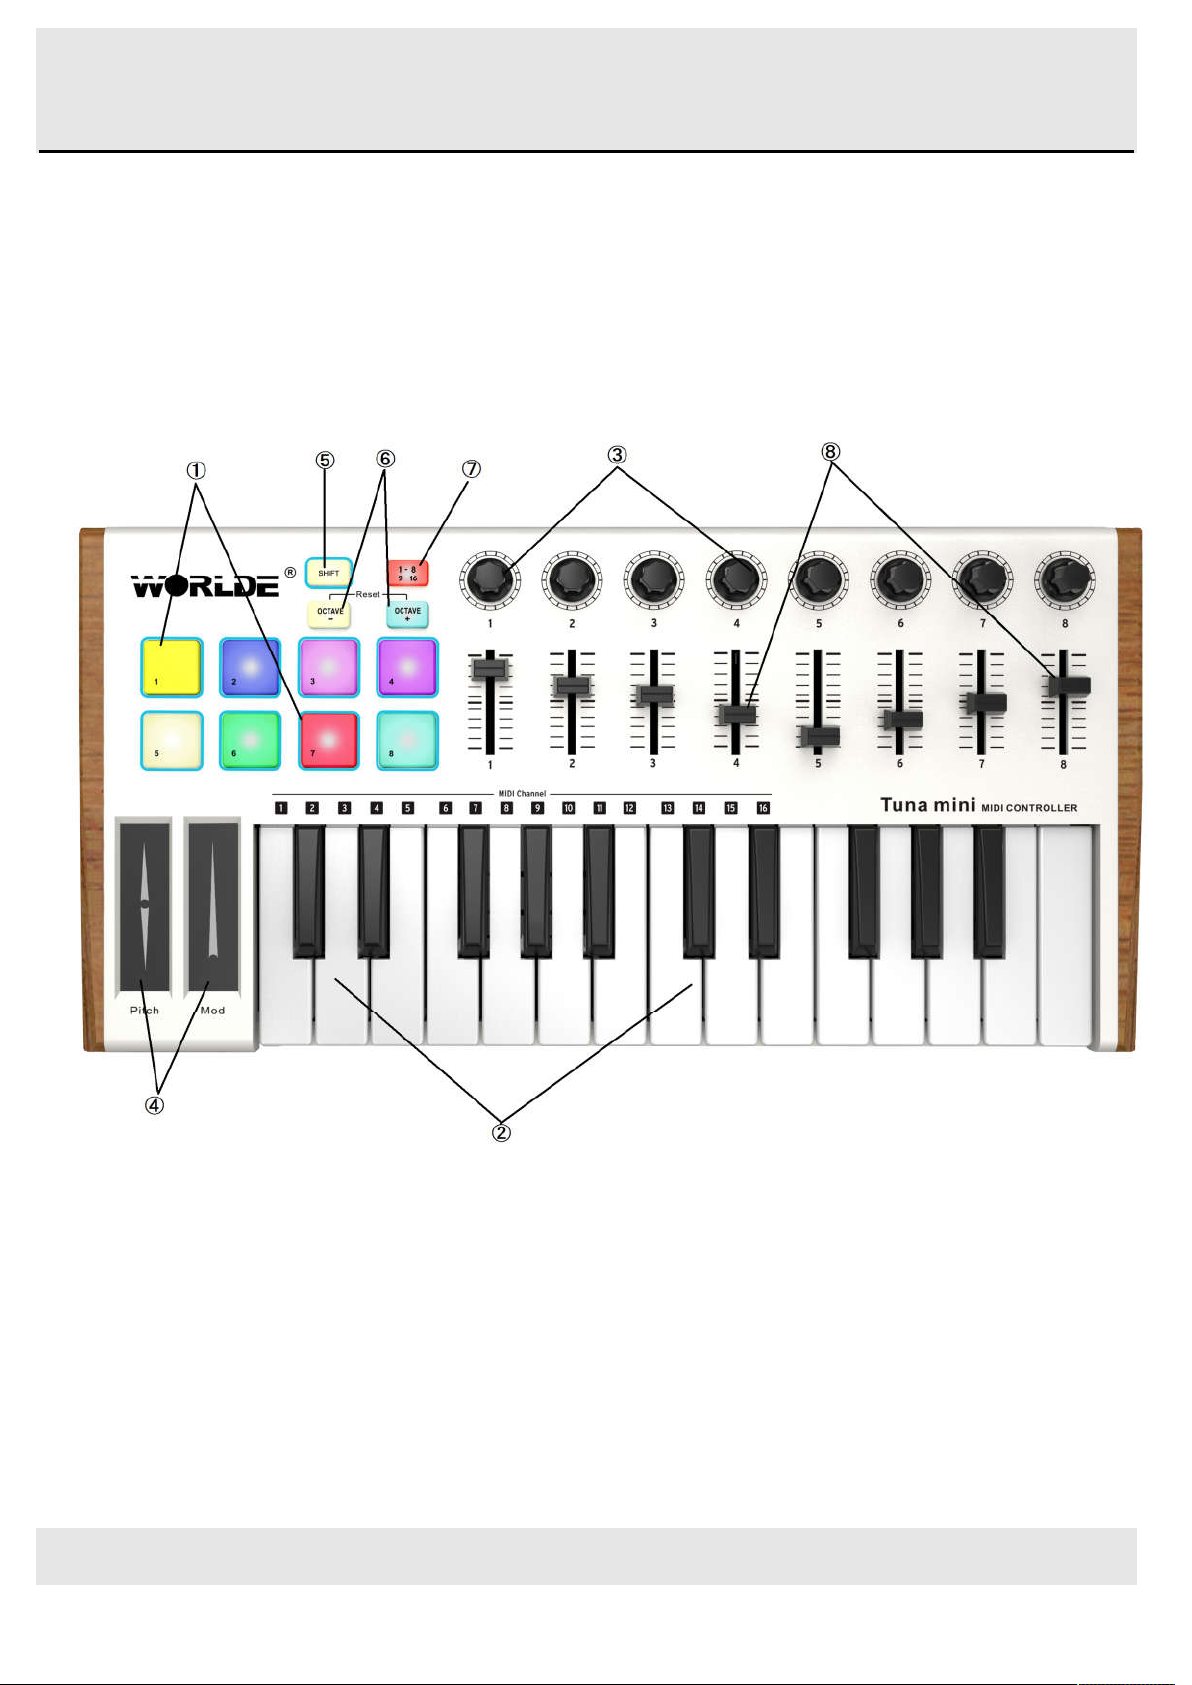
3.1 TUNAMINI Keyboard Overview ............................................................................................................................................... 5
3.1.1 Top Panel Overview ................................................................................................................................................................................... 5
3.1.2 Keyboard ..................................................................................................................................................................................................... 6
3.1.3 Pitch and Modulation touch strips ............................................................................................................................................................ 7
3.1.4 Shift and Pad Bank buttons ...................................................................................................................................................................... 7
3.1.5 Octave buttons............................................................................................................................................................................................ 7
3.1.6 Parameter control encoders ..................................................................................................................................................................... 8
3.1.7 The pads/preset buttons ............................................................................................................................................................................ 8
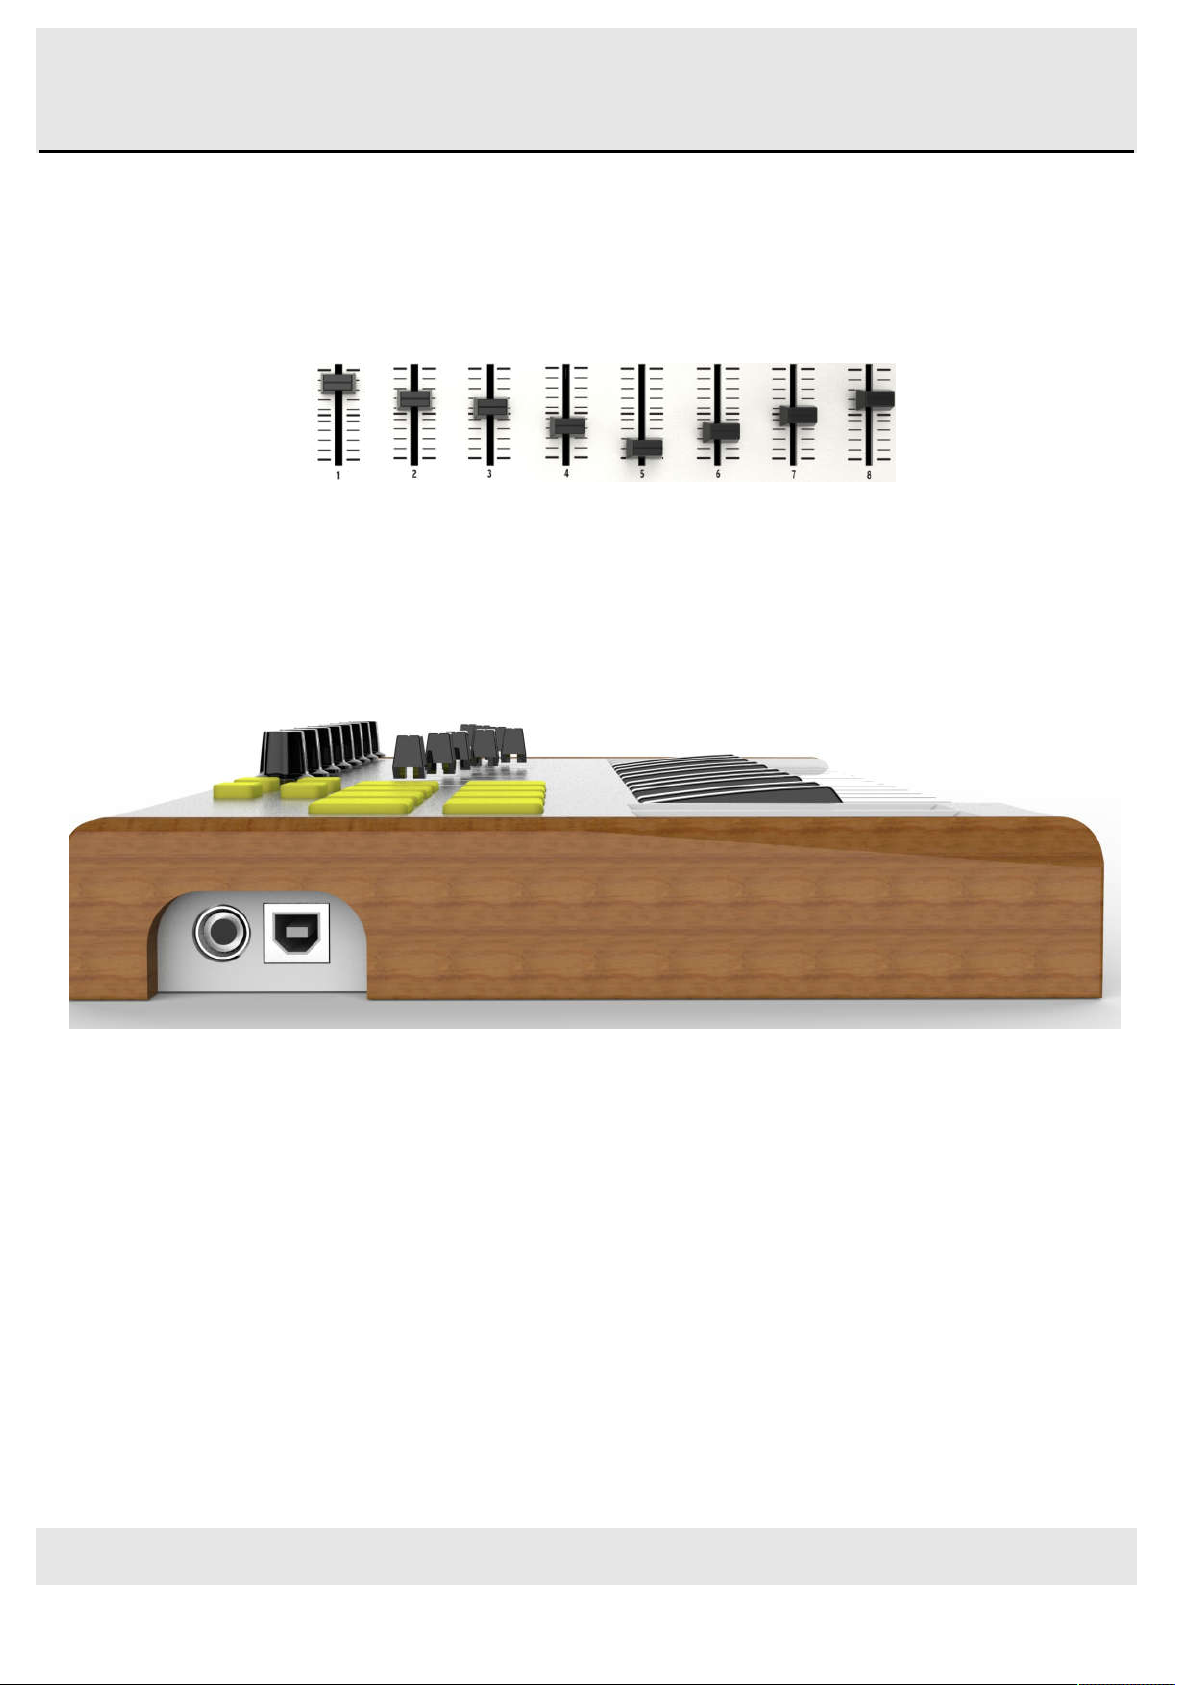
3.1.8 Parameter control sliders .......................................................................................................................................................................... 8
3.2 Side panel overview ................................................................................................................................................................. 9
4.SETUP ............................................................................................................................................................................... 10
4.1 Minimum System Requirements ........................................................................................................................................... 10
5.USING TUNAMINI WITH SOFTWARE .............................................................................................................................. 10
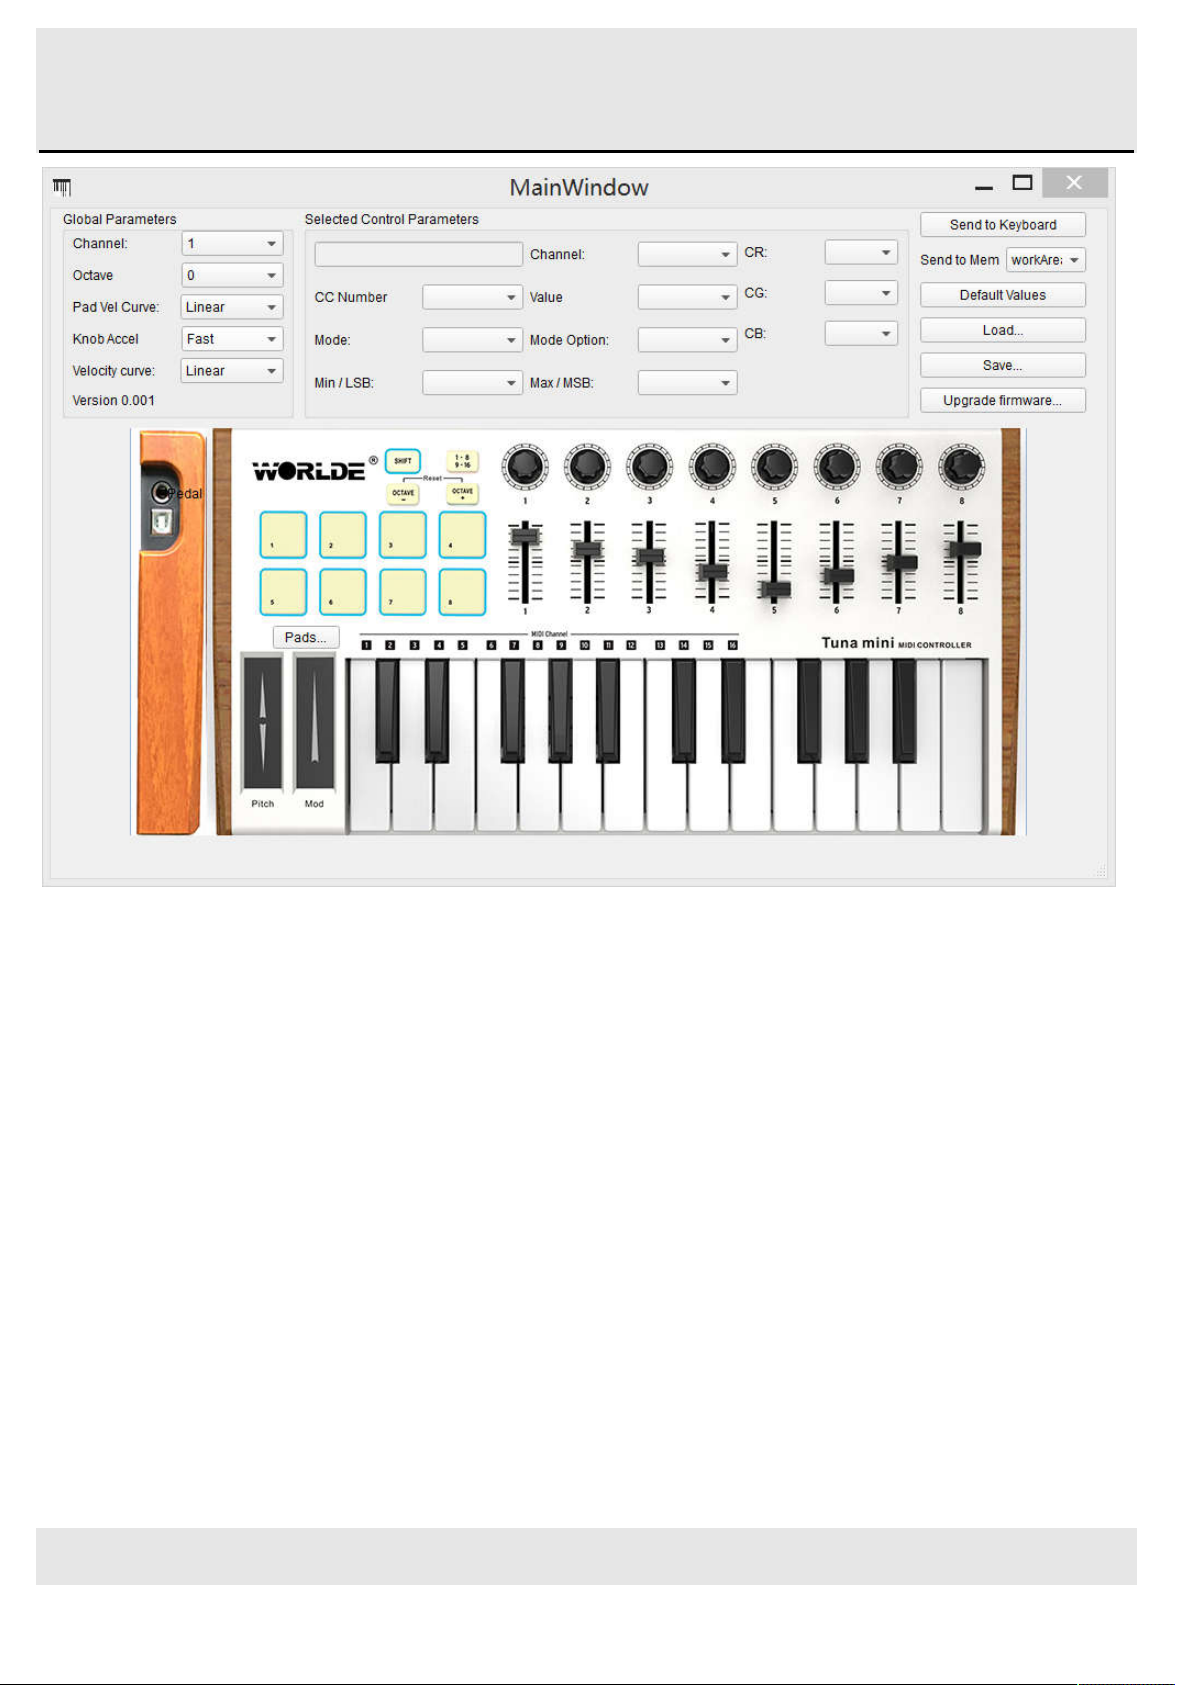
5.1 Creating MIDI Presets with the TUNAMINI Software Editor ................................................................................................ 10
5.1.1 Overview: What is a TUNAMINI Preset? .............................................................................................................................................. 10
5.1.2 Assign a Pad to Start/Stop MMC ............................................................................................................................................................ 11
5.1.3 Assign a couple of Pads to MIDI notes ................................................................................................................................................. 12
5.1.4 Assign a Pad to toggle a MIDI CC # between two values .................................................................................................................. 12
5.1.5 Assign an Encoder to control a MIDI CC # between two values ....................................................................................................... 13
5.1.6 Assign a Slider to control a MIDI CC # between two values .............................................................................................................. 15
5.1.7 Assign the Mod strip to Aftertouch ......................................................................................................................................................... 15
5.1.8 Save the changes to a Preset ................................................................................................................................................................ 17
5.1.9 Recalling a Preset / Switching between Presets ................................................................................................................................. 17
5.2 Changing the Global MIDI Channel ....................................................................................................................................... 18
5.3 Select the Backlit RGB Color of 8 Pads ............................................................................................................................... 19
6. ADVANCED SETUP INFORMATION ............................................................................................................................... 20
6.1 Pad calibration........................................................................................................................................................................ 20
Please be cautious with low values as they could have some negative side effects. ........................................................... 21
6.2 Upgrade firmware ................................................................................................................................................................... 21
7. APPENDIX ........................................................................................................................................................................ 22
7.1 ASSIGNABLE CONTROLLER PARAMETER LIST ................................................................................................................ 22
8. SPECIFICATIONS ............................................................................................................................................................ 25

HANGZHOU WORLDE DIGITAL PIANO CO.,LTD HANGZHOU WORLDE MUSIC ELECTRONIC CO., LTD
- 3 -
1. Introduction
Thank you for purchasing the Worlde TUNAMINI USB MIDI controller. To help you get the most out of your new
instrument, please read this manual carefully.
In order to use the functions of this product, you’ll need to make settings in the application you’re using. Make
settings as described in the owner’s manual for your application.
2. Features
Two banks of 8 high quality velocity & pressure sensitive performance pads with RGB backlit for 16 total,
can be assigned easily as pads, MIDI CC buttons or Program change switches.
25 velocity sensitive mini-keys, with 3 velocity curve and one constant velocity.
8 assignable encoders.
8 assignable control sliders.
2 touch sensors of dynamic pitch bend and modulation wheel pitch and modulation touch strips.
Standard sustain pedal jack
USB interface, adaptable to USB 2.0(FULL SPEED). Power supplied by USB.
Compatible with Win10/8/7/XP/Vista and Mac OSX. Drive free and hot-plug supported.
Edited by the TUNAMINI Software Editor, the picture below is the main screen. It can be downloaded from
www.worlde.com.cn for this software editor.

HANGZHOU WORLDE DIGITAL PIANO CO.,LTD HANGZHOU WORLDE MUSIC ELECTRONIC CO., LTD
- 4 -

HANGZHOU WORLDE DIGITAL PIANO CO.,LTD HANGZHOU WORLDE MUSIC ELECTRONIC CO., LTD
- 5 -
3. Parts and Their Functions
3.1 TUNAMINI Keyboard Overview
3.1.1 Top Panel Overview

HANGZHOU WORLDE DIGITAL PIANO CO.,LTD HANGZHOU WORLDE MUSIC ELECTRONIC CO., LTD
- 6 -
1. Trigger pads
Pads can transmit note messages or control change messages. Use the TUNAMINI Software Editor to select the
backlit RGB color of 8 pads. We’ll show you how to select the backlit RGB color of 8 pads in section 5.3.
2. Keyboard
There are twenty-five velocity-sensitive keys that can transmit note messages.
3. Encoder
These encoders transmit control change messages.
4. Pitch/Mod Touch strips
Pitch bend and modulation are activated by pressing the touch strips.
5. Shift button
Hold Shift and press a Pad to select a Snapshot.
Hold Shift and press a key to select the MIDI Channel.
6. Octave Down/Up buttons
Shift the keyboard range +/- 4 octaves. Press both buttons at once to reset the range to center.
7. Pad 1-8/9-16 button
Use to access Pad banks 1-8 or 9-16
8. Slider
These sliders transmit control change messages.
9. Sustain Pedal Jack
10. Full Sized USB connector
Connect the TUNAMINI to your computer with a USB cable via this port.
3.1.2 Keyboard
TUNAMINI has a 25-key velocity-sensitive mini-keyboard with a control surface designed for perfect integration with
software interface.

HANGZHOU WORLDE DIGITAL PIANO CO.,LTD HANGZHOU WORLDE MUSIC ELECTRONIC CO., LTD
- 7 -
3.1.3 Pitch and Modulation touch strips
If you touch the Pitch bend strip at its center and move your finger forward or backward it will alter the pitch of the played
sound. The range of the pitch bend is determined by the preset that has been selected.
Similarly, moving your finger along the Modulation strip alters the modulation amount of the played sound. The level of
modulation introduced by activating the modulation strip depends on which preset is selected.
Note:The modulation strip may not be assigned to modulate a parameter in some presets.
Pitch and Modulation strips
3.1.4 Shift and Pad Bank buttons
Let’s start on the right: The Pads 1-8/9-16 button toggles the TUNAMINI pads between two different sets of eight pad
assignments. 1-8 is the first set and 9-16 is the second set. Press the Pads1-8/9-16 button the led backlit will be lighting
which means the 9-16 pads set is working. The default setting for Pad 9-16 is Control Change No., so it won’t make any
sound when pressed.
The Shift button serves two purposes: recalling one of eight presets from memory (Shift+ pad. For example, press ‘Shift’
and PAD1 at the same time will recall the bank1. Recalling Bank1 is necessary if you want to map the encoders and sliders
to your DAW as the default mode for these two is relative, but it’s absolute mode in Bank1 which is compatible for that in
your DAW.), selecting the master MIDI channel (Shift + keyboard. For example, press ‘Shift’ and the Key corresponding to
Numeric 2 will select MIDI Channel 2 as master MIDI Channel. ).
The Shift and Pad Bank buttons
3.1.5 Octave buttons
Pushing one of the down or up buttons will transpose the keyboard by as much as four octaves up or down. Press the

HANGZHOU WORLDE DIGITAL PIANO CO.,LTD HANGZHOU WORLDE MUSIC ELECTRONIC CO., LTD
- 8 -
Octave button one time will change 1 Octave of the keyboard. The farther from center the keyboard has been transposed,
the faster the buttons will flash.
To reset the keyboard octave range back to center, press both buttons at the same time. Factory default range is C3-C5.
Octave buttons
3.1.6 Parameter control encoders
The 8 encoders can be assigned to control any editable parameter on the selected device. Use the WORLDE software
editor to edit the parameters. If your DAW can recognize the standard 128 midi controller, you only need to assign the
knobs to the controller No. as required. For example, No.7 is the volume controller in MIDI standard, so if you want to use
Knob1 as volume control, you should assign CC No.7 to Knob1 with WORLDE software editor, then the Knob1 will control
the volume of your DAW. Standard MIDI CONTROLLER PARAMETER LIST can be found in the Appendix.
The Parameter control encoders
3.1.7 The pads/preset buttons
The eight large buttons of the TUNAMINI serve a dual purpose. Their exact duties are determined by the state of the Shift
and Pads buttons.
For example: The pads can be assigned to trigger up to sixteen particular MIDI notes (drums, stabs, bass notes, whatever).
When the Pads 1-8/9-16 button is not lit, the first bank of pads is active (1-8) which will send notes message at this
moment. The 8 pads are just 8 keys now. Use the WORLDE TUNAMINI software editor to edit the key value for each pad.
The default is sending the note message on Channel10. When the Pads 1-8/9-16 button is lighting, the second bank of
pads is active (9-16) whose default is to send CC No. so the pads won’t produce any sound when pressed in this mode.
However, when used in conjunction with the Shift button, the pads will recall one of eight MIDI presets. This is
accomplished by holding the Shift button and pressing one of the pads. For example, if you hold the shift button and press
Pad1 the bank1 will be recalled.
The pads/ preset buttons
3.1.8 Parameter control sliders
The 8 sliders can be assigned to control any editable parameter on the selected device. Use the WORLDE TUNAMINI
software editor to edit the parameters. If your DAW can recognize the standard 128 midi controller, you only need to assign

HANGZHOU WORLDE DIGITAL PIANO CO.,LTD HANGZHOU WORLDE MUSIC ELECTRONIC CO., LTD
- 9 -
the sliders to the controller No. as required. For example, No.11 is the expression controller in MIDI standard, so if you
want to use Slider 1 as expression control, you should assign CC No.11 to Slider1 with WORLDE TUNAMINI software
editor, then the Slider1 will control the expression of your DAW. Standard MIDI CONTROLLER PARAMETER LIST can be
found in the Appendix.
The Parameter control sliders
3.2 Side panel overview
The side panel of the TUNAMMINI contains two important connectors: the footswitch jack and a USB Type B jack.
Side panel
The footswitch jack functions as an on/off switch and can be configured for either momentary applications (such as sustain
pedal) or latching behavior (first press/release sends one event, second press/release sends the next event). The default
is sustain control(No.64). Use the WORLDE TUNAMINI software editor to assign the pedal to other functions. It can be
assigned to 128 different control No.
Note: the default setting for footswitch jack is open meaning that pressing the pedal will function as sustain. If it’s without
sustain function when pressed, it means that the pedal polarity is opposite, so it needs to adjust the polarity by moving the
pedal polarity switch to the other end.

HANGZHOU WORLDE DIGITAL PIANO CO.,LTD HANGZHOU WORLDE MUSIC ELECTRONIC CO., LTD
- 10 -
4.Setup
4.1 Minimum System Requirements
Windows Mac OS
Pentium 3 800 MHz or higher Macintosh G3*800/G4*733 MHz or higher
(CPU requirement may be higher for laptops) (CPU requirement may be higher for laptops)
256MB RAM OS X 10.3.9 with 256 MB RAM,
Direct X 9.0b or higher OS X 10.4.2 or greater with 512 MB RAM
Windows XP(SP2)or higher *G3/G4 accelerator cards are not supported
(Windows 98,Me,NT or 2000 not supported)
5.Using TUNAMINI with Software
5.1 Creating MIDI Presets with the TUNAMINI Software Editor
5.1.1 Overview: What is a TUNAMINI Preset?
Thanks to the TUNAMINI Software Editor it’s possible to configure the TUNAMINI to work with practically any device or
software capable of responding to MIDI information.
To summarize, here are some examples of what you can do with a TUNAMINI preset:
● Assign pads to send MIDI Machine Control commands (MMC)
● Use the pads or the pedal to transmit MIDI notes
●Switch between two values of any MIDI CC# by playing a pad
●Assign an encoder to control any MIDI CC# and define its operational range
●Assign a slider to control any MIDI CC# and define its operational range
●Send Aftertouch messages from the Mod strip, set its min/max limits, and select ‘return to zero’ or ‘hold’ behavior
●Save the entire set of altered controls to one of TUNAMINI’s eight preset locations
●Define another seven sets of parameter assignments and save each one to a different memory location
● Recall any of the eight personalized presets easily and immediately

HANGZHOU WORLDE DIGITAL PIANO CO.,LTD HANGZHOU WORLDE MUSIC ELECTRONIC CO., LTD
- 11 -
5.1.2 Assign a Pad to Start/Stop MMC
One feature that often comes in handy with a controller keyboard is the ability to start and stop a song without having to
use the computer keyboard or mouse. It’s really easy to set up the TUMAMINI pads to do that.
For example we’ll use Pad 7 to send Stop commands and Pad 8 to send Start commands. This is accomplished through
the use of MIDI Machine Control commands, which you’ve probably seen abbreviated as “MMC”.
5.1.2.1 Select the Pad Mode
Let’s begin by selecting Pad 7 by clicking on its graphic in the TUNAMINI software editor or by tapping Pad 7 on the
TUNAMINI. Then click the Mode field to activate the pull-down menu to select MMC. Besides, click the CC No. field to
activate the pull-down menu to select one of MMC function(Rew CC No.:5, FF CC No.:4,STOP CC No.:1, PLAY CC
No.:2,REC CC No.:6, LOOP CC No.:3).
5.1.2.2 Set the MMC Message number
Once the Mode has been set to MMC, the trick is to set both the LSB and MSB to the same number so the pad knows
which command to send. MMC Stop command needs the CC number set to 1, like so:
Next, select Pad 8 so we can set it to the MMC command for “Start”. This means the CC number must be set to 2:
Now you should have Pad 8 set to start your song and Pad 7 set to stop it. Of course you can assign those functions to any
pad you like, now that you know how to do it.

HANGZHOU WORLDE DIGITAL PIANO CO.,LTD HANGZHOU WORLDE MUSIC ELECTRONIC CO., LTD
- 12 -
5.1.3 Assign a couple of Pads to MIDI notes
The natural thing to do when you’re starting a song is to lay down the kick and snare tracks. The TUNAMINI pads can be
assigned to any MIDI note number that you like, so for this example we’ll set Pads 1 and 2 to trigger the General MIDI note
numbers for the Bass drum and Snare drum (MIDI note numbers 36 and 38, respectively). Generally the drum sounds will
be sent on Channel 10.
By default the pads have their Mode set to MIDI note, so when you select each Pad we’ll get right down to selecting the
MIDI note number and velocity values. Let’s leave the other setting to “Gate” so the notes shut off when you lift the pad;
you can try the “Toggle” value later if you’d like the MIDI note to stay “On” until you hit the pad a second time.
5.1.3.1 Select the MIDI note number: Kick
The CC number field is used to set the MIDI note number, which makes sense: there are 128 MIDI Controller numbers and
128 MIDI Note numbers. So click the pull-down menu and set this value to 36 to select the General MIDI Kick drum note
number:
We’ll show you how to set Pad 2 to the Snare drum note number in section 5.1.3.2.
5.1.3.2 Select the MIDI note number: Snare
Setting Pad 2 to trigger the snare is done the same way, only by choosing a different MIDI note number (38 in this case):
So now you’re ready to lay down the groove for your song: You have Pads 1 and 2 set to play the Kick and Snare, and
Pads 7 and 8 set to Stop and Start the song.
5.1.4 Assign a Pad to toggle a MIDI CC # between two values
One popular musical effect these days is to take an audio loop, filter it heavily for certain sections of a song, and switch it
back to the full-open sound later in the song. You can pre-configure one of the TUNAMINI pads to send those commands
to a filter plug-in that should be readily available in your DAW software.
We’ll use Pad 6 for this example. Select it and then use the pull-down Mode menus to select “Switched” and “Toggle”:

HANGZHOU WORLDE DIGITAL PIANO CO.,LTD HANGZHOU WORLDE MUSIC ELECTRONIC CO., LTD
- 13 -
These settings will allow you to send two different values of a particular MIDI CC number each time you press the pad.
There are a couple of MIDI CC numbers that have been assigned the task of controlling filter brightness (CC# 74) or
harmonic content (CC# 71). We’ll use CC# 74 for this example.
Click on the CC number field and select the Brightness controller number as shown:
Next we’ll set some minimum and maximum values that might work (adjust them to suit the audio source):
The first press of Pad 6 will send a CC# 74 command with a value of 78, which will close the filter down part way but still let
a lot of the audio pass through. The second press of Pad 6 will send a value of 127, opening the filter completely.
Note: Be sure to check the MIDI Channel assignment to make sure it matches that of the receiving device.
5.1.5 Assign an Encoder to control a MIDI CC # between two values
The encoders are assignable using the same techniques described for the pads. Let’s give a quick example of an
interesting use: setting the rate of an LFO so it operates only within a certain range.

HANGZHOU WORLDE DIGITAL PIANO CO.,LTD HANGZHOU WORLDE MUSIC ELECTRONIC CO., LTD
- 14 -
Looking at the picture above we see familiar information:
Encoder 5 has been selected. It is assigned to the Global MIDI channel; you can specify any MIDI channel from 1-16 or
leave it on the Global channel.
Its Mode is set to Continuous, which means it will transmit a MIDI Continuous Controller number when it is turned.
The second Mode field is set to Absolute, which means it will transmit in a linear fashion from fully counter-clockwise to
fully clockwise.
The CC number field shows CC# 76, the MIDI CC # that has been assigned to control Vibrato Rate.
The Min / LSB and Max / MSB fields are set in such a way as to limit Encoder 5 to operation only within a certain range.
To summarize, the settings seen above mean that Encoder 5 will control the Vibrato Rate of the target device, sweeping it
between the values of 10 and 32 only. The vibrato will not become too fast, nor will it become too slow.
Naturally you can choose settings that are appropriate for the MIDI device you are using.
You can also assign the encoders to 128 standard midi controllers(Standard MIDI CONTROLLER PARAMETER LIST can
be found in the Appendix ). For example, if we want to use Encoder 2 as Pan MSB(Pan MSB MIDI Control No. is 10 in
MIDI standard), so you should assign CC No.10 to Encoder2 with WORLDE software editor, then the Encoder2 will control
the Pan MSB of your DAW. Details should be:
1) Click the Encoder2 in the software editor or by rotating Encoder2 on the TUNAMINI.
2) Change the CC Number to 10 in software editor.
3) Change the Mode Option to “absolute” in software editor.
4) Change the Channel to 10 in software editor.
5) Click “Send to Mem to workArea or Bank 1-8”. Then click “Send to Keyboard”.

HANGZHOU WORLDE DIGITAL PIANO CO.,LTD HANGZHOU WORLDE MUSIC ELECTRONIC CO., LTD
- 15 -
Note: Some devices may not use standard MIDI controller assignments. Refer to the documentation for your device to
determine what settings to use for each purpose.
5.1.6 Assign a Slider to control a MIDI CC # between two values
The sliders are assignable using the same techniques described for the encoders.
5.1.7 Assign the Mod strip to Aftertouch
Another cool thing about having such a flexible, powerful controller is having the ability to experiment with non-standard
assignments for the hardware. For example, rather than using the Mod strip to control Modulation, why not take advantage
of its ability to control Aftertouch?
And by control, we mean control. One of the physical limitations of standard Aftertouch implementation in a keyboard is
that you have to keep consistent pressure on the keys or else it fluctuates, goes too far, and/or goes away altogether. With
MIDI Control Center you can assign the Mod strip to bring in Aftertouch either gradually or instantly, and then have the
value you choose stay chosen until you touch the Mod strip again.
What follows is a walk-through on how to do all of the things mentioned above.
Note: The receiving device determines which parameter is affected by incoming Aftertouch messages.
5.1.7.1 Select the Mod strip
Touch the Mod strip to select it as the control to be edited. The white circle round it is hidden in the software editor.

HANGZHOU WORLDE DIGITAL PIANO CO.,LTD HANGZHOU WORLDE MUSIC ELECTRONIC CO., LTD
- 16 -
5.1.7.2 Select the Message Type (Mode)
Click on the Mode menu and select Aftertouch as the message type. It’s at the bottom of the drop-down list:
5.1.7.3 Standard vs. Hold
Next to the Mode, which you just set to Aftertouch, is another drop-down menu. It probably says “Standard”, which means
Aftertouch will ‘snap to zero’ when the Mod strip is released. If you want the Aftertouch value to remain where you put it,
select “Hold”.

HANGZHOU WORLDE DIGITAL PIANO CO.,LTD HANGZHOU WORLDE MUSIC ELECTRONIC CO., LTD
- 17 -
5.1.8 Save the changes to a Preset
So let’s review what we’ve done in section 5.1 so far: The pads have been set up to play kick and snare, toggle the filter
settings, and start/stop the song; one of the encoders is controlling the vibrato rate, and the Mod strip is controlling
Aftertouch. Not bad! There’s a lot more TUNAMINI can do, but that’s a good start.
So the next thing to do is make sure this configuration is available when you want it. To do that, you need to save these
settings as a group into one of the eight memory locations in the TUNAMINI.
The upper right-hand section of the TUNAMINI software editor has a button called “Send to Keyboard”. Right below that is
a pull-down menu that allows you to specify which of the TUNAMINI’s eight memory locations will be the repository for the
Preset you’ve created.
Before clicking the top button, select a location you know is available. We’ll use memory location #2 for this example:
Select #2 in the drop-down list as pictured above.
Once you’re sure where the preset will be stored, click the “Send to Keyboard” button:
That’s all there is to it! The preset you created has been safely stored to memory location #2, and can be recalled by using
the Shift button and Pad #2 together. See section 5.1.8 below for details.
5.1.9 Recalling a Preset / Switching between Presets
Once you’ve created a couple of presets you can switch between your personalized configurations very quickly. This is as
simple as it can be: simply hold the Shift button and press one of the pads.

HANGZHOU WORLDE DIGITAL PIANO CO.,LTD HANGZHOU WORLDE MUSIC ELECTRONIC CO., LTD
- 18 -
In the picture above the combination of the Shift button and Pad 2 will select Preset #2 from the TUNAMINI preset memory
locations.
To switch from Preset #2 to Preset #1, hold Shift again and press Pad 1 instead.
5.2 Changing the Global MIDI Channel
Switching between MIDI Channels is one very quick way to select which instrument and/or track you are controlling in your
DAW software. The combination of the Shift button and one of the keys on the TUNAMINI keyboard is how this is done.
Notice that there are numbers in small blue boxes above each of the first sixteen keys on the TUNAMINI keyboard. These
correspond to the 16 possible MIDI channel numbers, and indicate which key you should use in conjunction with the Shift
button to change the Global MIDI Channel setting.
For example, if you want to switch the Global channel of the TUNAMINI to MIDI Channel 2, hold the Shift button and press
the first C# key:

HANGZHOU WORLDE DIGITAL PIANO CO.,LTD HANGZHOU WORLDE MUSIC ELECTRONIC CO., LTD
- 19 -
Then when it’s time to switch to channel 1, for example, use the same technique but press a different key: in that case, you
would hold the Shift button and press the first C key on the keyboard.
5.3 Select the Backlit RGB Color of 8 Pads
Use the TUNAMINI Software Editor to select the backlit RGB color of 8 pads. You can download the TUNAMINI
Software Editor from Worlde website www.worlde.com.cn.
Press the pad and the red circle button ○
√ will appear on that, then select the color range No. for CR,CG and CB. Press
the “Send to Keyboard” to send the parameters to the TUNAMINI and then press the OK button to confirm. The color
range is from 0 to 127 for each one. 127 is the brightest. 0 is off work. For example, if we want to change the Pad1 color to
red, details should be:
1) Click the Pad1 in the software or by tapping Pad1 in TUNAMINI.
2) Change the CR value to 127, CG and CB value to 0.
3) Click “Send to Keyboard’.

HANGZHOU WORLDE DIGITAL PIANO CO.,LTD HANGZHOU WORLDE MUSIC ELECTRONIC CO., LTD
- 20 -
Reference RGB No. for some colors:
COLOR R. G. B
WHITE 127 127 127
BLACK 0 0 0
RED 127 0 0
GREEN 0 127 0
BLUE 0 0 127
CYAN 0 127 127
MAGENTA 127 0 127
YELLOW 127 127 0
ORANGE 127 82 0
6. Advanced Setup Information
6.1 Pad calibration
Pad thresholds are calibrated at the factory, so you shouldn’t encounter an overly sensitive pad. These settings are not
user-editable.
On the other hand, the full range of the pad is not set, and should you wish to alter that somewhat, you may use the pad
Table of contents
Other Worlde Recording Equipment manuals

Worlde
Worlde EASYPAD User manual

Worlde
Worlde EASYKEY 25 User manual

Worlde
Worlde Panda User manual

Worlde
Worlde Panda200 User manual

Worlde
Worlde Orca PAD64 User manual

Worlde
Worlde PANDAMINI II User manual

Worlde
Worlde Orca mini 25 User manual

Worlde
Worlde MINI User manual

Worlde
Worlde PRO P49 User manual

Worlde
Worlde Orca PAD48 User manual