Worx WU330 User manual

ROTARY HAMMER
Rotary hammer
Перфоратор
Pöörlev vasar
Rotējošs belznis
Rotacinis kūjis
•
•
•
•
•
Młot obrotowy
Ротативен пробивен чук
Ciocan articulat
Vrtací kladivo
Otočné kladivo
•
•
•
•
•
EN 05
RU 11
ET 19
LV 26
LT 33
PL 40
BG 47
RO 54
CZ 62
SK 69
WU330 WU330.1 WU330.2
WU332 WU332.1


{
{
�

4
Component list
1
2
3
4
5
6
7
8
9
10
11
On/off switch with variable speed control
Switch lock-on button
Forward and reverse rotation control
Function mode selection switch
Auxiliary handle
Adjustable depth stop
Replacement drill chuck locking ring (WU330.2)
Tool holder locking sleeve
Dust protection cap
Sds-plus type chuck (WU330/WU330.1/WU332/WU332.1)
Sds-plus “quik-change” chuck (WU330.2)
Technical data
Rated voltage 220V-240V~50Hz/60Hz
Rated power 710W
Rated no load speed 0-1050/min
Impact rate 0-4600bpm
Impact energy 2.7J
Drilling capacity max
Masonry 26mm
Steel 13mm
•
•
•
•
•
•
Wood 30mm
Protection class /II
Machine weight 2.5Kg
Noise and vibration data
When tested at hammer & drill mode LpA= 91dB
When tested at hammer only mode
according to 2000/14/EC: LpA= 90dB
When tested at hammer & drill mode LwA =102dB
KpA&KwA:3.0dB(A)
When tested at hammer only mode
according to 2000/14/EC: LwA=101dB
Vibration total values determined according to EN60745:
Hammer drilling
into concrete
Vibration emission value
αh,HD=19.065 m/s2 (for main handle)
αh,HD =18.143 m/s2 (for auxiliary handle)
Uncertainty K=1.5m/s2
Chiselling αh,CHeq=12.2m/s2 (for main handle)
αh,CHeq=10.977 m/s2 (for auxiliary handle)
Uncertainty K=1.5m/s2
•
•
•
•
•
•
•
•
•
Not all the accessories illustrated or described are included in
standard delivery.

5
1
2
3
4
5
6
7
8
9
10
11
12
13
14
15
Accessories
Auxiliary handle 1pc
Depth gauge 1pc
Drill chuck with adaptor and chuck key (WU330.1/WU332.1) 1pc
13mm precision keyed chuck with chuck key (WU330.2) 1pc
We recommend that you purchase your accessories from the same
store that sold you the tool. Use good quality accessories marked
with a well-known brand name. Choose the type according to the
work you intend to undertake. Refer to the accessory packaging for
further details. Store personnel can assist you and offer advice.
Additional safety points for your
rotary hammer
Connect the mains plug only when the tool is switched off. After
using, pull the mains plug.
Always direct the cable to the rear away from the machine.
Persons under 16 years of age are not permitted to operate this
machine.
Keep the tool and accessories out of the reach of children.
Remove the plug from the socket before carrying out any adjustment,
servicing or maintenance.
Fully unwind cable drum extensions to avoid potential overheating.
When an extension cable is required you must ensure it has the
correct ampere rating for your power tool and that it is in a safe
electrical condition.
Ensure your mains supply voltage is the same as your tool rating plate
voltage.
Your tool is double insulated for additional protection against a
possible electrical insulation failure within the tool.
Always check walls and ceilings to avoid hidden power cables and
pipes.
After long working periods, external metal parts and accessories
could be hot.
Wear eye protection when operating this tool.
Wear ear protectors when using rotary hammer. Exposure to
noise can cause hearing loss.
Use auxiliary handles supplied with the tool. Loss of control can
cause personal injury.
Hold the tool by insulated gripping surfaces when performing
an operation where the cutting tool may contact hidden wiring.
Contact with a ‘live’ wire will also make exposed metal parts of the
tool ‘live’ and shock the operator.
•
•
•
•

6
Symbols
1
2
Operation instructions
Note: Before using the tool, read the instruction book carefully.
CHANGING THE DRILL CHUCK (See A) (WU330.2)
• Removing the replacement drill chuck
Warning: Before removing the replacement drill chuck,
always remove the tool or bit! With the drill pointing toward you,
grasp the locking ring (7) of the SDS-plus “quik-change” chuck and
pull forward firmly, then rotate it to the side. The SDS-plus “quik-
change” chuck will come free.
• Attaching the replacement drill chuck
When mounting the precision keyed chuck (12), grasp the precision
keyed chuck with the whole hand, push it as far as it will go, then
rotate it to the side until it can clearly be heard to latch. The precision
keyed chuck locks itself. Check locking by pulling on the precision
keyed chuck. Make replacements in a corresponding manner.
INSERTING/REPLACING THE DRILL CHUCK (See C)
• Inserting the drill chuck
To work with tools without SDS-plus (e.g., drills with cylindrical
shafts), a suitable drill chuck must be used. Insert the adapter (14)
of the drill chuck (13) with a twisting motion into the SDS-plus chuck
(10) until it can be heard to lock. The adapter locks itself. Check the
locking by pulling on the drill chuck.
• Removing the drill chuck
To remove the drill chuck (13), pull the locking sleeve (8) to the rear,
hold in this position and remove the drill chuck from the tool holder.
Read the manual
Warning
Wear eye protection
Wear dust mask
Wear ear protection
Double insulated
WEEE marking

7
INSERTING AND REMOVING DRILL BIT IN SDS
Take care that the dust protection cap (9) is not damaged when
changing tools.
• Inserting
Clean and lightly oil the bit before inserting. Insert the dust-free bit
into the bit holder with a twisting motion until it latches.The bit locks
itself. Check the locking by pulling on the tool.
• Removing
Retract back the bit holder locking sleeve (8) and pull out the bit.
Warning!Your new WORX Rotary Hammer Drill generates
powerful forces to get your job done quickly and effectively. These
forces may cause inferior quality SDS bits to break and jam in the
chuck.We therefore recommend that only high quality SDS bits be
used with this tool.
MOUNTING OF BIT IN KEYED CHUCK
(WU330.1/WU330.2/WU332.1)
Warning
: Do not use tools without SDS-plus for hammer
drilling or chiseling!Before mounting the drill bit, attaching the 13
mm keyed chuck, insert bit between the chuck jaws as far as it will
go. Ensure drill bit is in the center of the chuck jaws. Using the chuck
key provided, there are three holes in which the chuck key should be
inserted. Tighten them equally in turn at each of the three holes, not
just at one hole. Your drill bit is now locked in the chuck. The bit can
be removed by reversing the above procedure (See B).
ON/OFF SWITCH WITH VARIABLE SPEED CONTROL
Depress to start and release to stop your tool. This tool has a variable
speed switch (1) that delivers higher speeds with increased trigger
pressure - speed is controlled by varying the pressure applied to the
switch (See D)
3
4
5
SWITCH LOCK-ON BUTTON
Depress the on/off switch (1) then the lock on button (2) (See D);
release the on/off switch first and the lock-on button second. Your
switch is now locked on for continuous use. To switch off your tool
just depress and release the on/off switch.
AUXILIARY HANDLE
Slide the handle onto the drill and rotate to the desired working
position. To clamp the auxiliary handle rotates the handle clockwise.
To loosen the auxiliary handle rotate the handle anti-clockwise (See
E).
Warning:Always use the auxiliary handle.
FORWARD AND REVERSE ROTATION CONTROL
With the drill pointing away from you, push the forward/reverse-lever
(3) to the left “ “for forward rotation. Push the forward/reverse-
lever (3) to the right for reverse rotation “ “.
Warning: Never change the direction of rotation while the
tool is rotating, wait until it has stopped.
ADJUSTABLE DEPTH STOP
Fit the drill bit or driver bit into the chuck. Loosen the depth stop
by rotating the handle anti-clockwise. Slide the depth stop until the
distance between the depth stop end and the drill/driver bit end is
equal to the depth of hole/screw you wish to make. Then clamp the
depth stop by rotating the handle clockwise.
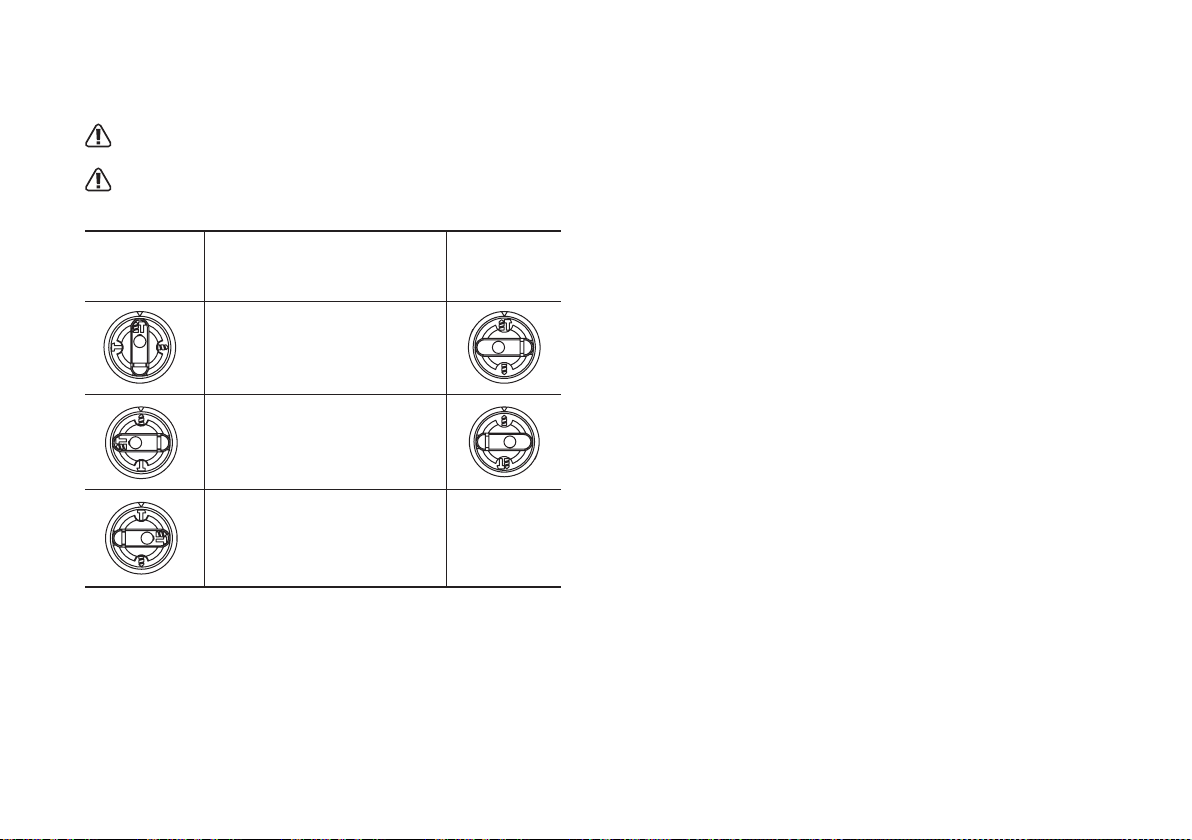
FUNCTION MODE SELECTION (See F & G)
The operation of the gearbox for each application is set with the
function mode selection switch (4), To change between functions,
6
7
8
9
10

8
depress the unlocking button (15) and rotate the selector to the
desired operating mode.
Warning: The operating mode selector switch may be
actuated only at a standstill.
Warning: Prolonged use will cause the aluminum housing
to become hot, do not touch.
WU330/
WU330.1/
WU330.2
WU332/
WU332.1
For simultaneous drilling
and impacting of concrete or
masonry, choose the Hammer
drilling position.
For screw driving, drilling
into steel, wood and plastics
choose the Rotary drilling
position.
For impacting only - for
light chipping, chiseling
and demolition applications
choose the Hammer position.
Working hints for your drill
(hammer)
If your power tool becomes over heated, set the speed to maximum
and run no load for 2-3 minutes to cool the motor. SDS-plus tungsten
carbide drill bits should always be used for concrete and masonry.
When drilling in metal, only use HSS drill bits in good condition.
Always use a magnetic bit holder when using short screwdriver bits.
Where possible use a pilot hole before drilling a large diameter hole.
Maintenance
Remove the plug from the socket before carrying out any
adjustment, servicing or maintenance.
Your power tool requires no additional lubrication or maintenance.
There are no user serviceable parts in your power tool. Never use
water or chemical cleaners to clean your power tool. Wipe clean with
a dry cloth. Always store your power tool in a dry place. Keep the
motor ventilation slots clean. Keep all working controls free of dust.
Occasionally you may see sparks through the ventilation slots. This is
normal and will not damage your power tool.
If the supply cord is damaged, it must be replaced by the
manufacturer, its service agent or similarly qualified persons in order
to avoid a hazard.

9
Environmental protection
Waste electrical products should not be disposed of with
household waste. Please recycle where facilities exist. Check
with your local authorities or retailer for recycling advice.
Plug replacement
(UK & Ireland only)
If you need to replace the fitted plug then follow the instructions
below.
IMPORTANT
The wires in the mains lead are colored in accordance with the
following code:
BLUE =NEUTRAL BROWN = LIVE
As the colors of the wires in the mains lead of this appliance may not
correspond with the colored markings identifying the terminals in
your plug, proceed as follows. The wire which is colored blue must
be connected to the terminal which is marked with N. The wire which
is colored brown must be connected to the terminal which is marked
with L.
Note: If a moulded plug is fitted and has to be removed take great
care in disposing of the plug and severed cable, it must be destroyed
to prevent engaging into a socket.
WARNING!
Never connect live
or neutral wires to
the earth terminal
of the plug. Only
fit an approved
13ABS1363/A plug
and the correct
rated fuse.
Connect
Blue to N
(neutral)
Outer sleeve
firmly clamped
Cable grip
Brown L (live)
13 Amp fuse approved
to BS1362

10
Declaration of conformity
We,
POSITEC Germany GmbH
Neuer Höltigbaum 6
22143 Hamburg
Declare that the product,
Description WORX Rotary hammer
Type WU330 WU330.1 WU330.2 WU332 WU332.1
Complies with the following Directives,
EC Machinery Directive 98/37/EC
EC Low Voltage Directive 2006/95/EC
EC Electromagnetic Compatibility Directive 2004/108/EC
Standards conform to
EN 55014-1 EN 55014-2 EN 61000-3-2
EN 61000-3-3 EN 60745-2-6 EN 60745-1
2007/07/20
Jacky Zhou
POSITEC Quality Manager
•
•
•

11
Список компонентов
1
2
3
4
5
6
7
8
9
10
11
Выключатель питания
Кнопка фиксации выключателя
Переключатель направления вращения
Переключатель режима работы
Дополнительная рукоятка
Ограничитель глубины сверления
Стопорное кольцо сменного сверлильного патрона(WU330.2)
Зажимная втулка держателя сменного обрабатывающего
инструмента
Пылезащитный колпачок
Патрон конструкции sds-plus (WU330/WU330.1/WU332/WU332.1)
Быстросменный патрон sds-plus (WU330.2)
Технические характеристики
Номинальное напряжение 220V-240V~50Hz/60Hz
Потребляемая мощность 710W
Скорость без нагрузки 0-1050/min
Частота ударов без нагрузки 0-4600bpm
Энергия удара 2.7J
Макс. диаметр сверления
Кирпич 26mm
•
•
•
•
•
•
Сталь 13mm
Дерево 30mm
Зажим инструмента /II
Вес 2.5Kg
Характеристики шума и
вибрации
При тестировании в режиме перфоратора и дрели LpA= 91дБ
При тестировании только в режиме перфоратора в
соответствии с 2000/14/EC: LpA= 90дБ
При тестировании в режиме перфоратора и дрели LwA =102дБ
KpA&KwA:3.0дБ
При тестировании только в режиме перфоратора в
соответствии с 2000/14/EC: LwA=101дБ
Суммарные значения вибрации, определенные согласно EN60745:
Ударное
сверление бетона
Уровень вибрации
αh,HD=19.065 м/с2 (главная рукоятка)
αh,HD =18.143 м/с2 (вспомогательная рукоятка)
Погрешность K=1.5м/с2
Перфорация
Уровень вибрации ah.Cheq=12.2м/с2 (главная
рукоятка)
Уровень вибрации ah.Cheq= 10.977 м/
с2(вспомогательная рукоятка)
Погрешность K=1.5м/с2
•
•
•
•
•
•
•
•
•
Не все принадлежности, иллюстрированные или описанные
включены в стандартную поставку.

12
Принадлежности/количество
Дополнительная рукоятка 1шт.
Ограничитель глубины сверления 1шт.
Сверлильный патрон с переходником и ключом
(WU330.1/WU332.1) 1шт.
13-Миллиметровый прецизионный патрон с ключом
(WU330.2) 1шт.
Рекомендуется приобретать все принадлежности в том же
магазине, где был приобретен инструмент. Используйте
качественные принадлежности с указанием общеизвестной
торговой марки. За более подробной информацией обратитесь
к разделу «Рекомендации по использованию перфоратора» в
этой инструкции или сведениям на упаковке принадлежностей.
Помощь и консультацию можно также получить у продавца.
1
2
3
4
5
6
7
8
9
10
11
Дополнительные меры
безопасности при работе с
вашим перфоратором
Присоединяйте штепсельную вилку к розетке электросети
только при выключенном электроинструменте. По окончании
работы, извлекайте штепсельную вилку из розетки электросети.
Всегда направляйте сетевой электрокабель сзади
электроинструмента и подальше от него.
Людям, не достигшим 16-ти летнего возраста, запрещается
пользоваться данным электроинструментом.
Храните электроинструмент и принадлежности в недоступном
для детей месте.
До выполнения любых работ по регулировке, обслуживанию и
уходу следует вынуть вилку электропитания из розетки.
Полностью размотайте барабан удлинительного кабеля во
избежание возможного перегрева.
Если необходим удлинитель, следует убедиться, что он
соответствует току потребления вашего электроинструмента и
находится в надежном электрическом состоянии.
Убедитесь, что напряжение электросети соответствует данным,
указанным на шильдике инструме нта.
В качестве дополнительной защиты от возможного нарушения
изоляции внутри инструмента, оборудование имеет двойную
изоляцию.
Всегда ПРОВЕРЯЙТЕ стены, полы и потолки на предмет
скрытой электропроводки и труб.
После продолжительных периодов работы наружные
металлические части и принадлежности могут нагреваться.
•
•
•
•

13
12
13
14
15
При работе с данным электроинструментом используйте
средства для защиты глаз.
При работе с перфоратором надевайте защитные
наушники. Воздействие шума может привести к потере
слуха.
Используйте дополнительную рукоятку,
поставляемую вместе с инструментом. Потеря
контроля может привести к травме.
При работе с перфоратором надевайте респиратор.
Условные обозначения
Прочтите инструкцию
Предупреждение
Наденьте защитные очки
Наденьте респиратор
Наденьте защитные наушники
Двойная изоляция
Маркировка WEEE
Сертификат соответствия ГОСТ Р

14
1
2
Эксплуатация
Внимание: Перед использованием инструмента,
внимательно прочитайте руководство по эксплуатации.
ЗАМЕНА СВЕРЛИЛЬНОГО ПАТРОНА (см. Рис. A)
(WU330.2)
• Снятие сменного сверлильного патрона
Предупреждение: Перед снятием сменного
патрона, всегда извлекайте сменный
обрабатывающий инструмент или насадку. Направив
электроинструмент на себя, возьмитесь за стопорное кольцо
(7) быстросменного патрона SDS-plus и сильно потяните его
в направлении вперед, и затем поверните. Быстросменный
патрон SDS-plus освободится.
• Установка сменного сверлильного патрона
Для установки прецизионного (с ключом) патрона (12), возьмите
его рукой, вдвиньте до упора и поверните, до ощущаемой
фиксации. Прецизионный патрон установлен. Проверьте
надежность фиксации, попробовав вытянуть прецизионный
патрон. Снятие производите в обратной последовательности.
УСТАНОВКА/СНЯТИЕ СВЕРЛИЛЬНОГО ПАТРОНА (см.
Рис. C)
• Установка сверлильного патрона
При работе с электроинструментом без использования системы
SDS-plus (например, применяя сверла с цилиндрическими
хвостовиками) необходимо использовать соответствующий
сверлильный патрон. Вдвиньте поступательно-вращательным
движением переходник (14) сверлильного патрона (13) в
патрон SDS-plus (10), до ощущаемой фиксации. Переходник
зафиксируется. Проверьте надежность фиксации, попробовав
вытянуть сверлильный патрон.
• Снятие сверлильного патрона
Для снятия сверлильного патрона (13), передвиньте зажимную
втулку (8) по направлению назад и, удерживая ее в этом
положении, извлеките сверлильный патрон из держателя
сменного обрабатывающего инструмента.
УСТАНОВКА И ИЗВЛЕЧЕНИЕ ОБРАБАТЫВАЮЩЕГО
ИНСТРУМЕНТА С ХВОСТОВИКОМ КОНСТРУКЦИИ
SDS-PLUS
При смене обрабатывающего инструмента следите,
чтобы у пылезащитного колпачка (9) не было
повреждений.
• Установка
Перед установкой, очистьте и слегка смажьте хвостовик
обрабатывающего инструмента. Вдвиньте поступательно-
вращательным движением очищенный от пыли
обрабатывающий инструмента в держатель, до ощущаемой
фиксации.
Обрабатывающий инструмент зафиксируется. Проверьте
надежность фиксации, попробовав вытянуть обрабатывающий
инструмент.
• Извлечение
Оттяните назад зажимную втулку (8) фиксатора инструмента и
извлеките насадку.
Предупреждение: Ваш новый перфоратор WORX
развивает большую мощность, делая вашу работу быстрой
и эффективной. Это может привести к повреждению и
3

15
заклиниванию в патроне низкокачественных SDS-насадок
обрабатывающего инструмента. Вследствие этого
рекомендуется использование с данным электроинструментом
только высококачественных SDS-насадок сменного
обрабатывающего инструмента.
УСТАНОВКА СВЕЛА В СВЕРЛИЛЬНЫЙ ПАТРОН
(WU330.1/WU330.2/WU332.1)
Предупреждение: При ударном сверлении или
долблении, не работайте с электроинструментом
без использования системы SDS-plus!
Перед закреплением сверла, установите 13 мм патрон, затем
продвиньте хвостовик сверла между кулачками зажимного
патрона до упора. Затем вставьте сверло или бит-отвертку
и зажмите его, вращая переднюю часть патрона по часовой
стрелке. Убедитесь, что сверло или бит расположены по
центру патрона. Теперь с помощью патронного ключа плотно
зафиксируйте патрон. Чтобы вытащить сверло или бит,
ослабьте затяжку патрона с помощью патронного ключа и
проверните переднюю часть патрона против часовой стрелки
(Рис. B).
ВЫКЛЮЧАТЕЛЬ ПИТАНИЯ С РЕГУЛЯТОРОМ
ОБОРОТОВ
Нажмите на выключатель (1), чтобы включить инструмент, и
отпустите выключатель, чтобы инструмент перестал работать.
Обороты будут возрастать, если нажимать на выключатель
сильнее (Рис. D)
4
5
КНОПКА ФИКСАЦИИ ВЫКЛЮЧАТЕЛЯ
Нажмите на выключатель питания (1), затем на кнопку
фиксатора (2) (Рис. D), после этого отпустите выключатель,
а затем кнопку фиксатора. Выключатель питания останется
постоянно включенным для непрерывной работы. Чтобы
выключить дрель, нажмите и отпустите выключатель питания.
ДОПОЛНИТЕЛЬНАЯ РУКОЯТКА
Установите дополнительную рукоятку на шейку корпуса
и поверните в нужное положение. Затем зафиксируйте в
этом положении, вращая ручку против часовой стрелке. Для
ослабления рукоятки вращайте ручку по часовой стрелке
(Рис. E).
Предупреждение: Никогда не работайте с
перфоратором без дополнительной рукоятки.
СМЕНА НАПРАВЛЕНИЯ ВРАЩЕНИЯ
Для сверления и завертывания шурупов используйте прямое
вращение, обозначенное“ “(переключатель в левом
положении). Используйте обратное вращение, обозначенное “
“ (переключатель в правом положении) для вывертывания
шурупов или извлечения застрявшего сверла.
Предупреждение: Никогда не изменяйте
направление вращения до полной остановки
патрона.
ОГРАНИЧИТЕЛЬ ГЛУБИНЫ
Вставьте бур в патрон. Затем установите ограничитель глубины
таким образом, чтобы расстояние между его передним концом
и концом бура равнялась требуемой глубине сверления.
6
7
8
9

16
Зафиксируйте ограничитель, поворачивая ручку против
часовой стрелки.
ВЫБОР РЕЖИМА РАБОТЫ (См. Рис. F и G)
Режим работы редуктора для конкретных условий эксплуатации
устанавливается переключателем (4) выбора режима работы.
Для изменения режима, нажмите клавишу (15) фиксатора и
вращайте переключатель до совмещения с указателем режима
работы.
Предупреждение: Рычаг переключателя режима
работы может быть приведен в действие только при
выключенном электроинструменте.
Предупреждение: В результате
продолжительной работы алюминиевый корпус
сильно нагревается, не касайтесь его.
10
WU330/
WU330.1/
WU330.2
WU332/
WU332.1
Для одновременного
сверления с ударом бетона
или каменной кладки,
выберите позицию “ударное
сверление”.
Для завинчивания винтов,
также сверления стали,
древесины и пластмасс
выберите позицию
“сверление”.
Для легких долбежных
работ (скалывание, рубка и
отбойные работы), выберите
позицию “молоток”.

17
Если сетевой шнур поврежден, то, во избежание опасности
поражения током, он должен быть заменен изготовителем, его
сервисным агентом или уполномоченным квалифицированные
лицом.
Защита окружающей среды
Отходы электротехнической продукции не следует
утилизировать с бытовыми отходами. Этот инструмент
необходимо доставить на местный центр утилизации для
надлежащей обработки.
Рекомендации по
использованию перфоратора
Если перфоратор слишком нагрелся, дайте ему поработать
2-3 минуты на максимальной скорости без нагрузки, чтобы
двигатель остыл. Для сверления бетона и каменной кладки
необходимо всегда использовать твердосплавные сверла с
хвостовиком конструкции SDS-plus. При сверлении металла
используйте HSS сверла в хорошем состоянии. При сверлении
отверстий большого диаметра, по возможности, просверлите
сперва отверстие меньшего диаметра.
Техническое обслуживание
До выполнения любых работ по регулировке,
обслуживанию и уходу следует вынуть вилку
электропитания из розетки.
Данный электроинструмент не требует дополнительной смазки
или технического обслуживания.
В инструменте отсутствуют детали, подлежащие
обслуживанию пользователем. Никогда не используйте
воду или химические чистящие средства для чистки
электроинструмента. Протирайте его сухой тканью. Всегда
храните электроинструмент в сухом месте. Содержите в
чистоте вентиляционные отверстия двигателя. Очищайте
от пыли все рабочие органы управления. Незначительное
искрение, заметное сквозь вентиляционные отверстия,
является нормальным и не наносит вред электроинструменту.

18
Декларация соответствия
Мы,
POSITEC Germany GmbH
Neuer Höltigbaum 6
22143 Hamburg
Заявляем, что продукция,
Марки WORX Перфоратор
Моделей WU330 WU330.1 WU330.2 WU332 WU332.1
Соответствует положениям Директив,
EC директива для машин 98/37/EC
EC директива для низковольтных устройств 2006/95/EC
EC директива по электромагнитной совместимости
2004/108/EC
И стандартам
EN 55014-1 EN 55014-2 EN 61000-3-2
EN 61000-3-3 EN 60745-2-6 EN 60745-1
2007/07/20
Jacky Zhou
Менеджер по качеству POSITEC
•
•
•

19
Komponentide nimekiri
1
2
3
4
5
6
7
8
9
10
11
Muudetava kiiruse sisse/väljalüliti
Lüliti lukustusnupp
Edasi ja tagasi pöörlemise juhtimine
Tööreziimi valikulüliti
Lisakäepide
Reguleeritav sügavuse stopper
Puuripadruni asendus-lukustusrõngas (WU330.2)
Masina korpuse lukustus
Tolmukate
Sds-plus tüüpi puuripadrun (WU330/WU330.1/WU332/WU332.1)
Sds-plus “quik-change” puuripadrun (WU330.2)
Tehnilised andmed
Nimipinge 220V-240V~50Hz/60Hz
Nimivõimsus 710W
Tühikiirus 0-1050/min
Löögimäär 0-4600bpm
Löögienergia 2.7J
Maks puurimisvõimsus
Müüritis 26mm
Teras 13mm
•
•
•
•
•
•
Puit 30mm
Kahekordne isolatsioon /II
Masina kaal 2.5Kg
Müra ja vibratsiooni andmed
Testimisel haamri ja puuri režiimis LpA= 91dB
Testimisel ainult haamri režiimis vastavalt direktiivile 2000/14/EÜ:
LpA= 90dB
Testimisel haamri ja puuri režiimis LwA =102dB
KpA&KwA:3.0dB(A)
Testimisel ainult haamri režiimis vastavalt direktiivile 2000/14/EÜ:
LwA=101dB
Vibratsiooni koguväärtus vastavalt standardile EN60745:
Haamerpuurimine
betoonis
Vibratsiooni emissioon: ah.HD= 19.065 m/s2
(põhikäepide)
Vibratsioon emissioon: ah.HD=18.143 m/s2
(lisakäepide)
Määramatus K=1,5 m/s2
Meiseldamine
Vibratsioon emissioon: ah.Cheq=12.2 m/s2
(lisakäepide)
Vibratsiooni emission: ah.Cheq= 10.977m/s2
(lisakäepide)
Määramatus K=1,5 m/s2
•
•
•
•
•
•
•
•
•
Mitte kõik kirjeldatud ja joonistel kujutatud
lisavarustuskomponendid ei kuulu standardvarustusse.

20
1
2
3
4
5
6
7
8
9
10
11
12
13
14
15
Tarvikud/kogus
Lisakäepide 1tk
Sügavuspiirik 1tk
Puuripadrun adapteri ja võtmega
(WU330.1/WU332.1) 1tk
13 MM puuripadrun koos võtmega (WU330.2) 1tk
Me soovitame osta kogu lisavarustuse samast poest nagu tööriistagi.
Kasutage hea kvaliteediga lisavarustust, millel on hästituntud
margi nimi. Täpsema teabe saamiseks vaadake Näpunäiteid või
lisavarustuse pakendit. Ka poe personal võib aidata ja soovitada.
Помощь и консультацию можно также получить у продавца.
Täiendavad ohutusnormid
piikvasarale
Ühendage põhipistik elektrivõrku ainult siis, kui seadeldis on välja
lülitatud. Pärast kasutamist, tõmmake pistik vooluvõrgust välja.
Suunake kaabel alati tahapoole, masinast eemale.
Alla 16-aastastel isikutel ei ole lubatud antud seadeldisega töötada.
Hoidke piikvasar ja selle lisaseadmed lastele kättesaamatus kohas.
Enne kui asutakse teostama mis tahes reguleerimis-, hooldus- või
remonttöid, tuleb tööriista toitejuhtme pistik pistikupesast lahti
ühendada.
Kerige pikenduskaabel alati lõpuni lahti, et vältida võimalikku
ülekuumenemist.
Kui on vaja kasutada pikendusjuhet, peab see olema teie
elektritööriista jaoks õige ampriklassiga ja elektriliselt ohutus
seisundis.
Kontrollige, et toide vastaks teie tööriista parameetrite tahvlil näidatud
pingele.
Teie tööriist on topeltisolatsiooniga, et kaitsta võimaliku
elektriisolatsiooni vea eest tööriistas.
Kontrollige alati seinu ja lagesid, et vältida varjatud elektrikaableid ja
torusid.
Pärast pikki tööperioode võivad sisemised metallosad ja lisaseadmed
olla kuumad.
Masinaga töötamisel kasutage silmakaitsmeid.
Kandke lööktrelli kasutamisel kuulmekaitset. Müra võib
kahjustada kuulmist.
Kasutage komplektis olevaid lisakäepidemeid. Kontrolli
kaotamine tööriista üle võib põhjustada vigastusi.
Hoidke tööriista isoleeritud hoidmispindadest, kui
on oht, et lõikur võib puudutada varjatud juhtmeid.
•
•
•
•
Other manuals for WU330
3
This manual suits for next models
4
Table of contents
Languages:
Other Worx Rotary Hammer manuals

Worx
Worx WU334 User manual

Worx
Worx WX392 User manual

Worx
Worx WX337 User manual

Worx
Worx H3 WX382 User manual

Worx
Worx WX382 User manual

Worx
Worx WX382 Installation manual

Worx
Worx H3 WX390 Operation instructions

Worx
Worx WX331.1 Installation manual

Worx
Worx WX381 Series User manual

Worx
Worx WX333 Installation manual