Worx WG119E User manual

P08
P15
P22
P29
P36
P43
P50
P57
P64
P71
P77
P83
P90
P96
2-in-1 Grass Trimmer/Edger
2-in-1 Rasentrimmer/Kantenschneider
Coupe bordure/taille-haies 2en1
Tosaerba/tagliabordi 2-in-1
Cortacésped/recortadora de bordes 2 en 1
2-in-1 grasrandsnijder
Przycinarka/podkaszarka do trawy 2-w-1
2 funkciós fűkasza/szegélyvágó
Instrument 2 în 1 pentru prelucrarea produselor din sticlă/tăierea muchiilor
pentru produsele din sticlă
2-v-1 sekačkou/zastřihovačkou okrajů
Vyžínač trávy/Zastrihávač trávnikov 2 v 1
Aparador/corta-relvas 2 em 1
2-n-1 Grästrimmer/kantklippare
Obrezovalnik trate/kotni obrezovalnik, 2-v1
EN
D
F
I
ES
NL
PL
HU
RO
CZ
SK
PT
SV
SL
WG119E

Original instructions EN
Übersetzung der Originalanleitung D
Traduction des instructions initiales F
Traduzione delle istruzioni originali I
Traducción de las instrucciones originales ES
Vertaling van de oorspronkelijke instructies NL
Tłumaczenie oryginalnych instrukcji PL
Eredeti használati utasítás fordítása HU
Traducerea instrucţiunilor iniţiale RO
Překlad původních pokynů CZ
Preklad pôvodných pokynov SK
Tradução das instruções originais PT
Översättning av originalinstruktionerna SV
Prevod izvirna navodila SL

1
11
2
5
6
7
98
10
3
4

1
2
12
2
3
1
D2 E
A B
D1
C

Pull the shaft
Push down
the collar
2
2
1
1
2
1
F5 F6
F1 F2
F4
F3

14
15
16
17
1
2
1
2
1
2
Pull the collar
Rotate the
shaft 180°
13
One click!
I J
G1 G2
H
G3

P
M
O
N
KL

8
2-in-1 Grass Trimmer/Edger EN
1. ON/OFF SWITCH
2. AUXILIARY HANDLE
3. HANDLE ROTATION LOCKING MECHANISM
4.
HEIGHT ADJUSTMENT LOCKING MECHANISM
5. TELESCOPE TUBE
6. CUTTING HEAD ADJUSTMENT BUTTON
7. MOTOR HOUSING
8. FLOWER GUARD
9. CUTTING HEAD
10. SAFETY GUARD
11. EXTENSION CORD HOLDER
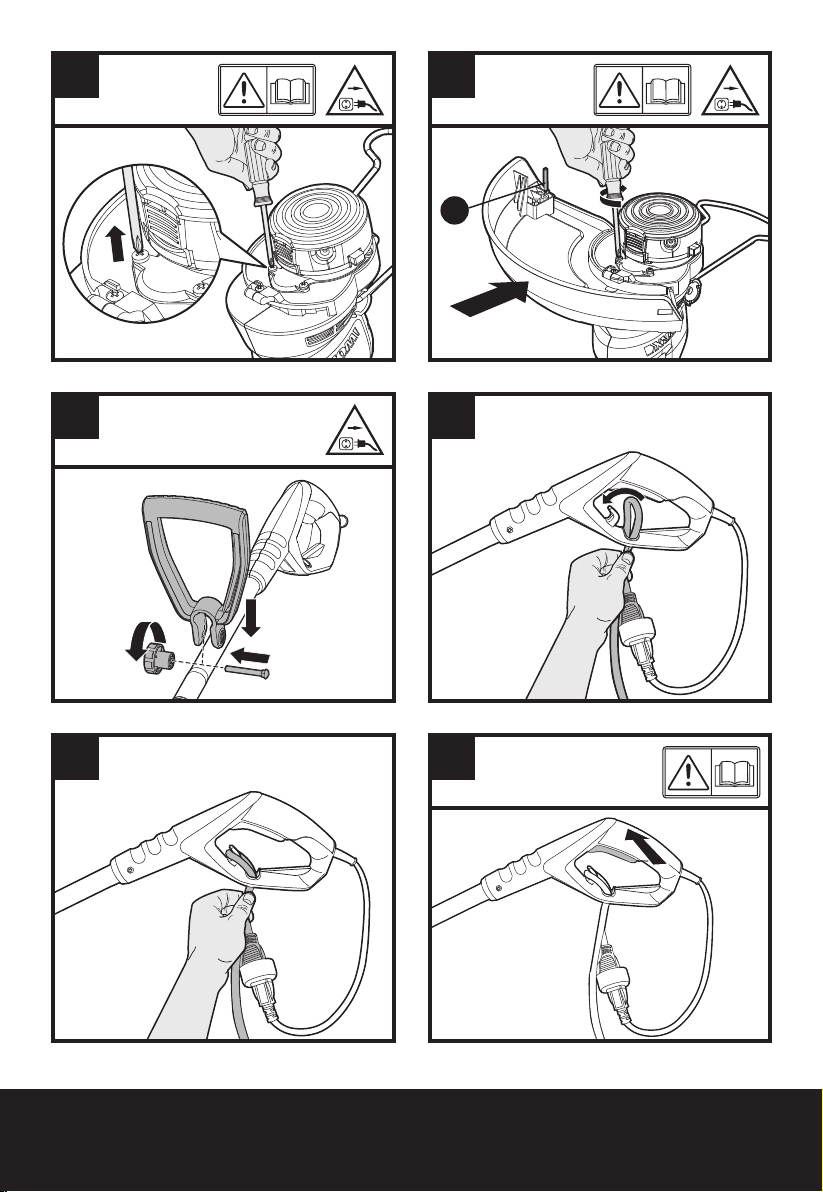
12. LINE CUTTER (See Fig. B)
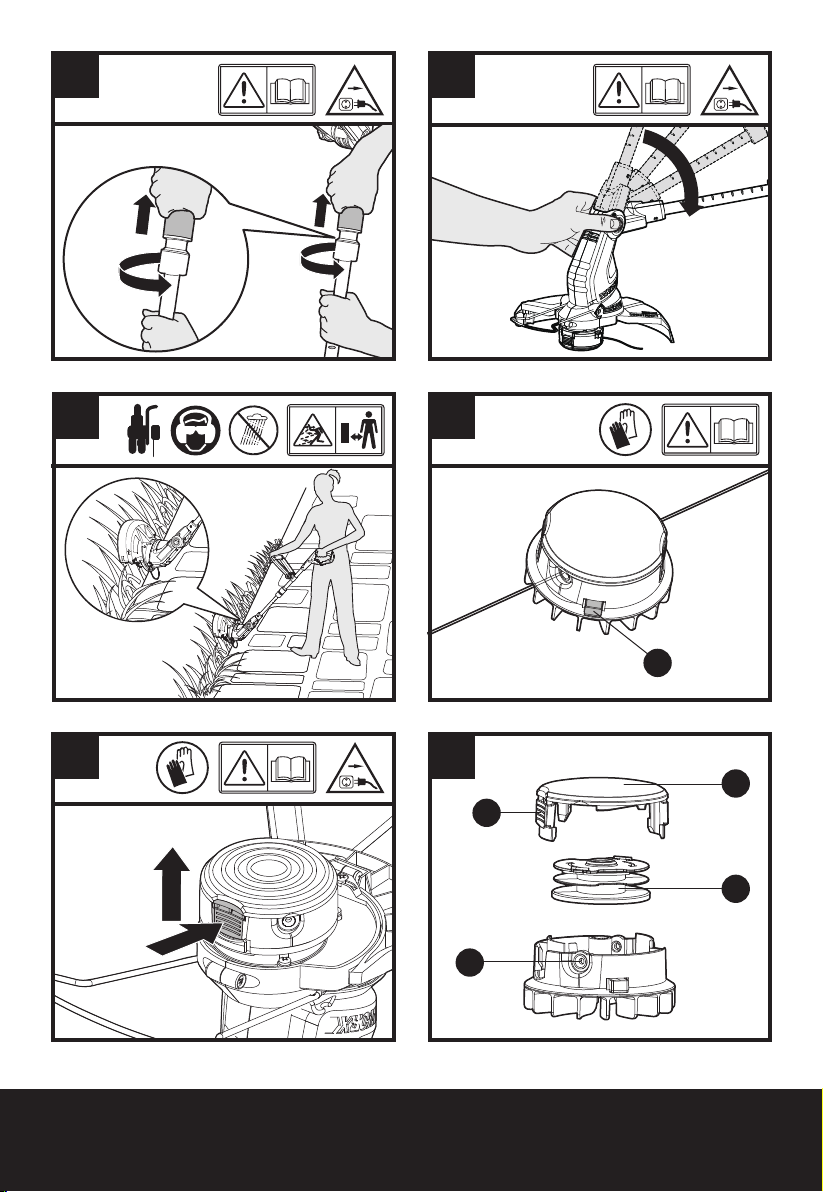
13. LINE FEED BUTTON (See Fig. H)
14. CUTTING HEAD COVER (See Fig. J)
15. CAP RELEASE LATCH (See Fig. J)
16. SPOOL (See Fig. J)
17. EYELET (See Fig. J)
Not all the accessories illustrated or described
are included in standard delivery.
TECHNICAL DATA
Type WG119E (1-designation of machinery,
representative of Lawn Trimmer and Edge
Trimmer)
Rated voltage 220-240V~50/60Hz
Power 550W
No load speed 8900/min
Max. cutting diameter 30cm
Diameter of line 1.65mm
Line length 2x5m
Weight 2.4kg
Protection class /II
NOISE DATA
A weighted sound pressure LpA=84dB(A)
KpA 3.0dB(A)
A weighted sound power LwA=96dB(A)
Wear ear protection.
VIBRATION INFORMATION
Typical weighted vibration
ah= 2.7m/s²
Uncertainty K=1.5m/s²
WARNING! The vibration emission value
during actual use of the power tool can differ
from the declared value depending on the ways in
which the tool is used dependant on the following
examples and other variations on how the tool is used:
How the tool is used and the materials being cut or
drilled.
The tool being in good condition and well maintained
Using the correct accessory for the tool and ensuring it
is sharp and in good condition.
The tightness of the grip on the handles and if any anti
vibration accessories are used.
And the tool is being used as intended by its design
and these instructions.
This tool may cause hand-arm vibration
syndrome if its use is not adequately managed.
WARNING! To be accurate, an estimation of
exposure level in the actual conditions of use
should also take account of all parts of the operating
cycle such as the times when the tool is switched off
and when it is running idle but not actually doing the
job.This may significantly reduce the exposure level
over the total working period.
Helping to minimise your vibration exposure risk.
ALWAYS use sharp chisels, drills and blades
Maintain this tool in accordance with these instructions
and keep well lubricated (where appropriate)
If the tool is to be used regularly then invest in anti
vibration accessories.
Avoid using tools in temperatures of 100C or less
Plan your work schedule to spread any high vibration
tool use across a number of days.

9
2-in-1 Grass Trimmer/Edger EN
ACCESSORIES
Flower guard 1
Auxiliary handle 1
Safety guard 1
Spool (WA0007) 1
We recommend that you purchase your accessories
from the same store that sold you the tool. Refer to
the accessory packaging for further details. Store
personnel can assist you and offer advice.
PRODUCT SAFETY
GENERAL SAFETY
WARNINGS
WARNING: Read all
safety warnings and all
instructions. Failure to follow
the warnings and instructions
may result in electric shock, fire
and/or serious injury.
Save all warnings and
instructions for future
reference.
If the supply cord is damaged,
it must be replaced by the
manufacturer, its service agent
or similarly qualified persons in
order to avoid a hazard.
IMPORTANT
READ CAREFULLY BEFORE
USE
KEEP FOR FUTURE
REFERENCE
SAFE OPERATING
PRACTICES
1. Training
a) Read the instructions
carefully. Be familiar with the
controls and the correct use
of the machine.
b) Never allow children,
persons with reduced
physical, sensory or mental
capabilities or lack of
experience and knowledge
or people unfamiliar with
these instructions to use the
machine, local regulations
may restrict the age of the
operator.
c) Keep in mind that the
operator or user is
responsible for accidents or
hazards occurring to other
people or their property.
2. Preparation
a) Before use check the
supply and extension cord
for signs of damage or
aging. If the cord becomes
damaged during use,
disconnect the cord from
the supply immediately.
DO NOTTOUCHTHE CORD
BEFORE DISCONNECTING
THE SUPPLY. Do not use
the machine if the cord is
damaged or worn.
b) Keep extension cords away
from moving hazardous
parts to avoid damages to
the cords which can lead to
contact with live parts.
c) Before use, always visually
inspect the machine for
damaged, missing or

10
2-in-1 Grass Trimmer/Edger EN
misplaced guards or shields.
d) Never operate the machine
while people, especially
children, or pets are nearby.
3. Operation
a) Keep supply and extension
cords away from cutting
means.
b) Wear eye protection, log
trousers and stout shoes at
all times while operating the
machine.
c) Avoid using the machine
in bad weather conditions
especially when there is a
risk of lightning.
d) Use the machine only in
daylight or good artificial
light.
e) Never operate the machine
with damaged guards or
shields or without guards or
shields in place.
f) Switch on the motor only
when the hands and feet
are away from the cutting
means.
g) Always disconnect the
machine from the power
supply (e.G. Remove the plug
from the mains)
1) Whenever the machine is
left unattended;
2) Before clearing a blockage;
3) Before checking, cleaning
or working on the machine;
4) After striking a foreign
object;
5) Whenever the machine
starts vibrating abnormally.
h)Take care against injury to
feet and hands from the
cutting means.
i) Always ensure that the
ventilation openings are kept
clear of debris.
j) Never fit metal cutting
elements.
k) Always be sure of your
footing on slopes.
l) Walk, never run.
m)Not overreach and keep the
balance at all times.
n) Not to touch moving
hazardous parts before the
machine is disconnected
from the mains and the
moving hazardous parts have
come to a complete stop.
4. Maintenance and storage
a) Disconnect the machine
from the power supply (e.G.
Remove the plug from the
mains) before carrying out
maintenance or cleaning
work.
b) Use only the manufacturer’s
recommended replacement
parts and accessories.
c) Inspect and maintain the
machine regularly. Have the
machine repaired only by an
authorized repairer.
d) When not in use, store the
machine out of the reach of
children.

11
2-in-1 Grass Trimmer/Edger EN
5. Recommendation
The machine should be
supplied via a residual
current device (rcd) with a
tripping current of not more
than 30mA.
SYMBOLS
Read operator’s manual
Keep bystanders away
Wear eye and ear protection
Do not expose to rain
Disconnect the mains plug if
the cord becomes damaged or
entangled.
Double insulation
Waste electrical products
must not be disposed of with
household waste. Please recycle
where facilities exist. Check with
your local authorities or retailer
for recycling advice.
Edging
Trimming
Unlock
Wear protective gloves
OPERATING INSTRUCTIONS
NOTE: Before using the tool, read the
instruction book carefully.
Intended Use
The machine is intended for the cutting of grass and
weeds under bushes, as well as on slopes and edges
that cannot be reached with the lawn mower.
WARNING! To avoid injury from unexpected
starting or electrical shock during assembly or
adjustment, do not plug the power cord into a source
of power.
Action Figure
Assembly
Assembling Safety Guard
WARNING: Make Sure the
Safety Switch is Locked
Off to Prevent Accidental
Starting.
See Fig. A, B
Assembling auxiliary handle See Fig. C
Pigtail power cord See Fig. D1,D2
Operation
ON/OFF Switch
WARNING! The cutting head
continues to rotate after the
trimmer has been switched off;
wait until it has completely
stopped then lay down the tool.
See Fig. E
Trimming
Adjusting the Height See Fig. F1
Adjusting the Auxiliary Handle See Fig. F2
Adjusting theTrimmer Head See Fig. F3
Trimming See Fig. F4
Using the Flower Guard See Fig. F5, F6

12
2-in-1 Grass Trimmer/Edger EN
Edging
WARNING! Always switch
the machine off and remove
plug from power source before
adjusting.
Changing the tool into the Edging
mode
NOTE: The trimmer head will only
rotate in one direction
See Fig. G1, G2
Edging See Fig. G3
Manually feeding the line See Fig. H
Removing the Cap See Fig. I
Cutting Head See Fig. J
Changing the line spool See Fig. K, L
Manually winding the line See Fig. M, N,
O, P
OPERATION INSTRUCTIONS
1. AUTOMATIC LINE FEED SYSTEM
When initially switching on the trimmer, a small
length of line is fed out.
A ‘clattering’ noise will be heard for a short time.This
is normal and is caused by the line being cut by the
line cutter. Once the line is cut to the correct length,
the ‘clattering’ noise will stop and the trimmer motor
will run at full speed.
To feed more line, stop the trimmer completely, then
restart, allowing the motor to reach full speed. Repeat
this until you hear the ‘clattering’ noise of the line
cutting. (Do not repeat this procedure more than 6 times)
2. MANUALLY FEEDING THE LINE (See Fig. H)
Press and release manual line feed button (13), whilst
gently pull out the lines until the lines reaches the
line cutter.
When the required amount of line is fed out, gently
pull on the second line (there is no need to press the
manual line feed button again). If the line extends
past the line cutter, too much line has been fed out.
If too much line is fed out, remove the cutting head
cover and rotate the spool anti-clockwise until the
line is at the desired length.
Removing the cap (See Fig. I)
Press and hold in the two latches (15).
Pull the Cutting Head Cover away from the Cutting
Head. Keep the cap and spool holder clean from
debris.To replace the cap, press it firmly towards the
spool holder. Ensure that it is correctly connected
by trying to remove it without depressing the two
latches.
Changing the line spool (See Fig. K, L)
First take off the cap and remove the old spool. Place
new spool into cutting head. Feed one line through
the eyelet, then repeat for second line (See Fig. L).
Release line from cleat on the Spool. Reattach the
cap.
WARNING! YourTrimmer is designed to only
use line with a maximum diameter of 1.65mm.
Only use nylon line.
IMPORTANT - Always wind the line onto the
upper section of the spool first.
3. MANUALLY WINDING THE LINE
(See Fig. M, N, O, P)
Take approximately 5m line and insert 15mm of
line into one of the holes in the upper section of the
spool (See Fig. M). Wind the line in the direction of
the arrows on the top of the spool (See Fig. N, O).
Leave approximately 100mm of line unwound and place
it into the cleat. Repeat on the lower section of spool.
Care should be taken to ensure that the line is neatly
coiled on the spool (See Fig. P). Failure to do so will
impair the efficiency of the automatic line feed.
Then fit the spool as described above in “Changing
the Line Spool”.
MAINTENANCE
Remove the plug from the socket before
carrying out any adjustment, servicing or
maintenance.
There are no user serviceable parts in your lawn
trimmer. Never use water or chemical cleaners to
clean your lawn trimmer. Wipe clean with a dry cloth.
Always store your lawn trimmer in a secure, dry
place out of the reach of children. Keep the motor
ventilation slots clean. Keep all working controls
free of dust. If you see some sparks flashing in the
ventilation slots, this is normal and will not damage
your lawn trimmer. Do not place other objects on the
product.
If the supply cord is damaged, it must be replaced
by the manufacturer, its service agent or similarly
qualified persons in order to avoid a hazard.
ENVIRONMENTAL
PROTECTION
Waste electrical products must not be disposed
of with household waste. Please recycle where
facilities exist. Check with your local authorities
or retailer for recycling advice.

13
2-in-1 Grass Trimmer/Edger EN
TROUBLESHOOTING
WARNING: Switch the machine off and remove plug from power source before investigating any fault.
Problems Possible Causes Corrective Action
Trimmer fails to
operate. No power
Power source socket faulty
Motor is broken.
Internal wiring of machine damaged.
Check power
Use another socket
Contact Service Agent.
Trimmer runs
intermittently. Motor is broken.
On/Off switch defective. Contact Service Agent.
Contact Service Agent.
Excessive
vibrations/
noise.
Machine defective.
Line spool is not wound well. Contact Service Agent.
Rewind the line. See “MANUALLY WINDING
THE LINE” (Fig. M, N, O, P).
Machine does
not cut. Line broken.
Motor is broken (speed is too low).
Grass entangled around cutting head.
Replace the line.
Contact Service Agent.
Remove grass.
Auto feed does
not work Cutting line is not wound well.
The line is tangled.
Line is used up.
Manually feed the line, if still cannot feed out,
remove the Spool out and rewind the line.
Replace with a new spool of line.

14
2-in-1 Grass Trimmer/Edger EN
PLUG REPLACEMENT
(ONLY FOR REWIRABLE
PLUG OF UK & IRELAND)
If you need to replace the fitted plug then follow the
instructions below.
IMPORTANT
The wires in the mains lead are colored in
accordance with the following code:
BLUE =NEUTRAL
BROWN = LIVE
As the colors of the wires in the mains lead of this
appliance may not correspond with the colored
markings identifying the terminals in your plug,
proceed as follows.The wire which is colored blue
must be connected to the terminal which is marked
with N.The wire which is colored brown must be
connected to the terminal which is marked with L.
WARNING! Never connect live or neutral wires
to the earth terminal of the plug. Only fit an
approved 13ABS1363/A plug and the correct rated
fuse.
NOTE: If a moulded plug is fitted and has to be
removed take great care in disposing of the plug
and severed cable, it must be destroyed to prevent
engaging into a socket.
Connect
Blue to N
(neutral)
Outer sleeve
firmly clamped
Cable grip
Brown L (live)
13 Amp fuse approved
to BS1362
DECLARATION OF
CONFORMITY
We,
POSITEC Germany GmbH
Konrad-Adenauer-Ufer 37
50668 Köln
Declare that the product,
Description WORX Electric Lawn trimmer/edger
trimmer
Type WG119E (1-designation of machinery,
representative of Lawn Trimmer and Edge
Trimmer)
Function Cutting grass and similar soft
vegetation and for trimming grass edges
Complies with the following Directives,
2006/42/EC, 2014/30/EU, 2011/65/EU,
2000/14/EC amended by 2005/88/EC
2000/14/EC amended by 2005/88/EC:
- Conformity Assessment Procedure as per
Annex VI
- Measured Sound Power Level 95.2dB(A)
- Declared Guaranteed Sound Power Level
96dB(A)
-The notified body involved
Name: Intertek Testing & Certification Ltd
(notified body 0359)
Address: Davy Avenue, Knowlhill, Milton
Keynes, MK5 8NL
Standards conform to:
EN 60335-1 EN 50636-2-91
EN 62233 EN ISO 3744
EN 55014-1 EN 55014-2
EN 61000-3-2 EN 61000-3-3
The person authorized to compile the technical file,
Name: Russell Nicholson
Address: Positec Power Tools (Europe) Ltd, PO
Box 6242, Newbury, RG14 9LT, UK
Suzhou 2017/03/31
Allen Ding
Deputy Chief Engineer,Testing & Certification

15
D
2-in-1 Rasentrimmer/Kantenschneider
TECHNISCHE DATEN
Typ WG119E (1- Bezeichnung der Maschine,
repräsentiert die Rasentrimmer und
Kantenschneider)
Nennspannung 220-240V~50/60Hz
Macht 550W
Leerlaufnenndrehzahl 8900/min
Max. Schneidradius 30cm
Fadendurchmesser 1.65mm
Fadenlänge 2x5m
Gewicht 2.4kg
Schutzisolation /II
INFORMATIONEN ÜBER LÄRM
Gewichteter Schalldruck LpA=84dB(A)
KpA 3.0dB(A)
Gewichtete Schallleistung LwA=96dB(A)
Tragen Sie einen Gehörschutz
INFORMATIONEN ÜBER
VIBRATIONEN
Typischer gewichteter
Vibrationswert
ah= 2.7m/s²
Unsicherheit K=1.5m/s²
WARNUNG! Der Vibrationsemissionswert
kann während des tatsächlichen Gebrauchs
des Elektrowerkzeugs vom angegebenenWert
abweichen, je nachdem, wie das Werkzeug
gemäß folgenden Beispielen und weiteren
Verwendungsmöglichkeiten eingesetzt wird:
Die Verwendung des Werkzeugs und die Art, wie die
Materialien geschnitten oder angebohrt werden.
Der Pflege- und Wartungszustand des Werkzeugs.
Die Verwendung des richtigen Zubehörs und dessen
Schärfe und Zustand.
Die Festigkeit der Handgriffe und die Benutzung von
Antivibrationszubehör.
Der bestimmungsgemäß eund diesen Anweisungen
entsprechende Gebrauch.
Wird dieses Werkzeug nicht angemessen
gehandhabt, kann es zum Auftreten des Hand-
Arm-Vibrationssyndroms kommen.
WARNUNG! Sie sollten die tatsächlichen
Arbeitsabschnitte genau ermitteln, um so
den Belastungsrad abzuschätzen. Auf diese Weise
kann der Belastungsgrad während der gesamten
Arbeitszeit möglicherweise wesentlich gemindert
werden.
So minimieren Sie das Risiko, dem Sie bei
Vibrationen ausgesetzt sind.
Verwenden Sie IMMER scharfe Meißel, Bohrer und
Sägeblätter.
Pflegen Sie dieses Werkzeug den Anweisungen
entsprechend und achten Sie stets auf eine gutes
Einfetten (wo erforderlich).
Bei regelmäßiger Verwendung von Elektrowerkzeug
sollten Sie in Antivibrationszubehör investieren.
Vermeiden Sie den Einsatz von Werkzeugen bei
Temperaturen von 10ºC oder darunter.
Erstellen Sie einen Arbeitsplan, um dieVerwendung
von hochvibrierenden Werkzeugen auf mehrereTage
zu verteilen.
1. EIN-/AUSSCHALTER
2. ZUSATZHANDGRIFF
3.
HANDGRIFFDREHUNG-SPERRMECHANISMUS
4.
HÖHENVERSTELLUNG-SPERRMECHANISMUS
5. TELESKOPSCHAFT
6. SCHNEIDKOPF-EINSTELLTASTE
7. MOTORGEHÄUSE
8. BLUMENSCHUTZ
9. SCHNEIDKOPF
10. SICHERHEITSSCHUTZ
11. VERLÄNGERUNGSKABEL-HALTERUNG
12. SCHNEIDFADEN (Siehe Abb. B)
13. FADENZUFUHRKNOPF (Siehe Abb. H)
14. SCHNEIDKOPFABDECKUNG (Siehe Abb. J)
15. KAPPENENTRIEGELUNG (Siehe Abb. J)
16. SPULE (Siehe Abb. J)
17. ÖSE (Siehe Abb. J)
Abgebildetes oder beschriebenes Zubehör
gehört teilweise nicht zum Lieferumfang.

16
D
2-in-1 Rasentrimmer/Kantenschneider
ZUBEHÖRTEILE
Blumenschutz 1
Zusatzhandgriff 1
Sicherheitsschutz 1
Spule (WA0007) 1
Wir empfehlen Ihnen, sämtliche Zubehörteile
beim selben Fachhändler zu beziehen, bei dem Sie
auch Ihr Elektrowerkzeug gekauft haben. Weitere
Informationen finden Sie auf der Verpackung der
Zubehörteile. Auch Ihr Fachhändler berät Sie gerne.
PRODUKTSICHERHEIT
ALLGEMEINE
SICHERHEITSHINWEISE
WARNUNG!
Lesen Sie alle
Sicherheitshinweise und
Anweisungen. Versäumnisse
bei der Einhaltung der
Sicherheitshinweise und
Anweisungen können
elektrischen Schlag, Brand und/
oder schwere Verletzungen
verursachen.
Bewahren Sie alle
Sicherheitshinweise und
Anweisungen für die
Zukunft auf.
Lassen Sie ein beschädigtes
Netzkabel vom Hersteller, von
einem Fachhändler oder von
einer ähnlich qualifizierten
Person austauschen, um eine
Gefährdung zu vermeiden.
WICHTIG
VOR GEBRAUCH BITTE
GENAU DURCHLESEN
FÜR SPÄTERE
BEZUGNAHME
AUFBEWAHREN
SICHERE
ARBEITSVERFAHREN
1. Training
a) Die Anweisungen
aufmerksam durchlesen.
Machen Sie sich mit den
Bedienelementen und
dem vorschriftsmäßigen
Gebrauch dieses Gerät
vertraut.
b) Lassen Sie niemals
Kinder, Personen mit
eingeschränkten physischen,
sensorischen oder mentalen
Fähigkeiten und Erfahrung
oder Personen, die nicht mit
diesen Anweisungen vertraut
sind, die Maschine bedienen.
Lokale Vorschriften können
das Alter des Bedieners
einschränken.
c) Die Bedienperson bzw. der
Benutzer ist für Unfälle
oder Schäden an anderen
Menschen oder deren
Eigentum verantwortlich.
2. Vorbereitung
a) Kontrollieren Sie das
Netzkabel und das
Verlängerungskabel
auf Beschädigung oder
Abnutzung. Falls das
Netzkabel im Gebrauch
beschädigt wird, sofort
den Netzstecker aus
der Steckdose ziehen.

17
D
2-in-1 Rasentrimmer/Kantenschneider
DAS NETZKABEL NICHT
BERÜHREN EHE ES AUS
DER STECKDOSE GEZOGEN
IST. Verwenden Sie die
Maschine nicht, wenn das
Kabel beschädigt oder
verschlissen ist.
b) Halten Sie
Verlängerungskabel fern
von gefährlichenTeilen, um
Schäden an den Kabeln zu
verhindern, die zum Kontakt
mit unter Strom stehenden
Teilen führen können.
c) Bevor Sie die Maschine
verwenden, untersuchen
Sie diese stets auf sichtbare
Schäden, fehlende oder
falsch platzierte Abdeckungen
oder Schutzschilde.
d) Benutzen Sie die Maschine
niemals während sich
Personen, insbesondere
Kinder, oderTiere in
unmittelbarer Nähe
aufhalten.
3. Betrieb
a) Halten Sie
Versorgungsleitungen und
Verlängerungskabel fern von
Schneidwerkzeugen.
b) Tragen Sie beim Betrieb der
Maschine stets Augenschutz,
lange Hosen und festes
Schuhwerk.
c) Vermeiden Sie die Nutzung
der Maschine bei schlechtem
Wetter, besonders wenn die
Gefahr eines Blitzschlags
besteht.
d) Verwenden Sie die Maschine
nur beiTageslicht oder gutem
künstlichen Licht.
e) Bedienen Sie die
Maschine niemals mit
beschädigten oder fehlenden
Schutzvorrichtungen oder
Abdeckungen.
f) Schalten Sie den Motor
nur ein, wenn die Hände
und Füße fern vom
Schneidebereich sind.
g) Klemmen Sie die
Maschine stets von der
Stromversorgung ab (z. B.
ziehen Sie den Stecker aus
der Steckdose)
1) Wenn die Maschine
unbeaufsichtigt gelassen
wird;
2) Sie ein Hindernis
wegräumen;
3) Sie die Maschine
überprüfen, säubern oder an
der Maschine arbeiten;
4) Nach der Kollision mit
einem Fremdkörper;
5) Immer, wenn die Maschine
ungewöhnlich zu vibrieren
beginnt.
h) Achten Sie darauf, Ihre
Hände und Füße nicht an
den Schneidwerkzeugen zu
verletzten.
i) Lüftungsöffnungen
regelmäßig kontrollieren und
säubern..

18
D
2-in-1 Rasentrimmer/Kantenschneider
j) Niemals
Schneidvorrichtungen aus
Metall anbauen..
k) Auf schrägen Flächen stets
auf sicherenTritt achten.
l) Gehen Sie, laufen Sie nicht.
m) Lehnen Sie sich nicht hinaus,
und halten Sie stets das
Gleichgewicht.
n) Berühren Sie keine
gefährlichen beweglichen
Teile, bevor die Maschine
von der Stromversorgung
getrennt wurde und die
beweglichenTeile vollständig
zum Stillstand gekommen
sind.
4. Wartung und
aufbewahrung
a) Klemmen Sie die Maschine
von der Stromversorgung
ab (z. B. ziehen Sie den
Stecker aus der Steckdose),
bevor Sie Wartungs-
oder Reinigungsarbeiten
durchführen.
b) Verwenden Sie ausschließlich
vom Hersteller empfohlene
Ersatzteile und Zubehör.
c) Untersuchen und warten Sie
die Maschine regelmäßig.
Lassen Sie die Maschine
nur von einem autorisierten
Fachmann reparieren.
d) Lagern Sie das Gerät
außerhalb der Reichweite
von Kindern, wenn es nicht
gebraucht wird.
5. Empfehlungen
Elektrogeräte über eine
Fehlerstrom-Schutzschaltung
mit einem Auslösestrom von
maximal 30mA zu betreiben.
SYMBOLE
Bedienungsanleitung lesen
Halten Sie einen
Sicherheitsabstand zu
Unbeteiligten ein
Tragen Sie Augen- und Gehörschutz
Setzen Sie es keinem Regen aus
Trennen Sie die
Stromversorgung, wenn
das Kabel beschädigt oder
verklemmt ist.
Schutzisolation
Elektroprodukte dürfen nicht mit
dem normalen Haushaltsmüll
entsorgt werden, sondern
sollten nach Möglichkeit zu
einer Recyclingstelle gebracht
werden. Ihre zuständigen
Behörden oder Ihr Fachhändler
geben Ihnen hierzu gerne
Auskunft.
Kantenschneiden

19
D
2-in-1 Rasentrimmer/Kantenschneider
Trimmen
Entriegeln
Schutzhandschuhe tragen
HINWEISE ZUM BETRIEB
HINWEIS: Lesen Sie das Handbuch vor
Inbetriebnahme des Werkzeuges sorgfältig
durch.
Bestimmungsgemäßer Gebrauch
Das Gerät ist bestimmt für das Schneiden von Gras
und Unkraut unter Büschen sowie an Böschungen
und Kanten, die mit dem Rasenmäher nicht erreicht
werden können.
WARNUNG! Um Verletzungen durch
unerwartetes Anlassen oder Stromschläge bei
der Montage oder Einstellung zu vermeiden, ziehen
Sie das Netzkabel nicht in der Energiequelle ab.
MASSNAHME ABBILDUNG
MONTAGE
Montage der Schutzhaube
WARNUNG! Stellen
Sie sicher, dass der
Sicherheitsschalter entriegelt
ist, um ein unabsichtliches
Starten zu vermeiden.
Siehe Abb. A, B
Montage des Zusatzgriffs Siehe Abb. C
Anschlussleitung Siehe Abb. D1,D2
Betrieb
Ein-/Ausschalter
WARNUNG: Beim
Ausschalten desTrimmers
dreht sich der Schneidkopf noch
weiter. Warten Sie mit dem
Niederlegen, bis er sich nicht mehr
dreht.
Siehe Abb. E
Trimmen
Höhe einstellen Siehe Abb. F1
Einstellung des Zusatzhandgriffes Siehe Abb. F2
Einstellung desTrimmerkopfes Siehe Abb. F3
Trimmen Siehe Abb. F4
Anwendung des Blumenschutzes Siehe Abb. F5,
F6
Kantenschneiden
WARNUNG! Stets
ausschalten und den
Netzstecker entfernen.
Wechseln des Werkzeugs in den
Kantenschneidmodus
HINWEIS:DerTrimmkopf lässt
sich nur in eine Richtung drehen.
Siehe Abb. G1,
G2
Kantenschneiden Siehe Abb. G3
Manuelle Zuführung des Fadens Siehe Abb. H
So Entfernt man die Kappe Siehe Abb. I
Schneidkopf Siehe Abb. J
Auswechseln der Fadenspule Siehe Abb. K, L
Manuelle Zuführung des Fadens Siehe Abb. M,
N, O, P
HINWEISE ZUM BETRIEB
1. AUTOMATISCHE FADENZUFUHR
Wenn Sie denTrimmer zum ersten Mal einschalten,
wird der Faden automatisch ein kleines Stück
verlängert.
Sobald der Faden das Kappmesser berührt, ist
ein ‚klapperndes’ Geräusch zu hören. Das ist
normal und eine Folge davon, dass der Faden vom
Fadenschneider geschnitten wird. Sobald der Faden
zur korrekten Länge zugeschnitten ist, hört das
Klappergeräusch auf und der Motor desTrimmers
läuft auf vollenTouren.
Schalten Sie dazu denTrimmer ab, lassen Sie
ihn zum Stillstand kommen und schalten Sie ihn
dann wieder ein, bis er volle Drehzahl erreicht.
Wiederholen Sie diesen Vorgang, bis Sie das
klappernde Geräusch hören, das entsteht, wenn der
Faden gegen das Kappmesser schlägt (max. 6 Mal
wiederholen).
2. MANUELLE ZUFÜHRUNG DES FADENS
(Siehe Abb. H)
Drücken Sie den Fadenzufuhrknopf (13) und lassen Sie
ihn los während Sie vorsichtig einen der beiden Fäden
herausziehen, bis er den Fadenschneider erreicht hat.
Wenn die benötigte Fadenmenge draußen ist, ziehen
Sie vorsichtig am zweiten Faden (Sie müssen nicht
nochmals den Fadenzufuhrknopf drücken).Reicht der
Faden über den Fadenschneider hinaus, ist zu viel
Faden herausgekommen.
Wenn zu viel Faden herausgekommen ist, sollten Sie
den Spulenhalter abnehmen und die Spule gegen
den Uhrzeiger klicken, bis der Faden die gewünschte
Länge hat.

20
D
2-in-1 Rasentrimmer/Kantenschneider
So entfernt man die kappe (Siehe Abb. I)
Halten Sie die beiden Laschen gedrückt (15).
Ziehen Sie die Abdeckung des Schneidkopfes vom
Schneidkopf weg. Halten Sie die Abdeckung des
Schneidekopfes und das Innere des Schneidkopfes
frei von Rasenresten. Zum Anbringen der Abdeckung
des Schneidkopfes drücken Sie diese fest auf den
Spulenhalter. Kontrollieren Sie, ob die Kappe richtig
sitzt, indem Sie versuchen sie zu lösen, ohne auf die
beiden Laschen zu drücken.
Auswechseln der fadenspule (Siehe Abb. K, L)
Nehmen Sie zuerst die Abdeckung des Schneidkopfes
ab und entfernen Sie die alte Spule. Setzen Sie die
neue Spule auf den Kappe. Führen Sie einen Faden
durch die Öse, und wiederholen Sie den Vorgang mit
dem zweiten Faden (Siehe Abb. L). Lösen Sie den
Faden von der Klemme auf der Spule. Bringen Sie die
Abdeckung des Schneidkopfs wieder an.
ACHTUNG! DerTrimmer ist für Fäden mit
einem Durchmesser von maximal 1,65 mm
ausgelegt. Verwenden Sie nur Nylonfaden.
WICHTIG – Den Faden immer erst auf den
oberen Teil der Spule aufwickeln.
3. MANUELLE ZUFÜHRUNG DES FADENS
(Siehe Abb.M, N, O, P)
Nehmen Sie einen ungefähr 5 m langen Faden.
Schieben Sie ein ca. 15 mm langes Stück Faden in
die Öffnungen im oberenTeil der Spule und wickeln
Sie die Spule in Richtung der oben auf der Spule
markierten Pfeile auf (Siehe Abb. M). Wiederholen
Sie den Vorgang mit einem anderen Stück Faden am
unterenTeil der Spule (Siehe Abb. N, O).
Lassen Sie die letzten 100mm des Fadens
heraushängen und klemmen Sie sie fest. Mit dem
unterenTeil der Spule genauso verfahren.
Achten Sie darauf, dass der Faden gleichmäßig auf
die Spule aufgewickelt ist. (Siehe Abb. P). Andernfalls
kann die automatische Fadenzufuhr nicht einwandfrei
funktionieren.
Bauen Sie dann die Spule wie unter „Austausch
von Spule und Schneidfaden“ beschrieben ein.
WARTUNG
Ziehen Sie grundsätzlich den Netzstecker,
bevor Sie Einstell-, Reparatur- oder
Wartungstätigkeiten ausführen.
Es enthält keineTeile, die Sie warten müssen.
Reinigen Sie Ihr Gerät niemals mit Wasser oder
chemischen Reinigungsmitteln. Wischen Sie
es mit einem trockenenTuch sauber. Lagern
Sie das Gerät immer an einem trockenen Platz,
und außer Reichweite von Kindern. Halten Sie
die Lüftungsschlitze sauber. Halten Sie alle
Bedienelemente staubfrei. Gelegentlich sind durch
die Lüftungsschlitze hindurch Funken zu sehen. Dies
ist normal und wird das Gerät nicht beschädigen.
Stellen Sie keine Gegenstände auf das Produkt.
Wenn ein Ersatz von Stecker oder Anschlussleitung
erforderlich ist, dann ist dies von unserer
Servicestelle oder einer Elektrofachwerkstatt
durchzuführen, um Sicherheitsgefährdungen zu
vermeiden.
UMWELTSCHUTZ
Elektroprodukte dürfen nicht mit dem normalen
Haushaltsmüll entsorgt werden, sondern
sollten nach Möglichkeit zu einer Recyclingstelle
gebracht werden. Ihre zuständigen Behörden oder Ihr
Fachhändler geben Ihnen hierzu gerne Auskunft
Other manuals for WG119E
2
Table of contents
Languages:
Other Worx Trimmer manuals

Worx
Worx WG268 User manual

Worx
Worx Powershare WG170 User manual

Worx
Worx WG259E Installation manual

Worx
Worx WG150 User manual

Worx
Worx WG200E User manual

Worx
Worx WG163E User manual

Worx
Worx WG156 9 Series User manual

Worx
Worx WGL 90 User manual

Worx
Worx WG119E Installation manual

Worx
Worx WG163.8 User manual