Wylie 8420 Programming manual

Operator’s & Parts Manual
8420, VSB, 8220 Boom
Printed In The USA — Specications & Design Subject To Change Without Notice!
4-1-18 05-08R4

This is a limited warranty. It covers products manufactured by WYLIE Mfg. Co. The Warrantor is WYLIE Mfg. Co., 702 E.
40th St., Lubbock, TX 79404 USA. The duration of the warranty for WYLIE manufactured equipment and products (excluding
polyethylene tanks) is for one year from date of delivery to the carrier. The Warrantor warrants to the Buyer that the product(s)
sold hereunder are free from defects to material and workmanship, under normal use and service, in the hands of the original
buyer.
If goods are defective, the defective goods will be replaced with identical goods. If identical goods are not available, the Buyer
may elect to receive a refund of the purchase price for the defective goods, or the Buyer may order similar goods. The damage
for defective goods shall not exceed the purchase price of the defective goods. No allowance shall be made for labor
or expense or repairing goods without prior approval in writing by the Warrantor. The Buyer’s remedy under this warranty
does not include incidental or consequential damages.
For products not manufactured by the Warrantor, the Warrantor warrants these products to the extent of the warranties of their
respective manufactures. There are no warranties which extend beyond this limited warranty, including the implied
warranty of merchantability. Dealers or representatives shall not make any representation in regard to particular goods except
as authorized by the Warrantor through a written warranty accompanying those particular goods.
WYLIE Mfg. Co., and its divisions, “Wylie Spray Centers,” in each location, requires as a condition of sale and coverage by its
LIMITED WARRANTY that all equipment sold by it be used in accordance with the instructions and specications of the Warrantor.
This requirement is in addition to the LIMITED WARRANTY.
Polyethylene and berglass tanks – These tanks are warranted for the storage and transport of water, herbicide solutions
(on farm), liquid fertilizer and liquid feed. Such tanks should not be used for the storage of any bulk herbicide (undiluted). Any
such use will render this warranty void.
In addition, the Warrantor makes no warranty with regard to bulkhead tank ttings used in connection with tanks containing bulk
herbicides and the use of any such ttings sold by the Warrantor or any WYLIE dealer in connection with tanks containing bulk
herbicides is improper.
Chemical Incompatibility – The Warrantor does not make any recommendations or warranties regarding chemical compatibility.
WYLIE shall not be liable for any damages due to chemical incompatibility, and any Buyer or user should rely solely on written
information furnished by the chemical manufacturer regarding chemical compatibility.
No employee of WYLIE Mfg. Co., or its representatives, agents or dealers, is authorized to vary the terms of this limited
warranty.
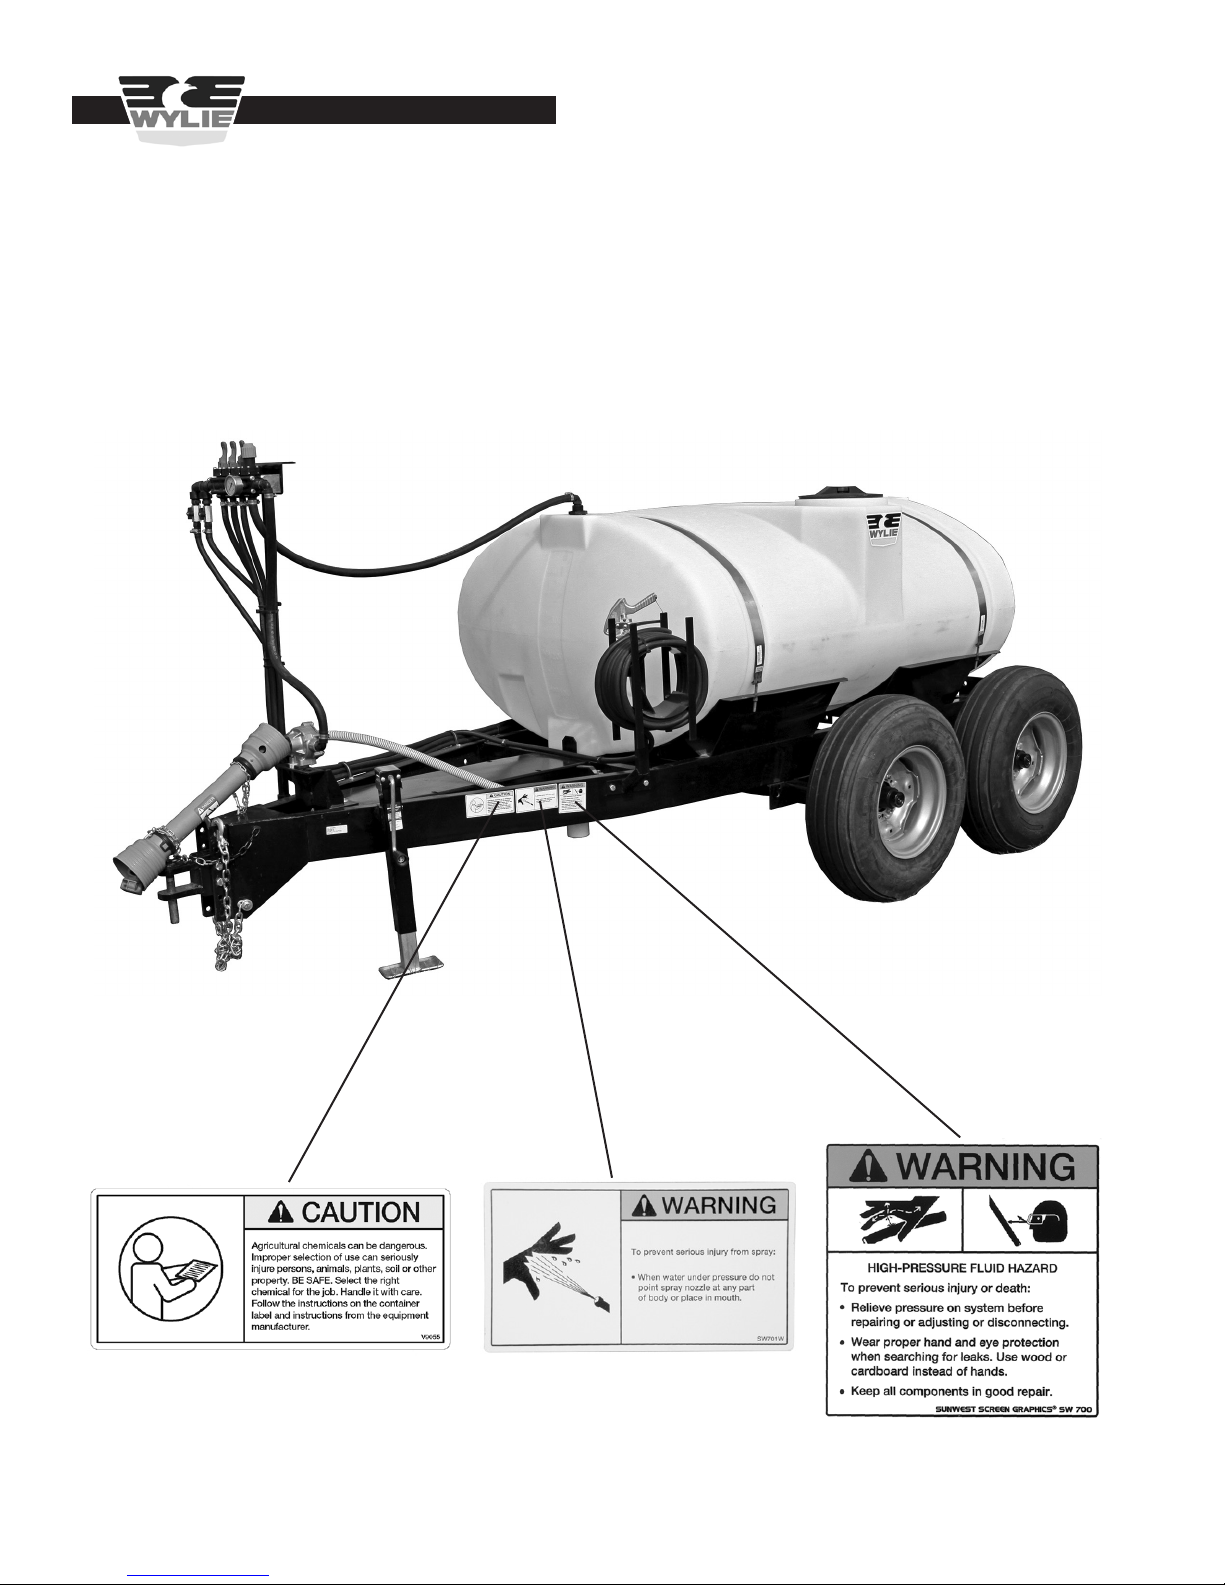
This equipment was carefully designed and manufactured to give you dependable service. To insure ecient operation of
this equipment, please read this operator’s manual carefully. Check each item and acquaint yourself with the adjustments
required to maintain optimum performance and operation. Remember, this equipment’s performance depends on
how you operate and care for it!
At the end of each season, thoroughly clean and inspect your equipment. Preventive maintenance saves time and pays
dividends. Your nearest Wylie Spray Center has original equipment parts which assure proper t and best performance.
Record your equipment’s model and serial numbers and the date you purchased this equipment in the space below.
Have this information available when you order parts or attachments.
Model Number:
Serial Number:
Date Purchased:
A Message To The Owner And Operator
Limited Warranty
Disclaimer of Warranty
Warranty Information

Wylie Manufacturing Company
702 E. 40th St.
Lubbock, TX 79404
Ph. 888-788-7753
8420, VSB, 8220 Boom
Date of Purchase
Model Number
Tank Serial Number
Trailer Serial Number
Boom Serial Number
Pump Model
Wylie Invoice Number
Owner’s Name
Address
City State Zip
Phone
Email
Dealer
Owner’s Signature
Must be returned within 10 days to validate the warranty.
Type of Applicator:
Row Crop Cotton
Small Grain Pasture
Other
Owner Registration
-- Or Register Online --
Go to: www.wyliesprayers.com

.

1
Table of Contents
Table Of Contents
Safety Issues .............................................................................................................................................................2-3
Safety Decals & Placement .......................................................................................................................................4-6
Introduction ................................................................................................................................................................... 7
Inspection & Setup .................................................................................................................................................. 8-11
Sprayer Operation .................................................................................................................................................12-15
Maintenance ............................................................................................................................................................... 16
Boom Adjustment ....................................................................................................................................................... 17
Trailer Adjustment ....................................................................................................................................................... 18
Troubleshooting Guidelines ...................................................................................................................................19-20
Lubrication .................................................................................................................................................................. 21
Repair Parts...........................................................................................................................................................23-50
8420 Boom Center Section .............................................................................................. 24
8420 Boom Primary/Secondary Section .......................................................................... 25
Vari-Space Boom (VSB) ...................................................................................................26
8220 Boom ....................................................................................................................... 27
Parallel Linkage; Boom Plumbing .................................................................................... 28
EP-1000 Trailer ................................................................................................................ 29
HCS Trailer ....................................................................................................................... 30
LCS Tandem Trailer ...................................................................................................31 - 32
LCS Single Trailer ............................................................................................................ 33
3 Point Carrier Frame ....................................................................................................... 34
3 Point Centrifugal Pump Plumbing ................................................................................. 35
EP-1000/HCS Pump Plumbing ........................................................................................ 36
EP-1000/HCS Tandem Plumbing .....................................................................................37
Mix-n-Fill Assembly; Fresh Water ..............................................................................38 - 39
Boom Buster; Hose & Gun ............................................................................................... 40
Roller Pump & Hypro Control Plumbing ........................................................................... 41
Raven 450 Automatic Controller ....................................................................................... 42
Remcor 2551 Control Panel (Ball Valves) ........................................................................ 43
Remcor 2040 Control (Solenoids) .................................................................................... 44
Raven Boom Valve ...........................................................................................................45
Remcor 1999A Solenoid ................................................................................................... 46
Hypro Valve Parts/ Brass Gear Pump Parts ..................................................................... 47
Hypro Roller Pump Parts .................................................................................................. 48
Ace 206 Pump Parts ........................................................................................................ 49
#43 Gunjet Repair Parts ................................................................................................... 50

2
Be alert when you see the above symbol in the manual. It warns of a hazard
which might lead to injury. It means: Attention! Become alert! Your safety is
Involved!
Three (3) words (Danger, Warning, and Caution) are associated with this symbol.
DANGER – Indicates a hazardous situation, which, if not avoided, will result in death or serious injury. This signal word
is to be limited to the most extreme situations.
WARNING – Indicates a hazardous situation, which, if not avoided, could result in death or serious injury.
CAUTION – Indicates a hazardous situation, which, if not avoided, may result in minor or moderate injury.
NOTICE – Indicates information considered important, but not hazard-related (e.g., messages relating to property damage).
SAFETY INSTRUCTIONS - Indicates a type of safety sign where specic safety-related instructions or procedures are described.
Before Use
Do not operate sprayer until this manual has been read and understood!
* Thoroughly read and understand all instructions before operating this sprayer. If you have questions,
please contact Wylie Manufacturing, 702 E. 40th St., Lubbock, TX 79404, (888) 788-7753.
You can also contact your nearest Wylie Spray Center.
* Place a “Slow Moving Vehicle” emblem on the rear of the unit prior to driving on open roads.
* Always wear safety goggles, chemical resistant apron and rubber gloves when handling chemicals.
* Read and understand the chemical manufacturer’s safety guidelines on handling, mixing and application.
During Use
* Do not allow anyone to ride on sprayer during operation. Falling can cause injury.
* Ensure the tractor has sucient weights to prevent tipping when spray tank is full.
* Reduce speed when crossing uneven or rough terrain.
* Always support the sprayer on parking stands and turn o tractor engine before making adjustments
or repairs.
Safety Issues
Safety Precautions

3
Safety Issues
* Inspect sprayer for wear or damage.
* Ensure that all fasteners and ttings are tight.
* Flush tank and pump with fresh water. Dispose of ush water using appropriate means.
* Carry out maintenance and/or lubrication procedures as outlined in this manual.
Always
* Keep hands, feet and clothing away from moving parts.
* Wear protective clothing and gloves when working with the hydraulic system.
* Escaping hydraulic uid under pressure can penetrate skin causing serious injury:
– Do Not use hands to check for leaks in hydraulic system, use cardboard or paper.
– Stop tractor engine and relieve pressure before connecting or disconnecting lines.
– Tighten all connections prior to starting engine or pressurizing line.
– If any uid is injected into the skin, obtain medical treatment immediately to avoid gangrene.
Operator’s Instructions
* Securely fasten seat belt if tractor is equipped with a Roll Over Protection System (ROPS).
* When possible, avoid operating the tractor near ditches, embankments and holes.
* Reduce speed when turning, crossing slopes and on rough, slick or muddy surfaces.
* Be aware of where you are going at all times; especially at row ends, roads and around trees.
* Do not permit others to ride.
* Operate tractor smoothly – no jerky turns, starts and stops.
* Hitch only to the drawbar and hitch points recommended by the tractor manufacturer.
* When tractor is idle, engage brakes and park lock securely.
* Tighten lug bolts before transporting and after the rst ve miles.
* Limit transport speed to 25 mph.
After Use

4
Decal #SW700
Decal #V9055
Decal #T3
Safety Decals & Placement
Safety Issues
Vari-Space Boom (VSB)
Decal #SW701W

5
Safety Decals & Placement
Safety Issues
Decal #SW202
Decal #SW700
Decal #T3
8420 Boom
Decal #V9055

6
Safety Decals & Placement
Safety Issues
Decal #SW700
HCS/LCS Trailers
Decal #V9055 Decal #SW701W

7
The Wylie 8420 boom, Vari-Space Boom (VSB), and 8220 boom are the result of years of testing and eld proven
experience. They are built of the nest materials and expert workmanship to provide you with years of reliable service.
The 8420 boom is built in a 45’ length while the VSB are built in 20’, 27’, or 42’ lengths and are available in 3 point and
trailer mounted congurations. The 8220 boom is available in a 30’ length. The setup and operation of the 8220 boom
on spray trailers is similar to the VSB, therefore, 8220 owners should refer to the instructions for the VSB and apply
them to the 8220 boom.
This manual explains where and how to make necessary adjustments to your sprayer for safe and proper operation.
Thoroughly read and understand the contents of this manual before operating your sprayer. If you have questions or do
not understand particular items, contact your nearest Wylie Spray Center or call Wylie Manufacturing at (888) 788-7753.
Please keep this manual handy to answer questions you may have as they arise.
Pay Particular Attention To All Safety Suggestions – Their purpose is to assure safe operation of the sprayer and
prevent injury or damage to yourself or the unit.
Introduction & Specs
Introduction
“8420” Boom Vari-Space Boom (VSB)
“8220” Boom

8
Inspection & Setup
Inspection & Setup
3 Point Carrier & Boom:
The 8420 boom and VSB can be mounted on the tractor
3 point hitch with or without a tank. If the boom is not
equipped with a tank, the tractor must be equipped with
front or side mount tanks to supply the boom with spray
solution.
The boom should be delivered setup and ready to mount
to the tractor without further assembly.
Crushing Hazard
To prevent serious injury or death:
Do not stand between sprayer and moving tractor
Stop tractor engine and set brake before installing pins
Mounting 3 pt. Carrier/Boom
Mount the carrier to the tractor 3 point hitch. Connect the
boom hydraulic and pump hydraulic hoses (if equipped)
to tractor hydraulic circuits. Adjust the top link to level the
sprayer when the boom is at spraying height. Move the
tractor to a at area with sucient clearance to unfold the
boom.
Spray Trailer & Boom:
The sprayer should be delivered setup and ready to attach
to the tractor without further assembly.
Attach to the tractor drawbar. Make sure that the clip pin is
inserted in the pull pin to prevent the pull pin from coming
out while transporting or spraying. The elliptical tank
sprayer has a height adjustable hitch. Set the hitch so that
the trailer is level when attached to the tractor.
A jack transport mount is available on some trailers which
prevents damage to the jack in very short turns.
Figure A1
Mounting 3 point VSB to tractor
Figure A2
Height Adjustable Hitch
Jack On Transport Mount >
Figure A3
Jack Mounted For Transport

9
Connect the boom hydraulic hoses and pump hydraulic
hoses (if equipped) to the tractor remotes. Hydraulic
centrifugal pumps require a tractor hydraulic circuit. Most
8420 booms are equipped with hydraulic fold while VSB
and 8220 booms are manual fold. The 8420 booms are
equipped with a parallel linkage and require a hydraulic
circuit. VSB and 8220’s bolt directly to the trailer frame.
The tractor engine should be shut o before
attaching the pump to the PTO shaft. Failure to do so
possibly cause serious injury or death.
Roller pumps are powered by the tractor PTO. The pump
may be equipped with a PTO drive shaft or the pump may
couple directly to the tractor PTO shaft.
Direct coupled roller pumps must have the chain attached
to the tractor frame to prevent the pump from rotating when
the PTO is engaged.
Spray Controller:
Several sprayer controllers can be tted with the 8420 boom
and the VSB’s. Usually the 8420 is controlled by the Raven
450 automatic controller or the Remcor 2551 controller. The
VSB and 8220 booms are usually controlled by a Remcor
2040 electric controller or the Hypro manual controller. If your
sprayer is equipped with a Raven or Remcor controller, refer
to the appropriate manual for detailed instructions on setting
the controller up for operation. The console should be mounted
in a convenient location in the tractor cab for easy access.
If your sprayer is equipped with a Hypro manual controller,
no further installation should be required.
Once the controller, foam marker control and any other
accessories are installed, move the tractor to a at area
with sucient clearance to unfold the boom.
Boom Inspection & Setup:
8420 Boom
The 8420 boom is equipped with an “over-center” break-
away that protects the boom when an obstruction is struck.
The breakaway may be folded to make transport easier.
If so, the breakaway must be unfolded manually.
Assure that the area is clear of all people before
unfolding boom. Failure to do so could cause bodily
injury to anyone hit by an unfolding boom.
Engage the hydraulic lever to unfold the boom. Carefully
unfold and fold the boom several times to purge any air
from the folding hydraulic system.
With the boom unfolded, check along the length of the
boom to assure that the boom is straight. If one or more
sections of the boom is not straight, refer to page 17 for
instructions on how to straighten boom.
Inspection & Setup
Figure A5
Remcor 2040 Mounted In Tractor
Figure A4
Pump With Drive Shaft Direct Coupled Pump
Figure A6
8420 Boom With Folded Breakaways

10
cables to make sure that they have uniform tension when
the boom is unfolded.
8220 Boom
The 8220 boom is a manually folded boom. Remove the
pin from the transport lock and rotate the boom to the spray
position.
Flushing The System
Do not add any chemical to any tank until the sprayer
has been fully checked for leaks.
Load about 100 gallons of clean water into the spray tank.
Add a few gallons of water to any other tanks such as the
fresh water tank.
Open ball valves to allow water to gravity ow through the
system. Check for any leaks. Close all ball valves except
the main ball valve between the spray tank and the pump.
Any uid leak on the suction side of the pump will result in
an air leak when the pump is started.
It is important to ush the boom before installing the spray
tips.
The sprayer can be equipped with a variety of pumps. The
following section will help starting the sprayer with the most
popular pumps.
Centrifugal Pump (Hydraulic Drive)
Note: The hydraulic uid ow supplying the pump must be set
the rst time the pump is engaged and anytime a dierent hy-
draulic circuit or tractor is used. Before engaging the pump, turn
the hydraulic adjustment to its lowest setting for that particular
circuit. With the return and boom valves turned o, engage the
hydraulic lever and slowly increase the hydraulic uid ow until
the boom pressure gauge reads no more than 100 psi.
Inspection & Setup
VSB (Vari-Space Boom)
Do not let the VSB drop. Allowing the boom to
free-fall into spray position could cause bodily
injury to anyone struck by a falling boom.
The VSB is a manual fold boom. The length of the boom
will determine if it is equipped with a secondary section.
With the sprayer positioned in an open area, remove the
lock pin while holding the boom. Let the boom lower into
position.
Once the boom has been lowered, unfold the secondary
section (if equipped). It is important to ush the boom
before installing the spray tips. Check the suspension
Figure A8
Unfolding VSB
Figure A7
Checking boom for straightness
boom
sections
should be
aligned
Transport Lock >
Figure A9
Unfolded 8220 Boom

11
Preparing The Sprayer For Operation
Install the spray tips and tip screens in each nozzle
body.
Open the agitator ball valve on the spray tank. Engage
the pump and open the valves to bring the boom up to
operating pressure. With the boom spraying, check all
plumbing connections for leaks. Make sure that all tips
are spraying a uniform pattern.
If the Hypro manual control is used, the operating pres-
sure will have to be set. The operating pressure is set by
adjusting the pressure relief valve located on the top of the
Hypro control valve. With the boom valves closed, tighten
the pressure relief valve to increase the pressure.
Figure A14
Installing tip screen and spray tip
Inspection & Setup
Activate the switch for each boom section to open the boom
valves (automatic controller should be set to “manual”) and
ush the boom with clear water. Turn the pump o once
the boom is ushed.
Roller Pump (PTO Drive)
With the agitator line open, engage the PTO drive to start
the pump. Water should be returning to the tank through
the agitator and the return line.
If an electric controller is used, turn the boom switches on
to allow water to ow through the open nozzle bodies. Turn
the pump o when the boom has been ushed.
If the manual Hypro controller is used, ip the boom valves
up to open the valves and allow the water to ow through
the open nozzle bodies. Close the valves and turn o the
pump when the boom has been ushed.
Figure A13
“O” Control Valves “On” Control Valves
Figure A12
Flushing boom with clean water
Figure A11
Activating Boom Switch On Remcor 2040 Controller
Figure A15
Adjusting Pressure Relief Valve
Figure A10
Adjusting hydraulic uid ow

12
Operation
Loading Spray Material Into The
Sprayer
Spraying solution can be loaded by either lling with a
pre-mixed solution or mixing the chemical and carrier on
the sprayer. Most trailer mounted sprayers have a Mix n’
Fill tank mounted on the trailer while most 3 point sprayers
use the Mix n’ Fill tank on the nurse trailer.
Always wear protective clothing, i.e. apron, face
shield, gloves and respirator, when handling any
chemicals. Failure to do so will risk chemical expo-
sure to your body resulting in sickness, injury or
possibly death.
3 Point Carrier:
3 point carriers may be equipped with an optional “Quick
Fill”. Remove the cap from the spray tank “Quick Fill”
coupling and attach the supply hose to the coupling. Open
the “Quick Fill” ball valve as well as the supply line. Fill
the spray tank with water or mixed solution.
If you are mixing the chemical in the spray tank, carefully
add the desired amount of chemical to the spray tank.
Turn the pump on and allow the agitator to circulate the
chemical for several minutes.
Trailer Sprayers:
Remove the cap from the “Quick Fill” coupling on the Main
Fill valve and attach the supply hose to the coupling. Open
the main ll ball valve as well as the main tank ball valve.
Make sure that the Mix-n-Fill valve is closed. Open the
supply line. Fill the spray tank with water, less the amount
of chemical to be added. (The Ace pump can be used to
ll the tank by closing the main valve and opening the ller
and return valve.)
The EP-1000 spray trailer is equipped with a Mix-n-Fill
tank mounted in the trailer tongue while the HCS-500T
spray trailer has the Mix-n-Fill tank mounted on a parallel
linkage frame.
EP-1000 Trailer Mix-n-Fill:
With the Mix-n-Fill valve closed, add the desired amount
of chemical to the Mix-n-Fill tank.
Open the agitator and return lines, then engage the pump.
Close the spray tank ball valve about halfway to “starve”
the pump slightly. Open the Mix n’ Fill ball valve to allow
the chemical to be drawn into the pump. Close the Mix
n’ Fill ball valve once the tank is empty to prevent an air
leak on the suction side of the pump. With the return ball
valve open, let the pump circulate the solution for several
minutes. Rinse the Mix n’ Fill tank and draw the rinse water
into the spray tank.
Figure B2
Filling Spray Tank
Operation
< ll valve open
< main valve open
Figure B3
Adding Chemical to EP-1000 Mix-n-Fill Tank
Figure B1
Filling Optional “Quick Fill”
ll hose >
fresh water valve closed >
Mix-n-Fill valve closed >

13
With the Mix n’ Fill ball valve closed, add the desired
amount of chemical to the Mix n’ Fill tank. Open the agitator
and return lines, then engage the pump. Close the spray
tank ball valve about halfway to “starve” the pump slightly.
Operation
HCS-500T Trailer Mix-n-Fill:
Pull the lock pin and lower the Mix-n-Fill tank. Place lock
pin back in the frame so that the tank stops in the correct
horizontal position. Assure that the Mix-n-Fill ball valve
is closed.
The Mix n’ Fill tank should always be empty except
when adding chemical to the sprayer. Raising and low-
ering the tank with chemical is dangerous and greatly
increases the possibility of chemical exposure to your
body resulting in sickness, injury or possibly death.
Figure B8
Adding Chemical to Mix-n-Fill Tank
< spray tank valve
< fresh water valve closed
< return valve open
agitator valve open >
Figure B4
EP-1000 Valve Setting for Chemical Induction
Figure B5
EP-1000 Chemical Induction
Figure B6
Removing Lock Pin from Mix-n-Fill Tank
Figure B7
Lowering Mix-n-Fill Tank
Figure B7
Adding Chemical To Mix-n-Fill Tank
lock pin >
Mix n’Fill valve closed >
open Mix-n-Fill valve >

14
Operation
Open the Mix n’ Fill ball valve to allow the chemical to be
drawn into the pump. Close the Mix n’ Fill ball valve once
the tank is empty to prevent an air leak on the suction side
of the pump.
With the return ball valve open, let the pump circulate the
solution for several minutes. Rinse the Mix n’ Fill tank and
draw the rinse water into the spray tank. Raise and lock the
Mix n’ Fill tank in the transport position. Close the return
line ball valve before starting to spray.
Other Spray Trailers:
Add chemical to other spray trailers by pouring the desired
amount of chemical in the spray tank through the llwell.
Open the spray tank valve and the agitator valve. Start the
pump and mix the chemical thoroughly.
Operating The Sprayer
The 8420 boom is equipped with lock bars to prevent
boom movement during transport. The lock bars should
be lowered before operation to allow the boom to self-level
during operation.
The boom must always operate perpendicular to the
ground. Failure to do this can cause excessive yaw
movement and can damage the boom.
Levelling Trailer Sprayers
Adjust the drawbar clevis on trailer units to level the spray
trailer. Set the boom to the desired spraying height by
adjusting the parallel linkage.
Levelling The Boom On 3 Point Units
Set the 3 point hitch on 3 point mounted units at the desired
boom spraying height. Adjust the top link to level the boom
while in the spraying position. (See Figure B13)
Activating The Sprayer
If you are using an automatic controller, refer to the owner’s
manual for instructions on setting the controller for the
desired spray volume and speed.
Figure B12
Trailer Should Run Level
Figure B8
Partially Closing Main Valve for Chemical Induction
Figure B10
Adding Chemical to LCS Trailer
< return & agitator valves open
< main valve partially open
Figure B9
Opening Mix n’Fill Valve
Mix n’Fill valve >
lock bars lock bars
Raise for Transport Lower for Operation
Figure B11
8420 Boom Lock Bars

15
Be aware of any obstructions, animals or people while
spraying. While the boom is equipped with a breakaway
to help protect the boom, damage or injury can occur
in a collision.
Engage the pump, activate the master switch on the con-
troller and begin spraying.
The 8420, 8220 and VSB are designed to operate at speeds
of 5-10 mph. Care and common sense, however, must be
used to determine the optimum speed for a particular spray-
ing operation. Factors such as rough surface conditions,
hillsides and terraces will require a slower operating speed.
Listed below are several things you should check to main-
tain trouble free spraying:
*Make sure spray tips are sized for the desired volume
and speed. (Refer to the TeeJet Catalog or Wylie
Catalog website if using TeeJet™ tips.)
*Clean pump strainer as needed to maintain adequate
ow to the pump.
*Keep tractor hydraulic level full for consistent
pump operation.
*Keep the agitator ball valve open and the return line
ball valve (if equipped) closed or slightly open while
spraying.
End Of The Day Procedure
Some chemicals require the boom to be ushed at the
end of the day to prevent corrosion in the pump or settling
of chemical in other components. To ush the pump and
boom, close the main tank, agitator and return line ball
valves, then open the fresh water tank valve. Set the con-
troller for manual operation, engage the pump and open
the boom valves to allow fresh water to ush the pump
and boom.
Operation
(4) Remove tips and strainers from the nozzle bodies.
Clean strainers and check tips for wear and damage.
(5) Open controller ball valves. Allow the system to
drain completely to prevent any parts from breaking due to
freezing. Loosen at least one cap from each boom section
to allow any water inside the nozzle bodies to drain. Check
any ttings where water can collect and disconnect to allow
drainage. Reconnect all ttings and ensure tightness once
system is drained.
(6) For further protection, pump environmentally safe
antifreeze or winter grade windshield washing uid into
the lines.
Preparing The Sprayer For Storage
(1) Flush the tank, pump and lines with clean water.
(2) Remove cap from the “Quick-Fill” and open ball
valve.
(3) Remove the drain plug from the primary strainer and
the plug from the “Tee” to drain the tank and suction lines.
Remove pump plug to drain pump housing.
Figure B15
Draining Tank
Figure B14
Valve Setting For Fresh Water Flush
Figure B13
Adjusting Top Link To Level Boom
Lower and lock into place any parking stands supplied with
trailer units when unhooked from the tractor to maintain
complete stability.
Agitator Valve Closed >
< Main Tank Valve Closed
Fresh Water Valve Open >
< Return Valve Closed

16
Maintenance
Maintenance and Adjustment
Occasionally, it may become necessary to clear debris
from the system. A primary strainer is located beneath
the spray tank.
Clearing Debris From System
Figure C2
Removing Tip Strainer
(2) Secondary strainers are located at each nozzle. To
clean, remove the nozzle cap (tip and gasket come out
with cap). Remove strainer from the nozzle body. Clean
and replace.
Wear chemical resistant rubber gloves,
apron and face protection when cleaning the
system. Failure to do so can cause sickness
or death. Read safety information provided
by chemical manufacturer for proper handling
procedures.
(1) Turn ball valve o. Remove the strainer’s base and
take out wire mesh screen. Clean and replace. Turn ball
valve on.
(3) Discard and replace damaged strainers.
It is possible for debris to get past the strainers and clog the
orice of the tip. Clean the tips with a TeeJet™ cleaning
brush only. Using wire, pocketknives or wire brushes
can cause damage to the tip, altering spray volume or
pattern.
Figure C1
Removing Strainer Screen
< Ball Valve
Strainer Screen >
Strainer Base >
Factory Setting Dimensions
35” (“8420” 45’)
End of Clevis to
End of Housing
34.5” (“8420” 45’)
End of Clevis to
End of Housing
Note: Chain length for #60 chain on secondary sprockets for wing section -- (20 links)
This manual suits for next models
2
Table of contents
Other Wylie Farm Equipment manuals
Popular Farm Equipment manuals by other brands

EASY COOPS
EASY COOPS Chicken Coop Plan 4x5 Assembly instructions

Horizont Agrar
Horizont Agrar Scout N2 operating instructions

Raven
Raven SmarTrax installation manual

Rain-Flo Irrigation
Rain-Flo Irrigation 2670 operating manual

Landoll
Landoll D5P Series Operator's manual

Focus Industries
Focus Industries Handler I manual