Y-cam HomeMonitor HD Pro User manual

1
Quick Start Guide
HomeMonitor HD Pro
Your unique camera ID is:
Sign up at http://www.homemonitor.me

2
Welcome to HomeMonitor™
Combining professional wireless internet cameras and
a secure online account, HomeMonitor™ allows you to
tap in to your home life from anywhere.
Watch live or see recorded events, from an internet-
enabled computer or smartphone, keeps you in touch
with what matters most.
HomeMonitor™ is super simple to set up and use, just connect a camera,
createanaccountandyou’reaway.
Never miss another important moment! HomeMonitor™ detects motion
and can send alerts to keep you updated, whilst simultaneously recording and
storing clips in to your secure online account so you can view or download later.
It’s easy, it’s versatile, it’s seeing your stuff – made simple.

3
Key features
• See and hear what’s happening live.
• Custom motion detection settings.
• Instantmotionalertsbyemailorpushnotication.
• Motion clips recorded into your online account.
• Customisable recording and alert schedules.
• Infrared nightvision lets you see-in-the-dark.
• Watch from your PC, Mac, smartphone, tablet and even Roku.
Your account includes*
• Live view from anywhere.
• Freeemailalertsandpushnoticationstoyoursmartphone.
• Free online secure storage in your own private account.
• View multiple HomeMonitor cameras under one account.
What’s in the box
HomeMonitor
HD Pro camera
with wall mount and
cable management
Wi-Fi aerial 1m/3ft network
(Ethernet cable)
3m/10ft power
supply with UK/
US/EU plugs
2 x screws and
anchors for xing
Screw, grommet
and Allan key for
wall mount
x2
Missing something? Contact us on monitor@y-cam.com
* Features may change occasionally as service improves, visit http://www.homemonitor.me for up-to-date account features

4
Stand
cap
Ball joint
Cable
Stand Stand cap screw
Exploring your HomeMonitor HD Pro
Light sensor
Lens
24 Infrared LEDs
HomeMonitor™ HD Pro
Image device: 1 Megapixel 1/4” CMOS
Viewing angle: Horizontal: 64°, Vertical: 35.5°
Infrared: 24 LEDs with range <10m. Infrared cut- lter
Dimensions: (W x L) 57 x 125 mm
Waterproof to IP66 standard
Sunshield
Top of camera Bottom of camera
Screw mount
Wi-Fi antenna
Protective boot
Status LED
Weatherproof reset button
Cable
Microphone
Sunshield adjusters
Green: (solid) Online/booting up
Green: (blinking) Sending video
Red: (blinking) Establishing connection
No light: No power
Status LED indications:
No light:

5
2
1
5
A
B
Setting up your HomeMonitor™ HD Pro
Setup shouldn’t take long & we’ll walk you through every
step. Before installing your camera where you need it,
this setup process should be done close to your router.
Access the cables
Attach Wi-Fi antenna (if using Wi-Fi)
Unscrew the
stand cap screw
(anti-clockwise)
Twist the stand
cap to remove
the cables
(anti-clockwise)
Remove the protective
boot and screw on the
Wi-Fi aerial in it’s place
(clockwise)

6
4
3
6
Connect the camera to your router and power
Use the network (Ethernet) cable supplied to connect your HomeMonitor camera to a spare
network port on the back of your router. Connect the power. The Status LED on the front of
theHomeMonitorHDProwillstartashing.Waitforittostarttalkingtoourserversandgo
green (can take up to 10 minutes).
Visit http://www.homemonitor.me and choose ‘Create Account’.
Follow online steps for connecting your HomeMonitor™ to Wi-Fi or using
it with a network cable.
Tip: If you already have an existing HomeMonitor account, please login and go to Camera
Manager to add your new camera.
Visit www.homemonitor.me & create your account

77
Connected on Wi-Fi or using extender
Wi-Fi connection for our camera is most
popular, but thick or insulated external walls
can greatly reduce the signal. Always test
the camera can reach your network before
installation.
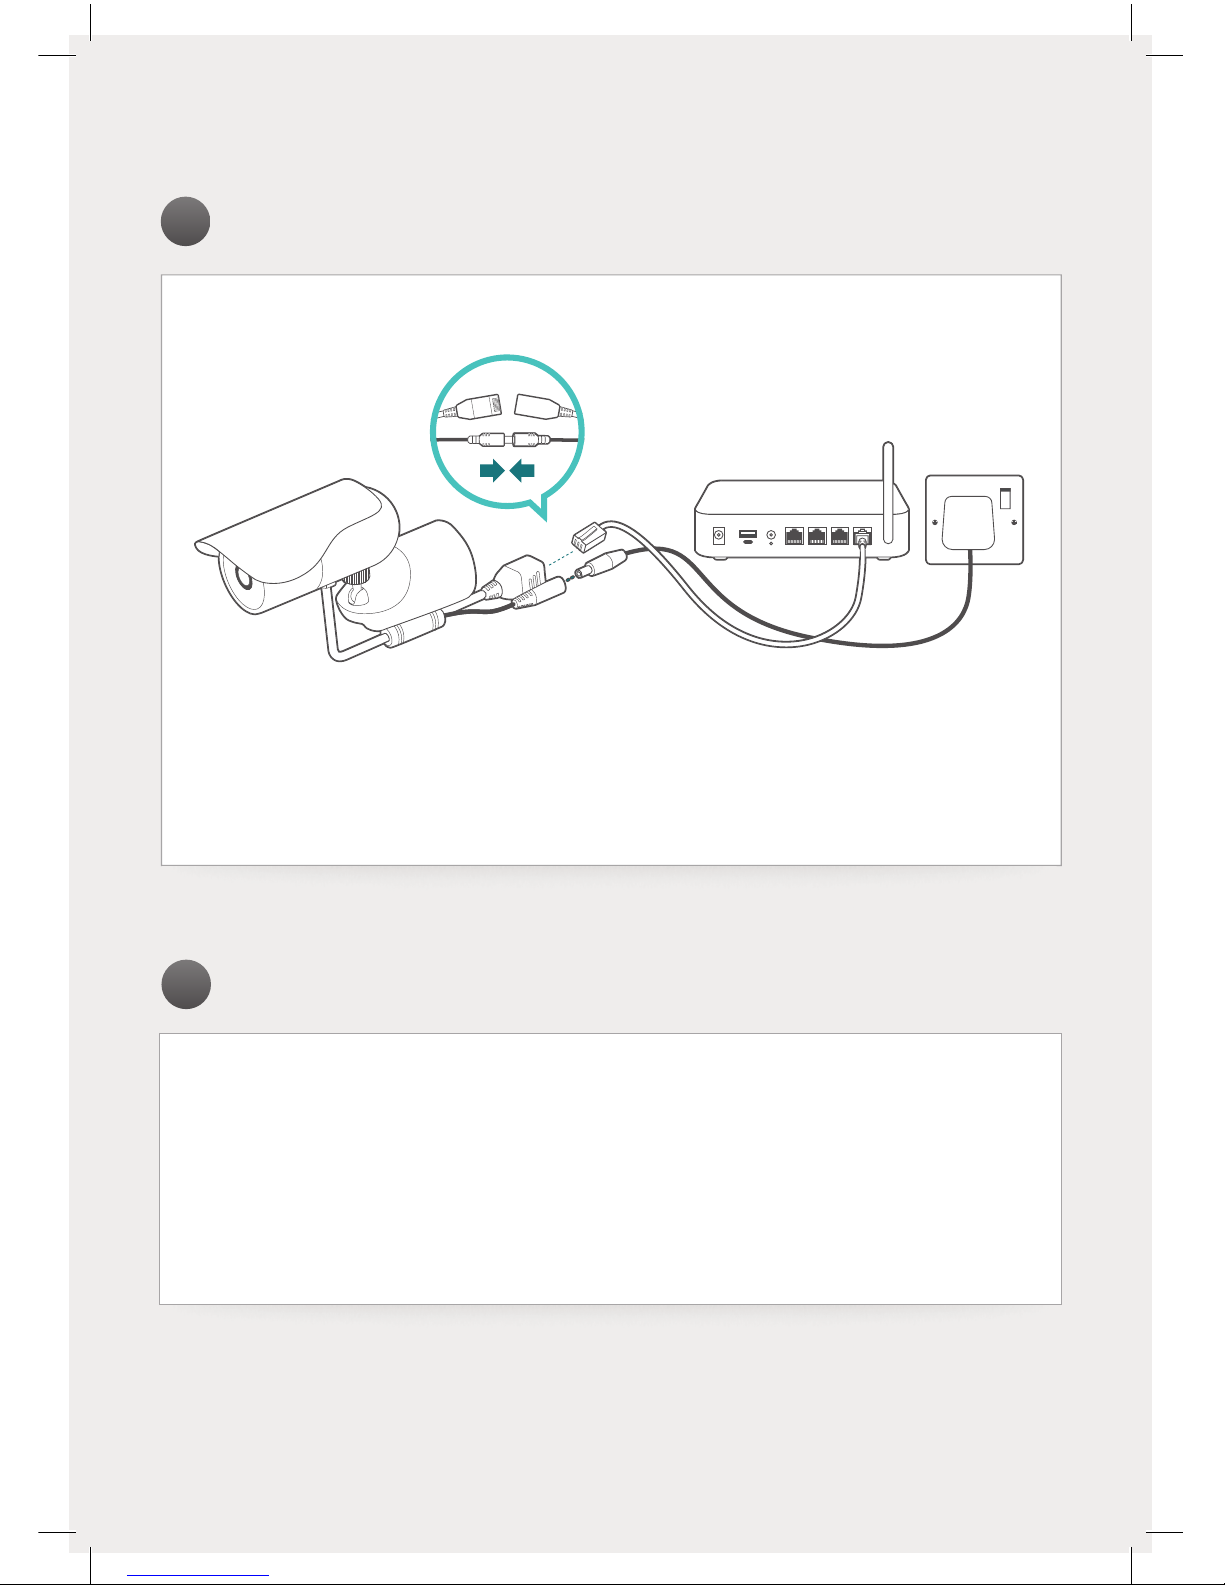
Connected by network cable or PoE
Ethernet or Power over Ethernet
(PoE) connections are the most reliable.
PoE allows you to also power the camera
from a PoE switch/router, so only 1 cable is
required to reach the camera.
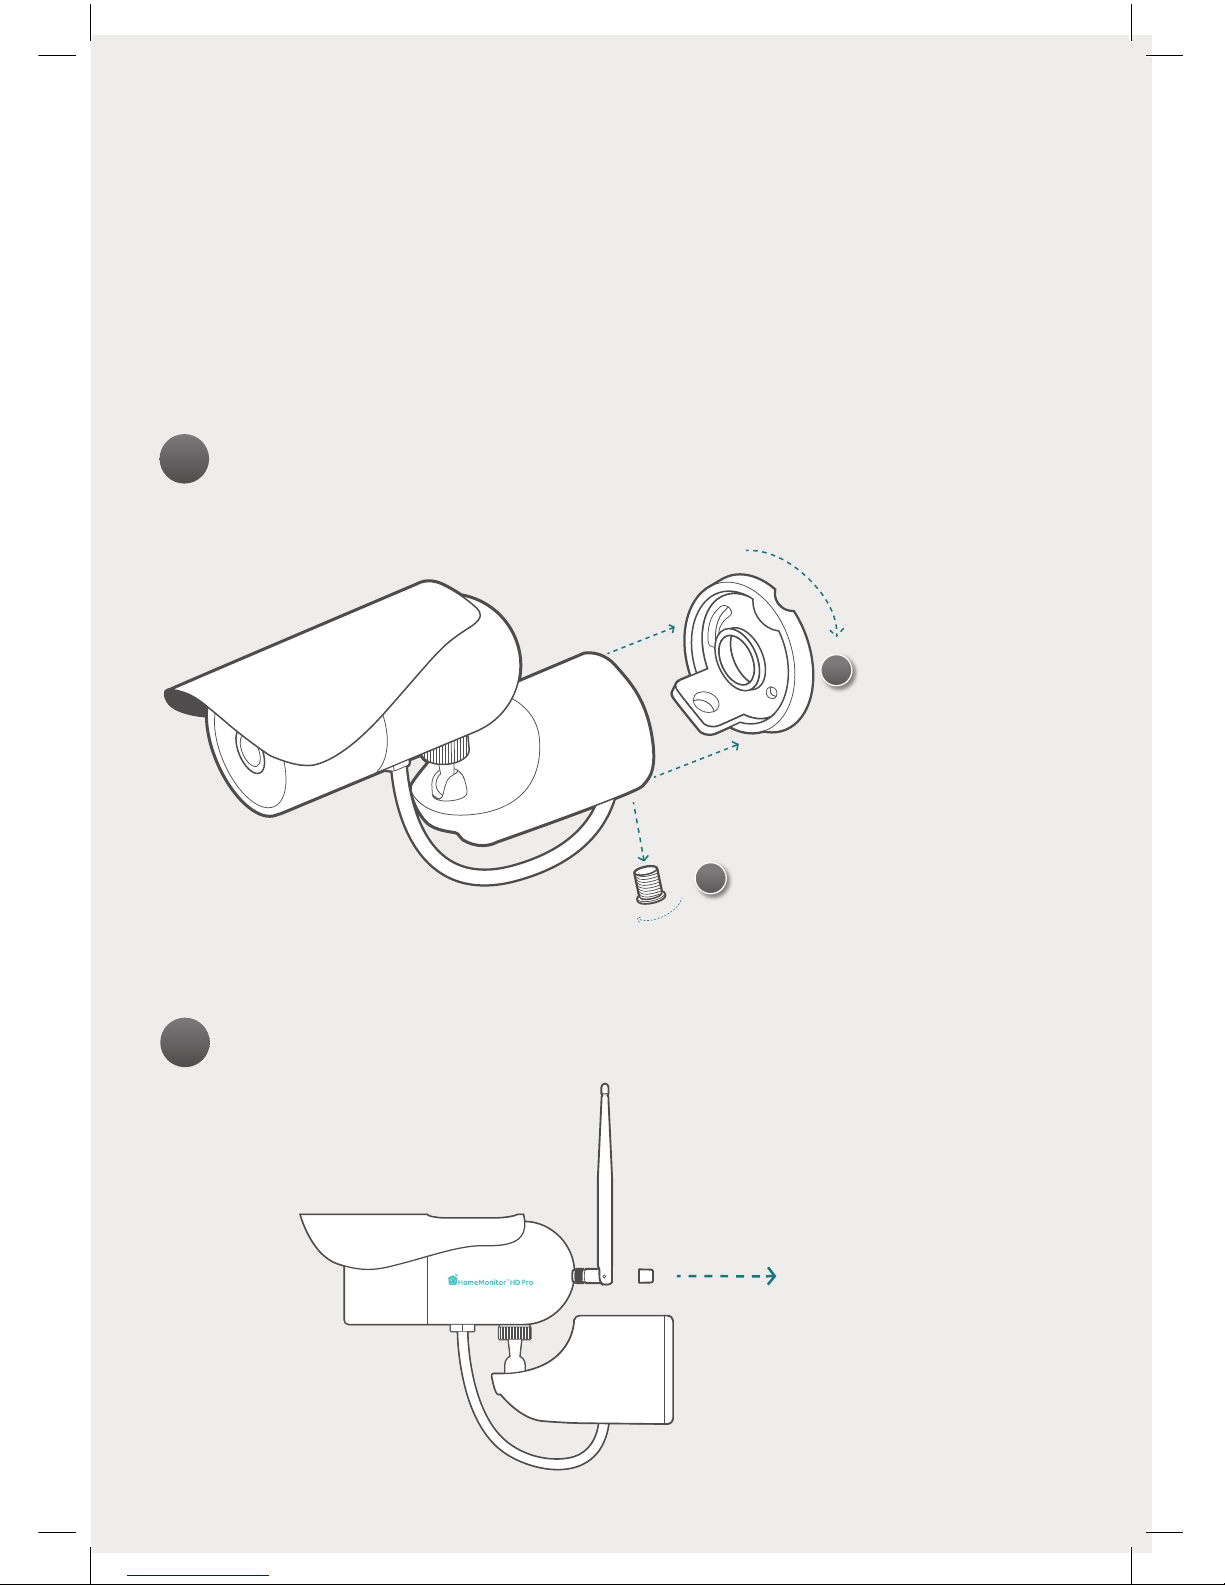
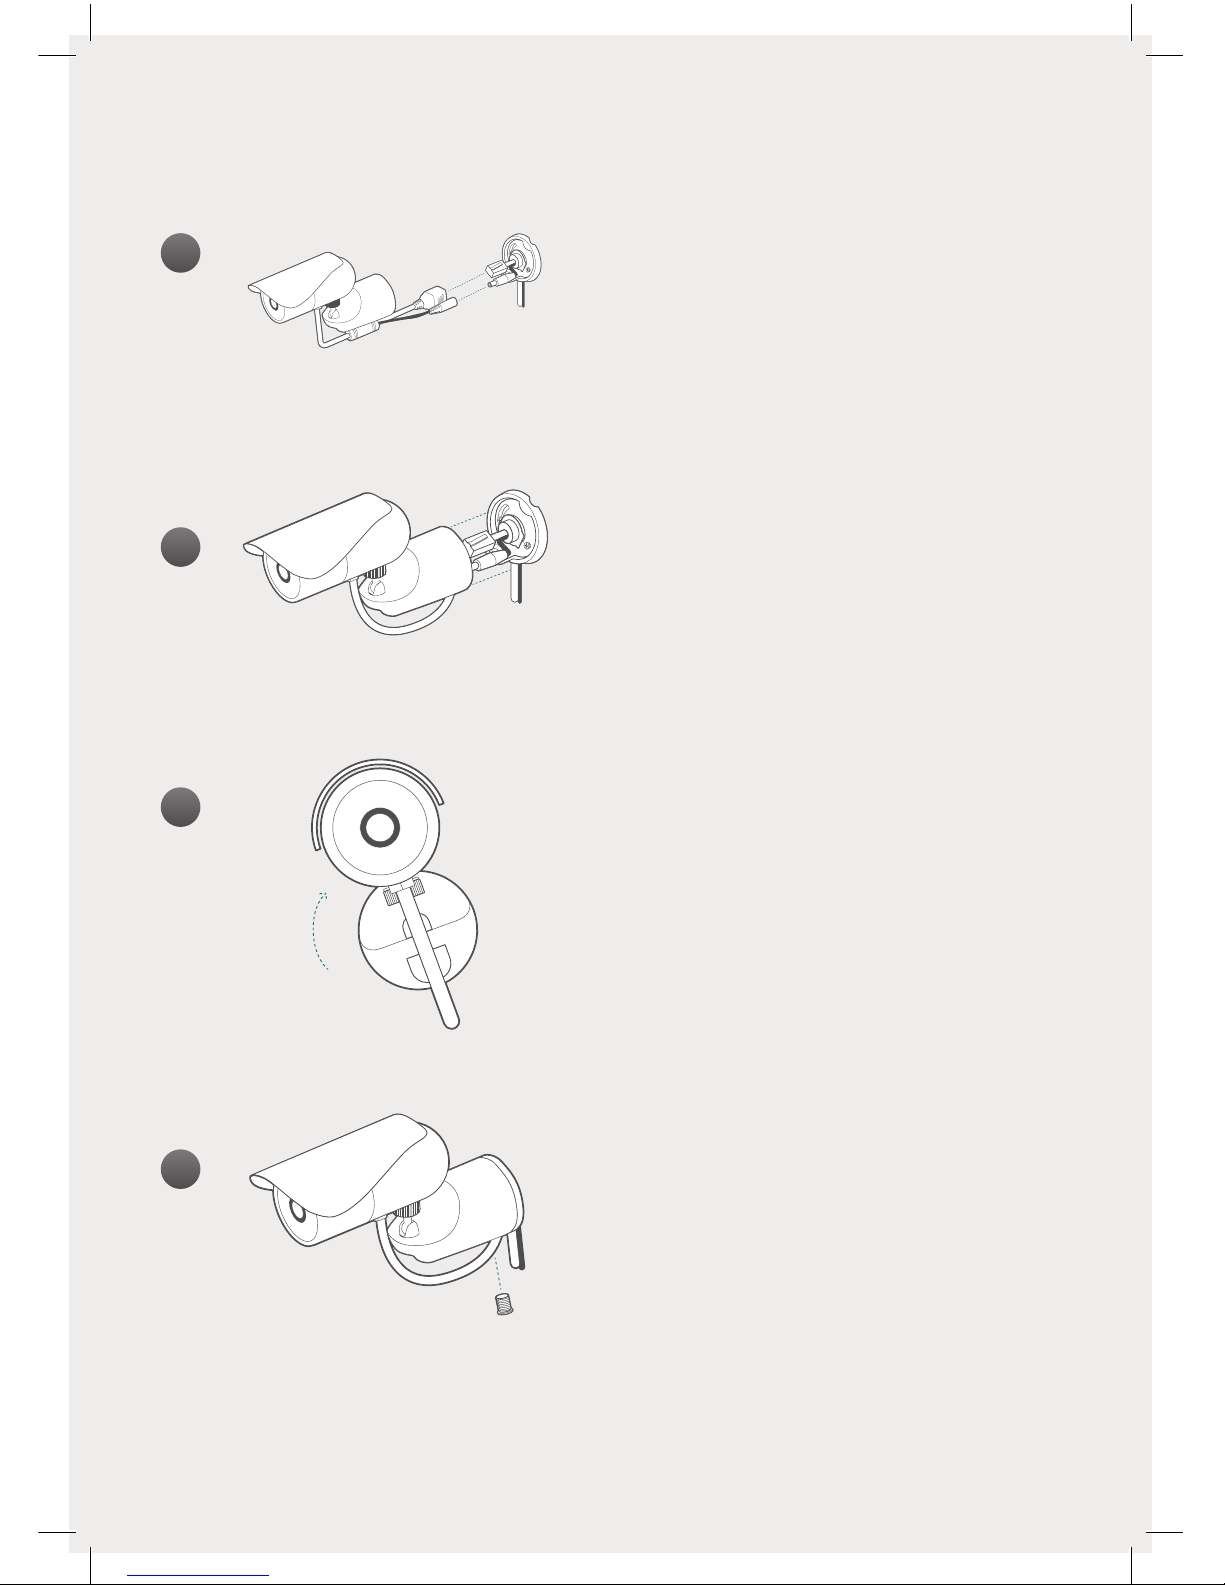
•If using Wi-Fi, make sure you remove the rubber protective boot from the Wi-Fi antenna
mounting screw before attaching the antenna.
•Wi-Fi will work best using WPA and WPA2 security, AES encryption and a Wi-Fi channel
between1-11.Youmayndyourconnectionmorereliablebyconguringtheseparticular
options in your router settings.
•We recommend placing the camera no further than 10m/30ft away from your router;
closerifthereareobstaclesinthewaysuchaswalls,oorsorceilings.
•Outside of this range, we would suggest using an Ethernet connection, Power over Ethernet,
installing a Wi-Fi signal extender or repeater, or using HomePlug/Powerline technology.
•HomeMonitor is only compatible with 2.4GHz network. If your router is using the 5GHz
band, please ensure it is operating in a mixed mode.
•Make sure your camera is connecting to your network properly before following the rest
of the installation procedure and securely fastening your camera to the wall.
Having issues? Our tech support team are on hand to help - visit - http://support.homemonitor.me
Installation & placement tips
Connect the camera to your router and power

8
3
1
2
8
Work out where you want the camera to be
placed, and drill two holes for the stand cap.
Prepare your cabling to the centre of this point
(See picture 1) (Power cable if using Wi-Fi, power
cable and/or ethernet cable if using network
connection or PoE), bearing in mind the cabling
will be going straight in to the back of the camera -
so all excess cable should be removed, with the
cable connectors as close to the centre of the base
plate as possible.
Position the plastic grommet over the cable
between the two screws, channeling the cable
through the groove if required (See picture 2)
Thegrommetonlytsintothestandcaponeway.
Positionthestandcapoverthewires,axthe
grommet in to the cap, and then screw the cap to
thewall,ensuringthegrommetisushagainst
the rear of the stand cap (See picture 3)
Prepare the camera and stand for mounting
(attach Wi-Fi aerial, tighten ball joints slightly,
move sun shield, etc as needed for your setup)
Note: Ensure all excess cable is is removed as
excesscablewillnottinthecameramount.
Installing your HomeMonitor™ HD Pro
How to install your HD Pro on a wall using our cable-
managed mount.
Tip: If using Wi-Fi, before mounting, ensure your camera is in a position where Wi-Fi is accessible

9
7
4
6
5
9
Connect the cable from the camera to the cabling
in step 2 (See picture 4)
Please make sure the power connector is pushed
in securely
Position the cable from the base of the camera
through the base of the stand and insert any
extra cable in to the stand (See picture 5)
Turn the camera and stand anti-clockwise and
place over the stand cap, and then turn clockwise
to lock in to place (See picture 6)
If you have any issues locking the stand in to place,
make sure the cable from the camera going in to
the base is not preventing the stand from locking
in to place.
Insert the stand cap screw and tighten it to
rmlysecurethecameraandstandtothewall
(See picture 7)
Readjust the cameras ball joint to capture the
desiredview.Axanyloosecablingtothewall.
Having issues? Our tech support specialists are on hand to help - visit http://support.homemonitor.me

10
!
?WhatdoIwanttoseeintheeldofview?
When do I want to have a motion recorded?
Do I want an email sent to me when a motion recording
is triggered?
What kind of scenarios do I want to trigger a motion recording?
Questions you may want to consider:
Getting the best from your
HomeMonitor™
It’s important your HomeMonitor™ is congured according
to your individual requirements. Once you have completed
the set up process it is advisable to test it so you are
satised it will do what you need.
When you have considered these questions make sure:
• The HomeMonitor™ is securely positioned facing what you want to see.
• The motion detection setup matches your needs.
• The schedule for the HomeMonitor™ is set to match your schedule.

11
Motion alert & notication tips
HomeMonitor™ is equipped with a sophisticated motion
sensor which detects when motion is happening and can
alert you to it by email.
If you want to receive email alerts every time motion is detected, you may
want to take in to consideration the following tips so that you achieve the best
results and reduce the number of worthless alerts:
Active pets (or children!) may activate the motion
recording by accident.
Moving cars or headlights may cause unwanted motion
recordings.
Movementsnearbusydoorsorwindowsmayseto
multiple alarms.
Sunlightandreectionsofthelightmaycausethemotion
alerts to trigger.
IRlightswillreectwhenpointedatglassandmaycreate
false alerts.
How notication alerts work
• Ifyouenablethealertnotications,youwillreceiveanemailwhen
the system detects motion.
• Once you receive the email alert you can follow the link to the
HomeMonitor™ Portal and see whether to take action or not.
• Motion recordings will be saved in your account ready for playback,
or you can download and keep them forever.

12
DE
C
B
A
Search for HomeMonitor channel
in the Channel Store on your Roku.
Roku channel may not be available
in all regions. Visit homemonitor.me
for more information.
Dedicated app for your smart TV
Day to day usage
Using HomeMonitor™ on your computer or tablet
• Visit http://www.homemonitor.me and log in to see your dashboard.
®

13
CD
B
A
Dedicated apps for your mobile device
Toggleson/o motion
alertnotications.
Toggleson/o motion
recording schedule.
Toggleson/o thecamera.
When disconnected the camera
will not detect motion, record
clips or transmit live video.
Click/tap to open camera Live View.
Motion alarm settings
(Desktop website only).
Using HomeMonitor™ on your smartphone or tablet
• Visit http://www.homemonitor.me/mobile and login.
Apple iPhone, iPad & iPod touch
iOS 5.1+ required
Visit App Store from
your iOS device &
search for “Y-cam
HomeMonitor”
or scan QR code.
Android smartphones & tablets
Android 2.3.1+ required
Visit Google Play from
your Android device
& search for “Y-cam
HomeMonitor”
or scan QR code.
A
D
E
B
C
We add more apps all the time - visit http://www.homemonitor.me/apps to see all our software.

14
Take the next steps
Now you have your HomeMonitor
installed, why not try one of the
following:
Add more cameras
Use multiple cameras, even at
multiple locations, all under one
account.
Upgrade to Plus Package
Get 30 days of online storage for
your camera for one small annual fee.
Visit http://www.homemonitor.me
for more information.
Free Plus
Alerts saved for 7 days Alerts saved for 30 days
Unlimited live view Unlimited live view
Unlimited downloads Unlimited downloads
Unlimited alerts Unlimited alerts
Free with every camera
7 days free recording forever!
$3999/£2999
Per camera, per year
Upgrade your camera through
HomeMonitor dashboard

15
Need further help?
If you have any further questions or need support, please visit
http://support.homemonitor.me – we’re happy to help.
Safety information
• Do not try to disassemble.
• Keep the power supply dry and avoid contact with liquid.
• Small parts may cause a choking hazard, keep away from children.
• Only use approved Y-cam accessories and power supplies.
• Do not cover the HomeMonitor™. Infrared Lights produce heat which may
createarehazard.
• Ensure the HomeMonitor™ is property attached to the supplied stand
beforenalinstallationandpositioning.
• Compliance is only assured by using the included power supply.

16
Packaging made from recyclable materials. Product RoHS compliant. All compliance certication
and safety requirements have been met by the developer and manufacturer, Y-cam Solutions Ltd.

17
Y-cam Solutions Ltd
Vision House
3 Dee Road
Richmond, Surrey
TW9 2JN
United Kingdom
Tel: +44 (0)20 8334 7373
Y-cam Solutions LLC
4500 140th Avenue North
Suite 101
Clearwater
FL 33762
United States
Tel: +1 727 233 8225
For more information or support on HomeMonitor, visit:
http://www.homemonitor.me or contact monitor@y-cam.com
Designed in Britain. Made in China.
v201312HDP
Table of contents
Other Y-cam Security System manuals
Popular Security System manuals by other brands

DSC
DSC MAXSYS PC4020 instruction manual

Videsur
Videsur VSDG60WR user manual

Honeywell
Honeywell SUGPACK-UK Quick installation guide

AAL Homecare
AAL Homecare Profiline HC-140 instruction manual

Care Call
Care Call CCS-CO-DETECTOR quick start guide

Honeywell
Honeywell ADEMCO VISTA-48D Installation and setup guide

Honeywell
Honeywell ADEMCO LYNX XL Series Installation and setup guide

Texecom
Texecom Premier Elite 8XP-W installation manual

Bosch
Bosch Plena Power Amplifier Installation and operation manual

Lyntech
Lyntech LY69-010-68 user manual

Telect
Telect Dual-Feed 350A 8/8-TPA user manual

Westfalia
Westfalia 84 68 19 Additional manual