Yaesu FTM-100DR User manual

FTM-100DR
Instruction Manual
(WIRES-X Edition)
C4FM/FM 144/430 MHz
DUAL BAND TRANSCEIVER
Thank you for purchasing this Yaesu product.
This instruction manual explains information related to the “WIRES-X Function”.
For information on basic operation of the transceiver, please refer to the enclosed
FTM-100DR operating manual.
Company names and products in this manual are trademarks or registered
trademarks of the respective company.

2
Using the WIRES-X
Contents
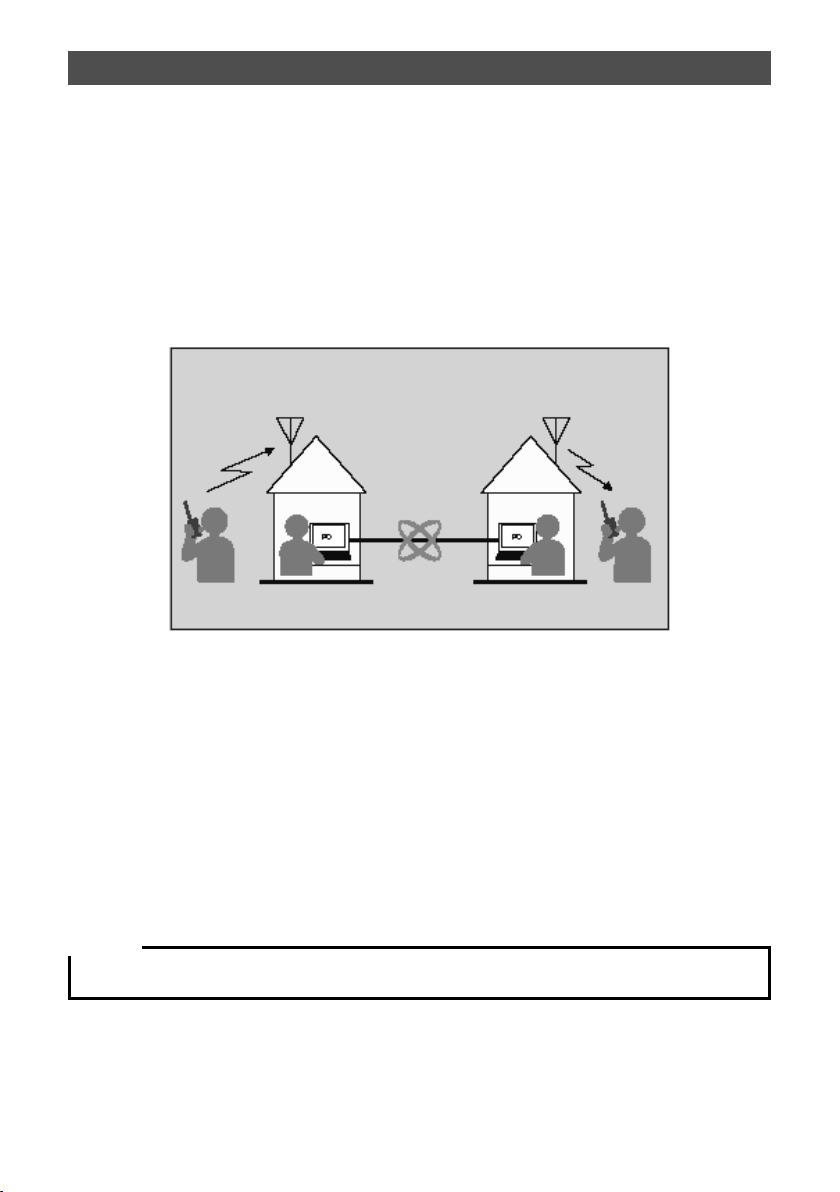
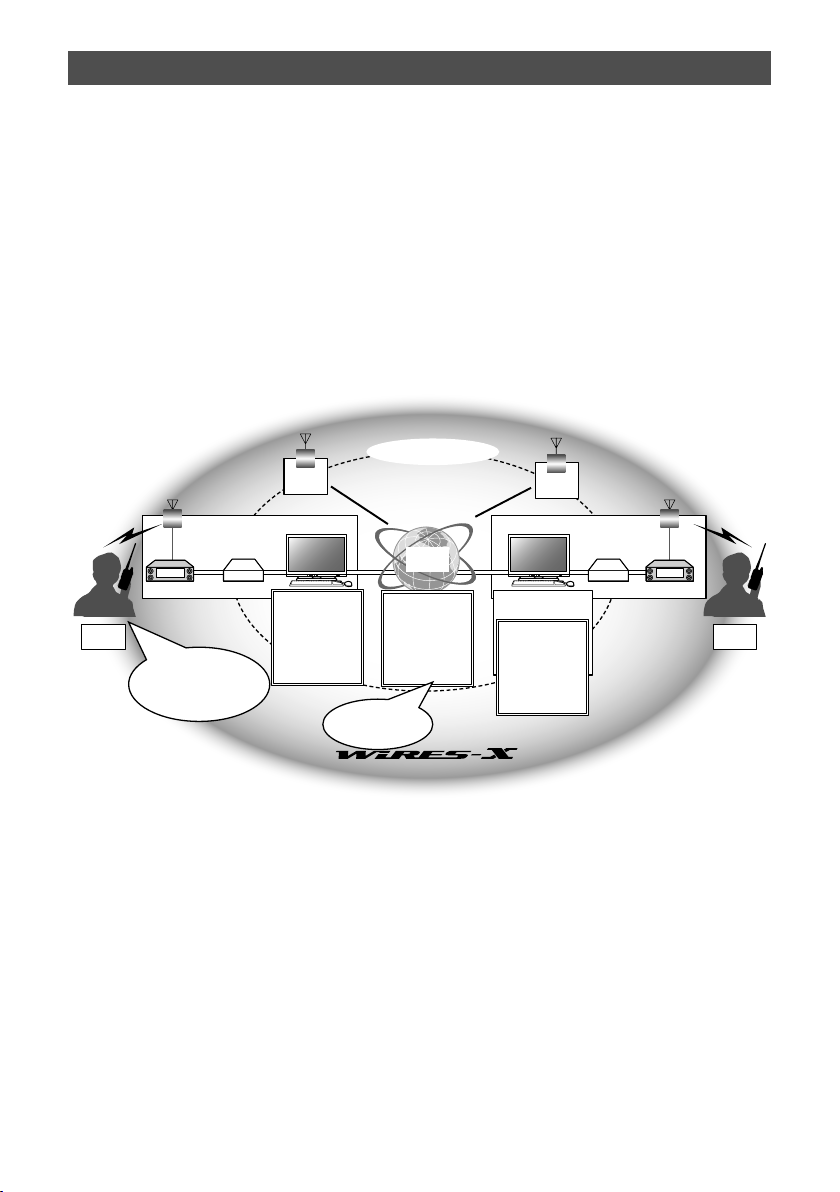
What is WIRES-X? ....................................................................3
Terminology ....................................................................4
Inputting Characters ..................................................................7
Switching the character type...........................................7
Deleting all input characters ...........................................7
Moving the cursor to the left ...........................................7
Moving the cursor to the right .........................................7
Deleting the most recently input character .....................7
Completing input.............................................................7
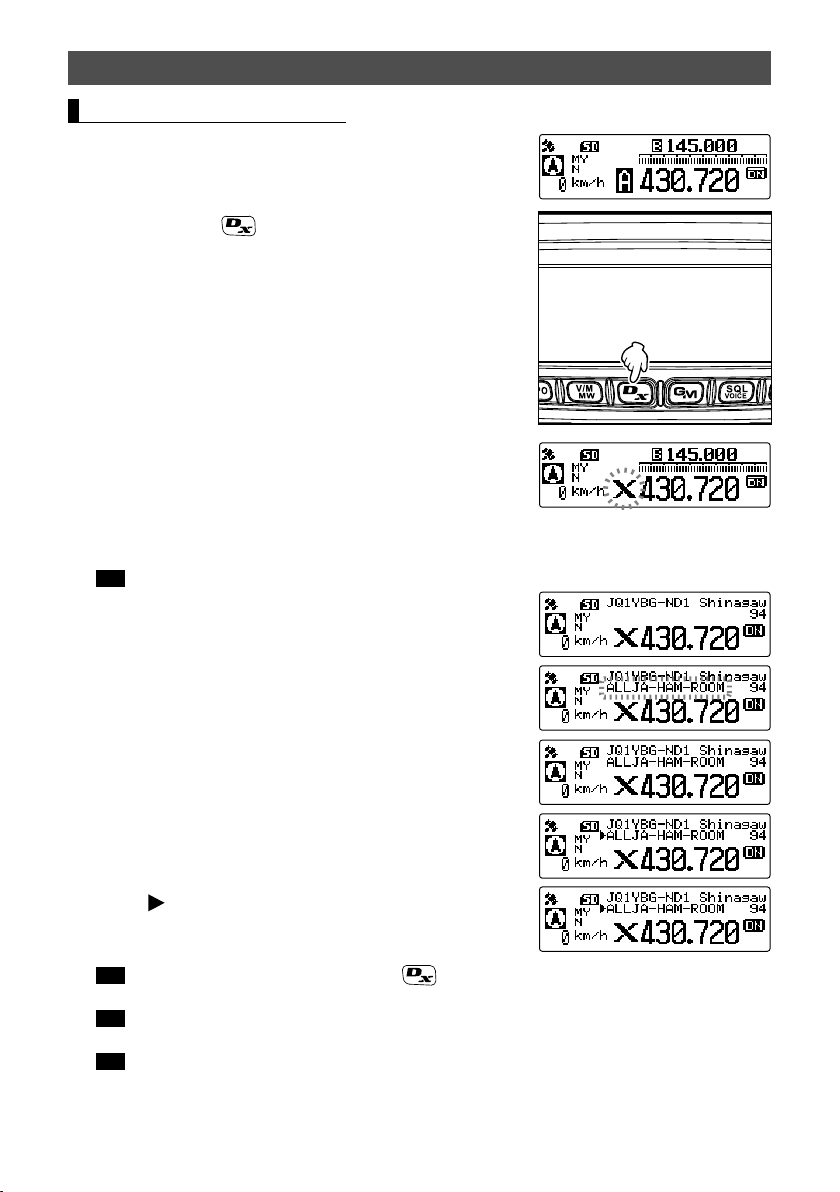
Connecting to a Faraway Station Using WIRES-X....................8
Finding a local node.............................................................8
Connecting in digital mode...................................................8
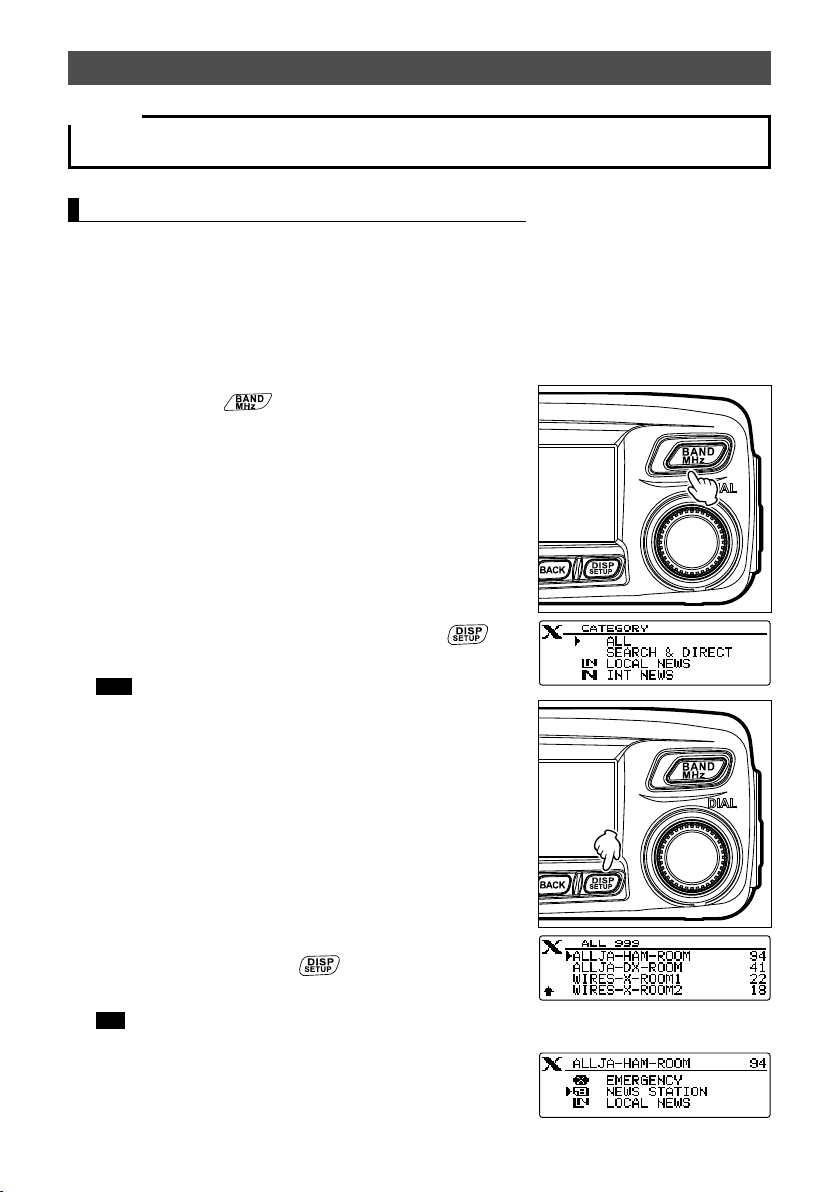
Connecting to local nodes ..............................................9
Connecting to a node or room on the Internet..............10
Communicating with others ..........................................12
Useful functions in digital mode .........................................13
Using preset channels ..................................................13
Releasing the WIRES-X connection ..................................15
Connecting to analog nodes ..............................................15
Connecting to nodes or rooms on the Internet .............15
Communicating with others ..........................................16
Disconnecting from the node or room...........................16
Various display functions....................................................16
Confirming the location of digital nodes........................16
Using the News Function of WIRES-X ....................................17
Viewing messages .............................................................17
Viewing text data in local nodes ...................................17
Viewing text data on the WIRES-X server
(INT NEWS)..................................................................19
Viewing text data in nodes or rooms on the Internet ....19
Importing images................................................................21
Importing images from local nodes...............................21
Importing images from the WIRES-X server
(INT NEWS)..................................................................21
Importing data from nodes or rooms on the Internet ....22
Viewing imported data later................................................22
Deleting imported data.......................................................23
Deleting a file................................................................23
Listening to audio messages..............................................24
Listening to emergency information in the local node...24
Listening to routine messages in local nodes...............24
Listening to emergency information on the WIRES-X
server (INT NEWS).......................................................25
Listening to routine messages on the WIRES-X server
(INT NEWS)..................................................................25
Listening to emergency information in nodes or rooms
on the Internet...............................................................26
Listening to routine messages in nodes or rooms on the
Internet..........................................................................26
Transmitting messages and images ..................................26
Creating and transmitting messages to local nodes.....27
Transmitting saved messages or images to local
nodes............................................................................28
Creating and transmitting messages to nodes or rooms
on the Internet...............................................................28
Transmitting saved messages or images to nodes or
rooms on the Internet....................................................29
Transmitting audio messages ............................................29
Transmitting emergency audio information to local
nodes............................................................................29
Transmitting routine audio messages to local nodes....30
Transmitting emergency audio information to nodes or
rooms on the Internet....................................................30
Transmitting routine audio messages to nodes or rooms
on the Internet...............................................................30
Using the FTM-100DR transceiver as a node station..............31
WIRES-X Setup Menu.............................................................32
WIRES-X setup menu list...................................................32
Using the WIRES-X setup menu........................................32
Setting the operating frequencies for repeaters/
WIRES-X ......................................................................32

3
What is WIRES-X?
WIRES (Wide-coverage Internet Repeater Enhancement System) is an Internet
communication system which expands the range of amateur radio communication. By
relaying radio signals via the Internet, stations can be connected where radio waves
cannot reach each other.
WIRES uses local nodes (stations connected to the Internet via PCs) as access points
which repeat communications of conventional amateur radio stations. When the local
nodes are connected to each other via the Internet, amateur stations all over the world
can communicate with each other just by connecting conventional stations to the local
nodes.
Local node Local node StationStation
Internet
In addition to the WIRES features, WIRES-X also supports digital communications. Using
WIRES-X, you can transmit and receive digitalized data such as text, image data and
audio.
Using the WIRES-X in conjunction with the transceiver allows you to have analog/digital
communications with stations outside the communication range. In digital communication
mode, you can search stations by call signs or keywords, and exchange data such as
messages and location information.
Since you can also use WIRES-X together with the GM (Group Monitoring) function on a
compatible transceiver to create a group including local nodes, you can also establish a
network covering a wider range.
Caution
You cannot connect to a currently in service WIRES-II node from a WIRES-X node, or vice versa.

4
What is WIRES-X?
Terminology
■Node
Radio repeater connected to the Internet via a PC, which repeats communications of
conventional amateur radio stations as an access point
●Local node
Node within the radio communication range of a conventional amateur radio station
●Analog node
Node which is a transceiver or repeater using the conventional FM format and can only
repeat DTMF (Dual Tone Multi Frequencies) codes and analog audio transmissions/
receptions
●Digital node
Node which is a transceiver or repeater compatible with digital communications in C4FM
(Continuous 4 level FM) format. With this type of node, you can transmit/receive audio
as well as text and image data. You can also repeat DMTF codes and analog audio
transmissions/receptions.
Local
node
Local
node
Local
node
Local node Local node
Local
node
Local
node
Local
node
Local
node
Local
node
Station Station
WIRES
server
HRI-200
PCPC
Internet connection
HRI-200
As long as the local nodes
are linked to each other, stations
can communicate with each
other by connecting to a
local node

5
What is WIRES-X?
■WIRES-X user ID
YAESU provides identification names with the WIRES-X nodes. For each node, a DTMF
ID (five-digit number) and user ID (alphanumeric characters consisting of up to 10 digits)
are provided.
If you know the ID of the node you want to connect with, you can transmit the DTMF
code from the transceiver, and directly specify the node to connect to by searching by
characters (only for digital nodes).
●ID list
Nodes and rooms which are currently operating WIRES are listed and published on our
website. We provide information such as IDs, call signs and operating frequencies (some
may not be published due to the wishes of owners).
■Room (Round QSO Room)
WIRES system community space to which multiple nodes can connect simultaneously.
As well as voice communications, you can also chat with text messages on the PC used
for the local node.
●Open room
Room which allows all nodes to connect to
●Closed room
Room only registered nodes can connect to
●Owner
Node which opens and organizes a room
●Activity
Nodes currently connected to a specific room
D
DD
D
AA
JF7XXX
-ND3
JQ1YBF-ND1 JA2YSO-ND2
JH4XXX
-ND4
JA2-ROOM
JQ1YBF-ND1
JF7XXX-ND3
JA1XXX-S1
* Currently
3 activities
in this room
JA1XXX
-S1
JA2XXX
-S2
WIRES
server
HRI-200
PCPC
Internet connection
HRI-200
When a local node
connects to a room,
stations already connected to
that node are also connected
to the room
Tip In the illustration,
D
refers to digital nodes and
A
refers to analog nodes.

6
What is WIRES-X?
■News function
This feature allows you to save digital data such as text, image and audio data on the PC
used for the local node, and access the data from the connected digital station.
From the digital transceiver, you can access the local node (LOCAL NEWS) and the data
storage area (news station) in the node or room you connect to, and import (upload) and
export (download) data.
The owners of a node or room can import/export data from/to their own station via a PC.
The owner can also delete data and change information such as its name and attribution.
The WIRES-X server also has its own news station (INT NEWS) where you can read
information and data supplied by YAESU.
D
DD
D
JF7XXX
-ND3
JQ1YBF-ND1 JA2YSO-ND2
JH4XXX
-ND4
JA2-ROOM
Local news
Audio messages
(emergency)
News Station
Audio files
Te xt data
Images
Local news
Audio messages
(emergency)
News Station
Audio files
Te xt data
Images
INT news
Audio messages
(emergency)
News Station
Audio files
Te xt data
Images
Connecting to a node
allows you to access data
in the local node, the WIRES-X
server, and a node or room
on the Internet
Data on the WIRES-X
server is only for
downloading
JA1XXX
-S1
JA2XXX
-S2
WIRES
server
HRI-200
PCPC
HRI-200
Internet connection
■Preset search function
If the preferred channel for connecting to a local node is programmed (preset) in the
transceiver, the channel can be scanned automatically when you start up WIRES-X.
Utilize this function as follows:
•Quickly connect to the local node you usually access by presetting its frequency in
advance.
•By presetting to a shared channel frequency with your friends nodes, you can quickly
connect the transceiver to a local node even while you are traveling in other areas.
You can use two transceivers as nodes, one for the preset search channel (receive only
channel) and the other for the voice channel (operation channel).

7
Inputting Characters
You can input letters and characters by following the procedure below.
Switching the character type
Press ( appears on the upper side). Pressing each time changes the
character type in the following order.
Uppercase letters → symbols → lowercase letters → numbers
Deleting all input characters
Press ( appears on the upper side).
Moving the cursor to the left
Press ( appears on the upper side).
Moving the cursor to the right
Press ( appears on the upper side).
Deleting the most recently input character
Press ( appears on the upper side).
Completing input
Press or .

8
Connecting to a Faraway Station Using WIRES-X
Finding a local node
To communicate using WIRES-X, a WIRES-X node station (local node) must be
established within radio contact range of the user transceiver.
WIRES-X nodes are stations users voluntarily registered with Yaesu. Their information
such as locations and operation styles are listed on our website:
https://www.yaesu.com/jp/en/wires-x/index.php
First use this list to search for a nearby local node, and nodes on the Internet used by
people you want to communicate with; write down the node names and frequencies.
Since the connection procedure differs between digital stations and analog stations,
confirm whether the node is an analog station or a digital station.
• When the local node is a digital station:
Connect from your transceiver in digital mode.
(Nodes on the Internet can connect to both digital and analog stations.)
• When the local node in an analog station:
Connect from your transceiver in analog mode.
(Nodes on the Internet can connect to both analog and digital stations.)
Connecting in digital mode
Caution
Before using WIRES-X, press to set the communication mode of the operating band to any mode
other than [FM]. For details, refer to “Selecting communication mode” in the basic operating manual.

9
Connecting to a Faraway Station Using WIRES-X
Connecting to local nodes
1Rotate the DIAL to set the operating band to the
frequency of the desired local node.
2Press and hold for over one second.
[
X
] flashes on the left side of the frequency display.
When a local node is found, [
X
] is lit solid, and the node name and city name
appear on the upper part of the screen.
Tip Depending on the connection status, the screen will show one of four display patterns.
(1)Connected to the local node, but unable to connect
to Internet nodes or rooms (never before established
connection to Internet nodes or rooms)
(2)Connected to the local node, but unable to connect
to Internet nodes or rooms (previously succeeded in
establishing connection to Internet nodes or rooms)
(3)Connected to the local node, successfully connected
to an Internet node or room (the Internet node or
room is the same as the one used before)
(4)Connected to the local node, successfully connected
to an Internet node or room (the Internet node or
room is different from the one used before)
When is displayed, rotate the DIAL. Call signs
of nodes and rooms on the Internet you previously
connected to flash.
Tip While [
X
] is flashing, briefly press the key to re-
establish connection to the local node.
Tip When any local node cannot be found, [
X
] will
disappear in five minutes.
Tip When the detected local node is a repeater station, [
[R]
] appears below [
X
].

10
Connecting to a Faraway Station Using WIRES-X
Caution
WIRES-X can only be used on the operating band.
Connecting to a node or room on the Internet
You can connect to the desired node or room in one of the following ways:
• Selecting an accessible node or room from the list
• Specifying the node name or room name
• Selecting the most recently connected node or room
• Specifying the DTMF ID of the node or room you want to connect to
●Searching from the node & room lists
1Press and hold for over one second.
Displays the category list.
2Rotate the DIAL to select [ALL], then press .
Displays the list of accessible nodes and rooms.
Tips • Connection destinations are displayed from the room
list and then node list.
• On the connection destination room columns, the
number of activities (the number of nodes connected
to each room) appears on the right side.
3Rotate the DIAL to select the node or room you want
to connect to, then press .
Starts connection.
Tip By pressing [PTT], you can also establish connection while
talking.
Once connection is successfully established, the
menu list of the node (room) you are connected to
will appear.

11
Connecting to a Faraway Station Using WIRES-X
●Searching by node or room name
1Press and hold for over one second.
Displays the category list.
2Rotate the DIAL to select [SEARCH & DIRECT],
then press .
Displays the character input screen.
3Enter all or part of the user ID or room name.
The characters you have just entered appear on the
screen.
Tip For details on how to enter letters, refer to “Inputting
Characters” on page 7.
4Press .
Starts searching. If connection destinations with the first part of a name partially
matching the name you entered are found, they will be listed.
Tips • If there is no connection destination matching the entered name, “No Data” appears and
then the screen returns to the “SEARCH & DIRECT” screen. Enter characters to search
by again.
• If the name you entered is found, the transceiver establishes connection immediately.
• The screen displays the room list search results followed by the node list search results.
• On the room columns in the search results, the number of activities (the number of nodes
connected to each room) appears on the right side.
5Rotate the DIAL to select the node or room you want
to connect to, then press .
Starts connection.
Tip By pressing [PTT], you can also establish connection while talking.
Once connection is successfully established, the menu list of the node (room) you
are connected to will appear.
●Connecting to the node or room you have most recently connected
If you have previously connected to a node or room on the Internet, it appears and
flashes on the upper part of the screen.
Press to start connection of the transceiver to the flashing node or room, and
once connection is established, the menu list of the node (room) you are connected to
will appear.
If there is on the left side of the node name on the
upper part of the screen, rotate the DIAL to display the
node you have most recently connected to.

12
Connecting to a Faraway Station Using WIRES-X
●Specifying the DTMF ID of the node or room you want to connect to
1Press and hold [#] on the microphone for over one second.
Displays the DTMF input screen.
2Use the numeric keys on the microphone to enter the DTMF
ID (five-digit code).
3Press [#] on the microphone.
Tip Pressing [*] on the microphone closes the DTMF input screen.
LOCK
P3
P2
P1
7
1
4
8
2
0
5
9
B
A
C
D
3
6
P4
LAMP
DTMF MICROPHONE
MH-48
ABC
JKL
TUV
GHI
PQRS
DEF
MNO
WXYZ
MIC
Communicating with others
1While displaying the station you are currently
connected to, press [PTT].
The transceiver switches to transmission mode.
2Speak into [MIC].
Tip Place the microphone about 5 cm away from your
mouth when you speak.
Caution Do not continuously transmit over an extended
period of time to reduce the risk of overheating,
malfunction, and injury.
3Release [PTT].
The transceiver switches to reception mode.
LOCK
P3
P2
P1
7
1
4
8
2
0
5
9
B
A
C
D
3
6
P4
LAMP
DTMF MICROPHONE
MH-48
ABC
JKL
TUV
GHI
PQRS
DEF
MNO
WXYZ
MIC
Tip
You can communicate with the node or room you are connected to by pressing [PTT] even when
viewing data in a node or room on the Internet using the NEWS function in digital mode.

13
Connecting to a Faraway Station Using WIRES-X
Useful functions in digital mode
Using preset channels
Programming (presetting) a channel frequency allows you to easily connect to a local
node.
By sharing a channel frequency with other nodes, you can connect the transceiver to a
local node even while you are out. This is useful for a group to operate a station.
●Presetting a channel
1Press and hold for over one second.
Displays the Setup menu.
2Rotate the DIAL to select [7 WIRES-X], then press
.
Displays the menu list.
3Check that [1 RPT/WIRES FREQ] is displayed, then
press .
Displays the selection items.
4Rotate the DIAL to select [PRESET], then press
.
Displays the frequency setting screen.
Tip The default setting is MANUAL.
5Rotate the DIAL to select the frequency.
Tips • Rotating the DIAL changes the frequency by the
increments specified from the Setup menu.
• Pressing and holding allows you to set the
frequency in 1 MHz units.
• The default settings are 146.550.
6Press and hold for over one second.
Sets the frequency and returns the screen to the
frequency display screen.

14
Connecting to a Faraway Station Using WIRES-X
●Connecting to a preset channel
1Follow the procedure in “Presetting a channel” on page 13 to make the preset
channel available in advance
2Press and hold for over one second.
On the left side of the frequency display, [P] and [
X
]
appear alternately.
When a local node is found, [
X
]lights up, and the
node name and city name appear on the upper part
of the screen.
Tip When any local node cannot be found, [P] disappears
in five minutes.
Tip
If the frequency of the detected local node is different from that of the preset channel, the frequency
automatically switches to the node frequency.
●Ending searching by a preset channel
1Follow steps 1 to 3 in “Presetting a channel” on page 13 to display the selection
items of [1 RPT/WIRES FREQ].
2Rotate the DIAL to select [MANUAL].
3Press and hold for over one second.
Returns the screen to the frequency display screen.
●Disconnecting from the node or room
1Press and hold [*] on the microphone for over one
second.
If disconnection is successful, the screen returns to the
local node connection screen.
LOCK
P3
P2
P1
7
1
4
8
2
0
5
9
B
A
C
D
3
6
P4
LAMP
DTMF MICROPHONE
MH-48
ABC
JKL
TUV
GHI
PQRS
DEF
MNO
WXYZ
MIC

15
Connecting to a Faraway Station Using WIRES-X
Releasing the WIRES-X connection
Pressing and holding for over one second switches the screen to the frequency
display screen, and [
X
]displayed on the left side of the frequency display disappears.
Tip The local node and the node or room remain connected.
Connecting to analog nodes
When the node you want to connect to is an analog station, use the DTMF function on
the transceiver. For details on how to use the DTMF function, refer to “Using the DTMF
function” in the basic operating manual.
Connecting to nodes or rooms on the Internet
1Set the main band frequency to the local node frequency.
2Press to switch to analog FM mode.
Tip For details, refer to “Selecting communication mode” in the basic operating manual.
3In the Setup menu from [4 SIGNALING] → [3 AUTO DIALER], select “OFF”.
Tip For details refer to “Transmitting the DTMF code manually” in the basic operating manual.
4While pressing [PTT] on the microphone, press [0] to
[9], [*], [#], [A] to [D].
Transmits the DTMF code.
5Release [PTT], and keep the transceiver in reception
mode for about 10 seconds.
Once connection is successfully established, you will be
able to hear audio.
Caution The connection destination screen does not appear.
LOCK
P3
P2
P1
7
1
4
8
2
0
5
9
B
A
C
D
3
6
P4
LAMP
DTMF MICROPHONE
MH-48
ABC
JKL
TUV
GHI
PQRS
DEF
MNO
WXYZ
MIC
Tip
You can store DTMF codes consisting of up to 16 digits for 9 channels on the transceiver. If you register
the codes of frequently-used connection destinations in advance, you can easily transmit a code by
pressing its abbreviated number while pressing [PTT].For details, refer to “Using the DTMF Function”
in the basic operating manual.

16
Connecting to a Faraway Station Using WIRES-X
Communicating with others
1Press [PTT].
The transceiver switches to transmission mode.
2Speak into [MIC].
Tip Place the microphone about 5 cm away from your mouth when you speak.
Caution Do not continuously transmit over an extended period of time to reduce the risk of
overheating, malfunction, or injury.
3Release [PTT].
The transceiver switches to reception mode.
Disconnecting from the node or room
1While pressing [PTT], press #99999 (DTMF disconnection command).
Disconnects the node or room.
Various display functions
Confirming the location of digital nodes
When the signal from the local node you have connected to contains GPS location
information, you can display the location information on the screen.
When the connection destination is displayed, the
location information of your station is displayed on the
left side of the screen.
Press once briefly to display the location
information of the partner station on the left side of the
screen. The screen displays the compass indicating
the direction and distance to the local node from your
station.
Tip
When the location of the partner station is displayed, press once briefly to display the satellite
acquisition information. Press again briefly to display the location information of your station
again.

17
Using the News Function of WIRES-X
When using WIRES-X in digital mode, you can transmit/receive messages (text data) and
images; you can also record/play audio messages.
Viewing messages
You can read messages (text data) that are transmitted/received by either a local node,
or a node or room on the Internet, from the transceiver.
Caution
zTo read messages, insert a microSD memory card into the transceiver in advance. For details, refer
to “Using a microSD memory card” in the basic operating manual.
Viewing text data in local nodes
1Follow the procedure in “Connecting to local nodes” on page 9 to connect your
transceiver to the desired local node.
2Press and hold for over one second.
Displays the “CATEGORY” screen.
3Rotate the DIAL to select [LOCAL NEWS], then
press .
Displays the “LOCAL NEWS” screen.
4Rotate the DIAL to select the desired local node,
then press .
If data reception is successful, the menu list of the
local node appears.

18
Using the News Function of WIRES-X
5Rotate the DIAL to select [NEWS STATION], then
press .
Displays the upload (transmission)/download
(reception) select screen.
6Rotate the DIAL to select [DOWNLOAD], then press
.
Displays the data type select screen.
7Rotate the DIAL to select [MSG], then press .
If data reception is successful, the data list appears.
Tip The list shows the registered data in reverse
chronological order.
8Rotate the DIAL to select the message you want to
view, then press .
Downloads the data and displays the content of the
message.
9Press .
Returns the screen to the data list.
Tips
• On the data content display screen, press to display the sender’s location information at the
time the data was sent.
• On each screen, pressing returns the screen to the previous screen.
●Operations on the data list
When there is a large number of data items available, the list will be divided into smaller
lists with 3 data items each.
• Rotating the DIAL scrolls the screen.
• Pressing ( appears on the upper side) jumps to the top of the list.
• Pressing ( appears on the upper side) jumps to the end of the list.

19
Using the News Function of WIRES-X
Viewing text data on the WIRES-X server (INT NEWS)
You can read text information provided by Yaesu on the WIRES-X server from the
transceiver.
1Follow the procedure in “Connecting to local nodes” on page 9 to connect your
transceiver to the desired local node.
2Press and hold for over one second.
Displays the “CATEGORY” screen.
3Rotate the DIAL to select [INT NEWS], then press
.
Displays the menu list of the WIRES-X server.
4Rotate the DIAL to select [NEWS STATION], then
press .
Displays the data type select screen.
5Rotate the DIAL to select [MSG], then press .
If data reception is successful, the data list appears.
Tip The list shows the registered data in reverse
chronological order.
6Rotate the DIAL to select the message you want to
view, then press .
Starts download. “DOWNLOAD” appears and
flashes.
Downloads the data and displays the content of the
message.
7Press .
Returns the screen to the data list.
Viewing text data in nodes or rooms on the Internet
1Follow the procedure in “Connecting to nodes or rooms on the Internet” on page 10
to connect the transceiver to the desired node or room on the Internet.
2Press and hold .
Displays the “CATEGORY” screen.
3Rotate the DIAL to select [LOCAL NEWS], then
press .
Displays the “LOCAL NEWS” screen.

20
Using the News Function of WIRES-X
4Rotate the DIAL to select the desired node or room
on the Internet, then press .
If data reception is successful, the menu list of the
node or room on the Internet appears.
5Rotate the DIAL to select [NEWS STATION] or
[LOCAL NEWS], then press .
Displays the upload (transmission)/download
(reception) select screen.
6Rotate the DIAL to select [DOWNLOAD], then press
.
Displays the data type select screen.
7Rotate the DIAL to select [MSG], then press .
If data reception is successful, the data list appears.
Tip The list shows the registered data in reverse
chronological order.
8Rotate the DIAL to select the message you want to
view, then press .
Starts downloading. “DOWNLOAD” appears and
flashes.
Downloads the data and displays the content of the
message.
9Press .
Returns the screen to the data list.
Tip
On the data content display screen, press to display the sender’s location information at the
time the data was sent.
Caution
When the category list or data list is displayed, pressing [PTT] readies the transceiver to transmit audio
to the node or room on the Internet you are currently connected to.
Other manuals for FTM-100DR
11
Table of contents
Other Yaesu Transceiver manuals

Yaesu
Yaesu VX-8R/E User manual

Yaesu
Yaesu FT-101ZD User manual

Yaesu
Yaesu FT-101E User manual

Yaesu
Yaesu FT-2400H User manual

Yaesu
Yaesu FT-450 - CAT OPERATION REFERENCE BOOK Service manual

Yaesu
Yaesu FT-77 User manual

Yaesu
Yaesu VX-7R User manual

Yaesu
Yaesu FT-8800R User manual

Yaesu
Yaesu Mark-V FT-1000MP User manual

Yaesu
Yaesu FT-7100M User manual

Yaesu
Yaesu FT-600 User manual

Yaesu
Yaesu FT-51R Manual

Yaesu
Yaesu FTM-7250DR User manual

Yaesu
Yaesu FTM-100DR/DE User manual

Yaesu
Yaesu FTV-700 User manual

Yaesu
Yaesu FT-897 Manual

Yaesu
Yaesu FT-80C - SERVICE User manual

Yaesu
Yaesu FT-2900R Manual

Yaesu
Yaesu FTM-3200DR User manual

Yaesu
Yaesu FT-5100 User manual