Test Run
Practice pitching your tent at home to ensure you understand the process
Ination
Make sure the 5 taps on the right hand side of the tent are closed o
Connect the pump to the Boston Value and inate to between 7 and 9 PSI.
The pressure release valve will “hiss” when 9 PSI is reached. It is important
not to over inate the tubes. It is recommended that during very hot
weather 7 PSI is used to provide room for expansion during the day. In
cooler or windier conditions 9 PSI is recommended. As each pole inates
it may be necessary to support the centre of the pole until they assume
their correct shape. It is also a good time to ensure that the base of each
pole is sitting correctly on the Velcro patches of the tent oor. Poles can
sometimes move o the Velcro during the pitching process.
Close the isolation taps inside the tent
Pick A Site
When nding a site for your tent, try to nd an area that is sheltered, at, and free from sharp objects. If
possible position your tent with the front door facing away from the prevailing wind. Also try not to pitch
your tent under trees as falling branches can damage the tent and falling sap can damage the fabric
1
Unpacking
When you take your tent out for the rst time, take a moment to see how it is packed or take a photo on your
phone. This will help you when it comes to packing your tent away. Separate and identify the dierent parts in
your tent.
- Tent - Pump
- Pressure release valve - Guy Ropes (Pre-attached)
- Pressure gauge - Additional Guy Ropes
- Pegs - Awning Pole Set
Pump Setup
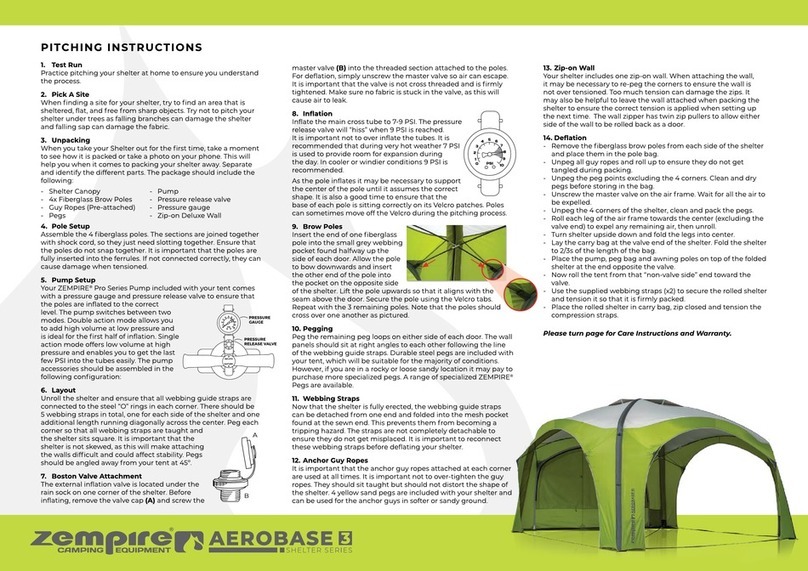
Your Zempire ® single action pump includes a pressure gauge and
pressure release valve to ensure that the poles are inated to the
correct level. The pump accessories should be assembled in the
following conguration
2
3
4
5
6
7
8
9
Layout
Unroll the tent with the oor facing down. Peg out the 4 corners and
the central living area as shown ensuring there is signicant tension
between and the oor sits as at as possible. For best results pegs
should be angled away from your tent at 45º
Setting The Floor
It may be necessary to align the base of each pole so that the oor sits
at and taught. You may also need to re align the corner pegging points
so the oor sits at.
Pegging
Peg the remaining peg loops around the tent. Durable
steel pegs are included with your tent which will be
suitable for the majority of conditions. However, if you
are camped at a rocky or loose sandy location it may
pay to purchase more specialized pegs. A range of
specialized Zempire ® Pegs are available.
Guy Lines
Guy lines are pre-attached on all Zempire ® tents. It is recommended that guy lines are used at all times. It is
important not to over tighten guy lines. They should sit taught but should not distort the shape of the tent
Awning Setup
1. Connect the steel awning poles together A1 to A2 (x4), RA to RB,
RC to RD, R2 to R3 to R4 to R5
2. Insert the end of R2 ridge pole into the pocket on inside of awning
above central air pole
3. Insert spike of RA/RB pole through hole at end of R5 and then
through the eyelet at the end of awning
4. Extend A4/A5 pole so roof sits taught, the clamp of the ip lock
should face downwards
5. Insert spikes of A1/A2 poles through eyelets on either side of
awning and guy out at 45º
6. RC/RD pole should be used to support the center of the ridge pole
during windy conditions
Deation
- Open all isolation taps inside of the tent
- Remove and clean all awning poles, do not store poles
inside each other
- Unpeg all guy ropes and roll up to ensure they do not get tangled
during packing
- Unpeg the peg points excluding the 4 corners.
- Open all 5 air release taps. These taps should remain open during pack
down process
- Carefully walk over the air tubes to expel as much air as possible
- Unpeg the 4 corners of the tent
- Clean and dry pegs before storing in the bag
- Fold Awning over the body of the tent
- Fold bedrooms over center room
- Fold in 1/3s
- Roll towards the outlets and attach tension straps
- Place inside carry bag
10
Weathering Your Tent
When you rst get your tent you will need to weather it. This
is a process of soaking the fabric to ensure that all the thread
swells up lling stitch holes and creating a watertight surface.
When you pitch your tent for the rst time soak the fabric
with a garden hose until the fabric looks visibly damp. Allow
to dry and repeat for two or three times.
Your tent will get more watertight the more you use it. Do
not be concerned if you have a small amount of water coming
through the seams on the rst few times you get heavy rain.
Natural Fibre
Zempire Canvas is made of combination of Natural Cotton for breathability and water fastness and
polyester for strength.
Please note that as cotton is a natural ber you will notice variances of both color and thickness of the
thread. This is normal and is a characteristic of a natural and breathable ber.
CLOSE
PSI
0
1
2
3
456
7
8
9
10
CLOSE
45o
45o
OPEN
OPEN
