ZERO-X RAPTURE HD ZX-RHD User manual

DRONE USER MANUAL
PRODUCT CODE: ZX-RHD
www.zero-x.com.au • www.zero-x.co.nz
••• RAPTUREHD •••
v1


3
1 Welcome ........................................................................................................... 5
Before you get up in the air................................................................................. 5
General Safety.................................................................................................... 5
Battery Safety..................................................................................................... 6
2 Introduction....................................................................................................7
2.1 Package Contents........................................................................................ 7
Fig 2.1.1................................................................................................. 7
2.2 Product Overview ......................................................................................... 8
RaptureHD Drone.......................................................................................... 8
Fig 2.2.1 ................................................................................................. 8
Fig 2.2.2 ................................................................................................. 8
Remote Control ............................................................................................ 8
Fig 2.2.3 ................................................................................................. 8
Remote Control LCD Screen ........................................................................ 9
Fig 2.2.4 ................................................................................................. 9
3 Setting up you Zero-X RaptureHD ..................................................................9
3.1 Charging the Battery..................................................................................... 9
3.2 Installing the RaptureHD Battery ................................................................... 10
Fig 3.2.1 ............................................................................................... 10
Fig 3.2.2 ............................................................................................... 10
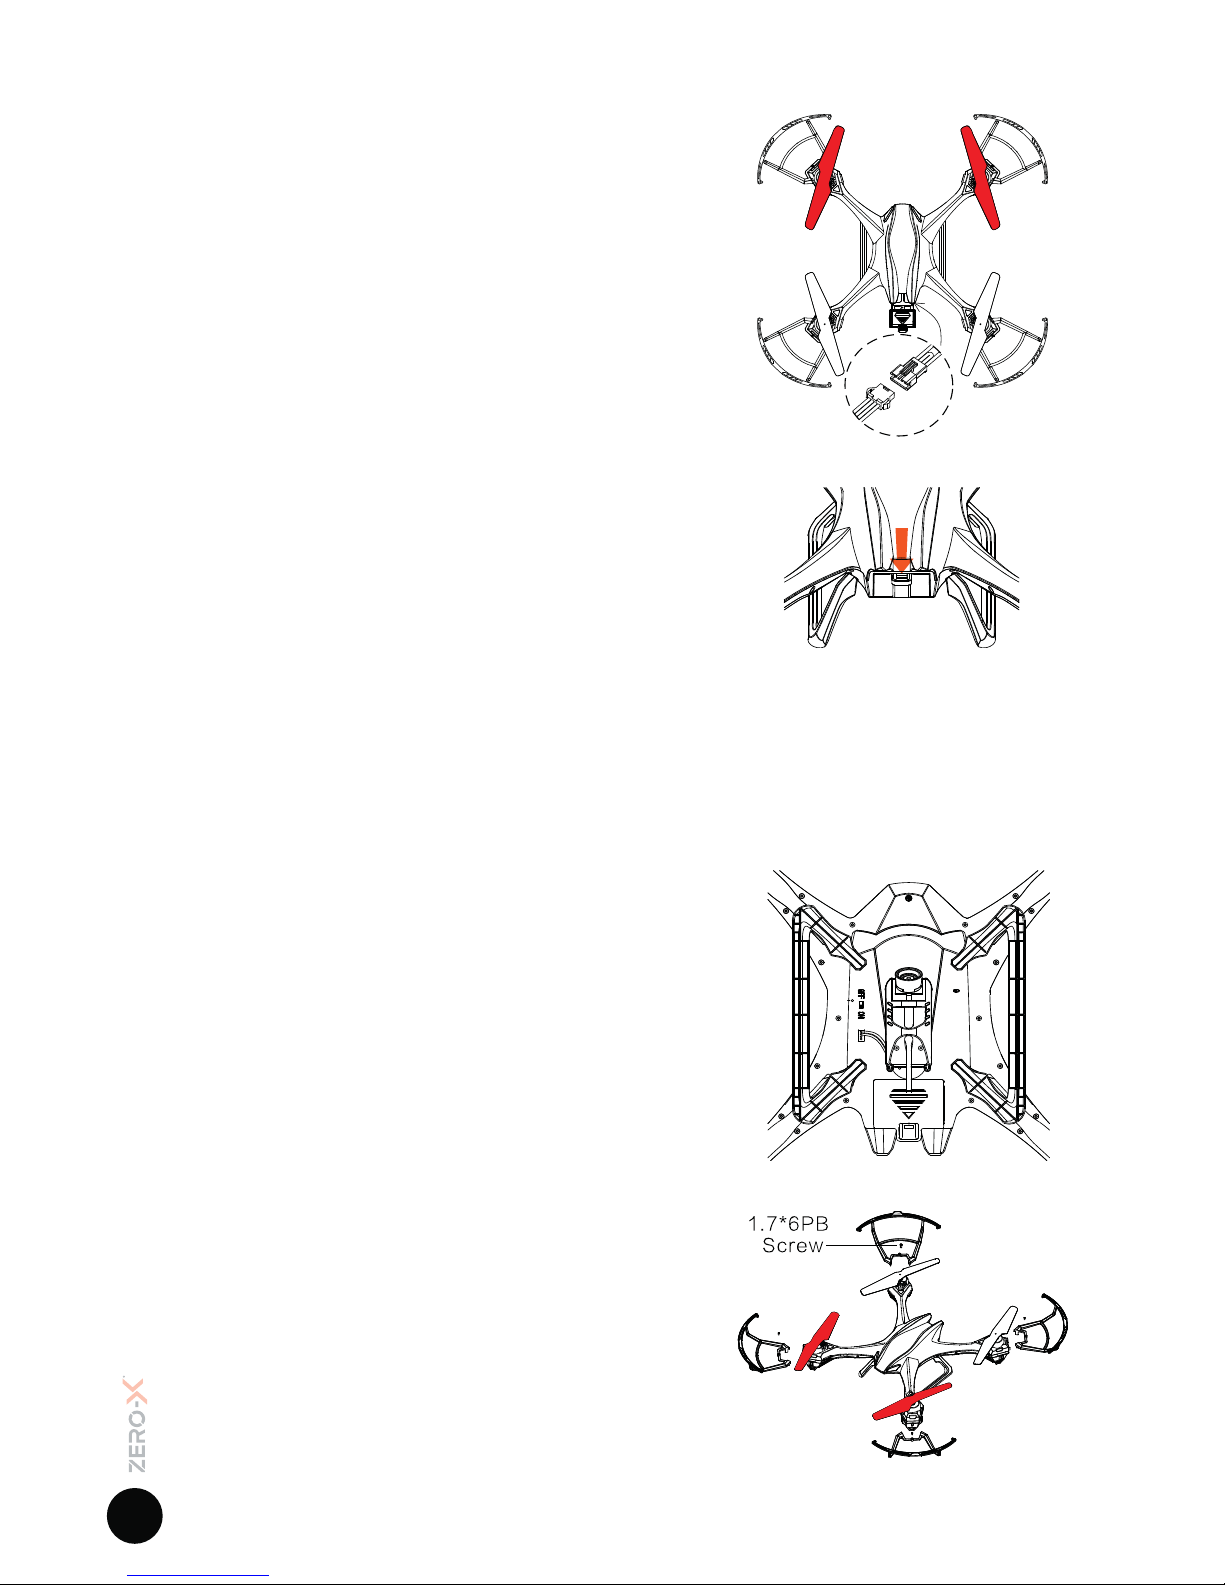
3.3 Camera Connection Guide ......................................................................... 10
Fig 3.3.1 ............................................................................................... 10
3.4 Installing a Micro SD Card (Micro SD Card not included) ....................................... 10
Fig 3.4.1 ............................................................................................... 10
3.5 Installing/Removing Rotor Guards.......................................................... 10-11
Fig 3.5.1 ............................................................................................... 10
3.6 Remote Control .......................................................................................... 11
Fig 3.6.1 ............................................................................................... 11
Fig 3.6.2 ............................................................................................... 11
4 Flight Safety.................................................................................................11
4.1 Flying your RaptureHD .........................................................................11-12
Fig 4.1.1 ............................................................................................... 12
4.2 Trouble Shooting ........................................................................................ 12
4.3 Controlling your RaptureHD .......................................................................... 13
Basic Controls ............................................................................................ 13
Fig 4.3.1 ............................................................................................... 13
4.4 Speed Modes........................................................................................ 13-14
Low Speed................................................................................................. 13
Mid Speed.................................................................................................. 14
High Speed ................................................................................................ 14
4.5 Trimming .................................................................................................... 14
Fig 4.5.1 ............................................................................................... 14

4.6 360° Flipping .............................................................................................. 15
4.7 Using you Camera...................................................................................... 15
Shooting Video ........................................................................................... 15
Fig 4.7.1 ............................................................................................... 15
Shooting Photos......................................................................................... 16
Fig 4.7.2 ............................................................................................... 16
4.8 First Person View Display............................................................................ 16
Interface ..................................................................................................... 16
Fig 4.8.1 ............................................................................................... 16
Brightness .................................................................................................. 16
Fig 4.8.2 ............................................................................................... 16
Pairing ........................................................................................................ 16
Directory Screen......................................................................................... 17
Fig 4.8.3 ............................................................................................... 17
Viewing....................................................................................................... 17
Fig 4.8.4 ............................................................................................... 17
Deleting Videos And Photos ....................................................................... 18
5 Maintenance ................................................................................................18
5.1 Cleaning ..................................................................................................... 18
5.2 Rotor Blade Installation and Replacement Guide ........................................ 18
Fig 5.1.1 ............................................................................................... 18
Fig 5.1.2 ............................................................................................... 18
Fig 5.1.3 ............................................................................................... 18
Fig 5.1.4 ............................................................................................... 18
5.3 Motor Replacement Guide.......................................................................... 19
5.4 Rotor Blade Replacement...................................................................... 19-20
Fig 5.4.1 ............................................................................................... 19
Fig 5.4.2 ............................................................................................... 19
Fig 5.4.3 ............................................................................................... 19
Fig 5.4.4 ............................................................................................... 19
Fig 5.4.5 ............................................................................................... 19
Fig 5.4.6 ............................................................................................... 19
Fig 5.4.7 ............................................................................................... 19
Fig 5.4.8 ............................................................................................... 20
Fig 5.4.9 ............................................................................................... 20
6 Parts And Accessories ................................................................................20
7 Specifications ..............................................................................................20
8 Warranty.......................................................................................................21

5
1. WELCOME
Thanks for purchasing a Zero-X RaptureHD, get ready to have the time of your
life! We’re sure your Zero-X RaptureHD will bring you a world of great experiences
in the air.
Please take the time to read the following safety warnings and operating
instructions carefully.
BEFORE YOU GET UP IN THE AIR
Connect the RaptureHD battery to the included USB charging cable and insert
the USB charging cable into the supplied USB wall charger. While the battery is
charging the LED on the charging cable will glow red. Once charging is complete
the light will glow green. While the battery is charging take the time to read the
instructions and familiarise yourself with the controls of your Zero-X RaptureHD.
GENERAL SAFETY
Please familiarise yourself with your local legislation regarding drone usage
before you begin using your Zero-X RaptureHD.
Included in the package contents of your Zero-X RaptureHD are the Australian
CASA guidelines, please read carefully and understand this information as
operating a drone outside of these guidelines may result in legal issues. Zero-X
takes no responsibility for operation of this product outside of what is legally
permissible in your local area.
• Do not fly your RaptureHD any closer than 30 metres from people, animals or
buildings, and check to make sure you are no closer than 5.5 kilometres from
any airfields or airports.
For more information on CASA’s Australian legislation visit:
http://www.casa.gov.au/ For information outside Australia please visit the
website of your local aviation authority.
• Do not attempt to modify the RaptureHD or any of its components in any way,
doing so will void your warranty and may affect the operation of the drone.
• Do not use the RaptureHD in any conditions that could affect, damage or
impair your view of the RaptureHD including rain, wind, snow, fog or low light.
• Avoid getting your RaptureHD wet, dusty or sandy. These elements will damage
the components of your RaptureHD.
• Please pay attention to the indication of low battery to avoid damage to your
RaptureHD, or your surroundings.
• Please do not attempt to touch the RaptureHD when the Remote Control is
powered on or if the rotor blades are turning.
• When flying your RaptureHD, please keep in mind the privacy of others.

6
IMPORTANT INFORMATION - PLEASE READ BEFORE USE
BATTERY SAFETY
When handled incorrectly, Lithium polymer batteries can be dangerous and
can potentially harm and do damage to persons or property. Zero-X does
not accept any liability of damage to persons or property if the battery is not
correctly charged, stored or protected.
• Always unwind all cables before charging.
• Do not over charge the battery. Once the charging process is completed,
remove the battery from the charger as soon as possible.
• You must charge the Lithium polymer battery in a safe area away from
flammable materials.
• Only use the included, or replacement Zero-X RaptureHD compatible
chargers and batteries.
• The battery is only to be charged under adult supervision, do not leave
charging batteries unattended. You should always remain in constant
observation to monitor the charging process and react immediately to any
potential problems that may occur.
• Do not charge the battery in temperatures hotter than 40°C or colder than
0°C.
• Do not cover the batteries when charging. Do not leave batteries in direct
sunlight.
• After each flight & or crash, please check battery for any damage or swelling.
• If the batteries are damaged, leaking, making noise, punctured or
malformed in any way DO NOT attempt to use it. Please dispose of the
battery immediately and safely in the correct manner.
• Do not bend, puncture, crush or scratch the drone’s batteries. Do not store
batteries in your pockets, on your person or in extreme temperatures.
• After flying/discharging the battery you must allow it to cool to ambient/
room temperature before recharging.
• If at any time during the charge or discharge process the battery begins to
balloon or swell, discontinue charging or discharging immediately. Quickly
and safely disconnect the battery, then place it in a safe, open area away
from flammable materials to observe it for at least 15 minutes. Continuing to
charge or discharge a battery that has begun to balloon or swell can result
in a fire. A battery that has ballooned or swollen even a small amount must
be removed from service completely.
• Never plug in a battery and leave it to charge unattended overnight.
• Non-compliance with the above warnings may result in the failure of the
battery.

7
2. INTRODUCTION
2.1 PACKAGE CONTENTS
4
10
12
11
9
3
7
5
6
8
2
1
1. RaptureHD Drone
2. RaptureHD Battery
3. RaptureHD Battery Charger
4. Remote Control
5. Remote Control Battery
6. Remote Control Batttery Charger
7. Spare Motors
8. Rotor Blades
9. Rotor Guards
10. Screwdriver
11. User Guide
12. USB Wall Charger *Fig 2.1.1

8
2.2 PRODUCT OVERVIEW
RAPTUREHD DIAGRAM
58
7
3
3
4 4
3
3
6
* Micro SD Card not included
Under Side
View
1 1
2 2
Top View
REMOTE CONTROL DIAGRAM
1
45
6
15
14 13
12
2
3
7
8
9
10
11
1. Front Rotor Blades
2. Rear Rotor Blades
*Fig 2.2.1 *Fig 2.2.2
*Fig 2.2.3
3. LED Lights
4. Feet
5. Power Switch
6. Camera
7. Battery
8. Micro SD Card Slot*
1. Power Switch
2. Left Thumbstick (Acceleration/Yaw)
3. Right Thumbstick (Pitch/Roll)
4. Yaw Trim Controller
5. Pitch / Roll Trim Controller
6. FPV Screen
7. View Button
8. Record Button
9. Photo Button
10. Up Button
11. Down Button
12. Micro SD Card Slot*
13. Glare Shield (Detachable)
14. Speed Button
15. Flip Mode (On/Off)

9
*Fig 2.2.4
REMOTE CONTROL LCD SCREEN DIAGRAM
1
3
4
5
6
2 7 8
1. Connection
2. View Footage / Photos
(Micro SD card must be inserted
into the FPV screen to view)
3. Shoot Video Footage
(Micro SD card must be inserted
in the RaptureHD Drone to shoot
video footage)
4. Shoot Still Photo
(Micro SD card must be inserted
in the RaptureHD Drone to shoot
still photos)
5. Brightness Up
6. Brightness Down
7. Micro SD Card in
camera icon
8. Micro SD Card in FPV
icon
3. SETTING UP YOUR ZERO-X RAPTUREHD
3.1 CHARGING THE BATTERY
Fully unwind the included USB charging cable and plug the USB end into
the included USB wall charger. Only use the USB charging cable and wall
charger included with the RaptureHD. If you are unable to use the supplied
wall charger, please ensure that the charger that you use is C Tick certified
and has an output minimum of DC 5V/1A and maximum of DC 5V/2.1A.
Chargers above or below this range can potentially damage the battery and
charger. When connected to a charging source the LED light in the charger
will glow green. Connect the drone battery to the charging cable and the
light will glow red indicating charging is in process. The LED on the USB
charging cable will begin to glow green again once charging is complete. To
keep the battery life as long as possible avoid removing the battery from the
charging cable before charging is complete. If you have just finished flying
your RaptureHD, please allow the battery to cool down for at least 30 minutes
before recharging.
• If the battery is being charged by computer, make sure to pull out the USB
cable if you want to shut down the computer.
• When connecting the USB cable with the battery, make sure to follow the
correct polar indicator.
• When Flying the RaptureHD, low battery will be indicated when the remote
control starts beeping and the lights on the RaptureHD start flashing.

10
3.2 INSTALLING THE RAPTUREHD BATTERY
• Ensure that the RaptureHD’s power switch
is in the OFF position. (Refer to Fig 2.2.2 on
page 8 - number 5)
• Connect the battery cable to the
RaptureHD’s power cable ensure that the
plug is inserted in the correct orientation.
• Tuck the cable into the battery opening.
• Insert the fully charged battery with the
charging wires facing outwards.
• Connect the battery cable to the
RaptureHD’s power cable. (Refer to Fig 3.2.1)
• Close the battery hatch making sure the
door clicks into place. (Refer to Fig 3.2.2)
FOR INFORMATION ON THE REMOTE
CONTROL BATTERY, SEE SECTION
MARKED REMOTE CONTROL
3.3 CAMERA CONNECTION GUIDE
• The camera on the RaptureHD should already be connected. It is advised
that the camera is not removed and reconnected as this can potentially
damage the camera connection.
• If it is necessary to plug these cables in make sure that the plugs are facing
the correct way as plugging these in incorrectly could permanently damage
the connection pins on the RaptureHD.
3.4 INSTALLING A MICRO SD CARD
• With the RaptureHD upside down and facing
away from you insert the Micro SD Card into
the side of the camera ensuring that the text
side of the Micro SD Card is facing up. (Refer
to Fig 3.4.1)
• Gently press the card in until you hear the lock
click into place. (Micro SD Card not included)
3.5 INSTALLING/REMOVING ROTOR GUARDS
• Rotor Guards are an optional fitting
on the RaptureHD, however for safety
reasons we strongly advise you to
attach them. Whether Rotor Guards are
attached or not, please be very careful
when handling the drone. To avoid
injury, do not touch the drone while
the blades are turning or the remote
control is powered on.
*Fig 3.2.1
*Fig 3.2.2
*Fig 3.4.1
*Fig 3.5.1

11
• Line up the guide pegs on the Rotor Guards with the holes on the arms of
the RaptureHD so that the screw in the Rotor Guard matches up with the
screw hole in the RaptureHD. (Refer to Fig 3.5.1)
• Firmly press the Rotor guard into position inserting one peg at a time.
• Insert the included screws into the screw holes and use the included
screwdriver tighten the screws making sure not to over tighten.
3.6 REMOTE CONTROL
• Connect the Remote Control Battery to the
included Remote Control Battery Charging Cable
and connect the USB end into the included USB
wall charger. (Refer to Fig 3.6.1)
• The red light on the Remote Control Battery Charger will turn off once
the battery is fully charged, once charged disconnect the battery form the
charger.
• Ensure that the Remote Controls’ power switch is in the OFF (Left) position.
• With the included screwdriver unscrew the battery cover on the rear of the
Remote Control.
• Remove the Battery Cover.
• Connect the Battery cable to the power cable inside the Remote Control
battery hatch. (Refer to Fig 3.6.2)
• Insert the Remote Control battery into the
battery slot and make sure that the wires are
tucked in to ensure they are not crushed buy
the battery cover.
• Replace the battery cover making sure not to
over tighten the screw.
4. FLIGHT SAFETY
Before flying your RaptureHD make sure that you are in a safe setting. CASA
restrictions regarding flying drones require the drone be no closer than 5.5kms
from any airport or airfield whilst flying. Drones should also not be flown over
populated areas or any closer than 30 metres from vehicles people or animals.
It is also required that you check your surroundings before taking off making
sure there are no obstacles or dangers in the area, including overhead power
lines and bodies of water. If there are hazards present in your intended area of
flight, please consider an alternative location.
4.1 FLYING YOUR RAPTUREHD
1. After installing a fully charged battery into the RaptureHD and Remote
Control and conducting a complete check of your surroundings, turn the
Power Switch (Refer to Fig 2.2.2 on page 8 - number 5) on the RaptureHD to
the ON position.
2. Once the RaptureHD is powered on, the LED lights on the arms should
flash, signalling no connection to the Remote Control. Place the RaptureHD
on flat ground facing away from you and move back three meters.
*Fig 3.6.1
*Fig 3.6.2

12
3. With the Left Thumbstick (Acceleration/Yaw) (Refer to Fig 2.2.3 on page 8 -
number 2) in the lowest (down) position, power on the Remote Control, the
remote should beep once to indicate power up has been successful.
4. To activate the connection between the Remote Control and the RaptureHD,
move the Left Thumbstick (Acceleration/Yaw) (Refer to Fig 2.2.3 on page 8 -
number 2) on the Remote Control to the highest (up) position, hold for one
second and then return the Left Thumbstick (Acceleration/Yaw) to the
lowest (down) position holding for another 5 seconds. (Refer to Fig 4.1.1)
The remote should beep three times, the lights on the arms of the
RaptureHD should shine solid and the
power indicator light on the Remote
Control will shine solid indicating that the
connection has been successful.
5. Calibrate the RaptureHD by holding the Right
Thumbstick (Pitch/Roll) (Refer to Fig 2.2.3 on
page 8 - number 3) in the bottom right position.
This ensures that the RaptureHD stays
level and flies straight. The Lights on the
RaptureHD will flash fast while calibrating.
Keep holding the Thumbstick in the bottom
right position until calibration is complete.
If the RaptureHD starts to fly abnormally, it
may need to be re-calibrated. To recalibrate
the RaptureHD turn the Remote Control and
RaptureHD off, and then restart the Launching your RaptureHD process.
4.2 TROUBLE SHOOTING
Once activated do not approach the drone again until the remote has been
powered off. If for any reason the RaptureHD does not work after following
the launching steps, please check the following:
a) The RaptureHD batteries are fully charged, correctly connected and not
damaged.
b) The connection between the Remote Control and the RaptureHD may
not have been completed correctly. Ensure that when activating the
connection, the Left Thumbstick is moved all the way to the top and then
all the way to the bottom. If this is not completed the connection will not
activate.
Once these elements have been checked turn both the RaptureHD
and the Remote Control off and start the launching process again.
*Fig 4.1.1
HOLD Left Thumbstick UP for 5 seconds
HOLD Left Thumbstick DOWN for 5 seconds

13
*Fig 4.3.1
4.3 CONTROLLING YOUR RAPTUREHD
BASIC CONTROLS
Lift / Descent
Yaw Left / Right
Roll Left / Right
Pitch Forward / Back
4.4 SPEED MODES
The RaptureHD has 3 speed modes that control the acceleration and
manoeuvrability of the drone.
To cycle through the Speed Modes, use the Speed Button (Refer to Fig 2.2.3
on page 8 - number 14) on the rear of the left handle of the Remote Control.
LOW
When the RaptureHD is powered up it will start in LOW speed mode.
In this mode the RaptureHD will control and fly slowly. It is advised that
beginners use this mode to learn the basics before moving onto the two
higher modes
Push up the Throttle Rudder
Stick and the drone will fly
up. Push down the Throttle
Rudder Stick and the drone
will fly down.
Push the Left Rudder Stick
to the left or to the right,
the drone will rotate in the
corresponding direction.
Push the Right Stick to the
left or to the right, the drone
will fly in the corresponding
direction.
Push the Right Stick forward
or backward, the drone
will fly in the corresponding
direction.

14
MID
Push the Speed Button (Refer to Fig 2.2.3 on page 8 - number 14) once and the
Remote Control will quickly beep twice indicating that the RaptureHD is now
in the medium Speed Mode.
In this mode the sensitivity of both the acceleration, and directional control
of the RaptureHD will be increased, making the RaptureHD more nimble and
quick.
HIGH
Pushing the Speed Button (Refer to Fig 2.2.3 on page 8 - number 14) the Remote
Control will quickly beep twice indicating that the RaptureHD is now in the
High Speed Mode.
In this mode the sensitivity of both the acceleration and directional control
will be increased again. It is advised that this mode is only used in a very
open space once the pilot has gained significant drone flight experience.
Push the Speed button again to return the drone to Low Speed setting.
4.5 TRIMMING
Trimming is used to balance the RaptureHD when the flight is off centred.
Please check before attempting to use trimming that the RaptureHD’s flight is
not being affected by outside forces such as wind.
Trimming Pitch
Trimming Roll
Trimming Yaw
To trim the RaptureHDs’ pitch, use the
Pitch Trim Controls (Refer to Fig 2.2.3 on page
8 - number 5) which are the top and bottom
buttons below the Right Thumbstick. This will
balance the forward and back movement of
the RaptureHD.
To trim the RaptureHDs’ roll, use the
Roll Trim Controls (Refer to Fig 2.2.3 on page
8 - number 5) which are the left and right
buttons below the Right Thumbstick. This
will balance the left and right movement of
the RaptureHD.
To trim the RaptureHDs’ Yaw, use the Yaw
Trim Controller (Refer to Fig 2.2.3 on page 8 -
number 4) which is the small switch on the
Remote Control below the Left Thumbstick.
This will balance the left and right spin of the
RaptureHD.
*Fig 4.5.1

15
4.6 360º FLIPPING
The RaptureHD is capable of performing 360° flips. This is possible by using
the Flip button (Refer to Fig 2.2.3 on page 8 - number 15).
To Perform a forward flip push the Flip Button (Refer to Fig 2.2.3 on page 8 -
number 15) on the back side of the Remote Controls Right handle. This will
launch the RaptureHD forward into a forward flip.
Please ensure that you have a 2 metre clearance below, and in all directions
around the drone before attempting to flip as this manoeuvre requires
considerable space. Flips will be deactivated when the RaptureHD has low
power, and will be reactivated once the battery is charged.
4.7 USING YOUR CAMERA
The camera on the RaptureHD is controlled via the Record and Snap buttons
on the left hand side on the FPV screen.
When you are intending to use the camera, please ensure that you have
inserted a Micro SD Card (Micro SD Card not included) into the Micro SD
Card slot in the camera on the underside of the RaptureHD. The camera will
not record to a SD Micro card that is inserted into the FPV screen.
The Left SD icon on the FPV screen will display green when a Micro SD Card
is detected, and it is ready to record video or take still photos.
If the SD icon does not display green, or shows “ERR”, try re inserting the
Micro SD Card into the RaptureHDs’ Camera and restart the RaptureHD. If
this issue persists please ensure you are using a compatible Micro SD card.
SHOOTING VIDEO:
The RaptureHD will capture 60 second clips, once it has finished recording
a clip it will begin a new clip and continue recording 60 second clips until you
stop recording. (Refer to Fig 4.7.1)
To start recording video, push the Record button (Refer to Fig 2.2.3 on
page 7 - number 8) on the left side
of the FPV Screen. The FPV
screen will flash the word “REC”
in red at the top of the screen
and a counter will show timing the
clip length indicating that recording
is in progress. To stop recording
push the Record Button again.
Ensure you have stopped recording
before removing the Micro SD Card,
or turning the power off on your
RaptureHD. (Refer to Fig 4.7.1)

16
SHOOTING PHOTOS:
To shoot a photo with your RaptureHD
press the Snap button (Refer to Fig 4.7.2)
on the left side of the FPV screen. “JPG”
will be displayed at the top of the FPV
screen in red indicating that a photo has
been taken.
4.8 FIRST PERSON VIEW DISPLAY
When connected the First Person Display streams the video from the
RaptureHDs camera as well as gives the ability to play back footage from an
inserted SD Micro Card.
INTERFACE
The FPV interface can be controlled
using the five buttons on the side of the
FPV screen. (Refer to Fig 4.8.1)
In the front menu the buttons control
recording footage, taking photos, viewing
recorded Videos/Photos and adjusting the
brightness of the FPV screen.
BRIGHTNESS
To increase or decrease the brightness of the
FPV screen use the up and down buttons on
the front menu. (Refer to Fig 4.8.2)
PAIRING
If you are in an area where more
than one drone is being flown it
is recommended that you pair your FPV screen
to your drone to avoid signal interference.
To pair your FPV screen to your RaptureHD:
1. Connect your RaptureHD to the controller by following the connection
instructions in the section named ‘Flying your RaptureHD’.
2. Once paired hold the Up button in the Front Menu for six seconds, this will
then allow you to pair the RaptureHD to the FPV Screen by pushing the Up
button again.
3. The FPV screen will then take five seconds to bind the connection which
will be counted down on screen.
4. The FPV Screen and RaptureHD are now paired.
*Fig 4.8.1
*Fig 4.8.2

17
DIRECTORY SCREEN
The Directory Screen is used to playback and delete Videos and Photos.
VIEWING
The FPV screen will allow you to view Videos and Photos taken with the
RaptureHD.
To view recorded Video or photos, remove the Micro SD Card form the
RaptureHD camera, and insert into the FPV Screen Micro SD Card Slot. (Refer
to Fig 2.2.2 & Fig 2.2.3 on page 8)
PLEASE NOTE. THE FPV SCREEN CANNOT REMOTELY PLAY VIDEOS
/ PHOTOS FROM A MICRO SD CARD THAT IS IN THE RAPTUREHD’S
CAMERA.
Once inserted, a white SD icon will appear at the top of the Front
Menu indicating that a Micro SD card has been detected. If the SD
icon does not appear, or shows “ERR”, try re-inserting the Micro
SD Card into the FPV Screen and restarting the Remote Control.
If this issue persists ensure you are using a compatible Micro
SD card.
Press the View Button (Refer to Fig 2.2.3 on page
8 - number 7) on the FPV screen which will take
you to the directory screen. In this screen the
Up (10) and Down (11) buttons are used to
navigate the folders, the Snap Photo Button (8)
is used to navigate back and the Record Video
Button (9) is used to select. (Refer to Fig 2.2.3 on
page 8 - numbers listed above)
To view a video or photo use the navigational
buttons to access folders and select (Refer to Fig 2.2.4 on page 9) a video or
photo. Once a video has completed playing the next video in the folder will
be queued to play. This will continue until playback is stopped or the last file
in a folder is played.
1. Delete (View Button) 7. Back Navigation
2. OK / Select (Record Button) 8. Playable File
3. Back (Photo Button) 9. Folder
4. Up Button 10. File Size
5. Down Button 11. File Name
6. Micro SD Card Capacity / Used 12. Folder Name
*Fig 4.8.3
*Fig 4.8.4

18
DELETING VIDEOS AND PHOTOS
With the delete function you can delete videos and photos taken with the
RaptureHD.
To delete a file from a Micro SD Card select the file that is required to be
deleted and push the Delete button (View). (Refer to Fig 2.2.3 on page 8 - number
7). You will then be asked if you are sure you want to delete this file, select
Yes or No accordingly and push OK (Refer to Fig 2.2.3 on page 8 - number 8) to
proceed.
5. MAINTENANCE
5.1 CLEANING:
Avoid exposing your RaptureHD and it’s accessories to dust, sand and
moisture as these can damage the RaptureHD. If the RaptureHD is exposed
to dust or sand, use a soft brush to remove any visible particles.
5.2 ROTOR BLADE REPLACEMENT:
1. Use the Included screwdriver to remove the screw on
the base of the Rotor Blade.
2. Gently remove the Rotor Blade.
3. Ensure that you are replacing the Rotor Blade
with the correct blade as there are two different
orientations of blades which are labelled A and B.
IF THE INCORRECT BLADE
IS USED IN THE INCORRECT
PLACEMENT THE RAPTUREHD
WILL NOT WORK.
Different colour Rotor Blades are used so it is
easy to identify the front and rear of the RaptureHD
when flying. To ensure that it is easy to fly the
RaptureHD make sure that the front and rear
blades are different colours. (Refer to Fig 5.1.3)
4. Gently push the replacement Rotor Blade onto
the rod ensuring that the screw hole on the
Rotor hole lines up with the hole on the rod.
Replace the screw, being careful not to over tighten. If
the screw will not fit into place, remove the screw and
make sure that the holes on both the Rotor Blade and
the rod are aligned.
*Fig 5.1.1
*Fig 5.1.4
*Fig 5.1.3
AB
*Fig 5.1.2

19
5.3 MOTOR REPLACEMENT GUIDE
The RaptureHD uses brushed motors similar to what is used in remote control
cars. These motors do need to be replaced from time to time to keep your
drone up in the air.
The following instructions will take you through how to replace your motors
when they are not working like new. It is recommended that before you
attempt to replace the motors you set up a clean level space.
5.4 ROTOR BLADE REPLACEMENT:
1. Turn the RaptureHD upside down and remove the 3 screws in
the motor housing and the screw in the LED window. (Refer
to Fig 5.4.1)
2. Carefully remove the motor housing panel and the LED
window. (Refer to Fig 5.4.2)
3. Turn the RaptureHD right side up and remove the two screws
from the motor. (Refer to Fig 5.4.3)
4. Remove the motor from the bottom of the motor housing.
(Refer to Fig 5.4.4)
5. Remove the adhesive from the motor’s power plug using a
blunt flat instrument to scrape back the adhesive. (Refer to
Fig 5.4.5)
6. Unplug the motor’s power plug being careful not to pull the socket off the circuit board.
7. Remove the heat sink from the old motor and slip it over the new motor being careful not
to block the new motor’s ventilation hole.
8. Connect orientation (clockwise, counter clockwise). Clockwise
motors will have a red connector socket and will be marked
with the code “CW”, while counter clockwise motors will have
a white connector socket and will be marked with the code
“CCW”. (Refer to Fig 5.4.6)
9. Slip the motor back into the motor housing making sure
that the screw holes in the top of the motor align with the
screw holes in the motor housing and the teeth on the gears
synchronise. (Refer to Fig 5.4.7)
*Fig 5.4.1
*Fig 5.4.2
*Fig 5.4.3
*Fig 5.4.4
*Fig 5.4.5
*Fig 5.4.6
*Fig 5.4.7

20
10. Replace the screws in the top of the motor securing the
motor to the motor housing (it is recommended that you use
a magnetic screwdriver as the motors also contain magnets
and can make it difficult to insert these screws). (Refer to Fig
5.4.8)
11. With the motor re attached put the LED window, and motor
housing panel back in place and re attach the screws
making sure not to over tighten. (Refer to Fig 5.4.9)
6. PARTS AND ACCESSORIES
To purchase parts and accessories for your Zero-X RaptureHD, please visit your
nearest Zero-X retailer or visit us online at www.zero-x.com.au
ZXRBSRBW Rotor Blades: Rapture, RaptureHD & Spectre drones – Black and White
ZXRBSRBO Rotor Blades: Rapture, RaptureHD & Spectre drones – Black and Orange
ZXRBSRBR Rotor Blades: Rapture, RaptureHD & Spectre drones – Black and Red
ZXRBSRVP Rotor Blades: Rapture, RaptureHD & Spectre drones – Value Pack
ZXBATSR1K 1000mAh Battery for Rapture, RaptureHD and Spectre drones
ZXCHSRDR Battery charger for Rapture, RaptureHD & Spectre drones
ZXBATSRCT Battery and charger for the Rapture & RaptureHD remote control
7. SPECIFICATIONS
Dimensions 48cm x 48cm x12cm
Weight 320g
Channels 4
Battery 1000mAh
Motors 4
Transmitter Battery 350mAh Rechargeable
Screen Colour FPV screen
Frequency 2.4
Camera Resolution 720P
Photo Resolution 2MP
Video Format AVI
Photo Format JPG
Memory Micro SD Card (up to 32GB)
Battery 5V, 2A, USB
*Fig 5.4.8
*Fig 5.4.9
Table of contents
Other ZERO-X Drone manuals

ZERO-X
ZERO-X stratus+ User manual

ZERO-X
ZERO-X Titan User manual

ZERO-X
ZERO-X nova ZX-NVA User manual

ZERO-X
ZERO-X polaris User manual

ZERO-X
ZERO-X swift+ User manual

ZERO-X
ZERO-X Pro Evolved 4K User manual

ZERO-X
ZERO-X Rapture ZXRAP User manual

ZERO-X
ZERO-X Hydra ZX-HRA User manual

ZERO-X
ZERO-X Raven+ User manual

ZERO-X
ZERO-X Force User manual