Zinwell ZIN-5005HD User manual


Safety Instructions
This product has been engineered and manufactured to assure your
personal safety. However, improper use can result in potential electric
shock or fire hazards. In order not to defeat the safe-guards incorporated
in this instrument and its accessories, please adhere to the following
instructions when installing, operating and servicing.
Power Source Warning
A marking label attached on the rear side of the adapter supplied)
indicates the correct power source for this equipment. Operate this
product only from an electrical outlet with the voltage and frequency
indicated on the product label. Incorrect power source may result in a
risk of electric shock or fire. If you are uncertain of the type of power
supplied to your home, consult your local power company or appliance
dealer.
Only use the power cord and adapter provided by the manufacturer.
Internal component may be damaged if you use a different adapter to
power this product. To avoid electric shock and fire hazard, match the
plug and outlet connections carefully, then fully insert. If the plug fails to
fit the outlet, please contact an electrician to update your power outlets.
Do not overload electrical outlets, extension cords, or integral convenience
receptacles as this can result in a risk of fire or electric shock. And to
prevent power cord damage, arrange all power cords so that people
cannot walk on the cords. Do not place objects on the cords.
Place this product in a location that is close enough to an electrical outlet
and where the power cord is easily accessible to be disconnected from the
wall outlet.

Usage Warning
To reduce the risk of electric shock, do not remove the cover or attempt to
disassemble this product. There are no user-serviceable parts inside.
Please refer all servicing to qualified service personnel.
Protect this product from foreign objects. Never push object of any kind
into this product through openings as they may touch dangerous voltage
points or short-out parts that could result in a fire or electric shock.
Do not expose this product to liquids, rain or moisture.
This product has ventilation openings that protect it from overheating.
Never block or cover these openings. And do not place this product near
heat sources such as radiators, heat registers, stoves or other products
producing heat.
Before cleaning or wiping this product, make sure your power cord is
already unplugged from the electrical outlet. Only use damp cloth to
clean this product, and never use a liquid cleaner or an aerosol cleaner.
During a thunderstorm, or when this product is unused for long periods of
time, unplug power cord from the wall outlet. This will prevent damage
to the product due to lightning and power-line surges.
Service Warning
Refer all servicing to qualified service personnel. For damage that
requires service, please unplug your power cord from the AC outlet first,
and contact your dealer or servicing personnel to obtain service for the
following conditions.
If there is damage to the adapter, power cord or plug.
If liquid enters this product.
If you drop this product, a heavy object falls on this product, or
damage occurs to the cover of this product.
If you expose this product to rain or water.
If this product does not operate normally by following the operating
instructions.
If this product exhibits a distinct change in performance.

Caution
Risk of explosion if battery is replaced by an incorrect type. Dispose of used
batteries according to the instructions.
Copyright Notice
No part of this user’s manual may be copied, translated, or reproduced
including electronic form without permission from the copyright owner. We
have made effort to ensure the accuracy and completeness of this document.
However, as ongoing development is continually improving the capabilities of
our products and the content described in this manual may be changed at any
time, we cannot guarantee the accuracy of the content of this document. We
disclaim liability for errors, omissions, or future changes. The information of
this document is subject to change without notice.
This device complies with Part 15 of the FCC Rules. Operation is subject to the
following two conditions:
(1) This device may not cause harmful interference.
(2) This device must accept any interferences received, including interference
that may cause undesired operation.
License Notice and Trademark Acknow edgement
Do by Digita :
Manufactured under license from Dolby Laboratories. Dolby and the double-D
symbol are trademarks of Dolby Laboratories.

Tab e of Contents
1
11
1
Introduction ........................................................................ 2
Package Content ............................................. 錯誤
錯誤錯誤
錯誤! 尚未定義書籤
尚未定義書籤尚未定義書籤
尚未定義書籤。
。。
。
Specification.............................................................................. 3
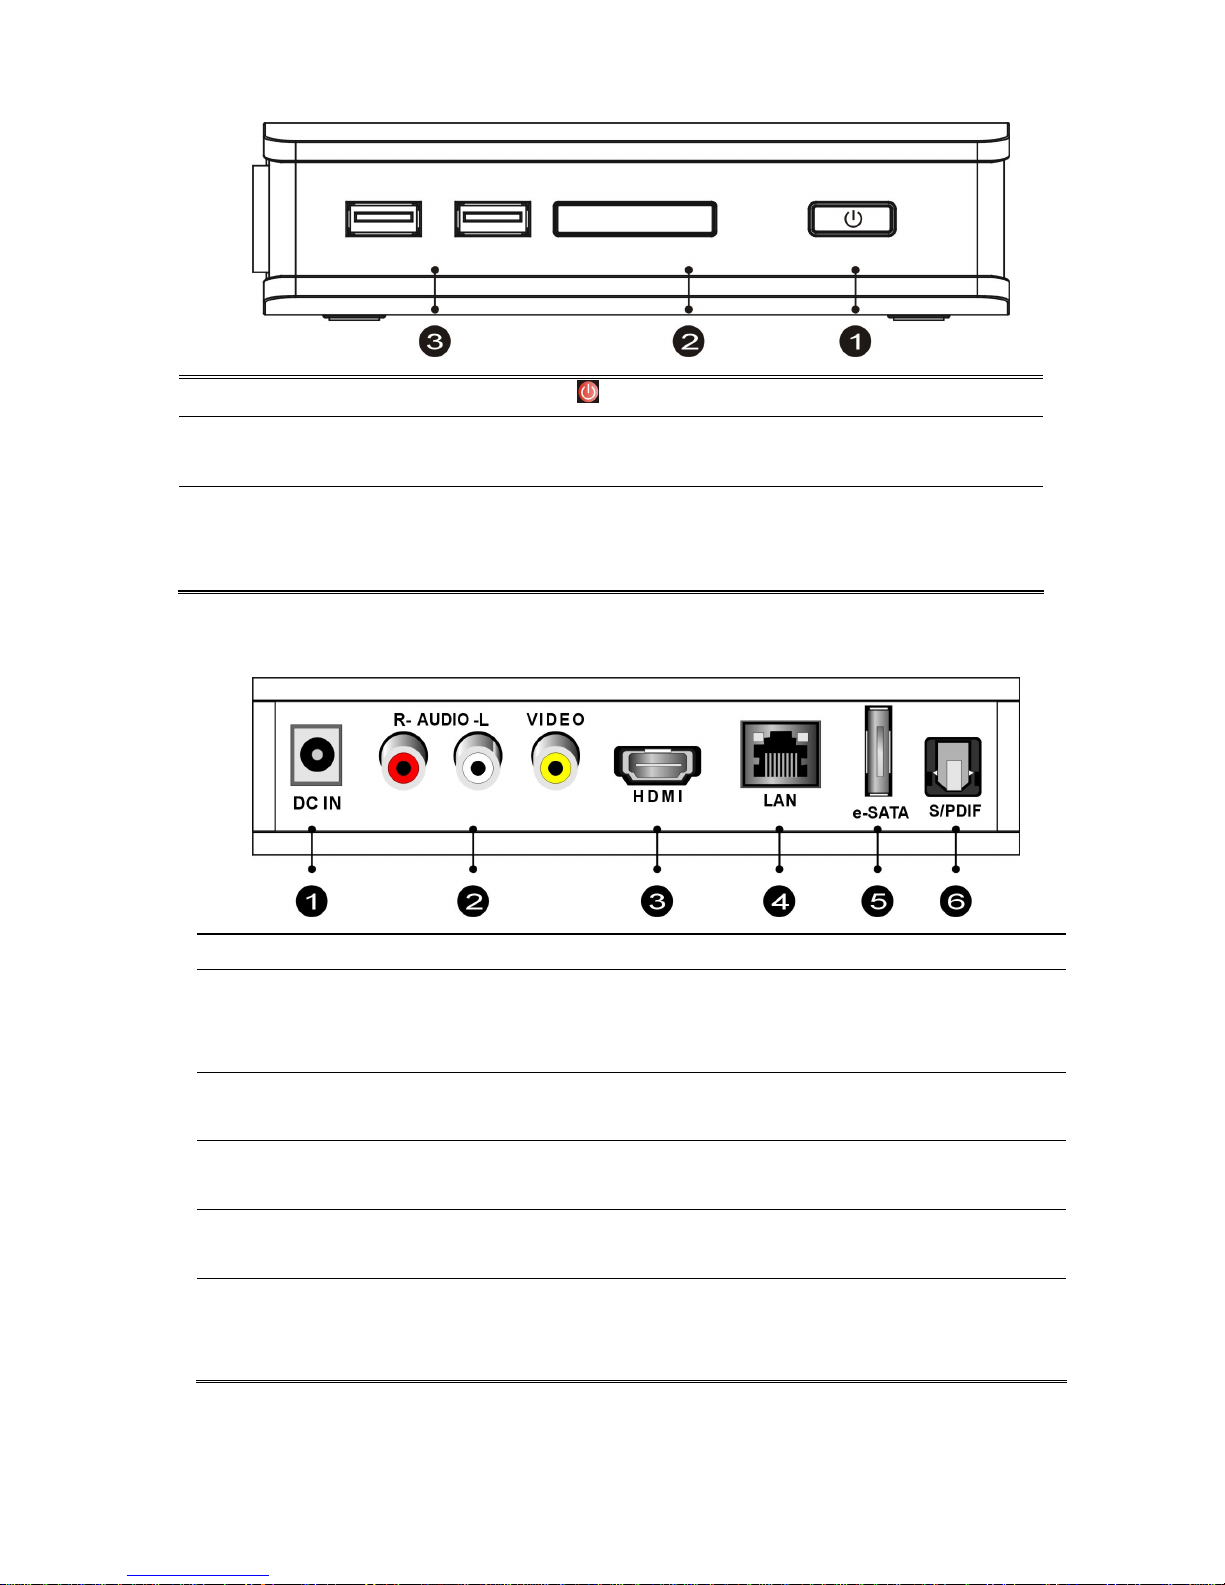
Front View................................................................................. 4
Back View.................................................................................. 4
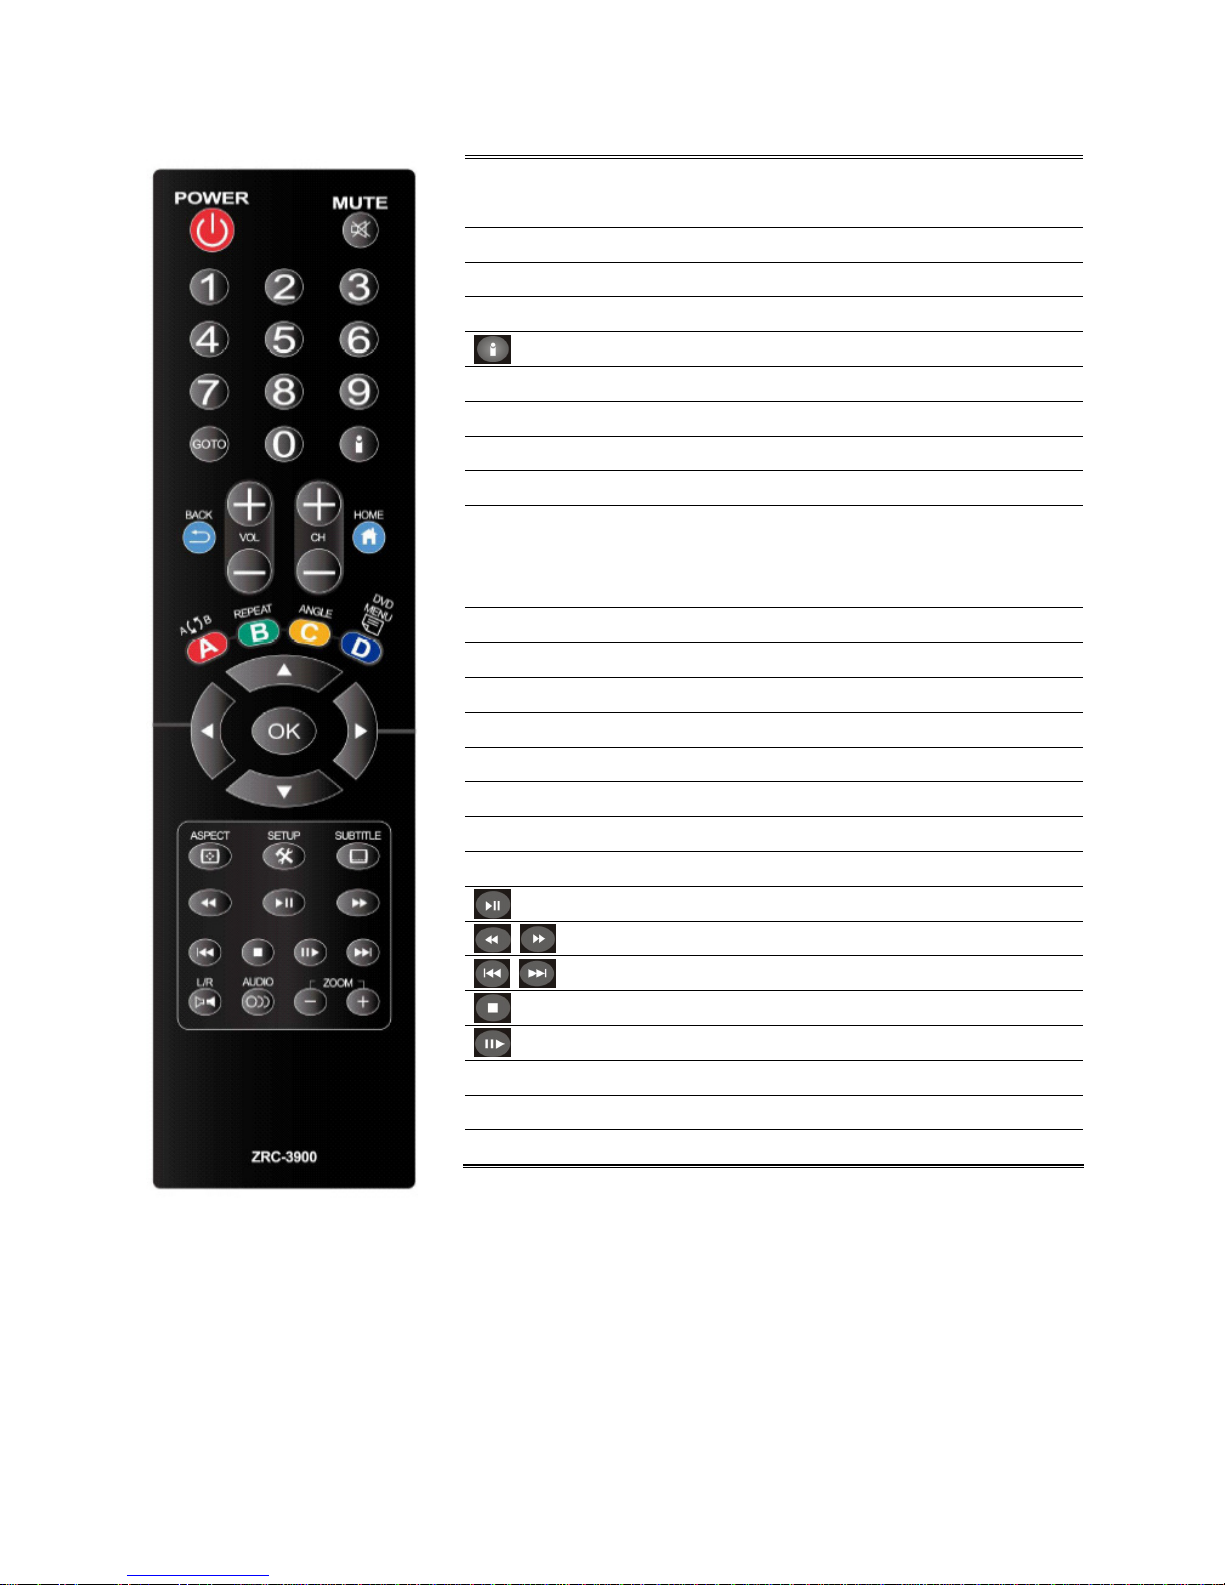
Remote Contro ......................................................................... 5
2
2 2
2 Insta ation.......................................................................... 6
Cab e Connections ..................................................................... 6
Internet Connections................................................................. 6
Connect USB Devices................................................................. 8
Power Cord Connection ............................................................. 8
Switch your TV Input/Source .................................................... 8
3
33
3
Network Connections .......................................................... 9
Wired Network Setup .............................................................. 10
Wire ess Network Setup .......................................................... 11
Fi e sharing (Simp e NAS) ....................................................... 12
Fi e sharing Configuration ....................................................... 13
4
4 4
4 P ay Media ......................................................................... 17
Video P ayback ........................................................................ 19
Music P ayback ........................................................................ 20
Photo P ayback........................................................................ 21
5
5 5
5 Bonus Features.................................................................. 22
Torrent Down oad.................................................................... 22
F ickr ....................................................................................... 23
6
66
6
Fi e Copy............................................................................ 24
7
7 7
7 Setup................................................................................. 25
Audio....................................................................................... 25
Video ....................................................................................... 26
System .................................................................................... 27
Other ....................................................................................... 27
8
88
8
Troub eshooting ................................................................ 28

2
1
11
1
Introduction
THE PRODUCT is a high-definition multimedia player and streamer connecting to
the external USB hard drives and your HD TV, bringing PC and internet
entertainment to the living room. THE PRODUCT is also a BitTorrent downloader
with built-in BitTorrent engine. It downloads media files into the attached USB
hard drives corresponding to the BitTorrent seeds already saved on the USB drive.
Playing and downloading your favorite media files is now PC-free. It supports most
video/audio/image formats so you do not need to convert downloaded media to
another format. You can plug in your USB devices to the THE PRODUCT to play
music, movies and pictures on TV by following the on-screen display OSD) menu.
The THE PRODUCT can also access the shared folders on the remote PCs through
the intranet local area network) and play the digital media files there on your TV.
It supports high-definition media playback with HDMI output.

3
Specification
Interfaces
Video Output HDMI、Composite Video
Audio Output Audio L/R、S/P DIF Optical)
Data Transfer e-SATA、USB x 2、Ethernet Port
Genera Specifications
MPEG1 AVI/MKV/TS/DAT/MPG/MPEG/VOB)
MPEG2
MKV/DAT/MPG/MPEG/VOB/ISO/IFO/TS/TP)
/M2TS
MPEG4 AVI/MP4/MKV/MOV/WMV/ASF)
DivX 3/4/5/6、Xvid AVI/MKV/MP4/MOV)
H.264/AVC
TS/AVI/MP4/MKV/MOV/FLV)/M2TS
VC-1 TS/AVI/ASF/WMV)/M2TS
WMV9 ASF/WMV)
Video
Real Video 8/9/10 RM/RMVB)
Audio
MP3、MPEG Audio、Dolby Digital、DTS 、
WMA、PCM、LPCM、ADPCM、FLAC、WAV、
AAC、RA、OGG、MKA
Photo HD JPEG、GIF、PNG、BMP、TIF、TIFF
Subtitle SRT、SMI、SUB、SSA、IDX+SUB
Support Media
Format
HDD Device
File Systems
EXT3、NTFS、FAT16/32、HFS+
Decoding
Up to 1080p RMVB up to 720p)
Output Up to 1080p
Power Supp y 100~240V ±10% input voltage/ 5V @ 3A

4
Front View
Back View
① DC IN Connects to the DC output of the power adapter.
② AUDIO L/R/
VIDEO
Connects to the display with the VIDEO IN/
AUDIO L/R IN jacks on the display using VIDEO
Yellow)/ AUDIO L White)/R Red) cables.
③ HDMI OUT Connects to the HDMI jack on the display; a
single cable transmits both audio and video data.
④ LAN Connects to the RJ-45 Ethernet 10/100 based
network. Not compatible with the telephone line.
⑤ e-SATA Plug the supported e-SATA devices into e-SATA
ports, such as e-SATA hard drives.
⑥ S/PDIF Connects the PRODUCT to a display that has an
optical digital audio port, using an optical digital
audio also called S/PDIF) cable.
① Power Press to turn the THE PRODUCT on.
② Network LED The LED blinks when THE PRODUCT
accesses to
Network.
③ USB Port Plug the supported USB devices into USB ports,
such as USB hard drives, cameras, camcorders
and wireless USB dongles.

5
Remote Contro
POWER
Press to turn on the THE PRODUCT; press again to switch
to stand-by mode.
MUTE Press to mute the sound.
Numeric Buttons 0-9 number keys for selecting desired options.
GOTO Video/movie chapter and time point selection.
Display the information of media files while in play mode.
BACK Return to the previous display.
VOL + / - Increase/decrease the volume.
CH + / - Reserved keypad for further application.
HOME Hot key to the main OSD menu.
REPEAT A-B
Press once to mark desired repeat point A; press again to
mark desired repeat point B; press yet again to turn this
feature off
REPEAT Enable/disable repeat of file playback.
ANGLE Switch DVD display angles.
DVD MENU Show DVD Menu.
Navigate through menu screen or media libraries.
OK Confirm or select.
ASPECT Adjust aspect ratio
SETUP Enter setup menu
SUBTITLE Switch subtitle files.
Play/pause selected file.
MULTI-FUNCTION: Refer to the instructions in the screen.
Return to previous file. / Go to next file.
Stop playback and return to the previous screen.
Play films in slow mode.
L/R Enable/disable Left/Right speaker.
AUDIO Switch multilingual outputs.
ZOOM Zoom video or image display on screen.

6
2
22
2
Insta ation
Cab e Connections
Match the cables to the connections on your TV or display. Your choices
of connection include:
HDMI For both audio and video output
RCA Cab e
For composite video yellow) and stereo
audio white and red)
S/PDIF For audio output
Internet Connections
Connect the THE PRODUCT to the home network through wired
LAN (Option A) or wire ess LAN (Wi-Fi 802.11 b/g/n) (Option
B)

7
A. Plug the Ethernet cable to the “LAN” jack on the rear panel of THE
PRODUCT, for wired Internet connection. THE PRODUCT will
detect the network automatically.
B. If you have the optional wireless USB dongle we approved, it is
possible to connect THE PRODUCT to the network wirelessly
using Wi-Fi 802.11 b/g/n. You need to plug the USB dongle into
one of the USB port on the front panel of the THE PRODUCT and
connect to the internet through wireless IP sharing router. You
may need to know your wireless AP, name of the router, and
encryption keys in order to set up correctly.

8
Connect USB Devices
Power Cord Connection
Plug one end of the power cord into the back of
the THE PRODUCT and the other end into a
power outlet. THE PRODUCT will start
automatically without pressing any other button
once the power is connected.
Switch your TV Input/Source
After choosing the desired video and audio connection, you need to
select appropriate video input mode using the remote control for your
TV/display to switch to the corresponding video output by pressing the
Input/Source button on the remote control.

9
3
33
3
Network Connections
▲ Network Connections: needed only when using “PC Media”, and
“Torrent Download ” features.
If your wired network equipment such as the IP Sharing router or AP
Access Point), uses DHCP to assign IP address, by default the THE
PRODUCT will automatically request the IP and other related
information to set up THE PRODUCT over the network in DHCP mode
under Setup> Network >Wired). If your network does not have
DHCP server, switch to the Static IP mode under Setup> Network
>Wired) and set up various parameters manually. If you have a
compatible wireless USB dongle, and have already set up the wireless
router/AP according to the instructions that come with the dongle,
please enter Setup> Network> Wire ess mode to input the WEP or
WPA keys.

10
Wired Network Setup
> DHCP
+
To access “Setup” on the main menu.
Select “Network”.
Select “Wired” on the Network menu.
Select “DHCP”.
+
To implement DHCP network setting.
THE
PRODUCT
will automatically receive its IP
address from a DHCP sever that is built into the
access point or IP sharing router.
> Static IP

11
Select “Wired” on the Network menu.
Select “Static IP”.
+ Input the value IP Address, Subnet mask
,
Gateway, and DNS text box respectively.
PS: Please acquire information of these setting values from your ISP(Internet
Service Provider)first.
Wire ess Network Setup
Select “Wireless setup
” on the Network menu.
+
THE PRODUCT
provides you multiple profiles for
use across multiple networks.
Note:
THE PRODUCT supports WEP, WPA-PSK and WPA2-PSK encryption
modes only.
Please use approved WI-FI dongle for wireless connection.

12
> Infrastructure (AP)
THE PRODUCT performs a list of current wireless network
connections- “SSIDs”. Along with its security protocols WEP/WPA2
key) and signal strength.
Select your preferred wireless network
connection.
+ If an access key is re
quired for the network
connection, the keyboard will pop up.
Once the wireless network setup is successful, the “SETUP
SUCCESSFUL” screen will appear.
> Ad-Hoc Setup
Rename SSID Rename your wireless
network connection.
+
Wireless Security
Set your wireless network as
an open system or have it
protected by WEP key
first, in
order to connect the THE
PRODUCT to the network.
Fi e sharing (Simp e NAS)
This function allow THE PRODUCT as a simple NAS device, you can
access folders located on THE PRODUCT for viewing, renaming, moving
and deleting by networking from your remote computer.

13
Fi e sharing Configuration
To activate this feature, please make sure:
The THE PRODUCT is connected to the network;
The network is properly set up. For more information on this part,
please refer to “Step 2” in “Setting up THE PRODUCT” section, and
“Network” under “Setup Menu”.
To allow the THE PRODUCT to access folders on your computer, you
need:
1) THE PRODUCT already connected to the network
2) to designate the folders/files on your PC as shared resources.
Please refer to Microsoft’s official website:
http://www.microsoft.com/windowsxp/using/networking/setup/home
net.mspx to see the initial and detailed process of Home Network Setup
in Windows XP. Please refer to the following instructions to allow the
THE PRODUCT to access the shared folders on the remote PC.
Step 1: Right click on the folder to be shared and select Sharing and
Security.
Step 2: If this is the first time you intend to share a folder, Windows XP
will prompt a warning message, urging you to use the Network
Setup Wizard for safety purpose. Choose to either run the
Wizard or do it yourself. XP will display another warning. If you
want the firewall enabled, select Use the wizard to enab e
fi e sharing. Otherwise, select enab e fi e sharing.
Caution: File sharing may lead to security problems since, by definition, it gives other users
access to the content of a part of the hard drive. As a result, it is essential that you share
only folders for which it would not be extremely important if their contents are revealed.

14
Step 3: You may now specify a “Share Name”, which will be used for
users on the network to access the shared folder. The icon of
the shared folder will be changed to showing a hand holding
the folder.
If your operating system is Windows Vista, please refer to the following
instructions:
(1) Open the Contro Pane and then open Network and Sharing
Center.
(2) Click the down arrow to the right of Fi e Sharing to expand it.
(3) Click Turn on fi e sharing and then click App y.
You may also refer to Setup menu on the OSD screen of THE PRODUCT
to select wired or wireless connection.

15
Fi e Sharing Configurations (With Windows Vista)
File sharing involves making the media content of one or more files /
folders on your PC) available through the network. By “enabling” this
file sharing, you can view these files / folders on your PC) to be
accessed / viewed on your THE PRODUCT on the same network).
Caution: File sharing may lead to security problems since, by definition,
it gives other users access to the content of a part of the hard drive. As
a result, it is essential that you share only folders for which it would not
be extremely important if their content were revealed or destroyed),
Furthermore, you are strongly advised against sharing a whole
partition of your hard drive. This operation is specifically discouraged if
you do not trust the other network users!
Enable “File Sharing” under Windows Vista
On your PC, Click Start, right-click Network, and then click
Properties..
A new Window titled “Network and Sharing Center” pops up.
In the “Sharing and Discovery” section of the Network and Sharing
Center window, click the down arrow next to File sharing.
Within the File sharing settings, click Turn on file sharing, and then
click Apply.
To enable public folder sharing, do the following:
In the Sharing and Discovery section of the Network and
Sharing Center window, click the down arrow next to Public
folder sharing.
Within the Public folder sharing settings, click “Turn on sharing
so anyone with network access can open, change, and create
files”.
Click Apply.
Once the “File Sharing” is enabled in Windows-Vista,
Click Start, and then click Computer.
In the Computer window, navigate to the folder containing the
folder that you want to share.
Right-click the folder that you want to share, and then click Share.
The File Sharing window is displayed.
Use the File Sharing window to select the Guest or Everyone
account. This is equivalent to simple file sharing in Windows XP.
When complete, click Share, and then click Done.

16
How to share fi e fo der in Windows 7
1) run "local security policy" applet under administrative tools.
If you don’t see administrative tools,
enable it under the properties of the start menu
2) under local policies>user rights assignment
“deny access to the computer from the network" REMOVE user "guest"
3) under local policies>user rights assignment “Access this computer
from the network”
=>add ‘EVERYONE’ and ‘ANONYMOUS LOGON’
4) under local policies>security options> Accounts: Limit local
account use of blank passwords. Change to "disabled"
5) under local policies>security options> Network Access:Shares that
can be accessed anonymously- put in the name of your share
6) Enable the guest account set the guest password to blank
7) Check the share permissions on your share and make sure it has
EVERYONE "read"
8) Check the file permissions on the files in your share and make sure
it has EVERYONE "read"
Other manuals for ZIN-5005HD
3
Table of contents
Other Zinwell Media Player manuals