Zoom MULTISTOMP MS-100BT User manual

Thank you very much for purchasing the ZOOM .
Please read this manual carefully to learn about all the functions of the
so that you will be able to use it fully for a long time.
Keep this manual in a convenient place for reference when necessary.
OPERATION MANUAL
© 2012 ZOOM CORPORATION
Copying or reproduction of this document in whole or in part without permission is prohibited.
If the is not used for 10
hours, it will turn off automatically
by default.
If you want the power to stay ON all the time,
please see "4 To set the Power Management
function" on page 22 and set the value to OFF.
*A printed list of effect parameters is not included with the .
Please download a copy from the ZOOM website.
→
http://www.zoom.co.jp/downloads/

Contents
Patch memory
The ON/OFF status and the parameter settings of each
effect are stored as ”patch memories”. The
can store 50 patch memories.
Effect unit
The can use between 1 and 6 effects at a
time and you can change the number used as you like. Each
one of these is called an “effect unit”.
Terms used in this manual
Introduction …………………………………………3
Usage and Safety Precautions ……………………4
Part Names …………………………………………6
Turning the Power ON ………………………………8
Adjusting Effects ………………………………… 10
Selecting and Saving Patch Memories ………… 12
Changing Patch Memories with the Footswitch
… 13
Using 2 or More Effects ………………………… 14
Using the Tuner …………………………………… 16
Tapping the Tempo ……………………………… 18
Using Bluetooth Functions ……………………… 20
Changing Various Settings ……………………… 21
Effect Types ……………………………………… 26
Restoring the to its Factory Default Settings
… 34
Troubleshooting ………………………………… 35
Specifications …………………………………… 37
Tuner Types ……………………………………… 38

3
Introduction
Introduction
Introduction
Add new effects to this next generation effector
Built-in
Bluetooth
®wireless technology allows you to add new effects to the wirelessly. Add new effects
simply by using Bluetooth to connect the to an iOS device that is running StompShare. This free app
allows you to buy effects you want.
StompShare app made for this pedal
StompShare includes a wide variety of effects, ranging from emulations of classic gear and standard pedals that belong
in every setup to amp models and unique ZOOM original effects. After auditioning these effects and trying them out, you
can easily buy the ones you like. We plan to continue increasing the variety of effects available in the future. Download
the StompShare app for free from the App Store.
Combine a variety of effects as you like
The 100 preloaded effects include not only distortion, reverb and other classic effects, but also modulation and special
effects, as well as models of amps that are prized on stage and in studios around the world. You can combine and use up
to 6 of these at a time as you like.

4Usage and Safety Precautions
Usage and Safety Precautions
In this manual, symbols are used to highlight warnings and cautions
that you must read to prevent accidents. The meanings of these
symbols are as follows:
Cleaning
Use a soft cloth to clean the panels of the unit if they become dirty.
If necessary, use a damp cloth that has been wrung out well.
Malfunction
If the unit becomes broken or malfunctions, immediately disconnect the AC adapter, turn
the power OFF and disconnect other cables. Contact the store where you bought the unit
or ZOOM service with the following information: product model, serial number and specific
symptoms of failure or malfunction, along with your name, address and telephone number.
SAFETY PRECAUTIONS
Usage Precautions
Warning
Precautions
Something that could cause serious injury or death.
Something that could cause injury or damage to the
equipment.
Warning
Caution
Other symbols
Prohibited actions
Required (mandatory) actions
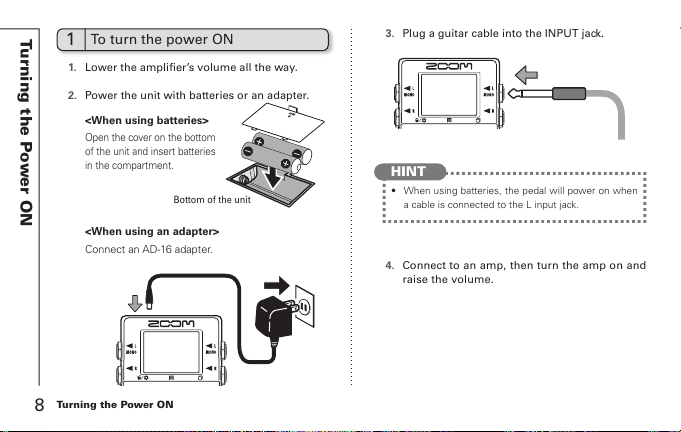
Operation using batteries
Use 4 conventional 1.5-volt AA batteries (alkaline or nickel-metal hydride).
Always close the battery compartment cover when using the unit.
AC adapter handling
When disconnecting the AC adapter from an outlet, always pull the body of
the adapter itself.
Battery handling
Install the batteries with the correct +/- orientation.
Use a specified battery type. Do not mix new and old batteries or different
brands or types at the same time. When not using the unit for an extended
period of time, remove the batteries from the unit.
If a battery leak should occur, wipe the battery compartment and the battery
terminals carefully to remove all battery residue.
Connecting cables with INPUT and OUTPUT jacks
Always turn the power OFF for all equipment before connecting any cables.
Alterations
Never open the case or attempt to modify the product.
Operation using an AC adapter
Use only a ZOOM AD-16 AC adapter with this unit.
Do not use do anything that could exceed the ratings of outlets and other
electrical wiring equipment. Volume
Do not use the product at a loud volume for a long time.
Product handling
Do not drop, bump or apply excessive force to the unit.
Be careful not to allow foreign objects or liquids to enter the unit.
Operating environment
Do not use in extremely high or low temperatures.
Do not use near heaters, stoves and other heat sources.
Do not use in very high humidity or near splashing water.
Do not use in places with excessive vibrations.
Do not use in places with excessive dust or sand.

5
Usage and Safety Precautions
Copyrights
”Made for iPod,””Made for iPhone,”and”Made for iPad” mean that an
electronic accessor y has been designed to connect specifically to iPod,
iPhone, or iPad, respectively, and has been certified by the developer to meet
Apple performance standards. Apple is not responsible for the operation of
this device or its compliance with safety and regulatory standards. Please note
that the use of this accessory with iPod, iPhone, or iPad may affect wireless
performance.
iPad, iPhone, iPod, and iPod touch are trademarks of Apple Inc., registered in
the U.S. and other countries.
Bluetooth and the Bluetooth logo are registered trademarks of Bluetooth SIG,
Inc. and are used under license by ZOOM CORPORATION.
All other trademarks, product names and company names mentioned in this
documentation are the property of their respective owners.
Note: All trademarks and registered trademarks mentioned in this manual
are for identification purposes only and are not intended to infringe on the
copyrights of their respective owners.

6Part Names
Part Names
DC9V AC adapter jack
To power the unit from an outlet,
connect an AD-16 adapter here
(→P8).
OUTPUT jacks
Connect to an amp or another
effector.
Use the MONO jack for a mono
connection.
Display
Shows the currently selected effect
and various other screens (→P9).
Bluetooth
Use to connect with an iOS device
and add new effects ( →P20).
Use also to update the firmware
(→P25).
INPUT jack
Connect a guitar.
Use the MONO jack for a mono
connection.
Footswitch
Turn s the effec t shown on the
display ON and OFF (→P10).
Press and hold for 1 second to open
the Tuner or Tap Tempo (→P16, 18).
ON/OFF indicator
Lights when the current effect is ON.
Does not light when the effect is
OFF (→P10).
Cursor keys
(→P7)
Parameter knobs
(→P7)

7
Part Names
Part Names
Parameter knobs Cursor keys
From the left
Parameter knob 1 [ ]
Turn left and right to adjust the parameter.
Press to open the MENU where you can remove and
rearrange effects and make various settings (→P14, 21).
You can also check the firmware version (→P25).
Parameter knob 2 [ ]
Turn left and right to adjust the parameter.
Press to open the MEMORY screen where you can
select and save patch memories, and change patch
memories using the footswitch (→P12, 13).
Parameter knob 3 [ ]
Turn left and right to adjust the parameter.
Press to change the parameter page (→P11).
Up and down cursor keys [ / ]
Press to change the effect type.
Press and hold for 1 second to select the effect category
(→P10).
Left and right cursor keys [ / ]
Press to show the effect to the left or right.
Press and hold for 1 second to add a new effect left or
right of the current effect (→P14).

8Turning the Power ON
Turning the Power ON
1. Lower the amplifier’s volume all the way.
2. Power the unit with batteries or an adapter.
1To turn the power ON
Open the cover on the bottom
of the unit and insert batteries
in the compartment.
Connect an AD-16 adapter.
<When using batteries>
<When using an adapter>
Bottom of the unit
3. Plug a guitar cable into the INPUT jack.
4. Connect to an amp, then turn the amp on and
raise the volume.
HINT
t 8IFOVTJOHCBUUFSJFTUIFQFEBMXJMMQPXFSPOXIFO
a cable is connected to the L input jack.

9
Turning the Power ON
2Display information
The Home Screen shows the current effect
Edit Screen shows parameter being edited
HINT
t 5IF QPTJUJPOTPGUIFWJSUVBMLOPCTDIBOHFXJUIUIF
parameter values.
HINT
t *G UIFSFBSFPSNPSFQBSBNFUFSTUIBUDBOCF
adjusted, multiple page tabs will be shown.
Virtual knob
Graphic for selected effect
Shows other effects are in this direction.
Parameter names
Effect type
Page tabs
Parameter values

10 Adjusting Effects
Adjusting Effects
Turn
Confirm that the Home Screen is shown.
NOTE
t 8IFOBOFGGFDUJT0/UIFGPPUTXJUDI-&%MJHIUT
t 8IFOBOFGGFDUJT0''UIFGPPUTXJUDI-&%JTVOMJU
1To turn an effect ON and OFF
Press
ONOFF
HINT
t 1SFTTBOEIPMEUPTFMFDUUIFFGGFDUDBUFHPSZ
See step 2 of ”To add an effect” . (See page 14.)
2To select an effect type
3To adjust parameters
Press either

11
Adjusting Effects
Adjusting Effects
Press
The next page opens.
Effect processing limit
T h e a l l o w s y o u
to combine 6 effects as you like.
How ever, if yo u co mb in e effec t
types that require great amounts of
processing power (amp models, for
example), the available processing
capacity might not be enough. If the processing required for an
effect exceeds the available capacity, the effect is bypassed and
a ”DSP Full!” message appears.This can be avoided by changing
1 or more of the effect types or setting them to THRU.
HINT
t 1SFTTBOEIPMEUIFCVUUPOGPS
at least 1 second to immediately set an effect
to THRU.
4To change the page
NOTE
t " O F GGFD U SFRVJSFTUIFTBNFBNPVOUPG
processing power whether it is ON or OFF.

12 Selecting and Saving Patch Memories
Selecting and Saving Patch Memories
Press
Press
Turn
Turn
Press
Press
2To save a patch memory with a
new name
1. Open the MEMORY list.
2. Select a patch memory.
1To select a patch memory
When shipped from the factory, the automatic patch
memory saving function is active. As soon as a
parameter is adjusted this change is automatically saved.
Confirm that the Home Screen is shown.
t 5VSOUPNPWFUIFDVSTPS
t 5VSOUPDIBOHFUIFDIBSBDUFS
t
t
Press to change the type
of character/symbol
Turn to select where to save
the patch memory
2.
Select the patch memory to be saved with a new name.
3.
Change the name and select
where to save the patch
memory.
4. Save the patch memory with the new name.

13
Changing Patch Memories with the Footswitch
Press
Press
Turn
HINT
t 1SFTTBOEIPMEUPSFNPWFBMMQBUDI
memories from the footswitch list.
Press
HINT
t
In the example on the right,
pressing the footswitch cycles
through the patch memories in
alphabetical order like this.
[04:Flanger]
[01:160Comp]
[02:RackCmp]
[04:Flanger]
[01:160Comp] …
Press
1. Open the MEMORY list.
3. Add or remove it.
2.
Select a patch memory to add to or remove from
the footswitch (A/B) list.
1
To add or remove patch memories to a
list that the footswitch cycles through
Confirm that the Home Screen is shown.
1. Open the MEMORY list.
2. Change the patch memory.
2
To cycle through patch memories in
the list in order using the footswitch

14 Using 2 or More Effects
Using 2 or More Effects
Press
Turn
Turn
Press
Press
1To add an effect
Press any
1. Open the ADD EFFECT UNIT screen.
HINT
t 4FMFDU&9*5UP SFUVSOUPUIF)PNF4DSFFOXJUIPVU
adding any effect.
Press and
hold either
for 1 second
Press
Confirm that the Home Screen is shown.
2. Select the effect category.
1. Open the MENU.
2. Select DELETE EFFECT UNIT.
3. SelectYES.
2To remove an effect

15
Using 2 or More Effects
Press
Press
Turn
Press
Press either
Turn
(Select)
(Select)
(Lift)
(Drop)
Turn
Press
Press
3
To scroll through the effects shown
When multiple effects are in use, scroll to change the
visible one.
Shows how many effects
are in this direction.
Shows the effect number
counting from the right.
1. Open the MENU.
2. Select EFFECT CHAIN.
4To change the order of effects
3. Select the effect to move and ”lift” it.
HINT
t &GGFDUTUIBUBSF0''BQQFBSHSBZ
4.
Select the new location for the effect and ”drop” it.
5. To complete these procedures

16 Using the Tuner
Using the Tuner
Turn
Turn
Press
Press
Press
1To activate theTuner
2To end tuning
NOTE
t
A setting must be changed to make pressing and holding
the footswitch activate Tap Tempo. (See page 21.)
Press
and
hold
for 1 second
3
To change the tuner’s standard pitch
4To select the tuner type
Confirm that theTuner Screen is open.

17
Using the Tuner
Using the Tuner
Turn
Press
5To use a drop tuning
CHROMATIC
The chromatic tuner shows the nearest pitch name
(semitone) and how far the input sound is from that pitch.
Other tuner types
Depending on the selected type, the nearest string
name and how far the sound input is from that pitch
are shown.
Please see the table at the end of this manual for the
types that can be selected. (See page 38.)
NOTE
t %SPQUVOJOHJTOPUQPTTJCMFXIFOUIF5:1&JTTFUUP
CHROMATIC.
Confirm that theTuner Screen is open.
6To tune a instrument
Play the open string that you want to tune and tune it.
Chromatic tuner
The name of the nearest note and the pitch accuracy
are shown.
Other tuners
The number of the nearest string and the pitch
accuracy are shown.
Flat Correct pitch Sharp

18 Tapping the Tempo
Tapping the Tempo
Delay effects and some modulation and filter effects can
be synchronized to the tempo. Select an effect that can be
synchronized, and set its Time, Rate or other parameter that
can be synchronized to a or note value.
The tempo can be set by tapping the footswitch or a knob.
1. Open theTap Tempo Screen.
1To set the tempo by tapping the
footswitch
NOTE
t #ZEFGBVMUwhen pressed and held, the footswitch
is set to activate the Tuner. To tap the tempo with
the footswitch, the setting must be changed so that
it activates Tap Tempo when pressed and held.
(See page 21.)
Press
and
hold
for 1 second
3. Complete the setting.
2. Tap the footswitch 2 or more times at the
desired tempo.
NOTE
t *GZPV QSFTTUIFGPPUTXJUDIXIFOUIFFGGFDUJT0/
the ON/OFF indicator becomes unlit and the effect
turns OFF for 1 second.
The ON/OFF indicator flashes in time with the
tempo.
Press
and
hold
for 1 second

19
Tapping the Tempo
Tapping the Tempo
3.
Tap the knob 2 or more times at the desired tempo.
2. Open the parameter editing screen.
NOTE
t
Tempo settings are saved separately for each patch memory.
1.
Open an effect that can be synchronized to the
tempo on the Home Scre
en. (
See page 10, 26.)
2To tap tempo by hand
Press
Press
The ON/OFF indicator flashes
in time with the tempo.

20 Using Bluetooth Functions
Using Bluetooth Functions
1To connect to an iOS device
HINT
t 0/&OBCMFT#MVFUPPUIGVODUJPOT
t 0''%JTBCMFT#MVFUPPUIGVODUJPOT
t 1"*3*/(4FMFDUXIFOQBJSJOHXJUIUIFJ04EFWJDF
t "GUFS CFJOHQBJSFEPODFUIFwil l
automatically connect when its power is turned ON
(and Bluetooth is ON).
t 8IFODPOOFDUFEUPBOJ04EFWJDFBQQFBSTPOUIF
Home Screen.
t "GUFSTFMFDUJOH0/PS0''QSFTT&9*5UPBDUJWBUFUIF
setting and close this screen.
1. Open the MENU.
2. Select Bluetooth.
Press
Turn
Press
3. Select PAIRING.
5. Select EXIT.
4. Select ZOOM MS-100BT on the iOS device.
Turn
Press
To connect to an iOS device, you must pair the
with the iOS device.
The address number, which
is set for each device, is used
to identify Bluetooth devices.
t 'PSEFUBJMFEJOTUSVDUJPOTBCPVUQBJSJOHBOE
co nn ec ti on s, s ee t he H el p guide of the
StompShare app.
t 8IFO QBJSJOHTVDDFFETBOEUIFJ04EFWJDF JT
connected, ON is selected automatically.
Other manuals for MULTISTOMP MS-100BT
1
Table of contents
Other Zoom Music Pedal manuals