• Keepthephoneoutofthereachoflittlechildren.Thephonemay
cause injury if used as a toy.
• Please use original accessories o r accessories that are autho-
rized by the manufacturer.
• Pleasekeepthephonedryandstoreinshadyandcoolplace.
• Donot exposeyourmobilephoneto directsunlightorstoreitin
hot areas. High temperatures can shorten the life of electronic
devices.
• Preventliquidfromseepingintoyourphone.
• Donotdrop, knock orharshly treat thephone.Rough handling
can break internal circuit boards.
• Donot connect the phonewith other unauthorized peripheral
equipments. Do not attemptto disassemble the mobile phone
and battery by yourself.
• Power off your phone before you clean the phone. Please use
clean fabric that is anti-static to clean your phone.
• Asyour mobilephonecan produceelectromagneticeld,donot
use the phone near electrical appliances.
• Donotchargethemobilephonewithoutbattery.
• Beawareoftheusage limitationwhen usinga mobilephone at
places such as oil warehouses or chemical factories.
• Theuseriscautionedthatchangesormodicationsnotexpress-
ly approved by the manufacturer could void the user’s authority
tooperatetheequipment.
Warranty Terms
Limitation of Liability
ZTEshallnotbeliableforanylossofprotsorindirect,special,inci-
dentalorconsequentialdamagesresultingfromorarisingoutoforin
connection with using this product, whether or not ZTE had been ad-
vised, knew or should have known the possibility of such damages.
Warning and Maintenance
Camera
Other Facilities
Technical Parameters
Sending SMS
Sending MMS
Sending E-mail
13 14 15 16 17 18
19 20 21 22 23 24
1. Instandbymode,selectMenu > Messages > Message > Cre-
ate Message.
2. Enter the phone number(s) of recipient(s). You can also press
Recipient to add the recipient(s)
3. Press the Down Key to access the Text eld.
4. Edit the message.
5. Select Send to send the message
1. Instandbymode,selectMenu > Messages > Message > Cre-
ate message.
2. Enter the phone number(s) of recipient(s). You can also press
Recipient to add the recipient(s).
3. Press the Down Key to access the Text eld.
4. Edit the message, or select Option > Insert to insert pictures,
videos or audios.
5. Select OK Key to send the message.
1. Instandbymode,selectMenu > Message > Email > New
Email.
2. Enter the recipient’(s’) Email address. You can also press Con-
tacts to add the recipient(s).
3. Press the Down Key to access Copy to Field and enter the
Email address of recipient(s).
4. Press the Down Key to access the Title eld and edit the title.
5. Press the Down Key to access the Text eld.
Your phone has an integrated digital camera, which allows you to
capture images.
1. Instandbymode,selectMenu > Camera.
2. Aim the camera lens at a person/place.
3. Select OK Key to take the photo.
4. Incameramode,pressOptions for more options:
Photo size: Set the size of an image.
Photo quality:Setthequalitystandardofanimage.
Brightness: Set the brightness of an image.
Contrast: Set the contrast of an image.
Effect: Set the effect of an image.
Shutter sound: Set the shutter sound.
Save to: Select the position to save the picture.
Use front/back camera: Switch to front/back camera.
Switch to video camera: Switch to video camera mode to
record a video clip.
If you encounter problems while using the phone, orif it performs
erratically,you canconsult theinformationin thechart below.If the
particular problem cannot be resolved using the information in the
chart, contact the dealer where you purchased the phone.
Function Selection Description
Games &
Apps
Menu > Games &
Apps
Download games and applica-
tions.
Contacts Menu > Contacts Create, edit or manage your
contact.
Browser Menu > Browser Launch WAP browser to link web
site.
Recent Call Menu > Recent
Call
Check calls log and calls dura-
tion.
Screen set-
tings
Menu > Settings
> Display
Thissettingallowsyoutocong-
ure screen display options.
Phone set-
tings
Menu > Settings
> Phone
This setting allows you to
congureyourphonetousing
conveniently.
Prolesset-
tings Menu > Proles
This setting allows you to per-
sonalize your phone to best suit
the environment you are in.
Security set-
tings
Menu > Settings
> Security
Security features protect the
phone from unauthorized use.
Call settings Menu > Settings
> Calls
This setting can enhance the call
function of your phone.
Video camera
Menu > Multi-
media > Video
camera
Shoot video clip.
FMradio Menu > Multime-
dia > FM radio
Inserttheearphoneandlisten
the radio.
Function Selection Description
Audio record
Menu > Multi-
media > Audio
record
Record the voice memo.
Playlist
Menu > Multi-
media > Music >
Playlist
When you have some audio
lesstoredonyourphoneyou
can create a playlist to play your
audiolesinthepreferredorder.
Streaming
URL
Menu > Multime-
dia > Video >
Streaming URL
Streaming URL are links to audio
or video streaming content over
the internet. The content is only
available while connected to
the server and depends on your
network provider.
Bluetooth Menu > Tools >
Bluetooth
Enable bluetooth to transfer data
with another bluetooth device.
Alarm Menu > Tools >
Alarm Set alarm clock.
Stopwatch Menu > Tools >
Stopwatch
To measure an exact duration of
time.
World time Menu > Tools >
World Time
View the other cities time of the
world.
Calculator Menu > Tools >
Calculator Execute basic math calculation.
Converter Menu > Tools >
Converter Makeunitconversion.
Calendar Menu > Calendar Set and modify the agenda.
Filemanager Menu > File Mgr Toorganizethelesorfolders.
PC software Join Me
Troubleshooting and FAQ’s
The software is only for Windows XP (SP2 and later), Vista and Win-
dows 7.
Installing Join Me
1. Connect the phone and the computer with the provided USB
data cable.
2. The Join ME software will launch automatically. If not,please
double-click AutoRun.exe.
Notes:
Some antivirus software a nd rewall software will prevent the pro-
gram AutoRun.exe. You can click My Computer and start the instal-
lation program by run the AutoRun.exefromtheCD-ROMJoin ME.
3. Click Join Me.
4. Followtheprompts toinstall thesoftware; thePCwill automati-
cally install the drivers.
Uninstalling Join Me
1. Select Start > Program > Join ME > Uninstall
Tips: Before uninstall, please close the program.
2. Complete uninstall according to the prompt information.
Running Join Me
MakesurethatyouinstallJoin Me application software before pow-
ering on your phone and connect it to your PC.
1. Connect your phone to the computer, and then click the Join Me
on the prompt window.
2. Click the Connect button. JoinME will automatically connect
to your phone. If the connection succeeds, the icon will be
shown in the Windows status bar.
3. By using the PC software, you are able to simply manage and
operatephonebook,short messages,lesand calendarinyour
Handset Standards UMTS2100MHz
GSM/GPRS/EDGE900/1800MHz
Dimensions (H×W×D) 116mm × 49 mm× 11.3mm
Weight Approx 84g (including battery)
Display 2.4”262KTFTcolorscreen
Frontcamera 0.3Mpixelcamera
Back camera 2.0Mpixelcamera
Extended memory Up to 8GB memory card
Battery 820mA hours, Lithium ion (Li-ion)
Performance
BMP/JPG/GIFimage;3GP/MP4video;
MP3/AMR/WAV/ACC/ACC+audio;Capture
Image:upto1200x1600,24b;Capture
Vid eo: u p to 1 76 x 14 4; US B 2.0 ; JAVA
MIDP2.0;MMSVideoandPicture, E-mail,
Calendar, Speakerphone, Voice Recorder,
Bluetooth
Continuous idle time Up to 200 hours
Continuous talk time About 180 minutes
Charge time Approximately 3 hours
The warranty does not apply to defects or errors in the product
caused by:
1. Reasonable abrasion.
2. Misuseincludingmishandling,physicaldamage,improperinstal-
lation, unauthorized disassembly of the product.
3. Wateroranyotherliquiddamage.
4. Anyunauthorizedrepairormodication.
5. Powersurges,lightning damage,re, oodorother eventsout-
side ZTE’s reasonable control.
6. Use of the product with any unauthorized third party products
such as generic chargers.
7. Any other cause beyond the range of normal usage for products.
End User shall have no right to reject, return, or receive a refund for
any product from ZTE under the above-mentioned situations.
This warranty is end user’s sole remedy and ZTE’s sole liability for
defective or nonconforming items, and is in lieu of all other warran-
ties, expressed, implied or statutory, including but not limited to the
impliedwarrantiesofmerchantabilityand tnessfora particularpur-
pose, unless otherwise required under the mandatory provisions of
the law.
Making a Speed Dial Call
Instandbymode,pressandholdthecorrespondingnumberkey(2to
9) in the speed dial list to make the call.
Setting Speed Dial Number
1. Select a contact in Contacts.
2. Press Options and select Set speed dial.
3. Select an Empty number and select Setup.
Text Input
Your phone provides the following input methods: Predictive Text
Mode Input (eZiEng), Multitap Input (abc/ABC/Abc), and Numbers
Input(123).
Operation Method
InputWords
eZiEng Input — Press each key once that
corresponds to the letter you want to enter.
The letters are shown on the display as they
are entered. The list of candidate words
changes as each key is pressed.
InputLetters
Abc/abc/ABCInput—Pressanumberkey
(2to 9)repeatedlyuntiltherequiredcharac-
ter is shown on the screen.
InputNumbers 123Input—Pressthenumberkeystoinput
numbers directly.
InputSpace Press the 0 Key, except for the number in-
put mode.
Movethecursorup,
down, left , or right Press the Navigation Keys.
6. Edit the Email.
7. Select OK Key to send the Email.
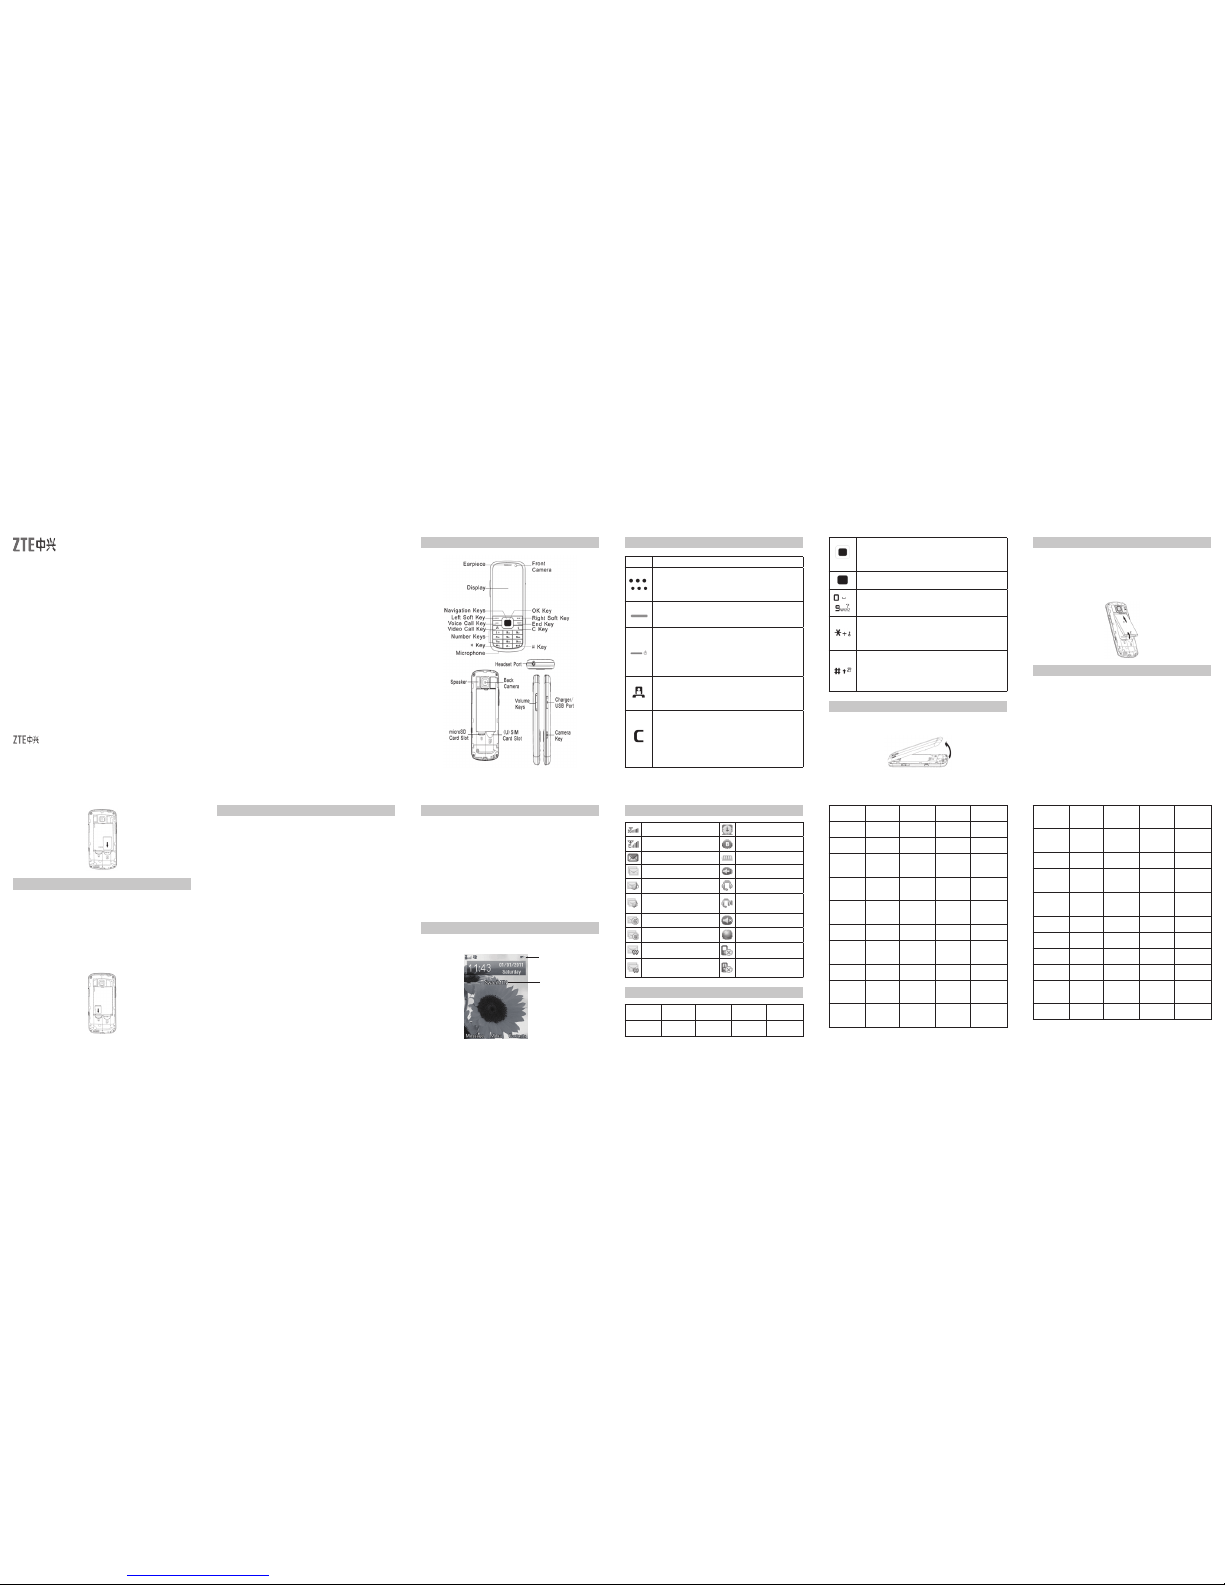
Making a Call
1. Instandbymode,enteraphonenumber.
2. Press the Voice Call Key or Video Call Key to make a voice
or video call.
Making a Emergency Call
Enter the emergency number and press the Voice Call Key to make
the call.
Notes:
• Emergency calls can be made without a (U) SIM Card (Phone
PIN not required).
• If the keypad is locked it is possible to dial the emergency
numbers without having to unlock the keypad.
• If the keypad is locked it is impossible to dial the emergency
numbers by pressing OK Key.
Lock/Unlock Your Phone
Use the keypad lock to prevent the keys from being pressed accidentally.
1. Manual Lock:Instandbymode,pressandholdthe* Key to en-
gage key lock.
2. Auto Lock:In standbymode,select Menu > Settings > Phone
> Auto keyguard and set your desired time to lock the keypad.
Notes:
If a call comes in when the keypad is locked, you can press
the Voice Call Key or Video Call Key to answer it. When the
call is ended or rejected, the keypad locks automatically.
When the keypad lock is on, calls might still be possible to
the emergency number(s).
Problem Solution
Poor reception
• Movetoalocationwherethenetworksignal
can be properly received.
• Avoidusing thephone atsuch times,or try
again after waiting a short time.
Echo or noise
• PresstheEnd Key and dial again. You may
beswitchedtoabetter-qualitynetworktrunk
or phone line.
Unable to select
certain features. • Contactyourserviceprovider.
Battery will not
charge.
• Contactthedealer.
• Adjust the battery charging environment to
avoid extremes of temperature.
• Checkallconnectors tomake sureallcon-
nections have been properly made.
Shortened standby
time
• Ifyouarelocatedinanareawheresignaling
is weak, temporarily switch off the phone.
• Useanewbattery.
• Change your locationtoonewherethe
network is accessible, or temporarily turn off
your phone.
You cannot switch
your phone on. • Rechargethephone’sbattery.
Problem Solution
(U)SIMcarderror
• Take the (U)SIM card to your service pro-
vider for testing.
• Insertthe(U)SIMcardproperly.
• Usea soft,dry clothto cleanthe (U)SIM
card contacts.
Unable to connect
to the network.
• Contactyourserviceprovider.
• Checkthe servicearea withyour service
provider.
• Movetoanopenspace,orifyouareinside
a building, move closer to a window.
You cannot answer
incoming calls.
• Go to Settings > Calls > > Call barring,
and then select Cancel all call barring.
You cannot make
outgoing calls.
• GotoSettings > Calls > Call barring, and
then select Cancel all call barring.
• Go t o Settings > Security > Fixed dial
numbers and select Off to turn this feature
off.
PINCodeis
blocked.
• Contactyour serviceprovider.Ifthe service
providerprovides the(U)SIM card’sPUK
code, use the PUK code to unlock the (U)
SIMcard.
Unable to enter
information into the
phone book.
• DeleteunnecessarydatafromtheContacts.
phone;After connecting, your phone can be used as a modem
for dial-up internet access.