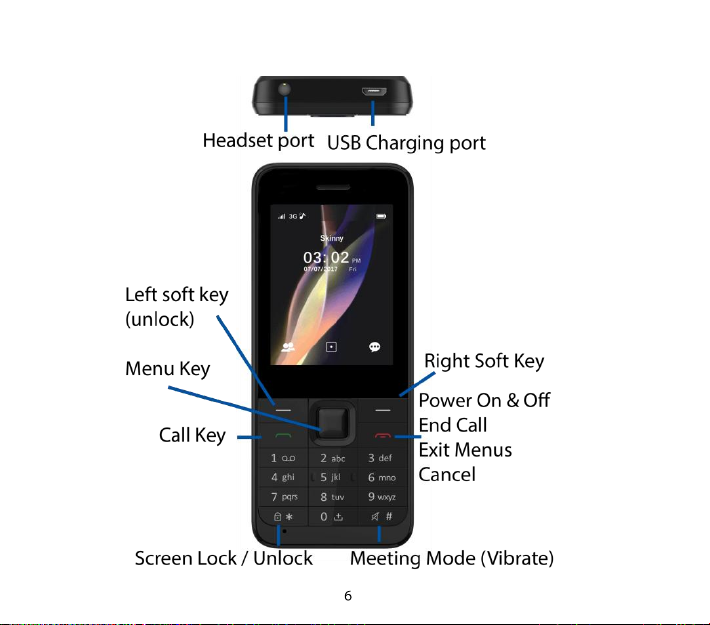
Zte Skinny F327S User manual

Skinny F327S
3G MOBILE PHONE
USER MANUAL
Search ‘ZTE Australia’ on Facebook , Google+ and Twitter to keep in touch.
©2017 Version 1.0 July 2017

WHAT’S INSIDE
03 Getting Started
06 Get to know your mobile phone
13 Calls
17 Contacts
19 Messaging
25 Settings
26 Media Player
27 Email
29 Quick Reference Features
33 Troubleshooting, Technical and Warranty
37 Technical Specifications
40 Extra bits you should know
This phone is suitable for use on the Skinny network. It supports
UMTS 850 only and is not suitable to use on other carriers.

GETTING STARTED
1. REMOVE THE BACK COVER
Use the thumb catch at the bottom left on the back to open the battery
cover.

2. INSERT THE SIM CARD (STANDARD SIZE)
Insert the SIM card with the gold contacts facing down and the slanted edge
on the top left as shown:
This phone uses a Standard sized or 2FF SIM Card.

3. INSERT THE BATTERY
Press the battery down flush into the case lining up the gold contacts and
pins.
Replace the battery cover and press gently to close the case.
Press and hold the Red power key to power your device on and off.
4. CHARGING YOUR HANDSET
Plug the micro USB cable in to the handset
Plug the other end of the cable into the AC adapter and plug the adapter
into an electrical outlet or USB port on your computer
The plug and socket are shaped so they will only fit together one way.
Important Notes:
Only use the AC charger and USB lead supplied. Insert the lead carefully.
Check the plug and socket are aligned correctly.
Do NOT use excessive force which may damage the USB port.
Be careful to avoid tripping on the lead whilst it is plugged in.
Physical damage to the USB port is NOT covered by warranty.
Normal charge time is 3-4 hours.
Do not leave on charge for more than 24hrs.
Charge the battery between 0°C~45°C. Charge the battery promptly when
flat.
With poor network conditions (less than 2 bars) battery life is reduced.
When not using the phone for long periods remove the battery.

GET TO KNOW YOUR MOBILE PHONE

UNLOCK THE SCREEN
To unlock, press the power key to wake up the screen
Press and hold the *Key to Unlock (Long press *)
To lock the screen press and hold the *key
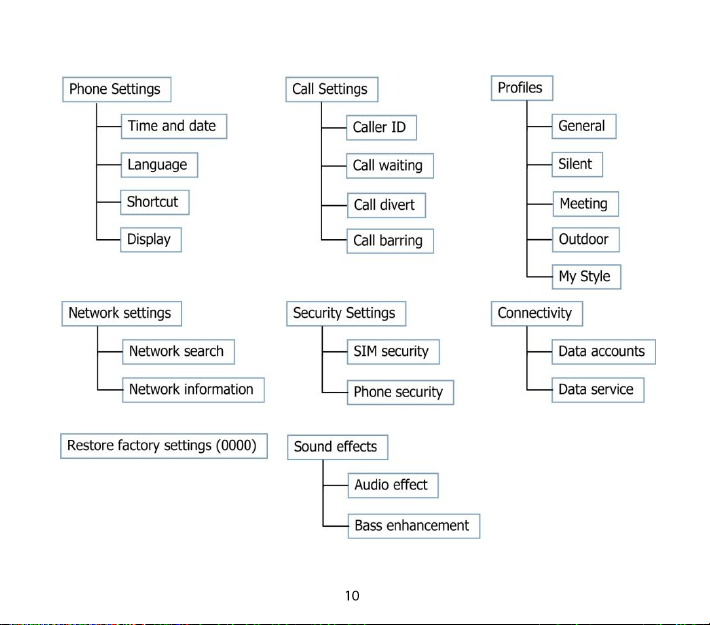
Go to Menu > Settings > Phone Settings > Display > Screen auto lock to
change the timer or switch this on or off.
Whenever the screen is locked a message will appear in the centre of the
screen telling you how to unlock the device.
When the screen and keypad are locked it is still possible to dial the
Emergency Services, so be careful not to activate the keypad or press the
device against hard objects in your bag or pocket.
Handy Hint:
To adjust period of time for the screen lock or switch auto screen lock on or
off go to Menu > Settings > Phone Settings > Display > Screen auto lock

NAVIGATION KEYS
From the Home screen press the navigation keys to launch the default
shortcuts:
Camera
Alarms Messages
Volume Down Volume Up
Images
During a Call the left and right navigation keys will adjust the in call volume
Press the Right Soft Key to activate Speaker mode during a call.
Handy Hints:
The arrow key shortcuts can be set to your own preferences.
To change default shortcuts go to: Menu > Settings > Phone Settings >
Shortcut
Main Menu Tip
Each menu item is laid out on a grid so you can press the corresponding key
on the keypad as a shortcut to the menu item. Example, pressing Menu 1
from the home screen takes you to Contacts. Pressing Menu 6 takes you to
Settings.

MENU QUICK REFERENCE GUIDE
Menu 1
Contacts
Messages
Calls
E-mail
Browser
Settings –see below
Camera
Media
FM Radio
Images
Recorder
Files
Menu 2
Bluetooth
Calendar
Alarm
World Clock
Notes
Calculator
Tasks
Convert
Torch
Stopwatch
SIM

SETTINGS MENU

KEY FUNCTIONS
Indicator
Description
Power Key –hold down to power On and Off
Press to End a Call.
Press to Exit a menu and return to the idle screen
Call Key - After entering a number press to make the call
Press to access the call logs
Press twice for last number redial.
Press OK to access the Main Menu and confirm menu selections
Unlock –Press and hold * to unlock
+ Key
Long press (press and hold) to get the International dialling prefix (+) and
Pause and Wait dialling modifiers
Volume
Press the left and right navigation keys
Soft Keys
The left and right soft keys perform the task shown on the screen
corresponding to their respective locations.

STATUS ICONS
Network signal level
Alarm is set
No Network
Bluetooth On
Connected to 3G
Missed Call
Connected to 2G
Received SMS
HSDPA Data
Received MMS
EDGE Data
Outgoing Message
Battery level
Screen is locked
Vibrate then ring
Roaming
Ring only
Speaker is muted
Vibrate only
Active Call
Silent
Call is on Hold

CALLS
There are 3 ways you can make a call on your phone:
1. Enter the number on the keypad, if you know the number
2. Select the left soft key to access Contacts, select the number then press
OK or the Green key to call directly
3. Press the button to access the call log to use your call history
to call.
Whichever way you choose, press the green key to make the call,
press the red key to hang-up.
During a call press the right soft key to enable Handsfree or Speaker-phone
mode.
Handy Hint:
You can use the left and right arrow keys on the navigation key pad to
increase or decrease the volume when in an active call.

HOW TO ANSWER AN INCOMING CALL
There are two ways to answer an incoming call:
Press the green key answer the call
Press the red key or Reject to end the call.
Handy Hint:
If you would like to silence an incoming call without rejecting it, press the
down arrow on the navigation keypad or the right soft key for Silence.
HOW TO CHANGE THE SCREEN BRIGHTNESS
The default screen brightness is set to the middle setting. This will allow you to
get the maximum possible out of your battery.
To change this setting Select Menu> Phone settings > Display > LCD
Backlight
Important Note:
Increasing the brightness of the screen will have an effect
on the battery power consumption

CALL FEATURE SUMMARY
The table below is a quick summary of call features
Function
Description
Menu Selection
Call Barring
Restrict various categories of
incoming or outgoing calls.
Menu > Settings > Call
settings > Call barring
Call Divert
Forward incoming calls to
another number.
Menu > Settings > Call
settings > Call divert
Call Waiting
If you are already on the phone
you hear pips to indicate
another incoming call. Press
Options to switch between the
two callers.
Menu > Settings > Call
settings > Call waiting
Last number
redial
Press the Green Call Key to
bring up the Call log
Press again to dial the first
number in the list or scroll
down to the number
Call Key ,
then Call Key
Send my
number
Show or hide your number
when making calls.
Menu > Settings > Call
settings > Caller ID

Set Speed Dial
Set your Contacts to be called
directly from the idle screen.
Long-press the number to dial.
Menu > Contacts >
Options > Phonebook
settings > Speed dial
Speakerphone
Use hands-free or in loud
speaker mode.
During a call press the
right soft key H-Free. Or
Options > H-Free
Speed Dial Call
Press and hold the
corresponding key on the
number pad to quickly call a
Speed Dial Contact.
From the idle screen
press and hold a
number key. 1 is preset
to Voicemail.
Volume
Use the Left and Right
navigation keys to adjust the
volume during a call
During a call press the
Left / right keys
Insert a Pause
or Wait
character while
dialling
‘P’ inserts a 3 seconds delay.
‘W’ waits indefinitely until you
enter the next character.
Used for call centres and phone
banking applications.
When dialling manually
press and hold the +
key for a Pause or Wait.
‘P’ and ‘W’ can also be
saved in Contact
numbers.

CONTACTS
There are some numbers that you may want to call again and again so it makes
sense to add these to your Contacts.
You can then access these numbers quickly and easily and add special features
such as Speed Dialling, a dedicated Ringtone or a Photo.
Function
Description
Menu Selection
Add a Contact
from a received
call
Access the Call log and
create a new Contact from
an incoming call record
Press the Call Key
> Select the call
record > Press Options >
Save to Phonebook
Add a Contact
from an SMS
Go to your Inbox and
select the required SMS.
Options > Advanced >
Use number >
Options > Save to
Phonebook
Copy Contacts
to and from a
SIM card
Copy Contacts from the
SIM into the handset or
handset to SIM
Menu > Contacts >
Options > Copy > To SIM
/ To phone

Delete a
Contact
Select the Contact then
press Options
Menu > Contacts >
Options > Delete
Enter a new
Contact
Save a number you have
just dialled as to a contact
Enter the number >
Options > Save to
Phonebook > Follow
the prompts
Search your
Contacts
Search Contacts to find a
particular person.
Menu > Contacts >
Scroll down or press a
letter key to search
Set a Contact
image
Add a photo or unique
ringtone to a Contact
(must be stored on phone)
Menu > Contacts >
Options >Edit > Scroll
right to add a Caller
picture or Caller Ringtone
and press Add.

MESSAGING
You can stay connected by using your mobile to send messages, multimedia
messages and emails to your family and friends.
HOW TO CREATE A TEXT MESSAGE (SMS)
Press the Left Soft Key as the shortcut for Messages (SMS) or select Menu >
Messages > Write Message (OK)
Follow the tips below to add Contact(s), and to send your message.
Important Note:
If your text message exceeds 160 characters you will be
charged for multiple text messages.
Letters, symbols and spaces count as characters.

HOW TO ADD A CONTACT TO A TEXT MESSAGE (SMS)
Press the Left Soft Key as the shortcut for Messages (SMS) or select Menu >
SMS > Write Message
Enter the phone number directly or press OK key to select a contact
manually from your Contacts
Scroll to the chosen contact(s) and OK
At this point you can select multiple contacts by scrolling through your list
and pressing OK
Press Add once all your contacts have been added
HOW TO ADD TEXT TO YOUR SMS
Once you have added your contacts you are ready to add text and send your
message.
From the contacts field, press the Down Arrow once to move the cursor into
the text field
Type the message using the letter keys on the keypad (see next heading)
Press OK to send or Back to save to Drafts and send later.
Table of contents
Other Zte Cell Phone manuals