Zte TELSTRA SMART TOUCH 2 User manual

TELSTRA SMARTTOUCH2
3GMOBILEPHONE
USER MANUAL
Copyright©2012.Allrightsreserved.
Nopartofthispublicationmaybeexcerpted,reproduced, translatedorutilisedinany
formorbyanymeans,electronicormechanical,includingphotocopyingandmicrofilm,
withoutthepriorwrittenpermissionofZTECorporation.
ThemanualispublishedbyZTECorporation.Wereserve theright tomake modifications
onprinterrorsorupdatespecificationswithoutpriornotice.
Version1.0May2012

2
LET’S GETTHISSHOWONTHEROAD
Youmustbeexcitedabout your brandnew Telstra SmartTouch2.You’ll soon
bechatting,texting and sharing photosonthego.
This guidewill helpyougettoknow your mobilephoneandall thefancy
thingsitcando.So yougetthemostout ofyour new Telstra SmartTouch2,
setasidesometimeto exploreand play around with all itsfeatures.
BeforeyougetstartedensureyouhaveanactiveTelstra NextG®SIM card.
Themodel numberforyourhandsetis T760.

3
WHAT’S INSIDE
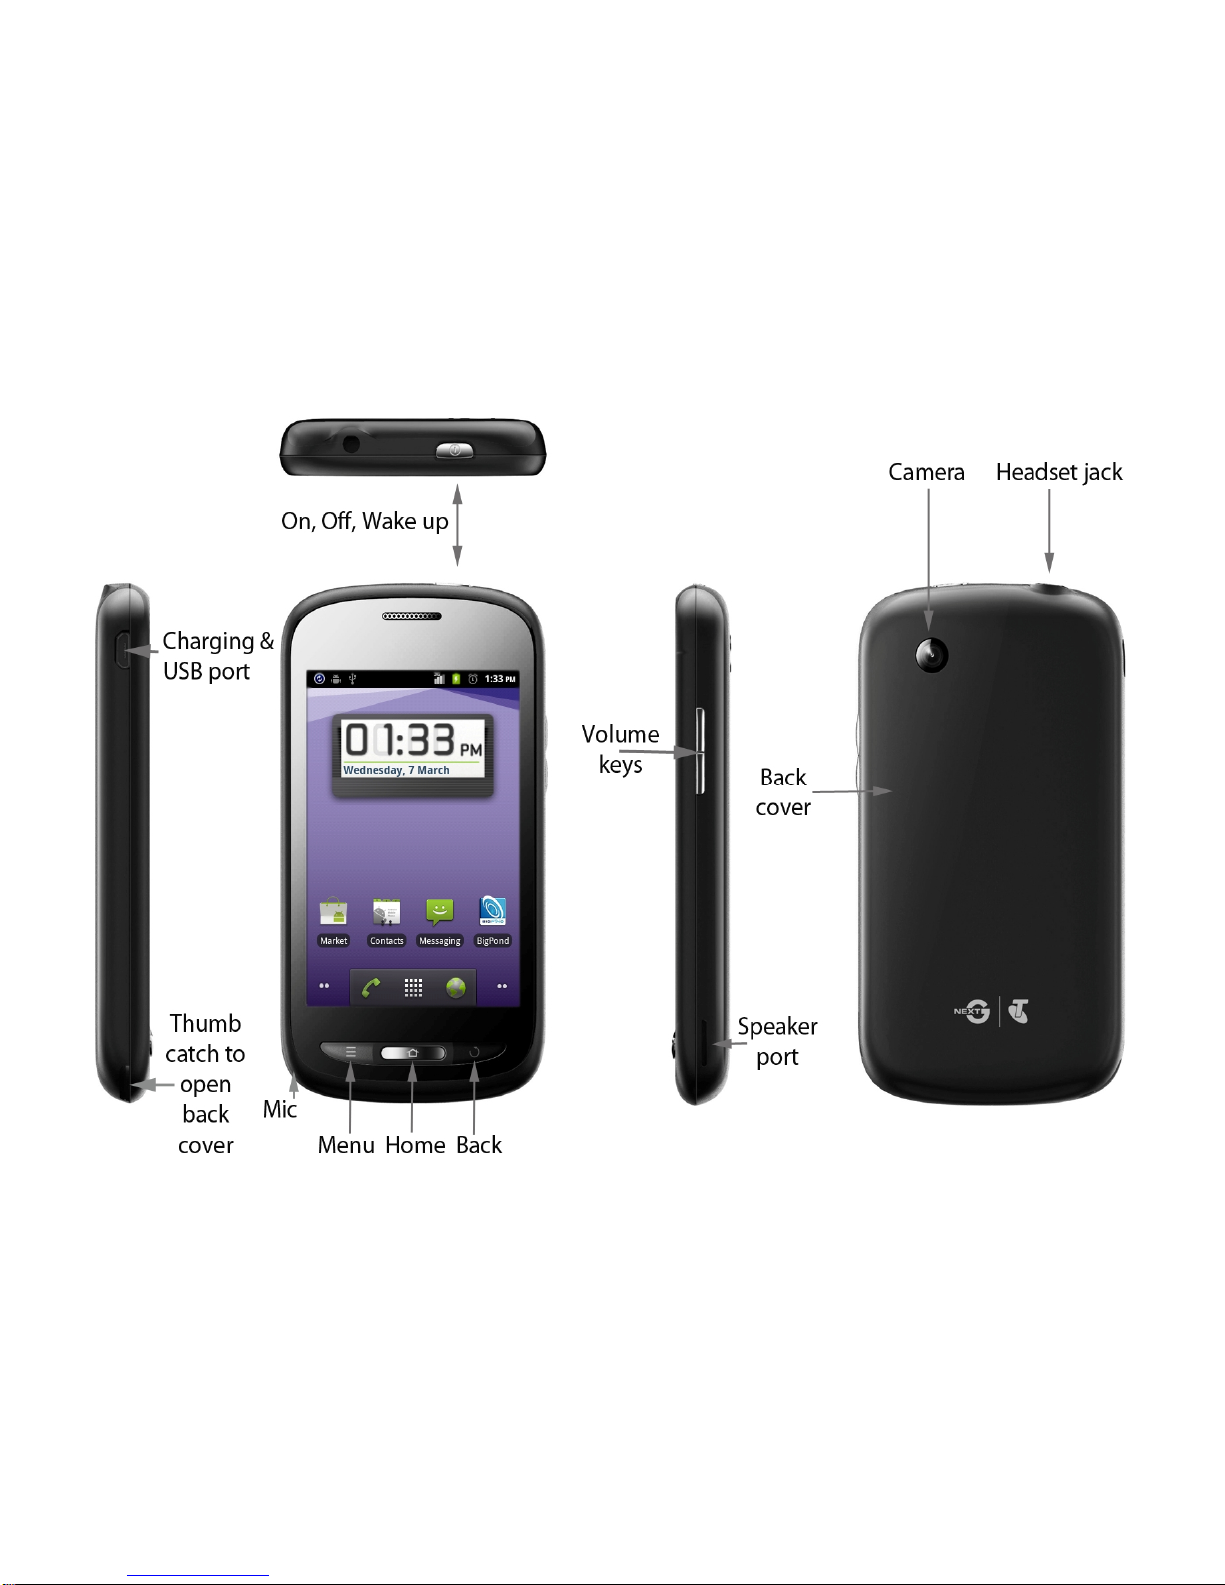
A QUICKLOOKAROUND YOURDEVICE.3
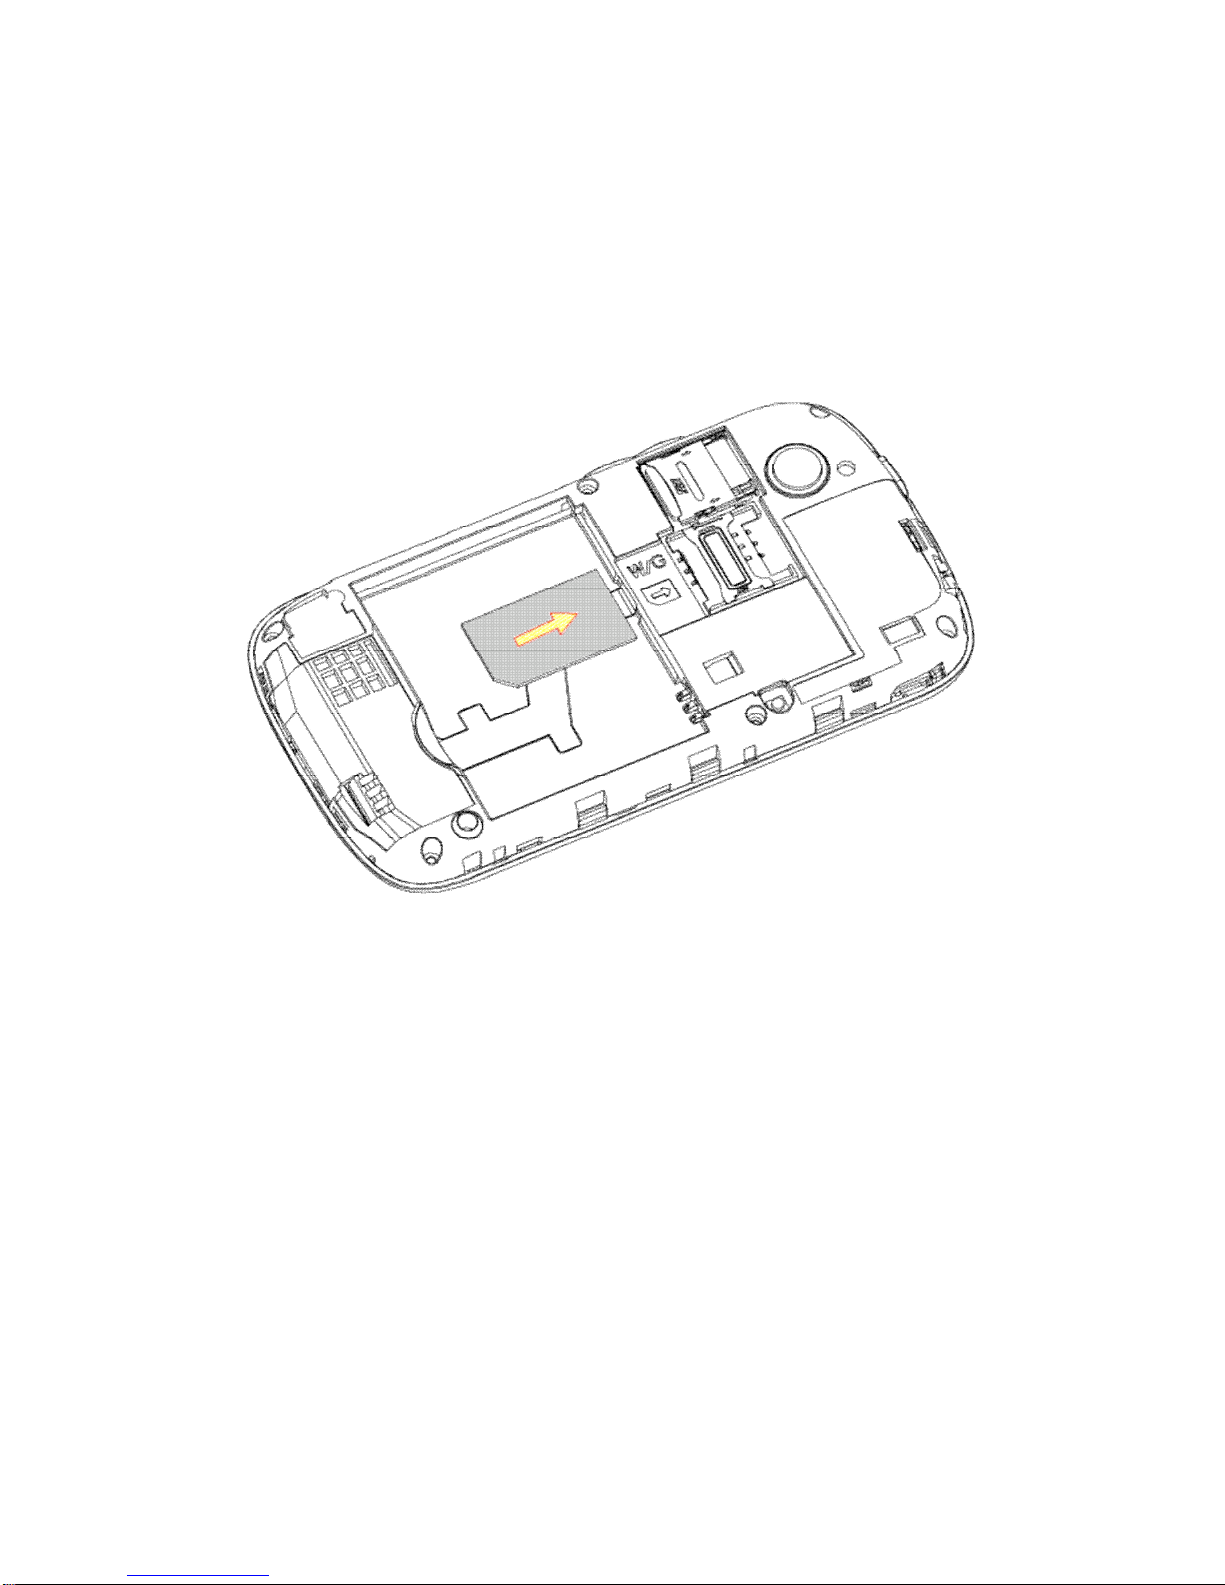
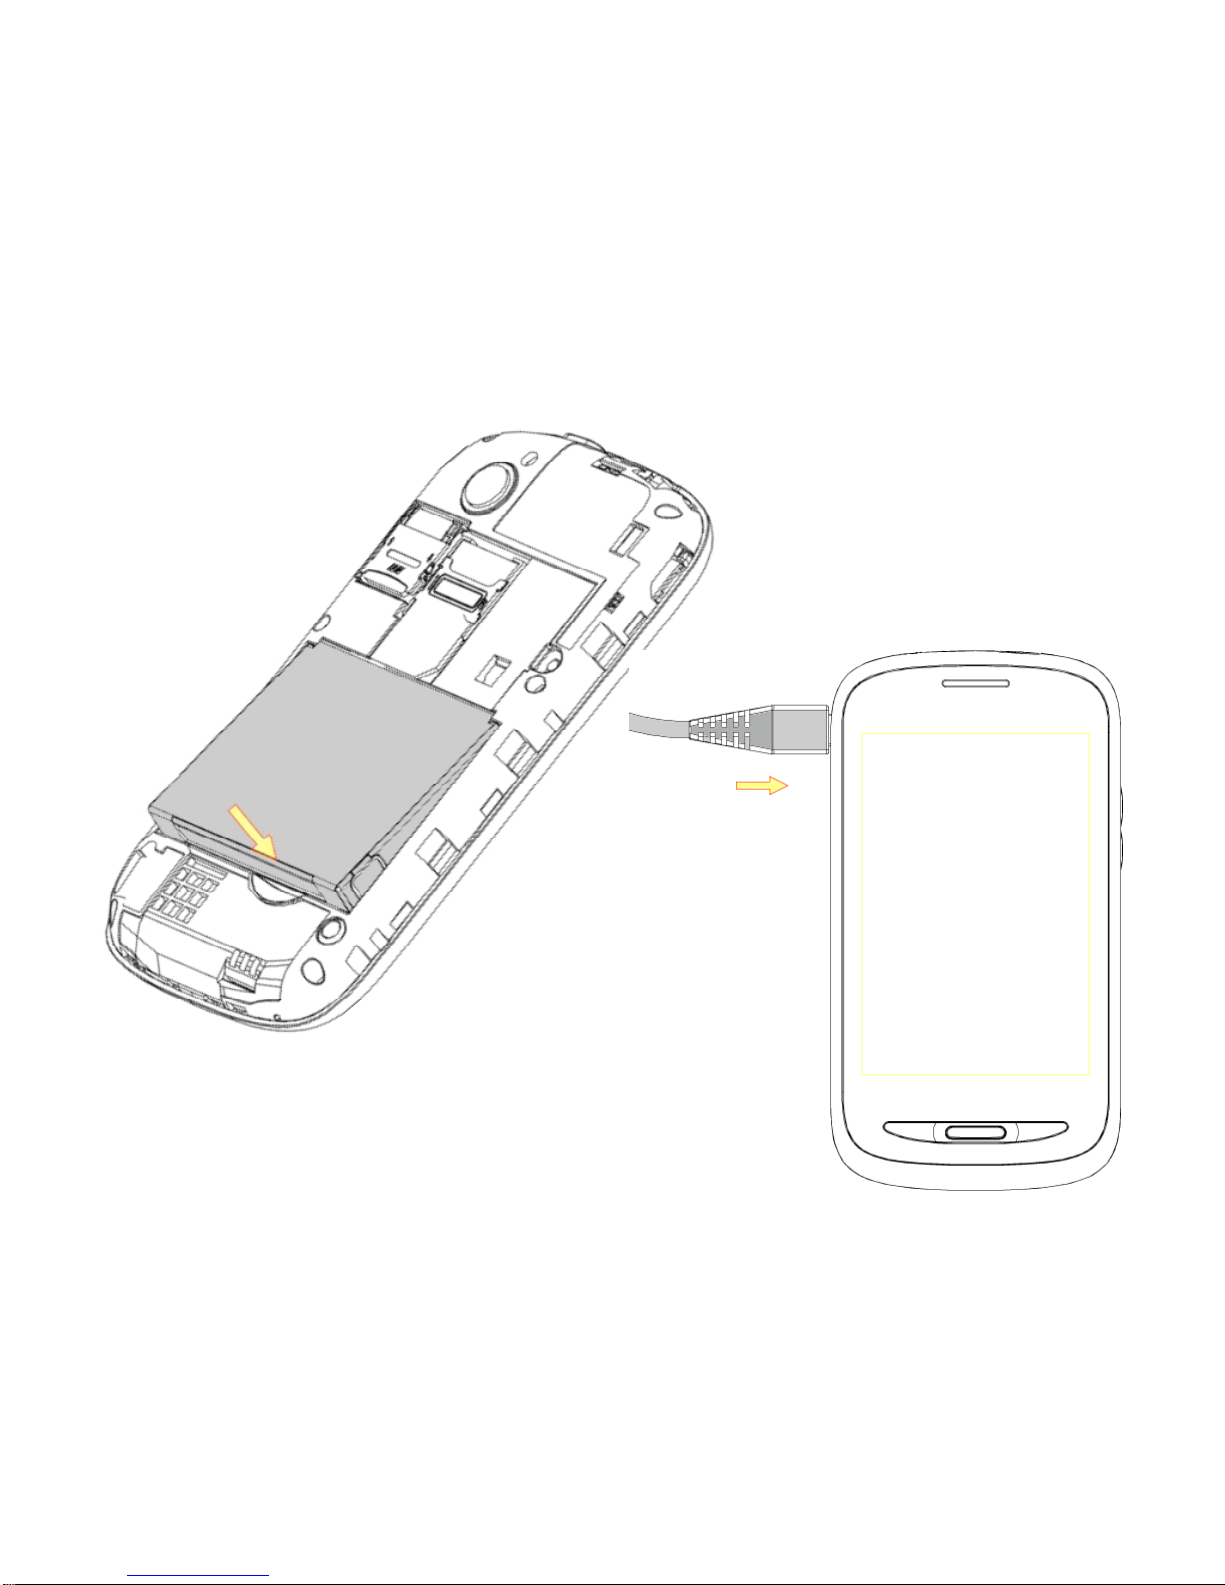
GETTINGSTARTED..............................................5
PHONECALLS....................................................24
CONTACTS.............................................................30
MESSAGES...........................................................34
GETTINGCONNECTED....................................41
CONNECT TOA COMPUTER........................44
USINGTHEBROWSER...................................45
BLUETOOTH..........................................................51
USINGMULTIMEDIA FUNCTIONS............53
PLAYVIDEOS......................................................60
GALLERY...............................................................61
SOUND RECORDER..........................................62
GOOGLE APPLICATIONS................................63
SECURITY..............................................................67
UPDATINGYOURDEVICE.............................69
TECHNICALSPECIFICATIONS:...................69
TROUBLESHOOTING.........................................71
WARRANTYINFORMATION..........................75
SAFETY...................................................................76

4
AQUICK LOOKAROUNDYOURDEVICE

5
GETTINGSTARTED
INSERTYOURSIM CARD
1. Removethebattery coverbyopeningfromthethumbnotch:
Thumbnotch

6
2. Insert yourSIMcard carefullyintotheSIMslotasshown:
3. Thehandsetisfittedwitha2GBmicroSD memory card
nexttotheSIMcard.Thiscanbe expanded upto32GB.
4. Thebatterywillonlyfit oneway, just checkthegoldpadson
thebatterylineupwith thegoldspringsinthephone.
5. Replacethebatterycoverandpresstoclickintoplace.

7
INSERTTHE BATTERY AND CHARGERLEADCAREFULLY

8
CHARGE THE BATTERY
Thebatteryis supplied partiallycharged.Onfirstuseplease
chargethebattery for3-4hours.Itisbettertokeep your
battery toppedup than toletit fullydischarge.
Important Notes:
Only use theAC chargerand USBleadsupplied.
Insertthechargerleadcarefully.
Checktheplug and socketare alignedcorrectly.
Do NOT useexcessiveforcewhichmay damagetheUSBport.
Be careful to avoidtripping ontheleadwhilstitis pluggedin.
Physical damageto theUSBportis NOTcoveredby warranty.
Normal chargetimeis 3-4hours.
Do notleaveonchargeformorethan24hrs.
To maximisebattery life limitmultimedia functions.
Chargethebattery between0°C~45°C.Chargethebattery
promptly whenflat.
With poornetworkconditions(less than2bars)battery life is
reduced.
Whennotusing thephoneforlong periodsremovethebattery.

9
TIPSTOMAXIMISE BATTERYLIFE
•After2-3charge/dischargecyclesthebattery lifewill
improve.Fromthen on usetopup chargingtorecharge
frequentlyandalways chargepromptlywhen flat.
•Toavoid thebatteryenteringadeepdischarged statecharge
thebatterypromptlywhen flat.
•Ifthebattery isdeeplydischarged it can take30minutesto
start charging.Leaveit on chargetorecoverthebattery.
•Keep yourhandsetandbattery cool.High temperatures
degradethebattery morequickly.
•Normalchargetime is 3-4hours.Donotchargemorethan
24hrs.
•Whennotusingthephone forlongperiodschargetoapprox
40%and removethebattery.
•With lownetworksignalconditionsbatterylifeisreduced.
•Turnoff BluetoothandWi-Fiwhennotinuse, and setthe
screenbrightness toautomatic tomaximisebattery life.

10
POWERON & OFF
•MakesurethatyourSIMcardandbatteryareinserted.
•Pressandhold thePowerKeytopoweron yourhandset.
•Topoweroff yourhandset,pressandhold thePowerKey
•Select Poweroff >OK.
GOOGLE ACTIVATION WIZARD: CREATE ORLOG INTOAGOOGLEACCOUNT
Werecommend you login orcreateaGoogleaccounttoenable
on lineservices.
Follow theonscreen wizard tocreateorlogin toanexisting
Googleaccount.
HandyHint
Ifyou setalockcodeonyourdeviceand then forgetthe
patternorPINnumberitcanberesetusingyourGoogle
Accountorafactory reset.
Toperformafactory resettap theEmergencycallbutton
(shownbelow),enter*983*987#. Alldatawill beerased.

11
WAKE UP FROM SLEEP MODE
•PressthePowerkeytoactivatethe
display.
•Dragthepadlockiconrighttounlock.
SWITCHYOURHANDSETTOSLEEP MODE
PressthePowerkeytoactivatesleep
mode.
Sleep Modeactivatesautomatically
withthetimeoutsetfromMenu >
Settings >Display>Screentimeout.
HandyHint
Ifyou setanunlockpattern, PINorpassword you need toenter
it tounlockthescreen.Ifyou forgetyourpatternorPINuse
yourGoogleAccountpasswordtoresetthephone.Thiswill
onlyworkifyou registeraGoogleaccountwith this handset.

12
MAINKEYFUNCTIONS
Keys Function
Power Key Holddowntopower on yourphone.
Presstoswitch tosleepmode.Presstowakeup.
Holddown forSilentmode,FlightmodeorPower off.
Menu
Presstoget theoptions on thecurrentscreen.
Home
PresstoreturntotheHomeScreenfromanyscreen.
Holddowntosee therecentlyusedapplications.
Back Presstogotothepreviousscreen.
Volume KeysUsetocontrol thevolume Upand Down
SoftKeys Function
Calls– Opensthedialer
Apps– OpentheApplications menu
Browser – gototheBigpondhomepage

13
THE HOMESCREEN
SlidetheHomeScreenleftorrightto
view additionalpages.
Longpress on thescreen toadd
Shortcuts, Widgets, Wallpapersetc.
PresstheMenu Keytoview options:
Add –widgets andshortcuts Search –open Googlesearch
Manageapps–viewinstalled
apps Notifications–view the
notificationspanel
Wallpaper–setbackground
image Settings –open device
Settings

14
ADD ORREMOVEICONS
•Press togotoAppsthen longpressanyicon toaddit to
thedesktop.
•Tapandhold theicontomove.
•Dragand drop theitemin thetrash todeleteit.
•Eg:Select >Long Press Camera toadd thistoyourdesktop:

15
EXAMPLE, ADD THE POWERCONTROL WIDGET TOTHE HOMESCREEN
•Longpress on thehomescreen toseeAddtoHomescreen
•Tap Widgets,thenscrolldown andtapPowerControl

16
PHONE STATUSAND NOTIFICATION ICONS
Data connected
Signal strength
Data inuse
Flightmode
Battery isvery low
No signal
Battery islow
Speaker ismuted
Battery isfull
Microphoneismuted
Battery ischarging
Vibrate modeenabled
Speaker modeison
FM Radio
Bluetoothison
USBconnected
GPSison
ConnectedtoaWi-Finetwork
Alarm isset
Headset connected

17
NOTIFICATION ICONS
New Email
New instantmessage
New SMS/MMS
Upcoming event
New voicemail
Song isplaying
Missedcall
Downloadingdata
Call inprogress
Contentdownloaded
Call on hold
Uploading data
Call forwardingon
More notifications
Problem withSMS/MMSdelivery
THE NOTIFICATIONS AND CONTROL PANEL
TheNotificationsPanelatthetop of theHomeScreen shows
usefuldeviceandstatusinformation.UsetheControlpanel to
quicklyenable Wi-Fi,Bluetooth, changeProfilesetc.

18
Pulldown thebaratthetop of thedisplaytoview the
Notificationsand Control panels:
HandyHint
You canalsoopentheNotificationspanel fromthehome
screenbytappingMenu>Notifications.
Notifications
ControlPanel

19
APPLICATIONS AND SETTINGS
Tap toaccessApplications.Scroll down toseemore...
You can install additional applicationsbygoingtoMarket

20
INSTALL APPLICATIONS FROM GOOGLE MARKET /PLAYSTORE
TapMarketfromtheHomeScreen todownloadand install
applicationsfromtheGoogleMarket.Selecttheitemandtap
Install.
•ThenameforGoogleMarketisbeingupdated toPlayStore.
•You needaGoogleaccounttoaccessMarket/PlayStore
ALLOWNON-MARKET APPLICATIONS
Go toSettings>Applications>Unknown sources.
UNINSTALL APPLICATIONS
•FromtheHomescreentap Menu>Manageapplications
•Select theapplication toremove
•TapUninstall, tap OKtoconfirm.
MULTI-TASKING
Run multipleapplicationssimultaneously.PresstheHomekey
fromanyapplication tolaunch, openorview somethingelse.
Theoriginal applicationwill besuspendeduntilyou return toit.
This manual suits for next models
1
Table of contents
Other Zte Cell Phone manuals