3M Attest 490M User manual

Description:
DIELINE
Base File Name:
Software:
SGS Contact:
Email:
Printer:
Printer Location:
Supplier:
3M™ Attest™
490M Mini Auto Reader
Requester: Debra Staack
Reference:
Die # / Doc. Size: 7.5" x 9"
Item Spec#: 34-8726-0983-8
Supersedes#:
Cat/Product#: 490M
Structure#: SS-84848 (284 pages)
Cover and Operator’s Manual
PA: 34872609838.indb
GA:
InDesign CC
PROCESS
BLACK
5897699-4 4
01.03.20 Version 4. Make changes per marked up PDF and update UPC
kat
08.01.20 Updates per Mu PDF TF
08.25.20 Files back from OMNI, check and FR kat
aOperator’s Manual
bManuel de l’utilisateur
cBenutzerhandbuch
dManuale dell’operatore
eManual del usuario
eManual del operador
fBedieningshandleiding
gAnvändarhandbok
hBrugsvejledning
iBrukerhåndbok
jKäyttöopas
kManual do Utilizador
kManual do Operador
lΕγχειρίδιο Χειριστή
mInstrukcja obsługi
oPříručka pro obsluhu
qPriročnik za uporabo
vИнструкция по эксплуатации
xUpute za korištenje
1Operatör Kılavuzu
4操作指南
5
6작업자 매뉴얼
3M™Attest™Mini Auto-reader
490M

1
a
3M™ Attest™ Mini Auto-reader 490M a
Read and understand all safety information
before using this product.
TABLE OF CONTENTS
PREFACE ................................................................................................................................................... 2
INTENDED USE........................................................................................................................................ 2
INDICATIONS FOR USE......................................................................................................................... 2
WARRANTY.............................................................................................................................................. 2
SAFETY AND PRECAUTIONS............................................................................................................... 2
HEALTH AND SAFETY INFORMATION ............................................................................................. 3
EXPLANATION OF PRODUCT ANDPACKAGINGLABELSYMBOLS......................................... 3
SPECIFICATIONS.................................................................................................................................... 4
INSTRUCTIONS FOR USE..................................................................................................................... 4
FEATURES OF THE 3M™ATTEST™MINI AUTO-READER 490M................................................7
MAINTENANCE, CARE ANDCLEANING ......................................................................................... 8
TROUBLESHOOTING GUIDE ............................................................................................................... 9
OPTIONAL 3M™ATTEST™CONNECT AUTO-READER APPLICATION..................................10
TROUBLESHOOTING -3M™ATTEST™CONNECT.....................................................................12
CUSTOMER SUPPORT..........................................................................................................................12

2
a
PREFACE
Content Disclaimers
Pictorial Disclaimer
Sample printouts, graphics, displays and screens are for information and illustration
purposes only and shall not be used for clinical or maintenance evaluations. Data
shown in sample printouts and screens do not reflect actual test results.
Hardware Disclaimer
The 3M™ Attest™ Mini Auto-reader 490M hardware specifications are subject to
change. The system images, hardware components and hardware specifications
included in the manual may not match the system installed. Any changes or
modifications to the authorized system installation have been verified as compatible
with the functionality outlined in this document.
INTENDED USE
The 3M™ Attest™ Rapid Biological Indicator System provides rapid, reliable
monitoring of steam and vaporized hydrogen peroxide sterilization processes
performed in health care facilities. The system is comprised of biological indicators,
challenge packs, and incubator/readers.
The 3M™ Attest™ Mini Auto-reader 490M is designed to incubate and
automatically read 3M™ Attest™ Biological Indicators 1295, 1491, and 1492V at
60°C for a final negative fluorescence reading at 24 minutes. The 3M™ Attest™
Mini Auto-reader 490M is also designed to allow for further incubation of
3M™ Attest™ Super Rapid Readout Biological Indicators, catalog numbers 1491 and
1492V, for a final negative, visual pH color change result at 24 hours and 48 hours,
respectively. This further incubation is optional and not intended for routine use.
A positive fluorescent result or a visual pH color change indicate a sterilization
process failure. However, due to the high sensitivity of the fluorescent result, there
is no advantage to continuing to incubate processed 3M™ Attest™ Biological
Indicators once the fluorescent result has been documented.
Other biological indicators (BIs) are not compatible with this device and cannot be
used.
INDICATIONS FOR USE
The 3M™ Attest™ Mini Auto-reader 490M is designed to incubate and
automatically read 3M™ Attest™ Rapid Readout Biological Indicators 1295 and
3M™ Attest™ Super Rapid Readout Biological Indicators, catalog numbers 1491 and
1492V, at 60°C for a final fluorescent result at 24 minutes.
The indications for use for Attest™ Biological Indicators are provided in the product’s
Instructions for Use.
WARRANTY
In the US, the 3M™ Attest™ Mini Auto-reader 490M has a one-year limited product
warranty. The US warranty, remedy and limitations are described on the product
webpage at Go.3M.com/490M. For countries outside of the US, any warranty is
established by the subsidiary with responsibility for sales of the 3M™ Attest™ Mini
Auto-reader 490M.
Register your device at Go.3M.com/490M.
SAFETY AND PRECAUTIONS
The 3M™ Attest™ Mini Auto-reader 490M and its related devices and accessories
are designed to provide safe and reliable service when used according to the
instructions provided. Please read, understand, and follow all safety information
contained in the instructions for use included with the 3M™ Attest™ Mini
Auto-reader 490M and the associated Attest™ biological indicators prior to use.
Use this equipment only for the purpose described in the Operator’s Manual. Retain
these instructions for future reference.
The unit is designed to be used only with the Power Supply module and USB
cable supplied by 3M. If this product is used in a manner not specified by 3M, the
protection provided by the product may be impaired.
Explanation of Signal Word Consequences
WARNING: Indicates a hazardous situation, which, if not avoided, could
result in death or serious injury.
CAUTION: Indicates a hazardous situation, which, if not avoided, could
result in minor or moderate injury.
Warnings and Safety Precautions
The following warnings and precautions should be followed to avoid unsafe actions
that could result in personal injury or damage to the instrument.
WARNING: To reduce the risk associated with hazardous voltage
Use indoors only.
Do not use the equipment if it is not working properly or if it has suffered any
damage.
Use only the power supply specified for this product and certified for the country
of use.
CAUTION: To reduce the risk of injury or instrument damage
Do not spill liquid onto or into the instrument. Do not immerse the unit in liquid.
Always unplug the 3M™ Attest™ Mini Auto-reader 490M and allow to cool
before cleaning.
Clean external surfaces using only the instructions provided by
the manufacturer.
Do not open the instrument housing – there are no user-serviceable parts.
Wear safety glasses and gloves when activating the 3M™ Attest™ Rapid
Readout Biological Indicator 1295.
Allow steam-processed 3M™ Attest™ Biological Indicators to cool for the
recommended time period before activating. Activating or excessive handling
of the biological indicator before cooling may cause the glass media ampoule
to burst.
Wear safety glasses when activating 3M™ Attest™ Super Rapid Biological
Indicators.
WARNING: To reduce the risk associated with incorrect results
Instrument is to be used by operators familiar with the device, device
functionality, and Operator’s Manual.
Do not place the instrument in environment exposed to sunlight or strong
incandescent light.
Do not place instrument close to any device that emits a strong
electro-magnetic field.
Do not use on a vibrating surface.
Activate and incubate 3M™ Attest™ Rapid Readout Biological Indicators
1295 within 1 hour of the completion of the sterilization cycle.
Do not incubate a 3M™ Attest™ Biological Indicator if, after processing and
before BI activation, it is observed to have a broken media ampoule. Retest the
sterilizer with a new biological indicator.
Allow steam-processed 3M™ Attest™ Biological Indicators to cool for the
recommended time period before activating.
Do not remove or change placement of 3M™ Attest™ Biological Indicator once it
is placed into a well.
Do not remove the 3M™ Attest™ Biological Indicator from the incubation well
until the (+) or (-) symbol on the display indicates the test is complete.
Do not re-incubate 3M™ Attest™ Biological Indicators for which the Auto-reader
has already determined a result.

3
a
HEALTH AND SAFETY
INFORMATION
Device Safety Compliance
The 3M™ Attest™ Mini Auto-reader 490M complies with the following standards as
demonstrated by the CB Scheme Certificate and test report issued by UL, LLC (UL):
• IEC/EN 61010-1:2010. Safety requirements for electrical equipment for
measurement, control, and laboratory use - Part 1: General requirements
• IEC/EN 61010-2-010:2014. Safety requirements for electrical equipment for
measurement, control, and laboratory use - Part 2-010: Particular requirements
for laboratory equipment for the heating of materials.
The 3M™ Attest™ Mini Auto-reader 490M is UL Listed and carries the UL mark with
adjacent indicators “C” and “US” based on compliance to the standards UL 61010-1,
CAN/CSA 22.2 No. 61010-1 and CAN/CSA 22.2 No. 61010-2-010.
The 3M™ Attest™ Mini Auto-reader 490M complies with the CE mark related to
the Low Voltage Directive (LVD) 2014/35/EU as confirmed in the Declaration of
Conformity.
The 3M™ Attest™ Mini Auto-reader 490M complies with the RoHS Directive,
Directive 2011/65/EU of the European Parliament and of the Council of 8 June
2011 on the restriction of the use of certain hazardous substances in electrical and
electronic equipment.
The 3M™ Attest™ Mini Auto-reader 490M complies with China RoHS
II requirements.
The 3M™ Attest™ Mini Auto-reader 490M complies with the WEEE Directive,
Directive 2012/19/EU of the European Parliament and of the Council of 04 July
2012 on waste electrical and electronic equipment (WEEE).
EMC Compliance
The 3M™ Attest™ Mini Auto-reader 490M complies with the following EMC
standards as confirmed in the Declaration of Conformity generated by 3M:
• IEC 61326-1:2012/EN 61326:2013 Electrical equipment for measurement, control
and laboratory use - EMC requirements - Part 1: General requirements
• EMC requirements of the CE mark EMC Directive 2014/30/EU.
The 3M™ Attest™ Mini Auto-reader 490M complies with the Australian and
New Zealand electrical safety and electromagnetic compatibility requirements as
confirmed in the Supplier’s Declaration of Conformity that is linked to the Australian/
New Zealand Regulatory Compliance Mark (RCM).
CAN ICES-3 (B)/NMB-3(B)
This device complies with part 15 of the FCC Rules. Operation is subject to the
following two conditions: (1) This device may not cause harmful interference, and (2)
this device must accept any interference received, including interference that may
cause undesired operation.
Modifications to this device shall not be made without the written consent of 3M
Company. Unauthorized modifications may void the authority granted under Federal
Communication Rules permitting the operation of this device.
This equipment has been tested and found to comply with the limits for a Class
B digital device, pursuant to part 15 of the FCC Rules. These limits are designed
to provide reasonable protection against harmful interference in a residential
installation. This equipment generates, uses and can radiate radio frequency energy
and, if not installed and used in accordance with the instructions, may cause
harmful interference to radio communications. However, there is no guarantee that
interference will not occur in a particular installation. If this equipment does cause
harmful interference to radio or television reception, which can be determined
by turning the equipment off and on, the user is encouraged to try to correct the
interference by one or more of the following measures:
- Reorient or relocate the receiving antenna.
- Increase the separation between the equipment and receiver.
- Connect the equipment into an outlet on a circuit different from that to which the
receiver is connected.
- Consult the dealer or an experienced radio/TV technician for help.
EXPLANATION OF PRODUCT
AND PACKAGING LABEL SYMBOLS
Symbol Glossary
Symbol Title Symbol Description and Reference
Manufacturer
Indicates the medical device
manufacturer as defined in Medical
Device Regulation (EU) 2017/745
formerly EU Directive 93/42/EEC.
Source: ISO 15223, 5.1.1
Authorized
Representative in
European Community
Indicates the authorized representative
in the European Community. Source:
ISO 15223, 5.1.2, 2014/35/EU, and/or
2014/30/EU
Date of Manufacture Indicates the date when the medical
device was manufactured. Source: ISO
15223, 5.1.3
Catalogue number Indicates the manufacturer's catalogue
number so that the medical device can
be identified. Source : ISO 15223, 5.1.6
Serial number
Indicates the manufacturer's serial
number so that a specific medical
device can be identified. Source: ISO
15223, 5.1 .7
Caution
Indicates the need for the user to
consult the instructions for use for
important cautionary information
such as warnings and precautions that
cannot, for a variety of reasons, be
presented on the medical device itself.
Source: ISO 15223, 5.4.4
CE Mark Indicates conformity to all applicable
European Union Medical Device
Regulations and Directives.
UL Listed Indicates product was evaluated and
Listed by UL for the USA and Canada.
Regulatory Compliance
Mark
Indicates product complies with
applicable Australian regulatory
requirements. Source: AS/NZS
4417.1:2012
China RoHS II symbol Indicates the product’s environmental-
friendly use period in years. Source:
SJ/T 11364-2014
Direct current
To indicate on the rating plate that the
equipment is suitable for direct current
only or to identify relevant terminals.
Source: IEC 60417-5031
Recycle electronic
equipment
DO NOT throw this unit into a municipal
trash bin when this unit has reached
the end of its lifetime. Please recycle.
Source: Directive 2012/19/EC on waste
electrical and electronic equipment
(WEEE)
For more information see, HCBGregulatory.3M.com

4
a
SPECIFICATIONS
Power Supply Specifications
Power supply Operating Condition Units
Voltage Range 100-240 Volts AC
Frequency 50/60 Hertz
Current 0.6 Amps
Environmental Operating Conditions
Environmental Condition Operating Condition Units
Altitude 3000 (max) Meters
Operating Temperature 16 – 35 ºC
Storage Temperature -10 to 50 ºC
Operating Relative Humidity 20-80 (non-condensing) %
Voltage Range 12 Volts DC
Frequency DC
Current 1.2 Amps
Installation/Over Voltage Category II
Pollution Degree 2
Unit Dimensions
Width - 15.5 cm
Height - 8.25 cm
Depth - 5.25 cm
INSTRUCTIONS FOR USE Initial Set-up
Choose Location
Place 3M™ Attest™ Mini Auto-reader 490M on a firm level surface away from
sunlight and incandescent light.
Select & Install Correct Power Plug
The 3M™ Attest™ Mini Auto-reader 490M power supply comes with multiple
blade configurations. Install the blade configuration appropriate for your country
into the power supply. Connect the power supply to the power receptacle located
on the back of the 3M™ Attest™ Mini Auto-reader 490M and then plug into an
appropriate AC grounded outlet.
The power supply plug serves as the electrical supply source disconnecting
device. Do not position any equipment around the power supply which makes it
difficult to unplug the power supply.
The bootloader (B X.X.X) and firmware (V X.X.X) versions are briefly sequentially
displayed when the 3M™ Attest™ Mini Auto-reader 490M is powered on.
WARNING:
• Do not place the instrument in environment exposed to sunlight or strong
incandescent light.
• Do not place instrument close to any device that emits a strong
electro-magnetic field.
• Do not use on a vibrating surface.
Wait 30 Minutes Before Using
Once plugged in, allow a 30 minute warm-up period before placing biological
indicators into the incubation wells. The C1 caution code will disappear when
proper incubation temperature is reached.
Special Considerations
It is recommended that the unit be left on to eliminate warm-up periods.
The unit may be unplugged when it is anticipated that it will not be used for an
extended period.
WARNING: Use only the power supply specified for this product and
certified for the country of use.

5
a
INSTRUCTIONS FOR USE Wells, Button, Display & Connections
WELLS
1. Incubation wells – the 3M™ Attest™ Mini Auto-reader 490M has four
incubation wells.
Button
2. Touch button (Alarm OFF)
Display
3. Example of Positive ( + ) BI result for well #1
4. Example of Negative ( - ) BI result for well #2
5. Example of remaining incubation time for well #3
6. Example of error code for well #4
Rear View
7. USB cable port – connect “B” end of supplied USB cable here to use
3M™ Attest™ Connect
8. Power receptacle – connect power supply AC adaptor here

6
a
INSTRUCTIONS FOR USE Readout
Procedure
Instructions for Biological Indicator (BI) Activation
and Incubation
CAUTION: Allow steam-processed 3M™ Attest™ Biological Indicators to
cool for the recommended time period before activating. Activating or excessive
handling of the biological indicator before cooling may cause the glass ampoule
to burst.
CAUTION: Wear safety glasses when activating 3M™ Attest™ Super
Rapid Biological Indicators.
CAUTION: Wear safety glasses and gloves when activating the
3M™ Attest™ Rapid Readout Biological Indicator 1295.
WARNING: To reduce the risk associated with incorrect results
Do not incubate a 3M™ Attest™ Biological Indicator if, after processing and
before BI activation, it is observed to have a broken media ampoule. Retest the
sterilizer with a new biological indicator.
Activate and incubate 3M™ Attest™ Rapid Readout Biological Indicators
1295 within 1 hour of the completion of the sterilization cycle.
Allow steam-processed 3M™ Attest™ Biological Indicators to cool for the
recommended time period before activating.
Do not re-incubate 3M™ Attest™ Biological Indicators for which the Auto-reader
has already determined a result.
Follow this procedure for every 3M™ Attest™ Biological Indicator (BI) to be read:
While wearing safety glasses (and gloves for
the 1295 BI), PLACE BI in Attest™ Biological
Indicator Activator.
CLOSE and SQUEEZE Attest™ Biological
Indicator Activator to close BI cap and crush
media ampoule.
Remove BI, visually VERIFY the glass ampoule
(containing growth media) has been crushed,
and FLICK BI to distribute purple growth media
to the growth chamber at the bottom of the vial.
INSPECT to verify media has transferred to
growth chamber at the bottom of the BI vial.
Orient flat side of activated BI towards front
of 3M™ Attest™ Mini Auto-reader 490M and
PLACE the BI into any incubation well. Observe
3M™ Attest™ Mini Auto-reader 490M display
to confirm correct placement of the BI. If the
BI is correctly seated, the 3M™ Attest™ Mini
Auto-reader 490M will display ●●●, ●●,
●, and then remaining minutes of incubation
directly below the incubating BI
RECORD BI result.
WARNING: Do not remove the biological indicator from the incubation
well until the (+) or (-) symbol on the display indicates the test is complete.

7
a
INSTRUCTIONS FOR USE Additional
Information
BI Placement
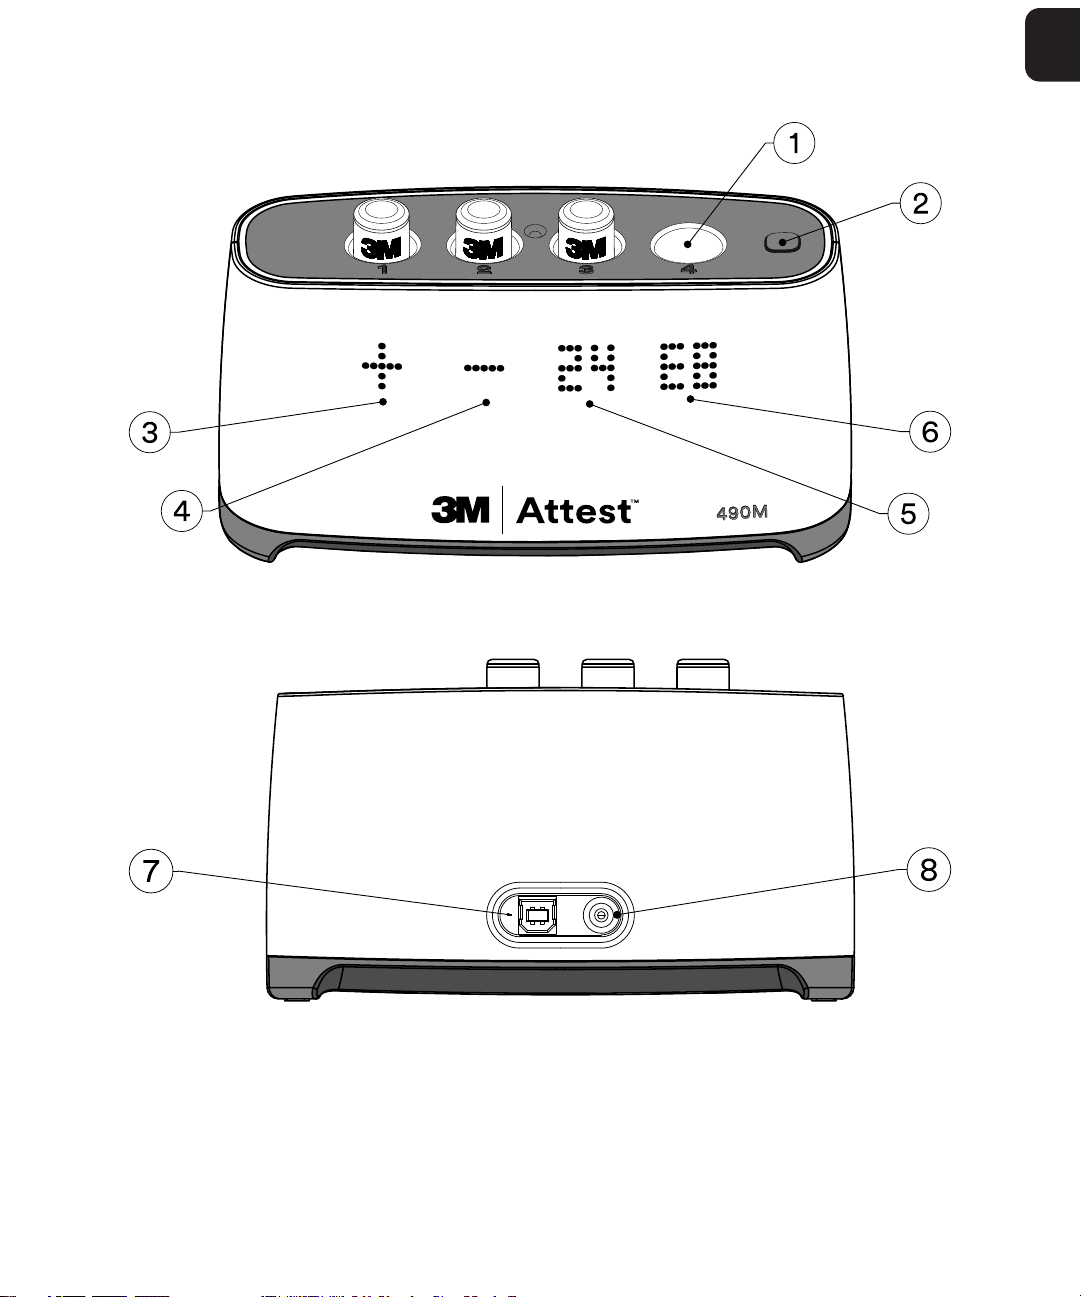
All incubation wells in the 3M™ Attest™ Mini Auto-reader 490M are programmed
to provide a final fluorescent result within 24 minutes of incubation and may be used
to incubate 3M™ Attest™ Super Rapid Biological Indicators 1491 and 1492V and the
3M™ Attest™ Rapid Readout Biological Indicator 1295.
Remaining incubation time, in minutes, will be displayed on the front of the unit to
indicate the 3M™ Attest™ Biological Indicator is incubating in the reader well and
should not be touched. The time remaining display indicates the results are not
available and incubation is in progress. Do not remove 3M™ Attest™ Biological
Indicators until the (+) or (-) symbol on the display indicates the test is complete.
Note: If a 3M™ Attest™ Biological Indicator is inadvertently removed before the
incubation period is complete, an alarm will sound, and a C2 caution code will be
displayed under that well. You must return the 3M™ Attest™ Biological Indicator to
the incubation well within 10 seconds or the results will be lost.
WARNING: Do not remove or change placement of 3M™ Attest™
Biological Indicator once it is placed into a well. Doing so may result in loss of
results and the biological indicator test may be invalid.
INSTRUCTIONS FOR USE
Positive Control
Activate and incubate at least one non-processed 3M™ Attest™ Biological Indicator
to use as the positive control each day that a processed 3M™ Attest™ Biological
Indicator is incubated and read by the unit. Write a “C” (for “control”) and the date
on the label. The positive control can be placed in any incubation well. A positive
control should be run for each catalog number and have the same lot number as the
processed 3M™ Attest™ Biological Indicator.
The positive control BI helps confirm:
• correct incubation temperatures are met
• viability of spores has not been altered due to improper storage temperature,
humidity, or proximity to chemicals
• capability of media to promote rapid growth, and
• proper functioning of 3M™ Attest™ Mini Auto-reader 490M components.
INSTRUCTIONS FOR USE
Interpretation of Results
Fluorescent Results
As soon as a positive 3M™ Attest™ Biological Indicator result is detected, a flashing
(+) symbol will be displayed directly under the incubating BI and an alarm will
sound (if the sound feature is enabled). Tap the touch button to acknowledge the
result, stop the flashing display, and silence the alarm (if enabled). At the end of the
24-minute incubation time, if a negative 3M™ Attest™ Biological Indicator result is
detected, a (-) symbol will be displayed directly under the incubating BI. The final
negative fluorescent result (-) for a processed 3M™ Attest™ Biological Indicator
after 24 minutes of incubation indicates an acceptable sterilization process.
After either the + or – symbol is displayed, and the result is recorded, the
3M™ Attest™ Biological Indicator can be removed from the well. The result (+ or -)
is displayed until the BI is removed from the incubation well. The result clears ten
seconds after the BI has been removed. Do not re-incubate BIs as the result will not
be valid.
The unprocessed control BI must provide a positive fluorescent result (+). Processed
BI results are not valid until the daily positive control BI reads fluorescent positive (+).
With a processed 3M™ Attest™ Biological Indicator, a positive (+) result indicates a
sterilization process failure. Act on any positive test results immediately. Determine
the cause of the positive 3M™ Attest™ Biological Indicator and retest the sterilizer
following facility policies and procedures.
Optional Visual pH Color Change Result -
3M™ Attest™ Super Rapid Readout Biological
Indicators 1491 and 1492V
3M™ Attest™ Super Rapid Readout Biological Indicators may be further incubated
for a visual pH color change. This optional further incubation is not intended for
routine use and may be used for special studies. Due to the high sensitivity of the
fluorescent result, there is no advantage to incubating the 3M™ Attest™ Super
Rapid Readout Biological Indicators 1491 and 1492V beyond 24 minutes. After
activation and during incubation, the white Nonwoven Material in the biological
indicator will absorb bromocresol purple indicator, the pH-sensitive indicator dye
in the growth media, and appear blue. In the case of a positive control BI, a yellow
color change of the growth media and/or Nonwoven Material will appear within
24 hours for 1491 BIs and within 48 hours for 1492V BIs. Any observation of a yellow
color within the vial indicates a positive result. In the case of a processed BI, a
media and/or Nonwoven material color change from purple to yellow indicates a
steam sterilization process failure. A negative pH color change result, i.e. media and
Nonwoven Material remain purple/blue, can be assessed at 24 hours for 1491 BIs
and at 48 hours for 1492V BIs.
Optional Visual pH Color Change Result -
3M™ Attest™ Rapid Readout Biological Indicator 1295
3M™ Attest™ Rapid Readout Biological Indicators 1295 may be further incubated for
a visual pH color change. Due to the high sensitivity of the fluorescent result, there
is no advantage to continuing to incubate 3M™ Attest™ Rapid Readout Biological
Indicators 1295 after the fluorescent result has been determined and documented.
This optional further incubation is not intended for routine use but may be used for
special studies.
In the case of a positive control BI, a yellow color change of the growth media will
appear within 24 hours. Any observation of a yellow color within the vial indicates a
positive result. The pH color change result can be recorded, and the BI discarded as
soon as the yellow color is observed.
If a visual pH color change result is desired for processed 3M™ Attest™
Rapid Readout Biological Indicators 1295, the use of a humidified incubator
is recommended to avoid media dry-out. Transfer the processed 1295 BI to a
humidified incubator operating at 60ºC after the fluorescent result has been
determined by the 3M™ Attest™ Mini Auto-reader 490M. A media color change
from purple to yellow indicates a sterilization process failure. A negative pH color
change result, i.e., media remains purple, can be assessed at 7 days.
INSTRUCTIONS FOR USE – Disposal
Instrument contains a lithium battery. Dispose of instrument in accordance with
federal, state, and local requirements.
FEATURES OF THE 3M™ ATTEST™ MINI AUTOREADER 490M
Audible Alarm
An audible alarm will sound and a flashing (+) symbol will be displayed directly under
the incubating BI when a positive result is detected. An alarm will also sound if an
incubating BI is removed from the 3M™ Attest™ Mini Auto-reader 490M incubation
well before a result has been determined. Data will be lost if the BI is not replaced in
the incubation well within 10 seconds.
The audible alarm for positive results can be silenced for a particular 3M™ Attest™
Biological Indicator. This is accomplished by pressing the touch button after
the alarm has sounded. This will turn off the alarm for that BI only. Any positive
3M™ Attest™ Biological Indicator results subsequently detected in other incubation
wells will result in the alarm sounding. Removing the BI reactivates the alarm for that
well. Pressing the touch button to silence the alarm for a positive BI does not disable
the alarm for error or caution code alarm warnings. The default factory setting is
audible alarm enabled. The alarm can be disabled in the 3M™ Attest™ Connect
Settings page.
Serial Number, Firmware Version, and
Temperature Status
To check the serial number, firmware version, or heater block temperature, press
and hold the touch button. The unit’s serial number, firmware version, and incubator
block temperature will sequentially appear on the Display. The 3M™ Attest™ Mini
Auto-reader 490M contains an internal temperature self-diagnostic program.
Should the temperature fall outside the specification (60.0ºC +/- 2.0ºC), an error
code will be displayed.

8
a
Power Disruptions
When electrical power is restored following a power disruption, the 3M™ Attest™
Mini Auto-reader 490M checks the heater block temperature.
• A C1 caution code is displayed under all unoccupied incubation wells if the
temperature is below specification. The C1 caution code will clear when the
temperature reaches specification (60.0ºC +/- 2.0ºC).
• For any incubating BIs for which the result was determined prior to the power
disruption, the result is displayed when power is restored provided the BI remains
in the well.
• For any incubating BIs for which the result was not determined prior to the power
disruption:
OIf the heater block temperature is within specification, readings resume as
indicated by the remaining incubation time under the BIs on the Display.
OAfter short power disruptions, if the heater block temperature is above 50°C,
but not within specification, a C3 caution code is displayed under affected
wells and readings are not taken. Readings resume, as indicated by the
remaining incubation time on the Display, when the temperature reaches
specification.
OIf the heater block temperature is below 50°C, the E5 error code is displayed
below affected BIs. A result will not be determined, and the load/sterilizer
should be tested with a new BI per facility protocol.
Optional 3M™ Attest™ Connect
If desired, the 3M™ Attest™ Mini Auto-reader 490M may be connected to a
Personal Computer (PC) via the supplied USB cable for additional functionality.
Downloading and installing the free 3M™ Attest™ Connect Auto-reader application
allows users to:
• View current status of BIs in the 3M™ Attest™ Mini Auto-reader 490M on a PC
screen
• View and export previous BI records to create print-outs, and/or save
documentation as an electronic file.*
• Interface with compatible Instrument Tracking software systems
• Create diagnostic files for remote customer service support and trouble-shooting
• Configure 3M™ Attest™ Mini Auto-reader 490M settings
• Enable future upgrades of the 3M™ Attest™ Mini Auto-reader 490M firmware
See the OPTIONAL 3M™ Attest™ Connect Auto-reader Application section of this
manual for more details.
* Refer to your facility’s record keeping policy and procedure. The user is solely
responsible for the integrity and security of the data on their PC.
MAINTENANCE, CARE
AND CLEANING
The 3M™ Attest™ Mini Auto-reader 490M does not contain any user-serviceable
parts or require any routine maintenance or calibration. Any malfunctions will be
indicated by an error code. Refer to the Troubleshooting Guide section for error code
explanations.
Clean the exterior surface of the 3M™ Attest™ Mini Auto-reader 490M by wiping it
with a damp cloth moistened with a mild detergent. Do not attempt to clean interior
components.
CAUTION: Always unplug the 3M™ Attest™ Mini Auto-reader 490M and
allow to cool before cleaning.
Do not spill liquid onto or into the instrument. Do not immerse the unit in liquid.
Clean external surfaces using only the instructions provided by the manufacturer.
Do not open the instrument housing – there are no user-serviceable parts.

9
a
TROUBLESHOOTING GUIDE
The Display will indicate detected malfunctions by displaying a caution or error code under affected BI wells. The audible alarm, if enabled, sounds and the Display flashes to
alert the user to all caution (except C1 and C3) and error codes. Press the touch button to stop the flashing and silence the audible alarm (if enabled). Refer to the following:
Code Problem Solution
C1 Unit Warm-up Caution
Incubation block not at temperature. Allow a 30-minute warm-up after 3M™ Attest™ Mini Auto-reader 490M is plugged
in. (Note: 3M™ Attest™ BI readings are disabled until incubator block reaches
60ºC +/- 2ºC).
C2 BI Removed from Well Caution
3M™ Attest™ BI has been removed before incubation is complete. Replace 3M™ Attest™ BI in proper well within 10 seconds to prevent loss of
collected data.
C3 Auto-reader heater block not within temperature specification
following a short power disruption. No action is required, system will recover. C3 is displayed under incubating BIs for
which result has not yet been determined. Readings are suspended until heater
block temperature is within specification.
C6 Purple growth media not detected in biological indicator growth
chamber. Readings will not begin until C6 caution code is cleared. To clear caution code,
remove BI and inspect to verify cap is closed, media ampoule is crushed, and
media has filled growth chamber at the bottom of the vial. If necessary, repeat
BI activation steps, FLICKING BI to distribute growth media to the growth chamber,
and return BI to incubation well.
E0 Calibration error detected. Contact Customer Support.
E1 Temperature Control Loss
Error occurs if system is no longer able to control the temperature of
the incubator heater block to 60ºC +/- 2ºC.
Unplug the unit and plug it back in to clear error.
If error doesn’t clear, unplug the unit and contact Customer Support.
E3 Memory Failure Error
3M™ Attest™ Mini Auto-reader 490M unable to save/read data from
memory.
Unplug the unit and plug it back in to clear error. If error doesn’t clear, contact
Customer Support.
E4 BI Inserted during unit warm-up Remove BI. Wait for C1 Caution Code to clear before incubating BI.
E5 Power Failure Error Ensure power supply connection to Auto-reader is secure.
Affected BI result(s) inconclusive as power to Auto-reader was off for too long to
provide valid result for affected BI(s).
Retest load/sterilizer with a new BI per facility policy.
E8 Optical Detection System Fault Detected
This error occurs for a specific well if the system detects that a UV
LED or optics detection circuit is not working properly.
Unplug the unit and plug it back in to clear error.
If error doesn’t clear, contact Customer Support.
Unaffected well(s) may be used to incubate BIs.
Other Unwanted alarm sounds when positive BI detected. Disable audible alarm. See instructions in 3M™ Attest™ Connect Settings
page section.
Other Alarm Sounds
3M™ Attest™ Biological Indicator has been removed from
incubation/reader well prematurely.
Replace 3M™ Attest™ Biological Indicator in incubation/reader well within
10 seconds to prevent loss of data collected.
Other Display does not function properly. Unplug the unit and plug it back in. If problem persists, contact Customer Support.
Other Negative Result for Positive Control BI
BI not properly activated. Media did not contact spore carrier.
Control BI was sterilized.
Ensure BI cap is closed and glass ampoule is crushed.
Flick BI until media flows to spore chamber at bottom of BI.
Check process indicator on BI cap. Use a non-sterilized BI as a control.
Other Unexplained Positive Result for Processed BI
Tape or label may impact result.
Do not place tape or labels on BI.
Other Display does not acknowledge BI Check BI orientation and ensure BI is properly seated in incubation well.
Only use BIs that are compatible with this device.
Contact Customer Support.

10
a
OPTIONAL 3M™ ATTEST™ CONNECT AUTOREADER APPLICATION
Use of 3M™ Attest™ Connect provides additional functionality as described in the
Features section of this manual.
Personal Computer (PC) Requirements
3M™ Attest™ Connect is designed to be used with PCs with internet access running
either the Windows 7 or Windows 10 operating systems. The 3M™ Attest™ Connect
application will run in the first supported language specified in the PC’s language
settings. For best results, a minimum PC display resolution of 1440 X 900 is
recommended.
Getting Started
Open a web browser on the PC and navigate to Go.3M.com/490M. Click on the
REGISTER PRODUCT button to begin the registration process. When prompted,
click on the Download Attest Connect for Windows button.
Double click on the Setup3MAttestConnect.exe file and follow the prompts on the
screen to review and accept the End User License Agreement (EULA) and install
3M™ Attest™ Connect. 3M™ Attest™ Connect will automatically start.
Next, connect a 3M™ Attest™ Mini Auto-reader 490M to the PC using the
supplied USB cable. The first time an Auto-reader is connected, you will be
presented with a “Sign In” form. Sign in using the same email address that was
entered in the registration process. The sign in process links the installation of
3M™ Attest™ Connect on your PC with the registration information created in the
registration website.
Once the sign in form completes, the Home page will appear on the PC screen.
3M™ Attest™ Connect has four main pages: Home, History, Settings, and BI Details.
HOME PAGE
As depicted below, when the 3M™ Attest™ Auto-reader 490M is connected to the PC, the Home page provides a real-time, virtual image of the Auto-reader along with other
information and functionality.
1. Incubating BIs. BIs are depicted as type ‘unknown’ until the BI Type and Control
status are specified by the user on the BI Details page. Navigate to the BI Details
page for a specific BI by clicking on the BI image when either the remaining
minutes of incubation or result is displayed.
2. Click the virtual button to stop Display flashing and silence the audible alarm (if
enabled). A diagonal line through the speaker image indicates the audible alarm
has been disabled.
3. Click to minimize the application.
4. Click to close the application.
5. Click to navigate to the History page.
6. Click to navigate to the Settings page.
7. Auto-reader model #
8. Auto-reader firmware version
9. Auto-reader serial number
10. Any BI results, remaining incubation time, or caution/
error codes appearing on the Auto-reader Display are
shown in this row. Click on caution/error codes for an
explanation of the problem and solution.

11
a
HOME PAGE Firmware Update
1. To check for firmware updates, connect the 3M™ Attest™ Auto-reader 490M to your PC when all incubation wells are empty. Open your PC’s System Tray,
right click on the 3M™ Attest™ Connect icon , and click on About. Click on the Check for Updates button. If 3M has released a firmware update, an
Install Update button will appear on the Home page. Click the Install Update button to initiate the firmware update.
Notes:
- Firmware updates are available only to registered users who have installed 3M™ Attest™ Connect. You will be prompted to install the latest version of
3M™ Attest™ Connect software, if an update is available, before installing the firmware update.
- The 3M™ Attest™ Mini Auto-reader 490M must be empty (i.e., have no incubating BIs) when a firmware update is installed.
HISTORY PAGE
Navigate to the History page by clicking
the History button on the Home page.
The History page provides a summary
of the data for all incubated BIs. While
the 3M™ Attest™ Mini Auto-reader
490M saves only the last 1,250 records,
3M™ Attest™ Connect can save
all records. Records are numbered
sequentially. Any positive (+) results for BIs
which have not been designated a control
BI are highlighted in red (e.g., Record 11 in
screenshot). The data in the History page
can be sorted by clicking on any of the
column headers.
For additional analysis, if desired, click
the Export button to create a .csv file
which will be assigned a unique file name
and stored in C: > 3MAttestConnect. The
exported file includes both the Auto-reader
Values and the User Values for each record.
There are two ways to navigate to a specific BI Details page from the History page:
1. Find the desired record, highlight the row, and click Details.
2. Find the desired record and double click anywhere in the row.
BI DETAILS PAGE
This page is used to document BI type,
BI lot number, control status, and
associate a processed BI with a specific
sterilization cycle. Only one BI Details
Page can be open at a time.
The top five fields (Auto-reader Values)
are populated automatically by the
3M™ Attest™ Mini Auto-reader 490M
and cannot be changed by the user.
The remaining fields (User Values) are
completed by the end-user.
3M™ Attest™ Connect learns entered
values to create a drop-down list of entries
specific to your facility. Selections may
be eliminated from the dropdown list by
right-clicking on the targeted value and
responding Yes to the Delete message.
The data entered in the User Values
section of the BI Details page may be
edited before or after the data is saved.
IMPORTANT: To create a permanent
record, click Print to generate an individual BI record which can be printed from a
networked printer and saved as a paper file or saved as an electronic record (file is
saved to C: > 3MAttestConnect).*
* Refer to your facility’s record keeping policy and procedure.

12
a
SETTINGS PAGE
Navigate to the Settings page by clicking
the Settings button on the Home page. On
the Settings page the user can:
- Disable or Enable the audible alarm
by selecting the desired radio button.
The factory setting is alarm enabled.
If the audible alarm is disabled, the
3M™ Attest™ Mini Auto-reader 490M
display will continue to flash to alert the
user to positive (+) BI results and any
caution/error codes.
- Synchronize the 3M™ Attest™ Mini
Auto-reader 490M time with that of
the PC to which it is connected by
clicking the Synchronize Time button.
To automatically synchronize the time
each time the unit is connected to a PC, check the Auto-Sync Time box.
- Check information (e.g., Serial Number, Heater Block Temperature) about the
3M™ Attest™ Mini Auto-reader 490M.
- Create a file that can be sent to 3M for troubleshooting by clicking the
Service Pack button. The default storage location for the .spz file is in
C: > 3M AttestConnect.
UPGRADING 3M™ ATTEST™
CONNECT SOFTWARE
3M may occasionally provide software updates for the 3M™ Attest™ Connect
Auto-reader application. To check for updates, open your PC’s System Tray, right
click on the 3M™ Attest™ Connect icon , and click on About. Click on the
Check for Updates button to determine whether updates are available. Follow
the prompts to download and install the software update. A 3M™ Attest™ Mini
Auto-reader 490M does not need to be connected to the PC to download or install
3M™ Attest™ Connect updated software.
TROUBLESHOOTING 3M™ ATTEST™ CONNECT
Issue Cause Solution
BI image on Home page does not
match cap and/or process indicator
color of incubating BI
User has not specified BI Type and/or user has
not designated whether BI is a control BI. Navigate to BI Details page and specify BI Type from the dropdown list; check
the control box for control BIs.
Home page is not displayed on PC
screen PC doesn’t detect connected 3M™ Attest™
Auto-reader 490M Unplug and then reconnect USB cable to PC.
Home page not displayed on PC
screen 3M™ Attest™ Connect has been minimized. Click on the icon in the PC task bar.
Home page is not displayed on PC
screen 3M™ Attest™ Connect has been closed. Open PC System Tray, right click on the 3M™ Attest™ Connect icon , click
on applicable 3M™ Attest™ Auto-reader 490M serial number.
Home page is not displayed on PC
screen and icon doesn’t appear in
PC System Tray
Application may have crashed. On PC, go to Search Windows, type 3M, and click on
3M™ Attest™ Connect
Or
Go to Windows Start menu, 3M folder, click on 3M™ Attest™ Connect.
On History page, BI Start Times read
the year 2000 3M™ Attest™ Mini Auto-reader 490M real
time clock’s back-up battery is not operating
correctly.
Contact Customer Support. The real time clock captures BI incubation start
time but does not control incubation duration. The accuracy of BI results is not
affected by failure of the real time clock’s back-up battery.
Pop-up appears when user clicks
Install Update button on 3M™ Attest™
Connect Home page.
3M™ Attest™ Connect software must be
current before 3M™ Attest™ Auto-reader
490M firmware can be upgraded.
Follow instructions to update 3M™ Attest™ Connect software. Then click
Install Update button on 3M™ Attest™ Connect Home page and proceed with
firmware update.
CUSTOMER SUPPORT
In the USA, call the 3M Health Care Help Line at 1-800-228-3957.
Outside of the USA, contact your local 3M Subsidiary.

13
b
Mini-lecteur Auto-reader 3M™ Attest™ 490M b
Veuillez lire et comprendre toutes les informations
de sécurité avant d’utiliser ce produit.
TABLE DES MATIÈRES
PRÉFACE ..................................................................................................................................................14
UTILISATION PRÉVUE...........................................................................................................................14
INDICATIONS D’UTILISATION ...........................................................................................................14
GARANTIE ...............................................................................................................................................14
SÉCURITÉ ET PRÉCAUTIONS..............................................................................................................14
INFORMATIONS DE SANTÉ ET DE SÉCURITÉ................................................................................15
EXPLICATION DES SYMBOLES APPOSÉS SUR L’ÉTIQUETTE DU PRODUIT
ET DE L’EMBALLAGE ............................................................................................................................15
CARACTÉRISTIQUES ............................................................................................................................16
MODE D’EMPLOI...................................................................................................................................16
CARACTÉRISTIQUES DU MINI-LECTEUR AUTO-READER 3M™ATTEST™490M...............19
MAINTENANCE, ENTRETIEN ET NETTOYAGE .............................................................................20
GUIDE DE DÉPANNAGE.......................................................................................................................21
APPLICATION 3M™ATTEST™CONNECT AUTO-READER EN OPTION...............................22
DÉPANNAGE -3M™ATTEST™CONNECT ...................................................................................24
ASSISTANCE CLIENTS ........................................................................................................................25

14
b
PRÉFACE
Exclusions de responsabilité pour le contenu
Exclusion de responsabilité pour les images
Les modèles d’imprimés, de graphiques, d’affichages et d’écrans sont proposés à
titre d’information et d’illustration uniquement, et ne doivent pas être utilisés pour
des évaluations cliniques ou de maintenance. Les données illustrées sur les modèles
d’imprimés et d’écrans ne reflètent pas les résultats de tests réels.
Exclusion de responsabilité pour le matériel
Les spécifications pour le matériel du mini-lecteur Auto-reader 3M™ Attest™
490M sont susceptibles d’être modifiées. Les images, spécifications et composants
matériels du système inclus dans ce manuel peuvent différer du système installé.
Toute modification de l’installation autorisée du système a été vérifiée et est
compatible avec les fonctions décrites dans ce document.
UTILISATION PRÉVUE
Le système d’indicateurs biologiques rapides 3M™ Attest™ permet un contrôle
de routine rapide et fiable des processus de stérilisation à la vapeur et à la
vapeur de peroxyde d’hydrogène réalisés dans les établissements de santé.
Ce système comprend des indicateurs biologiques, des paquets-tests et des
incubateurs/lecteurs.
Le mini-lecteur Auto-reader 3M™ Attest™ 490M est conçu pour incuber et lire
automatiquement les indicateurs biologiques 3M™ Attest™ 1295, 1491 et 1492V
à 60 °C pour une lecture finale de fluorescence négative à 24 minutes. Le mini-
lecteur Auto-reader 3M™ Attest™ 490M est également conçu pour permettre
de poursuivre l’incubation d’indicateurs biologiques à lecture super rapide 3M™
Attest™, références catalogue 1491 et 1492V, pour un résultat final négatif du
changement visuel de couleur du pH respectivement à 24 heures et 48 heures.
Cette incubation supplémentaire est facultative. Elle n’est pas destinée à une
utilisation de routine.
Un résultat de fluorescence positif ou un changement visuel de couleur du
pH indique un échec du processus de stérilisation. Toutefois, en raison de la
grande sensibilité du résultat fluorescent, il n’existe aucun avantage à continuer
à incuber des indicateurs biologiques 3M™ Attest™ traités une fois le résultat
fluorescent documenté.
Les autres indicateurs biologiques (IB) ne sont pas compatibles avec ce dispositif,
et ne peuvent pas être utilisés.
INDICATIONS D’UTILISATION
Le mini-lecteur Auto-reader 3M™ Attest™ 490M est conçu pour incuber et lire
automatiquement les indicateurs biologiques à lecture rapide 3M™ Attest™
1295 et les indicateurs biologiques à lecture super rapide 3M™ Attest™, références
catalogue 1491 et 1492V, à 60 °C pour un résultat fluorescent final à 24 minutes.
Les indications d’utilisation pour les indicateurs biologiques Attest™ sont fournies
dans le mode d’emploi du produit.
GARANTIE
Aux États-Unis, le mini-lecteur Auto-reader 3M™ Attest™ 490M bénéficie d’une
garantie produit limitée d’un an. La garantie, les recours et les limitations pour les
États-Unis sont décrits sur la page Web du produit à l’adresse Go.3M.com/490M.
Pour les autres pays que les États-Unis, toute garantie est établie par la filiale avec la
responsabilité des ventes du mini-lecteur Auto-reader 3M™ Attest™ 490M.
Enregistrez votre appareil à l’adresse Go.3M.com/490M.
SÉCURITÉ ET PRÉCAUTIONS
Le mini-lecteur Auto-reader 3M™ Attest™ 490M et les périphériques et accessoires
associés sont conçus pour assurer un service sûr et fiable conformément aux
instructions fournies. Vous devez lire, comprendre et vous conformer à toutes
les informations de sécurité contenues dans le mode d’emploi fourni avec le
mini-lecteur Auto-reader 3M™ Attest™ 490M et les indicateurs biologiques
Attest™ associés avant de les utiliser. Utilisez cet équipement uniquement aux fins
décrites dans le Manuel de l’utilisateur. Conservez ces instructions pour toute
référence ultérieure.
Cette unité est conçue pour être utilisée uniquement avec le module d’alimentation
et le câble USB fournis par 3M. Si ce produit est utilisé d’une manière non spécifiée
par 3M, la protection assurée par le produit peut être affectée.
Explication des conséquences correspondant aux
mentions d’avertissement
AVERTISSEMENT : indique une situation dangereuse qui, si elle n’est pas
évitée, peut provoquer la mort ou une grave blessure.
MISE EN GARDE : indique une situation dangereuse qui, si elle n’est pas
évitée, peut provoquer une blessure légère ou modérée.
Avertissements et mises en garde
Les avertissements et mises en garde suivants doivent être suivis afin d’éviter des
actions dangereuses susceptibles de provoquer des blessures ou des dommages
matériels.
AVERTISSEMENT : pour réduire le risque associé à une tension dangereuse
Utiliser en intérieur uniquement.
N’utilisez pas l'équipement s’il ne fonctionne pas correctement ou s’il a subi
des dommages.
Utilisez uniquement l'alimentation spécifiée pour ce produit et certifiée pour le
pays d’utilisation.
MISE EN GARDE : pour réduire le risque de blessure ou de dommages
sur l’instrument
Ne pas renverser de liquide sur ni dans l’instrument. Ne pas immerger l’unité
dans un liquide.
Toujours débrancher le mini-lecteur Auto-reader 3M™ Attest™ 490M et le
laisser refroidir avant le nettoyage.
Nettoyer les surfaces externes uniquement selon les instructions fournies par
le fabricant.
Ne pas ouvrir le logement de l’instrument. Il n’y a aucune pièce pouvant être
entretenue par l’utilisateur.
Porter des gants et des lunettes de sécurité lors de l'activation de l’indicateur
biologique à lecture rapide 3M™ Attest™ 1295.
Laisser refroidir les indicateurs biologiques traités à la vapeur 3M™ Attest™
pendant la durée recommandée avant de les activer. L'activation ou la
manipulation excessive de l’indicateur biologique avant son refroidissement peut
provoquer l'éclatement de l’ampoule de milieu.
Porter des lunettes de sécurité lors de l'activation des indicateurs biologiques
super rapides 3M™ Attest™.

15
b
AVERTISSEMENT : pour réduire le risque associé à des résultats incorrects
L’instrument doit être utilisé par des opérateurs familiarisés avec ce dispositif,
ses fonctions et le Manuel de l'utilisateur.
Ne pas placer l’instrument dans un environnement exposé à la lumière du soleil
ou à une forte lumière incandescente.
Ne pas placer l’instrument à proximité d’un dispositif émettant un champ
électromagnétique puissant.
Ne pas utiliser sur une surface vibrante.
Activer et incuber les indicateurs biologiques à lecture rapide 3M™ Attest™
1295 dans l’heure suivant la fin du cycle de stérilisation.
Ne pas incuber un indicateur biologique 3M™ Attest™ si, après le traitement et
avant l’activation de l’IB, il apparaît que l’ampoule de milieu est brisée. Soumettre
le stérilisateur à un nouveau test avec un nouvel indicateur biologique.
Laisser refroidir les indicateurs biologiques traités à la vapeur 3M™ Attest™
pendant la durée recommandée avant de les activer.
Ne pas retirer ni déplacer l’indicateur biologique 3M™ Attest™ après l'avoir placé
dans un puits.
Ne pas retirer l’indicateur biologique 3M™ Attest™ du puits d’incubation avant
que le signe (+) ou (-) sur l'écran indique que le test est terminé.
Ne pas réincuber les indicateurs biologiques 3M™ Attest™ pour lesquels
l'Auto-reader a déjà déterminé un résultat.
INFORMATIONS DE SANTÉ ET
DE SÉCURITÉ
Conformité du dispositif en termes de sécurité
Le mini-lecteur Auto-reader 3M™ Attest™ 490M est conforme aux normes
suivantes, comme indiqué par le certificat CB Scheme et le rapport de test publié
par UL, LLC (UL):
• CEI/EN 61010-1:2010. Règles de sécurité pour appareils électriques de
mesurage, de régulation et de laboratoire - Partie 1 : Exigences générales
• CEI/EN 61010-2-010:2014. Règles de sécurité pour appareils électriques de
mesurage, de régulation et de laboratoire - Partie 2-010 : Exigences particulières
pour appareils de laboratoire utilisés pour l’échauffement des matières.
Le mini-lecteur Auto-reader 3M™ Attest™ 490M est habilité UL et porte le symbole
UL avec les indicateurs adjacents « C » et « US » en raison de sa conformité aux
normes UL 61010-1, CAN/CSA C22.2 n° 61010-1 et CAN/CSA C22.2
n° 61010-2-010.
Le mini-lecteur Auto-reader 3M™ Attest™ 490M est conforme au symbole CE
concernant la directive basse tension (DBT) 2014/35/UE, comme le confirme la
Déclaration de conformité.
Le mini-lecteur Auto-reader 3M™ Attest™ 490M est conforme à la directive
RoHS, Directive 2011/65/UE du Parlement Européen et du Conseil du 8 juin 2011
sur la restriction de l’utilisation de certaines substances dangereuses dans les
équipements électriques et électroniques.
Le mini-lecteur Auto-reader 3M™ Attest™ 490M est conforme aux exigences de la
directive chinoise RoHS II.
Le mini-lecteur Auto-reader 3M™ Attest™ 490M est conforme à la directive DEEE,
Directive 2012/19/UE du Parlement Européen et du Conseil du 04 juillet 2012 sur les
déchets d’équipements électriques et électroniques (DEEE).
Conformité CEM
Le mini-lecteur Auto-reader 3M™ Attest™ 490M est conforme aux normes CEM
suivantes, comme le confirme la Déclaration de conformité produite par 3M :
• CEI 61326- 1:2012/EN 61326:2013 Appareils électriques de mesurage, de
régulation et de laboratoire - Exigences de CEM - Partie 1 : Exigences générales
• Exigences de CEM du symbole CE Directive CEM 2014/30/UE.
Le mini-lecteur Auto-reader 3M™ Attest™ 490M est conforme aux exigences
de compatibilité électromagnétique et de sécurité électrique d’Australie et de
Nouvelle-Zélande, comme le confirme la Déclaration de conformité du fabricant
associée au symbole de conformité réglementaire (RCM) australien/néo-zélandais.
CAN ICES-3 (B)/NMB-3(B)
Cet appareil est conforme à la section 15 des règles de la FCC. Son utilisation
est soumise aux deux conditions suivantes : (1) cet appareil ne doit pas causer
d’interférences nocives, et (2) cet appareil doit accepter les interférences reçues,
y compris celles susceptibles d’en altérer le fonctionnement.
Aucune modification ne doit être apportée à cet appareil sans l'accord écrit de
3M Company. Les modifications sans autorisation peuvent annuler le pouvoir
conféré dans le cadre des règles fédérales sur les communications autorisant
l’utilisation de cet appareil.
Cet équipement a été testé et déclaré conforme aux limites pour un appareil
numérique de classe B conformément à la partie 15 des règlements de la FCC.
Ces limites sont conçues pour fournir une protection raisonnable contre toute
interférence nuisible dans une installation résidentielle. Cet équipement produit,
utilise et peut émettre de l'énergie radio électrique et, s'il n'est pas installé et utilisé
conformément aux instructions, peut produire des interférences nuisibles aux
communications radio. Toutefois, rien ne garantit l'absence d’interférences dans
une installation donnée. Si cet équipement produit des interférences nuisibles à
la réception de la radio ou de la télévision, ce qui peut être déterminé en mettant
l'équipement hors tension puis de nouveau sous tension, l’utilisateur est encouragé
à essayer de corriger les interférences en appliquant une ou plusieurs des mesures
suivantes :
- Réorienter ou déplacer l'antenne de réception.
- Augmenter la distance entre l'équipement et le récepteur.
- Raccorder l'équipement à une prise sur un autre circuit que celui auquel le
récepteur est raccordé.
- Demander l'aide d’un revendeur ou d’un technicien radio/TV expérimenté.
EXPLICATION DES SYMBOLES
APPOSÉS SUR L’ÉTIQUETTE DU
PRODUIT ET DE L’EMBALLAGE
Glossaire des symboles
Titre du symbole Symbole Description et référence
Fabricant
Indique le fabricant du dispositif médical selon
le règlement (UE) 2017/745 relatif aux dispositifs
médicaux, anciennement Directive UE 93/42/
CEE. Source : ISO 15223, 5.1.1
Représentant
autorisé dans la
Communauté
européenne
Indique le représentant autorisé dans la
Communauté européenne. Source : ISO 15223,
5.1.2, 2014/35/UE et/ou 2014/30/UE
Date de
fabrication Indique la date à laquelle le dispositif médical a
été fabriqué. ISO 15223, 5.1.3
Numéro de
référence
Indique le numéro de référence du produit de
façon à identifier le dispositif médical. Source :
ISO 15223, 5.1.6
Numéro de série Indique le numéro de série du fabricant qui
permet d’identifier un dispositif médical
spécifique. Source : ISO 15223, 5.1.7
Attention
Renvoie à la nécessité pour l’utilisateur de
consulter le mode d’emploi fournissant des
données importantes liées à la sécurité, comme
les avertissements et les précautions qui, pour
un grand nombre de raisons, ne peuvent pas être
apposés sur le dispositif médical même. Source :
ISO 15223, 5.4.4
Marque CE
Signale la conformité du dispositif avec toutes
les directives ou réglementations applicables
de l'Union européenne en matière de dispositifs
médicaux.
Répertorié UL Indique que le produit a été évalué et répertorié
par UL pour les États-Unis et le Canada.
Symbole de
conformité
réglementaire
Indique que le produit est conforme aux
exigences réglementaires australiennes
applicables. Source : AS/NZS 4417.1:2012
Symbole China
RoHS II
Indique la période d’utilisation respectueuse de
l’environnement du produit, en années. Source :
SJ/T 11364-2014

16
b
Titre du symbole Symbole Description et référence
Courant continu
Indique sur la plaque signalétique que
l'équipement convient au courant continu
uniquement ou identifie les bornes adaptées.
Source : CEI 60417-5031
Recycler les
équipements
électroniques
NE PAS éliminer cette unité avec les déchets
municipaux à la fin de sa durée de vie. Veuillez la
recycler. Source : Directive 2012/19/CE relative
aux déchets d’équipements électriques et
électroniques (DEEE)
Pour plus d’informations, visitez HCBGregulatory.3M.com
CARACTÉRISTIQUES
Caractéristiques de l’alimentation
Alimentation Condition d’utilisation Unités
Plage de tension 100 à 240 Volts c.a.
Fréquence 50/60 Hertz
Intensité 0,6 Ampères
Conditions d’utilisation environnementales
Condition environnementale Conditions d’utilisation Unités
Altitude 3 000 (max) Mètres
Température de service 16 à 35 ºC
Température de stockage -10 à 50 ºC
Humidité relative de fonctionnement 20 à 80 (sans condensation) %
Plage de tension 12 Volts c.c.
Fréquence c.c.
Intensité 1,2 Ampères
Installation/Surtension Catégorie II
Niveau de pollution 2
Dimensions de l’unité
Largeur : 15,5 cm
Hauteur : 8,25 cm
Profondeur : 5,25 cm
MODE D’EMPLOI Installation initiale
Choix de l’emplacement
Placez le mini-lecteur Auto-reader 3M™ Attest™ 490M sur une surface ferme et
plane, à l'écart de la lumière du soleil et de la lumière incandescente.
Sélectionner et installer la bonne prise de courant
L'alimentation du mini-lecteur Auto-reader 3M™ Attest™ 490M est fournie avec
plusieurs configurations de lames. Installez la configuration de lame adaptée à
votre pays dans l'alimentation. Branchez l'alimentation dans la fiche d'alimentation
située à l'arrière du mini-lecteur Auto-reader 3M™ Attest™ 490M, puis branchez
dans une prise c.a. mise à la terre appropriée.
La prise d'alimentation permet de déconnecter l’appareil. Ne placez autour
de l'alimentation aucun équipement qui rendrait difficile le débranchement
de l'alimentation.
Les versions du bootloader (B X.X.X) et du microprogramme (V X.X.X) apparaissent
brièvement l'une après l'autre à la mise sous tension du mini-lecteur Auto-reader
3M™ Attest™ 490M.
AVERTISSEMENT :
• Ne pas placer l’instrument dans un environnement exposé à la lumière du
soleil ou à une forte lumière incandescente.
• Ne pas placer l’instrument à proximité d’un dispositif émettant un champ
électromagnétique puissant.
• Ne pas utiliser sur une surface vibrante.
Attendre 30 minutes avant d’utiliser
Laisser chauffer les indicateurs biologiques pendant 30 minutes après les avoir
branchés avant de les placer dans les puits d’incubation. Le code de mise en garde
C1 disparaît une fois la température d’incubation appropriée atteinte.
Considérations spéciales
Il est recommandé de laisser l’unité sous tension afin d’éliminer les périodes de
préchauffage. L’unité peut être débranchée lorsqu’il n’est pas prévu de l’utiliser
pendant une période prolongée.
AVERTISSEMENT : utilisez uniquement l'alimentation spécifiée pour ce
produit et certifiée pour le pays d’utilisation.

17
b
MODE D’EMPLOI Puits, boutons, affichage et connexions
PUITS
1. Puits d’incubation – Le mini-lecteur Auto-reader 3M™ Attest™ 490M compte
quatre puits d’incubation.
Bouton
2. Bouton tactile (arrêt de l’alarme)
Affichage
3. Exemple de résultat d’IB positif ( + ) pour le puits n° 1
4. Exemple de résultat d’IB négatif ( - ) pour le puits n° 2
5. Exemple de durée d’incubation restante pour le puits n° 3
6. Exemple de code d’erreur pour le puits n° 4
Vue de l’arrière
7. Port USB – Branchez l’extrémité B du câble USB fourni ici pour utiliser
3M™ Attest™ Connect
8. Fiche d’alimentation – Branchez l’adaptateur d’alimentation c.a. ici

18
b
MODE D’EMPLOI Procédure de lecture
Instructions pour l’activation et l’incubation des
indicateurs biologiques (IB)
MISE EN GARDE : laisser refroidir les indicateurs biologiques traités à
la vapeur 3M™ Attest™ pendant la durée recommandée avant de les activer.
L'activation ou la manipulation excessive de l’indicateur biologique avant son
refroidissement peut provoquer l'éclatement de l’ampoule.
MISE EN GARDE : porter des lunettes de sécurité lors de l'activation des
indicateurs biologiques super rapides 3M™ Attest™.
MISE EN GARDE : porter des gants et des lunettes de sécurité lors de
l'activation de l’indicateur biologique à lecture rapide 3M™ Attest™ 1295.
AVERTISSEMENT : pour réduire le risque associé à des résultats incorrects
Ne pas incuber un indicateur biologique 3M™ Attest™ si, après le traitement et
avant l’activation de l’IB, il apparaît que l’ampoule de milieu est brisée. Soumettre
le stérilisateur à un nouveau test avec un nouvel indicateur biologique.
Activer et incuber les indicateurs biologiques à lecture rapide 3M™ Attest™
1295 dans l’heure suivant la fin du cycle de stérilisation.
Laisser refroidir les indicateurs biologiques traités à la vapeur 3M™ Attest™
pendant la durée recommandée avant de les activer.
Ne pas réincuber les indicateurs biologiques 3M™ Attest™ pour lesquels
l'Auto-reader a déjà déterminé un résultat.
Respectez cette procédure pour chaque indicateur biologique (IB) 3M™ Attest™
à lire :
En portant des lunettes de sécurité (et des gants
pour le 1295 BI), PLACEZ l’IB dans l'activateur
de l’indicateur biologique Attest™.
FERMEZ et PINCEZ l'activateur de l’indicateur
biologique Attest™ pour fermer le capuchon de
l’IB et écraser l'ampoule de milieu.
Retirez l’IB, VÉRIFIEZ visuellement que
l’ampoule de verre (contenant le milieu de
croissance) a été écrasée, et RENVERSEZ l’IB
pour répartir le milieu de croissance violet dans
la chambre de croissance, au fond du flacon.
INSPECTEZ pour vérifier que le milieu a été
transféré dans la chambre de croissance, au
fond du flacon de l'IB.
Orientez le côté plat de l'IB activé vers l'avant
du mini-lecteur Auto-reader 3M™ Attest™
490M et PLACEZ l'IB dans un puits
d'incubation. Observez l'affichage du mini-
lecteur Auto-reader 3M™ Attest™ 490M pour
confirmer la position de l'IB. Si l’IB est bien en
place, le mini-lecteur Auto-reader 3M™ Attest™
490M affiche ●●●, ●●, ●, puis les minutes
d’incubation restantes juste au-dessous de l’IB
qui incube.
NOTEZ le résultat de l’IB.
AVERTISSEMENT : ne pas retirer l’indicateur biologique du puits
d’incubation avant que le signe (+) ou (-) sur l'affichage indique que le test
est terminé.

19
b
MODE D’EMPLOI Informations
supplémentaires
Positionnement de l’IB
Tous les puits d’incubation dans le mini-lecteur Auto-reader 3M™ Attest™
490M sont programmés pour offrir un résultat fluorescent final en 24 minutes
d’incubation, et peuvent être utilisés pour incuber les indicateurs biologiques super
rapides 3M™ Attest™ 1491 et 1492V et l’indicateur biologique à lecture rapide
3M™ Attest™ 1295.
La durée d’incubation restante, en minutes, apparaît à l’avant de l’unité pour
indiquer que l’indicateur biologique 3M™ Attest™ incube dans le puits du lecteur
et ne doit pas être touché. L’écran de durée restante indique que les résultats ne
sont pas disponibles et que l’incubation est en cours. Ne retirez pas les indicateurs
biologiques 3M™ Attest™ avant que le signe (+) ou (-) sur l’affichage indique que
le test est terminé.
Remarque : en cas de retrait involontaire de l’indicateur biologique
3M™ Attest™ avant la fin de la période d’incubation, une alarme retentit et un
code d’avertissement C2 apparaît sous ce puits. Vous devez replacer l’indicateur
biologique 3M™ Attest™ dans le puits d’incubation dans les 10 secondes
suivantes, sinon les résultats seront perdus.
AVERTISSEMENT : ne pas retirer ni déplacer l’indicateur biologique
3M™ Attest™ après l'avoir placé dans un puits. Cela risquerait de provoquer la
perte de résultats et d'invalider le test avec l’indicateur biologique.
MODE D’EMPLOI
Témoin positif
Activez et incubez au moins un indicateur biologique 3M™ Attest™ non traité à
utiliser comme témoin positif chaque jour où un indicateur biologique 3M™ Attest™
traité est incubé et lu par l’unité. Inscrivez un « T » (pour « témoin ») ainsi que la
date sur l’étiquette. Le témoin positif peut être placé dans n’importe quel puits
d’incubation. Un témoin positif doit être utilisé pour chaque référence catalogue et
porter le même numéro de lot que l’indicateur biologique 3M™ Attest™ traité.
Le témoin positif permet de confirmer :
• que les températures d’incubation correctes sont atteintes ;
• que la viabilité des spores n’a pas été altérée en raison d’une température de
stockage inadéquate, de l’humidité ou de la proximité de produits chimiques ;
• que le milieu est apte à favoriser une croissance rapide ; et
• le bon fonctionnement des composants du mini-lecteur Auto-reader
3M™ Attest™ 490M.
MODE D’EMPLOI Interprétation
des résultats
Résultats fluorescents
Dès qu’un résultat positif est détecté pour un indicateur biologique 3M™ Attest™,
un symbole (+) clignote juste au-dessous de l’IB qui incube et une alarme retentit (si
le son est activé). Touchez le bouton tactile pour accepter le résultat, mettre fin au
clignotement et arrêter l’alarme sonore (si activée). À la fin de la durée d’incubation
de 24 minutes, si un résultat négatif est détecté pour un indicateur biologique 3M™
Attest™, un symbole (-) apparaît juste au-dessous de l’IB qui incube. Le résultat
fluorescent négatif final (-) pour un indicateur biologique 3M™ Attest™ traité après
24 minutes d’incubation indique un processus de stérilisation acceptable.
Une fois le signe (+) ou (-) apparu et le résultat noté, vous pouvez retirer l’indicateur
biologique 3M™ Attest™ du puits. Le résultat (+ ou -) apparaît jusqu’au retrait de l’IB
du puits d’incubation. Le résultat disparaît dix secondes après le retrait de l’IB.
Ne réincubez pas les IB car le résultat ne serait pas valide.
L’IB témoin non traité doit présenter un résultat de fluorescence positif (+).
Les résultats des IB traités ne sont pas valables tant que l’IB témoin positif quotidien
n’affiche pas une fluorescence positive (+).
Avec un indicateur biologique 3M™ Attest™ traité, un résultat positif (+) indique
un échec du processus de stérilisation. Prenez des mesures immédiates pour
tout résultat de test positif. Déterminez la cause du résultat positif de l’indicateur
biologique 3M™ Attest™ et testez à nouveau le stérilisateur conformément aux
politiques et procédures de l’établissement.
Résultat du changement visuel de couleur du pH, en
option - Indicateurs biologiques à lecture super rapide
3M™ Attest™ 1491 et 1492V
Les indicateurs biologiques à lecture super rapide 3M™ Attest™ peuvent encore
être incubés pour un changement visuel de couleur du pH. Cette prolongation
facultative de l’incubation n’est pas destinée à un usage de routine. Elle peut servir
pour des études spéciales. En raison de la grande sensibilité du résultat fluorescent,
il n’existe aucun avantage à incuber les indicateurs biologiques à lecture super
rapide 3M™ Attest™ 1491 et 1492V au-delà de 24 minutes. Après activation et au
cours de l’incubation, le matériau non-tissé de couleur blanche dans l’indicateur
biologique absorbera l’indicateur de pourpre de bromocrésol, l’indicateur de pH
déteint dans le milieu de croissance et apparaît bleu. Dans le cas d’un IB servant de
témoin positif, le milieu de croissance et/ou le matériau non-tissé devient jaune au
bout de 24 heures pour les IB 1491 et de 48 heures pour les IB 1492V. Une coloration
jaune à l’intérieur du flacon indique un résultat positif. Dans le cas des IB traités, le
passage de la couleur du milieu et/ou du matériau non-tissé de violet à jaune indique
l’échec du processus de stérilisation à la vapeur. Un résultat négatif du changement
de couleur du pH, c’est-à-dire lorsque le milieu et le matériau non-tissé restent
violets/bleus par exemple, peut être évalué au bout de 24 heures pour les IB 1491 et
de 48 heures pour les IB 1492V.
Résultat du changement visuel de couleur du pH,
en option - Indicateur biologique à lecture rapide
3M™ Attest™ 1295
Les indicateurs biologiques à lecture rapide 3M™ Attest™ 1295 peuvent encore
être incubés pour un changement visuel de couleur du pH. En raison de la grande
sensibilité du résultat fluorescent, il n’existe aucun avantage à continuer à incuber
des indicateurs biologiques à lecture rapide 3M™ Attest™ 1295 une fois le résultat
fluorescent déterminé et documenté. Cette prolongation facultative de l’incubation
n’est pas destinée à un usage de routine, mais peut servir pour des études spéciales.
Dans le cas d’un IB servant de témoin positif, le milieu de croissance devient jaune
au bout de 24 heures. Une coloration jaune à l’intérieur du flacon indique un résultat
positif. Le résultat du changement de couleur du pH peut être noté et l’IB jeté dès
que la couleur jaune est observée.
Si un résultat du changement visuel de couleur du pH est souhaité pour les
indicateurs biologiques à lecture rapide 3M™ Attest™ 1295 traités, il est
recommandé d’utiliser un incubateur humidifié afin d’éviter tout assèchement du
milieu. Transférez le 1295 BI traité vers un incubateur humidifié fonctionnant à 60 ºC
après que le résultat fluorescent a été déterminé par le mini-lecteur Auto-reader
3M™ Attest™ 490M. Un changement de couleur du milieu du violet au jaune
indique un échec du processus de stérilisation. Un résultat négatif du changement
de couleur du pH, c’est-à-dire lorsque le milieu reste bleu, peut être évalué au bout
de 7 jours.
MODE D’EMPLOI – Élimination
L’instrument contient une batterie au lithium. Jetez l’instrument conformément aux
exigences fédérales, régionales et locales.
CARACTÉRISTIQUES DU MINILECTEUR AUTOREADER
3M™ ATTEST™ 490M
Alarme sonore
Une alarme sonore retentit et un symbole (+) clignote juste au-dessous de l’IB qui
incube lorsqu’un résultat positif est détecté. Une alarme retentit également si un IB
qui incube est retiré du puits d’incubation du mini-lecteur Auto-reader 3M™ Attest™
490M avant d’obtenir un résultat. Les données seront perdues si l’IB n’est pas
remplacé dans le puits d’incubation dans les 10 secondes.
L’alarme sonore pour des résultats positifs peut être désactivée pour un indicateur
biologique 3M™ Attest™ spécifique. Il faut pour cela appuyer sur le bouton tactile
après que l’alarme a retenti. Cela entraîne la désactivation de l’alarme pour cet IB
uniquement. Tout résultat positif de l’indicateur biologique 3M™ Attest™ détecté
par la suite dans d’autres puits d’incubation fait retentir l’alarme. Le retrait de l’IB
entraîne la réactivation de l’alarme pour ce puits. Une pression sur le bouton tactile
pour arrêter l’alarme pour un IB positif ne permet pas de désactiver l’alarme pour les
avertissements de codes d’erreur ou d’avertissement. L’alarme sonore est activée par
défaut en usine. Cette alarme peut être désactivée sur la page Settings (Réglages)
de 3M™ Attest™ Connect.
Numéro de série, version du microprogramme
et température
Maintenez une pression sur le bouton tactile pour vérifier le numéro de série,
la version du microprogramme ou la température du bloc du réchauffeur.
Le numéro de série de l’unité, la version du microprogramme et la température du
bloc du réchauffeur apparaissent consécutivement sur l’affichage. Le mini-lecteur
Auto-reader 3M™ Attest™ 490M contient un programme d’auto-diagnostic de la
température interne. Si la température quitte la plage spécifiée (60,0 ºC +/- 2,0 ºC),
un code d’erreur apparaît.
Table of contents
Languages:
Other 3M Laboratory Equipment manuals

3M
3M Steri-Vac GS Series User manual

3M
3M 1492V User manual

3M
3M Attest Auto-reader 390 User manual

3M
3M Steri-Vac GSX Series User manual

3M
3M Attest 290 User manual

3M
3M Petrifilm 6408 Instruction sheet

3M
3M Attest Steam incubator User manual

3M
3M 6432 Instruction sheet

3M
3M Attest 1491 User manual

3M
3M Attest Auto-reader 390G User manual
Popular Laboratory Equipment manuals by other brands

Agilent Technologies
Agilent Technologies QuickSwap G3185B Installation and setup

GF
GF Hycleen Automation System user guide

Julabo
Julabo Corio C operating instructions

Major Science
Major Science MC-0203 instruction manual

Amersham Biosciences
Amersham Biosciences AKTAexplorer installation guide

Bruker
Bruker CryoProbe Installation