12.
Commissioning
11.
Instruments
BCM.V2P03.1AP_AB_UNO-DM-1.2_2.0_3.3_4.0_4.6_5.0-TL-PLUS-Quick Installation Guide EN-RevD
EFFECTIVE 14-05-2017
© Copyright 2017 ABB. All Rights Reserved.
Specications subject to change without notice.
9.
Line cable and protective devices
10.
Output connection (AC)
13.
Display menu structure
→
Features and Technical Data
14.
Features and Technical Data
Protection switch under load (AC switch) and sizing of the line cable
To protect the AC connection line of the inverter, we recommend the installation of a protection device against overcurrent and earth leakages with the following
features:
UNO-DM-1.2 UNO-DM-2.0 UNO-DM-3.3 UNO-DM-4.0 UNO-DM-4.6 UNO-DM-5.0
Type Circuit breaker with differential magnetic-thermal protection
Nominal voltage 230 Vac
Nominal current 10 A 16 A 20 A 25 A 25 A 32 A
Magnetic protection feature B/C
Number of poles 2
Type of differential protection A/AC
Differential sensitivity 300 mA
ABB declares that the ABB high frequency inverter without a transformer are not manufactured to inject continuous currents of ground fault, and therefore, the
differential installed downstream of the inverter, type B according to IEC 60755/A 2, is not required.
Characteristics and sizing of the line cable
The cable should be three-pole. The section of the AC line conductor must be sized in order to avoid unwanted
disconnections of the inverter from the distribution network due to high impedances of the line that connects the inverter to
the point of supply of electricity.
Line conductor
cross-section
Maximum length of the line conductor (m)
UNO-DM-1.2 UNO-DM-2.0 UNO-DM-3.0 UNO-DM-4.0 UNO-DM-4.6 UNO-DM-5.0
1.5 mm218 m 10 m 6 m 5 m 4 m - m
2.5 mm222 m 15 m 11 m 10 m 8 m 6 m
4 mm240 m 25 m 19 m 16 m 13 m 10 m
6 mm256 m 38 m 29 m 24 m 20 m 16 m
The values are calculated in nominal power condition considering:
1. a power loss along the line of not more than 1%.
2. copper cable used, with HEPR rubber insulation and placed in open air
Contact us
www.abb.com/solarinverters
LED and KEYS, in various combinations, may display the status conditions or perform complex actions to be explored by consulting the product manual.
LEDs
06
POWER
Green Solid when the inverter is working correctly. Flashes when checking the grid or if
there is insufcient sunlight.
COMM
STATUS Multicolor
Operation status of wireless communication line.
ALARM Yellow The inverter has detected an anomaly. The anomaly is shown on the
“EVENTS” section of the internal webserver and on the display.
RSSI Multicolor Quality of the wireless communication signal.
GFI Red Ground fault on the DC side of the PV generator. The error is shown on the
“EVENTS” section of the internal webserver and on the display.
Keys
08
ESC Used to access the main menu, to go back to the previous menu or to go back to the previous digit to be edited.
UP Used to scroll upwards the menu options or to shift the numerical scale in ascending order.
DOWN Used to scroll downwards through the menu options or to shift the numerical scale in descending order.
ENTER Used to conrm an action, to access the main menu or the submenu for the selected option (indicated by the > symbol) or to switch to the next digit to edit.
Caution! Before performing the operations described below, make sure that you have properly disconnected the AC line downstream of
the inverter
For the grid connection of the inverter, 3 connections are needed: ground, neutral and phase. The ground connection of the inverter is mandatory.
The connection of the network cable to the inverter is performed by means of the dedicated AC output connector
10
, by doing the following:
1. Remove the connector head by pressing on the two retaining clips and
then loosen the cable gland.
2. Insert the cable into the connector and cut the cable to length
Make sure that the cable bend radius is greater than 4 times the cable
diameter
3. Prepare the cable according to the following measurement:
N
L
Max 6 mm²
12mm with ferrules*
8mm without ferrules*
X
Ø10÷14mm
X
Y
L,N 25 mm
Y
30mm
z:
10mm max
z
(*): Use properly crimped ferrules only on stranded wire with a conductor
section values between 1.5 - 4 mm².
4. Install the individual wires (phase, neutral and ground) on the connector
head according to the instructions printed on each of the three terminals
(tightening torque 0.8...1 Nm)
5. Close the connector and tighten the cable gland respecting the tightening
torque (4+1 Nm) to ensure the IP65 degree of protection
6. Remove the pre-installed protective cap on the inverter.
Insert the counterpart in the AC output connector
10
while taking care to align
the references (present in both connectors) that prevent connection errors.
To maintain the IP protection rating of the inverter, it is mandatory to install the counterpart with the AC cable connected or the protective
cap, on the AC output connector. In addition, the connector must not be subjected to tensile forces (examples: do not connect weights to
the AC cable, do not leave excess wire hanging, etc.).
UNO-DM-1.2 UNO-DM-2.0 UNO-DM-3.3 UNO-DM-4.0 UNO-DM-4.6 UNO-DM-5.0
Input
Absolute maximum input voltage (Vmax,abs)600 V
Input activation voltage (Vstart)120 V
(adj. 100...150V)
150 V
(adj. 100...250 V)
200 V
(adj. 120...350 V)
200 V
(adj. 120...350 V)
200 V
(adj. 120...350 V)
200 V
(adj. 120...350 V)
DC input voltage operating range (Vdcmin...Vdcmax)0.7xVstart...580 V (min 90 V)
Rated input DC voltage (Vdcr)185 V 300 V 360 V 360 V 360 V 360 V
Rated input DC power (Pdcr) 1500 W 2500 W 3500 W 4250 W 4750 W 5150 W
Number of independent MPPTs 1 1 2 2 2 2
Maximum Input power for each MPPT (PMPPTmax) 1500 W 2500 W 2000 W 3000 W 3000 W 3500 W
DC input voltage range (VMPPT min ... VMPPT max) with parallel
conguration of MPPT at Pacr 100...530 V 210...530 V 170...530 V 130...530 V 150...530 V 145...530 V
DC power limitation with parallel conguration of MPPT
N/A
N/A Linear derating from Max to Null
[530V≤VMPPT≤580V]
DC power limitation for each MPPT with independent
conguration of MPPT at Pacr , max unbalance example
N/A N/A
2000 W
[200V≤VMPPT≤530V]
other channel:
Pdcr-2000W
[112V≤VMPPT≤530V]
3000 W
[190V≤VMPPT≤530V]
other channel:
Pdcr-3000W
[90V≤VMPPT≤530V]
3000 W
[190V≤VMPPT≤530V]
other channel:
Pdcr-3000W
[90V≤VMPPT≤530V]
3500 W
[200V≤VMPPT≤530V]
other channel:
Pdcr-3500W
[90V≤VMPPT≤530V]
Maximum DC input current (Idc max) / for each MPPT (IMPPTmax)10 A 10 A 20.0 A/10.0 A 32.0 A/16.0 A 32.0 A/16.0 A 38 A/19.0 A
Maximum return current (AC side vs DC side) < 5 mA (In the event of a fault, limited by the external protection on the AC circuit)
Maximum short circuit current (Isc max) / for each MPPT 12.5 12.5 A 12.5 A / 25.0 A 20.0 A / 40.0 A 20.0 A / 40.0 A 22.0 A / 44.0 A
Number of input DC connection pairs for each MPPT 1
DC connection type Quick t PV connector (1)
Type of PV panels connected in input in accordance with
Standard IEC 61730 Class A
Input protection
Reverse polarity protection Yes, from a current limited source
Input overvoltage protection for each MPPT- Varistors Yes
Photovoltaic array insulation control According to local standard
DC disconnect switch characteristics (version with DC
disconnect switch) 600 V/25 A
Ø10÷14mm
max. 6 mm²
COMM
STATUS
RSSI
080706
UNO-DM-1.2 UNO-DM-2.0 UNO-DM-3.3 UNO-DM-4.0 UNO-DM-4.6 UNO-DM-5.0
Output
AC connection type Single phase
Nominal output AC power (Pacr@cosφ=1) 1200 W 2000 W 3300 W 4000 W 4600 W 5000 W
Maximum output AC power (Pac max@cosφ=1) 1200 W 2000 W 3300 W 4000 W (2) 4600 W 5000 W
Maximum apparent power (Smax)1200 VA 2000 VA 3300 VA 4000 VA (2) 4600 VA 5000 VA
Nominal output AC voltage (Vacr)230 V
Output AC voltage range (Vac min...Vac max)180...264 Vac (3)
Maximum AC output current (Iac max)5.5 A
10.0 A
14.5 A 17.2 A (2) 20.0 A 22.0 A
Maximum fault current
<25 A rms (100 ms)
Short circuit current contribution 10.0 A
12.0 A
16.0 A 19.0 A 22.0 A 24.0 A
Inrush current Negligible
Nominal output frequency (fr) 50 Hz (4)
Output frequency range (fmin...fmax)47...53 Hz (4)
Nominal power factor and adjustability interval > 0.995; 0.1 – 1 Over/Under excited
Total harmonic current distortion < 3.5%
AC connections type Panel female connector
Output Protection
Anti-islanding protection According to local standard
Maximum external AC overcurrent protection 10.0 A 16.0 A 20.0 A 25.0 A 25.0 A 32.0 A
Output overvoltage protection - Varistor 2 (L - N / L - PE)
Operational Performances
Maximum efciency (η
max
) 94.8% 96.7% 97.0% 97.0% 97.0% 97.4%
Weighted efciency (EURO/CEC) 92.0% / - 95.0%/- 96.5%/- 96.5%/- 96.5%/- 97.0%/-
Power threshold of the power 8.0 W
Nighttime consumption < 0.4 W
Communication
Embedded Communication interface Wireless (5)
Optional Communication interface RS485, Ethernet, ZigBee (6)
Embedded Communication protocol ModBus TCP (SunSpec)
Optional Communication protocol ModBus RTU (SunSpec), Aurora protocol
Commissioning tool Web user interface, Display, Aurora Manager Lite
Firmware update capabilities Locally and remotely
Monitoring Plant Portfolio Manager, Plant Viewer, Plant Viewer for Mobile (7)
Environmental
Ambient temperature range -25...+60°C /-13...140°F
Ambient temperature derating above
50°C/122°F
above
50°C/122°F
above
50°C/122°F
above
50°C/122°F
above
40°C/104°F (8)
above
45°C/113°F
Relative humidity 0...100% condensing
Typical noise emission pressure < 50 dB(A) @ 1 m
Maximum operating altitude without derating 2000 m/6560 ft
Classication of environmental pollution
degree for the external environment 3
Environmental category Outdoor
Physical
Environmental protection degree IP 65
Cooling system Natural
Dimensions (H x W x D) 553 mm x 418 mm x 175 mm/21.8” x 16.5” x 6.9”
Weight 15 kg/33 lb
Mounting system Wall brackets
Overvoltage category in conformity with IEC 62109-1 II (DC input) III (AC output)
Safety
Isolation level Transformerless (TL)
Certications CE, RCM
Safety class I
Safety and EMC standard
IEC/EN 62109-1, IEC/EN 62109-2, AS/NZS 4777.2, EN 61000-6-1, EN
61000-6-2, EN 61000-6-3, EN 61000-6-4, EN 61000-3-2, EN 61000-3-3
IEC/EN 62109-1, IEC/EN 62109-2, AS/NZS 4777.2, EN 61000-6-1, EN
61000-6-2, EN 61000-6-3, EN 61000-6-4, EN 61000-3-11, EN 61000-3-12
Grid standard (9) (check your sales channel for availability)
CEI 0-21, DIN V VDE
V 0126-1-1, VDE-AR-N
4105, G83/2, G59/3, RD
413, ITC-BT-40,
AS/NZS 4777.2, IEC
61727, IEC 62116
CEI 0-21, DIN V VDE
V 0126-1-1, VDE-AR-N
4105, G83/2, G59/3, RD
413, ITC-BT-40,
AS/NZS 4777.2, IEC
61727, IEC 62116
CEI 0-21, DIN V VDE
V 0126-1-1, VDE-AR-N
4105, G83/2, G59/3, RD
413, ITC-BT-40,
AS/NZS 4777.2, IEC
61727, IEC 62116
CEI 0-21, DIN V VDE
V 0126-1-1, VDE-AR-N
4105, G83/2, G59/3, RD
413, ITC-BT-40,
AS/NZS 4777.2, IEC
61727, IEC 62116
CEI 0-21, DIN V VDE
V 0126-1-1, VDE-AR-N
4105, G59/3, RD 413,
ITC-BT-40, AS/NZS
4777.2, IEC 61727,
IEC 62116
CEI 0-21, DIN V VDE
V 0126-1-1, VDE-AR-N
4105, G59/3, RD 413,
ITC-BT-40, AS/NZS
4777.2, C10/11, IEC
61727, IEC 62116
1. Refer to the document “String inverter – Product Manual appendix” available at www.abb.com/solarinverters to know the brand and the model of the quick t connector.
2. For UK G83/2 grid standard, maximum output current limited to 16A up to a maximum output power of 3600W and maximum apparent power of 3600 VA.
3. The AC voltage range may vary depending on specic country grid standard.
4. The Frequency range may vary depending on specic country grid standard.
5. As per IEEE 802.11 b/g/n standard.
6. Availble for custom version only.
7. Plant Viewer per Mobile availble remotely only, not for local commissioning.
8. Pacr = 4200 W @ 45°C/113°F.
9. Further grid standard will be added, please refer to ABB Solar page for further details.
Note. The features that are not specically mentioned in this data sheet are not included in the product
Before proceeding with commissioning, make sure you have carried out all the operations and checks indicated in the previous sections of
this quick installation guides, and verify that the inverter cover
05
was properly closed!
Commissioning and conguration of the inverter can be made using a wireless capable device such as a smartphone, tablet or laptop.
The steps for commissioning are listed below:
1. Set the inverter’s DC disconnect switch
16
(for -S version) or any external DC switches to “ON” position: If the input voltage applied to one of the two input
channels is greater than the minimum starting voltage, the inverter will start up.
The inverter is powered ONLY by the voltage coming from the photovoltaic generator: the presence of grid voltage alone IS NOT SUFFICIENT to
allow the inverter to power up.
2. Enable Wireless on the device that is being used for the inverter commissioning (tablet, smartphone or PC) and connect it to the Access Point created by the
inverter: a network with the name ABB-XX-XX-XX-XX-XX-XX will appear in the list of networks, where “X” is a hex digit of the MAC address (MAC address
can be found on the “Wireless Identication Label” placed on the side of the inverter or previously applied to this quick installation guide - see cover page).
3. When required enter “ABBSOLAR” as network password for the inverter’s access point.
After the inverter has been powered up for 24 hours, the access point default password “ABBSOLAR” will be disabled.
Any subsequent access to the internal webserver will be possible only using the PRODUCT KEY printed on the “Wireless identication
label” previously applied to this quick installation guide (see cover page) as access point password.
4. Open the internet browser (recommended browser: Chrome versions from v.55, Firefox versions from v.50, Safari versions from v.10.2.1) and enter the pre-
set IP address to access the conguration wizard page: 192.168.117.1
5. A conguration wizard will open, consisting of a sequence of steps in which all the required elds must be completed correctly (language of the wizard can be
selected in the upper status bar). The steps and information required by the conguration wizard are:
STEP 1 - Set the Administrator/User login credentials (minimum 8 character for password). User and password are CASE SENSITIVE.
STEP 2 (OPTIONAL) - Enter the required information (IP selection mode, SSID and Password) to connect the inverter to the residential wireless network with
“Station Mode” (Note: This step can be skipped to continue operating with the point-to-point connection “AP mode”). Once the inverter is connected to the
wireless network, a new message will provide you the IP Address assigned by the router to the inverter that can be used each time you want to access the
internal webserver. TAKE NOTE OF THEM.
STEP 3 - Set the Date, Time and Time zone (The inverter will propose these elds when available).
STEP 4 - Set the inverter country standard, Input channel conguration and Meter conguration (if installed). Clicking the “END” button the wizard will be
completed (after conrmation the inverter will reboot).
From the moment that the grid standard is set, you have 24 hours to make any changes to the value, after which the “Country Select”
functionality is blocked and the remaining time will have to be reset in order to have the 24 hours of operation available again. To select a
new grid standard follow the procedure “Resetting the remaining time for grid standard variation” described in the product manual.
6. Set the external AC disconnect switch downstream to the inverter to “ON” position. Once both AC and DC switches are closed and the wizard commissiong
procedure is nished, the inverter starts the grid connection sequence: the inverter performs the grid voltage check, measures the photovoltaic generator
insulation resistance against earth and carries out other self-diagnosis checks.
During the checks before the parallel with the grid, the “Power” LED keeps ashing, the “Alarm” and “GFI” LEDs are off. If there is not sufcient sunlight to
connect to the grid, the inverter will repeat the connection procedure until all the parameters are within range.
If the preliminary checks for parallel connection to the grid are successful, the inverter connects to the grid and begins to export power to the grid.
The “Power” LED remains xed on while the “Alarm” and “GFI” LEDs are off
Refer to the product manual for further information about the conguration and the use of the functionality of the internal Webserver.
Commissioning and conguration of the inverter can also be done with the display
07
. Consult the product manual for more information.
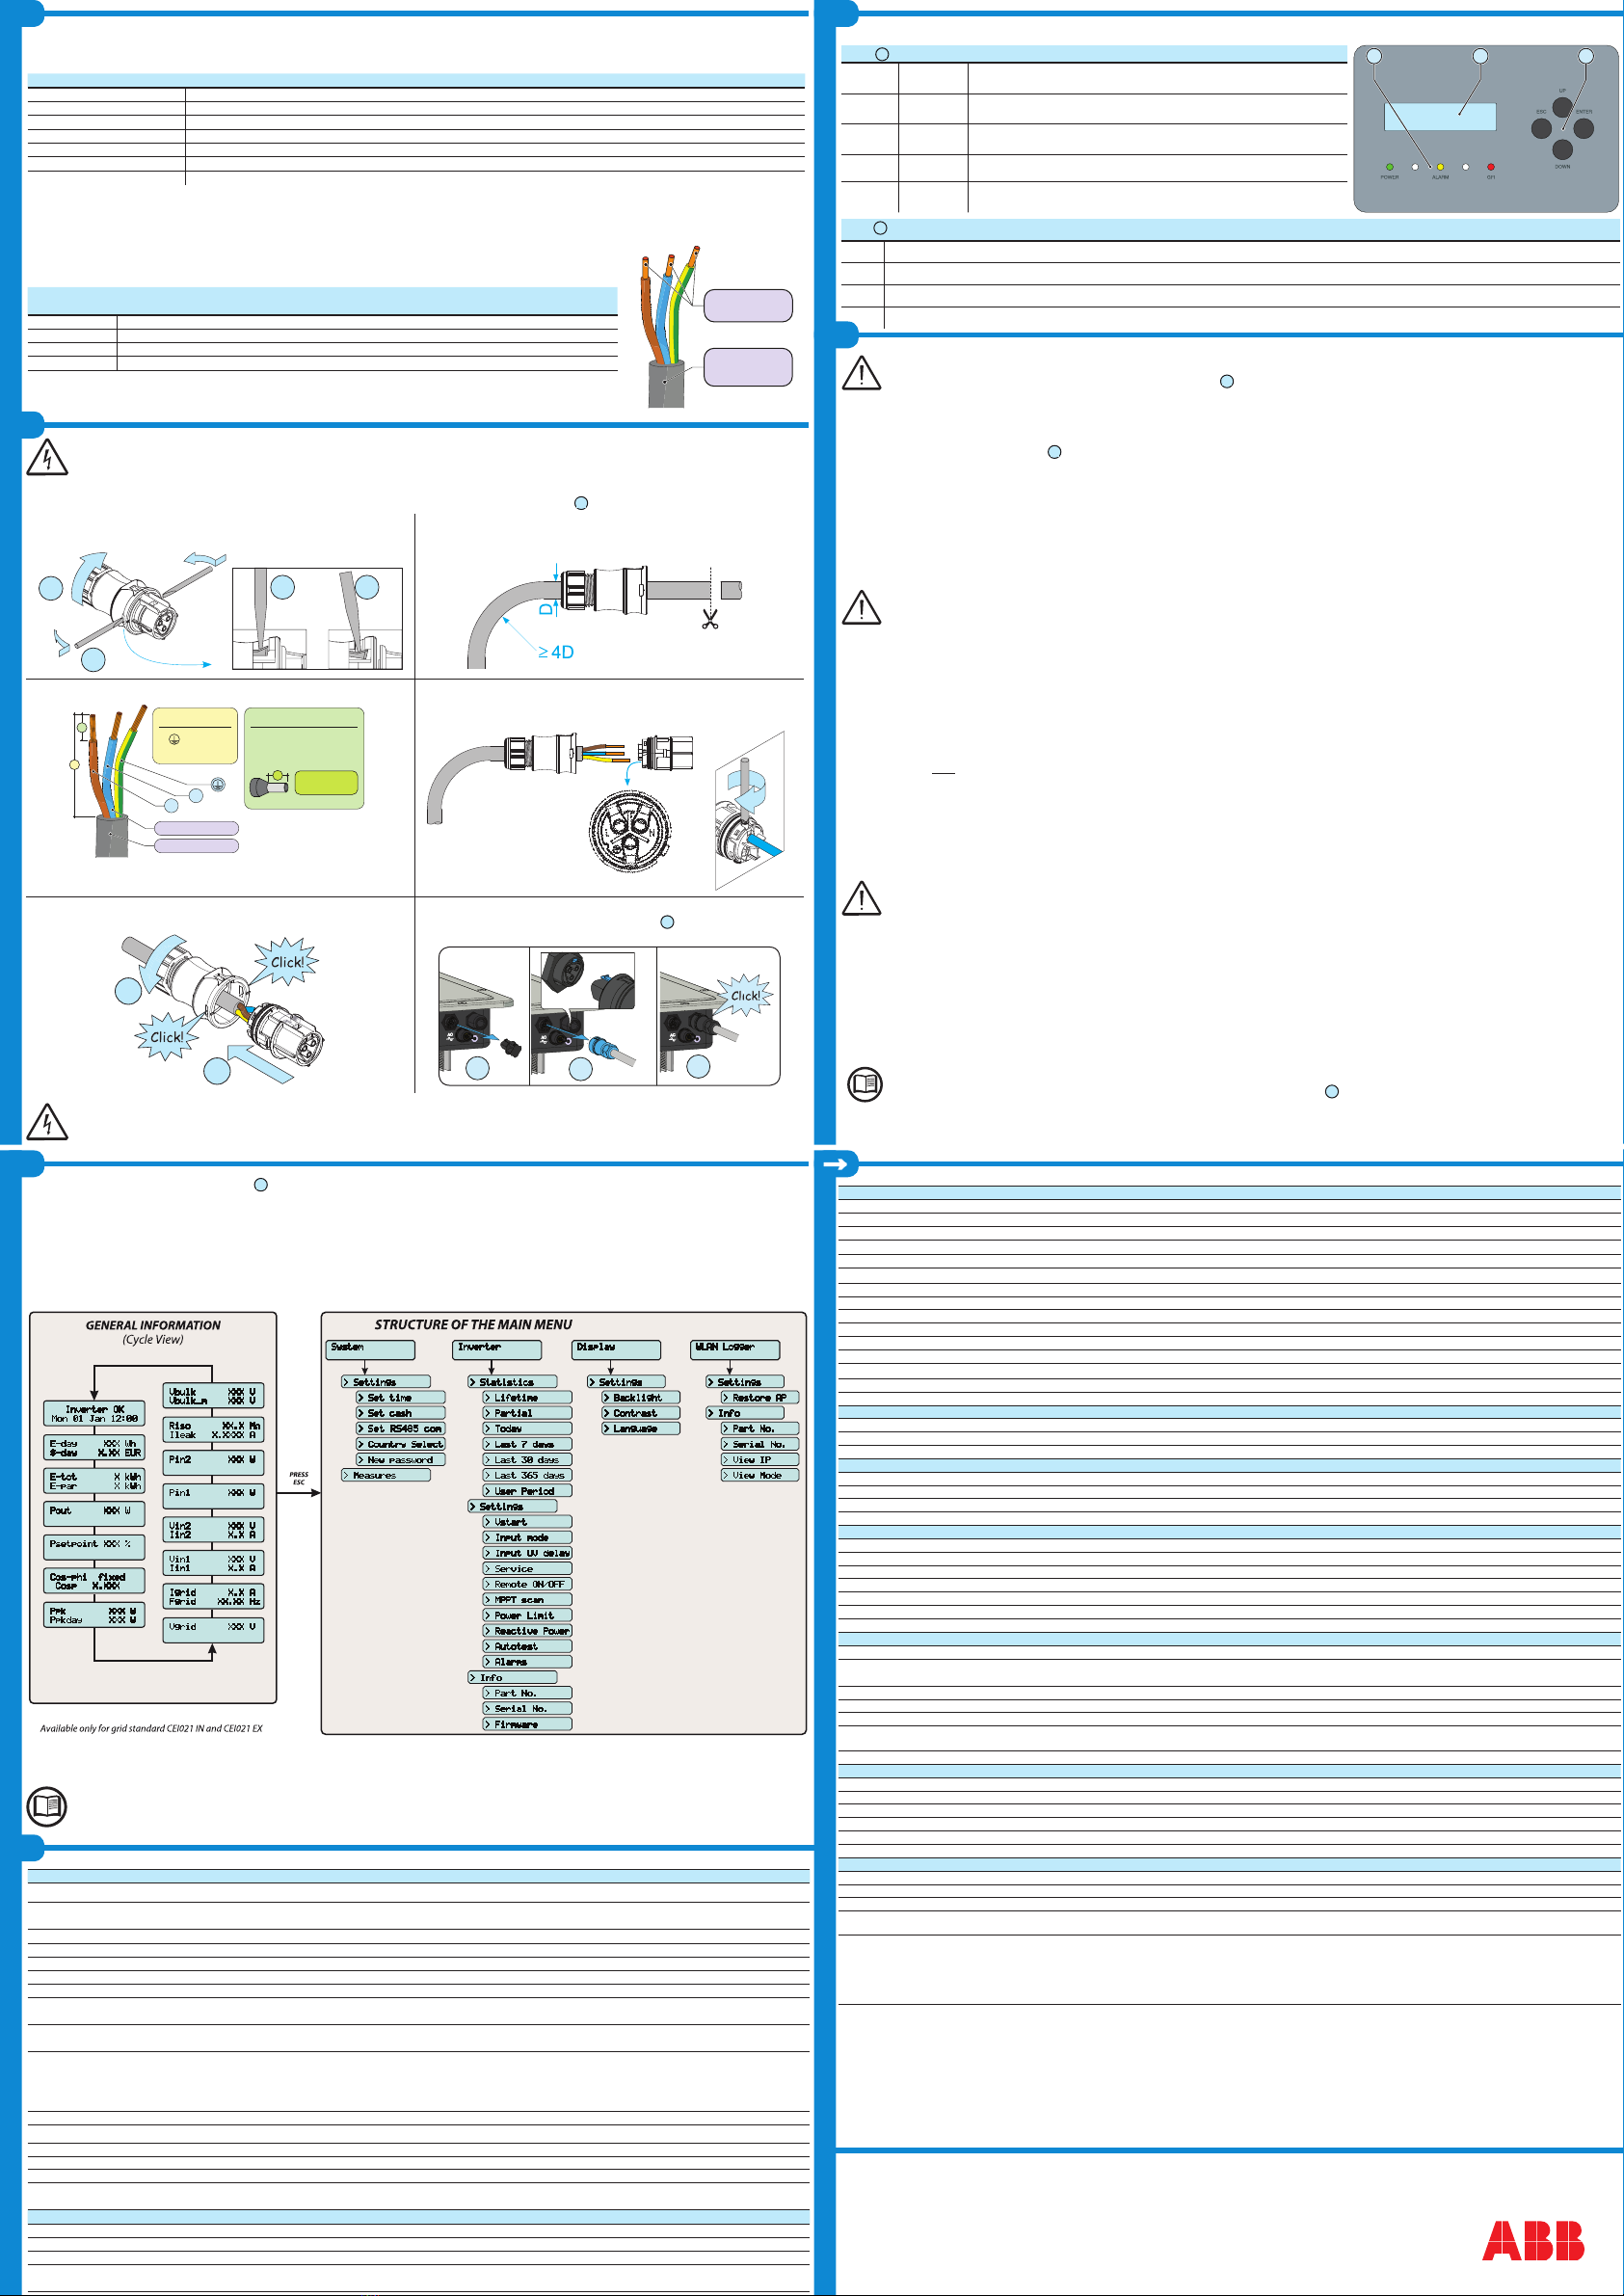
The ABB inverters are equipped with a display
07
, consisting of 2 lines of 16 characters each, which can be used to:
- View the operating status of the inverter and the statistical data
- View service messages for the operator
- View alarm and fault messages
- Change the inverter settings
During the normal operation of the inverter, the display cycles through the GENERAL INFORMATION. This information relates to the input and output parameters
and the inverter identication parameters. By pressing ENTER it is possible to block automatic scrolling on a screen so that it is locked to this screen.
Press ESC to access the main menu, which is structured as follows:
> Settings
> Measures
> Set time
> Set cash
> Set RS485 com
> Country Select
> New password
Inverter
> Statistics
> Settings
> Vstart
> Input mode
> Input UV delay
> Service
> Info
> Part No.
> Serial No.
> Firmware
> Remote ON/OFF
> MPPT scan
> Power Limit
> Reactive Power
> Autotest
> Alarms
> Lifetime
> Partial
> Today
> Last 7 days
> Last 30 days
> Last 365 days
> User Period
Display
> Settings
> Backlight
> Contrast
> Language
WLAN Logger
> Settings
> Serial No.
> View IP
> View Mode
> Restore AP
> Info
> Part No.
*
Inverter OK
Mon 01 Jan 12:00
E-day XXX Wh
$-day X.XX EUR
E-tot X kWh
E-par X kWh
Pout XXX W
Psetpoint XXX %
Cos-phi fixed
Cosp X.XXX
Pin2 XXX W
Pin1 XXX W
Vin2 XXX V
Iin2 X.X A
Vin1 XXX V
Iin1 X.X A
Igrid X.X A
Fgrid XX.XX Hz
Ppk XXX W
Ppkday XXX W
Vgrid XXX V
Riso XX.X M©
Ileak X.XXXX A
Vbulk XXX V
Vbulk_m XXX V
System
*
Display menu may differ from previous structure depending on rmware installed in the inverter. Firmware version can be displayed accessing to the
display menu Inverter > Info > Firmware.
Refer to the manual for details regarding use and functions available in the menu and for details regarding alarm and fault messages.


