manuals.online logo
Brands
  1. Home
  2. •
  3. Brands
  4. •
  5. ABB
  6. •
  7. Switch
  8. •
  9. ABB SACE Tmax XT5 User manual

ABB SACE Tmax XT5 User manual

1
INSTALLATION INSTRUCTIONS
Retrofit of Spectra G-frame with ABB Tmax XT5
breaker Dual Mount (Bolt-On kits)
General
These instructions are applicable to retrofit of Spectra G-frame with ABB Tmax XT5 breaker.
Table 1 lists the parts included in the bolt-on circuit breaker kits for double branch configurations (400A max).
WARNING
Danger of electrical shock or injury. Turn OFF power ahead of the panel board or switchboard before working inside the equipment
or removing any component. Equipment is to be installed and maintained by properly trained and qualified personnel only.
Installation
Numbers in brackets in the following instructions and figures refer to the item numbers in table below.
Item Part Description Qty.
  
  
  
Breaker mounting bracket 
  
Mounting Stud 

 
Supplied with breaker 
Supplied with breaker 
 Left link and Tap assembly 
 Middle link and Tap assembly 
Item Part Description Qty.
 Right link and tap assembly 
  
  
  
 Thread Cutting Screw
 
  
  
Item Part Description
Torque wrench
—
Retrofit Kit
—
Required Tools
Below listed tools are required for installation
—
Table 1. Retrofit kit
STEP 2
Find the side of the panel interior at which the dimension from the
face of nearest vertical bus to the inner face of the bus support rail

Main Bus
Lugs installed
on load side
LOAD LOAD
LINE LINE

—

—
Figure 3. Installation of right link assembly
—
Figure 4. Installation of middle link assembly
—
Figure 1. Breaker preparation
Right side
cable entry
Left side
cable entry

 

REF  
 
  
  
STEP 6
Install the breaker mounting bracket [4] on the bus support rail
       
Refer figure 6.
—
Figure 5. Installation of left link assembly
—
Figure 6. Installation of breaker mounting bracket
   
   
!
2
STEP 1

more information. Install the appropriate lugs as in load side as
shown in figure 1.
Step 3
Install the link assembly - Right link assembly [12] to adjacent pole
from 2.75 inches ref. as shown in figure 3. Fasten the complete link

washer [2] and nut [3]. Refer figure 3.
Step 4
Install the link assembly - Middle link assembly [11] to middle pole
as shown in figure 4. Fasten the complete link assembly loosely to

[3]. Refer figure 4.
Step 5
Install the link assembly - Left link assembly [10] to outermost pole
as shown in figure 5. Fasten the complete link assembly loosely to

[3]. Refer figure 5.
STEP 7 Continued
—
Figure 7a. Installation of breaker
—
Figure 7b. Installation of breaker
 
 




  
Remove knock out features before
assembly to breaker
Remove knock out features before
assembly to breaker

!
!
3
STEP 7
Install the pre-assembled breaker. Attach the breaker assembly to
-
ing stud [6] to 18 lb-in. Refer figure 7a. Attach to link assembly with


STEP 9
Note: Use M3 x 8 if the required screw is not available.


STEP 8
Remove the plastic wall (knock out) in terminal cover and install the
terminal cover on load side (slide down in as shown in figure 8).
—

—
Figure 8. Installation of terminal cover
STEP 11

Attach the blankout out plate [17] to the filler plate with thread

—

—
Figure 10. Tighten the bolted strap connection
STEP 10
Tighten all the three bolted strap connections (carriage bolt as-
sembly) at the vertical bus to 65 lb-in. It may be necessary to re-
move adjacent circuit breaker modules to allow access to the
bolted connections at the vertical bus.
Item 5 - screw to be assembled with screw

thread end projecting outside as shown

STEP 13


the thread cutting screw [16] and screw [18] on filler plates. Torque
the screw [16] to 6.5 lb-in. Refer figure 13.
STEP 14: Continued - XT5 Kirk Lock Mounting Kit and Installa-
tion
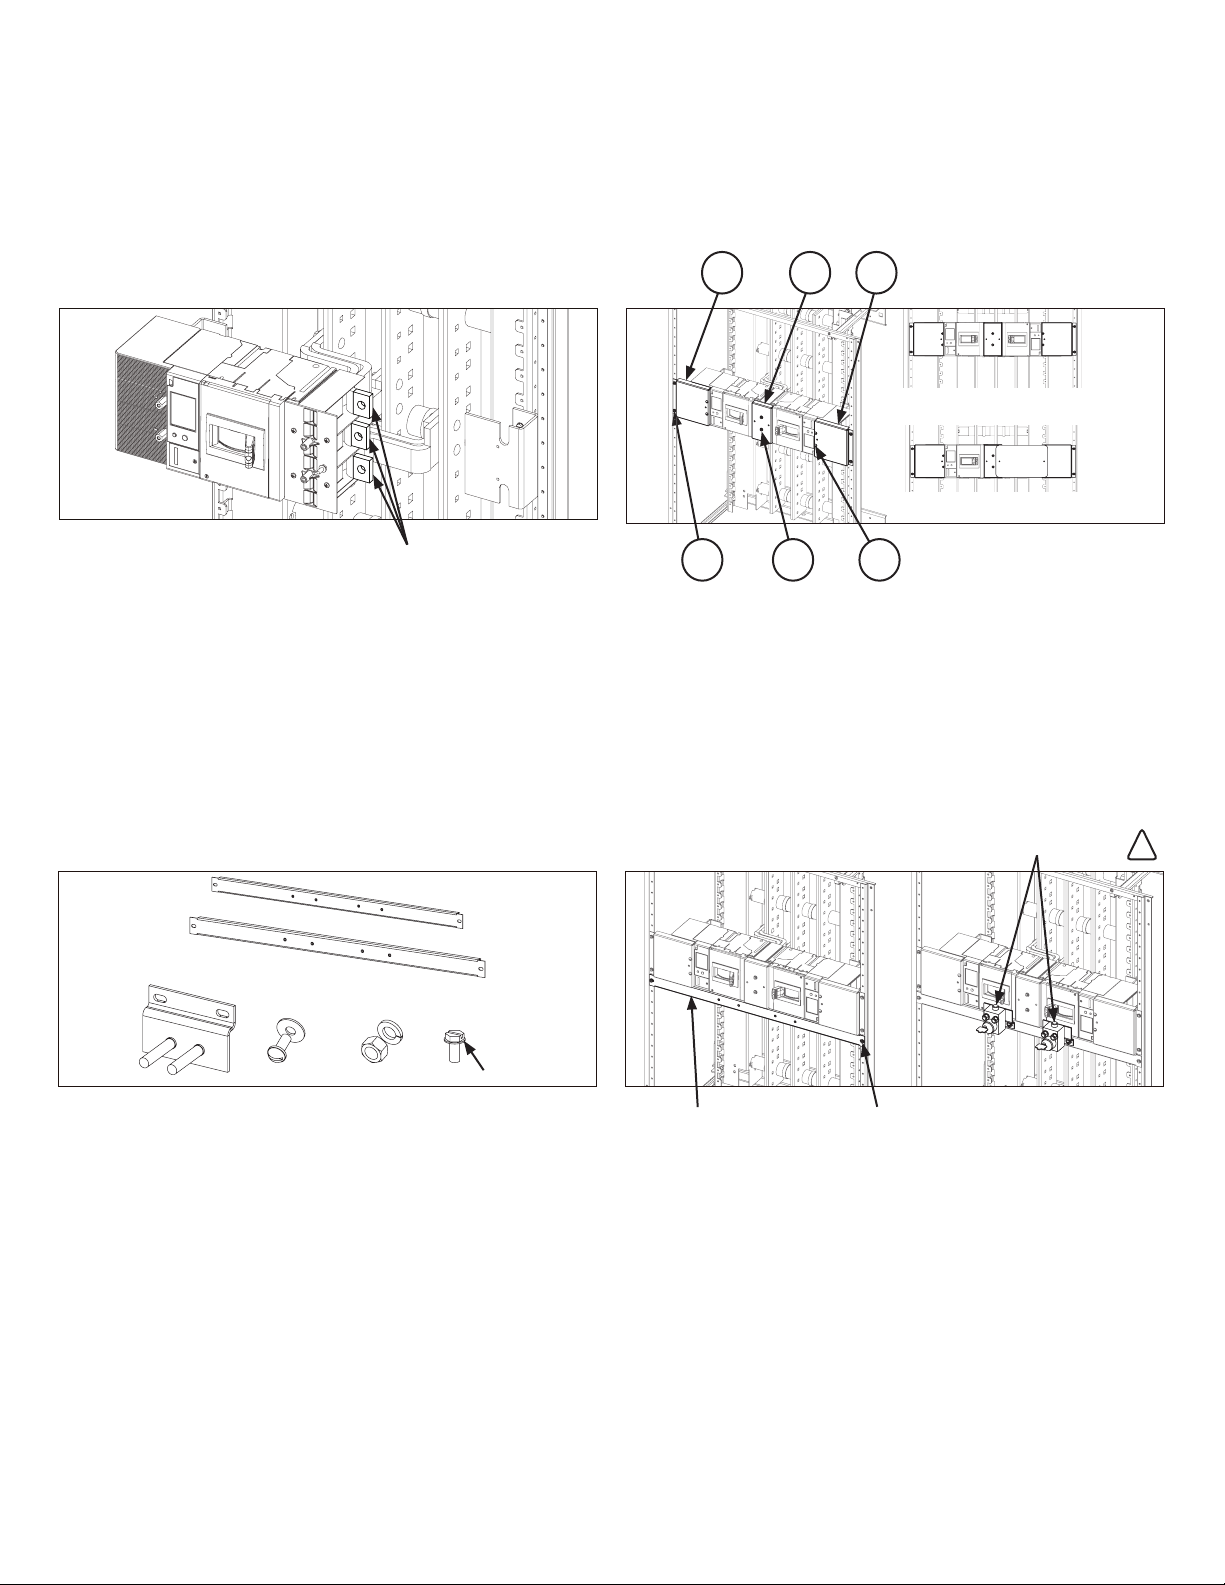
Choose the appropriate panel width 1x space plate from the kirk
lock kit and fit 1x space plate on the panel with thread forming
screw (2x) as shown in figure 14b.
On the 1x space plate install the kirk lock assy with 2x screws fas-
tened or 1x space plate. Verify the lock function after complete in-
stallation.
—
Figure 14b. XT5 kirk lock installation on panel
Double branch breakers installed
Single breaker and other side
with blank out plate


 



(for Kirk mounti ng only)
Thread forming







Apply tape to these unused
strap contact surfaces


Remove extensions on punger (if any) !
4
—
Figure 13. Installation of filler plate
—
Figure 14a. XT5 kirk lock mounting kit assembly
STEP 14: Optional - XT5 Kirk lock mounting kit assembly

14a.
Note: Kirk-lock is not included in the kit. Re-use Kirk lock from
panel.
STEP 12: Tape unused contacts
Apply multiple wrappings of insulation to unused strap contact
-
-

shown to achieve a minimum tape thickness of 0.028 inch. This in-
sulation thickness requires two complete layers of overlapping
turns.
—
Figure 12. Applying insulating tape to unused contact surfaces
—
ABB Inc.
305 Gregson Drive
Cary, NC 27511
—
We reserve the right to make technical
changes or modify the contents of this doc-
ument without prior notice. With regard to
purchase orders, the agreed particulars
shall prevail. ABB AG does not accept any re-
sponsibility whatsoever for potential errors
or possible lack of information in this docu-
ment.
abb.com
We reserve all rights in this document and in
the subject matter and illustrations con-
tained therein. Any reproduction, disclosure
to third parties or utilization of its contents
– in whole or in parts – is forbidden without
prior written consent of ABB AG. Copy-
right© 2019 ABB
All rights reserved
Disclaimer : These instructions do not cover all details or variations in equipment nor do they provide for every possible contingency that may be met in connection with installation, operation
or maintenance. Should further information be desired or should particular problems arise that are not covered sufficiently for the purchaser's purposes, the matter should be referred to the
ABB Company.
Documentation Number: DET 1053

Other manuals for SACE Tmax XT5

4

Other ABB Switch manuals

ABB UniGear ZS3.2 User manual

ABB

ABB UniGear ZS3.2 User manual

ABB DWTL1 User manual

ABB

ABB DWTL1 User manual

ABB vital 1 User manual

ABB

ABB vital 1 User manual

ABB TruONE ATS User guide

ABB

ABB TruONE ATS User guide

ABB Zenith ZTS T Series Manual

ABB

ABB Zenith ZTS T Series Manual

ABB InLine II ZHBM-ITS Series User manual

ABB

ABB InLine II ZHBM-ITS Series User manual

ABB UniSec User manual

ABB

ABB UniSec User manual

ABB Power Break II User manual

ABB

ABB Power Break II User manual

ABB SafeRing User manual

ABB

ABB SafeRing User manual

ABB Zenith ZTG T Series User manual

ABB

ABB Zenith ZTG T Series User manual

ABB Zenith ZTX Series User manual

ABB

ABB Zenith ZTX Series User manual

ABB 3299-22958 User manual

ABB

ABB 3299-22958 User manual

ABB Sense 7 Series User manual

ABB

ABB Sense 7 Series User manual

ABB OTA125 User manual

ABB

ABB OTA125 User manual

ABB FAP 1011 User manual

ABB

ABB FAP 1011 User manual

ABB FAP 1001 User manual

ABB

ABB FAP 1001 User manual

ABB 3299A-A12100 User manual

ABB

ABB 3299A-A12100 User manual

ABB DS1 User manual

ABB

ABB DS1 User manual

ABB NAL Series User manual

ABB

ABB NAL Series User manual

ABB MKey8M User manual

ABB

ABB MKey8M User manual

ABB VersaRupter General instructions

ABB

ABB VersaRupter General instructions

ABB FIP2002 User manual

ABB

ABB FIP2002 User manual

ABB RS85 User manual

ABB

ABB RS85 User manual

ABB E-Hub 2.0 User manual

ABB

ABB E-Hub 2.0 User manual

Popular Switch manuals by other brands

FAAC XK 21 L quick start guide

FAAC

FAAC XK 21 L quick start guide

H3C S9505 SRP installation manual

H3C

H3C S9505 SRP installation manual

Sytech EASY WIZ SY-CON01 user manual

Sytech

Sytech EASY WIZ SY-CON01 user manual

Exsys EX-1182VIS manual

Exsys

Exsys EX-1182VIS manual

HP ProCurve 5400zl Series Read me first

HP

HP ProCurve 5400zl Series Read me first

Siemens SITRANS L Series operating instructions

Siemens

Siemens SITRANS L Series operating instructions

Rose electronics ServeView Pro SEB-8UB Specifications

Rose electronics

Rose electronics ServeView Pro SEB-8UB Specifications

GRASS VALLEY MASTERPIECE user manual

GRASS VALLEY

GRASS VALLEY MASTERPIECE user manual

Resource Data Management PR0109 user guide

Resource Data Management

Resource Data Management PR0109 user guide

GESTRA NRS 2-4 installation instructions

GESTRA

GESTRA NRS 2-4 installation instructions

LevelOne FEP-0311 user manual

LevelOne

LevelOne FEP-0311 user manual

AV Access 8KSW21-KVM user manual

AV Access

AV Access 8KSW21-KVM user manual

LevelOne GTL-2661 Quick installation guide

LevelOne

LevelOne GTL-2661 Quick installation guide

GarrettCom Ethernet Networks and Web Management brochure

GarrettCom

GarrettCom Ethernet Networks and Web Management brochure

3Com ProCurve E4500-48 Getting started guide

3Com

3Com ProCurve E4500-48 Getting started guide

Comnet CNFE4SMSPOE Installation and operation manual

Comnet

Comnet CNFE4SMSPOE Installation and operation manual

Renkforce Superslim operating instructions

Renkforce

Renkforce Superslim operating instructions

CNET CGS-1600 Specifications

CNET

CNET CGS-1600 Specifications

manuals.online logo
manuals.online logoBrands
  • About & Mission
  • Contact us
  • Privacy Policy
  • Terms and Conditions

Copyright 2025 Manuals.Online. All Rights Reserved.