manuals.online logo
Brands
  1. Home
  2. •
  3. Brands
  4. •
  5. abi
  6. •
  7. Bathroom Fixture
  8. •
  9. abi SOLA 13329 User manual

abi SOLA 13329 User manual

S O LA O UTDO O R S HO W E R SET
Dis cla imer: P ro d u c ts in th is ma n u a l mu s t by la w b e in s talled b y licen s ed an d reg is tered tra d es p eo p le in a cco rd a n ce w ith th e releva n t stan d a rds . A B I a n d th e ma n u fa ctu rer/d is trib u to r
res erve t h e rig h t to va ry s p ecif ic a tio n s o r d elete mo d els fro m t h eir ra n g e w ith o u t prio r n o tif ic a t io n . Dimen s io n s a re n o min a l mea s u remen ts o n ly. Th e in f o rmatio n lis ted is co rrect at th e time
o f p u b lica tio n , h o w ever A B I a n d th e man u f a c tu rer/d is trib u to r ta kes n o res p o n s ib ility fo r p rin tin g erro rs. C o p yrig h t © A B I I n terio rs 2 02 2 Pty Ltd
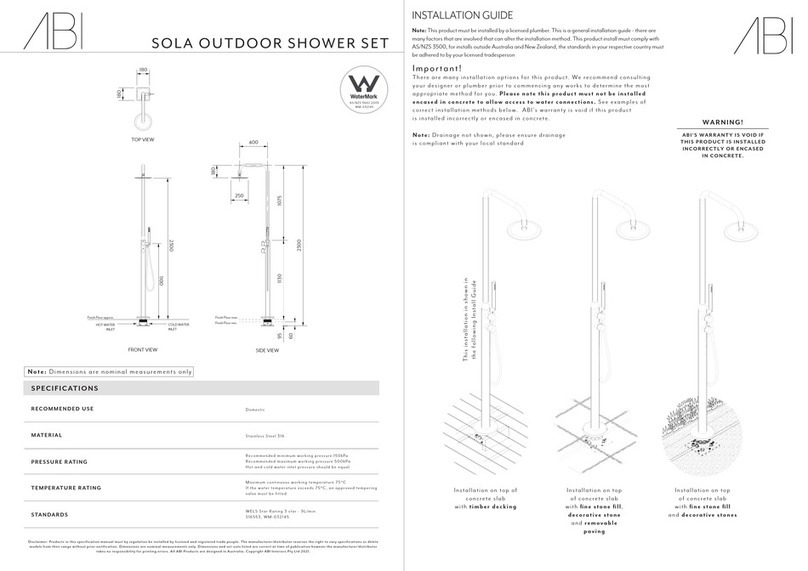
SPECIFICATIONS
RECOMMENDED USE Domestic
MATERIAL 316 Stainless Steel
TEMPERATURE RATING Maximum continuous working temperature 75°C
If the water temperature exceeds 75°C,an approved tempering
valve must be fitted
PRESSURE RATING Recommended minimum working pressure 150kPa
Recommended maximum working pressure 500kPa
Hot and cold water inlet pressure should be equal
SUITABLE HOT WATER UNITS Storage tank: Yes
Continuous Flow: Yes
Gravity Feed: Not suitable
STANDARDS Overhead Shower: WELS 3 star, 9L/min, Hand Shower: WELS 3 star,
8.5L/min, S16553
AS/NZS 3718:2005
WM-021226
INSTALLATION GUIDE
Note: This product must be installed by a licensed tradesperson.
This is a general installation guide - there are many factors that
are involved that can alter the installation method. For installations
within Australia and New Zealand, this product must be installed in
compliance with AS/NZS 3500.
1. Use the base as a template to mark holes.
2. Place lid on top to check level. Double check
your position is correct.
1
1. Tighten nuts to secure base down.
2. Attach hot and cold water pipes (use
appropriate thread sealant).
3
5Attach and bolt body to base. 6
1. Trim plastic housing to be level with floor
structure (if required).
2. Secure water pipes appropriately.
4
1. Remove base, drill the holes into the
concrete footing to a depth of 60mm.
2. Insert dyna bolts.
CONCRETE FOOTING
2
1.
1.
1.
1.
2.
2.
2.
Hot
Cold
2.
60
Connect shower head to Arm.
Note: Drainage not shown, please ensure drainage
is compliant with your local standard
Important!
There are many installation options for this product. We recommend consulting
your designer or plumber prior to commencing any works to determine the most
appropriate method for you. Please note this product must not be installed
encased in concrete to allow access to water connections. See examples of
correct installation methods below. ABI's warranty is void if this product
is installed incorrectly or encased in concrete.
Installation on top of
concrete slab
with timber decking
This installation in shown in
the following Install Guide
Installation on top
of concrete slab
with fine stone fill,
decorative stone
and removable
paving
Installation on top
of concrete slab
with fine stone fill
and decorative stones
ABI'S WARRANTY IS VOID IF
THIS PRODUCT IS INSTALLED
INCORRECTLY OR ENCASED
IN CONCRETE.
WARNING!
1. Use the base as a template to mark holes.
2. Place lid on top to check level. Double check
your position is correct.
1
1. Tighten nuts to secure base down.
2. Attach hot and cold water pipes (use
appropriate thread sealant).
3
5
Attach and bolt body to base.
6
1. Trim plastic housing to be level with floor
structure (if required).
2. Secure water pipes appropriately.
4
1. Remove base, drill the holes into the
concrete footing to a depth of 60mm.
2. Insert dyna bolts.
CONCRETE FOOTING
2
1.
1.
1.
1.
2.
2.
2.
Hot
Cold
2.
60
Connect shower head to Arm.
Note: Drainage not shown, please ensure drainage
is compliant with your local standard
Important!
There are many installation options for this product. We recommend consulting
your designer or plumber prior to commencing any works to determine the most
appropriate method for you. Please note this product must not be installed
encased in concrete to allow access to water connections. See examples of
correct installation methods below. ABI's warranty is void if this product
is installed incorrectly or encased in concrete.
Installation on top of
concrete slab
with timber decking
This installation in shown in
the following Install Guide
Installation on top
of concrete slab
with fine stone fill,
decorative stone
and removable
paving
Installation on top
of concrete slab
with fine stone fill
and decorative stones
ABI'S WARRANTY IS VOID IF
THIS PRODUCT IS INSTALLED
INCORRECTLY OR ENCASED
IN CONCRETE.
WARNING!
2.
2.
1. Attach floor covering.
2. Push cover plate down.
*ENLARGED PARTS
7
1.
1.
1.
2.
1
2
9
12 13
10
11
3
4
5
7
8
6
In the box
1. Base
2. Lid
3. Cover Plate
4. Body
5. Arm
6. Shower Head
7. Hand-held Shower Head
8. Hose
9. Set Screw
10. 20mm Bolt
11. 90mm Dyna Bolt set
12. Alan key 6mm
13. Alan key 3mm
x6
x10
8
Connect Arm to Body.
1. Connect internal flexi-hoses.
2. Push together and use an alan key to fasten
set screw.
* Test and check all water points for leaks.
91. Attach hand held shower head.
2. Test and commission.
2.
2.
1. Attach floor covering.
2. Push cover plate down.
*ENLARGED PARTS
7
1.
1.
1.
2.
1
2
9
12 13
10
11
3
4
5
7
8
6
In the box
1. Base
2. Lid
3. Cover Plate
4. Body
5. Arm
6. Shower Head
7. Hand-held Shower Head
8. Hose
9. Set Screw
10. 20mm Bolt
11. 90mm Dyna Bolt set
12. Alan key 6mm
13. Alan key 3mm
x6
x10
8
Connect Arm to Body.
1. Connect internal flexi-hoses.
2. Push together and use an alan key to fasten
set screw.
* Test and check all water points for leaks.
91. Attach hand held shower head.
2. Test and commission.
DO NOT use cream
cleaners or bleach.
These substances are
abrasive.
Regularly clean with
mild liquid detergent
or soap and water.
DO NOT use cleaning
pads with abrasive
surfaces as this may
scratch the material.

Other abi Bathroom Fixture manuals

abi Sola 13327 User manual

abi

abi Sola 13327 User manual

abi VAADA 10745 User manual

abi

abi VAADA 10745 User manual

abi 13532 User manual

abi

abi 13532 User manual

abi CYRUS 100131 User manual

abi

abi CYRUS 100131 User manual

abi SAMIRA 11946 User manual

abi

abi SAMIRA 11946 User manual

abi CAPRI 11658 User manual

abi

abi CAPRI 11658 User manual

abi RYLA 10375 User manual

abi

abi RYLA 10375 User manual

abi KINGSLEY 14113 User manual

abi

abi KINGSLEY 14113 User manual

abi ELYSIAN 12880 User manual

abi

abi ELYSIAN 12880 User manual

abi HENDERSON 13075 User manual

abi

abi HENDERSON 13075 User manual

abi ELYSIAN MULTIPURPOSE HOLDER User manual

abi

abi ELYSIAN MULTIPURPOSE HOLDER User manual

abi KINGSLEY 12656 User manual

abi

abi KINGSLEY 12656 User manual

Popular Bathroom Fixture manuals by other brands

Akw iSure Installation and instruction manual

Akw

Akw iSure Installation and instruction manual

DANIEL RUBINETTERIE A579JCM50 Assembly instructions

DANIEL RUBINETTERIE

DANIEL RUBINETTERIE A579JCM50 Assembly instructions

Omnires Mini MI1544 Installation and Maintenance

Omnires

Omnires Mini MI1544 Installation and Maintenance

Kohler K-922 installation guide

Kohler

Kohler K-922 installation guide

Kohler Components EX28096K-4 installation instructions

Kohler

Kohler Components EX28096K-4 installation instructions

BELLOSTA via dei condotti B3-120/C installation instructions

BELLOSTA

BELLOSTA via dei condotti B3-120/C installation instructions

Triton ASTI Installation and operating instructions

Triton

Triton ASTI Installation and operating instructions

Glacier bay HD910-X1110H Use and care guide

Glacier bay

Glacier bay HD910-X1110H Use and care guide

Kohler K-1681 installation guide

Kohler

Kohler K-1681 installation guide

Helvex Konos 2107 installation guide

Helvex

Helvex Konos 2107 installation guide

Phoenix S10001 quick start guide

Phoenix

Phoenix S10001 quick start guide

Hans Grohe Croma Select S 280 1jet Showerpipe 26557000 Instructions for use/assembly instructions

Hans Grohe

Hans Grohe Croma Select S 280 1jet Showerpipe 26557000 Instructions for use/assembly instructions

Triton LocBoard LB2-B Installation & assembly instructions

Triton

Triton LocBoard LB2-B Installation & assembly instructions

Franke CMPX551 Installation and operating instructions

Franke

Franke CMPX551 Installation and operating instructions

noken 100130997 N312140105 installation instructions

noken

noken 100130997 N312140105 installation instructions

Mira Agile S B97C Installation and user guide

Mira

Mira Agile S B97C Installation and user guide

Dura Faucet DF-SA610C quick start guide

Dura Faucet

Dura Faucet DF-SA610C quick start guide

Crosswater SB035B C manual

Crosswater

Crosswater SB035B C manual

manuals.online logo
manuals.online logoBrands
  • About & Mission
  • Contact us
  • Privacy Policy
  • Terms and Conditions

Copyright 2025 Manuals.Online. All Rights Reserved.