manuals.online logo
Brands
  1. Home
  2. •
  3. Brands
  4. •
  5. Abus
  6. •
  7. Control Unit
  8. •
  9. Abus PLHA10000 User manual

Abus PLHA10000 User manual

Other manuals for PLHA10000

2

Other Abus Control Unit manuals

Abus ESMO50001 Mounting instructions

Abus

Abus ESMO50001 Mounting instructions

Abus FU8010 User manual

Abus

Abus FU8010 User manual

Abus FU8211 User manual

Abus

Abus FU8211 User manual

Abus FUMO50025 User manual

Abus

Abus FUMO50025 User manual

Abus Profiline AZ6451 User manual

Abus

Abus Profiline AZ6451 User manual

Abus FUBE50000 User manual

Abus

Abus FUBE50000 User manual

Abus FUMO50110 Mounting instructions

Abus

Abus FUMO50110 Mounting instructions

Abus ModuVis TVHS20340 User manual

Abus

Abus ModuVis TVHS20340 User manual

Abus TVHS10040 User manual

Abus

Abus TVHS10040 User manual

Abus FUMO50000 Mounting instructions

Abus

Abus FUMO50000 Mounting instructions

Abus PLHA10000 User manual

Abus

Abus PLHA10000 User manual

Abus PLAC90230 User manual

Abus

Abus PLAC90230 User manual

Abus FU8020 User manual

Abus

Abus FU8020 User manual

Abus FUMO50001 Mounting instructions

Abus

Abus FUMO50001 Mounting instructions

Abus Security Center AZ5140 User manual

Abus

Abus Security Center AZ5140 User manual

Abus FUMO50110 User manual

Abus

Abus FUMO50110 User manual

Popular Control Unit manuals by other brands

Seitz 14A80 user manual

Seitz

Seitz 14A80 user manual

Wilo RS485 Installation and operating instructions

Wilo

Wilo RS485 Installation and operating instructions

Becker CentralControl CC41 Commissioning Instruction

Becker

Becker CentralControl CC41 Commissioning Instruction

SICK CDB650 operating instructions

SICK

SICK CDB650 operating instructions

Panduit NetKey NKP5E88M Series installation instructions

Panduit

Panduit NetKey NKP5E88M Series installation instructions

MX Options Concentric Petite Fitting instructions

MX

MX Options Concentric Petite Fitting instructions

Clean Water Systems Fleck 2510 Installation & start?up guide

Clean Water Systems

Clean Water Systems Fleck 2510 Installation & start?up guide

Fairchild FSB44104A user guide

Fairchild

Fairchild FSB44104A user guide

LEGRAND Wattstopper LMIN-104 installation instructions

LEGRAND

LEGRAND Wattstopper LMIN-104 installation instructions

PMK ATT10BNCS instruction manual

PMK

PMK ATT10BNCS instruction manual

Tektronix TDS3FFT user manual

Tektronix

Tektronix TDS3FFT user manual

Woodward easYgen Technical manual

Woodward

Woodward easYgen Technical manual

Balluff BNI EIP-502-105-R015 user guide

Balluff

Balluff BNI EIP-502-105-R015 user guide

NXP Semiconductors TWR-LS1021A Getting started

NXP Semiconductors

NXP Semiconductors TWR-LS1021A Getting started

Advantech PCM-3117 Startup manual

Advantech

Advantech PCM-3117 Startup manual

Danfoss MCO 101 manual

Danfoss

Danfoss MCO 101 manual

Moons' Lin Engineering R701P user manual

Moons'

Moons' Lin Engineering R701P user manual

Aventics RV1 operating instructions

Aventics

Aventics RV1 operating instructions

manuals.online logo
manuals.online logoBrands
  • About & Mission
  • Contact us
  • Privacy Policy
  • Terms and Conditions

Copyright 2025 Manuals.Online. All Rights Reserved.

 DieausführlicheBedienungsanleitungundtechnischeDatenndenSieauf
unserer Webseite:
Vous trouverez le manuel d’utilisateur détaillé et les données techniques sur
notre site Internet :
De gedetailleerde gebruikershandleiding en technische gegevens vindt u
op onze website:
Istruzioni d‘uso dettagliate e dati tecnici sono disponibili sul nostro sito web:
A full instruction manual and technical data can be found on our website:
 Dedetaljeredebetjeningsvejledningenogtekniskedatandesipåvores
hjemmeside:
 Szczegółowainstrukcjaobsługiorazdanetechniczneznajdująnanaszej
stronie internetowej:
Las instrucciones de uso detalladas y los datos técnicos se encuentran en
nuestra página web:
 Dendetaljeradebruksanvisningenochtekniskadatannsipåvårhemsida:
ABUS Security Center • Linker Kreuthweg 5
86444 Aing • Germany • abus.com
PLHA10000
QUICK GUIDE
www.abus.com/product/PLHA10000
• PLHA10000 verfügt über zwei Eingänge S1 und
S2 für den Anschluss an Wandtaster und zwei
Ausgänge für die Steuerung von Beleuchtung
oder anderen 230V Aktoren.
• Die Ausgänge werden entweder über die
Schaltereingänge oder über Z-Wave Befehle
eines Z-Wave Gateways geschalten.
• Wenn einer der beiden Ausgänge angeschalten
ist, leuchtet die LED.
•PLHA10000hastwoinputsS1andS2forconnection
to wall switches and two outputs for controlling
lightingorother230Vactuators.
• The outputs are switched either via the switch
inputsorviaZ-WavecommandsofaZ-Wavegateway.
• If one of the two outputs is switched on, the LED
lightsup.
Operating the
device
Gerätebetrieb
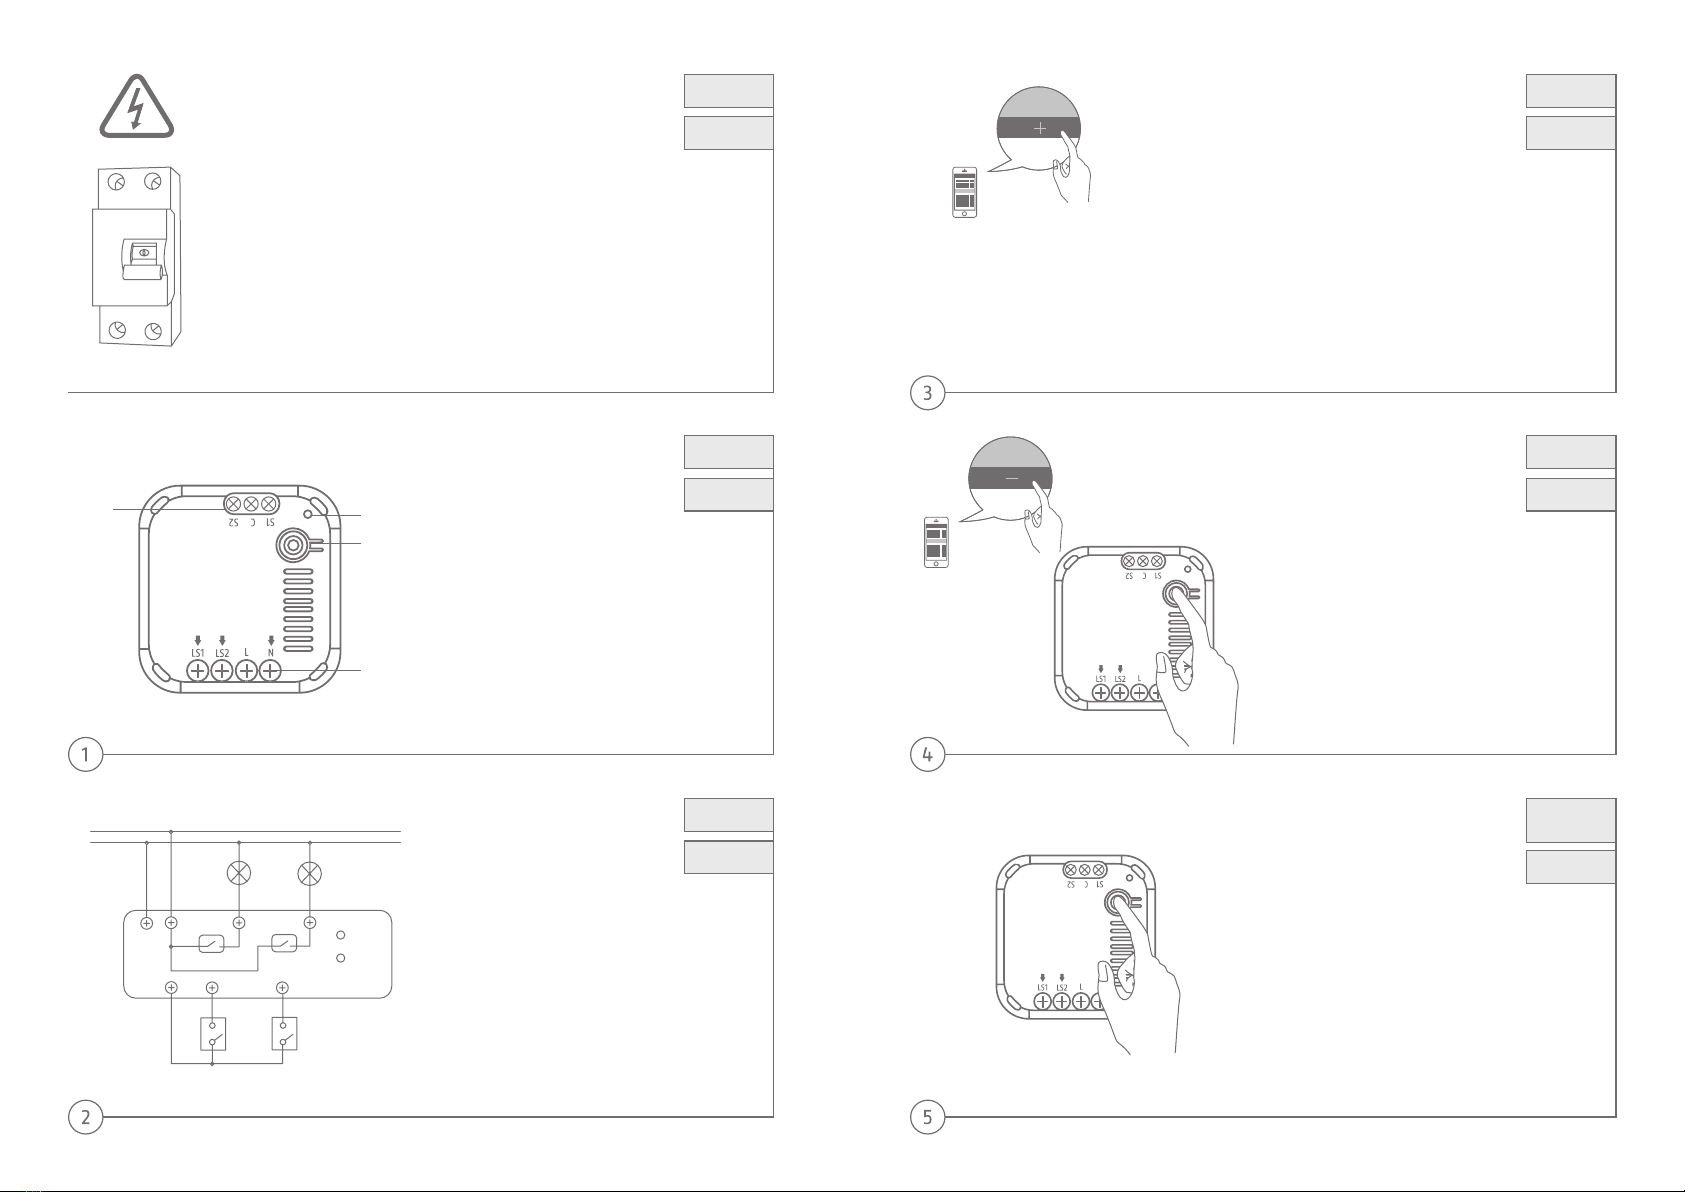
Bei der Montage muss die anzuschließende elektrische Leitung spannungsfrei sein.
Daher als Erstes Strom abschalten und Spannungsfreiheit mit einem Spannungsprüfer
überprüfen. Bei der Installation des Gerätes handelt es sich um eine Arbeit an der
Netzspannung. Sie muss daher durch einen Fachmann nach den landesüblichen
Installationsvorschrien und Anschlussbedingungen durchgeführt werden.
Sofern Sie mit der Installation und dem Betrieb des Geräts noch nicht vertraut sind, lesen
Sie zu Ihrer eigenen Sicherheit unbedingt zuerst die vollständige Bedienungsanleitung.
Duringinstallation,theelectricalwiringbeingconnectedmustbedead.
Therefore,switchothepowerrstanduseavoltagetestertocheckthatthepowersupply
isdisconnected.Installingthisunitinvolvesworkonthemainsvoltagesupply.Thismust
therefore be carried out in accordance with applicable national wiring regulations and
electricaloperatingconditions.Ifyouarenotyetfamiliarwiththeinstallationandoperation
ofthedevice,besuretoreadthecompleteoperatinginstructionsrst,foryourownsafety.
Warning!
Achtung!
Switch
inputs • Drücken Sie in ihrer Z-Wave App auf die -
(Remove) Taste und folgen den Anweisungen.
• Drücken Sie 3 mal schnell (innerhalb von
1,5 Sekunden) auf die Link Taste.
• Die App zeigt an, dass der Auslern-
Prozess erfolgreich war.
• Click the – (Remove) button in your Z-Wave
Appandfollowthefurtherinstructions.
•PresstheLinkbutton3timesquickly
(within1.5seconds).
• The App will show if the Remove
Deviceprocesswassuccessful.
• Stellen Sie sicher, dass Sie alle Warnhinweise
beachtet haben und die elektrische
Leitung stromlos ist.
• Die Montage erfolgt in einer Unterputzdose
im Innenbereich.
• Verkabeln Sie das Produkt anhand der Skizze.
• Make sure that you have read and understood all
safety precautions and that the power of the
lightingcircuithasbeenturnedo.
•Installationisdoneinaush-mountedboxindoors.
•Wiretheproductaccordingtothesketch.
Installation
Installation
• Drücken Sie in ihrer Z-Wave App auf die + (Add) Taste und folgen
den Anweisungen.
• Drücken Sie 3 mal schnell (innerhalb von 1,5 Sekunden) auf die Link Taste.
• Die App zeigt an, dass der Einlernen-Vorgang erfolgreich war.
• Für Z-Wave Gateways mit SmartStart Funktion: Alternativ unterstützt
das Gerät auch die automatische Einbindung via SmartStart, der
Einlernvorgang startet automatisch, sobald das Gerät mit Strom
versorgt wird.
•Clickthe+(Add)buttoninyourZ-WaveAppandfollowthefurtherinstructions.
•PresstheLinkbutton3timesquickly(within1.5seconds).
•TheAppwillshowiftheAdddeviceprocesswassuccessful.
•ForZ-WaveGatewayswithSmartStartfunction:Thedevicesupports
SmartStartfunction,whereinclusionisinitiatedautomaticallyonpower-on.
Add Device
(Inclusion)
Gerät
einlernen
3x
LED
Link
AC inputs/
outputs
L
N
N L
Load 1 Load2
LS1 LS2
LED
Button
CS1 S2
• Drücken Sie 3 mal schnell (innerhalb
von 1,5 Sekunden) auf die Link Taste.
• Drücken Sie schnell (innerhalb von 1 Sekunde)
ein viertes mal und halten die Link Taste
für mindestens 5 Sekunden gedrückt.
• Das Gerät ist jetzt auf Werkseinstellungen
zurückgesetzt.
•PresstheLinkbutton3timesquickly
(within1.5seconds).
• Press the Link button quickly (within 1 second)
againandholditforatleast5seconds.
•Thedeviceisnowrestoredtofactorysettings.
Factory Reset
Werksein-
stellungen
zurücksetzen
3x+5sec.
Remove Device
(Exclusion)
Gerät
auslernen