AEG LOOP User manual

USER GUIDE
CORDLESS
TELEPHONE
Loop
UK
V2

2
P1 P2
P3
P4
P5
13

1 BECAUSE WE CARE
Thank you for purchasing this product. This product has been designed
and assembled with utmost care for you and the environment. This is
why we supply this product with a quick installation guide to reduce
the number of paper (pages) and therefor save trees to be cut for
making this paper. A full and detailed user guide with all the features
descripted can be found on our website www.aegtelephones.eu.
Please download the full user guide in case you want to make use of
all the advanced features of your product. To save the environment we
ask you not to print this full user guide. Thank you for supporting us to
protect our environment.
2 IMPORTANT SAFETY INSTRUCTIONS
Please follow these safety instructions when using your telephone
equipment to reduce risk of fire, electric shock and injury:
•Read and understand all the instructions.
•Follow all warnings and instructions marked on the product.
•Unplug this product from the wall outlet before cleaning. Do not use
liquid cleaners or aerosol cleaners. Use a damp cloth for cleaning.
•Keep this product away from hot, humid conditions or strong
sunlight, and don’t let it get wet or use it near water (for example,
near a bath tub, kitchen sink, and swimming pool).
•Do not overload wall outlets and extension cords as this can result in
the risk of fire or electric shock.
•Unplug this product from the wall outlet under the following
conditions:
>When the power supply cord or plug is damaged.
>If the product fails to operate normally despite following the
operating instructions.
>If the product has been dropped and the cabinet has been
damaged.
>If the product exhibits a distinct change in performance.
3
UK

•NEVER use your phone outdoors during a thunderstorm. Unplug the
base from the telephone line and the mains socket when there are
storms in your area. Damage caused by lightning is not covered by
the guarantee.
•Do not use the telephone to report a gas leak in the vicinity of the
leak.
•Use only the supplied NiMH (Nickel Metal Hydride) batteries that
came with your phone or an authorized replacement recommended
by the manufacturer. There is a risk of explosion if you replace the
battery with an incorrect battery type. The use of other battery types
or non-rechargeable batteries/primary cells can be dangerous. They
may cause interference and/or damage to the unit or surroundings.
The manufacturer will not be held liable for damage arising from
such non-compliance.
•Do not use third party charging pods. Damage may be caused to
the batteries.
•Please ensure that the batteries are inserted in the correct polarity.
Dispose of batteries safely. Do not burn, immerse them in water,
disassemble, or puncture the batteries.
3 INTENDED USE
This telephone is intended to be connected to a public analogue
telephone network or to an analogue extension of a compatible PBX
system.
4

4 PACKAGE CONTENT
The package contains the following items:
•1 Handset
•1 Base station
•1 Mains power adapter
•1 Telephone line cord
•2 AAA NiMH rechargeable batteries
•User’s manual
5 HANDSET & BASE CONNECTION
•When purchased, all handsets are already registered to the
base unit and should link to it when they are all powered up.
•To use your cordless handset and base unit together, you must
be able to establish a radio link between them. The signal
between the handset and the base unit is in accordance with
the normal standards for a DECT phone: Maximum range up
to 300 metres outdoors or 50 metres indoors. Be aware that:
>Large metal objects, such as refrigerators, mirrors
or filing cabinets, between the handset and the
base unit may block the radio signal.
>Solid structures, such as walls, may reduce the signal strength.
>Electrical equipment may cause interference
and/or affect the range.
•Do not place the base unit close to another telephone,
TV or audio equipment - it may cause interference.
•Putting the base unit as high as possible ensures the best signal.
•If the sound in the earpiece becomes faint or distorted during a call,
you may be going out of range of the base unit. Move nearer to the
base unit within 20 seconds; otherwise the line may be cut off.
5
UK

6 INSTALLING YOUR PHONE
4.1 Connecting the Base Station (See P5)
•Plug the mains power cable and telephone line cord into the base
station.
•Plug the power adapter into a 100 - 240Vac, 50 - 60Hz mains power
socket and the telephone line cord into a telephone line socket.
Warning: Always use the cables provided in the box. Use only the
supplied adaptor. Using other power adapter may damage the unit.
Note: Place the base unit within easy reach of the mains power socket.
Never try to lengthen the mains power cable. The base station needs
mains power for normal operation and the cordless handsets will not
work without it.
6.1 Installing and Charging the Rechargeable Batteries(see P3)
•Insert the 2 supplied batteries into the battery compartment,
observing the correct polarity (see markings inside battery
compartment).
Warning: Use only the supplied NiMH rechargeable batteries.
•Place the back cover over the back of the handset and press down
until it clicks into place.
•Place the handset on the base and charge for 15 hours before using
the handset for the first time.
>The handset will give a double beep when it is properly
placed on the base and the battery charging indicator
on the base lights up to indicate charging.
NOTE
The handset may become warm when the batteries are being charged
or during prolonged periods of use. This is normal and does not
indicate a fault.
CAUTION
Risk of explosion if the battery is replaced by an incorrect type. Dispose
of used batteries according to the instructions.
6

7 Set the handset language
•Press M and .to select “HS SETTINGS”.
•Press M and .to select “LANGUAGE”.
•Press M and .to select the desired language.
•Press M to confirm.
8 GET TO KNOW YOUR PHONE
8.1 Handset Overview(see P1)
1M
•In idle mode: Press to access the main menu.
•In sub-menu mode: Press to confirm the
selection.
•During a call: Press to access Intercom/
Phonebook/Redial List/ Call List.
2m
•In idle mode: Press to initiate an intercom call.
•In main menu mode: Press to go back to idle
screen.
•In sub-menu mode: Press to go back to previous
menu.
•In sub-menu mode: Press and hold to go back
to idle screen.
•In editing / pre-dial mode: Press to delete a
character / digit.
•In editing / pre-dial mode: Press and hold to
delete all the characters / digits.
•During a call: Press mute / unmute the
microphone.
•While the handset is ringing: Press to turn off
the ringer volume.
7
UK

3=
•In idle mode: Press to access the call list.
•In menu mode: Press to scroll up the menu
items.
•In Phonebook list / Redial list / Call List: Press to
scroll up the list.
•During a call: Press to increase the volume.
•During ringing: Press to increase the ringer
volume.
4-
•In idle mode: Press to access the redial list.
•In menu mode: Press to scroll down the menu
items.
•In Phonebook list / Redial list / Call List: Press to
scroll down the list.
•During a call: Press to decrease the volume.
•During ringing: Press to decrease the ringer
volume.
5T
•In idle / predialing mode : Press to make a call.
•In Redial list / Call List / Phonebook entry: Press
to make a call to the selected entry in the list.
•During ringing: Press to answer a call.
6O
•During a call: Press to end a call and go back to
idle screen.
•In menu / editing mode: Press to go back to
previous menu.
•In menu / editing mode: Press and hold to go
back to idle screen.
•In idle mode: Press and hold to power on/off
the handset.
8

7
ALPHA-
NUMERIC
KEYPAD,
*, #
•Presstoinsertadigit/character/*/#.
•X key in idle mode: Press and hold to enable
or disable the keypad lock.
•Jkey in idle mode: Press and hold to turn on
/ off the ringer.
•<0>keyinpredialing/numbereditingmode:
Press and hold to insert a pause.
•<#> key in Call List mode: Press to review
caller’s number if applicable.
8H
•During a call: Press to turn on / off the
speakerphone.
•In Idle mode / predialing mode / Redial list /
Call List / Phonebook entry: Press to make a call
with speakerphone.
•During ringing: Press to answer a call with
speakerphone.
9P•In idle mode: Press to access the phonebook
list.
10 F•During a call: Press to dial a flash.
11 •Microphone
12 •Speaker
8.2 Base Station Overview(see P4)
13 Press to page your handset(s).
Long press to start registration mode
9
UK
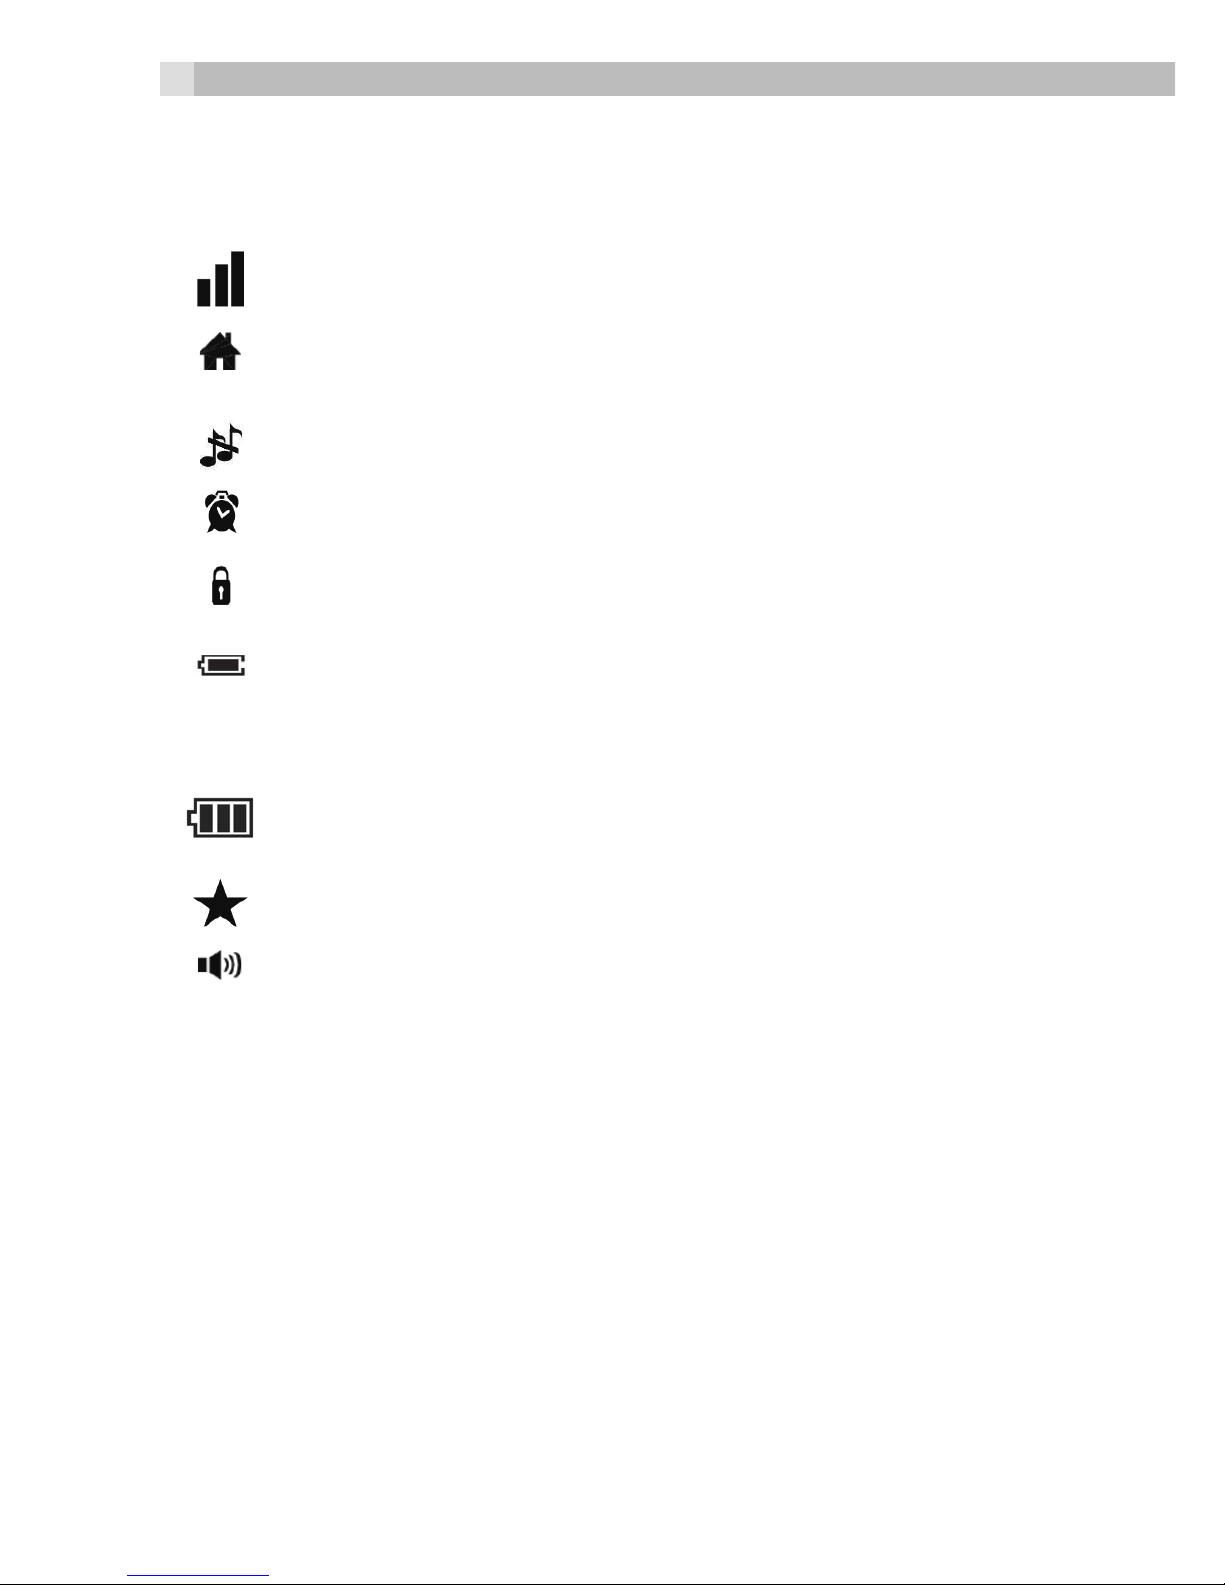
8.3 Handset LCD Display Icons and Symbols(see P2)
The LCD display gives you information on the current status of the
telephone.
More blocks indicate a stronger reception signal.
Less blocks indicate a weaker reception signal.
Indicates a call is in progress.
Flashes when there is an incoming call.
Indicate that the ringer is switched off.
Steady when an alarm is set.
Indicate that the keypad is locked.
Indicate when the battery is fully charged.
Whole icon flashes when the battery charging. Internal
block icon flashes when the battery is in final charging stage.
Indicate when the battery needs charging.
Flash when low battery power level is detected.
Indicate new call in call list.
Indicates the speakerphone is turned on.
8.4 Menu Structure
In idle mode, press Mto show CALL LIST, the first option in the
Main Menu list.
Press =to go to other options in the menu list.
Press Mto enter a sub-menu or function.
Press m to go back to the previous level.
Press and hold mto cancel the current operation and return to the
idle screen.
Note: If you do not press any key on the handset for 30 seconds, the
display will automatically return to the idle screen.
Refer to the following for the menu structure.
10
Other manuals for LOOP
1
Table of contents
Other AEG Cordless Telephone manuals

AEG
AEG Voxtel S100 User manual

AEG
AEG voxtel d150 User manual

AEG
AEG Voxtel S110 Combo User manual

AEG
AEG Voxtel Smart 3 User manual

AEG
AEG Voxtel D80 User manual

AEG
AEG Spirit 100 User manual

AEG
AEG voxtel D550BT User manual

AEG
AEG Lloyd Combo15 Instruction manual

AEG
AEG Voxtel S105 User manual

AEG
AEG Voxtel Smart 3 User manual


