AEG AFNDA18 User manual


2

3
It is essential that you read the instructions in this manual before operating this
machine.
Subject to technical modifications.

4
A- Belt hook
B- Trigger
C- Jam release
D- No-mar pad
E- Workpiece contact
F - Pusher
G- Depth of drive adjustment
H- Angled magazine
I - Battery
J - Charger
K- Tool bag
L - LED button
A-
B- No-mar pad
Workpiece contact
A- Depress latches to remove
battery pack
B - To install
C- Battery pack
A- Magazine B- Nails
A- Pusher
A
B
C
DE
F
G
H
I
A
B
C
A
B
A
DA15
DA17
DA19
DA21
DA23
DA25
Nail diameter
.069 in.
K
J
Code A
in. mm
DA15 1-1/4 32
DA17 1-1/2 38
DA19 1-3/4 44
DA21 2 51
DA23 2-1/4 57
DA25 2-1/2 64
L
A
B
Fig. 1
Fig. 2 Fig. 3
Fig. 5
Fig. 6
Fig. 4
A

5
A - Trigger
B - Workpiece contact
A - Inside lever
B - Pusher
A - Jam release
B - Latch
A - Drive depth adjustment dial
B - To decrease depth
C - To increase depth
A
B
A
C
B
A
B
A
B
A - Trigger mode selector
B - Single sequential actuation mode
C - Contact actuation mode
A
B
C
Fig. 8
Fig. 11Fig. 9Fig. 7
Fig. 10

6
Motor 18 Volt DC
Fastener Type 15 gauge DA type 34 degree nish nails
Fastener Range 32mm to 64mm (1-1/4” to 2-1/2”)
Magazine Capacity 100 nails
Fastener Driving Speed 3 fasteners per second
Weight 3.1 Kg (6.8 lbs)
Read and understand all instructions. Failure to follow all
instructions listed below, may result in electric shock, re and/
or serious personal injury.
■ Keep your work area clean and well lit. Cluttered benches
and dark areas invite accidents.
■ Do not operate power tools in explosive atmospheres, such
as in the presence of flammable liquids, gases, or dust.
Power tools create sparks which may ignite the dust or
fumes.
■ Keep bystanders, children, and visitors away while
operating a power tool. Distractions can cause you to lose
control.
■ A battery operated tool with integral batteries or a separate
battery pack must be recharged only with the specified
charger for the battery. A charger that may be suitable for
one type of battery may create a risk of fire when used with
another battery.
■ Use battery operated tool only with specifically designated
battery pack. Use of any other batteries may create a risk
of fire.
■ Use battery only with charger listed.
MODEL BATTERY PACK
(Li-ion) CHARGER
AFDNA18 L1830R, L1815R BL1218
■ Stay alert, watch what you are doing and use common
sense when operating a power tool. Do not use tool while
tired or under the influence of drugs, alcohol, or medication.
A moment of inattention while operating power tools may
result in serious personal injury.
■ Dress properly. Do not wear loose clothing or jewellery.
Contain long hair. Keep your hair, clothing, and gloves
away from moving parts. Loose clothes, jewellery, or long
hair can be caught in moving parts.
■ Avoid accidental starting. Be sure switch is in the locked
or off position before inserting battery pack. Carrying tools
with your finger on the switch or inserting the battery pack
into a tool with the switch on invites accidents.
■ Remove adjusting keys or wrenches before turning the tool
on. A wrench or a key that is left attached to a rotating part
of the tool may result in personal injury.
■ Do not overreach. Keep proper footing and balance at all
times. Proper footing and balance enable better control of
the tool in unexpected situations.
■ Use safety equipment. Always wear eye protection.
Dust mask, non-skid safety shoes, hard hat, or hearing
protection must be used for appropriate conditions.
■ Do not wear loose clothing or jewellery. Contain long hair.
Loose clothes, jewellery, or long hair can be drawn into air
vents.
■ Do not use on a ladder or unstable support. Stable footing
on a solid surface enables better control of the tool in
unexpected situations.
■ Use clamps or other practical way to secure and support
the workpiece to a stable platform. Holding the work by
hand or against your body is unstable and may lead to loss
of control.
■ Do not force tool. Use the correct tool for your application.
The correct tool will do the job better and safer at the rate
for which it is designed.
■ Do not use tool if switch does not turn it on or off. A tool
that cannot be controlled with the switch is dangerous and
must be repaired.
■ Disconnect battery pack from tool or place the switch in
the locked or off position before making any adjustments,
changing accessories, or storing the tool. Such preventive
safety measures reduce the risk of starting the tool
accidentally.
■ Store idle tools out of reach of children and other untrained
persons. Tools are dangerous in the hands of untrained
users.
■ When battery pack is not in use, keep it away from other
metal objects like: paper clips, coins, keys, nails, screws,
or other small metal objects that can make a connection
from one terminal to another. Shorting the battery terminals
together may cause sparks, burns, or a fire.
■ Maintain tools with care. Keep cutting tools sharp and
clean. Properly maintained tools with sharp cutting edges
are less likely to bind and are easier to control.
■ Check for misalignment or binding of moving parts,
breakage of parts, and any other condition that may affect
the tool’s operation. If damaged, have the tool serviced
before using. Many accidents are caused by poorly
maintained tools.
■ Use only accessories that are recommended by the
manufacturer for your model. Accessories that may be
suitable for one tool may create a risk of injury when used
on another tool.
■ Keep the tool and its handle dry, clean and free from oil and
grease. Always use a clean cloth when cleaning. Never use
brake fluids, gasoline, petroleum-based products, or any
strong solvents to clean the tool. Following this rule will
reduce the risk of loss of control and deterioration of the
enclosure plastic.
■ Tool service must be performed only by qualified repair
personnel. Service or maintenance performed by
unqualified personnel may result in a risk of injury.
■ When servicing a tool, use only identical replacement

7
parts. Follow instructions in the Maintenance section of
this manual. Use of unauthorized parts or failure to follow
Maintenance instructions may create a risk of shock or
injury.
■ Hold tool by insulated gripping surfaces when performing
an operation where the cutting tool may contact hidden
wiring. Contact with a “live” wire will also make exposed
metal parts of the tool “live” and shock the operator.
■ Know your power tool. Read operator’s manual carefully.
Learn its applications and limitations, as well as the specific
potential hazards related to this tool. Following this rule will
reduce the risk of electric shock, fire, or serious injury.
■ Eye protection which conforms to ANSI specifications
and provides protection against flying particles both
from the FRONT and SIDE should ALWAYS be worn by
the operator and others in the work area when loading,
operating or servicing this tool. Eye protection is required
to guard against flying fasteners and debris, which could
cause severe eye injury.
■ The employer and/or user must ensure that proper eye
protection is worn. We recommend Wide Vision Safety
Mask for use over eyeglasses or standard safety glasses
that provide protection against flying particles both from the
front and side. Always use eye protection which is marked
to comply with ANSI Z87.1.
■ Additional safety protection will be required in some
environments. For example, the working area may include
exposure to noise level which can lead to hearing damage.
The employer and user must ensure that any necessary
hearing protection is provided and used by the operator and
others in the work area. Some environments will require
the use of head protection equipment. When required,
the employer and user must ensure that head protection
conforming to ANSI Z89.1-1997 is used.
■ Protect your lungs. Wear a face or dust mask if the
operation is dusty. Following this rule will reduce the risk of
serious personal injury.
■ Protect your hearing. Wear hearing protection during
extended periods of operation. Following this rule will
reduce the risk of serious personal injury.
■ Battery tools do not have to be plugged into an electrical
outlet; therefore, they are always in operating condition. Be
aware of possible hazards when not using your battery tool
or when changing accessories.
■ Following this rule will reduce the risk of electric shock, fire,
or serious personal injury.
■ Do not place battery tools or their batteries near fire or heat.
This will reduce the risk of explosion and possibly injury.
■ Do not crush, drop or damage battery pack. Do not use a
battery pack or charger that has been dropped or received
a sharp blow. A damaged battery is subject to explosion.
Properly dispose of a dropped or damaged battery
immediately.
■ Batteries can explode in the presence of a source of ignition,
such as a pilot light. To reduce the risk of serious personal
injury, never use any cordless product in the presence of
open flame. An exploded battery can propel debris and
chemicals. If exposed, flush with water immediately.
■ Do not charge battery tool in a damp or wet location.
Following this rule will reduce the risk of electric shock.
■ For best results, your battery tool should be charged in a
location where the temperature is more than 50°F but less
than 100°F. Do not store outside or in vehicles.
■ Under extreme usage or temperature conditions, battery
leakage may occur. If liquid comes in contact with your skin,
wash immediately with soap and water, then neutralize with
lemon juice or vinegar. If liquid gets into your eyes, flush
them with clean water for at least 10 minutes, then seek
immediate medical attention. Following this rule will reduce
the risk of serious personal injury.
■ Use the tool only for its intended use. Do not discharge
fasteners into open air.
■ Keep hands and body parts clear of immediate work
area. Hold workpiece with clamps when necessary to
keep hands and body out of potential harm. Be sure the
workpiece is properly secured before pressing the nailer
against the material. The workpiece contact may cause the
work material to shift unexpectedly.
■ Keep face and body parts away from back of the tool cap
when working in restricted areas. Sudden recoil can result
in impact to the body, especially when nailing into hard or
dense material.
■ Never use this tool in a manner that could cause a fastener
to be directed toward anything other than the workpiece.
■ Do not use the tool as a hammer.
■ Always carry the tool by the handle. Never carry the tool
by the air hose.
■ Do not alter or modify this tool from the original design or
function without approval from the manufacturer.
■ Always be aware that misuse and improper handling of
this tool can cause injury to yourself and others.
■ Never clamp or tape the trigger or workpiece contact in an
actuated position.
■ Never leave a tool unattended with the battery installed.
■ Do not operate this tool if it does not contain a legible
warning label.
■ Do not continue to use a tool that does not function
properly.
■ Do not use tool if trigger does not actuate properly. Any tool
that cannot be controlled with the trigger is dangerous and
must be repaired.
■ Check operation of the workpiece contact mechanism
frequently. Do not use the tool if the workpiece contact
mechanism is not working correctly as accidental driving
of a fastener may result. Do not interfere with the proper
operation of the workpiece contact mechanism.
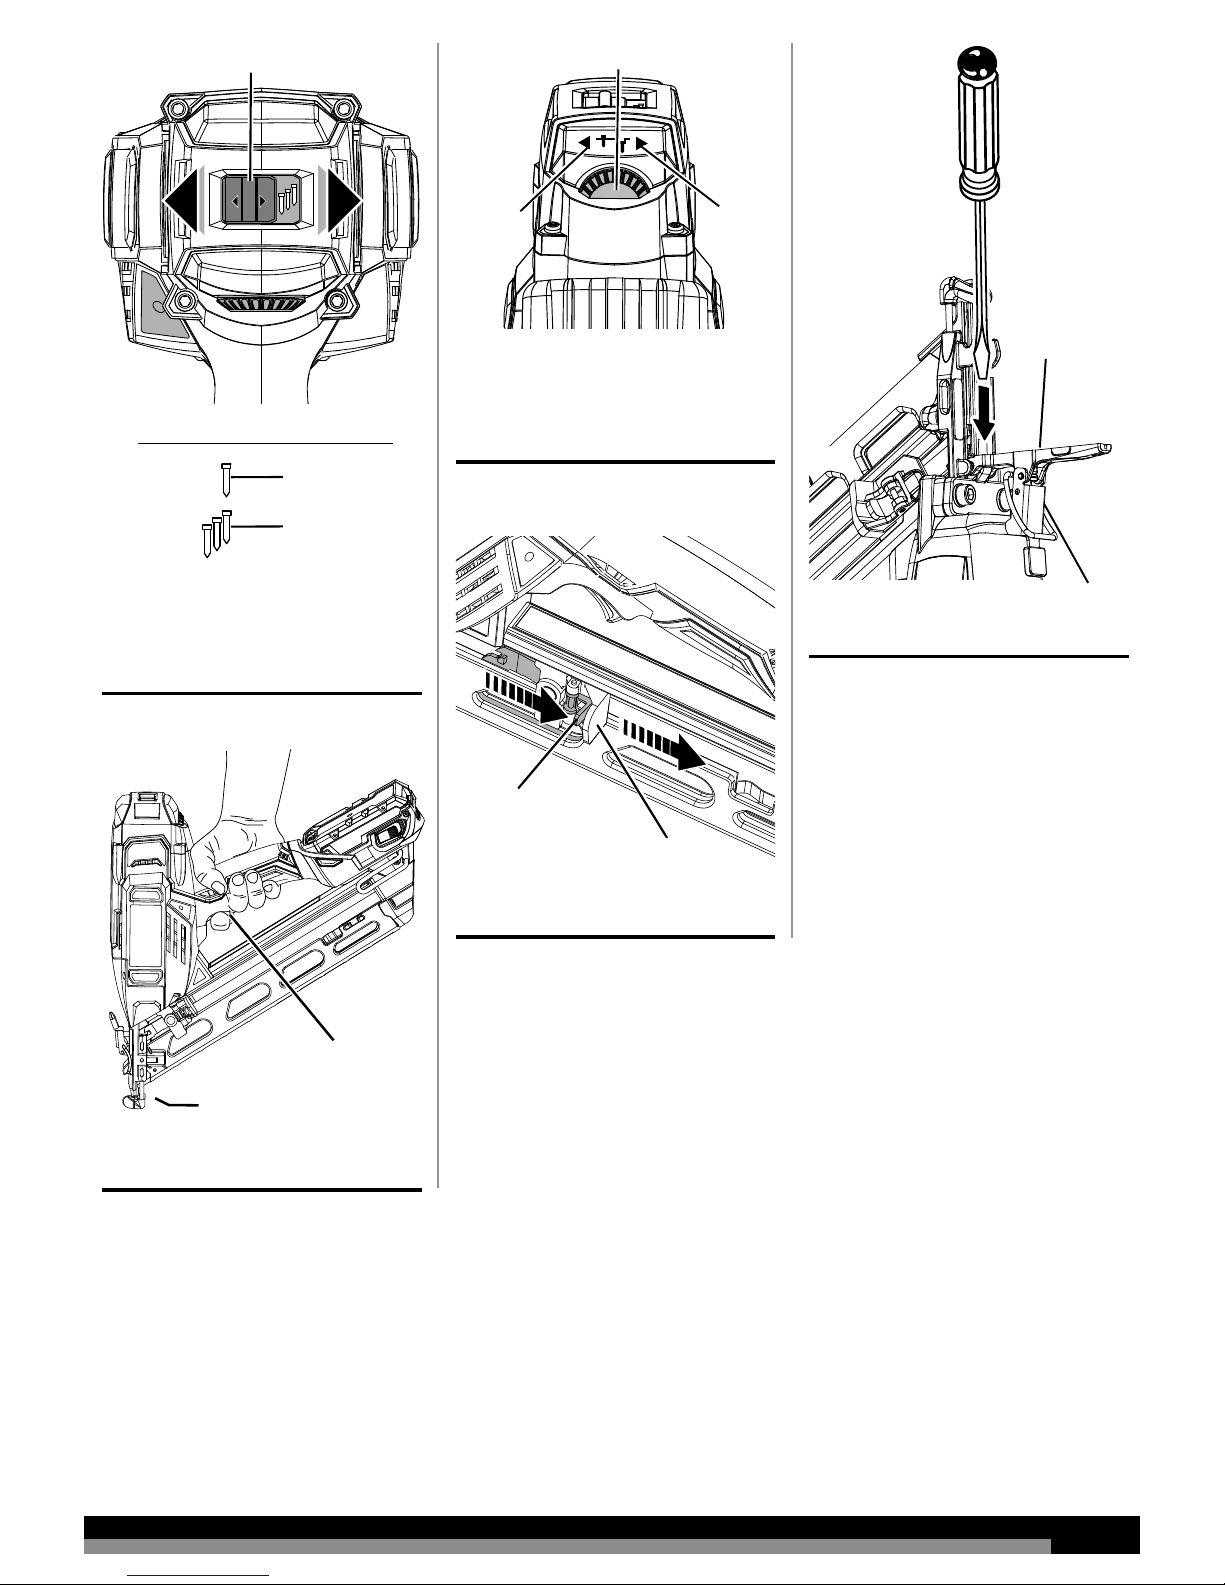
■ Use only fasteners that are recommended for your model.
■ Always assume that the tool contains fasteners.
■ Do not carry the tool from place to place holding the trigger.
Accidental discharge could result.
■ Always handle the tool with care:
● Respect the tool as a working implement.
● Never engage in horseplay.
● Never pull the trigger unless nose is directed toward
the work.
● Keep others a safe distance from the tool while tool is in

8
operation as accidental actuation may occur, possibly
causing injury.
■ Choice of triggering method is important. Check manual for
triggering options.
■ Do not point the tool toward yourself or anyone whether it
contains fasteners or not.
■ Do not actuate the tool unless you intend to drive a fastener
into the workpiece.
■ Keep fingers away from trigger when not driving fasteners
to avoid accidental firing.
■ During normal use the tool will recoil immediately after
driving a fastener. This is a normal function of the tool.
Do not attempt to prevent the recoil by holding the nailer
against the work. Restriction to the recoil can result in
a second fastener being driven from the nailer. Grip the
handle firmly and let the tool do the work. Failure to heed
this warning can result in serious personal injury.
■ Do not drive fasteners on top of other fasteners or with the
tool at an overly steep angle as this may cause deflection
of fasteners which could cause injury.
■ Do not drive fasteners near edge of material. The workpiece
may split causing the fastener to ricochet, injuring you or a
co-worker. Be aware that the nail may follow the grain of
the wood, causing it to protrude unexpectedly from the side
of the work material.
■ Do not load the tool with fasteners when any one of the
operating controls is activated.
When loading tool:
● Never place a hand or any part of body in fastener
discharge area of tool.
● Never point tool at anyone.
● Do not pull the trigger or depress the workpiece contact
as accidental actuation may occur, possibly causing
injury.
■ Refer to them frequently and use them to instruct others
who may use this tool. If you loan someone this tool, loan
them these instructions also.
This product has been shipped completely assembled.
■ Carefully remove the tool and any accessories from the
box. Make sure that all items listed in the packing list are
included.
■ Inspect the tool carefully to make sure no breakage or
damage occurred during shipping.
■ Do not discard the packing material until you have carefully
inspected and satisfactorily operated the tool.
■ Angled finish nailer
■ Battery pack
■ Charger
■ Tool bag
■ Operator’s manual
■ Safety glasses
You may use this tool for the purposes listed below:
■ Finish and trim (interior and exterior)
■ Door & window casing
■ Door jambs
■ Baseboard
■ Crown molding
■ Cabinetry
■ Cap and shoe molding
■ Molding
■ Staircases
■ Door and window trim
■ Chair rail
■ Brickmold
■ Hardwood flooring
■ Panelling
■ Furniture
18 V lithium-ion batteries are designed with features that
protect the lithium-ion cells and maximize battery life. Under
some operating conditions, these built-in features may cause
the battery and the tool it is powering to act differently from
nickel-cadmium batteries.
During some applications, the battery electronics may signal
the battery to shut down, and cause the tool to stop running.
To prevent further shut down of the battery, avoid
forcing the tool.
If releasing the trigger and removing and reinstalling the battery
pack does not reset the battery and tool, the battery pack is
depleted. If depleted, the battery pack will begin charging when
placed on the lithium-ion charger.
For complete charging instructions, refer to the operator’s
manual for the BL1218 charger. For battery pack instructions,
see the manual for the L1830R, L1815R lithium-ion battery
pack.
See gure 2.
■ Place battery pack in the tool. Align raised rib on battery
pack with the groove inside the tool.
■ Make sure the latch on the back of the battery pack snaps
in place and battery pack is secured in the tool before
beginning operation.
When placing battery pack in the tool, be sure raised rib on
battery pack aligns with the bottom of the tool and latches into
place properly. Improper installation of the battery pack can
cause damage to internal components.

9
See gure 2.
■ Locate latch on the back of battery pack and depress to
release battery pack from the tool.
■ The battery pack will disconnect in direction to be removed
when latch is depressed.
Battery tools are always in operating condition. Therefore,
switch should always be locked when not in use or carrying
at your side.
See gure 3.
The no-mar pad attached to the nose of the tool helps prevent
marring and denting when working with softer woods.
Remove the battery pack from the tool before removing or
replacing the no-mar pad. Failure to do so could result in
serious personal injury.
The pad can be removed by pulling it down and away from the
nose. To replace the pad, t it into place over the nose and
push up at the back to reset.
See gures 4 - 6.
■ Remove the battery pack from the tool.
■ With the nose of the tool pointed away from you, feed
a strip of nails into the magazine. Be sure the nails are
pointed downward and at the angle shown.
NOTE: See figure 4, for acceptable nail sizes.
Keep the tool pointed away from yourself and others when
loading nails. Failure to do so could result in possible serious
personal injury.
■ Slide the nail strip as far forward in the magazine as
possible.
■ Slide the pusher all the way to the rear of the magazine.
Release the pusher and allow it to push the nails up to
the driving mechanism. The pusher will stop when it rests
against the end of the nail strip.
NOTE: Do not allow the pusher to snap back into place.
Use only the nails recommended for use with this tool. The
use of any other nails can result in tool malfunction, leading to
serious injuries.
Never load nails with the workpiece contact or trigger activated.
Doing so could result in possible serious personal injury.
See gures 7 - 8.
Never wedge or hold back the workpiece contact mechanism
during operation of the tool. Doing so could result in possible
serious injury.
This tool is shipped from the factory with the trigger mode
selector set in the Single Sequential Actuation mode. The
trigger mode selector can also be set for Contact Actuation
mode.
Single sequential actuation provides the most accurate
fastener placement.
■ Remove the battery pack from the tool.
■ Slide the trigger mode selector all the way to the right.
■ Reinstall the battery pack.
■ Grip the tool firmly to maintain control. Position the nose of
the tool onto the work surface.
■ Push the tool against the work surface to depress the
workpiece contact.
■ Squeeze the trigger to drive a fastener.
■ Allow the tool to recoil away from the work surface as the
fastener is driven.
NOTE: The trigger must be depressed within 3 seconds of
placing the nose of the tool against the workpiece. If depressing
the trigger does not drive a fastener, lift the tool away from the
workpiece, then replace and try driving the fastener again.
Contact actuation allows very fast repetitive fastener
placement.
■ Remove the battery pack from the tool.
■ Slide the trigger mode selector all the way to the left.
■ Reinstall the battery pack.
■ Grip the tool firmly to maintain control.
■ Squeeze and hold the trigger. Push the tool against the
work surface to depress the workpiece contact and drive
a fastener.
■ Allow the tool to recoil away from the work surface as the
fastener is driven.
NOTE: In Contact Actuation Mode, the tool may also be
operated by depressing the workpiece contact against the
surface and squeezing the trigger. The nose of the tool must be
pressed against the workpiece within 3 seconds of depressing
the trigger. If pressing the nose to the workpiece does not drive
a fastener, release the trigger, depress the trigger again, then
try driving the fastener again.
During normal use the tool will recoil immediately after driving
a fastener. This is a normal function of the tool. Do not attempt
to prevent the recoil by holding the nailer against the work.
Restriction to the recoil can result in a second fastener being
driven from the nailer. Grip the handle rmly, let the tool do
the work, and do not place second hand on top of tool at any
time. Failure to heed this warning can result in serious personal
injury.
When used in the contact actuation mode do not carry the
tool with the trigger depressed as this will cause a fastener to
discharge if the workpiece contact accidentally bumps against
an object. Failure to observe this warning can result in serious
personal injury.

10
See gure 9.
The driving depth of the nail may be adjusted by rotating the
dial clockwise to increase or counterclockwise to decrease
the depth the nail is driven. It is advisable to test the depth
on a scrap workpiece to determine the required depth for the
application and to drive a test nail after each adjustment until
the desired depth is set.
See gure 10.
■ Remove the battery pack from the tool.
Remove the battery pack from the tool before removing nails.
Failure to do so could result in serious personal injury.
■ To remove a strip of nails from the tool, hold the finish nailer
by the handle with your right hand, and rest your left hand
underneath the tool with your left thumb on the pusher.
■ Depress the inside lever on the pusher to release and allow
the pusher to slowly slide to the front.
NOTE: Always keep fingers clear of nail track of magazine
to prevent injury from unintended release of the pusher.
■ Slide the nails toward the back of the magazine and
remove.
See gure 11.
■ Remove the battery pack from the tool before clearing a
jammed fastener. Failure to do so could result in serious
personal injury.
If a nail or fastener becomes jammed in the tool, remove the
battery pack and keep the tool pointed away from you while
clearing the jam.
■ Remove the battery pack from the tool.
■ Remove fasteners from the tool.
■ Pull up on the latch and open the jam release.
■ Insert a flat blade screwdriver into the driving mechanism
and push the driver mechanism back, freeing the fastener
jam.
■ Remove the bent fastener.
■ Close the jam release and latch.
■ Reinstall the battery pack.
■ Reinstall fasteners and close the magazine.
Use only AEG accessories and spare parts. Should
components need to be replaced which have not been
described, please contact one of our AEG service agents (see
our list of guarantee/service addresses).
If needed, an exploded view of the tool can be ordered. Please
state the Article No. as well as the machine type printed on
the label and order the drawing at your local service agents or
directly at: AEG Electric Tools, Max-Eyth-Straße 10, D-71364
Winnenden, Germany.
Please read the instructions carefully before
starting the machine.
Remove the battery pack before starting any
work on the machine.
Do not dispose of electric tools together with
household waste material! In observance of
European Directive 2002/96/EC on waste
electrical and electronic equipment and its
implementation in accordance with national
law, electric tools that have reached the end
of their life must be collected separately and
returned to an environmentally compatible
recycling facility.

11

AEG Electric Tools
Max-Eyth-Straße 10
D-71364 Winnenden
Germany
Table of contents
Other AEG Power Tools manuals
Popular Power Tools manuals by other brands

Hornbach
Hornbach 6119820 manual

Desoutter
Desoutter Delta Series installation guide

Bluerock Tools
Bluerock Tools SL-1.25 Operational manual

Black & Decker
Black & Decker MT300 Original instructions

Fayat Group
Fayat Group DYNAPAC DRP70D Operating instruction

Parkside
Parkside PDNB 6.3 B2 Translation of the original instructions