AeroPlus Corvus Racer 540 User manual
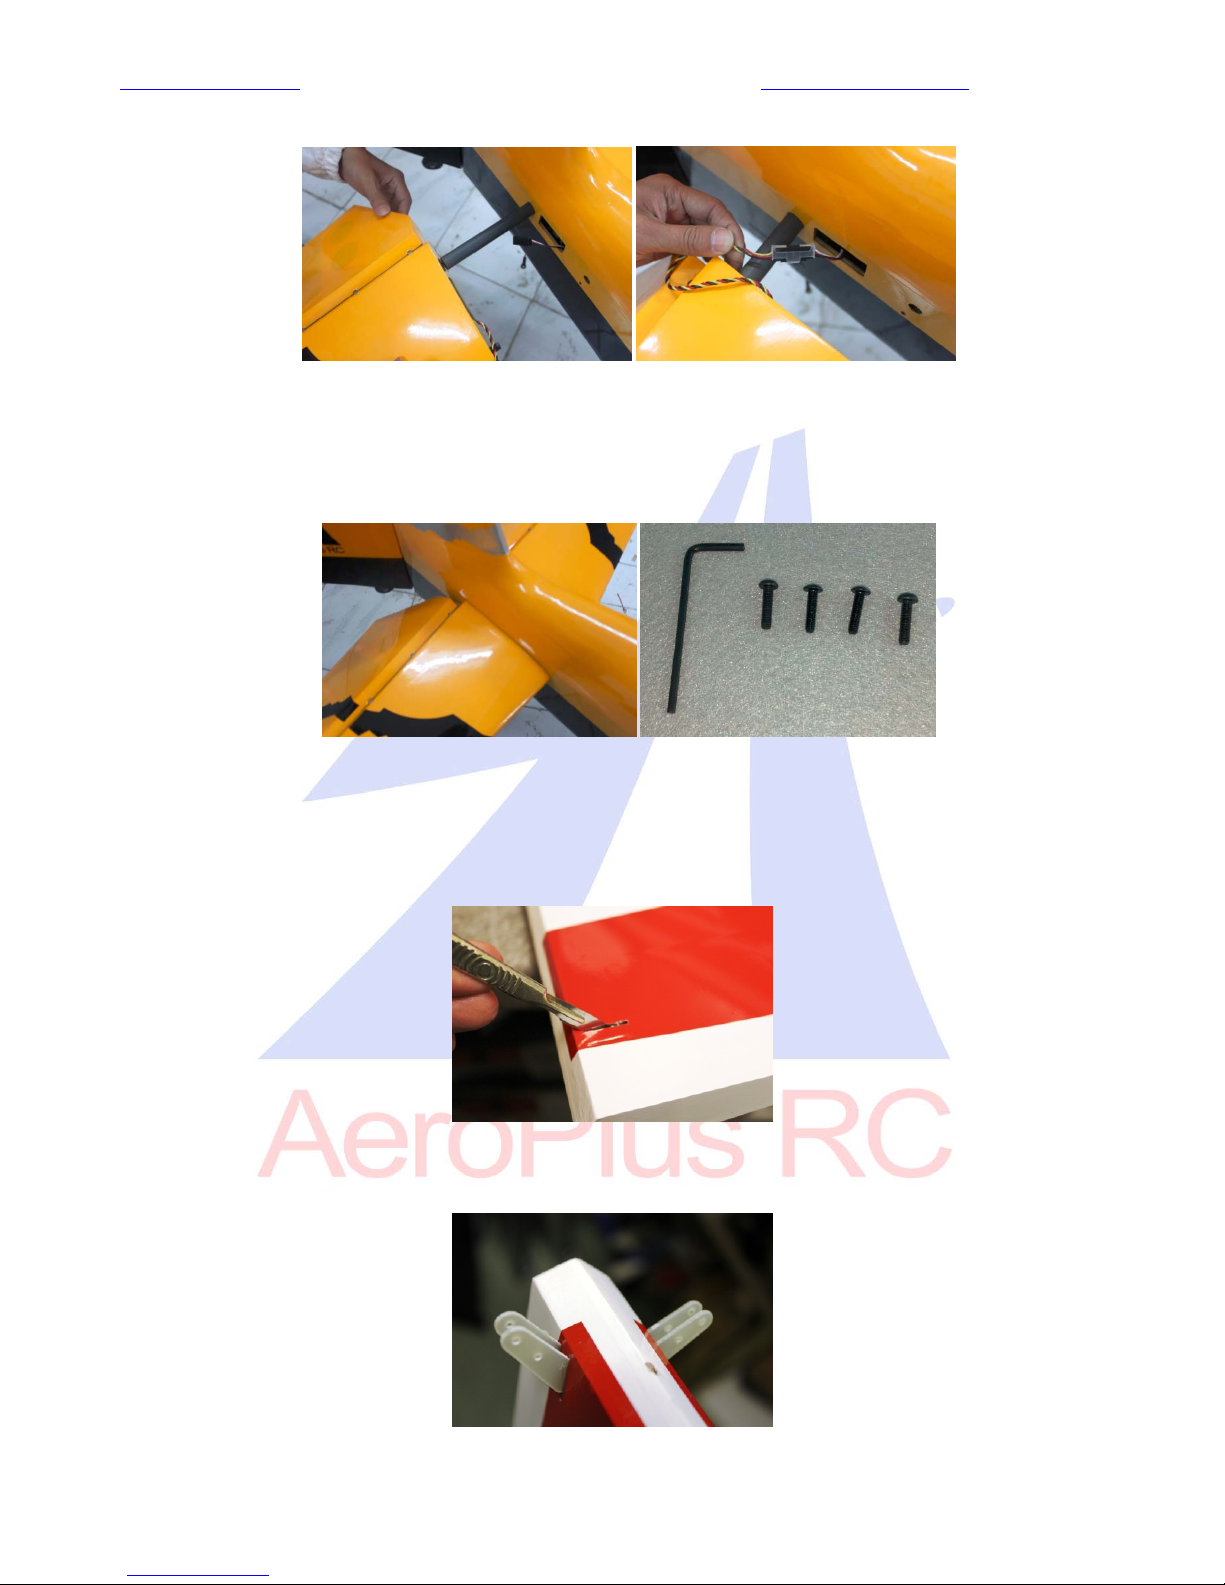
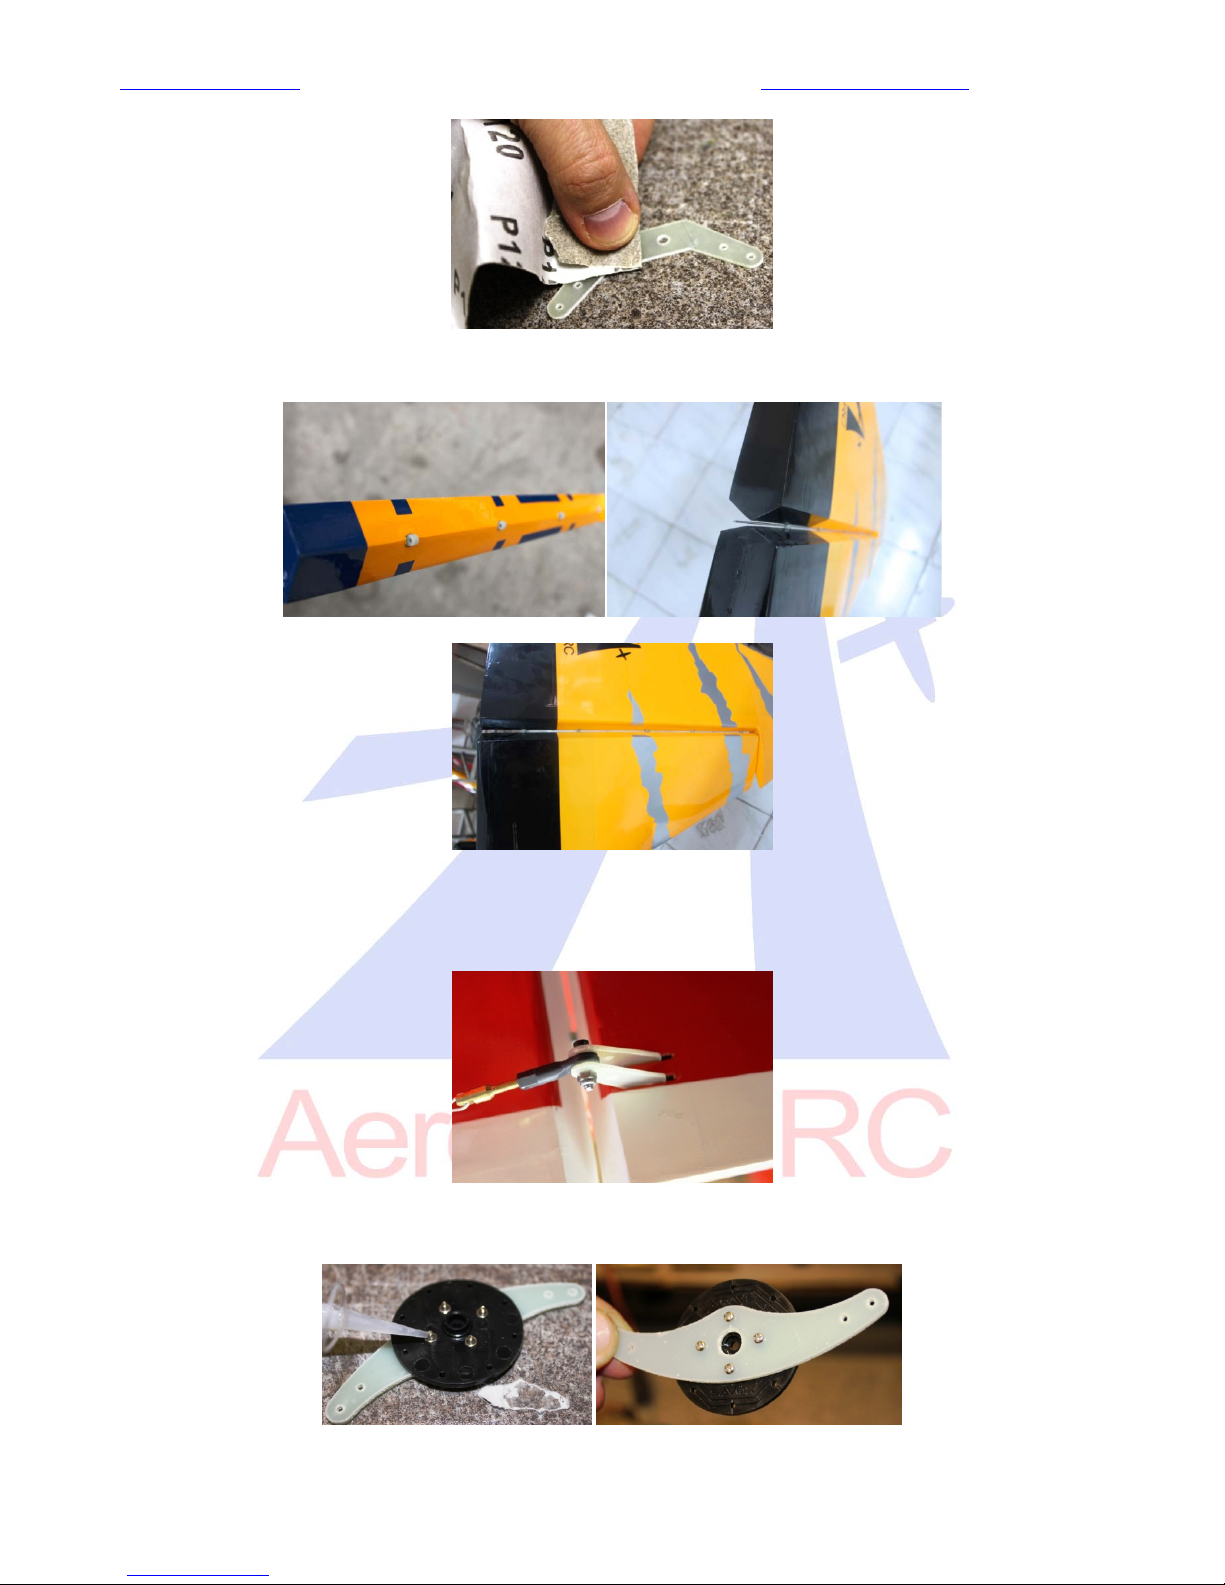
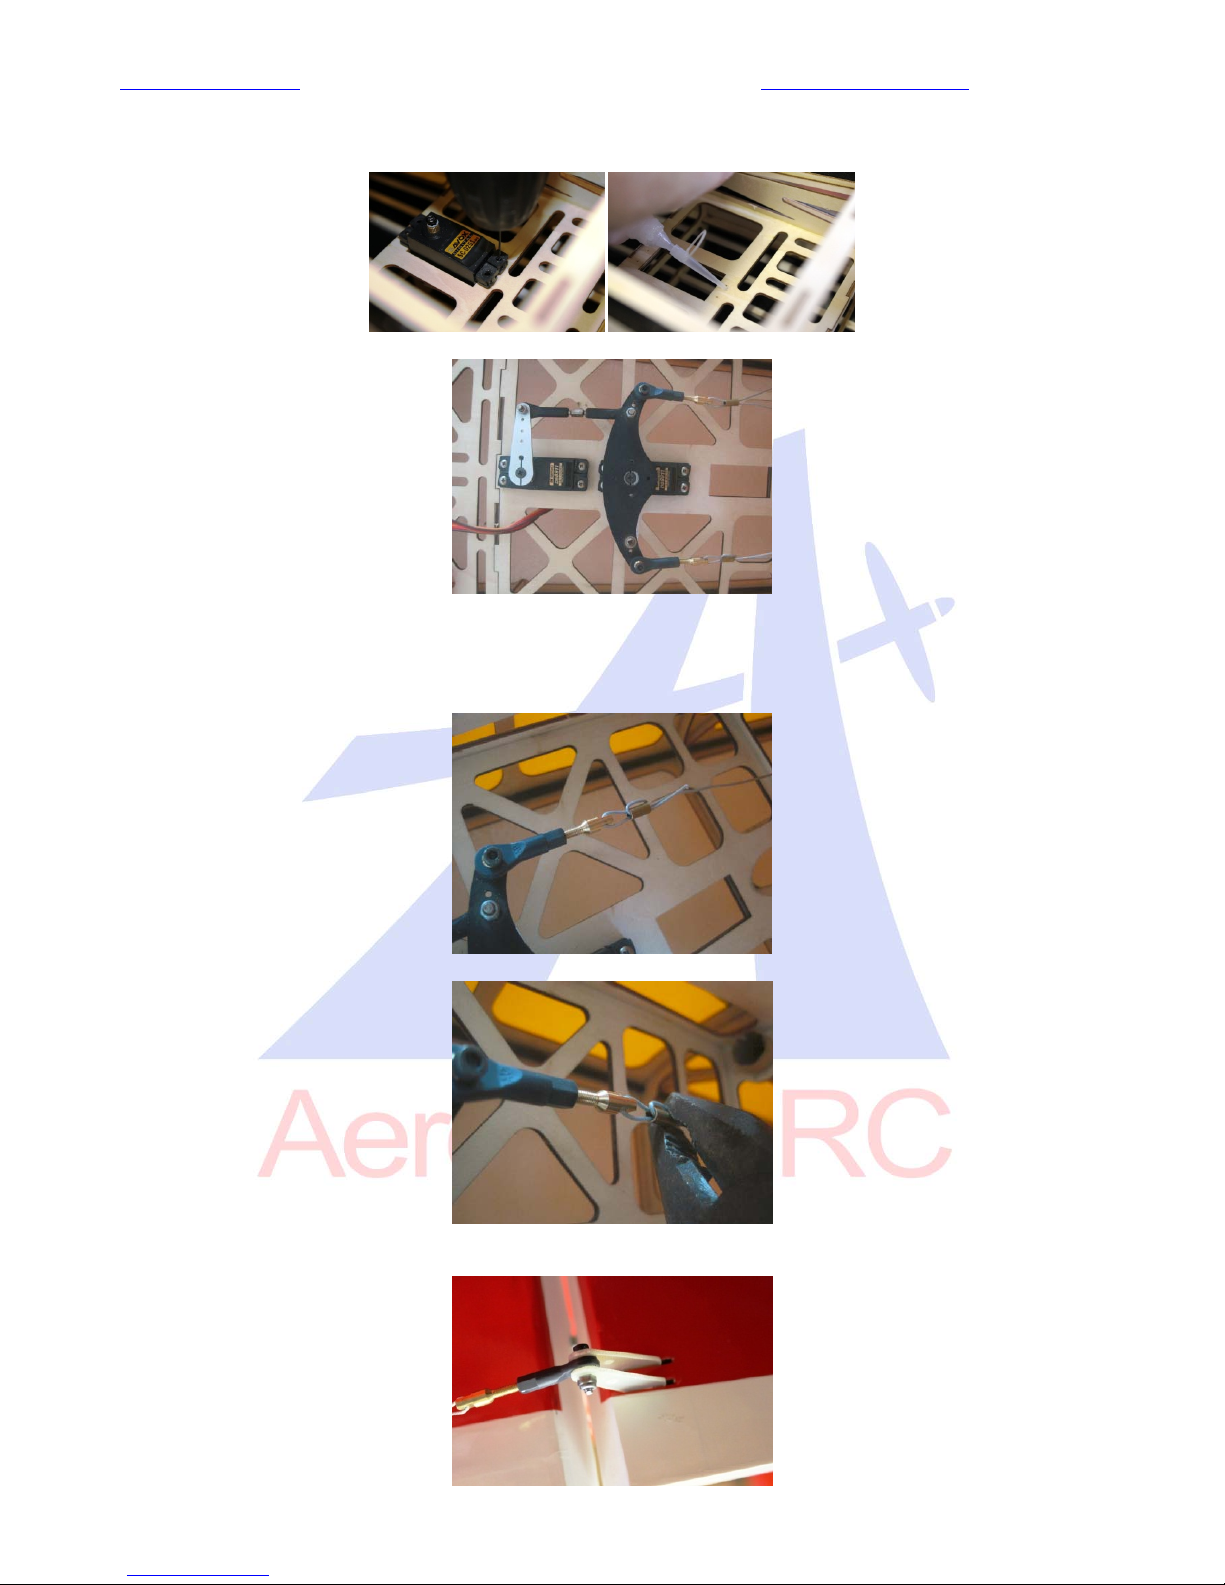
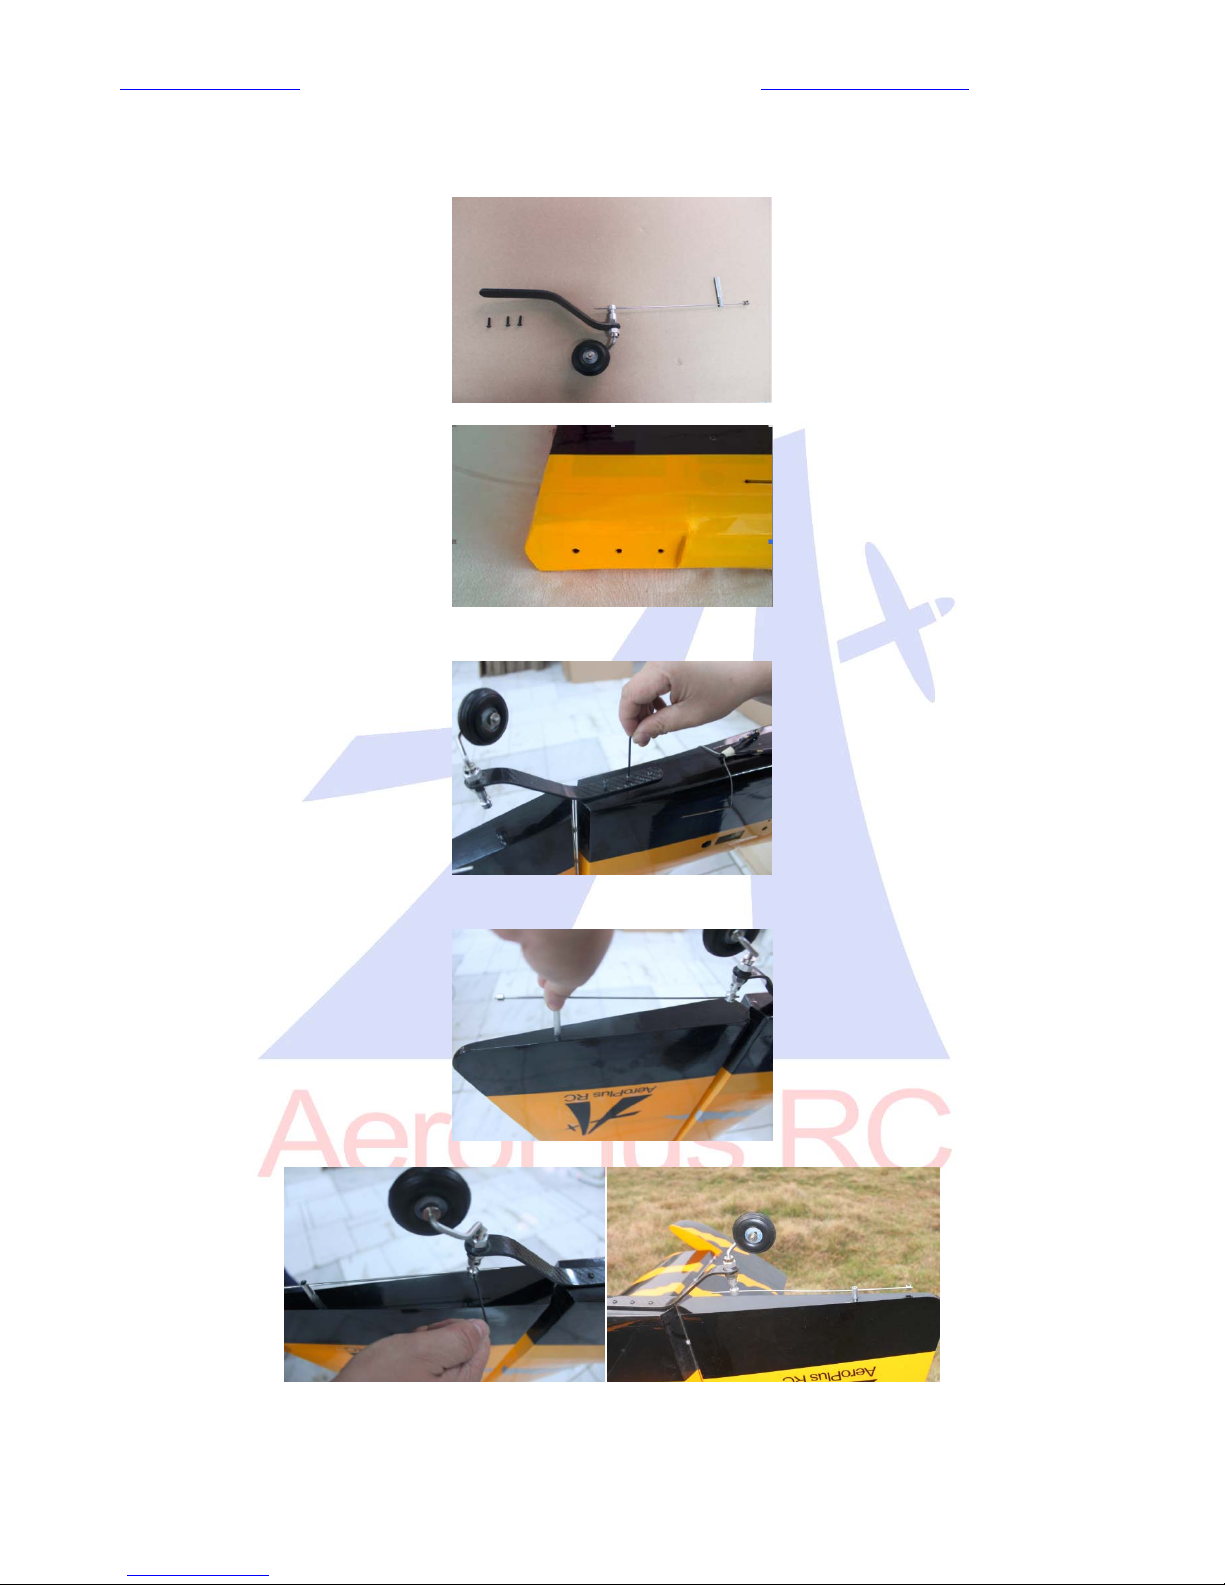
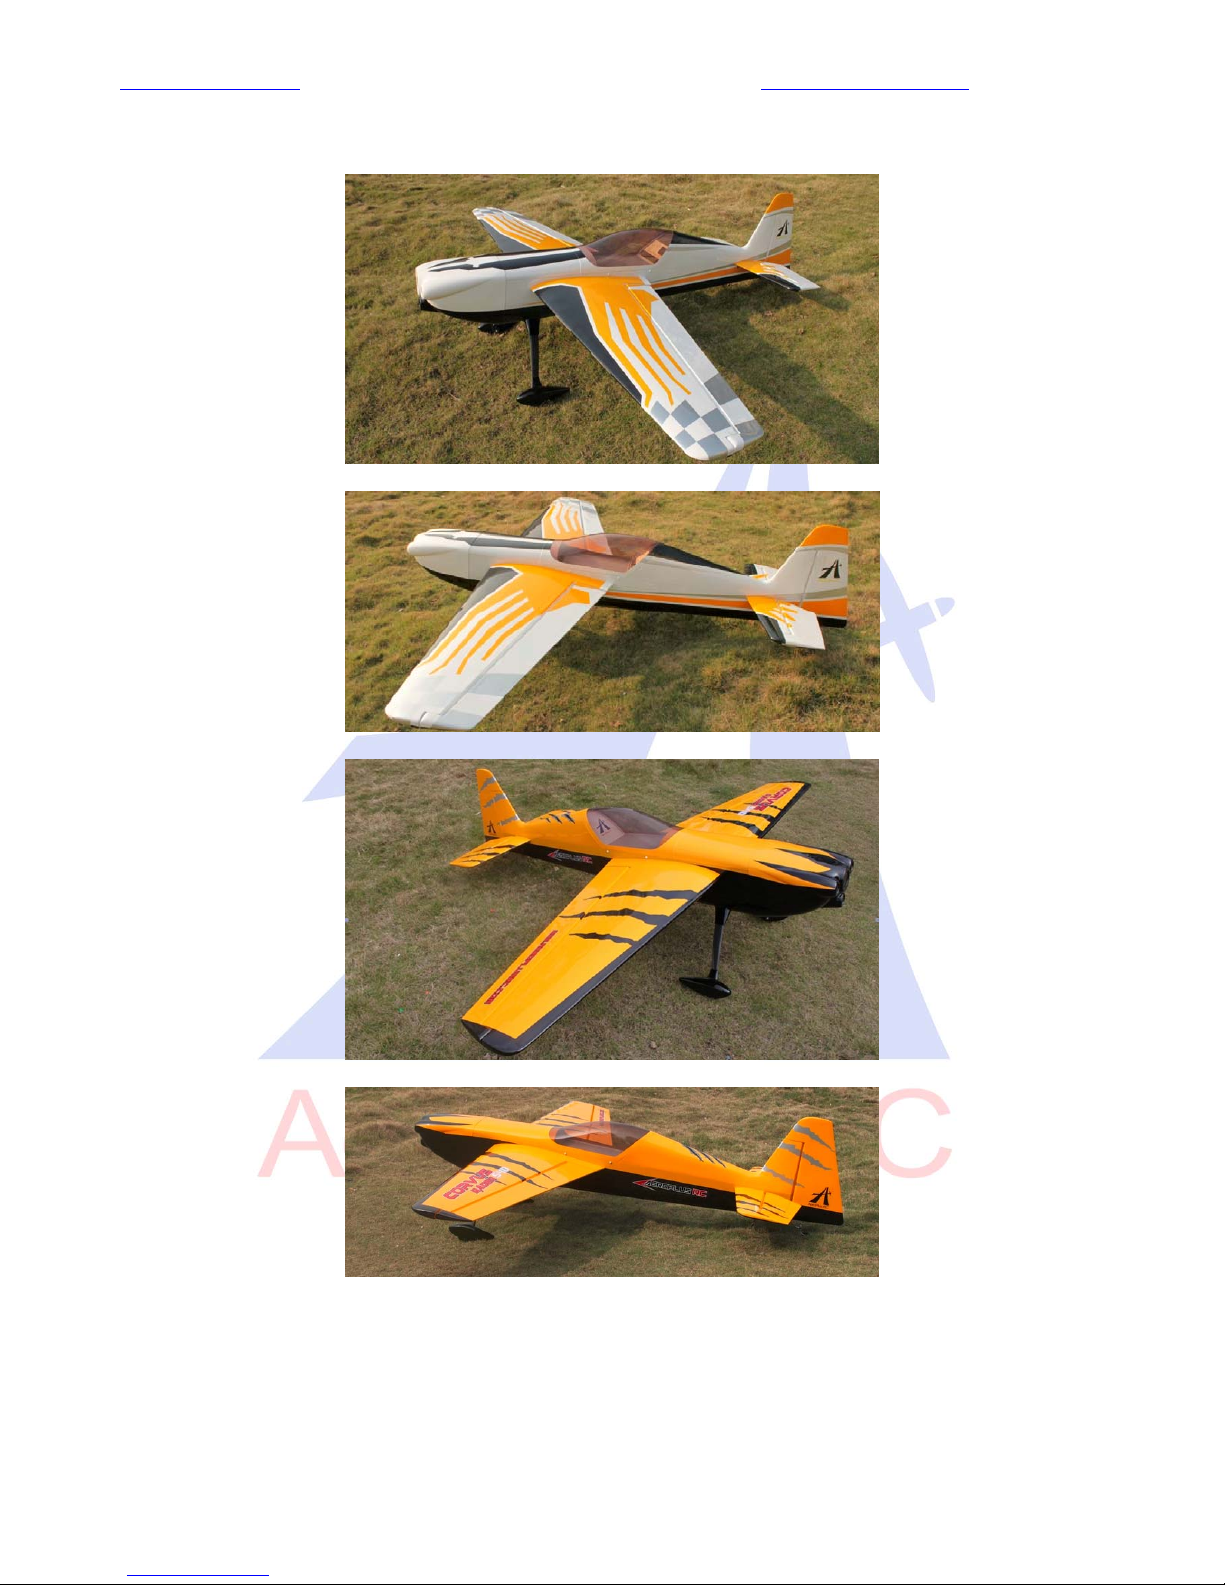
www.aeroplusrc.com[email protected]
AeroPlusRCCopyright2013©AllRightsReserved
CorvusRacer540
88‐125cc
ItemNo:A‐G100006
Specs:
WINGSPAN:108"(2740mm)
LENGTH:99"(2510mm)(notincludingspinner)
WINGAREA:2111sqin(136.2sqdm)
FLYINGWEIGHT:25.3‐28lbs(11500‐12800g)
ENGINE:88cc‐120ccgas
RADIO:4CH/6‐9S
Description
CoveringMaterialGenuineOracover
CarbonFibre: Spinner,wingtubeandsleeves,landinggear,tailgear;
Fibreglassservoarms,hornandreinforcedU/Cmounting
Fiberglassservoarmsandhorn;
Built‐intunedpipeorcanistertunnel;
PrePlumbedTank
RemovableWings,StabsandRudders;
Carbonfibrerodstomakethewingsandfuselagelightweightandstrong;
PUWheels;Adjustablepushrods;
Twopiececlamshellcowl,RingedCowl
Extracoveringprovidedforsmallrepairs
Predrilledhinges
2Colourschemes
A‐G100006B
CUBYELLOW:ORACOVER21‐032
BLACK:ORACOVER21‐071
SILVERY:ORACOVER21‐091
A‐G100006A
CUBYELLOW:ORACOVER21‐032
BLACK:ORACOVER21‐071
WHITE:ORACOVER21‐010
SILVERY:ORACOVER21‐091

www.aeroplusrc.com[email protected]
AeroPlusRCCopyright2013©AllRightsReserved
88‐125ccCorvusRacer540
CongratulationsonyourpurchaseofyournewAeroPlusRcCorvusRacer540.This
planehasbeendesignedtobeoneofthelightestandhighestperformanceaerobatics
planesanywhere.Wehopethatyouwillenjoythisplaneandwillexceedyour
expectationsinwhatamodelairplanecanbe.
Thankyou,
AeroPlusRc
Unpacking‐
Carefullyunpackthemodel,whenopeningtheplasticbagsmakesureyoudonottocutanycoveringon
themodel.Inspecteachitemtomakesuretherewasnodamageinshipping.Ifforanyreasonyouare
nothappywithanypartorareunsurepleasecontacttheDealerthatyoupurchasedfrom.
Covering‐
Becauseofthemultipleclimatezonesencounteredonthetripfromthefactorytoyou,
someofthecoveringmayhavewrinkles.Wehighlyrecommendthatyoutaketimetore‐
sealallcoveringedgeswithanironandtouseaheatguntoremoveanywrinklesandre‐
tightenthecovering.Itisbesttodothisnowwhilebeforetheplaneisassembled.
*Note:Becarefulnotletanyheatgetnearpartslikethecanopyorcowlasthismaycause
damage.
AssemblyTips
Wealsorecommendthatyougooveralltheaccessiblejointswithcyanoglue.Wickglue
intoareasofhighstressaroundtheU/Cplateandmotorbox.
UseaqualityThread‐lockonallmetaltometaljoints.Evenifyourmodeliselectric
poweredwithlowerlevelsofvibrationthethread‐lockwillensurethatthingsdonotfall
offofyourairplane!!

www.aeroplusrc.com[email protected]
AeroPlusRCCopyright2013©AllRightsReserved
LandingGearAssembly
Topreventdamagetothefuselagewhiletheairplaneisassembledwerecommendfittingthelandinggearfirst.
Note:Beforestartingensureallofyourpartsareinclude.
Parts
CFLandingGear
2xwheelpants
2xwheels
2xaxles
4xcollets
4xM5bolts
1. FirstPusheachaxlethroughthelargeholesandtightenupusing2wrenches13mm
2. NextPlaceacolletontheaxlefollowedbythewheel,thenanothercolletontheoutsideasperthe
belowdiagram.
Note:Donottightenupthecolletsyetasthewheelneedstobefittedsothereisanequaldistancewithin
thewheelpant.
3. TheLandinggearrakesforwardsousethecorrectwheelpantperside.Putasmallamountof
thread‐lockontothe2xfactoryfittedblindnutsonthewheelpant.

www.aeroplusrc.com[email protected]
AeroPlusRCCopyright2013©AllRightsReserved
4. Fitthewheelpantsoverthewheelassembleandsecurewith2xcapheadbolts.
5. Nowlineupthewheelinthecenterofthewheelpantopeningandtightenthecollets.Remember
tousethread‐lockonthesetscrewsandtomakesurethewheelcanmovefreely.
RearStab
1. Nowgluethecontrolhornsintotheelevators.
a. Firstuseasharphobbyknifetoremovethecoveringfromtheslots.
b. Beforegluingtheareaonthehornsthatgoesinsidetheelevatorneedstoberoughedupwith
sandpaper.Thisallowsabettergluejoint.
c. UsingEpoxynowgluethetwocontrolhornsintotheirrespectiveplaces.
Note:itishighlyrecommendedtoinstallaballjointinbetweenthecontrolhornstomaintain
properspacingduringgluing.
Note:alsopleasetakecaretomakesurethelinkagewholeinthecontrolarmisonthehingeline.

www.aeroplusrc.com[email protected]
AeroPlusRCCopyright2013©AllRightsReserved
2. Installingtheelevatorservos.
a. Firsttestfittheservointotheservomount.Sometrimmingmakeberequired.
Note.Servofitssosplineistowardsthefrontoftheplane.
b. Nowpredrilltheservomountswitha1/16drillbit,thesecuretheservointotheservomount
withservohardware.
c. NextremovetheservoandusethinC.A.gluetoreinforcethethreads.Aftertheglueisdry
reinserttheservo.
Note.Dependingonservoarmsuseditmaybenecessarytoinstallarmbeforereinstallingtheservo.
d. Nextinstalltheservolinkages.
3. Extensions
a. Threada36”servoextensionthoughthetubeintheplanetotheopeningsneartheelevator.

www.aeroplusrc.com[email protected]
AeroPlusRCCopyright2013©AllRightsReserved
b. Connecttheservototheextensionbutbesuretouseaservocliporapieceofheatshrinkto
ensureitdoesnotbecomedisconnectedduringflight.
4. InstallingElevatorHalfs
a. Installthesmallcarbontubeintothefuselage.
b. SlidetheElevatorHalfontothetube.
Note:makesuretheservowiregoescleanlyinsidethefuselageandisnotpinched.
c. Attachedtheelevatorhalftothefuselagewiththeprovidedhardware.
M3×12innerhexagonscrew&M3wrench
5. Repeattheprocessfortheotherelevatorhalf.
Rudder
1. Removethecoveringwheretherudderhornspushthroughwitheitherahobbyknifeorsoldering
iron.
2. Testfittherudderhorns
Note:Besuretherudderhornsareequalonbothsidesandinlinewiththehinge
pointthisisveryimportant!

www.aeroplusrc.com[email protected]
AeroPlusRCCopyright2013©AllRightsReserved
3. Sandtheareaonthehornthatfitsinsidetheruddersothegluebondsbetter.
4. Attachingtherudder.
a. Inserttheeasyremovalpinintothepinhinges.
5. Gluetherudderhornsintherudderwithepoxy;wipeoffexcessgluewhileitiswet.
Note:Usetheballjointandboltwhilegluingtomaintainalignment.
Note:Whilestillmovablemeasurethatthesameamountpushesouteachside.Careneedstobetakenhere
otherwiseyourruddergeometrywillbeincorrect.
6. InstallingtheRuderServo
a. Ifusingtheincludedruderarmassembletherudderservocontrolarmasbelow,drillholesfor
screwsanduseC.A.gluetostopthenutsfromcomingloose.

www.aeroplusrc.com[email protected]
AeroPlusRCCopyright2013©AllRightsReserved
b. Fittherudderservoanddrillholesusinga1/16drillbitfortheservoscrews,thendropthinC.A.
glueintotheholestostrengthenthewood.
Note:besurethegluehasfullycuredbeforeinstallingtheservoagain.
c. Usingservoscrewsfixtheservoinplace,notethesplineistowardsthefrontoftheplane.
7. Installingtherudercables
a. Threadthecablesthoughthefuselagefromtherudertotheservotrey
b. Loopthecablethoughthecrimpandattachmentpointasshownbelow.
c. Crimpthecableusingapairofpliesthentrimcable.
d. Repeatthisattheruderend.
Note:besurethecablesaretauntbutnotovertight.

www.aeroplusrc.com[email protected]
AeroPlusRCCopyright2013©AllRightsReserved
TailGear
1. Locateallpartsinpicturebelow,whenassemblingremembertousethread‐lockonallparts
2. Assemblegearaccordingtophotograph.
3. Screwthetailgeartothefuselagewiththethreesuppliedbolts
4. Nextcheckplacementoftillerrod.
5. Beforegluingintillmountbesuretosliptillermountovertillerrod.
6. Glueintillermountandtightentillerrod.

www.aeroplusrc.com[email protected]
AeroPlusRCCopyright2013©AllRightsReserved
WingsandAilerons
1. Theaileronsonthewingsarepre‐glued.Checkeachonebygentlypullingtomakesurethat
theyaresecure
2. Installingaileroncontrolhorns
a. Removethecoveringwheretheaileronhornsaregluedinplace.Useeitherasoldering
ironorasharpknife
b. Usingsandpaperroughtheareathatwillbegluedintotheaileron.
c. Gluebothhornsinwithepoxyglue.
Note:besuretoinstallaballlinktoinsurecorrectalignmentwhengluing
d. Repateforall4aieroncontrolhorns.
3. InstallAileronSerovs
a. Firsttestfittheservointotheservomount.Sometrimmingmakeberequired.
Note.Servofitssosplineistowardsthefrontoftheplane.
b. Nowpredrilltheservomountswitha1/16drillbit,thesecuretheservointotheservo
mountwithservohardware.

www.aeroplusrc.com[email protected]
AeroPlusRCCopyright2013©AllRightsReserved
c. NextremovetheservoandusethinC.A.gluetoreinforcethethreads.Aftertheglueis
dryreinserttheservo.
d. Ifrequiredinstallaservoextensionleadontotheservo,remembertouseaservoplug
cliporheatshrink
e. Fittheservoandcentretheservoarm.
f. Usingthesuppliedpushrodscrewaball‐linkontoeachend.

www.aeroplusrc.com[email protected]
AeroPlusRCCopyright2013©AllRightsReserved
g. Usingthesuppliedboltsattachthepushrodatbothends.Checktoseeyouhave
sufficientmovementoftheaileron.Ifnotadjust.
h. Repeatonotherwing
Note:Onwingsusingtwoservosbesuretheservosarenotbinding.Iftheareyoumakehaveto
adjustlinkagesoruseaproductsuchasamatchbox
GasEngineinstallation
1. Usingthetemplatethatcamewithyourchosenengine,usingthecrossaxisontheengineboxto
markthemountingholes.
2. Checkthediameteroftherequiredboltsanddrillaccordingly.
3. Mounttheenginewiththestandoffstothebulkhead.Remembertouselargewashersonthe
insidetospreadtheloadanduseplentyofthread‐lock.
Note:Dependingonwhatengineisusedyouwillneeddifferentlengthstandoffstogetcorrectspaceinthe
cowl
Note:Todeterminethestandofflengthneededmeasurethedistancefromthebulkheadtothecowlring
plusalittleclearance.Thensubtractthedistancefromthefrontuptheenginehubtothebackplateofthe
engine.Thedifferencewillbethestandofflengthneeded.

www.aeroplusrc.com[email protected]
AeroPlusRCCopyright2013©AllRightsReserved
4. Exhaustoptions.Theplaneisequippedwithapipetunnelsoitwillaccommodate
manykindsofexhaustincludingstock,cans,andpipes.
5. Cuttingcowlforexhaustandairflow.Marktheareaneededtoberemovedandcutoutusinga
rotarycuttingtool.
a. Youwillneedtocutthecowlaccordinglytoclearyourchosenexhaust.Remembertostart
wholessmallandworkthemuntilitfits.
b. Tomakesuretheenginestayscool.Ensurethatenoughaircangetoutofthecowl.Theration
isusually3to1.Withtheexitbeing3timeslargethentheintake.
6. Thefueltankispre‐installed.AttachgasprooftubesuchasTygonaccordingtothelabellingon
tank
7. Usethesuppliedpushrodwithaballjointtoconnecttothethrottlearmontheengine.Thenfinda
convenientplacetolocatethethrottleservousingthesuppliedmount.
8. Installtheengineboxcoverplateonceallconnectionshavebeenmadefortheengine.

www.aeroplusrc.com[email protected]
AeroPlusRCCopyright2013©AllRightsReserved
9. Mounttheenginesignitiontothemotorboxonradiofoamtoreducevibvrations.
RadioGear
1. Oneachsideofthefuselagenearthecanopyboltsareareasforswitchestobemounted.
2. AconvenientplacetomounttheRXisjustinfrontoftherudderservo.Ensurethatitis
mountedonVelcroorradiofoamandsecurelystrappeddown.
CanopyAttachment
3. Thecanopyisheldinplacewiththe4screws,ensurethesearetightbeforeflying

www.aeroplusrc.com[email protected]
AeroPlusRCCopyright2013©AllRightsReserved
Beforeyoufly!
Wehighlyrecommendtheuseofbothdualratesandexponential.Thiswillallowthemodeltoflyboth
precisionand3Dattheflickofaswitch.
SuggestedSetup
LowRates Exponential HighRate Exponential
Elevato15‐20deg 15‐20% 35‐45deg 30‐60%
Ailerons15‐20deg 15‐20%35‐45deg 30‐60%
Rudder25‐30deg 15‐20%35‐45deg 30‐60%
Foryourmaidenflightsalwaysuselowrates,Alsopleaserememberthat+and–exponentialisdifferent
permanufacturer,checkyourTXmanual.
Alwaysrangecheckyourmodelbeforethemaidenflight.Carryoutashortflightthengoovereverything
tomakesurenothinghascomeloose.
CGLocation
WesuggestforinitialtestflightssettheCG164mmor6½inchesfromtheleadingedgeofthewing.
Adjustafterfirstflightstopersonalpreference.

www.aeroplusrc.com[email protected]
AeroPlusRCCopyright2013©AllRightsReserved
Table of contents
Other AeroPlus Toy manuals

AeroPlus
AeroPlus EXTRA 330SC 60CC User manual

AeroPlus
AeroPlus Extra 330LT User manual

AeroPlus
AeroPlus Sbach 342 20CC User manual

AeroPlus
AeroPlus Edge 540 V3 35CC User manual

AeroPlus
AeroPlus Corvus Racer 540 35CC User manual

AeroPlus
AeroPlus MXS-R 30CC User manual

AeroPlus
AeroPlus YAK 55M User manual

AeroPlus
AeroPlus Edge 540 V3 20CC User manual

AeroPlus
AeroPlus Sbach 342 User manual

AeroPlus
AeroPlus A?G030010A User manual