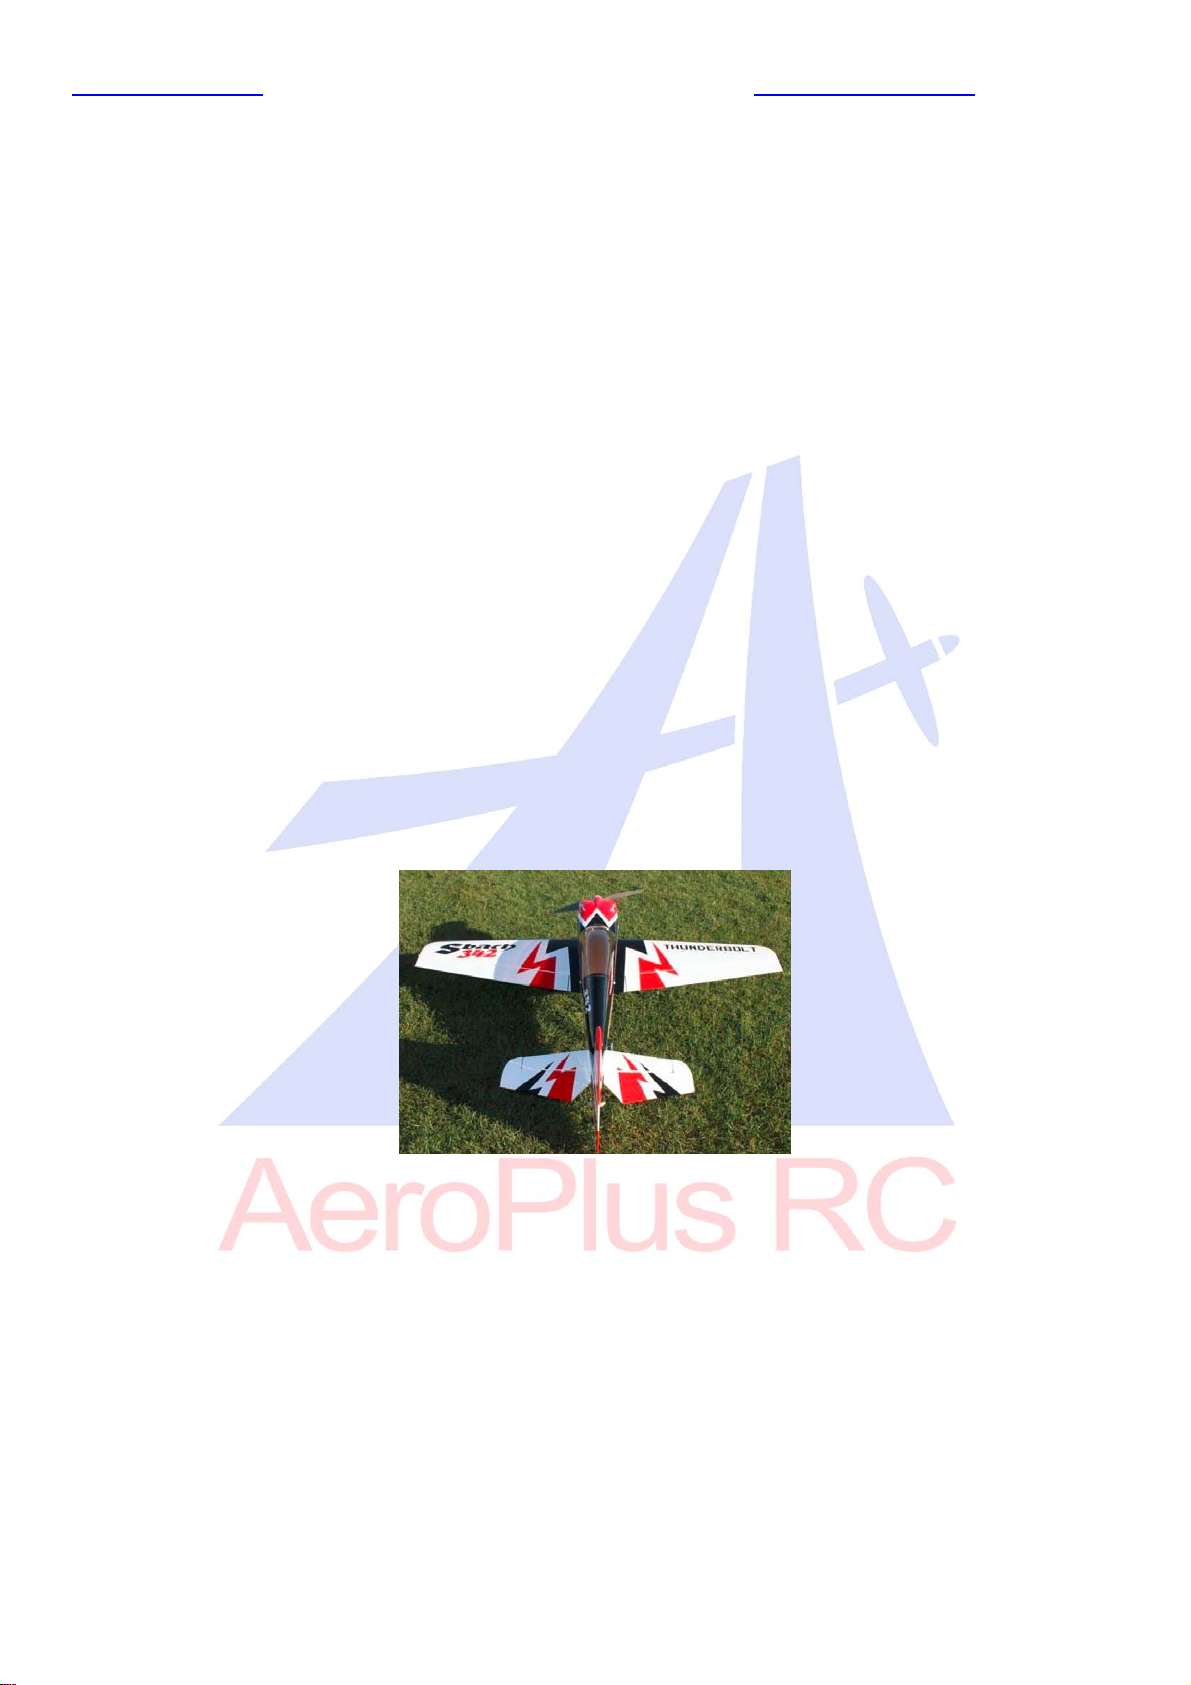
AeroPlus Sbach 342 20CC User manual
www.aeroplusrc.com[email protected]
AeroPlusRCCopyright2013©AllRightsReserved
Sbach34220CC
ItemNo:A‐G020004
Specifications
WingSpan 68in(1720mm)
Length 65"(1656mm)
WingArea 907sqin(58.5sqdm)
FlyingWeight 7‐7.7lbs(3200‐3500g)
Glow 75‐.91(2C).91‐1.10(4C)
Gasoline 20‐26cc
Electric BRUSHLESSMOTORA5030
Radio 4CH/5‐6servos
Description
CarbonFiberwingtube,landinggear,tailgear;
Fibreglassservoarms,hornandreinforcedU/Cmounting
Scalereaddeck
Adjustablepushrods
Ringedcowl
Predrilledhinges
Colourschemes
A‐G020004A

www.aeroplusrc.com[email protected]
AeroPlusRCCopyright2013©AllRightsReserved
Unpacking
Carefullyunpackthemodelmakingsurethatifyouuseasharpknifetoopenbags,nottocutanycoveringonthe
model.Inspecteachitemtomakesurenotransitdamagehashappened.Ifyouarenothappywithanypartor
areunsurepleasecontacttheDealerthatyoupurchasedfrom.
Covering
Duetothemodelspendingtimeindifferentclimateszonesfromthefactoryonitswaytoyou,someofthe
coveringmayhavewrinkles.Wehighlyrecommendthatyoutaketimetore‐sealallcoveringedgeswithaniron
andtouseaheatguntoremoveanywrinklesandre‐tightenthecovering.Itisbesttodothisnowwhiletheplane
isnotassembled,remembertonotletanyheatgetnearanypartslikethecanopyorcowlasthismaycause
damage.
AssemblyTips
Wealsorecommendthatyougooveralltheaccessiblejointswithcyanoglue.Wickglueintoareasofhighstress
aroundtheU/Cplateandmotorbox.
UseNutlockonallmetaltometaljoints.Evenifyouareusingelectricwithlowvibrationlevelsitwillmakesure
thatthingsdonotdropoffyourairplane!!
www.aeroplusrc.com[email protected]
AeroPlusRCCopyright2013©AllRightsReserved
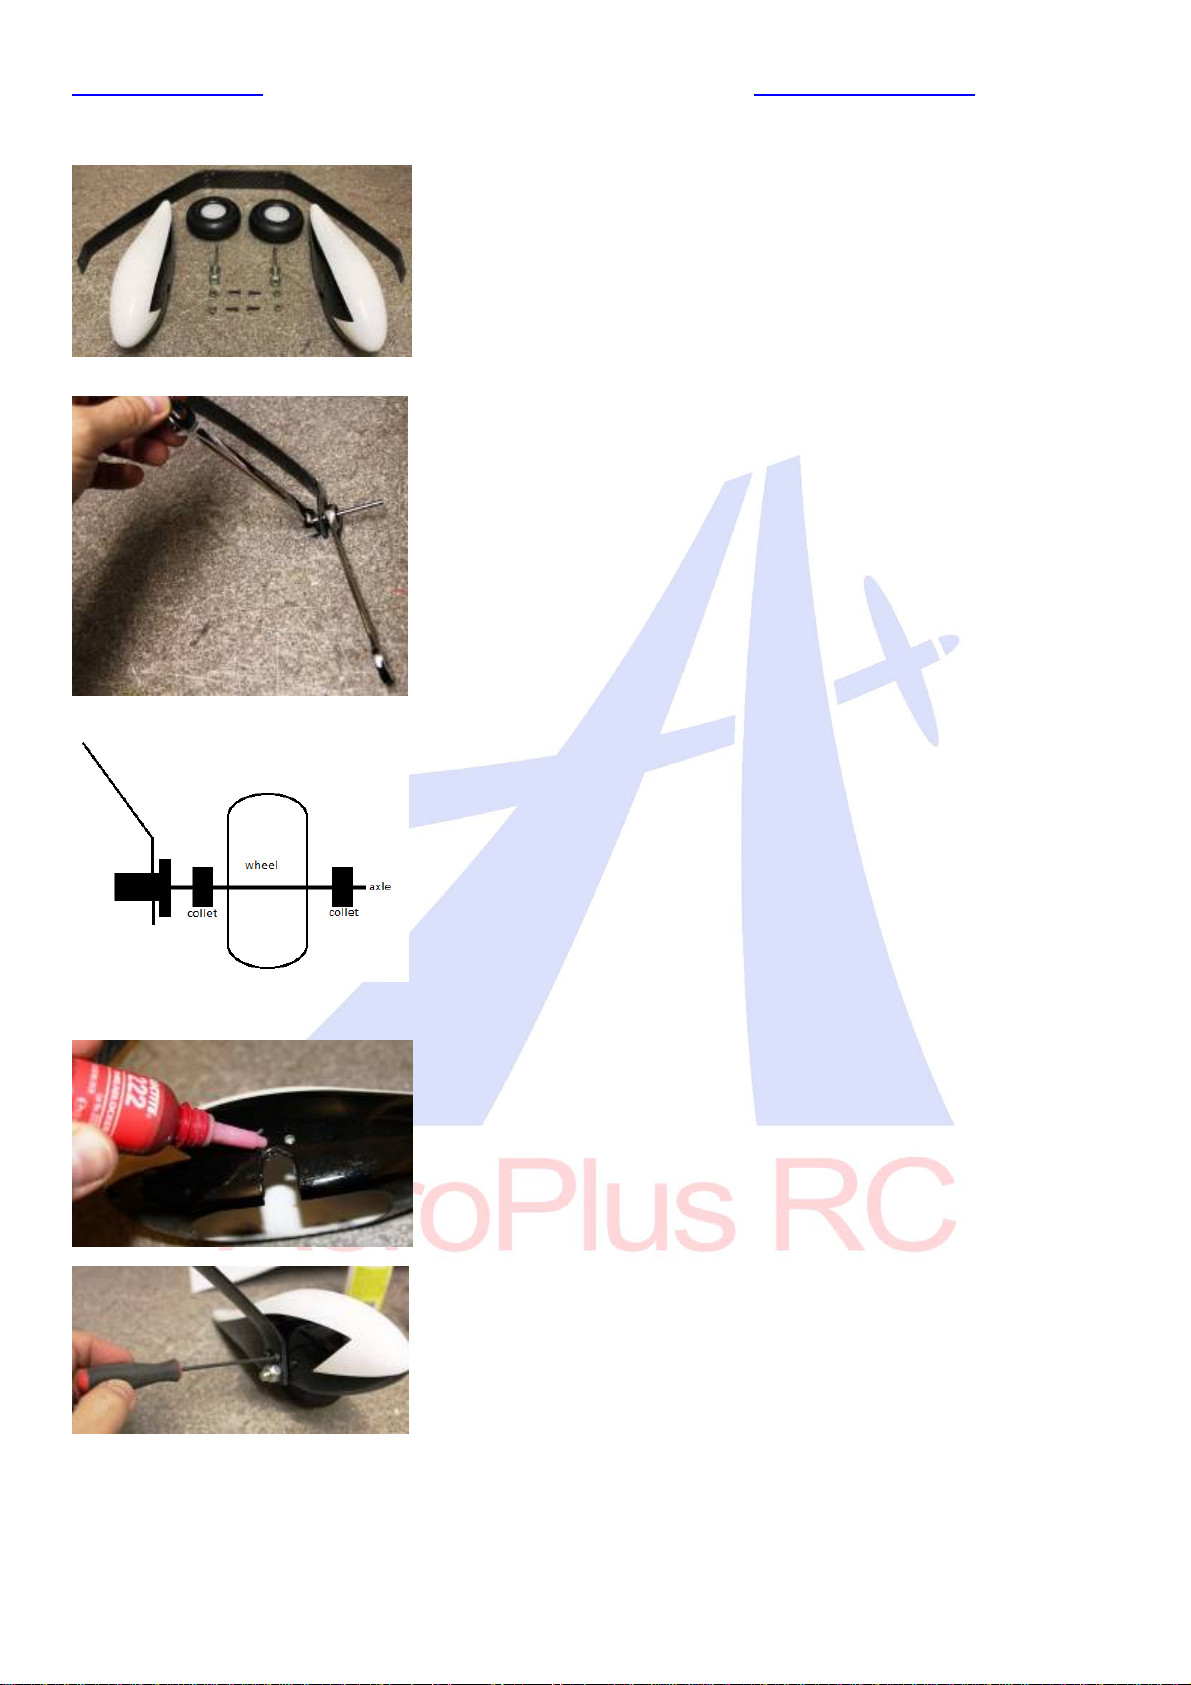
LandingGearAssembly
Tostopthefuselagegettingdamagedwhilethemodelisassembledwerecommendfittingthelandinggearfirst.
Pusheachaxlethroughthelargeholesandtightenupusing2spanners.
Placeacolletontheaxlefollowedbythewheel,thenanothercolletontheoutsideasperbelowdiagram.
Donottightenupthecolletsyetasthewheelneedstobefittedanequaldistancewithinthewheelpant.
TheU/Crakesforwardsousethecorrectwheelpantperside.Putnutlockontothe2xfactoryfittedblindnutsonthewheelpant
Fitovertheaxleandsecurewith2xcapheadbolts
Nowlineupthewheelinthecentreofthewheelpantopeningandtightenthecollets.Remembertousenutlockandtomakesurethewheelcan
movefreely.
Parts
CFLandingGear
2xwheelpants
2xwheels
2xaxles
4xcollets
4xM3bolts
www.aeroplusrc.com[email protected]
AeroPlusRCCopyright2013©AllRightsReserved
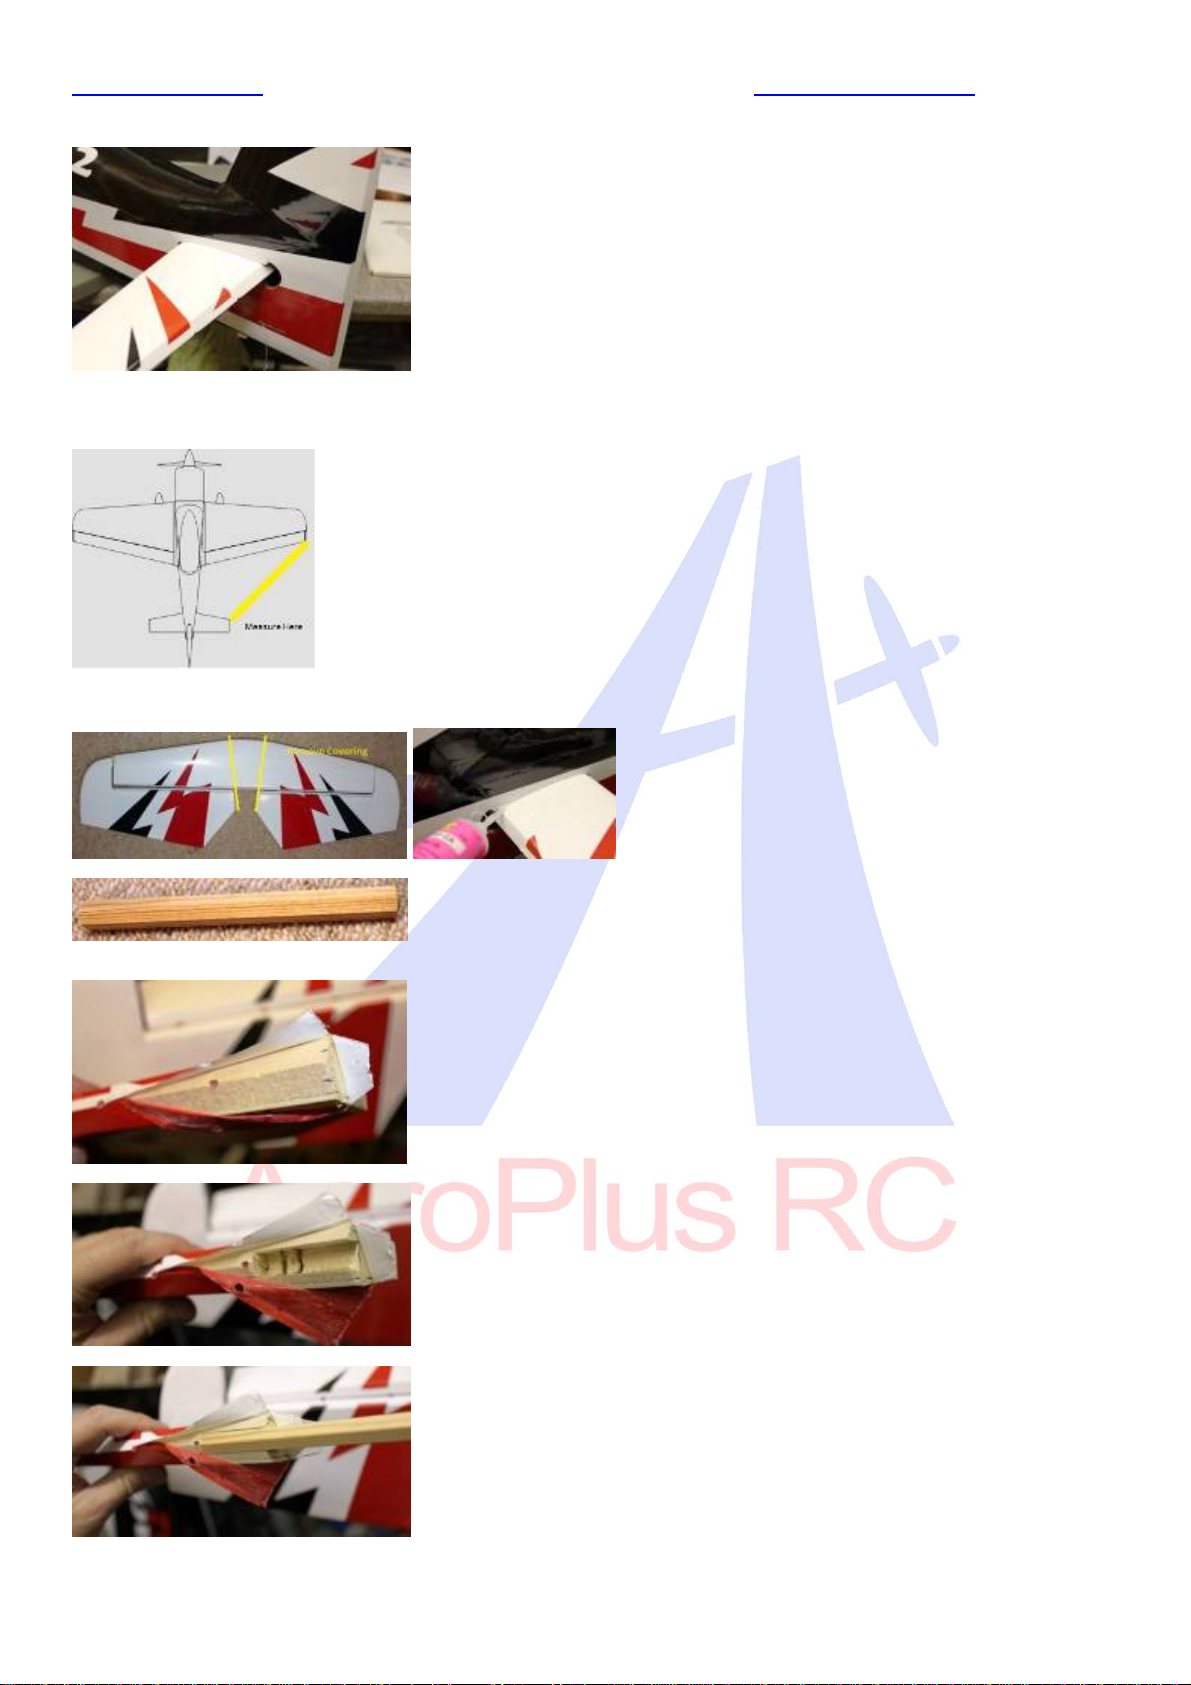
RearStab
Removetheelevatorsandhingesfromtherearstabandplaceitintheopening.
Itisimportantthatcareistakenwhenaligningtherearstab.Measureeachsidetomakesurethatanequalamountshowsoneachside.
FittheCFwingtubeandlookingfromthefrontandbackcheckthattheelevatorplateisinhorizontalalignmenttotherearstab.Ifitisnotthentrim
theopeningsothatitisequal.
Fitthewingsandmeasurefromtheendofthewingtotheelevatorstabtomakesurethatbothsidesareequal
Glueing–Onceyouthinkyouarereadytoglue,measureagain.Werecommend2methodsforgluing.Eitherremovethecoveringontheareathatis
coveredbythefuselageandgluewithepoxyorleavethecoveringonandgluewiththincyno.Wickinginthinfirst,ifalargegapisvisiblethenuse
mediumorthick.Remembertowickinsmallamountsatatimekeepingtheplanelevel,thiswillensurethegluestayswhereitneedstobe.
Dependingonifyouarefitting1or2elevatorservo’syoumayneedtofittheelevatorjoiningbar.
Workouthowmuchofthejoinerbarneedtogointotheelevatorhalfbylayingthebaroverthehalvesandsettingthesamelengthastherearstab.
Openupthecoveringattheinsideofeachoftheelevatorhavesandmarktheareaofwoodthatneedstoberemoved.
Cuttheareaofwoodawaywithasharpknife
Testfitthejoinerbar
www.aeroplusrc.com[email protected]
AeroPlusRCCopyright2013©AllRightsReserved
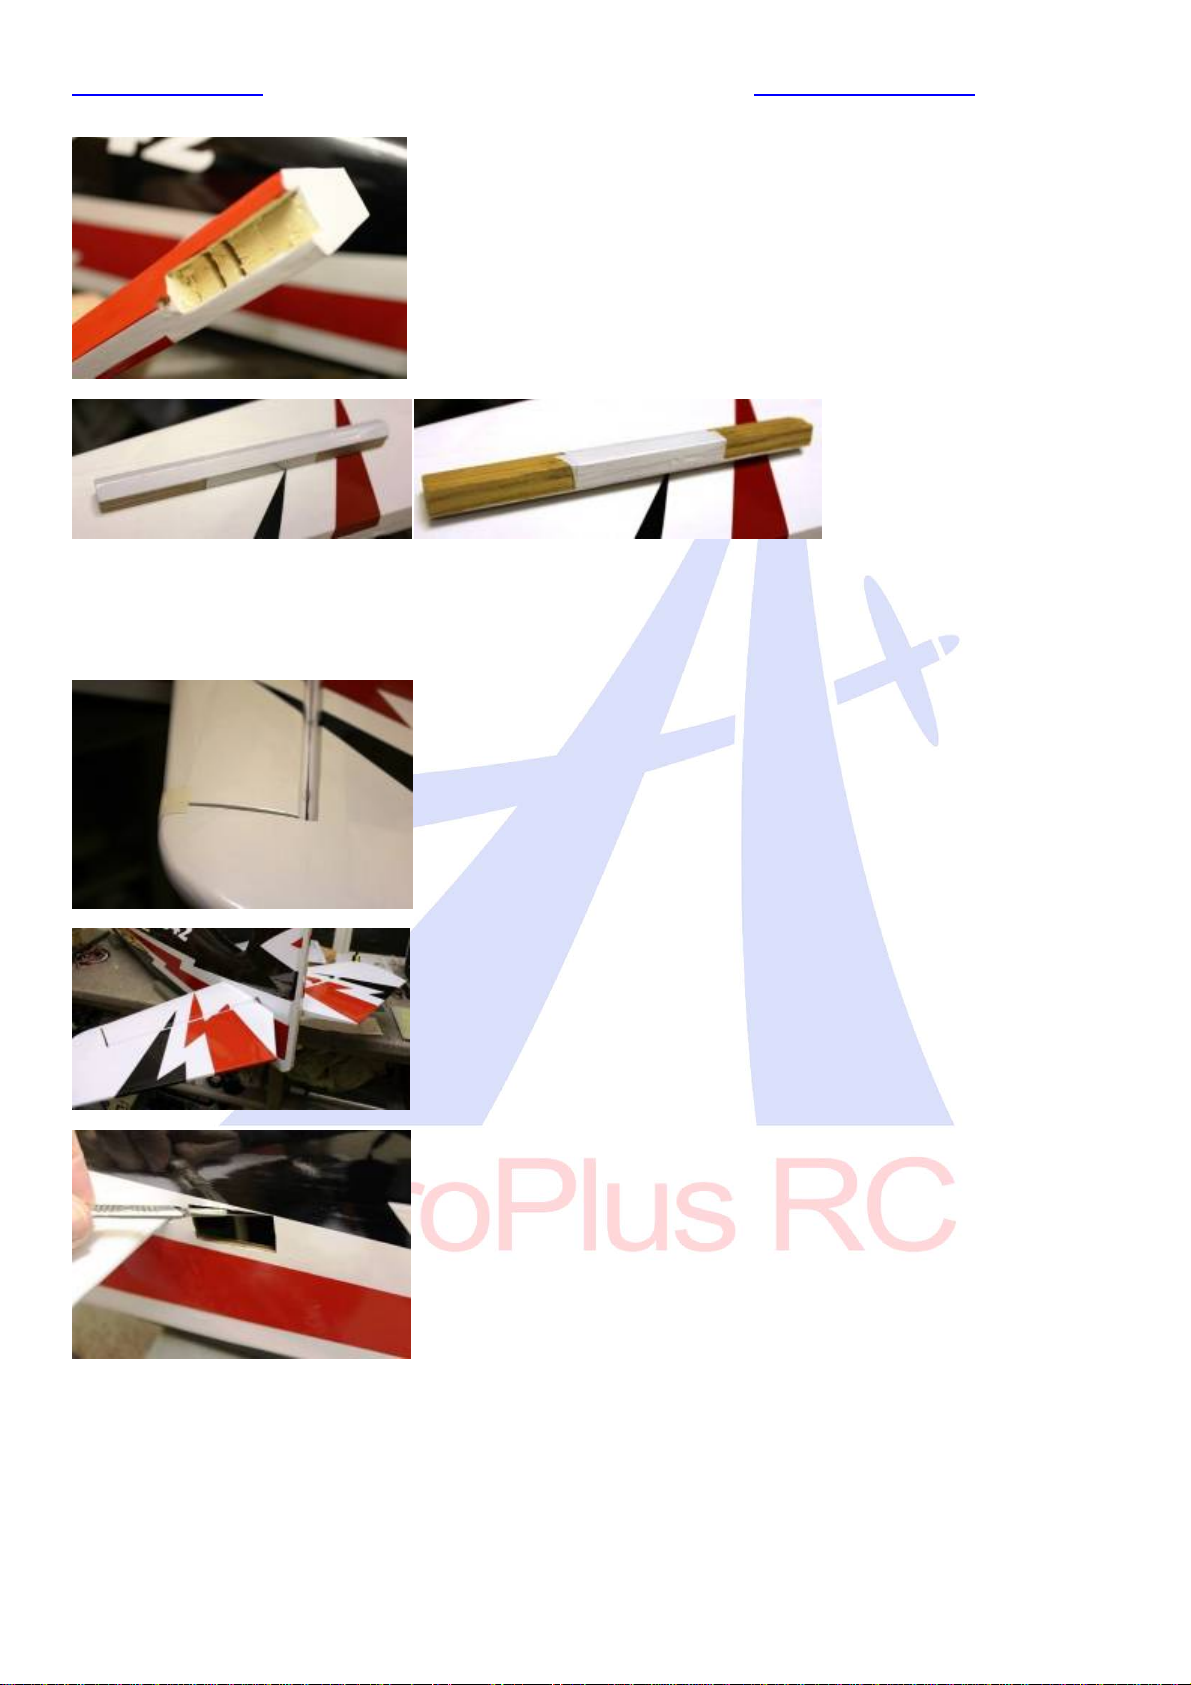
Ironbackdownthecovering
Coverthejoinerbarleavingtheglueareaexposed
Cuttheareaforthejoinerbarontheotherelevatorhalf,irondownthecoveringandtestfit.
Gluethejoinerbarinto1oftheelevatorhalveswithepoxy.
Nowwecanhingeoneoftheelevatorswiththejoinerbargluedin.
Apply‘vaseline’tothehingepointonthehingesandusing30minuteepoxytogluetheseintotheboththestabandelevatorhalf.Wipeoffexcess
gluebeforeitsets.
Dryfittheotherelevatorhalfwiththehingesandmakesurethatbothhalvesaligntothestab.Trimwherethejoinerbarsitsifrequired.
Gluethehingesinbothstabandelevatoragainwith30minuteepoxy.Whilegluingusetapetokeepitinalignment
Completedelevator
Removethecoveringfortheelevatorservo
www.aeroplusrc.com[email protected]
AeroPlusRCCopyright2013©AllRightsReserved
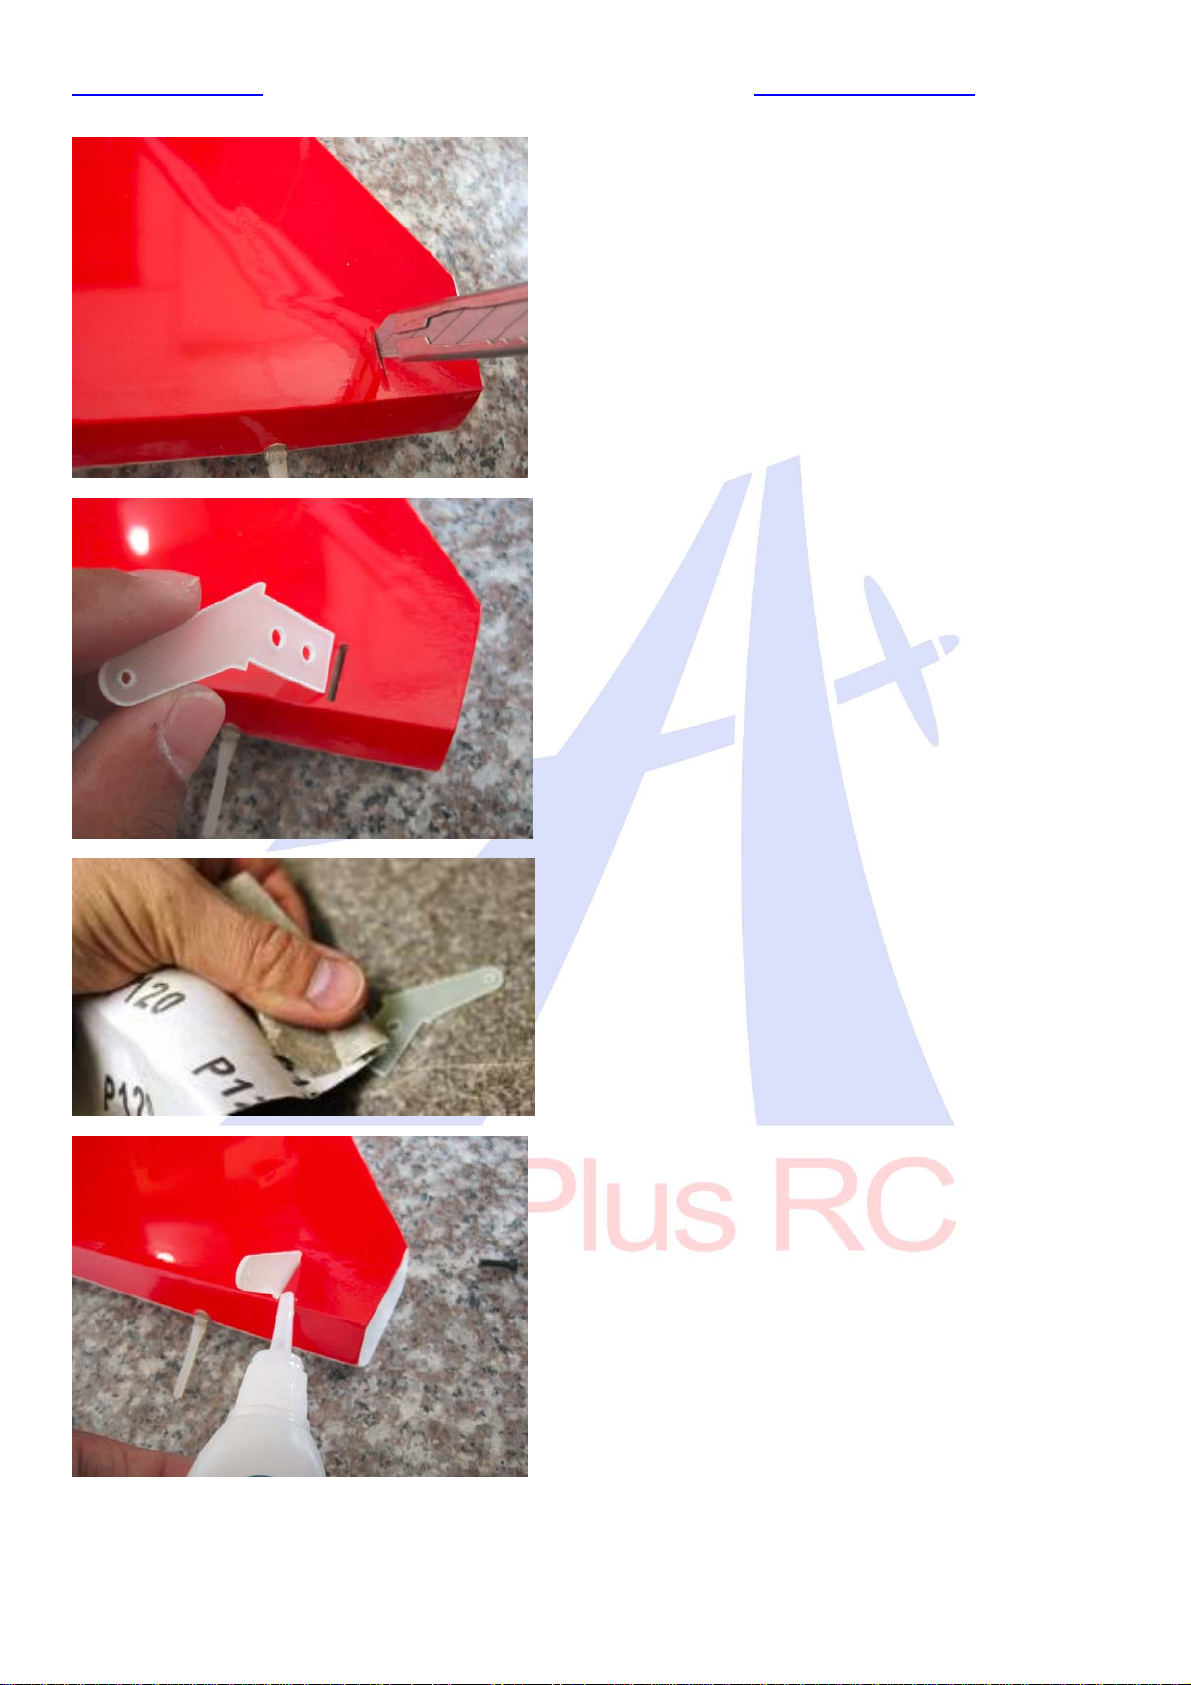
Removethecoveringwheretheelevatorhornsfit,useeitherasolderingironorasharpknife.
Testfitthehorns
Theareaonthehornsthatgoesinsidetheelevatorneedstoberoughedupwithsandpaper.Thisallowsabettergluejoint.
Gluethehornsinplacewithepoxyglue.Putaboltthroughtheballjointholetomakesurethatthehornsstayinalignmentwhiledrying.
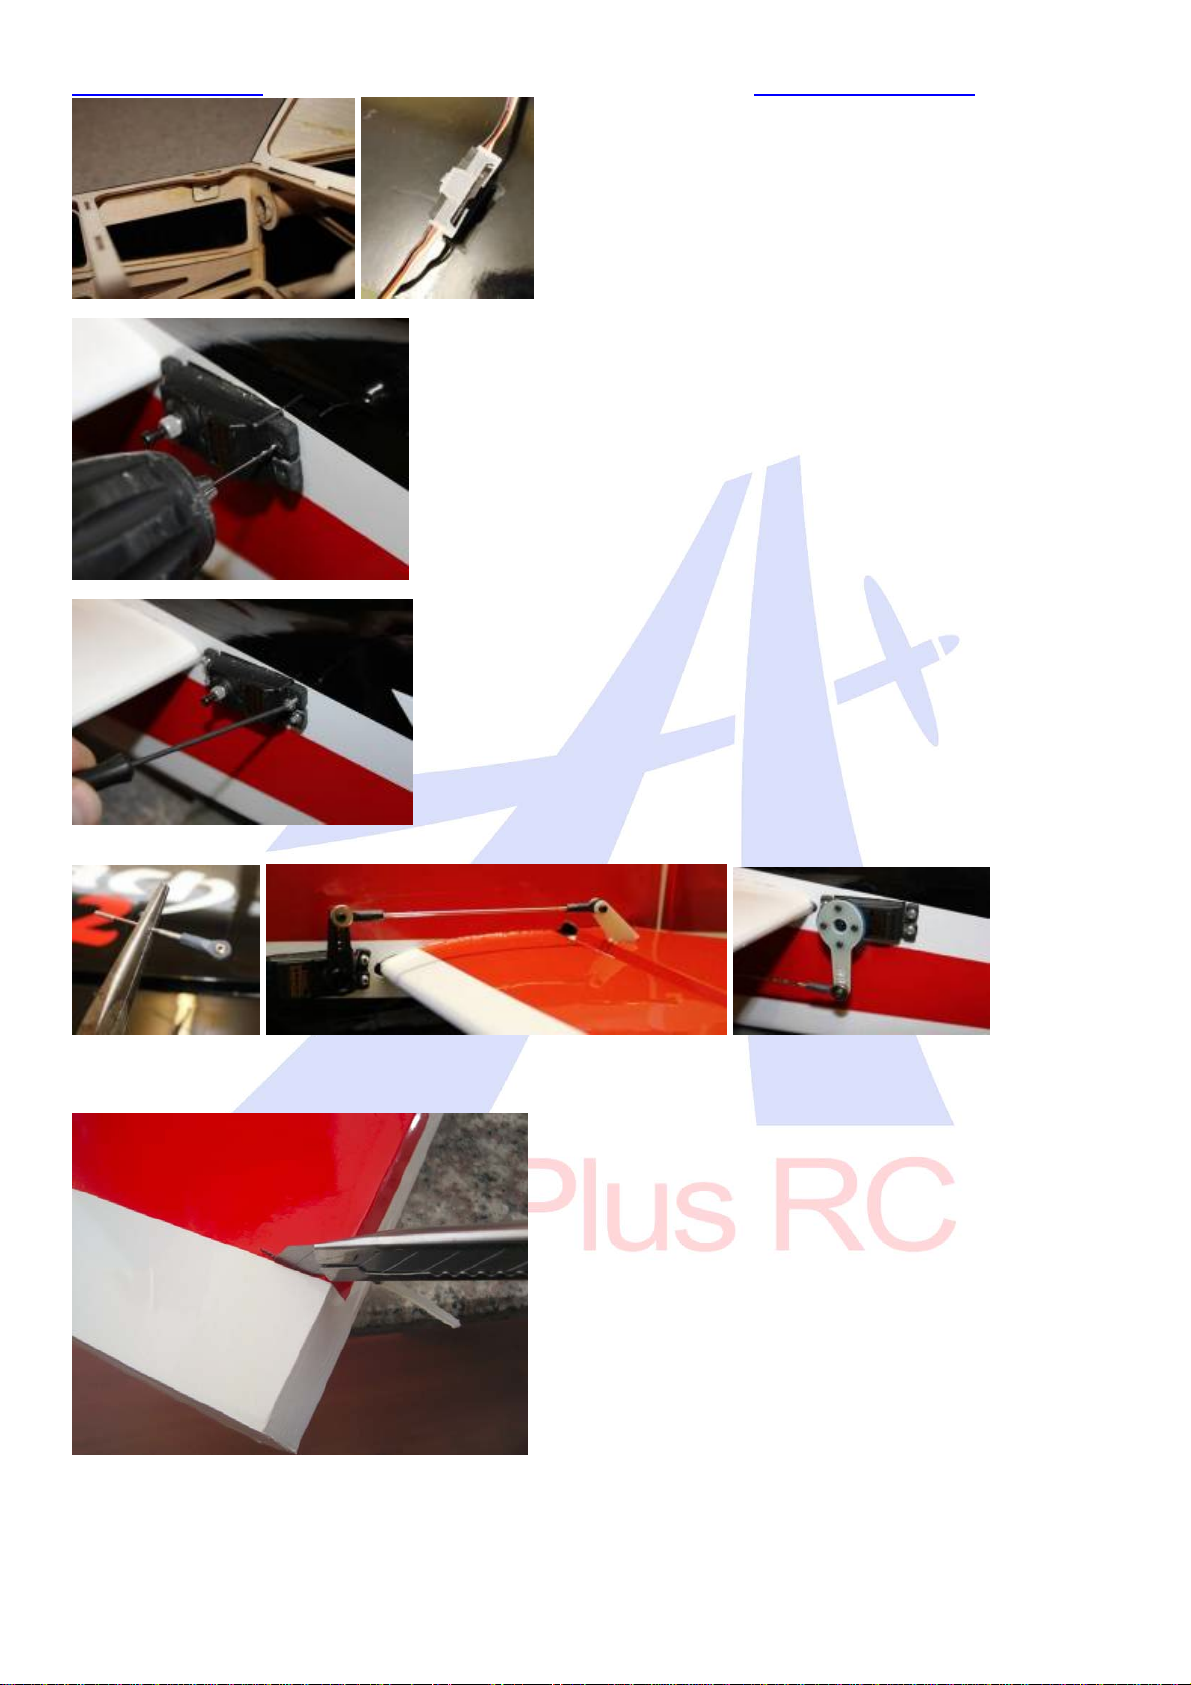
Beforefittingtheelevatorservofixanextensionleadsothatthewirecanberoutedthroughthecardboardtubewireholderinthefuselage.Onthe
servoleadjointaddaservoplugclip.
www.aeroplusrc.com[email protected]
AeroPlusRCCopyright2013©AllRightsReserved
FittheElevatorServoservoandusingafinedrill,drillholesfortheservoscrews.Removetheservoanddropthincynointoall4holes.
Re‐fittheelevatorservoandsecureitinwithservoscrews.
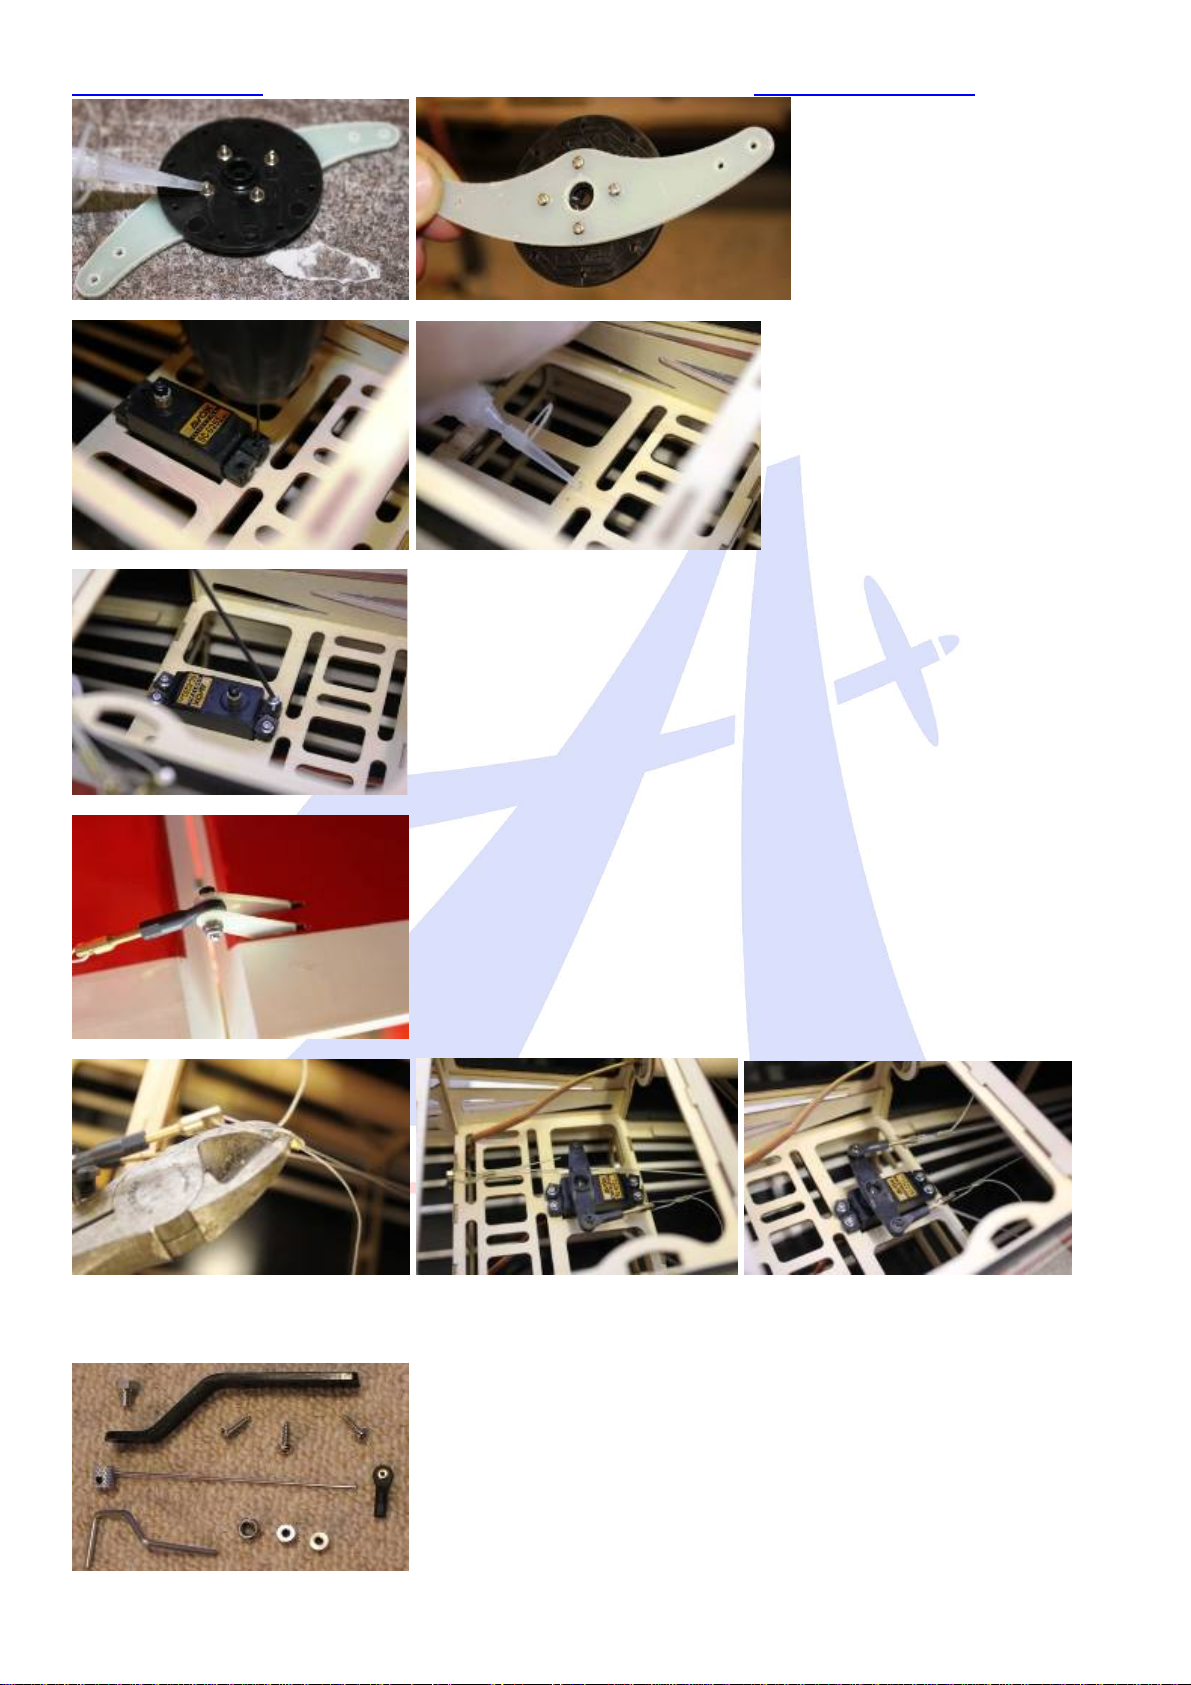
CentretheservousingyourTX,andfitaservoarm.Useeitheranaftermarketarmorattachthearmsthatweresuppliedtoaservohead.Screwball
jointsontothepushrod(useplierstoholdpushrod)andboltinplacewithsuppliedbolts.Centreofservoshouldalignwithelevatorflattothestab.
Ifyouareusingdualelevatorservosthenrepeattheprocessontheotherside.
Rudder
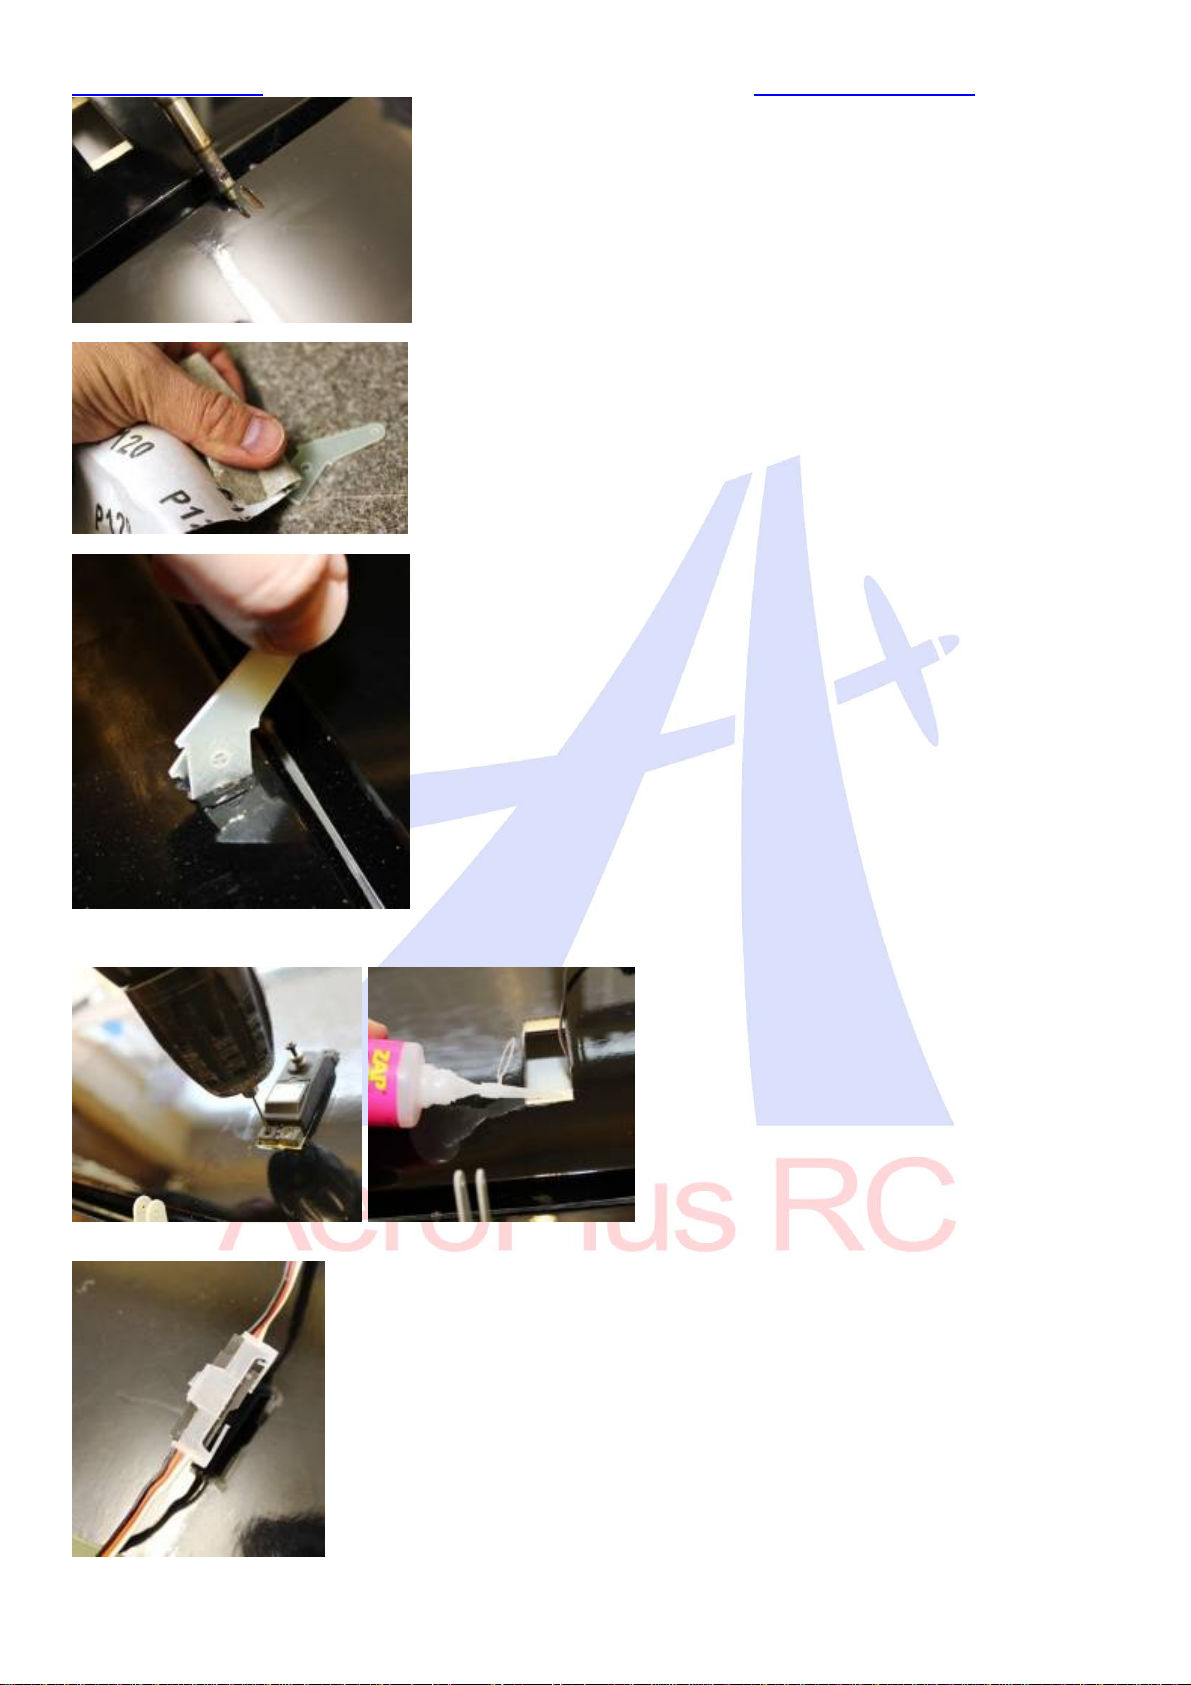
Removethecoveringwheretherudderhornspushthroughwitheitheraknifeorsolderingiron.
Testfittherudderhorns

www.aeroplusrc.com[email protected]
AeroPlusRCCopyright2013©AllRightsReserved
Sandtheareaonthehornthatfitsinsidetheruddersothegluebondsbetter
Gluetherudderhingesintoboththerudderandfinusingepoxyglue.Remembertousevaselineonthehingejoint.Whiledryingusetapetokeepit
inalignment.
Gluetherudderhornsthroughtherudderwithepoxy,wipeoffexcessgluewhileitiswet.Usetheballjointandboltwhilegluingtomaintain
alignment.Whilestillmovablemeasurethatthesameamountpushesouteachside.Careneedstobetakenhereotherwiseyourruddergeometry
willbeincorrect.
Assembletherudderservocontrolarmasbelow,drillholesforscrewsandusecynotostopthenutsfromcomingloose.
www.aeroplusrc.com[email protected]
AeroPlusRCCopyright2013©AllRightsReserved
Fittherudderservoanddrillholesusingafinedrillfortheservoscrews,dropthincynointotheholestostrengthenthewood.
Usingservoscrewsfixtheservoinplace,notethesplineistowardsthefrontoftheplane
Theclosedloopwiresareassembledintheplane;attachtherearballjointstotherudder.Dothistobothsides.(Sbach20CCusedsinglehorn)
Fitthearmontotherudderservoandcrimpthewirestoatauttension
TailGear
Locateallpartsasinpicture,whenassemblingremembertonutlockallparts

www.aeroplusrc.com[email protected]
AeroPlusRCCopyright2013©AllRightsReserved
AssembletheGearasperphoto
Attherearofthefuselageyouwillfindaplywoodarea,laytheCFgearonthisandmarkthe3holes.Takingcaretomakesureitisstraight.
Drilleachholewithafinedrillanddropthincynointotheholestostrengthenthewood.
ScrewtheCFgearonwiththethreesuppliedselftapingscrews.
Drillaholeinthebaseoftherudderfortheruddersteeringguide.
Beforegluingwithcyano,placeitoverthethinrod.
AileronServos
Theaileronsonthewingsarepre‐glued.Checkeachonebygentlypullingtomakesurethattheyaresecure
Removethecoveringwheretheaileronhornsaregluedinplace.Useeitherasolderingironorasharpknife
www.aeroplusrc.com[email protected]
AeroPlusRCCopyright2013©AllRightsReserved
Usingsandpaperroughtheareathatwillbegluedintotheaileron.
Gluebothhornsinwithepoxyglue,useaboltthroughthehornswhengluingtomakesurethealignmentiscorrect.
Fittheaileronservoanddrillfineholeswheretheservoscrewswillfit.Thenapplythincyanotostrengthentheholes.
#(Sbach20CCusedsinglehorn)
Ifrequiredinstallaservoextensionleadontotheservo,remembertouseaservoplugclip.
Fittheservoandcentretheservoarm.

www.aeroplusrc.com[email protected]
AeroPlusRCCopyright2013©AllRightsReserved
#(Sbach20CCusedsinglehorn)
Usingthepushrodsuppliedscrewballjointsontoeachend.Thecorrectlengthwillleavetheaileronlineduptotheinnerpartstillattachedtothe
wing.
Usingsuppliedboltsattachthepushrodatbothends.Checktoseeyouhavesufficientmovementoftheaileron.Ifnotadjust.
#(Sbach20CCusedsinglehorn)
Carryoutthesameprocedureontheotherwing.
GasEngine
Fromthetemplatethatcamewiththeengine,usingthecrossaxisontheengineboxmarkthemountingholes.
Checkthediameteroftherequiredboltsanddrillaccordingly.
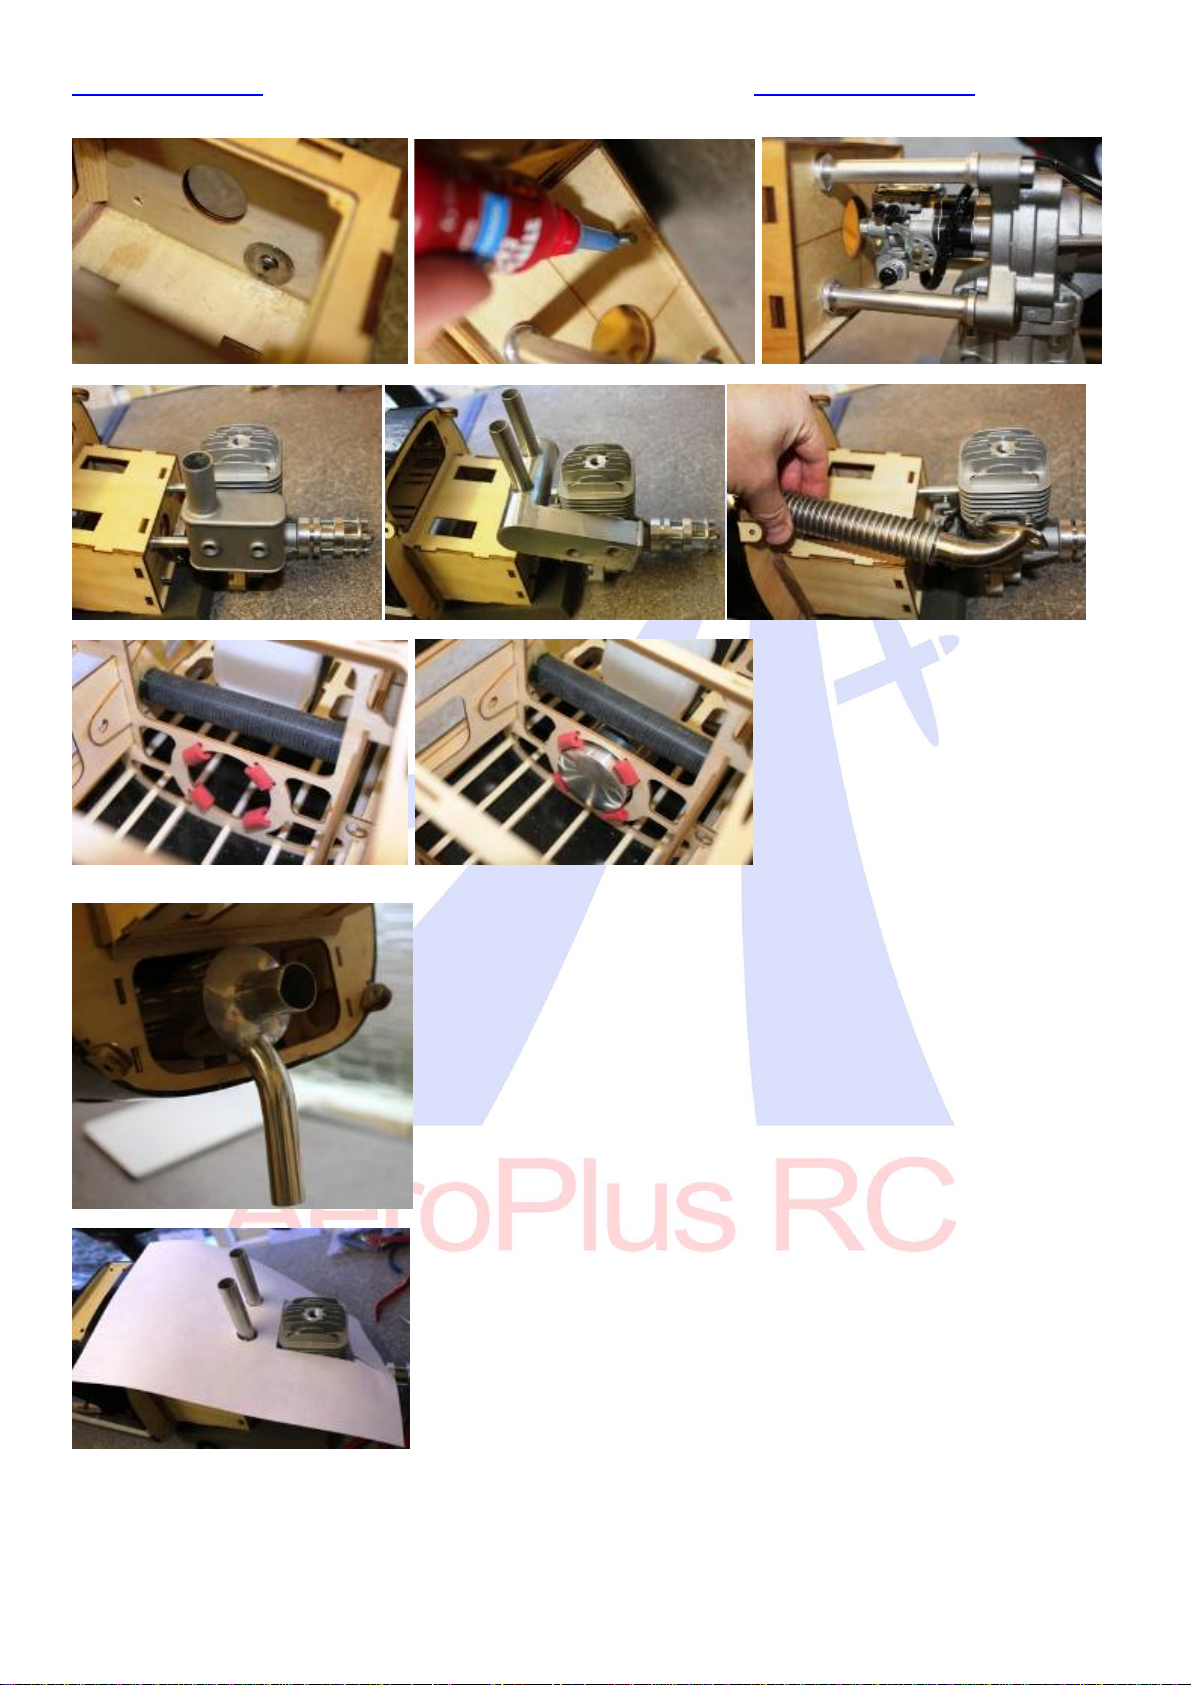
www.aeroplusrc.com[email protected]
AeroPlusRCCopyright2013©AllRightsReserved
Mounttheenginewiththestandoffstothebulkhead.Remembertouselargewashersontheinsidetospreadtheloadanduseplentyofnutlock.
Exhaustoptions.Dependingontheenginemanyexhaustoptionsareavailable.Standardmuffler,PittsExhaustofcanisterwithheader.
Ifusingacanisterabracketisalreadyinsidethemodel.Usingsilicontubingitwillholdtheendofthecanister.
Thefrontoutletofthecanisterwillpopoutofthebottomofthecowl
Cutouttheareafortheenginecylinderheadandtheexhaustoutletonapieceofthincardandtapethistothefuselageatoneend.

www.aeroplusrc.com[email protected]
AeroPlusRCCopyright2013©AllRightsReserved
Removetheengineandfitthecowl,thenfoldthecardbackover.
Marktheareaandcutoutusingadremel.Ensurethatenoughaircangetoutofthecowl.Therationisusually,3timeoutto1in.
Fittheignitiononthesideofthemotorbox.UseVelcroandalsoastraptoensureitdoesnotcomeoffwithvibration.
Thecowlisfixedin4places,2atthetopand2atthebottom.Placemaskingtapeoverthebottom2andpiercewheretheblindnutholeis.
Refitthecowlanddrillwherethemarkedholewas.
Thefueltankispre‐installed.Attachpetrolproofpipeasperlabellingontank
Usethesuppliedpushrodwithaballjointtoconnecttothethrottlearmontheengine.Thenfindaconvenientplacetolocatethethrottleservo
usingthesuppliedmount.
Installtheengineboxcoverplateonceallconnectionshavebeenmadefortheengine.

www.aeroplusrc.com[email protected]
AeroPlusRCCopyright2013©AllRightsReserved
Electric
Assemblethesuppliedelectricmotorboxandbolttotheenginebulkhead.
Dependingonthelengthofyourmotoryoumayneedtousethesuppliedroundplywoodspacerstoachievethecorrectlengthforthemotor.
MounttheESCinairflowonthesideoftheelectricmotormount,usingavelcostrap.
Withtheremovalofthefueltankitleavesalargeareawherethebatteriescanbemounted.
Switch
Oneachsideofthefuselagenearthecanopyboltsareareasforswitchestobemounted.
RX
AconvienientplacetomounttheRXisjustinfrontoftherudderservo.Ensurethatitismountedonvelcoandstrappeddown.

www.aeroplusrc.com[email protected]
AeroPlusRCCopyright2013©AllRightsReserved
Canopy
Thecanopyisheldinplacewiththe2thumbscrews,ensurethesearetightbeforeflying
Set‐up
Wehighlyrecommendtheuseofbothdualratesandexponential.Thiswillallowthemodeltoflybothprecisionand3Dattheflickofaswitch.
LowRates ExponentialHighRate Exponential
Elevator15‐20deg 15‐20% 35‐45deg 45‐60%
Ailerons15‐20deg 15‐20% 35‐45deg 45‐60%
Rudder25‐30deg 15‐20% 35‐45deg 45‐60%
Fortestflightsalwaysuselowrates,rememberthat+and–exponentialisdifferentpermanufacturer,checkyourTXmanual.
Alwayschecktherangeonyourmodelbeforethemaidenflight.Carryoutashortflightthengoovereverythingtomakesurenothinghascomeloose.
CGLocation
WesuggestforinitialtestflightssettheCG116mmor4inchesfromtheleadingedgeofthewing.
Adjustafterfirstflightstopersonalpreference.
This manual suits for next models
1
Table of contents
Other AeroPlus Toy manuals

AeroPlus
AeroPlus EXTRA 330SC 60CC User manual

AeroPlus
AeroPlus Corvus Racer 540 User manual

AeroPlus
AeroPlus Edge 540 V3 35CC User manual

AeroPlus
AeroPlus MXS-R 30CC User manual

AeroPlus
AeroPlus Sbach 342 User manual

AeroPlus
AeroPlus Extra 330LT User manual

AeroPlus
AeroPlus YAK 55M User manual

AeroPlus
AeroPlus Corvus Racer 540 59 User manual

AeroPlus
AeroPlus A?G030010A User manual

AeroPlus
AeroPlus Edge 540 V3 20CC User manual


