AGAiT EC02 User manual

Robotic Vacuum Cleaner /
Staubsaugerroboter /
Aspirateur portable robotisé /
Robot aspirapolvere
Fully Automated Intelligent Dust
Buster / Vollautomatischer intelligenter
Staubsauger / Aspirateur de poussière
intelligent complètement automatique /
Robot aspirapolvere completamente
automatizzato
User’s Manual / Bedienungsanleitung /
Manuel de l’utilisateur / Manuale d’uso
Easy-Clean Life Style
Start Home
Power

Safety Notice \ Sicherheitshinweise \ Avertissement de
sécurité \ Avvisi per la sicurezza .................................................1
Package Content \ Lieferumfang \ Contenu de la boîte \
Contenuti della confezione ...........................................................5
Main Unit Parts and Operating Instructions \ Komponenten
des Hauptgerätes und Bedienungsanweisungen \ Pièces de
l'unité principale et instructions d'utilisation \ Parti dell’unità
principale e Istruzioni operative ..................................................6
1 Main unit parts \ Komponenten des Hauptgerätes \ Pièces de l'unité
principale \ Parti dell’unità principale ........................................................6
2 Button functions and indicator \ Tastenfunktionen und Anzeige \
Fonctions des boutons et indicateurs \ Tasti di funzione e indicatori .......8
3. UV light \ UV-Licht \ Rayon UV \ Lampada UV .........................................9
Battery Instructions \ Hinweise zum Akku \ Instructions
pour la batterie \ Istruzioni sulla batteria ..................................10
Charging the Battery \ Akku aufladen \ Chargement de la
batterie \ Caricamento della batteria .........................................12
1. Charging with the recharging dock \ Rückkehr zum Ladedock \
Chargement avec la station de chargement \ Caricamento usando la
stazione di caricamento ..........................................................................12
2. Charging with adapter \ Mit Netzteil aufladen \ Chargement avec
l'adaptateur \ Caricamento usando l’adattatore......................................14
Remote Control \ Fernbedienung \ Télécommande \
Telecomando ...............................................................................15
Maintenance \ Wartung \ Entretien \ Manutenzione .................20
1. Two front side brushes \ Die beiden vorderen seitlichen Bürsten \
Deux brosses frontales \ Due spazzole frontali......................................20
2. Roll brush \ Die Rollbürste \ Brosse rotative \ Spazzola rotante ............20
3. Dust bin and filter \ Staubbehälter und Filter \ Bac à poussière et filtre \
Raccoglitore e filtro .................................................................................21
FAQ and Troubleshooting \ Häufig gestellte Fragen und
Problemlösung \ FAQ & Guide de dépannage \ Domande
poste di frequente e Risoluzione dei problemi .......................22
Product Warranty \ Produktgarantie \ Garantie du produit \
Garanzia del prodotto .................................................................26
Table of contents \ Inhaltsverzeichnis \
Table des matières \ Contenuti

-1-
Safety Notice
Before using Eclean, please read the Safety Notice carefully and follow the
instructions below:
Forbidden
● To reduce the risk of electric shock, do not disassemble the product.
Do not sit on the product or place any object upon it under any
circumstance.
● Please pay special attention to prevent children, the elderly or pets
from any danger.
● Keep away from re or other volatile ammable liquid when using the
product.
● Do not cleanse the product with water, or use it on moist surfaces to
avoid malfunction of electrical wire or component.
● Do not expose the product to direct sunlight, otherwise machine
operation may be interfered.
● To avoid eye damage, do not look straight into the Ultraviolet light (UV
light) when it's on.
Notice
● To avoid malfunction, please ensure the air outlet is not blocked by
foreign objects while using the product. To avoid trapping the product,
please clear the cleaning zone and remove items, such as clothes,
wires and plastic bags, before cleaning.
● To avoid danger, please remove the Venetian blinds, curtains, bed
sheets or carpet tassels from the cleaning ground.
● The product is for domestic use only and not intended for factory or
any business-related use. If the product is damaged due to misuse, the
warranty shall be avoided.If the product is sent for repair, the fees for
labor and parts shall be assessed at our discretion.
● The ideal operating temperature range is 0°C to 45°C. Subject the
product to temperatures outside of this range may cause malfunction.
● If you have any problem using the product, please contact our dealers.
-2-
Sicherheitshinweise
Bitte lesen Sie sich die Sicherheitshinweise vor dem Einsatz des Eclean
aufmerksam durch und befolgen die nachstehenden Anweisungen:
Verboten
● Demontieren Sie das Produkt nicht, andernfalls besteht
Stromschlaggefahr. Setzen Sie sich keinesfalls auf das Produkt,
platzieren Sie keine Gegenstände darauf.
● Bitte geben Sie besonders auf die Sicherheit von Kindern, älteren
Menschen und Haustieren Acht.
● Benutzen Sie das Gerät nicht in der Nähe von offenen Flammen und
aggressiven brennbaren Flüssigkeiten.
● Reinigen Sie das Gerät nicht mit Wasser; benutzen Sie es zur
Vermeidung von Fehlfunktionen elektrischer Drähte und/oder
Komponenten nicht auf feuchten Oberächen.
● Setzen Sie das Gerät nicht dem direkten Sonnenlicht aus; andernfalls
kann der Betrieb gestört werden.
● Blicken Sie zur Vermeidung von Augenverletzungen nicht direkt in das
ultraviolette Licht (UV-Licht), wenn es eingeschaltet ist.
Hinweise
● Bitte stellen Sie zur Vermeidung von Fehlfunktionen sicher, dass
die Abluftöffnungen während des Betriebs nicht durch Fremdkörper
blockiert sind. Bitte räumen Sie den zu reinigenden Bereich frei und
entfernen jegliche Gegenstände (Kleidung, Kabel, Plastiktüten) vom
Boden, damit das Gerät nicht blockiert wird.
● Bitte entfernen Sie aus Sicherheitsgründen Jalousien, Vorhänge,
Bettlaken und Teppichfransen von dem zu reinigenden Boden.
● Das Gerät dient ausschließlich dem Einsatz in Privathaushalten; es
eignet sich nicht zur Verwendung in Fabriken, Geschäften oder Büros.
Falls das Produkt aufgrund von falschem Gebrauch beschädigt wird,
erlischt die Garantie. In diesem Fall werden bei Einsenden des Gerätes
zu Reparaturzwecken die Kosten für Arbeit und Teile nach unserem
Ermessen erhoben.
● Die ideale Betriebstemperatur liegt zwischen 0 °C und 45 °C. Wenn
Sie das Produkt Temperaturen außerhalb dieses Bereichs aussetzen,
können Fehlfunktionen auftreten.
● Falls Probleme beim Einsatz des Gerätes auftreten, wenden Sie sich
bitte an unsere Händler.

- 3 -
Avertissement de sécurité
Avant d'utiliser Eclean, veuillez lire attentivement les Consignes de sécurité
et suivre les instructions qui suivent :
Interdit
● Pour réduire les risques de choc électrique, ne démontez pas cet
appareil. Ne vous asseyez pas sur cet appareil et ne posez jamais des
objets dessus.
● Faites particulièrement attention avec les jeunes enfants, les personnes
âgées et les animaux.
● Gardez cet appareil à l'abri du feu et des liquides inammables volatiles
lorsque vous l'utilisez.
● Ne nettoyez pas cet appareil avec de l'eau et ne l'utilisez pas sur des
surfaces mouillées an d’éviter des problèmes électriques ou des
composants.
● N'exposez pas cet appareil directement au soleil pour éviter les
interférences.
● Ne regardez pas directement le rayon ultraviolet (UV) lorsque cet
appareil est allumé pour éviter des problèmes oculaires.
Notice
● Pour éviter un malfonctionnement, veuillez vous assurer que la sortie
d'air n'est pas obstruée par un corps étranger lorsque vous utilisez cet
appareil. Pour éviter de bloquer cet appareil, assurez-vous que l'endroit
que vous voulez nettoyer est vide et enlevez les objets comme des
habits, ls ou sacs en plastiques avant de la nettoyer.
● Pour réduires les risques, veuillez enlever les rideaux, les stores, les
couvertures de lit ou les tapis de l'endroit que vous voulez nettoyer.
● Ce produit est conçu pour une utilisation domestique uniquement et pas
pour une utilisation professionnelle. Si le produit a été endommagée
par une utilisation incorrecte, la garantie ne sera pas valide. Si le
produit a été renvoyé pour des réparations, les frais de pièces et de
main d'oeuvre seront décidés par nous.
● La température recommandée pour l'utilisation de l'adaptateur secteur
est entre 0°C et 45°C. L'utilisation à des températures hors de cette
plage peut causer un malfonctionnement.
● Si vous remarquez un problème quelconque lorsque vous utilisez cet
appareil, contactez votre revendeur.

- 4 -
Avvisi per la sicurezza
Prima di usare Eclean, leggere accuratamente gli Avvisi per la sicurezza ed
osservare le istruzioni che seguono:
Vietato
● Non smontare il prodotto per evitare il rischio di subire scariche
elettriche. Non sedere mai sul prodotto né collocare alcun oggetto
sopra di esso in qualsiasi circostanza.
● Prestare particolare attenzione per evitare pericoli a bambini, persone
anziane ed animali domestici.
● Quando il prodotto è in uso, tenerlo lontano dal fuoco o altre sostanze
volatili o liquidi inammabili.
● Non pulire il prodotto con acqua, né usarlo su superci bagnate per
evitare guasti elettrici o ai componenti.
● Non esporre il prodotto alla luce diretta del sole, diversamente il
funzionamento della macchina può subire interferenze.
● Non guardare direttamente luce a raggi ultravioletti (lampada UV),
quando è accesa, per evitare lesioni agli occhi.
Avviso
● Quando il prodotto è in uso, assicurarsi che lo scarico dell’aria non sia
bloccato da oggetti estranei per evitare guasti. Tenere sgombra l’area
da pulire e rimuovere oggetti come abiti, cavi e borse di plastica prima
della pulizia per evitare che il prodotto di inceppi.
● Rimuovere dall’area da pulire veneziane, tende, lenzuola e frange dei
tappeti per evitare pericoli.
● Il prodotto è solo per uso domestico e non per impieghi in fabbriche o
altre attività commerciali. La garanzia sarà annullata se il prodotto è
danneggiato a causa di un cattivo uso. Se il prodotto è inviato per la
riparazione, i costi di manodopera e pezzi di ricambio possono essere
addebitati a nostra discrezione.
● La temperatura operativa ideale è compresa tra 0°C e 45°C.
L’esposizione del prodotto a temperature inferiori o superiori può
provocare guasti.
● Rivolgersi al rivenditore o concessionario in caso di problemi con l’uso
del prodotto.

- 5 -
Package Content \ Lieferumfang \ Contenu de
la boîte \ Contenuti della confezione
(1) Eclean Main Unit \ Eclean \
Unité principale Eclean \ Unità
principale EClean
(2) Remote Control \
Fernbedienung
\ Télécommande \
Telecomando
(3) Filter \ Filter \ Filtre \ Filtro
(4) Rechargeable Battery \ Akku \
Batterie rechargeable \ Batteria
ricaricabile
(5) Adapter \ Netzteil \
Adaptateur \ Adattatore
(6) Recharging Dock \ Ladedock
\ Station de chargement \
Stazione di caricamento
(7) Dust Bin \ Staubbehälter \ Bac à
poussière \ Raccoglitore
(8) User’s Manual \
Bedienungsanleitung \
Manuel de l’utilisateur \
Manuale d’uso
(1)
Start Home
Power
(2)
Enter
Power Home Stop
Spot Clean Max
Plan Clock Area
(3) (4)
(5) (6)
(7) (8)
Robotic Vacuum Cleaner /
Staubsaugerroboter /
Aspirateur portable robotisé /
Robot aspirapolvere
Fully Automated Intelligent Dust
Buster / Vollautomatischer intelligenter
Staubsauger / Aspirateur de poussière
intelligent complètement automatique /
Robot aspirapolvere completamente
automatizzato
User’s Manual / Bedienungsanleitung /
Manuel de l’utilisateur / Manuale d’uso
Easy-Clean Life Style
Start Home
Power
- 6 -
Main Unit Parts and Operating Instructions \
Komponenten des Hauptgerätes und
Bedienungsanweisungen \ Pièces de l’unité
principale et instructions d’utilisation \ Parti
dell’unità principale e Istruzioni operative
1 Main unit parts \ Komponenten des Hauptgerätes \ Pièces de l’unité principale \
Parti dell’unità principale
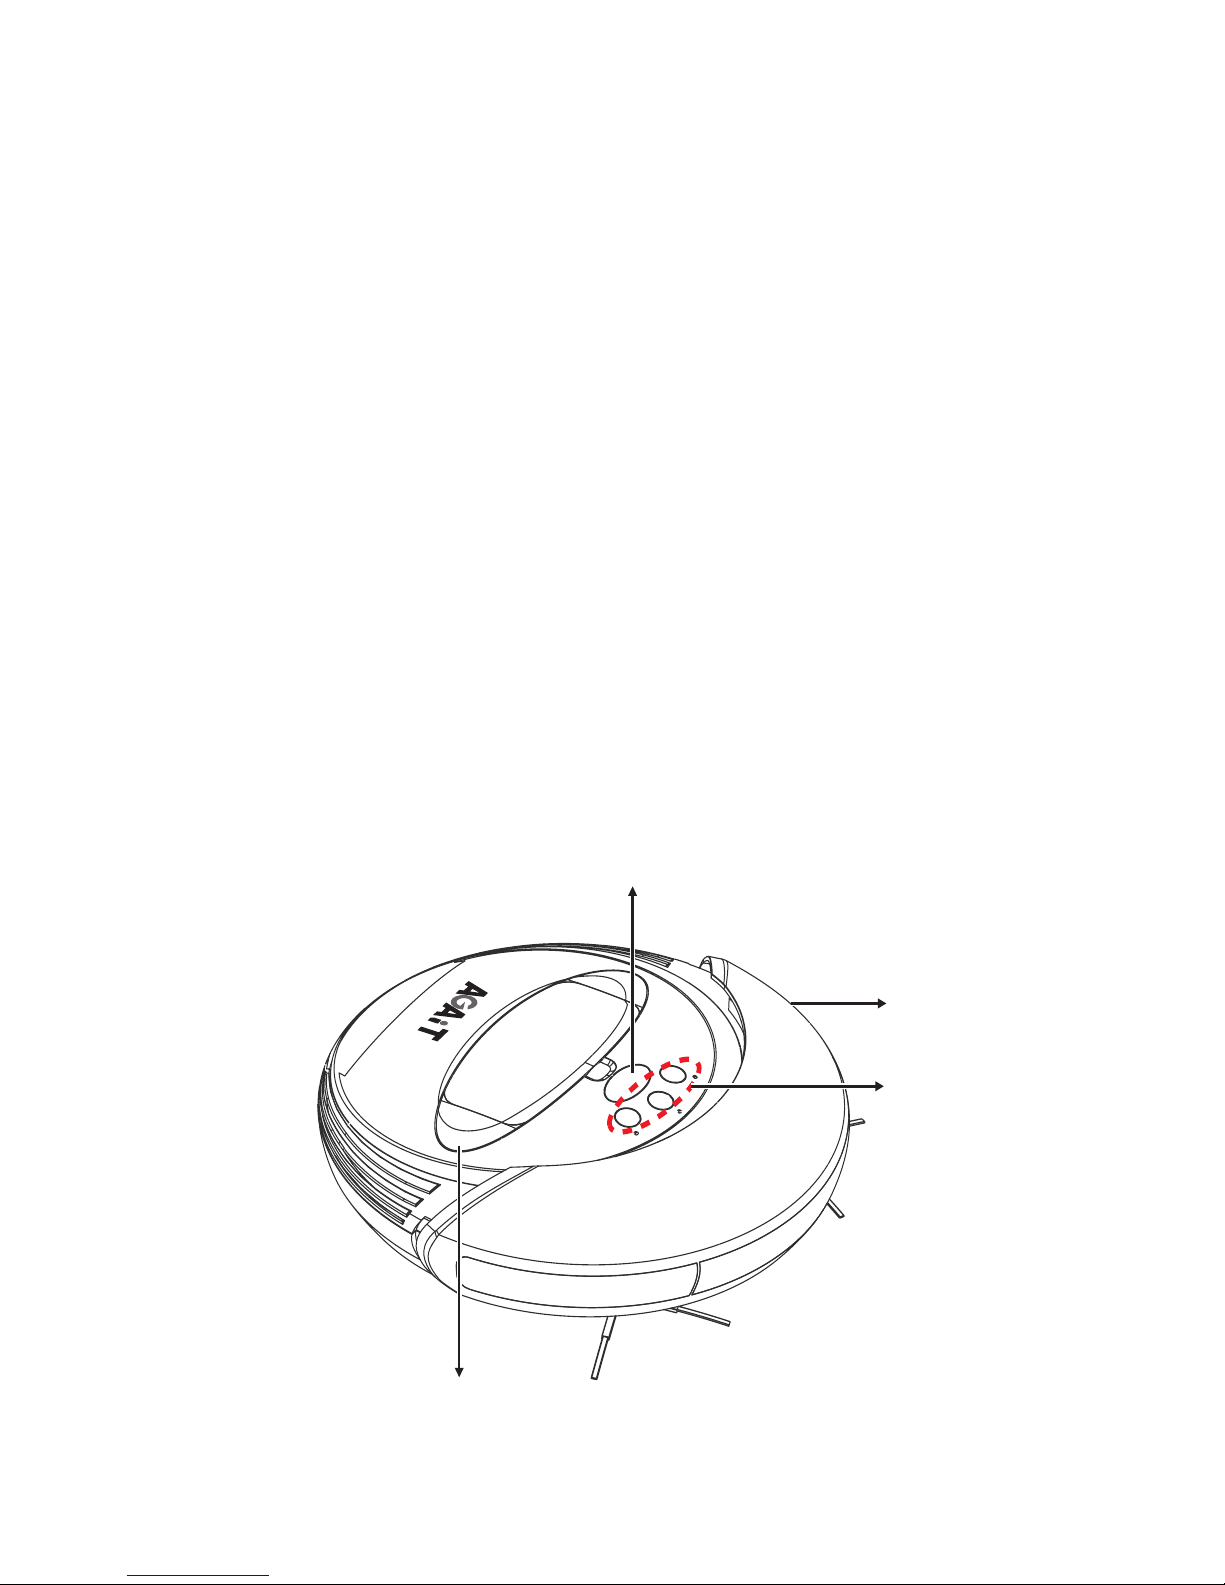
Front View \ Ansicht von vorne \ Vue de devant \ Veduta frontale
(1) Receiving port \ Empfangsport
\ Port de réception \ Porta di
ricezione
(2) Bumper \ Stoßfänger \ Bumper
\ Paraurti
(3) Operating panel button 1.2.3
\ Bedienfeld mit drei Tasten
\ Boutons du panneau de
contrôle 1.2.3 \ Tasti del
pannello operativo 1, 2, 3
(4) Dust bin cover \ Abdeckung des
Staubbehälters \ Couvercle du
bac à poussière \ Coperchio
raccoglitore
(2)
(3)
(1)
(4)
Start Home
Power
-7-
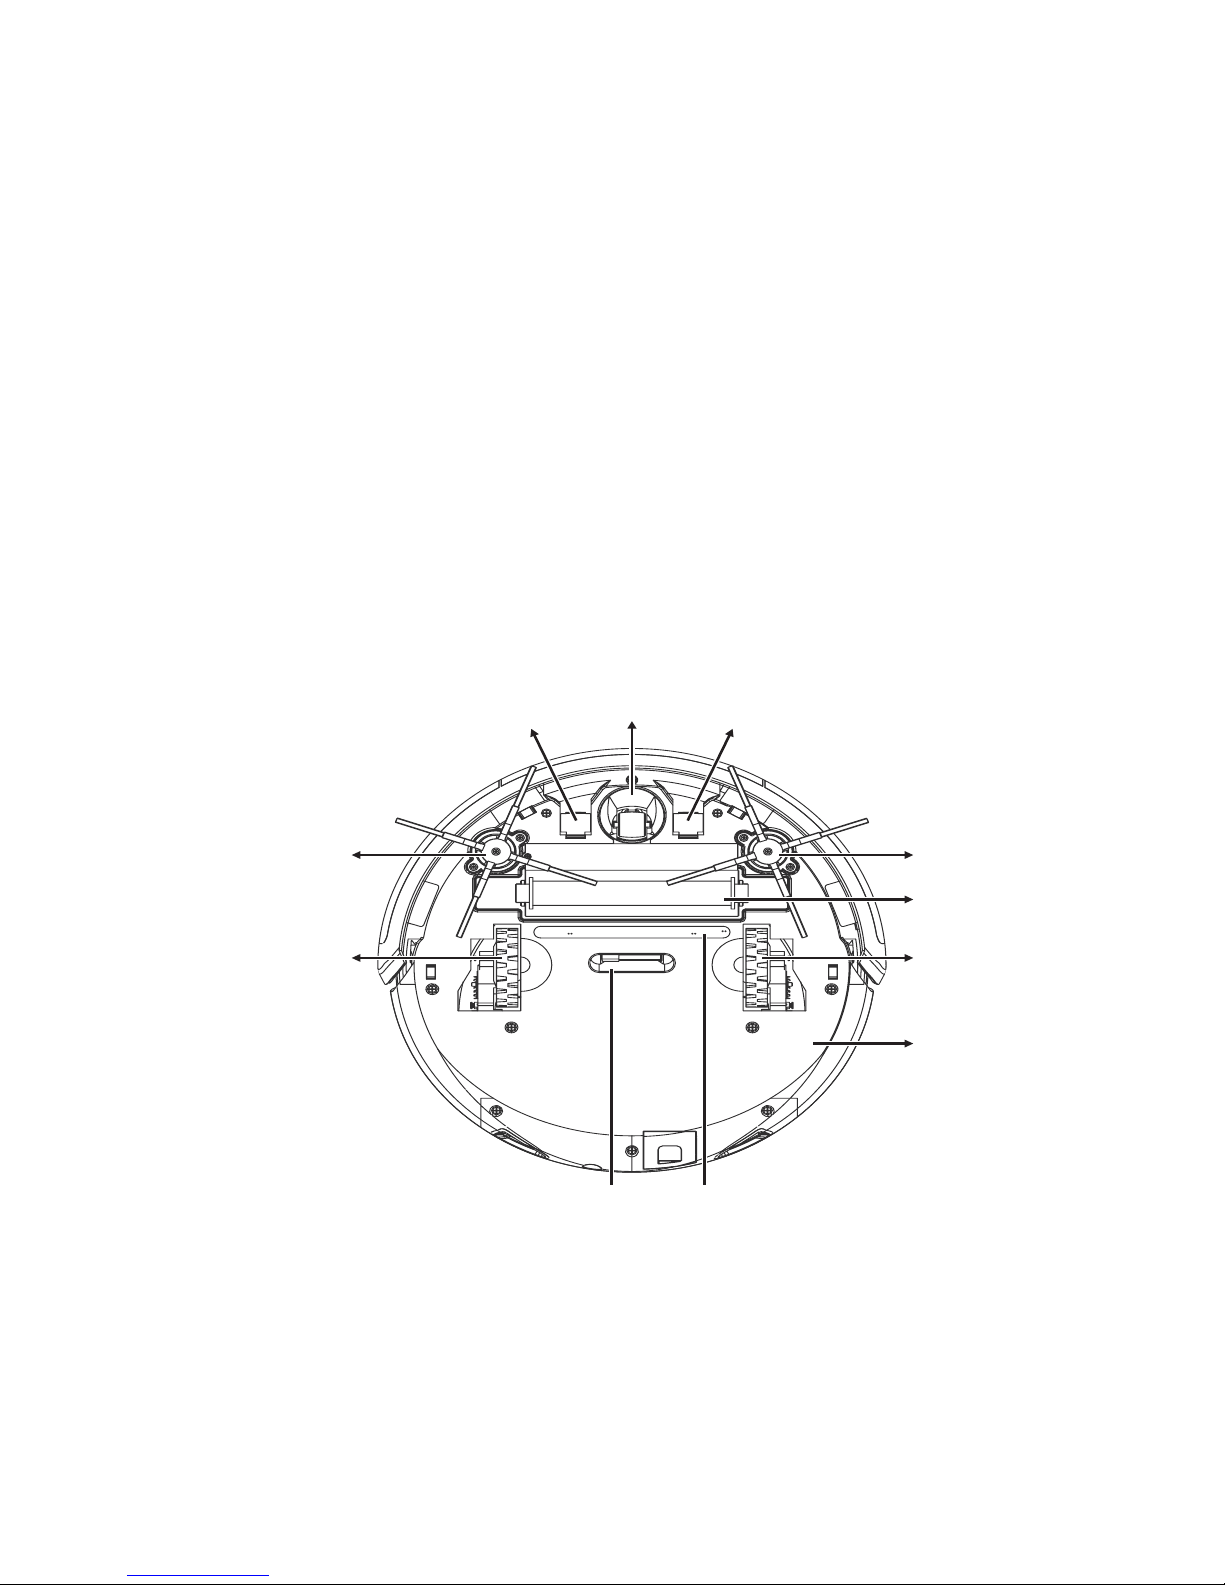
Bottom View \ Ansicht von unten \ Vue de dessous \ Veduta inferiore
(5) Recharging connector \
Ladeanschluss \ Connecteur
de chargement \ Connettore
caricamento
(6) Omni wheel \ Omnidirektionales
Rad \ Roue multidirections \
Ruota omnidirezionale
(7) Front side brush \ Vordere
seitliche Bürste \ Brosse
frontale \ Spazzola frontale
(8) Roll brush \ Rollbürste \ Brosse
rotative \ Spazzola rotante
(9) Main wheel \ Hauptrad \ Roue
principale \ Ruota principale
(10) Bottom cover \ Untere
Abdeckung \ Couvercle de
dessous \ Coperchio inferiore
(11) Dust suction entrance
\ Saugöffnung \ Entrée
d’aspiration de poussière \
Ingresso aspirazione polvere
(12) UV light \ UV-Licht \ Rayon UV
\ Lampada UV
(7)(7)
(8)
(10)
(9) (9)
(6) (5)
(5)
(12) (11)
- 8 -
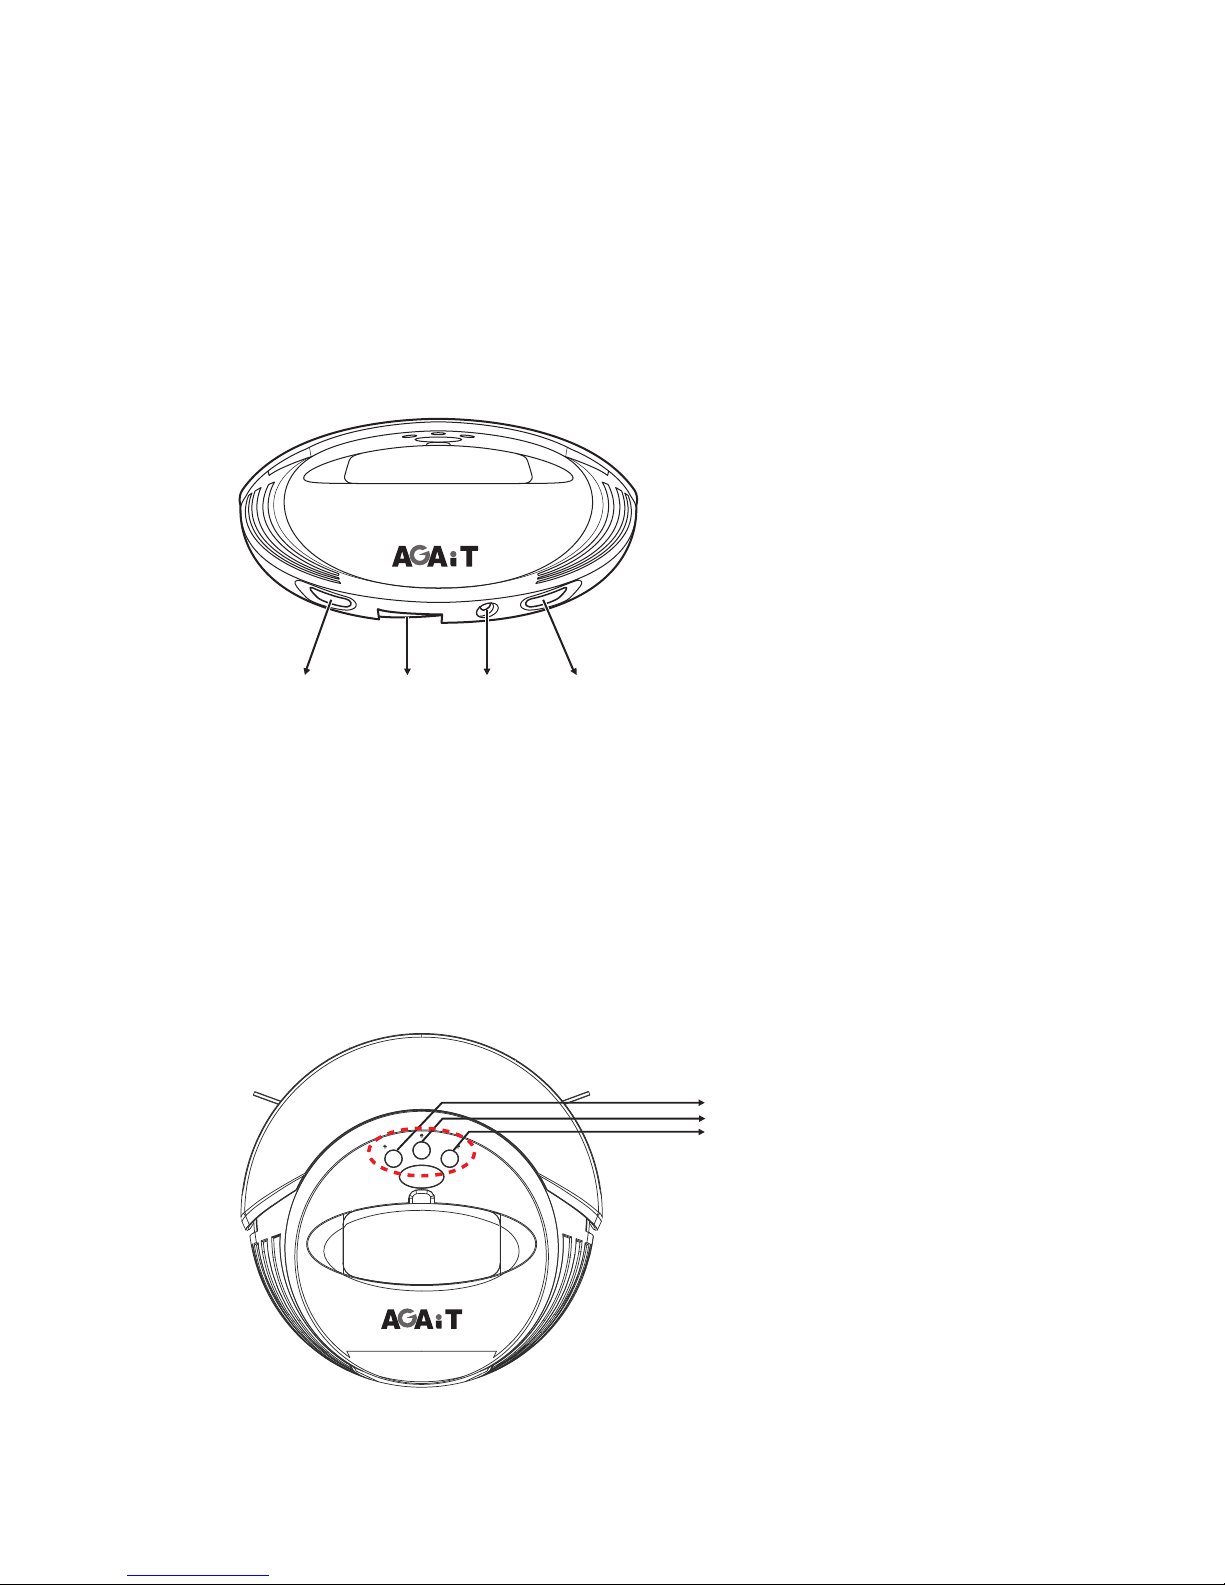
Rear View \ Ansicht von hinten \ Vue de derrière \ Veduta posteriore
(13) Left air outlet \ Abluftöffnung
links \ Sortie d’air gauche \
Scarico dell’aria, sinistro
(14) Freshener room \
Raumerfrischerfach \
Espace pour désodorisant \
Deodorante
(15) Socket for adapter \
Netzteilanschluss \ Prise
pour l’adaptateur \ Presa per
l’adattatore
(16) Right air outlet \ Abluftöffnung
rechts \ Sortie d’air droite \
Scarico dell’aria, destro
(13) (16)(15)(14)
2 Button functions and indicator \ Tastenfunktionen und Anzeige \ Fonctions des
boutons et indicateurs \ Tasti di funzione e indicatori
(1) Start / Stop cleaning \ Saugvorgang starten / beenden \ Commencer /
Arrêter le nettoyage \ Avvio / arresto pulizia
(2) Power Switch \ Ein-/Austaste \ Bouton d’alimentation \ Interruttore
d’alimentazione
(3) Charging with the Recharging Dock \ Rückkehr zum Ladedock \
Chargement avec la station de chargement \ Caricamento usando la
stazione di caricamento
(1)
(2)
(3)
Start Home
Power
- 9 -
Indicator Instructions \ Hinweise zur Anzeige \ Instructions sur les indicateurs \
Spiegazioni degli indicatori:
Indicator Description
Flashing red Low power
Red Error occurred while cleaning; operation stopped
Flashing blue Cleaning operation in progress
Blue Detected a dusty area; Spiral Cleaning Mode (DUST) activated
Flashing white Recharging
Flashing green Recharging with adapter
Anzeige Beschreibung
Blinkt rot Geringer Akkustand
Rot Fehler während des Saugvorgangs; Betrieb gestoppt
Blinkt blau Saugvorgang erfolgt
Blau Verschmutzter Bereich erkannt, Spiralmodus aktiviert
Blinkt weiß Ladevorgang erfolgt
Blinkt grün Ladevorgang mit Netzteil
Indicateur Description
Rouge clignotant Puissance faible
Rouge Erreur pendant le nettoyage ; opération arrêtée
Bleu clignotant Opération de nettoyage en cours
Bleu Poussière détectée ; Mode de nettoyage en spirale (POUSSIÈRE)
activé
Blanc clignotant Chargement en cours
Vert clignotant Chargement avec l'adaptateur
Indicatore Descrizione
Rosso lampeggiante Batteria scarica
Rosso Si è verificato un errore durante la pulizia, l’operazione è stata
arrestata
Blu lampeggiante Pulizia in corso
Blu Area polverosa rilevata, modalità di pulizia a spirale (POLVERE)
attivata
Bianco lampeggiante Caricamento in corso
Verde lampeggiante Caricamento usando l’adattatore
3. UV light \ UV-Licht \ Rayon UV \ Lampada UV
• Eclean will turn on the UV light while cleaning, and it will automatically turn off once you pick up the
main unit.
• Eclean will turn off the UV light once cleaning operation is discontinued.
• Während des Saugvorgangs ist das UV-Licht des Eclean eingeschaltet; sobald Sie das Gerät
hochheben, wird das Licht automatisch ausgeschaltet.
• Der Eclean schaltet das UV-Licht auch aus, wenn der Saugvorgang unterbrochen wird.
• Eclean allumera le rayon UV pendant le nettoyage, et l’éteindra automatiquement lorsque vous
soulevez l’unité principale.
• Eclean éteindra automatiquement le rayon UV lorsque le nettoyage est terminé.
• Eclean accenderà la lampada UV durante la pulizia e la spegnerà automaticamente quando si
solleva l’unità principale.
• Eclean spegnerà la lampada UV quando l’operazione di pulizia è arrestata.

-10 -
Battery Instructions \ Hinweise zum Akku \
Instructions pour la batterie \ Istruzioni sulla
batteria
Notice \ Hinweise \ Notice \ Avviso
1. To avoid short circuit, please ensure the metal domes are aligned while installing the
battery.
2. Under normal operating conditions, the battery life will be reduced after repeated
charges, causing the cleaning time to be gradually shortened.
3. Cleaning time: Before starting any cleaning task, we recommend you to fully charge
the battery.
4. If you're not going to use Eclean for an extended period of time (approx. one month),
please remove the battery and store it in a dry and cool place to ensure longer
battery life.
2) Open the battery cover.
Öffnen Sie die Akkufachabdeckung.
Ouvrez le couvercle de la batterie.
Aprire il coperchio dello scomparto batterie
3) Aligning the metal domes on battery and
main unit, then insert the battery.
Richten Sie die Metallkuppeln an Akku und
Gerät aus, installieren Sie dann den Akku.
Alignez les bornes en métal de la batterie
avec l’unité principale puis insérez la
batterie.
Allineare i contatti metallici della batteria e
dell’unità principale, poi inserire la batteria.
1) Remove the screws from the battery cover.
Lösen Sie die Schrauben von der
Akkufachabdeckung.
Enlevez les vis du couvercle de la batterie.
Rimuovere le viti dal coperchio dello
scomparto batterie

-11-
1. Bitte achten Sie bei der Installation des Akkus zur Vermeidung eines
Kurzschlusses auf die Ausrichtung der Metallkuppeln.
2. Unter normalen Betriebsbedingungen verringert sich die Akkulaufzeit nach
mehrmaligem Auaden; dadurch reduziert sich auch allmählich die Saugzeit.
3. Saugzeit: Wir empfehlen Ihnen, den Akku vor Beginn eines Saugvorgangs
vollständig aufzuladen.
4. Wenn Sie den Eclean längere Zeit nicht benutzen (circa einen Monat), nehmen
Sie den Akku zur Sicherstellung einer längeren Akkulaufzeit bitte heraus und
bewahren ihn an einem trockenen, kühlen Ort auf.
1. Pour éviter les court-circuits, assurez-vous que les bornes en métal sont
correctement alignées lorsque vous installez la batterie.
2. Sous des conditions normales d’utilisation, la durée de vie de la batterie
diminuera après de nombreux chargements, donc la durée du nettoyage
diminuera aussi graduellement.
3. Durée de nettoyage : Avant de commencer à faire un nettoyage, nous vous
recommandons de charger complètement la batterie.
4. SI vous n’allez pas utiliser Eclean pendant une longue période (environ
un mois), enlevez la batterie et gardez-la dans un endroit frais et sec pour
préserver sa durée de vie.
1. Quando si installa la batteria, accertarsi che i contatti metallici siano allineati per
evitare cortocircuiti.
2. In normali condizioni d’uso, la durata della batteria si ridurrà dopo ripetuti
caricamenti, provocando la graduale diminuzione dei tempi di pulizia.
3. Tempi di pulizia: Prima di iniziare la pulizia, si raccomanda di caricare
completamente la batteria.
4. Se non si usa Eclean per un periodo prolungato (un mese circa), rimuovere la
batteria e conservarla in un luogo fresco e asciutto per garantire la durata della
batteria.
-12-
Charging the Battery \ Akku aufladen \
Chargement de la batterie \
Caricamento della batteria
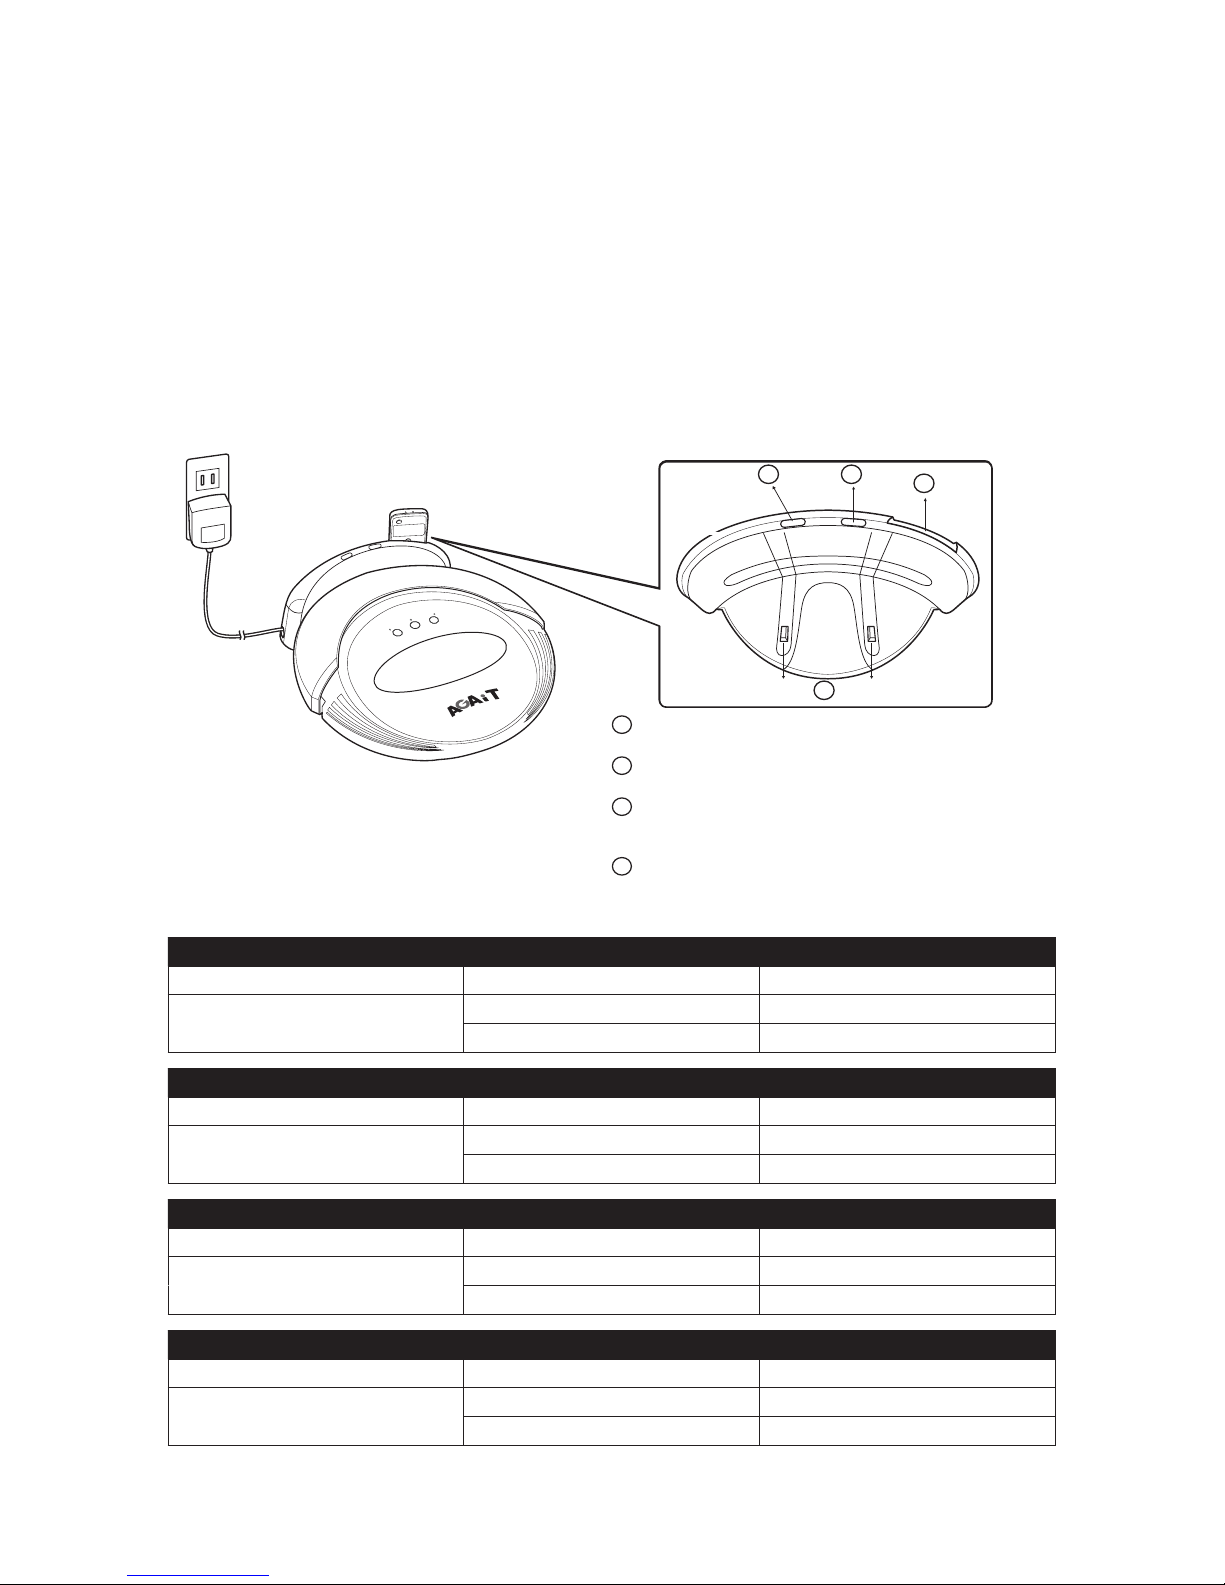
1. Charging with the recharging dock \ Rückkehr zum Ladedock \ Chargement
avec la station de chargement \ Caricamento usando la stazione di
caricamento
Start
Home
Power
Recharging Dock \ Ladedock \ Station de
chargement \ Stazione di caricamento
1 2 3
4
1 Power indicator \ Betriebsanzeige \ Indicateur
d'alimentation \ Indicatore d’alimentazione
2 Charging indicator \ Ladeanzeige \ Indicateur de
chargement \ Indicatore di caricamento
3 Where remote control is placed \ Fernbedienungsfach \
Où la télécommande est placée \ Alloggio del
telecomando
4 Charging contacts \ Ladekontakte \ Contacts de
chargement \ Contatti di caricamento
Indicator Status Description
Power indicator Red Receiving power
Charging Indicator Flashing red Recharging
Red Fully charged
Anzeige Status Beschreibung
Betriebsanzeige Rot Stromversorgung erfolgt
Ladeanzeige Blinkt rot Ladevorgang erfolgt
Rot Vollständig geladen
Indicateur État Description
Indicateur d'alimentation Rouge Sous tension
Indicateur de chargement Rouge clignotant Chargement en cours
Rouge Complètement chargé
Indicatore Stato Descrizione
Indicatore d’alimentazione Rosso Ricevimento alimentazione
Indicatore di carica Rosso lampeggiante Caricamento in corso
Rosso Completamente carico

-13 -
1.1. Testing the Charging Function \ Ladefunktion testen \ Test de la fonction de
chargement \ Controllo della funzione di caricamento:
1.1.1. Testing with main unit: Press "Power" button on Eclean. After Eclean has been turned
on, press "Home" button.
Mit Hauptgerät testen: Drücken Sie die „Power“-Taste am Eclean. Sobald der Eclean
eingeschaltet ist, drücken Sie die „Home“-Taste.
Test avec l'unité principale : Appuyez sur le bouton "Power" (Marche) sur Eclean.
Lorsque Eclean est allumé, appuyez sur le bouton "Home" (Retour).
Controllo usando l’unità principale: Premere il tasto "Power" (Alimentazione) di Eclean.
Dopo che Eclean è stato acceso, premere il tasto "Home" (Origine).
1.1.2. Testing with remote control: Press "Power" button on the remote control. After Eclean
has been turned on, press "Home" button on the remote control.
Mit Fernbedienung testen: Drücken Sie die „Power“-Taste an der Fernbedienung.
Sobald der Eclean eingeschaltet ist, drücken Sie die „Home“-Taste an der
Fernbedienung.
Test avec la télécommande : Appuyez sur le bouton "Power" (Marche) sur la
télécommande. Lorsque Eclean est allumé, appuyez sur le bouton "Home" (Retour) sur
la télécommande.
Controllo usando il telecomando: Premere il tasto "Power" (Alimentazione) del
telecomando. Dopo che Eclean è stato acceso, premere il tasto "Home" (Origine) del
telecomando.
If Eclean is properly attached to the recharging dock, it will "beep" once, the charging indicator
will ash in red, and Eclean will start charging.
If Eclean failed to return to the recharging dock, it will adjust its direction to properly attache to
the recharging dock.
Wenn der Eclean richtig am Ladedock angebracht ist, gibt er einen Signalton aus, die
Ladeanzeige blinkt rot und der Eclean wird aufgeladen.
Falls der Eclean das Ladedock nicht erreichen konnte, passt er die Ausrichtung zur
Verbindung mit dem Ladedock neu an.
Lorsque Eclean s'attache correctement à la station de chargement, il fera un "bip", l'indicateur
de chargement clignotera en rouge et Eclean commencera à se charger.
Si Eclean n'a pas réussi à retourner à la station de chargement, il ajustera sa direction pour
s'attacher correctement à la station de chargement.
Se Eclean è collegato il modo appropriato alla stazione di caricamento, emetterà un segnale
acustico, l'indicatore di caricamento lampeggerà di colore rosso ed Eclean inizierà a caricarsi.
Se Eclean non torna alla stazione di caricamento, regolerà la sua direzione per collegarsi in
modo appropriato alla stazione di caricamento.

-14 -
Place the recharging dock next to any wall, and leave a 1 m²-room for Eclean to
return.
Bringen Sie das Ladedock neben einer beliebigen Wand an; halten Sie eine Fläche
von etwa 1 m² frei, damit der Eclean zum Dock zurückkehren kann.
Placez la station de chargement près d'un mur et laissez un espace de 1 m² devant
pour permettre à Eclean d'y retourner facilement.
Collocare la stazione di caricamento vicino a qualsiasi parete, lasciando uno spazio
di 1 m² per le manovre di Eclean.
2. Charging with adapter \ Mit Netzteil aufladen \ Chargement avec l’adaptateur \
Caricamento usando l’adattatore
Start Home
Power
Indicator Instructions \ Hinweise zur Anzeige \ Instructions sur les indicateurs \ Spiegazioni
degli indicatori:
The Power indicator on Eclean will ash in green while charging.
Die Betriebsanzeige am Eclean blinkt während des Ladevorgangs grün.
L'indicateur Marche du Eclean clignotera en vert lorsqu'il est en train de se charger.
L’indicatore Power di Eclean lampeggerà di colore verde durante il caricamento
-15 -
Remote Control \ Fernbedienung \
Télécommande \ Telecomando
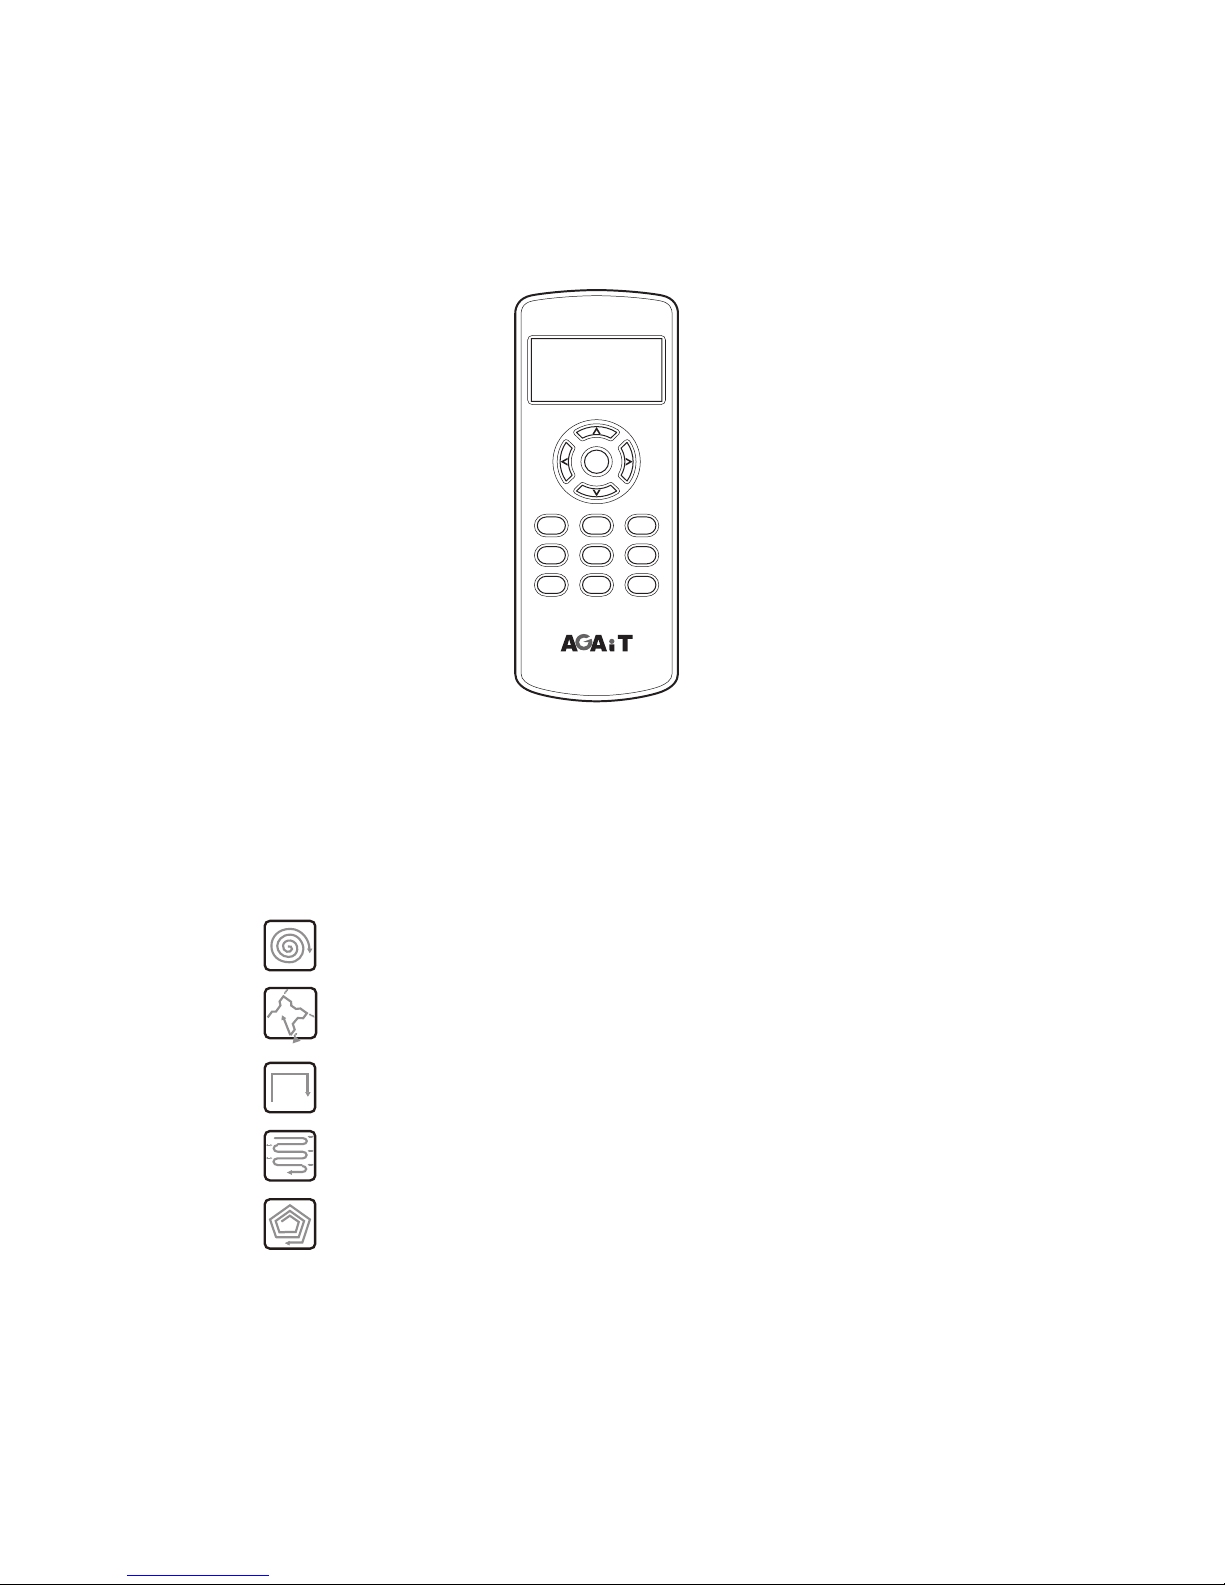
Enter
Power Home Stop
Spot Clean Max
Plan Clock Area
Power: Power button.
Home: Locate the recharging dock to charge the battery. Not available in "Max" mode.
Stop: Stop cleaning.
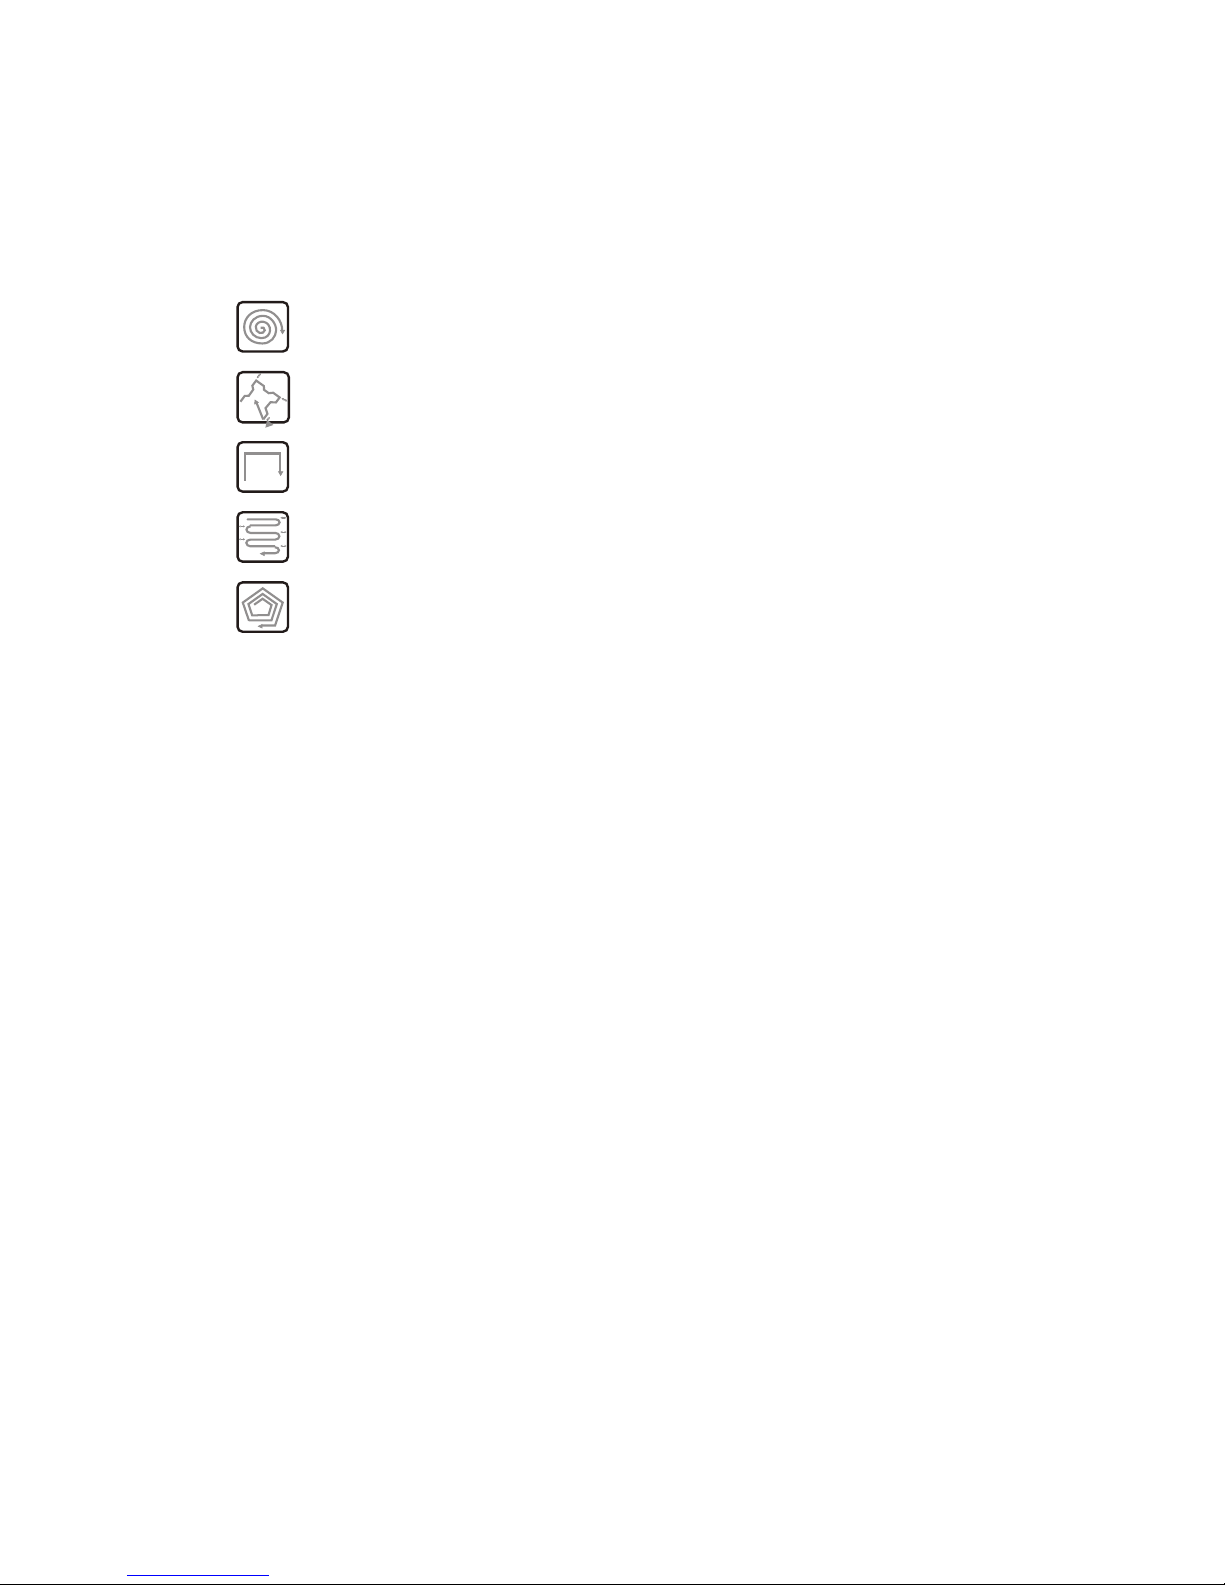
Spot: Activate "Spot Cleaning" mode (run Spiral mode in a specic area).
Clean: Start cleaning.
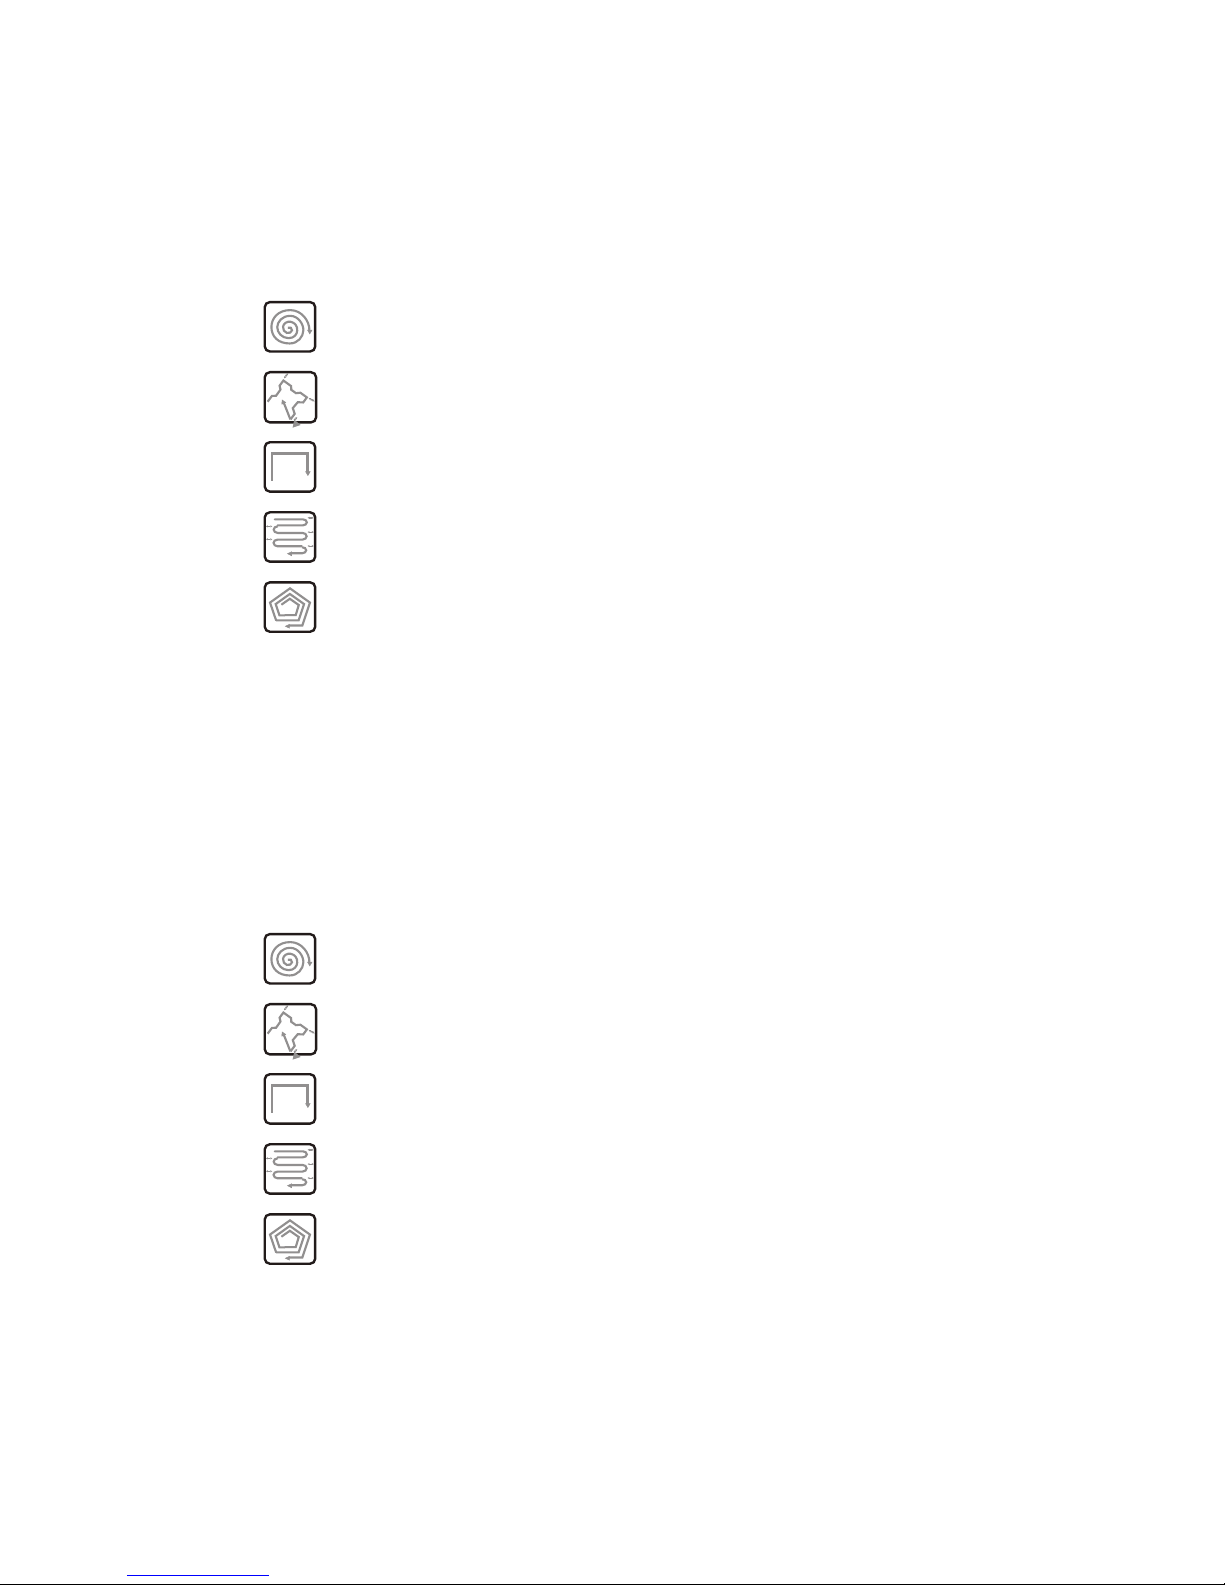
Spiral mode - Clean a specic area (keep away from the stairs)
Random Wander mode
Along Wall mode - Cleaning along walls or furniture
"S" Shape mode - Cleaning rectangular areas (keep away from stairs)
Polygonal mode - Clean a specic area
Max: Instruct Eclean to clean until the battery runs out (consumes the most power)."Home" mode
can not be used in conjunction with this mode.
Plan: Activate cleaning plan and setup mode. You can designate the desired cleaning time in a
week.
-16 -
Power: Ein-/Austaste.
Home: Das Gerät kehrt zum Auaden des Akkus zum Ladedock zurück. Im „Max“-Modus nicht verfügbar.
Stop: Beendet den Saugvorgang.
Spot: Aktiviert den Modus „Punktreinigung“ (Ausführung des Spiralmodus in einem bestimmten
Bereich).
Clean: Startet den Saugvorgang.
Spiralmodus – Reinigt einen bestimmten Bereich (von Treppen fernhalten)
Zufälliger Wandermodus
Entlang der Wand – Saugt entlang von Wänden und Möbeln
„S“-förmiger Modus – Saugt rechtwinklige Bereiche (von Treppen fernhalten)
Polygonal-Modus – Saugt einen bestimmten Bereich
Max: Der Eclean saugt solange, bis der Akku erschöpft ist (maximaler Stromverbrauch). Bei diesem
Modus ist die „Home“-Taste nicht verfügbar.
Plan: Aktiviert den modus zur saugplanerstellung und -einrichtung. Sie können die gewünschte
Saugzeit in einer Woche festlegen.
Power (Marche) : Bouton Marche.
Home (Retour) : Retourne à la station de chargement pour charger la batterie. Pas disponible en mode
"Max".
Stop : Arrête de nettoyer.
Spot (Point) : Active le mode "Nettoyage Point" (utilise le mode Spirale dans certains endroits).
Clean (Nettoyer) : Commence à nettoyer.
Mode Spirale - Nettoie un endroit particulier (évitez d'utiliser près des escaliers).
Mode Parcours aléatoire
Mode Long des murs - Nettoie le long des murs ou des meubles.
Mode Forme "S" - Nettoie des endroits rectangulaires (évitez d'utiliser près des
escaliers).
Mode Polygone - Nettoie un endroit particulier.
Max : Demande à Eclean de nettoyer jusqu'à ce que la batterie est vide (consumme le plus d'énergie).
Le mode "Home" (Retour) ne peut pas être utilisé avec ce mode.
Plan : Active le mode plan de nettoyage et réglage. Vous pouvez programmer le schédule de nettoyage
dans une semaine.
-17-
Power (Alimentazione): Tasto d’alimentazione.
Home (Origine): Torna alla stazione di caricamento per caricare la batteria. Non disponibile in
modalità "Max".
Stop: Arresta la pulizia.
Spot (Punto): Attiva la modalità di "Pulizia punto" (modalità spirale in un’area specica).
Clean (Pulizia): Avvia la pulizia.
Modalità spirale – Pulisce un’area specica (tenere lontano dalle scale)
Modalità percorso casuale
Modalità lungo le pareti – Pulizia lungo le pareti o mobili
Modalità a "S" – Pulizia di aree rettangolari (tenere lontano dalle scale)
Modalità poligono – Pulisce un’area specica
Max: Istruisce Eclean a pulire no ad esaurimento della batteria (maggiore consumo
energetico). La modalità "Home" (Origine) non può essere usata insieme a questa
modalità.
Plan (Pianica): Attiva la pianicazione della pulizia e la modalità d’impostazione. Si può impostare data e
ora della pulizia settimanale.
1. How to Set Up \ Einstellung \ Comment faire pour régler \ Come si esegue l’impostazione:
1.1 Press "Plan" button on the remote control to set schedule;
Drücken Sie zum Einstellen des Zeitplans die „Plan“-Taste an der Fernbedienung;
Appuyez sur le bouton "Plan" de la télécommande pour régler le schédule ;
Premere il tasto "Plan" (Pianica) del telecomando per impostare la pianicazione;
1.2 Press "<" or ">" button to select, and press "^" or "v" to adjust time. The options are:
Drücken Sie zur Auswahl „<“ oder „>“; passen Sie die Zeit mit „^“ oder „v“ an. Zu den Optionen
zählen:
Appuyez sur le bouton "<" ou ">" pour sélectionner et appuyez sur "^" ou "v" pour régler l'heure. Les
options sont :
Premere il tasto “<” o “>” per selezionare, e premere il tasto “^” o “v” per regolare. Le opzioni sono:
● Day Setting: You will see SUN (Sunday), MON (Monday)…to SAT (Saturday) on the remote
control display;
● Schedule Setting: You can set 3 cleaning schedules. You'll see 1, 2 and 3 shown on the remote
control display.
● Tageinstellung: Im Display der Fernbedienung werden MO (Montag), DI (Dienstag) etc.
angezeigt;
● Zeitplaneinstellung: Sie können 3 Saugzeitpläne einstellen. Im Display der Fernbedienung
werden 1, 2 und 3 angezeigt.
● Réglage du jour : Vous verrez SUN (Dimanche), MON (Lundi)…jusqu'à SAT (Samedi) sur
l'écran de la télécommande ;
● Réglage du schédule : Vous pouvez choisir entre 3 schédules de nettoyage. Vous verrez 1, 2
et 3 sur l'écran de la télécommande.

-18 -
● Impostazione giorno: Sul display del telecomando si vedrà SUN (Domenica), MON (Lunedì)…
no a SAT (Sabato);
● Impostazione pianicazione: Si possono impostare 3 pianicazioni per la pulizia. Sul display
del telecomando si vedrà 1, 2 e 3.
1.3 After conrmation, press "Plan" button to set the start / stop cleaning time. Press "<" or ">" button to
assign "Start hr / min” and “Stop hr/ min", and press "^" or "v" to adjust time.
Drücken Sie nach der Bestätigung zum Einstellen der Start-/Stoppzeit des Saugvorgangs „Plan“.
Wählen Sie mit „<“ oder „>“ zwischen „Start h/min” und „Stopp h/min“; passen Sie die Zeit mit „^“
und „v“ an.
Après conrmation, appuyez sur le bouton "Plan" pour régler l'heure du début/n du nettoyage.
Appuyez sur le bouton "<" ou ">" pour choisir "Commencer hr / min” et “Arrêter hr/ min" et appuyez
sur "^" ur "v" pour régler l'heure.
Dopo la conferma, premere il tasto "Plan" (Pianica) per impostare l’ora d’inizio/ne pulizia.
Premere il tasto "<" or ">" per assegnare "Ore/minuti inizio" e "Ore/minuti ne", poi premere "^" o "v"
per regolare l’orario.
The scheduled cleaning time should be at least 3 minutes later than the current time.
Die geplante Saugzeit sollte mindestens 3 Minuten in der Zukunft liegen.
L'heure de nettoyage programmée doit être au moins 3 minutes après l'heure actuelle.
L’orario pianicato per la pulizia deve essere di almeno 3 minuti successivi all’ora corrente.
1.4 After nishing setting, press "Enter" button to conrm the scheduled time.
Upon the scheduled start time, Eclean will "beep" twice and start cleaning.
Upon the scheduled stop time, Eclean will "beep" twice, stop cleaning, and head for the recharging
dock.
Drücken Sie nach Abschluss der Einstellungen zum Bestätigen des Zeitplans „Enter“.
Sobald die eingestellte Startzeit erreicht ist, gibt der Eclean zwei Signaltöne aus und startet den
Saugvorgang.
Sobald die eingestellte Endzeit erreicht ist, gibt der Eclean zwei Signaltöne aus, beendet den
Saugvorgang und kehrt zum Ladedock zurück.
Lorsque vous avez ni les réglages, appuyez sur le bouton "Enter" (Entrer) pour conrmer l'heure
du schédule.
Lorsque l'heure du début du schédule est atteinte, Eclean fera deux "bips" et commencera à
nettoyer.
Lorsque l'heure du n du schédule est atteinte, Eclean fera deux "bips" et retournera à la station de
chargement.
Dopo avere congurato le impostazioni, premere il tasto "Enter" per confermare.
All’ora d’inizio pulizia pianicata, Eclean emetterà due segnali acustici ed avvierà la pulizia.
All’ora di ne pulizia pianicata, Eclean emetterà due segnali acustici, arresterà la pulizia e tornerà
alla stazione caricamento.
Other manuals for EC02
1
Table of contents
Other AGAiT Vacuum Cleaner manuals

AGAiT
AGAiT Eclean User manual

AGAiT
AGAiT Eclean User manual

AGAiT
AGAiT EClean EC03 User manual

AGAiT
AGAiT Eclean User manual

AGAiT
AGAiT EC-01 EClean User manual

AGAiT
AGAiT E-CLEAN MINI User manual

AGAiT
AGAiT E-CLEAN 02 User manual

AGAiT
AGAiT EC-01 EClean User manual

AGAiT
AGAiT Eclean User manual

AGAiT
AGAiT EClean EC03 User manual

Popular Vacuum Cleaner manuals by other brands


Shark
Shark NINJA STRATOS IZ400UK Series instructions

Electrolux
Electrolux AIRSPEED ZAS1000A user manual

Nilfisk-Advance
Nilfisk-Advance VP100 Instructions for use

ulsonix
ulsonix FLOORCLEAN 30DS user manual

Hoover
Hoover C2094 - Portapower Commercial Vacuum Cleaner Schematic diagram

Senya
Senya SYCK-VC022 User instructions