ageLOC WellSpa io User manual

USER’S MANUAL
™

TABLE OF CONTENTS
System Contents and Components 1–2
Safety Instructions, Warnings, and Precautions 3
Charging Your ageLOC® WellSpa iO™ 6
Connecting Your ageLOC WellSpa iO 7
to the Nu Skin Vera®App
Pairing Your ageLOC WellSpa iO 7
Using Your ageLOC WellSpa iO 8
Cleaning and Caring for Your ageLOC WellSpa iO 10
Troubleshooting 11
Maintenance 13
Replacement and Warranty Information 13
Patents 13
Technical and Regulatory Information 14
Definition of Symbols 14

1
SYSTEM CONTENTS
ageLOC® WellSpa iO™ device
Quick Start Guide
Charger
USB charging adapter not included.
CONNECTING YOUR AGELOC
®
WELLSPA iO™ TO THE
VERA
®
APP
To unlock the full ageLOC WellSpaiO experience, use the QR code on
the cover to download Nu Skin’sVera
®
app from the App Store or Google
Play.Follow the in-app instructions to connect your device.
NOTE: App Storeis a trademark of Apple Inc., registered in the U.S. and other countries.
Google Play is a trademark of Google LLC.
STEP 3. DURING SESSION
Lightly glide the device over your skin. Takecare to avoid sensitive areas. Each minute will be
counted down by the sound of a tone and an indicator light turning off.
WellSpa iO to pause and emit a tone. Resume by placing the nodes on your skin and/or
applying more product as needed to ensure a smooth glide. Refer to the User’sManual
for more help.
STEP 4. SESSION COMPLETION
At the end of your session, the device will emit a tone and automatically turn off.You will hear
the same sound when you manually power off your device. Massage anyexcess serum or gel
into your skin.
See diagrams below for suggested usage areas and Nu Skin Vera
®
for full usage instructions.
CHARGING YOUR AGELOC
®
WELLSPA iO™ DEVICE
The battery indicator will turn amber when the battery is low.
charger to begin charging.
NOTE: When the battery is critically low,the
indicator light will flash amber,and the device
will turn off when the user attempts to turn it
on. This indicates there is not enough battery
remaining to perform a session.
Our rechargeable battery helps reduce waste. We inviteyou to learn more about our
sustainability initiatives by visiting nuskin.com/sustainability
AGELOC
®
WELLSPA iO
™
QUICK START GUIDE
Unleash the freedom to be you with whole-body spa. Whatever your
concerns, you can personalize your ageLOC WellSpaiO expe rience.
Plus, the WellSpa iO system features proprietary Adaptive Microcur-
rent Technology,which continuously adjusts and adapts to your skin
it’s the best part of your best-self routine.
Indicator Lights
Metallic Nodes
USING YOUR AGELOC WELLSPA iO
You may use yourageLOC WellSpa iO device system up to 5 minutes, three
times per week to daily, on each body area.
STEP 1.APPLY AGELOC BODY SERUM OR AGELOC BODYACTIVATING GEL
Smooth your serum or gel liberally on area to be treated. If you plan to
treat more than one area, only apply the product to the area to be
immediately treated.
STEP 2. STARTINGA SESSION
Press the power button to turn on the device. All five indicator lights will
illuminate the first time you power on. The number of illuminated indicator
lights indicates the session time. Each time you press the Power button,
you select a new time. Press the Power button again until youhave selected
setting for the next session. Place the device on the area of your skin
where you’ve applied the serum or gel. The device will emit a tone, and
treatment area.
©2023 NSE PRODUCTS, INC.
NU SKIN ENTERPRISES SINGAPORE PTE LTD
SAFETY AND REGULATORY INFORMATION
WARNING Only use the ageLOC WellSpaiO Wireless Charger provided to
recharge your device.
For use with a power adapter with the followingratings: 5V min 500mA.
skin eruptions, or areas of skin that lack normal sensation.
-
asis rosea, have allergies to metal, or if you haveproblematic or overly
sensitive skin.
• Do not use if you have an implanted cardiac device(e.g., cardiac monitors,
ICDs, pacemakers, ECG alarms).
skin, are epileptic, wear body piercings, have a metal implant, areill, have
bleeding tendencies, bruise easily, are pregnant or maybecome pregnant,
have undergone a recent surgical procedure,or have an ongoing or pre-
vious medical condition such as heart disease, stroke, high blood pressure
or liver disorders.
stinging or redness.
devices, at the same time.
the device.
where electrical stimulation can put you at risk of injury.
surface.
• Do not operate while bathing or showering. Do not submerge your device
in water.
pulled into water.
extremely cold environment.
damaged.
Scan Code to View Full User’s Manual.
CONNECTING YOUR AGELOC®WELLSPA iO™ TO THE
VERA®APP
To unlock the full ageLOCWellSpa iO experience, use the QR code on
the cover to download Nu Skin’sVera
®
app from the App Store or Google
Play.Follow the in-app instructions to connect your device.
NOTE: App Storeis a trademark of Apple Inc., registered in the U.S. and other countries.
Google Play is a trademark of Google LLC.
STEP 3. DURING SESSION
Lightly glide the device over your skin. Takecare to avoid sensitive areas. Each minute will be
counted down by the sound of a tone and an indicator light turning off.
WellSpa iO to pause and emit a tone. Resume by placing the nodes on your skin and/or
applying more product as needed to ensure a smooth glide. Refer to the User’sManual
for more help.
STEP 4. SESSION COMPLETION
At the end of your session, the device will emit a tone and automatically turn off.You will hear
the same sound when you manually power off your device. Massage anyexcess serum or gel
into your skin.
See diagrams below for suggested usage areas and Nu Skin Vera®forfull usage instructions.
CHARGING YOUR AGELOC®WELLSPA iO™ DEVICE
The battery indicator will turn amber when the battery is low.
charger to begin charging.
NOTE: When the battery is critically low,the
indicator light will flash amber,and the device
will turn off when the user attempts to turn it
on. This indicates there is not enough battery
remaining to perform a session.
Our rechargeable battery helps reduce waste. We inviteyou to learn more about our
sustainability initiatives by visiting nuskin.com/sustainability
AGELOC®WELLSPA iO™
QUICK START GUIDE
Unleash the freedom to be you with whole-body spa. Whatever your
concerns, you can personalize your ageLOC WellSpaiO expe rience.
Plus, the WellSpa iO system features proprietary Adaptive Microcur-
rent Technology,which continuously adjusts and adapts to your skin
it’s the best part of your best-self routine.
Indicator Lights
Metallic Nodes
USING YOUR AGELOC WELLSPA iO
You may use yourageLOC WellSpa iO device system up to 5 minutes, three
times per week to daily, on each body area.
STEP 1.APPLY AGELOC BODY SERUM OR AGELOC BODYACTIVATING GEL
Smooth your serum or gel liberally on area to be treated. If you plan to
treat more than one area, only apply the product to the area to be
immediately treated.
STEP 2. STARTINGA SESSION
Press the power button to turn on the device. All five indicator lights will
illuminate the first time you power on. The number of illuminated indicator
lights indicates the session time. Each time you press the Power button,
you select a new time. Press the Power button again until youhave selected
setting for the next session. Place the device on the area of your skin
where you’ve applied the serum or gel. The device will emit a tone, and
treatment area.
©2023 NSE PRODUCTS, INC.
NU SKIN ENTERPRISES SINGAPORE PTE LTD
SAFETY AND REGULATORY INFORMATION
WARNING Only use the ageLOC WellSpaiO Wireless Charger provided to
recharge your device.
For use with a power adapter with the followingratings: 5V min 500mA.
skin eruptions, or areas of skin that lack normal sensation.
-
asis rosea, have allergies to metal, or if you haveproblematic or overly
sensitive skin.
• Do not use if you have an implanted cardiac device(e.g., cardiac monitors,
ICDs, pacemakers, ECG alarms).
skin, are epileptic, wear body piercings, have a metal implant, areill, have
bleeding tendencies, bruise easily, are pregnant or maybecome pregnant,
have undergone a recent surgical procedure,or have an ongoing or pre-
vious medical condition such as heart disease, stroke, high blood pressure
or liver disorders.
stinging or redness.
devices, at the same time.
the device.
where electrical stimulation can put you at risk of injury.
surface.
• Do not operate while bathing or showering. Do not submerge your device
in water.
pulled into water.
extremely cold environment.
damaged.
Scan Code to View Full User’s Manual.
CONNECTING YOUR AGELOC
®
WELLSPA iO™ TOTHE
VERA
®
APP
To unlock the full ageLOCWellSpa iO experience, use the QR code on
the cover to download Nu Skin’sVera
®
app from the App Store or Google
Play.Follow the in-app instructions to connect your device.
NOTE: App Storeis a trademark of Apple Inc., registered in the U.S. and other countries.
Google Play is a trademark of Google LLC.
STEP 3. DURING SESSION
Lightly glide the device over your skin. Takecare to avoid sensitive areas. Each minute will be
counted down by the sound of a tone and an indicator light turning off.
WellSpa iO to pause and emit a tone. Resume by placing the nodes on your skin and/or
applying more product as needed to ensure a smooth glide. Refer to the User’sManual
for more help.
STEP 4. SESSION COMPLETION
At the end of your session, the device will emit a tone and automatically turn off.You will hear
the same sound when you manually power off your device. Massage anyexcess serum or gel
into your skin.
See diagrams below for suggested usage areas and Nu Skin Vera
®
for full usage instructions.
CHARGING YOUR AGELOC
®
WELLSPA iO™ DEVICE
The battery indicator will turn amber when the battery is low.
charger to begin charging.
NOTE: When the battery is critically low,the
indicator light will flash amber,and the device
will turn off when the user attempts to turn it
on. This indicates there is not enough battery
remaining to perform a session.
Our rechargeable battery helps reduce waste. We inviteyou to learn more about our
sustainability initiatives by visiting nuskin.com/sustainability
AGELOC
®
WELLSPA iO
™
QUICK START GUIDE
Unleash the freedom to be you with whole-body spa. Whatever your
concerns, you can personalize your ageLOC WellSpaiO expe rience.
Plus, the WellSpa iO system features proprietary Adaptive Microcur-
rent Technology,which continuously adjusts and adapts to your skin
it’s the best part of your best-self routine.
Indicator Lights
Metallic Nodes
USING YOUR AGELOC WELLSPA iO
You may use yourageLOC WellSpa iO device system up to 5 minutes, three
times per week to daily, on each body area.
STEP 1.APPLY AGELOC BODY SERUM OR AGELOC BODYACTIVATING GEL
Smooth your serum or gel liberally on area to be treated. If you plan to
treat more than one area, only apply the product to the area to be
immediately treated.
STEP 2. STARTINGA SESSION
Press the power button to turn on the device. All five indicator lights will
illuminate the first time you power on. The number of illuminated indicator
lights indicates the session time. Each time you press the Power button,
you select a new time. Press the Power button again until youhave selected
setting for the next session. Place the device on the area of your skin
where you’ve applied the serum or gel. The device will emit a tone, and
treatment area.
©2023 NSE PRODUCTS, INC.
NU SKIN ENTERPRISES SINGAPORE PTE LTD
SAFETY AND REGULATORY INFORMATION
WARNING Only use the ageLOC WellSpaiO Wireless Charger provided to
recharge your device.
For use with a power adapter with the followingratings: 5V min 500mA.
skin eruptions, or areas of skin that lack normal sensation.
-
asis rosea, have allergies to metal, or if you haveproblematic or overly
sensitive skin.
• Do not use if you have an implanted cardiac device(e.g., cardiac monitors,
ICDs, pacemakers, ECG alarms).
skin, are epileptic, wear body piercings, have a metal implant, areill, have
bleeding tendencies, bruise easily, are pregnant or maybecome pregnant,
have undergone a recent surgical procedure,or have an ongoing or pre-
vious medical condition such as heart disease, stroke, high blood pressure
or liver disorders.
stinging or redness.
devices, at the same time.
the device.
where electrical stimulation can put you at risk of injury.
surface.
• Do not operate while bathing or showering. Do not submerge your device
in water.
pulled into water.
extremely cold environment.
damaged.
Scan Code to View Full User’s Manual.

2
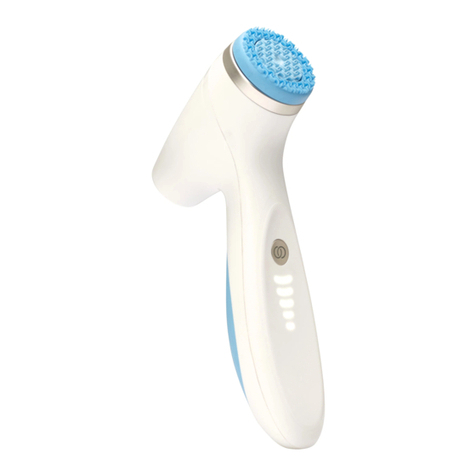
SYSTEM COMPONENTS
Indicator Lights
Power Button
Battery Indicator
Metallic Nodes

3
SAFETY INSTRUCTIONS, WARNINGS, AND PRECAUTIONS
ageLOC® WellSpa iO™ and the ageLOC WellSpa iO Wireless Charger are tested at pressures matching 4000m in altitude.
This appliance contains batteries that are non-replaceable.
WWARNINGS
WARNING Only use the ageLOC WellSpa iO
Wireless Charger provided to recharge your device.
• The ageLOC WellSpa iO device is only for use on healthy
skin.
• Do not apply to head/face, neck, throat, chest, décolleté, or
groin. Do not use over areas of skin that lack normal
sensation as it could result in irritation.
• Do not use if you have open sores, wounds, or rashes, are
prone to pityriasis rosea, have allergies to metal, or if you
have problematic or overly sensitive skin.
• Do not use over swollen, red, infected, or inflamed areas; or
over skin eruptions (e.g., phlebitis, thrombophlebitis, varicose
veins).
• Do not use over, or in proximity to, cancerous lesions or
diseased tissues.
• Do not touch another person, or electrically live parts/items
while using the device
• Do not use for longer periods of time or more frequently
than recommended.
• Do not operate while bathing or showering. Do not
submerge your device in water.
• Do not use if you have an implanted cardiac device (e.g.,
cardiac monitors, ICDs, pacemakers, ECG alarms).
• Consult with your physician or healthcare provider if you
have sensitive skin, are epileptic, wear body piercings, have a
metal implant, or are ill. If you experience irritation or prolonged
stinging, redness, discontinue use immediately and seek medical
advice, if necessary.
• Consult with your physician or healthcare provider before
using the device if you have bleeding tendencies, bruise easily,
are pregnant or may become pregnant, have undergone a
recent surgical procedure.

4
SAFETY INSTRUCTIONS, WARNINGS, AND PRECAUTIONS Cont.
• Consult with your physician or healthcare provider before
using the device if you have any ongoing or previous
medical conditions, such as heart disease, stroke, high blood
pressure or liver disorders.
• Keep the device and charger out of the reach of children.
• Remove jewelry or other metal adornment from the surface
of the skin prior to use.
• Do not use with other devices, including multiple, ageLOC®
WellSpa iO™ devices, at the same time.
• ageLOC WellSpa iO is for individual use only.
• Charge only with the ageLOC WellSpa iO Wireless
Charger. No other charging accessories should be used with
the device.
• Always place your ageLOC WellSpa iO device and geLOC
WellSpa iO Wireless Charger on a dry, heat-resistant, stable,
flat surface, especially when charging.
• Do not keep the charger plugged in when not in use or after
device has reached full charge.
• Do not use harsh chemicals or abrasives on your ageLOC
WellSpa iO device or ageLOC WellSpa iO Wireless Charger.
• To reduce the risk of shock, irritation, fire, or injury, do not
place or store your device or charger where it may fall or be
pulled into water.
• Do not place or store the device where it may fall or be
pulled into a bathtub, sink, or toilet.
• Do not store near a heat source, such as a radiator, fire, or
heat vent. Do not leave in a hot vehicle.
• Do not leave the ageLOC WellSpa iO device in an
extremely cold environment for prolonged periods of time.
• Do not use the device to apply electrical stimulation while
driving, operating machinery, or engaging in any activity in
which electrical stimulation can put you at risk of injury.
• Periodically inspect for damage; never operate the device if
it has been damaged. In the case of any device defect or if
the device gets damaged, contact Nu Skin Support Services.
• Do not modify the device in any way.

5
TEMPERATURE
Ideal device storage and charging is to occur at room
temperature, between C and C F to F.
Only store the device in environments between C and
C F to F.
Storage and charging outside of these ranges will adversely aect
the battery, metallic nodes, and operation of the device.
Very high temperatures or hot environments, (e.g., above
CF, direct sunlight, within vehicles in extremely hot
conditions, etc.) can result in overheating and other
catastrophic conditions that severely impact the performance
and life of the device.
Very low temperatures or freezing environments can result in
permanent damage to the metallic nodes and operation.

6
CHARGING YOUR AGELOC® WELLSPA iO™ DEVICE
The battery indicator will turn amber when the battery is low.
• Before charging, make sure the device and charger are
completely dry.
• Plug the charger into a USB adapter and then into a wall
outlet. Place the device on the charger to begin charging.
• While the device charges, the battery indicator breathes green.
• When the device is fully charged, the battery indicator will
turn solid green.
• Do not keep the charger plugged in when not in use or after
device has reached full charge.
NOTE
When the battery is critically low, the battery indicator will flash amber, and the
device will turn o when the user attempts to turn it on. This indicates there is not
enough battery remaining to perform a session.
If there are no indicator lights, charge the device. Indicator lights will turn on once
the device is charged.
Our rechargeable battery helps reduce waste.
We invite you to learn more about our sustainability
initiatives by visiting nuskin.com/sustainability.

7
CONNECTING
AGELOC® WELLSPA iO™ TO THE
NU SKIN VERA® APP
To unlock the full ageLOC WellSpa iO experience, scan the
QR code to download the Nu Skin Vera®app from the App
Store or Google Play. Follow the app instructions to connect
to your device.
PAIRING YOUR AGELOC®
WELLSPA iO™
1. Download the Nu Skin Vera®app.
2. Ensure your phone’s Bluetooth®* is enabled.
3. Sign in to Nu Skin Vera.
• Already have a Nu Skin account? Use it to sign in.
• New to Nu Skin? Sign up—it’s easy!
4. Tap “Devices”in the navigation bar.
5. Tap “Pair New Device.
”
6. If the device is o, press the Power button to turn the
device on.
7. Tap “Connect.
”
8. The device will pair and you’re ready to go.
* The Bluetooth®word mark and logos are registered trademarks owned by Bluetooth
SIG, Inc. and any use of such marks by NSE Products, Inc. is under license. Other
trademarks and trade names are those of their respective owners.
App Store and the Apple logo are trademarks of Apple Inc., registered in the U.S. and other countries. Google Play is a trademark of Google LLC.
For information about how Nu Skin collects, uses, and shares Personal Data please visit https://www.nuskin.com/content/global-privacy.html

8
USING YOUR AGELOC® WELLSPA iO™ DEVICE SYSTEM
You may use your ageLOC WellSpa iO device system up to 5 minutes, three times per week to daily, on each body area.
STEP 1. APPLY AGELOC BODY SERUM OR AGELOC BODY
ACTIVATING GEL
Smooth your serum or gel liberally on the area to be treated,
avoiding face, neck, chest, and groin. If you plan to treat more
than one area, only apply the product to the area to be
immediately treated.
STEP 2. STARTING A SESSION
Press the power button to turn on the device. All five indicator
lights will illuminate the first time you power on. The number
of illuminated indicator lights indicates the session time. Each
time you press the Power button, you select a new time. Press
the Power button again until you have selected your preferred
time from 1–5 minutes. Your device will remember your setting for
the next session. Place the device on the area of your skin where
you’ve applied the serum or gel. The device will emit a tone,
and your session will start automatically. Begin a new session
for each treatment area.
STEP 3. DURING THE SESSION
Lightly glide the device over your skin. Take care to avoid
sensitive areas. Each minute will be counted down by the
sound of a tone and an indicator light turning o.
• A lack of product or a loss of contact with your skin will interrupt
the current causing WellSpa iO to pause and emit a tone.
Resume by placing the metallic nodes on your skin and/or
applying more product as needed to ensure a smooth glide.
• The device will emit an alert tone if you are moving the
device too quickly.
• To turn the device o at any time, simply press and hold
the Power button until the lights turn o.

9
STEP 4. SESSION COMPLETION
At the end of your session, the device will emit a tone and
automatically turn o. You will hear the same sound when you
manually power o your device. Massage any excess serum
or gel into your skin.
See diagrams below for suggested usage areas and Nu Skin
Vera®for full usage instructions.

10
CLEANING AND CARING FOR
YOUR AGELOC® WELLSPA iO™
Use slightly damp, lint-free wipe(s) to wipe away any serum,
gel, or debris from the handheld device and charger after
each use. Continue to wipe until visibly clean. Store in a cool,
dry place. Do not immerse device in water or any liquid at any
time. Using dry, non-linting wipe(s), thoroughly dry the
external surfaces of the handheld device and charger.

11
TROUBLESHOOTING
LOSS OF CONDUCTIVITY DURING USE
If the metallic nodes lose contact with your skin, the current will be
interrupted, causing WellSpa iO to pause, emit a tone, and
the indicator lights to breathe.
pro tip:A lack of serum or gel may cause a loss of conductivity.
Apply more product to your skin and ensure the device is in contact
with both your skin and the product for optimal use.
MOVEMENT ALERTS DURING USE
The device will emit a sound if you are moving too quickly.
The session will automatically resume when you resume the
correct movement speed. Slowly glide the device over the
targeted areas.
RESET BLUETOOTH® CONNECTION
If you have problems pairing with Nu Skin Vera®or if you need
to unpair your device from your phone, conduct a Bluetooth
reset.
1. Disconnect from Nu Skin Vera within the app by navigating
to Device Settings > Forget this Device.
2. Disconnect your phone.
• iPhone: Navigate to your phone’s Settings > Bluetooth >
My Devices > NuSkinBDiO > Forget This Device.
• Android: Navigate to your phone’s Settings >
Connections > Bluetooth > Settings icon > Forget/Unpair.
3. Place WellSpa iO on the charger.
4. Press and hold the Power button for 5 seconds.
Wait for:
- Indicator lights 1–5 to flash once.
*The Bluetooth®word mark and logos are registered trademarks owned by Bluetooth SIG, Inc.
and any use of such marks by NSE Products Inc. is under license. Other trademarks and trade
names are those of their respective owners.

12
FACTORY RESET
To factory reset your ageLOC® WellSpa iO:™
1. Disconnect from Nu Skin Vera®within the app by navigating
to Device Settings > Forget this Device.
2. Disconnect from your phone.
• iPhone: Navigate to your phone’s Settings > Bluetooth®>
My Devices > NuSkinBDiO > Forget This Device.
• Android: Navigate to your phone’s Settings >
Connections > Bluetooth > Settings icon > Forget/Unpair
3. Place WellSpa iO on the charger.
4. Press and hold the power button for 10 seconds.
Wait for:
- Indicator lights 1–5 to flash once.
Keep pressing and holding until:
- All indicator lights flash 3 times (at 10 seconds).
NOTE
ageLOC WellSpa iO automatically stores quality and usage
information. When the device is factory reset, some device
usage data will be retained for quality purposes. To view
Nu Skin’s privacy notice, visit:
-https://www.nuskin.com/en_US/corporate/privacy.html
DEVICE DISPOSAL
You must dispose of ageLOC® WellSpa iO properly
according to local laws and regulations. The device contains
electronic components and a lithium-ion battery, which
requires disposal separate from household waste. When
ageLOC WellSpa iO reaches its end of life, contact your
local waste management department to learn about proper
disposal and recycling options.
Dispose of batteries properly for your area.

13
MAINTENANCE
See the “Cleaning and Caring for Your ageLOC® WellSpa iO”
section for routine maintenance.
Do not ship damaged devices by air.
SERVICING
Do not attempt to repair the device yourself, as this will void
any warranty. There are no user-serviceable parts. Please see
the warranty section for service.
REPLACEMENT AND
WARRANTY INFORMATION
Limited One-Year Warranty: Nu Skin guarantees your
device to be free from defects in materials and workmanship
for a period of one year from the original date of consumer
purchase. This warranty does not cover damage to the
product due to misuse or accident, including dropping the
device. If the product becomes defective within the one-year
warranty period, please call your local Nu Skin Support
Services to arrange for a replacement.
If your device has been discontinued, Nu Skin may replace
your device with a new product which meets or exceeds the
specifications and performance of your device. In such cases,
Nu Skin may require you to top up the price dierence
between your device and the new product.
Your market may oer extended warranty coverage on your
locally purchased device. Please visit your local Nu Skin
website or contact your local Nu Skin Support Services for
more information

14
PATENTS
US and international patents pending.
TECHNICAL AND REGULATORY
INFORMATION
ageLOC® WellSpa iO™
Model: BS2R
Maximum Output:
V, µµA, .Hz
Bluetooth frequency: .GHz
III IPX III IPX
ageLOC WellSpa iO Wireless Charger
Input: V min mA
III IPX

15
DEFINITION OF SYMBOLS
Symbol Definition
iWarning
Dispose of Batteries
Properly for Your Area
III Two Levels of Shock
Protection
Charge only with specified
charger
Direct Current

© NSE PRODUCTS, INC.
WEST CENTER STREET, PROVO, UT.
DISTRIBUTED BY NU SKIN ENTERPRISES SINGAPORE PTE LTD
NORTH BRIDGE ROAD, ODEON TOWERS, SINGAPORE
NUSKIN.COM
Table of contents
Other ageLOC Personal Care Product manuals

ageLOC
ageLOC Galvanic Body Spa User manual

ageLOC
ageLOC Me User manual

ageLOC
ageLOC LumiSpa User manual

ageLOC
ageLOC GALVANIC SPA User manual

ageLOC
ageLOC ageLOC ME STARTER KIT User manual

ageLOC
ageLOC LumiSpa User manual

ageLOC
ageLOC LumiSpa User manual

ageLOC
ageLOC LumiSpa iO User manual

ageLOC
ageLOC LumiSpa iO User manual

ageLOC
ageLOC LumiSpa User manual
Popular Personal Care Product manuals by other brands

EFBE-SCHOTT
EFBE-SCHOTT SC OKB 920 D manual

VITAFON
VITAFON VITAFON-T Exploitation manual and user guide

Saniclass
Saniclass Adema Lonato installation instructions

Amplicord
Amplicord D1 user manual

HiB
HiB Beam 60 quick start guide

Madeli
Madeli Slique II TRANQUILITY II Specifications, Installation and User’s Guide