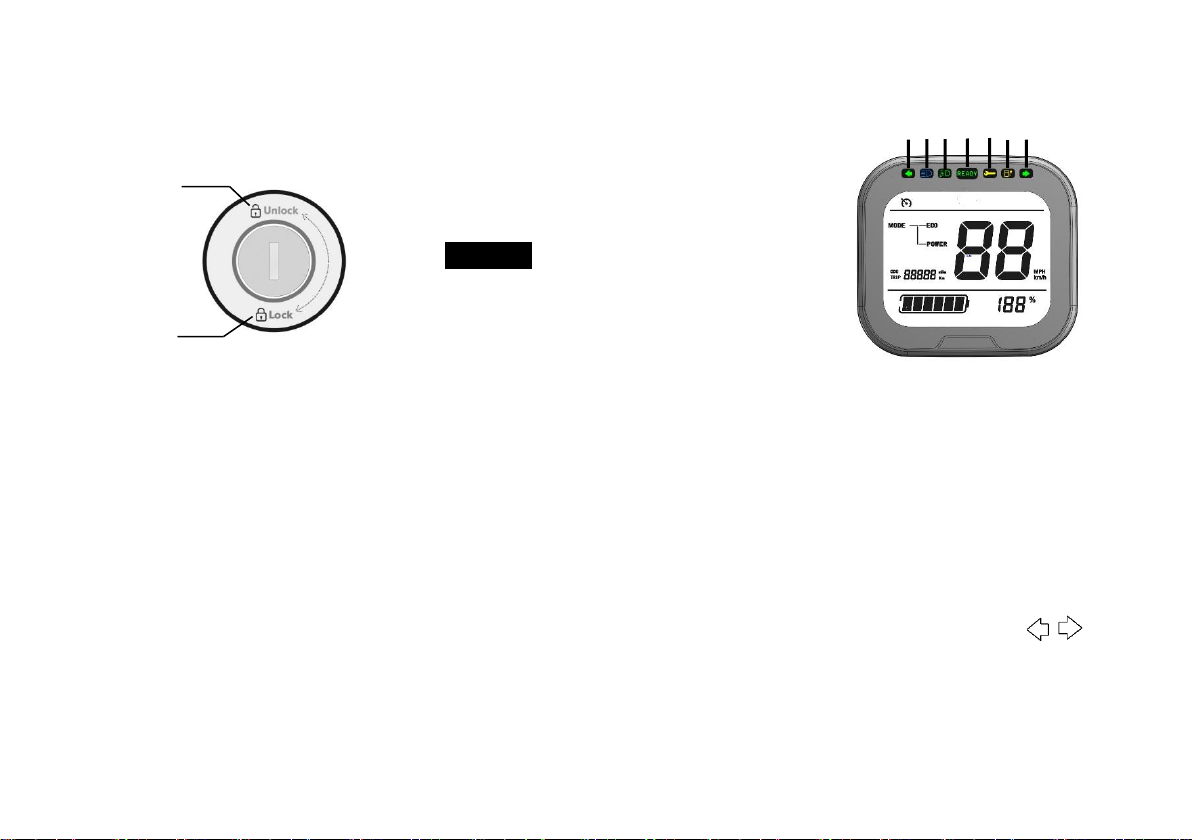
AGM Goccia GEV1000 User manual

1

2

3
Please read the user manual carefully before riding. This manual should also be attached to the vehicle after
the vehicle is resold.
Instructions for use of the AGM Goccia GEV1000.
Version 2020v1
Check for the latest information our website: www.agm-goccia.nl

4
Catalogue
1
Safety Warning 5
2
Name of main parts of vehicle 6
3Function of the meter and each button 8
4
Use and charge of battery 11
5
Remote control 14
6
Check before riding 15
7
Regular inspection, maintenance, and repair 16
8
Warranty 17
9
Vehicle Specification Table 19
10
Failures and solutions 20
11
Registration of maintenance 21

5
1. Safety Warning
Before riding the vehicle you must
know the following points:
-Must fully understand the
operation method of the
vehicle.
-Understand the warnings,
cautions, and regulations in
the manual.
-Mopeds should carry people
or goods in accordance with
laws and regulations.
-When riding on rainy or snowy
days the braking distance will
be prolonged. Be careful
about steering in severe
weather such as heavy rain
-Please avoid using third-party
accessories and avoid
disassembling, cracking, or
modifying the vehicle without
authorization. The losses
caused by this will be borne by
you and you will lose our
warranty.
Note: All materials, pictures, and
technical parameters in this
manual use the latest products at
the time of publication. As product
changes will lead to changes in
technical parameters and
performance enhancements.

6
Saddle
Rearrack
Rear light, License plate light, Turn
light
Pedal
Rear brake
Motor
Rear absorber
2. Nameofmainpartsof vehicle
Left side view

7
Displayer
Throttle turn
Rearviewmirror
Left brake lever
Head light + turn light
Front absorber
Front wheel
Fronttire
Front brake
Right side view

8
3. Function of the meter and
each button
Rudder lock
Lock
In this position, the steering
rudder can be locked, the vehicle
cannot drive normally, the key can
be removed.
To lock the rudder
1. Turn the vehicle rudder to the
left to the bottom.
2. The key will be inserted into
the rudder lock.
3. Turn the key to [Lock] position
at the position of [Unlock].
4. Remove the key.
To open the rudder lock
1.
Insert the key into the
rudder lock
2.
Turn the key to [UnLock]
position
3.
Remove the key
Warning Do not turn the key to
the [Lock] position while the
vehicle is running, otherwise it will
cause the vehicle to lose control or
accidents. Whether the steering
rudder is locked or not, the key
must be removed during use.
Indicator lights and warning lights
This indicator starts to flash
1. Turn indicator
2. High beam indicator
3. Low beam indicator
4. Ready
5. Vehicle fault light
6. Battery warning light
Direction indicator
When pushing the turn signal
switch to the left or right.
Unlock
Lock
1
2
3
4
5
6
1

9
High beam indicator
When the headlight uses a high
beam, this indicator lights up.
Low beam indicator
When the headlight uses a low
beam light, this indicator lights.
Ready
Lights up when starting up,
indicating that the vehicle is
working properly and can be ready
to ride.
Vehicle fault light
The electronic circuit detects that
the vehicle is not working
properly, and this warning light
will stay on. When this
phenomenon occurs, please
contact your AGM Goccia dealer
for system diagnosis.
Battery warning light
This indicator light indicates that
the battery is low, you need to use
the charger to charge the battery.
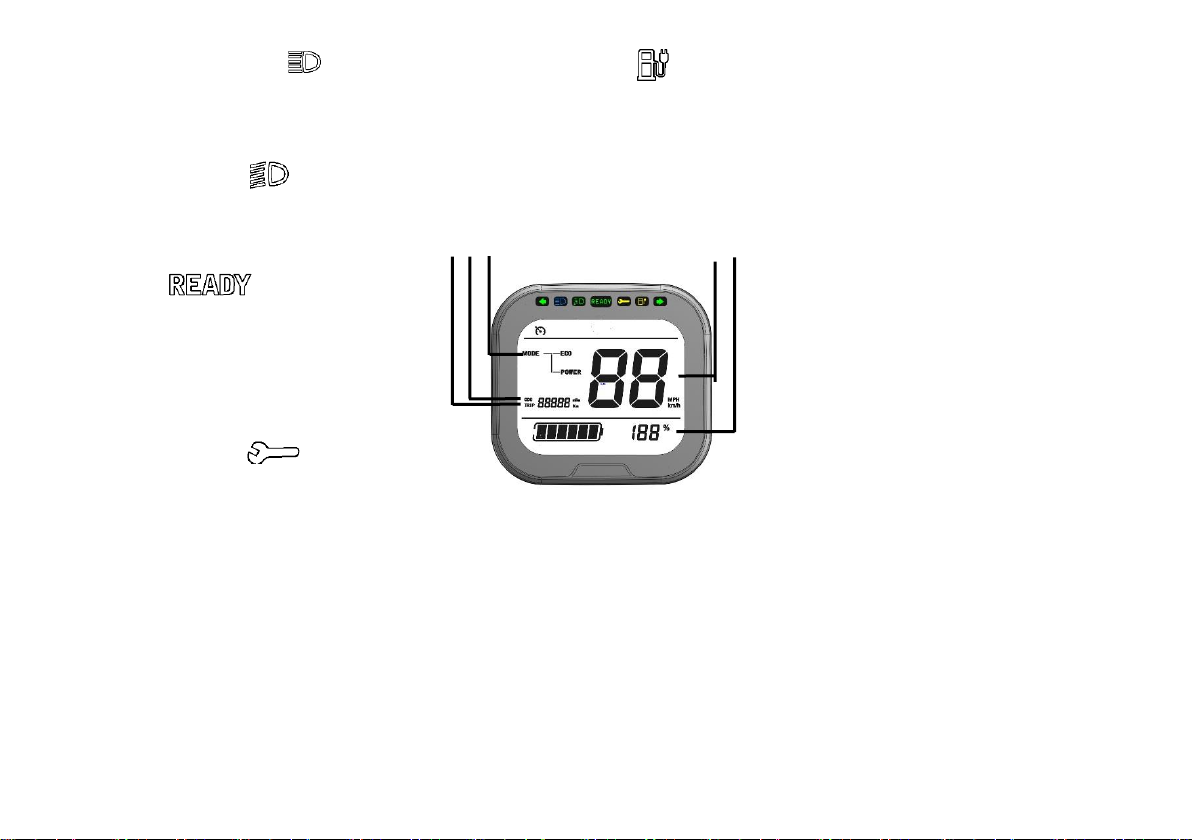
Multifunctional LCD instrument
1. TRIP (Interval meter)
2. ODO (odometer)
3. Mode indication
4. Speedometer (error code)
5. Remaining battery
This multifunctional LCD
instrument has the following
function modes:
▪Interval meter (TRIP)
Displays the distance traveled
during your current trip.
▪Odometer (ODO)
Displays the total distance
traveled by the vehicle.
Tip: When the vehicle is stopped,
pinch the rear brake grip, and
then quickly turn the throttle
handle twice tomake the TRIP and
ODO on the instrument switch.
▪Mode indication
Displays the driving mode of the
vehicle, the 2 options are ECO and
Power mode.
▪Speedometer (faultcode)
The real-time speed of the
vehicle is displayed while riding.
When the vehicle fails, the
vehicle fault code will flash.
1 2
3 4
5

10
▪Remaining battery
Displays the percentage of power
remaining in the battery.
Left combination switch
Left hand open
1. Far and near light switch
2. Turn signal switch
3. Horn button
Right handle switch
1. Lighting switch
2. Mode switch
Far and near light switch / /
Push the switch to or high
beam; push to Low beam
Turn signal switch /
Push the switch to ,make the
right direction light flash; Push
the switch to to make the left
direction light flash. If you want
to cancel the blinking of the
direction light, you can move the
switch back to the middle
position.
Horn button
Press this button to make the
speaker sound.
Mode switch
Press this button to switch the
vehicle's driving mode between
ECO and Power.
Rear brake grip
The rear brake grip is located on
the left handle, and grasp the grip
in the direction of the handle to
make the rear wheel brake.
Front brake grip
The front brake grip is located on
the right handle. Grasp the grip in
the direction of the handle to
make the front wheel brake.
3 2 1
1
2

11
4. Use and charge of battery
Battery installation and use
Use the bucket key to open the
bucket and make sure the main
power switch is in the ON position.
Tip: When you are not using the
vehicle for a long time, you should
turn the power switch to the OFF
position.
Then put the battery into the
battery compartment and insert
the discharge. Insert the seat into
the discharge port on the battery,
replace the seat cushion, and
confirm that the seat barrel lock
has been locked.
Warning It is strictly forbidden to
short circuit the battery fuse.
Non-maintenance personnel are
strictly prohibited from wiring the
discharge cables;
Description of battery power
indicator:
1. In the charging state, the
indicator will show the current
power.
2. In the non-charging state,
pressing the battery indicator will
display the level of charge. If the
indicator shows red and flashes
this indicates that the battery is
low, the battery should be
charged at this time.
Battery usage environment
▪The ambient temperature of
the battery is -20 ~ 60 ℃. Try
to avoid getting water, drinks
and corrosive liquids into the
battery.
▪Don’t put the battery near fire
sources and flammable and
explosive gas liquids,
otherwise it may cause
deflagration or explosion.
▪If the battery has a strange
smell, heat, deformation
during use, please stop using
it immediately and contact

12
your AGM Goccia dealer for
inspection and repair.
Battery maintenance
▪If you don’t use your battery
for a long time, please charge
your battery regularly to keep
the power above 50%. If the
battery power is lower than
20% for a long time, it may
cause the battery to lose
power and cause irreversible
attenuation to the battery
capacity.
▪The battery is a consumable,
and the capacity will naturally
decay during use. When you
feel that the cruising range
can’t meet the demand for
using, you should replace it.
▪If you encounter battery
failure, please contact your
AGM Goccia dealer for repair
and replacement. Don’t
disassemble the battery
without permission,
otherwise it may cause the
battery to generate heat and
smoke, which may seriously
cause fire or explosion.
Note After replacing the battery,
do not disassemble the used
battery without authorization, it
should be recycled by the relevant
professional departments.
Charging mode selection
External charging mode
After pulling the battery out of the
seat bucket, you can insert the
charging head into the charging
interface for external charging. At
this time, the battery power
indicator will light up and display
the battery power.
Vehicle charging mode
You can also insert the charging
head directly into the vehicle
charging port located at the front
of the bucket to charge the
vehicle. The instrument panel will
light up and display the battery
power.

13
Battery charging method and
environment
Before using the charger please
check whether the rated input
voltage (AC 100-240 V) of the
charger is always the same as the
grid voltage. Connect the
charger's output plug to the
battery's charging jack before
connecting the charger's input.
The plug is connected to AC
power, and the power indicator is
red. This procedure cannot be
reversed.
When the charging indicator is
red, the battery is charging; when
the green light is on the battery is
fully charged.
The lithium battery used by AGM
Goccia is maintenance-free. The
ambient temperature during
charging should be between 0 ℃~
35 ℃, and the humidity should be
lower than 90%. Exceeding the
range may affect the charging
time, capacity and life of the
battery.
Warning
When the charger is working,
please keep it in a safe where
children can’t touch it, and don’t
cover anything on the surface
Be sure to use the original charger,
otherwise it may cause a short
circuit of the battery, which will
seriously cause damage to the
battery.
The charger contains a high-
voltage circuit. Do not
disassemble it by yourself.
When changing the charger, it
should match the model of the
battery.

14
5. Remote Control
The AGM Goccia has a one-key
start function, you only need to
use the remote control to start the
vehicle.
Unlock the vehicle
When you press the unlock button
on your remote control, the
power button on the vehicle will
light blue, the vehicle is unlocked
successfully.
Start the vehicle (key-less)
Press the start button twice on
your remote control when the
vehicle is unlocked. The vehicle is
now powered, then press the
mode button on your handle bar.
You can ride by turning the
throttle handle.
Start the vehicle
Press the power button on the
vehicle, it will be flashing. The
vehicle is now powered, then
press the mode button on your
handle bar. You can ride by
turning the throttle handle.
Lock the vehicle
When you finish riding, press the
power button on the vehicle to
switch from the steady light to the
blinking state, and then press the
lock button on the remote control,
the vehicle will be locked.
Start
Lock
Unlock
Power

15
6. Check before riding
Before each ride, the vehicle
should be checked to ensure that
the vehicle can be operated in a
safe state. Please make sure to
follow the inspection and
maintenance specifications
described in the instruction
manual and maintenance manual.
Before riding the vehicle, please
check the following:
Warning If the vehicle is not
properly inspected and
maintained, it will increase the
chance of accidents or damage to
components. Once any problem is
found, you must not ride the
vehicle. If the problem cannot be
solved in this manual, please find
the nearest AGM Goccia dealer for
repair and inspection.
Inspection of power circuits and
lights
1. Turn on the power, operate
the lighting switch, check
whether the front and rear
lights are on, and whether the
light intensity of the front
lights is normal.
2. Check the front and rear brake
levers separately to see if the
brake power-off function is
normal.
3. Check the lighting device for
damage. In order not to affect
the safe driving, please check
carefully.
Inspection of front and rear brakes
Use the front and rear brake
handles for braking, and check
whether the braking effect is
normal.
Inspection of handlebars and front
and rear wheels
1. Swing the handlebar up, down,
left and right, check for
looseness and make sure that
the rudder is unlocked.
2. Turn the handlebar and check
for overtightening.
3. Check whether the front and
rear wheel.
Inspection of tires
1. Determine whether the air
pressure of the tire is
appropriate according to the
depression of the part where
the tire touches the ground.
When abnormal air pressure
is detected, use a barometer
to measure and adjust to
normal.
2. Check the tire for cracks and
excessive wear (the tread
height on the tire is less than
2mm). If so, you should go to
your AGM Goccia dealer to
replace the new tires in time.

16
Inspection of reflectors and
license plates
1. Check the side reflector and
rear reflector for dirt and
damage. If there is, it should
be cleaned or re- placed in
time.
2. Check whether the license
plate is installed securely, the
number is clear, and there is
no dirt and damage.
Cleaning attention
▪When cleaning the vehicle,
don’t directly pour water on
the brake drum, motor, and
front and rear axles to prevent
water from influencing the
performance and life.
▪When cleaning, don’t use
steam or high-pressure water.
7. Regular inspection,
maintenance and repair
Regular maintenance can keep
your vehicle in a safe and efficient
condition. Maintaining safety is
the responsibility of the owner.
Below we explain the inspection
and adjustment points of the
vehicle, the important periodic
maintenance inspection items are:
Brake
Driving on dry and level roads, use
the front and rear brakes
separately to check the braking
effect.
Front brake adjustment
If you find that the front brake is
not effective or there is a problem
please contact your AGM Goccia
dealer. Because the front brake is
a liquid press brake personal
repair is not recommended.
Rear brake adjustment
If you find that the rear brake is
too lose you can turn the drum
brake nut on the left side of the
rear wheel in the direction of the
car (clockwise). At the same time,
hold the left brake lever with the
left hand to check the tightness.
We warn you that if you tighten
the brake too much this can
damage to brake and the engine.
If you are not comfortable with
adjusting it yourself go to your
AGM Goccia dealer.
Note Regularly observe the
degree of wear of the brake pads
of the front and rear brakes, if the
brake pads are worn too much.
Please go to the service outlet to
replace the brake pads in time.
Tires
Tires connect your vehicle to the
road. They are an important part
of safety, durability and ride

17
quality. Make sure your tire
pressure is correct. The
recommended tire pressure is 2.2
bar.
Absorbers
Regularly check whether the
shock absorber can normally
compress and rebound and
whether the shock absorber
cylinder has oil leakage and cracks.
If the above situation occurs,
please go to your AGM Goccia
dealer to replace the shock
absorber.
Maintenance schedule
The new scooter must be subject
to the first inspection and
maintenance at your AGM Goccia
dealer when it reaches 1,000 km
or two months (whichever comes
first). The scooter is
recommended to be subject to
regular inspection and
maintenance at your AGM Goccia
dealer every 3,000 km or six
months (whichever comes first).
Storage of the AGM Goccia
Short time
Please store the vehicle in a dry
and cold place and cover with a
dust cover if necessary to block
dust.
Long time
1. Unplug the power socket on
the battery and take out the
battery.
2. Set the main power switch to
the Off position.
3. Lubricate all control cables,
grips and double braces. In
addition rotate the tire once a
month, do not stay in the
same position to avoid the
deterioration of the tire
because it is fixed in a certain
point.
4. Store the battery separately in
a dry and cold place. Please
read the paragraph regarding
the maintenance of the
battery carefully.
8. Warranty
The warranty of the manufacturer
consists of a cover on the parts
and warranty on the battery.
The warranty consists of replacing
the broken parts and a motor
warranty on the complete electric
engine.
The manufacturer’s warranty does
not cover damage as a result of
normal use, improper use,
collisions, lack to maintenance,
storage and transport, theft and
vandalism, overload and
environmental and natural
disasters.

18
The manufacturer does not
guarantee tires, friction material,
fuses, rubbers, brake pads, cables,
plastic work, chrome parts, rust
and damage to the paint, unless
otherwise established.
Any wages are not covered by the
guarantee and is therefore not
reimbursed.
The AGM Goccia should always be
serviced at an accredited AGM
Goccia dealer and subjected to
the maintenance schedule.
The warranty is valid for 24
months or 12,000 km, whichever
comes first.
Warranty only applies if all
warranty conditions are met,
which occur under normal use and
if a warranty claim has been
reported to the manufacturer
within the warranty period.
If all warranty conditions are met,
AGM Goccia gives a guarantee on
the broken part and not on a
complete vehicle.
Battery warranty
Separate warranty conditions
apply to the lithium-ion batteries.
the Battery warranty applies. This
warranty conditions covers the
cost of repair or replacement of
the battery under the following
conditions.
If there is a warranty the battery
will be repaired or replaced with
battery that has the same capacity
as the original battery.
The warranty is valid for 24
months or 12,000 km, whichever
comes first.
Damage resulting from improper
use, collisions and repairment of
the battery by non-AGM Goccia
technicians are not covered.
Like all other batteries they lose
capacity during use over time. The
loss of capacity due to the normal
use over time is not covered
battery warranty.
Please consult the user manual for
important information about
extending the service life of the
battery.

19
9. Vehicle specifications
Size: L x W x H
1710mmx690mmx1080mm
Wheel base
1190mm
Weight
54.5Kg
Max speed
25/45 km/h
Maximum load
150Kg
Battery type
Lithium-ion
Battery capacity
20Ah
Voltage
48V
Motor model
Rear hub motor
Rated outpower
1000w
Rated voltage
48V

20
10. Failures and solutions
Fault code
Causes
Solutions
01
Engine hall element failure
Contact AGM Goccia dealer
02
Vehicle handle bar malfunction
Replace the handle bar
03
Controller failure
Contact AGM Goccia dealer
04
Failure of brake sensor
Replace the brake sensor
05
Engine phase loss
Contact AGM Goccia dealer
06
Undervoltage protection
Contact AGM Goccia dealer
07
Battery communication problem
Contact AGM Goccia dealer
CH
Charging
The battery is charging
30
Instrument communication failure
Contact AGM Goccia dealer
Failure
Causes
Solutions
The Goccia has no power
Power switch not in right position
Battery is not connected correctly
Battery has low power
Put the Power switch in the on position
Re-connect the battery plug
Charge the battery
The Goccia does not
accelerate
Brake handle is blocked
Throttle handle failure
Place the brake handle at the right position.
Change handlebar if damaged
Insufficient mileage or
low speed
The battery is not fully charged
Under inflated tire
Heavily overloaded
Brake pads interference
Battery is aging or normal scrap
Charge the battery
Check the tire pressure and inflate if needed
Keep the appropriated load
Check the brake system before driving
Replace battery
Battery cannot be
charged
The charger is not plugged in
Ambient temperature to high or low
Check if the plug is loose
Charge the battery in normal conditions
Table of contents