Air Techniques Accent B5100B User manual

Instruction Manual
Part Numbers:
B5100B and B5200B
INTRAORAL DIGITAL
X-RAY IMAGING SYSTEM
TM
Bluetoot h®Interface Model

TABLE OF CONTENTS
2
Congratulations . . . . . . . . . . . . . . . . . . . . . . .3
Warranty . . . . . . . . . . . . . . . . . . . . . . . . . . . .3
On-Line Warranty Registration . . . . . . . . . . .3
Safety Notice . . . . . . . . . . . . . . . . . . . . . . . . .4
Knowledge of Warnings and Cautions . . . . . . . . .4
Authorized Dealer Service Only . . . . . . . . . . . . .4
General Safety Information . . . . . . . . . . . . . . . .4
Use Of Accessory Equipment . . . . . . . . . . . . . . .5
Electrical Safety Notes . . . . . . . . . . . . . . . . . . .5
Markings . . . . . . . . . . . . . . . . . . . . . . . . . . .5
Important Information . . . . . . . . . . . . . . . . . .6
Purpose of this Manual . . . . . . . . . . . . . . . . .7
Box Contents . . . . . . . . . . . . . . . . . . . . . . . . .7
Key Parts . . . . . . . . . . . . . . . . . . . . . . . . . . . .8
Unpacking and Inspection . . . . . . . . . . . . . . .8
Product information . . . . . . . . . . . . . . . . . . . .9
Correct Usage . . . . . . . . . . . . . . . . . . . . . . . .9
Incorrect Usage . . . . . . . . . . . . . . . . . . . . . . .9
Technical Data . . . . . . . . . . . . . . . . . . . . . . . .10
Computer Requirements . . . . . . . . . . . . . . . . .12
Functional Description . . . . . . . . . . . . . . . . . .13
Indicators and Connectors . . . . . . . . . . . . . . .14
TWAIN Interface . . . . . . . . . . . . . . . . . . . . . . .15
Installation . . . . . . . . . . . . . . . . . . . . . . . . . .17
Operation . . . . . . . . . . . . . . . . . . . . . . . . . . . .22
Operational Options . . . . . . . . . . . . . . . . . . .24
Care and Maintenance . . . . . . . . . . . . . . . . . .27
Troubleshooting . . . . . . . . . . . . . . . . . . . . . . .29
Accessories . . . . . . . . . . . . . . . . . . . . . . . . . . .30
FOREWORD
Air Techniques and its AllPro Imaging division have prepared this document
as a guide to the proper use of the ACCENT
TM Bluetooth®Intraoral
Digital X-ray Imaging System. References in this manual to Air Techniques
includes its division AllPro Imaging.
Refer to the following companion documents as necessary:
Accent Sensor Care Guide, P/N B5028
NiMH Battery Charger Instruction Manual, P/N B5087

CONGRATULATIONS
3
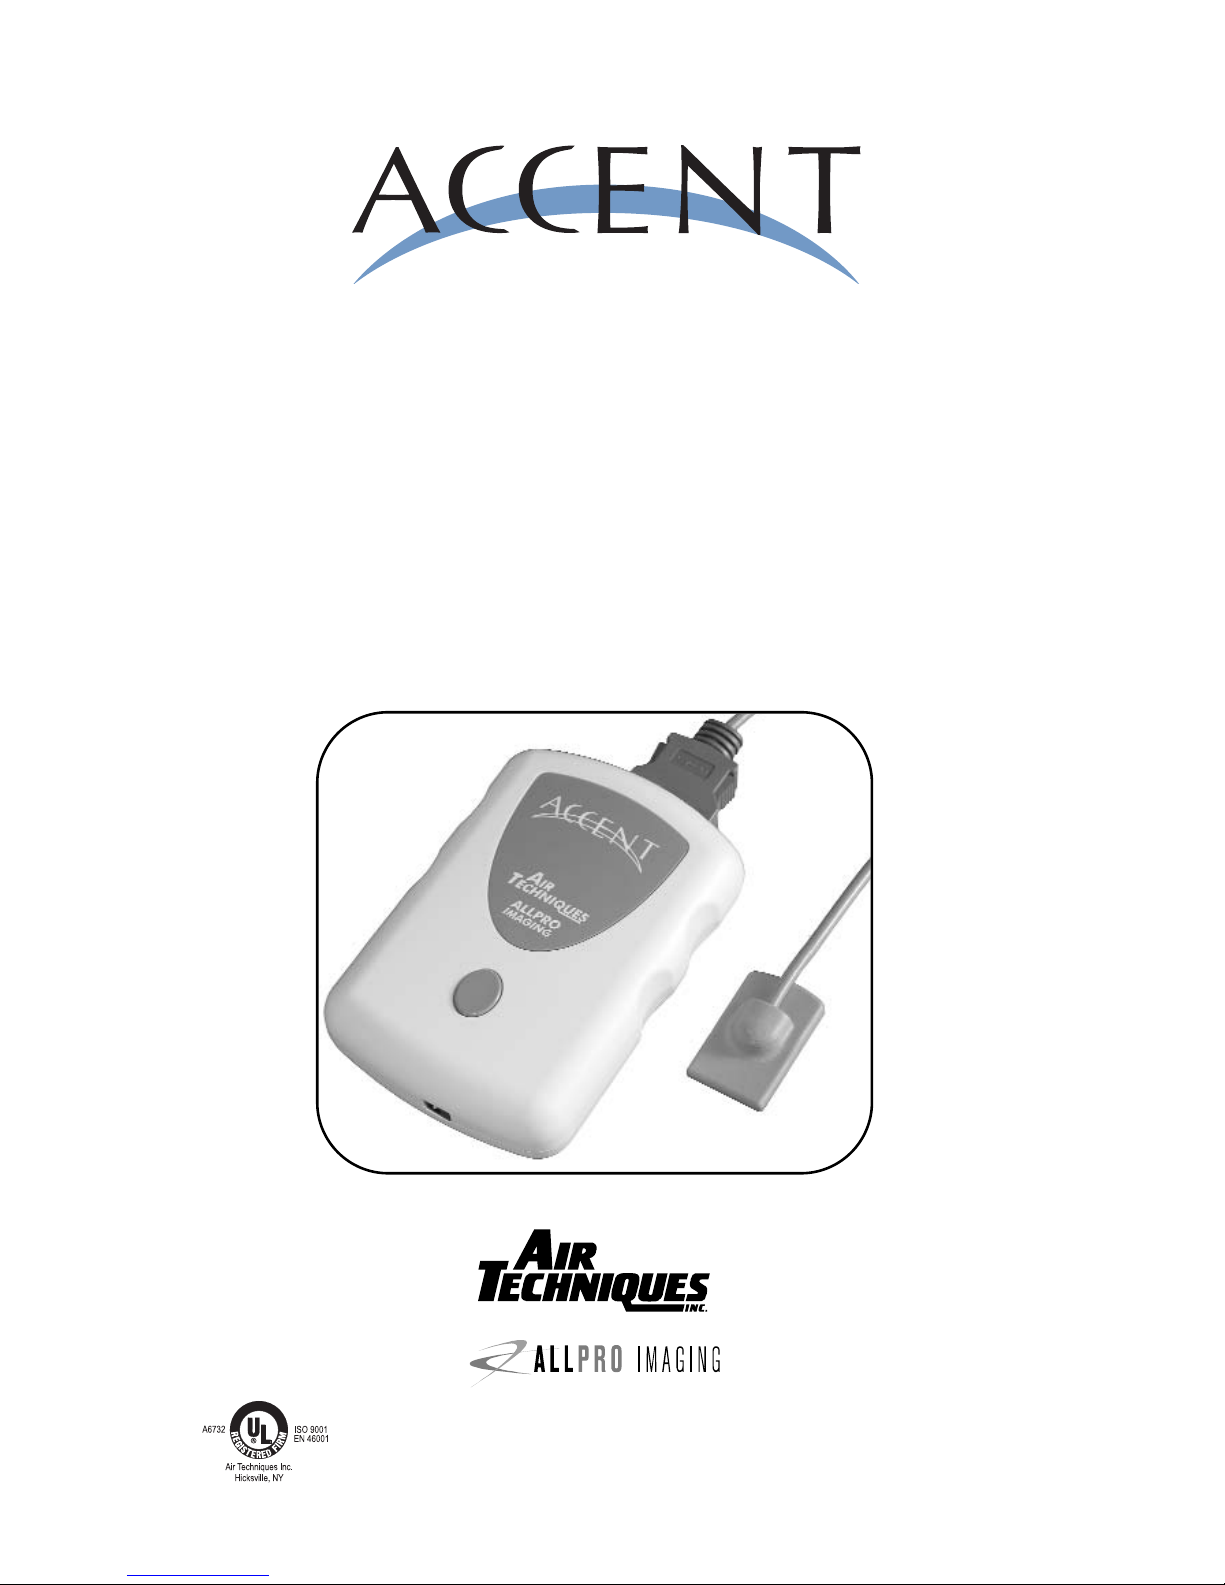
Congratulations on your purchase of the ACCENT
TM Bluetooth®
Intraoral Digital X-ray Imaging System, the latest imaging product from Air
Techniques, a leading manufacturer of dental equipment since 1962.
The ACCENT
TM Bluetooth® Intraoral Digital X-ray Imaging System (hereafter
referred to as ACCENT) offers the benefits of a film-less radiographic
system that produces high resolution, diagnostic quality images. Using
proven Charge-Coupled Device (CCD) technology, the ACCENT produces
high efficiency, low noise digital images which are transmitted to your computer
for immediate viewing.
This manual covers the installation, operation and maintenance of the
ACCENT System. Review and follow the guidelines included in this manual
to ensure that your ACCENT System gives the highest level of service.
Also, contact your authorized Air Techniques dealer for product support
and information on how to expand your ACCENT System.
WARRANTY
Quickly and easily register your new ACCENT on-line. Just have your
product model and serial numbers available. Then go to the Air
Techniques website, www.airtechniques.com, or the AllPro Imaging
website, www.allproimaging.com, click the warranty link and complete
the registration form. This on-line registration ensures a record for the warranty
period and helps us keep you informed of product updates and other valu-
able information.
ON-LINE WARRANTY REGISTRATION
The ACCENTTM System is warranted to be free from defects in material and
workmanship for a period of 2 years from the date of purchase. The manufac-
turer’s limited warranty coverage is as follows:
AACCCCEENNTTCCoonnttrroollMMoodduullee--Any Control Module returned through an
authorized dealer, will be repaired or replaced at our option at no charge
provided that our inspection indicates it to have been defective.
AACCCCEENNTTSSeennssoorrss--Sensor failures due to manufacturing defect or accidental
damage during the warranty period will be repaired or exchanged with replace-
ment sensor that, at the manufacturer’s discretion, will be either “Re-manufac-
tured Equipment” or new. Sensor failure due to obvious equipment misuse or
improper care, can, at the manufacturer’s discretion, modify the terms or dura-
tion of this manufacturer’s warranty.
Replacement equipment continues under warranty for the remainder of the origi-
nal 2-year warranty. The warranty does not apply to damage due to shipping, mis-
use, careless handling or repairs by non-authorized service personnel. Dealer
labor, shipping, and handling charges are not covered by this warranty.
Warranty void if installed or serviced by other than authorized service personnel.
Air Techniques, Inc./ALLPRO Imaging is not liable for indirect or consequential
damage or loss of any nature in connection with this equipment.
This warranty is in lieu of all other warranties expressed or implied. No rep-
resentative or person is authorized to assume for us any liability in connection
with the sale of our equipment.

SAFETY NOTICE
4
General Safety Information.
KRetain all packing material for possible return of the product to
the manufacturer. Take care that it does not fall into the hands of
children. Only the original packing guarantees optimal safety of
the device during transport. Should it be necessary to return the
device to the manufacturer during the warranty period, Air
Techniques will not accept claims for damage arising from using
incorrect packing materials.
KFederal law restricts this device to sale by or on the order of a
licensed practitioner.
KBefore every use the operator must check the functional safety
and the condition of the appliance.
KThe operator must be knowledgeable in the operation of the
appliance.
KThis device is not to be used in any areas where the atmosphere
could cause fire or explosion.
This equipment has been designed to minimize exposure of personnel
to hazards. While the ACCENT is designed for safe operation, certain
precautions must be observed.
Use of the ACCENT not in conformance with the instructions speci-
fied in this manual may result in permanent failure of the unit.
Knowledge of Warnings and Cautions.
Users must exercise every precaution to ensure personnel safety, and be
familiar with the warnings and cautions presented throughout this manu-
al and summarized below.
In this manual, the following definitions apply for all WARNINGS and
CAUTION Statements:
WARNINGS: Any operation, procedure or practice, which, if not strictly
observed, may result in injury or long-term health hazards
to personnel.
CAUTIONS: Any operation, procedure or practice, which, if not strictly
observed, may result in destruction of equipment or loss of
treatment effectiveness or damage to equipment..
Authorized Dealer Service Only.
The interior of the Control Module is only accessible by removing
hardware with tools. It should be opened and serviced only by an
authorized service technician.
Failure to heed this warning may result in equipment damage or
personal injury, and wwiillllvvooiiddaannyyaannddaallllwwaarrrraannttiieess..Contact your
authorized dealer for service information.

5
SAFETY NOTICE
Electrical Safety Notes.
KTo avoid risk of electric shock, fire, short-circuit or dangerous
emissions, never insert any metallic object into the equipment.
KCheck the device cables for possible damage before switching on.
Damaged cables, plugs and sockets must be replaced before use.
KDo not locate control module where it could be sprayed with water,
or in a damp environment.
Alerts users to important information and/or mandatory regulations
or prohibitions for the prevention of personal injury or substantial
property damage. Read carefully to avoid any problems.
Markings.
The following terms or symbols are used on the equipment or in this
manual to denote information of special importance:
Item used only once.
Discard after use.
2
Use of Accessory Equipment.
The use of ACCESSORY equipment not complying with the equivalent
safety requirements of this equipment may lead to a reduced level of
safety of the resulting system.
Consideration relating to the choice shall include:
- use of the ACCESSORY in the PATIENT VICINITY
- evidence that the safety certification of the ACCESSORY has been
performed in accordance to the appropriate IEC 601-1 and/or
IEC 601-1-1 harmonized national standard.
Use of ACCESSORIES or cables other than those specified or provided
by Air Techniques' may result in increased EMISSIONS or decreased
IMMUNITY of the EQUIPMENT.
ATTENTION USERS: Manufacturing date code, located inside the
battery compartment, is in the format:
MONTH YYYY.
Indicates static sensitive device. User must
handle properly to avoid damage from
electrostatic discharge (ESD).

6
IMPORTANT INFORMATION
General Notes.
KAll instructions in this manual form an integral part of the unit.
They must be kept close to the unit and in readiness whenever
required. Precise observance of these instructions is a pre-condition
for use of the unit for the intended purpose and for its correct
operation. This manual should be passed on to any future pur-
chaser or operator.
KSafety of the operator as well as trouble-free operation of the unit
are only ensured if use is made of original equipment parts.
Moreover, use may only be made of those accessories that are
specified in the technical documentation or that have been
expressly approved and released by Air Techniques for the intended
purpose. Air Techniques cannot warranty for the safety or proper
functioning of this unit in the case where parts or accessories are
used that are not supplied by Air Techniques.
KThere is no guarantee against damage arising where parts or
accessories are used that are not supplied by Air Techniques.
KObserve the usage and storage conditions.
KAppliances which accumulate condensation or become wet
through a change of temperature may only be operated after they
are fully dry again.
KAir Techniques regard themselves as being responsible for the
equipment with regard to safety, reliability and proper functioning
only if assembly, resetting, changes or modifications, extensions
and repairs have been carried out by Air Techniques or a dealer
authorized by Air Techniques and if the equipment is used in con-
formity with the instructions contained in this manual.
KThe device conforms to the relevant safety standards valid at this
time.
KAny reprinting of the technical documentation, in whole or in part,
is subject to prior written approval by Air Techniques.

7
PURPOSE OF THIS MANUAL
BOX CONTENTS
Each component of the ACCENT is shipped packaged in individual
protective containers all packed in a single box, which includes:
This manual covers the installation, operation and maintenance of the
following ACCENTsystems and components:
KBluetooth ACCENTSystem
with Size 1 Sensor, . . . . . . . . . . . . . . . . . .Part Number B5100B
KBluetooth ACCENTSystem
with Size 2 Sensor, . . . . . . . . . . . . . . . . . .Part Number B5200B
KBluetooth Control Module Only, . . . . . . . .Part Number B5050B
KSize 1 Sensor Only . . . . . . . . . . . . . . . . . .Part Number B5120
KSize 2 Sensor Only . . . . . . . . . . . . . . . . . .Part Number B5220
IItteemmssCCoommmmoonnttooBBlluueettooootthhAACCCCEENNTTSSyysstteemmss
PP//NNssBB55110000BB,,BB55220000BBaannddCCoonnttrroollMMoodduullee,,PP//NNBB55005500BBQQuuaannttiittyyPPaarrttNNoo..
Bluetooth Control Module 1 B5050B
Bluetooth to USB Adapter 1 B5075
NiMH Rechargeable AAA Batteries (Pack of 4) 2 B5013
NiMH Battery Charger Assembly 1 B5085
Sensor Storage Holder 1 B5030
CD containing drivers for TWAIN 1 B5060
Accent Instruction Manual 1 B5046B
IItteemmssIInncclluuddeeddwwiitthhSSiizzee11SSeennssoorr,,PP//NNBB55112200
aannddBBlluueettooootthhAACCCCEENNTTSSyysstteemm,,PP//NNBB55110000BB
Size 1 Sensor 1 B5120
Accent Sensor Care Guide 1 B5028
Disposable Infection Control Sheaths for Size 1
Sensor (sample pack of 25) 1 B5125
IItteemmssIInncclluuddeeddwwiitthhSSiizzee22SSeennssoorr,,PP//NNBB55222200
aannddBBlluueettooootthhAACCCCEENNTTSSyysstteemm,,PP//NNBB55220000BB
Size 2 Sensor 1 B5220
Accent Sensor Care Guide 1 B5028
Disposable Infection Control Sheaths for Size 2
Sensor (sample pack of 25) 1 B5225

8
Unpack each component of the ACCENT and inspect for physical
damage such as scratched panels, damaged connectors, etc. If any
damage is noted, notify your authorized dealer immediately so corrective
action can be taken.
Make sure to save all packaging material in case repackaging and
shipment is necessary.
Verify that all listed items were received. If any item is missing, notify
your authorized dealer.
UNPACKING AND INSPECTION
BLUETOOTH to USB
ADAPTER
with USB Connection Cable
P/N B5075
Figure 1. Bluetooth ACCENTSystem
Key Parts Identification
USB CONTROL
MODULE
P/N B5050B
SIZE 2
SENSOR
ASSEMBLY
P/N B5220
SIZE 1
SENSOR
ASSEMBLY
P/N B5120
KEY PARTS
SENSOR
STORAGE HOLDER
P/N B5030
NiMH BATTERY
CHARGER ASSEMBLY
P/N B5085

9
PRODUCT INFORMATION
Correct Usage
KOperation of the ACCENT may only be carried out by suitably
qualified personnel.
KThe ACCENT is only to be used in the production of intraoral
X-ray exposures.
KThe ACCENT should be used in a room equipped for it.
KRoom temperature should be in the range 50 to 105°F (10 to 40° C)
with relative humidity between 20 and 60%.
KIf the device is brought into the room of operation from a cooler
environment, condensation can build up. Do not connect the
device until it has warmed up to room temperature and is
absolutely dry.
KThis room should be free of all possible interferences (e.g. strong
magnetic fields), as these could affect the operation.
KThe ACCENT may only be operated together with authorized
software.
KCorrect usage includes observing all installation and operating
instructions and adherence to the set-up, operation and main-
tenance instructions.
KAny use, above and beyond that described in this manual as
correct usage, will invalidate the Air Techniques warranty.
KThe operator is liable for all damages caused as a result of
incorrect usage of this appliance.
KOnly ACCENT Sensors made by Air Techniques may be used
with the ACCENT Control Module.
Incorrect Usage
KAny use that is not described in this manual as correct usage is
considered as incorrect usage. The manufacturer is not to be held
liable for any damage caused as a result of incorrect usage. The
operator bears all risks in this case.
KAdditionally, the manufacturer is not liable for any damage to
the ACCENT Sensor caused by patient biting, dropping or
incorrect handling. See warranty on page 3 for the ACCENT
Sensor.

TECHNICAL DATA
10
Power Supply
The Bluetooth ACCENTControl Module is powered by four NiMH
rechargeable AAA batteries. No external power supply is required.
Operating Conditions
Temperature 50 to 105°F (10 to 40°C)
Humidity 20 to 60 % non- condensing
Transport and Storage Conditions
Temperature -40 to 158°F (-40 to 70º C)
Humidity 10 to 95 % non- condensing
Bluetooth ACCENTControl Module
Digital Signal Processing 32 bits
Image Acquisition 4096 gray scales
PC Connection Wireless Bluetooth
Weight:
(without supplied batteries) 4.75 ounces (135 g)
(with supplied batteries) 7 ounces (200 g)
Dimensions: Length Width Height
4.75 inches 3.25 inches 1.25 inch
(121 mm) (83 mm) (32 mm)
ACCENT Sensor Size 1
Number of pixels 1.25 million
Pixel Size 22 x 22 µm
Technology CCD + Scintillator
Weight 3 ounces. (88 g)
Dimensions Length Width Height
External 1.6 inches 1 inch 0.25 inches
(39.5 mm) (25 mm) (5.7 mm)
Active Surface 20 x 30 mm, i.e. 600 mm²
Attached Cable length) 4 feet (1.25 meters)

11
TECHNICAL DATA
ACCENT Sensor Size 2
Number of pixels 2.05 million
Pixel Size 22 x 22 µm
Technology CCD + Scintillator
Weight 3.4 ounces. (95 g)
Dimensions Length Width Height
External 1.67 inches 1.26 inches 0.25 inches
(42.5 mm) (32.5 mm) (5.7 mm)
Active Surface 27.5 x 36.08 mm, i.e. 990 mm²
Attached Cable length 4 feet (1.25 meters)
IEC601-1 Classification:
Class 1
Type B
Transportable
Continuous Operation
Equipment not suitable for use in the presence of flammable
anaesthetic mixture(s).
Protection against ingress of liquids -Ordinary
Electromagnetic Interference:
Electromagnetic interference between the equipment and other
devices can occur. Do not use the equipment in close conjunction
with sensitive device or devices creating high electromagnetic dis-
turbances.
Portable and Mobile RF communications equipment and devices
can affect MEDICAL ELECTRICAL EQUIPMENT operation.

12
COMPUTER REQUIREMENTS
The minimum computer system requirements necessary to operate the
ACCENT Sensor are listed below. Items listed with an asterisk (*) are
required.
Operating System: * Windows XP Professional for an
Intel 32-bit processor with Service
Pack 2 or later.
Communication Port: * Must be USB 1.1 or 2.0 or later for
supplied Bluetooth to USB adapter
or Bluetooth 1.1 controller.
CPU: 2.8 GHz Pentium IV
RAM: 1 GB
Hard Drive: 120 GB
Monitor: SVGA 17 inch, 1024 x768 or higher
resolution,contrast ratio 450:1,
1024 x 768 Resolution: .22 dot pitch capability. For optimum
viewing a CRT is recommended.
Video Display Adapter: 32 MB RAM
Peripherals: * CD ROM Drive
Standard Keyboard and Mouse
Backup Device
External Surge Protector
Power supply backup
Image Management Software: * Compatible authorized third-party
software is required. (not included
with product)
Important: To operate the ACCENTSensor, it must be connected to a
compliant Computer System, and the computer must be loaded
with Air Techniques Authorized Image Management Software. Air
Techniques provides neither the PC nor the Software. The PC
and Software are provided by the dealer or user.

13
FUNCTIONAL DESCRIPTION
The Bluetooth ACCENT system is comprised of a ACCENT Sensor
(size 1 or size 2) with attached connection cable and a Bluetooth Control
Module allowing wireless connection. The ACCENT Sensor is connected to
the Control Module via a 4-foot (1.25 meter) cable. The Control Module
connects to the user-supplied computer system using the Bluetooth wire-
less connection protocol.
During operation of the ACCENT system, the X-ray beam is converted
into an electronic signal by the ACCENT Sensor. The resulting image
information is digitized using a 12-bit A/D converter and then stored in
the Control Module.
The image memory of the Control Module reduces the possibility of
image loss caused by interference or misuse. The image is transferred
block by block to the user-supplied computer system and processed by
the image software.
Only one image can be processed during a data transmission cycle,
which is indicated by an illuminated front-panel blue LED indicator. New
images can be created when the front-panel yellow LED indicator starts
blinking.
The ACCENT can only be used when connected via the wireless
Bluetooth protocol to a user-supplied computer system loaded with an
Image Management Software authorized by Air Techniques.
Each time the ACCENT Sensor is used it must be covered with an
appropriate disposable infection control sheath (PN B5125 or B5225).
System Properties.
If unsure of the operating system
version installed, check that it
meets the necessary requirements
by checking the SSyysstteemmPPrrooppeerrttiieess
window.
This is done simply by right clicking
the MMyyCCoommppuutteerriiccoonn..Selecting
PPrrooppeerrttiieessfrom the menu list displays
the SSyysstteemmPPrrooppeerrttiieesswindow as
shown. The installed operating
system version is listed under the
GGeenneerraallTTaabb..
The SSyysstteemmPPrrooppeerrttiieesswindow can
also be displayed from the Desktop
SSttaarrttbutton. Just press the SSttaarrttbut-
ton and select SSeettttiinnggssCCoonnttrrooll
PPaanneelland then SSyysstteemm..
COMPUTER REQUIREMENTS

14
INDICATORS AND CONNECTORS
Front Panel. The specific functions of the LED indicators and connector
(see Figure 3) located on the front panel of the Control Module are
described below.
Green LED indicator Illuminates green upon power turn on
then flashes briefly to indicate that the
system is operating.
Yellow LED indicator Blinks yellow to indicate that system is
ready for image acquisition.
Illuminates steady yellow to indicate that
the ACCENT system has an image.
Extinguishes during image transfer.
Blue LED indicator Illuminates solid blue to indicate that the
ACCENTsystem is linked to the computer.
Blinks blue during image transfer.
Sensor Connector Socket Accepts connection of either Size 1 or 2
ACCENT Sensor.
Figure 3. Bluetooth ACCENTControl Module Front View
BLUE
YELLOW
GREEN
20-PIN SENSOR
CONNECTOR
SOCKET
Power Turn-ON: Depress the Power Button
for approximately 1.5 seconds.
Power Turn-OFF: Depress the Power Button for
approximately 5 seconds to turn off Control
Module. Observe that Green and Yellow
LEDs illuminate then extinguish.
Power Button. As shown by Figure 2, the Power Button located on the
top panel of the Control Module, controls operating power as follows.
POWER
BUTTON
Figure 2. Bluetooth ACCENTControl Module Top View
Rear Panel. As shown by Figure 4, the
rear panel of the Control Module has a
center pin connector. This connector
accepts the connection of DC power
connector end from the optional battery
charger AC mains line cord, (P/N B5080). Figure 4. Bluetooth
ACCENTControl Module
Rear View

15
About the TWAIN Consortium:
The TWAIN Working Group is a not-for-profit organization, which repre-
sents the imaging industry. TWAIN’s purpose is to provide and foster a
universal public standard, which links applications and image acquisition
devices. The ongoing mission of this organization is to continue to
enhance the standard to accommodate future technologies.
The TWAIN consortium does not market any software, hardware or other
products. It has a website at http://www.twain.org/ on which you can find
a wealth of practical information for people that want further information
on the subject.
The TWAIN standard exists for Windows and Macintosh platforms. Only
Windows is covered herein. At the present time, there is no Macintosh
version of the TWAIN interface for ACCENT sensors.
On paper, the TWAIN standard allows total interconnection of software
and peripherals. However, software and peripherals are not obliged to
comply with the entire standard. So there can be partial or complete
incompatibilities in some cases.
TWAIN Interface for ACCENT
This section provides instruction for connecting the ACCENT using the
TWAIN interface. It contains procedures to acquire images using the
ACCENTsystem with widely used, commercially available image program
applications via the TWAIN interface. Refer to the documentation sup-
plied for the individual imaging program application for detailed oper-
ating procedures and specific setup instructions to acquire or manipulate
images.
If your imaging application does not display the Accent TWAIN user
interface, use the TWAIN Test application included with the ACCENT
software and driver installation. The TWAIN Test application displays the
Accent TWAIN user interface providing controls to the break existing
wireless link or establish a new one. The Accent TWAIN user interface
‘remembers’ the last link that was used, so when you return to your imaging
application, acquisition will use the new settings.
Installation of the TWAIN interface for the ACCENT
The TWAIN interface is installed, by default, as part of the ACCENT
software and driver installation.
TWAIN Graphical User Interface
As shown in Figure 5, the TWAIN Graphical User interface is simple and
intuitive. It is divided into six separate functional areas described on the
next page.
TWAIN INTERFACE

16
1. Title Bar: Contains the words "Accent: TWAIN Data Source". If it
displays any other words, then you are using a language other
than English or you have not selected the Accent as your TWAIN
data source.
2. Language Selection Box: By default, the interface uses the same
language as Windows or English.
3. Resolution Box: Allows selection of high resolution (HR) or low
resolution (LR). By default, the Accent system acquires
images in low resolution. Refer to the "Image Resolution" section
on page 26.
4. Connection Box: By default, the TWAIN interface searches for an
Accent USB Control Module connection. Click on the ‘Wireless
system’ button to search for an Accent Bluetooth Control
Module. While searching for a Bluetooth Control Module, the
progress bar below the button displays a yellow progress bar.
Once the Bluetooth Control Module has been found, the
progress bar represents the battery state. The batteries need
charging when this turns red.
5. LED Indicators: The blue, red, yellow, and green LEDs indicate
the status of your Accent system. The red LED indicates an error
if it remains illuminated for more than 5 seconds, or indicates a
search reset when it flashes briefly. The green LED illuminates
when a link to an Accent system has been established. The yel-
low LED blinks when the software is ready to acquire a new
image. When X-rays have been detected, the blue LED illumi-
nates while the data are being transmitted.
6. Close Button: Lets you close the Accent TWAIN user interface
when you have finished taking X-rays. Some imaging applica-
tions close the TWAIN user interfaces after capturing each
image; others wait for the user to close the window. While
searching for a Bluetooth device, it may take up to 20 seconds
for the window to close.
Figure 5. TWAIN Graphical User Interface
TWAIN INTERFACE
1
2
3
5 6
4

17
INSTALLATION
Protect the imaging system from direct sunlight and excessive
heat. Ensure that the Control Module connector is
accessible at all times for connection of the
ACCENT sensor plug as necessary.
Installing the ACCENT system is as simple as installing batteries,
deciding where to place the Control Module and the Sensor Storage
Hanger. The Control Module must be within 10m (30 feet) of the computer
system loaded with an authorized Image Management Software applica-
tion in a location convenient to the patient.
Important: Do not use bumpers when using the optional Control Module Holster.
The Control Module with bumpers does not fit into the holster.
Bumpers are permanently adhered to the Control Module surface and
can not be easily removed once applied.
Installing the Batteries -
Remove rear cover and place four NiMH AAA
batteries inside the battery compartment. Make
correct contact for polarity (+ and -) according to
the sign in the battery compartment.
Control Module Location -
Although the Control Module can be put on
a table top or any flat stable surface, it is rec-
ommended that it be placed in the optional
Control Module Holster (P/N B5040) secured
to the X-ray arm using the supplied belt.
Sensor Storage Hanger Location -
Adhere the self-sticking Sensor Storage Hanger
to the X-ray arm near the Control Module.
Optional Bumpers -
Self-sticking bumpers are supplied to act as feet for the Control Module
when not using the optional Control Module Holster (P/N B5040).

18
INSTALLATION
Static electricity, a natural phenomenon, and consequently
electrostatic discharge can damage electronic devices,
particularly computers and associated peripherals.
Static Prevention - Static electricity is a potential source of problems
with electronic devices, particularly computers and their peripherals.
Your ACCENT system is no exception. As such, basic precautions
should be taken to prevent static build-up, especially if you are using the
system in a carpeted room and/or areas of low humidity.
The following suggestions will help eliminate static build-up and protect
your computers, ACCENT equipment, and other electronic devices:
Ensure your electrical outlets are properly grounded
Floor treatments (i.e. Staticide 2005/2002)
Anti-static floor mats
Air Humidifier
Air Ionizer
Bluetooth ACCENT System Interconnection. Refer to Figure 6
and perform the following procedures to connect the ACCENT system.
1. Connect the ACCENT Sensor by aligning the connector pins
and inserting the sensor cable plug into the sensor socket of the
Control Module until it securely snaps into place.
2. Connect the supplied Bluetooth to USB Interface Adapter by inserting
it into any available USB port on the computer. Use the supplied USB
connection cable as necessary.
Figure 6. Bluetooth ACCENTSystem Interconnection
BLUETOOTH
CONTROL MODULE
ASSEMBLY
USER-SUPPLIED
PC COMPUTER
STATION
SIZE 1 OR 2
BLUETOOTH
CCD
SENSOR
Connection to
Computer via
Bluetooth Port
CCD SENSOR
CONNECTOR
CABLE
BLUETOOTH
ACCENT
SYSTEM

19
INSTALLATION
Note: Turn Control Module off before removing the ACCENT Sensor.
Remove the ACCENT Sensor by squeezing pulling the sensor cable
plug from the sensor socket of the Control Module.
Make sure that the four NiMH AAA batteries are fully charged prior to use.
Charge batteries in accordance with the NiMH Battery Charger Instruction
Manual, P/N B5087.
Important: Do not run the TWAIN Test program while acquiring images with
another program. Acquiring from two applications causes the
Bluetooth Control Module to lock-up resulting in loss of image data.
If the Bluetooth Control Module locks up, reset by turning the power
OFF and then back ON.
Initial Setup
This procedure teaches Windows about the new Bluetooth device. It
must be performed once on each computer that will use the Accent
Bluetooth Control Module. Perform the procedures as follows:
1. Install the Accent TWAIN Interface and Drivers from the Accent
drivers disk. Insert the Accent Driver disc, the installation pro-
gram automatically runs and opens the AAcccceennttDDrriivveerrssaanndd
MMaannuuaallsswindow shown below.
2. Select IInnssttaalllltthheeAAcccceennttTTWWAAIINNIInntteerrffaacceeaannddDDrriivveerrssfrom the
AAcccceennttDDrriivveerrssaannddMMaannuuaallsswindow and observe that the AAcccceenntt
––IInnssttaallllSShhiieelldd
WWiizzaarrddinstaller window opens.
Note: A Microsoft® Certification statement may appear.If it does,
click Continue Anyway to proceed with installation.
3. Select NNeexxttfor all options within the AAcccceenntt––IInnssttaallllSShhiieellddWWiizzaarrdd
installer to load all the software and drivers. Click FFiinniisshhwhen done.

20
INSTALLATION
5. Configure Windows to find the new Bluetooth device by pressing
the SSttaarrttbutton and selecting SSeettttiinnggssCCoonnttrroollPPaanneelland then
selecting the BBlluueettooootthhDDeevviicceessoption. Observe that the
BBlluueettooootthhDDeevviicceesswindow opens as shown below.
Note: The Bluetooth Devices option may be located in the Printers and
Other Hardware option category.
6. In the BBlluueettooootthhDDeevviicceesswindow, select the OOppttiioonnsstab. Ensure
that the AAlllloowwBBlluueettooootthhddeevviicceessttooccoonnnneeccttttootthhiissccoommppuutteerrand
the AAlleerrttmmeewwhheennaa
nneewwBBlluueettooootthhddeevviicceewwaannttssttooccoonnnneecctt
boxes are checked and then press the OOKKbutton.
4. Connect the Linksys Bluetooth to the USB Adapter supplied with the
Bluetooth Control Module to any available USB port. The drivers will
load automatically when using the rreeqquuiirreeddWindows XP Professional
for an Intel 32-bit processor with Service Pack 2 or later.
Note: Make sure that the required Windows XP Professional with Service
Pack 2 or later is installed. See page12 for details.
This manual suits for next models
1
Table of contents
Other Air Techniques Medical Equipment manuals

Air Techniques
Air Techniques AirStar AS10 User manual

Air Techniques
Air Techniques AirStar AS10 User manual

Air Techniques
Air Techniques F3700T User manual

Air Techniques
Air Techniques Mojave Mobile User manual

Air Techniques
Air Techniques ScanX Classic User manual

Air Techniques
Air Techniques Rxonly ProVecta 3D Prime User manual

Air Techniques
Air Techniques MOJAVE LT3M Operating manual

Air Techniques
Air Techniques ProVecta 3D Prime User manual

Air Techniques
Air Techniques MOJAVE LT3 Manual

Air Techniques
Air Techniques ProVecta 3D Prime User manual