6
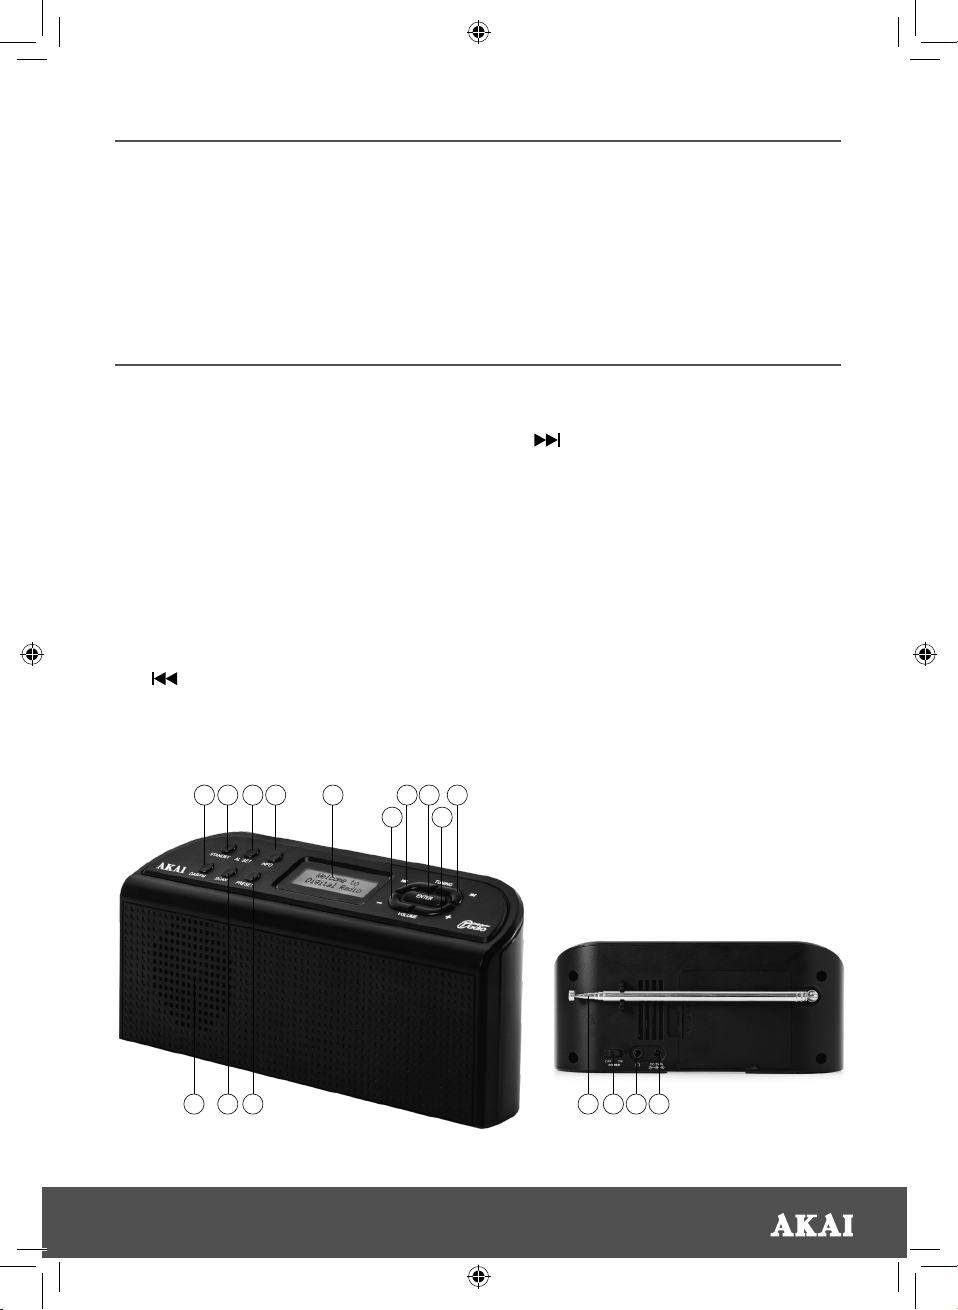
USING YOUR APPLIANCE
POWER ON/OFF
To power on the DAB radio, insert the DC
5V adaptor into the corresponding jack
at the back of the unit and plug it into a
mains adaptor. Alternatively, insert 4 x AA
batteries into the battery compartment at
the back of the unit. Turn the On/Off switch
at the back of the DAB RADIO to On. The
DAB RADIO will power on, and the display
will show ‘Welcome to Digital Radio’. The
DAB RADIO will then automatically enter
STANDBY mode. Pressing the STANDBY
button will play the last station listened to.
STANDBY
Under STANDBY mode, press the
STANDBY button to switch to DAB or FM
mode.
Under DAB/FM mode, press the STANDBY
button to switch back to STANDBY mode
MENU SYSTEM
1. Under DAB or FM mode, press and
hold the INFO button to select the
MENU.
2. Press or to select Time/date/
System version/ Factory reset.
3. Press ENTER to enter the
corresponding function setting.
• Time setting: press or to select
the hours and minutes, press ENTER
to confirm.
• Date setting: press or to the
select year/month/date, press ENTER
to confirm .
• System version: Choosing this option
will display the current date. Under
FM/DAB mode, the device will sync
with the time and date of the station.
• Factory reset:
Press and hold the INFO button. Press
or until the screen shows
‘Factory reset’ and then press ENTER.
The screen will then show ‘Factory
reset <NO> Yes’. To reset, press
or to select Yes and press
ENTER. The screen will then show
‘Restarting….’ The DAB RADIO will
now return to the original default
settings. Set time/date, alarm and
preset stations will disappear. After
finishing the reset, the DAB RADIO will
enter DAB mode and scan stations
automatically.
VOLUME+/- VOLUME SELECTING
Press VOL- or VOL+ to adjust the volume.
Press and hold these buttons to adjust the
volume quickly.
ALARM SETTING
1. In DAB/FM mode, press AL SET to enter
Alarm setting status. The text ‘Alarm
1’ will flash on the unit’s LCD screen to
show the alarm has been activated.
2. Press AL SET again once the alarm
setting has been activated to move
on to Alarm 2. The text ‘Alarm 2’ will
flash on the unit’s LCD screen to show
this alarm has been activated.
3. Once the desired alarm has been
selected, press Enter to begin
programming it. The text ‘Alarm 1: On’
will be displayed on the screen. Press
Enter again when this text is on screen
to turn the alarm off. The text will
change to ‘Alarm 1: Off’ to show this
option has been selected.
4. Press Enter again when the alarm has
been set to ‘On’ to adjust the hours.
The text ‘Hour: 00’ will be displayed
on the unit’s LCD screen to show this
process has been started.
CONNECTING TO AND ANSWERING THE
PHONE
In Bluetooth mode, and when your phone is
paired, select the pairing name of A58073.
When there is an incoming call, press the
Play/Pause/ [Phone Icon] to answer it in
hands-free mode. Press for 2-3 seconds to
hang up.
PLAYING MUSIC
Play/Pause: In music mode (Bluetooth, FM
Radio), touch the Power/Play/Pause key
momentarily.
Mode switching: Touch the Power/ [M] key
momentarily to switch to the next function
(Bluetooth, FM radio).
Volume Down/Next Track: In music mode,
touch the - key momentarily to play the
“Next Track”, and a longer continuous
press to reduce the volume.
Volume Up/Previous Track: In music
mode, touch the + key momentarily to
play the “Previous Track”, and a longer
continuous press to increase the volume.
Radio Mode: Press the + key repeatedly
to search radio stations. If you skip past a
station, use the – key to back track.
DC5V (MICRO USB charging interface):
When charging, a light will illuminate by
the micro USB port. Once the speaker
is fully charged the light will switch off
automatically.