Alber Scalacombi Eco User manual

www.alber.de
Gebrauchsanweisung D
User manual GB/US
Instructions d’utilisation F
Istruzioni per l‘uso I
Manual de instrucciones E
Instruktionsbok S
DAMIT TREPPENSTEIGEN
EINFACH WIRD.
GA S34 Umschlag alle Sprachen.in5 5 07.04.2009 15:38:13

Gebrauchsanweisung D
User manual GB/US
Instructions d’utilisation F
Istruzioni per l‘uso I
Manual de instrucciones E
Instruktionsbok S
Service Center (Deutschland)
Montag bis Donnerstag von
8.00 - 18.00 Uhr
Freitags von
8.00 - 16.00 Uhr
erreichbar unter
Telefon ++49 (0)7432 2006-0
Das scalacombi eco ist klassifiziert als Gerät Typ B.
36.0001.4.99.03
Stand: 01.02.2011
GA S34 Umschlag alle Sprachen.in6 6 24.11.2009 10:36:26

1
2
3
45
6
7
89
10 11
12
13
14
15
16
17
18
19
22
23
20
24
21
25
GA S34 Umschlag alle Sprachen.in1 1 07.04.2009 15:38:10

81
Contents
1. Introduction 2
1.1 Important safety instructions – please observe carefully at all times 2
1.2 Proper use of the scalacombi 2
1.3 Permissible operating conditions/locations of operation 3
1.4 Standard scope of delivery 3
1.5 Optional accessories 3
1.6 Stairs suitable for scalacombi 3
1.7 Technical data 4
1.8 The main elements at a glance 4
2. Commissioning 5
2.1 Adjustment of the scalacombi 6
2.2 Functional check 7
2.3 Sitting down on the seat 8
2.4 Switching on the scalacombi 9
2.5 Switching off the scalacombi 9
3. Operation on a staircase 10
3.1 Climbing up a staircase 10
3.2 Climbing down a staircase 11
3.3 Climbing a spiral staircase 12
3.4 Climbing metal grid stairs 12
3.5 Halting the scalacombi while climbing a staircase 13
4. Anti-theft device 13
4.1. Activating anti-theft device 13
4.2. Deactivating anti-theft device 13
5. Automatic shut-down 14
6. Batteries 14
6.1 Charging the batteries 14
6.2 Information on the batteries used in the scalacombi 14
7. Transport and storage 15
7.1 Disassembling and assembling individual components 15
7.2 Instructions for storage and transportation 16
8. LED display and error messages 17
9. First remedies in the event of a malfunction 17
10. Safety and hazard information 18
10.1. General safety and hazard information 18
10.2 Safety and hazard warnings attached to the scalacombi 19
11. Care and cleaning instructions, safety inspections (maintenance),
reuse and disposal 19
11.1 Care and cleaning instructions 19
11.2 Safety inspections (maintenance) 19
11.3 Reuse 20
11.4 Disposal 20
12 Warranty and liability 20
12.1 Warranty for defects 20
12.2 Guarantee of durability 20
12.3 Liability 20
13 Optional accessories 21
13.1 Headrest 21
GA_S34_GB.indd 1 31.01.2011 09:47:42

2
1. Introduction
1.1 Important safety instructions – please observe carefully at all times
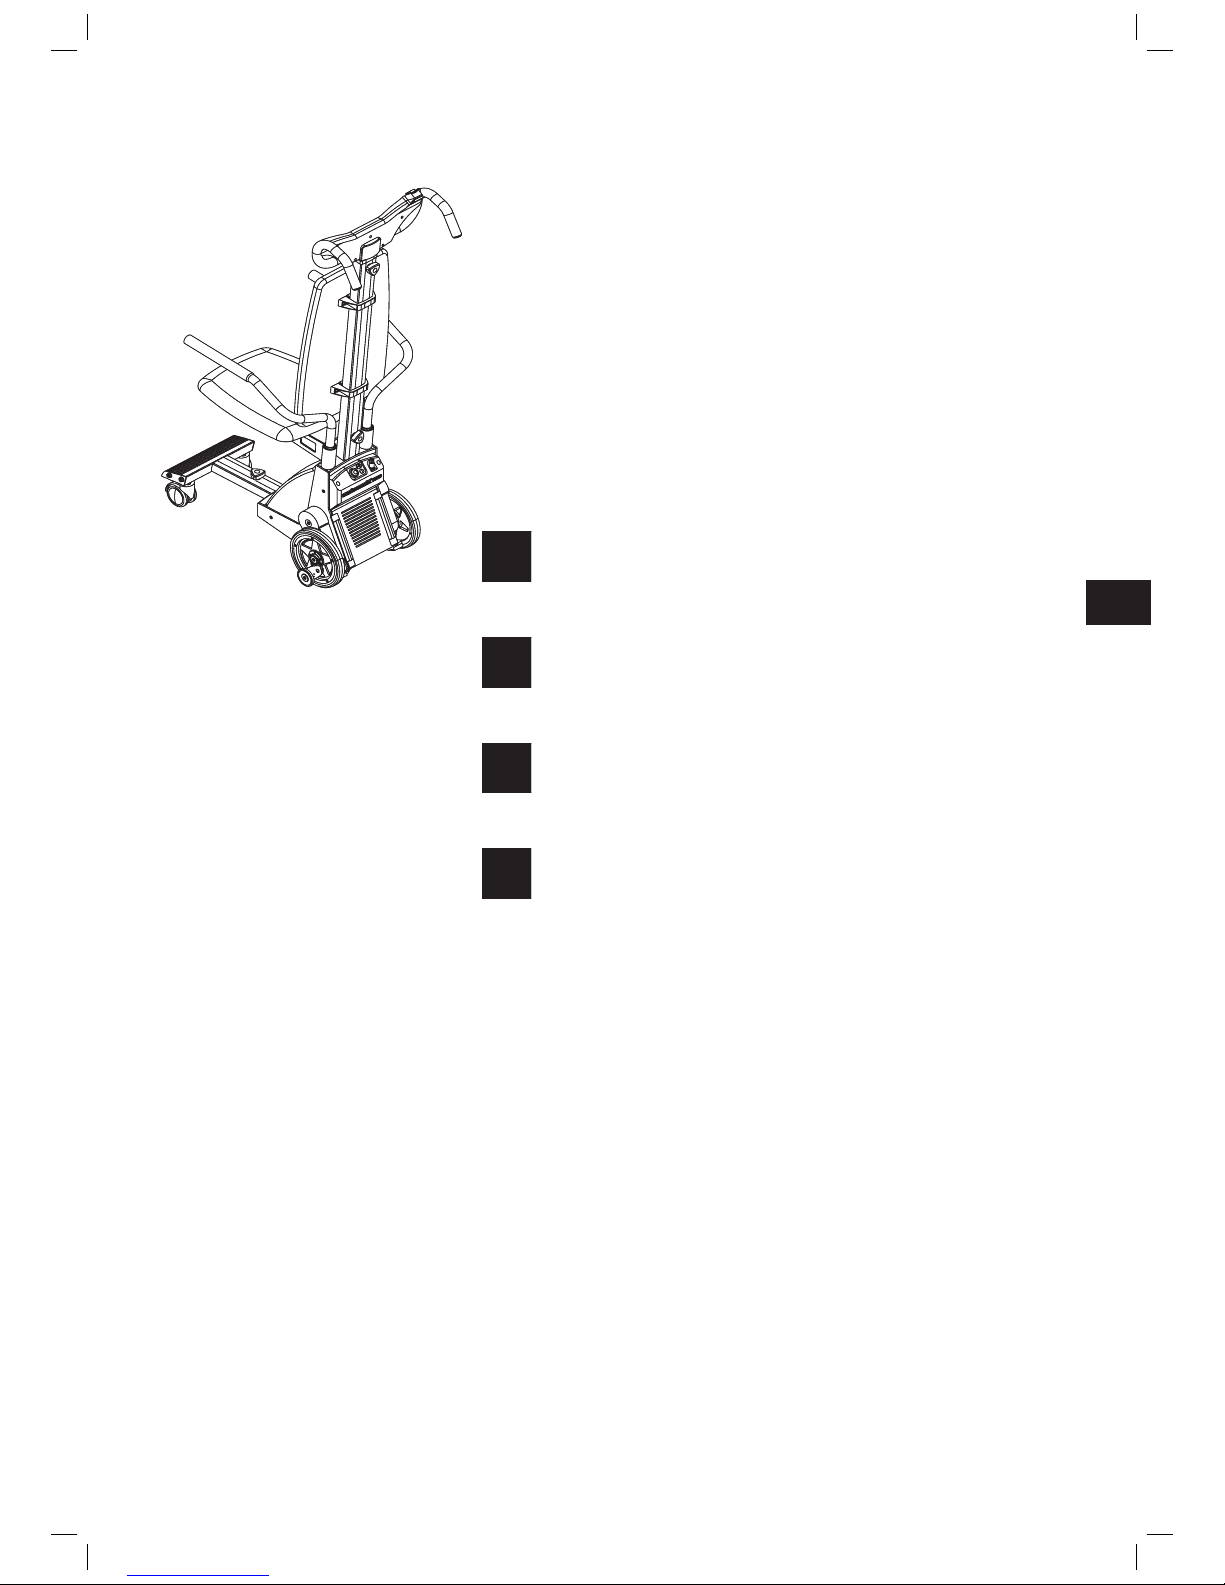
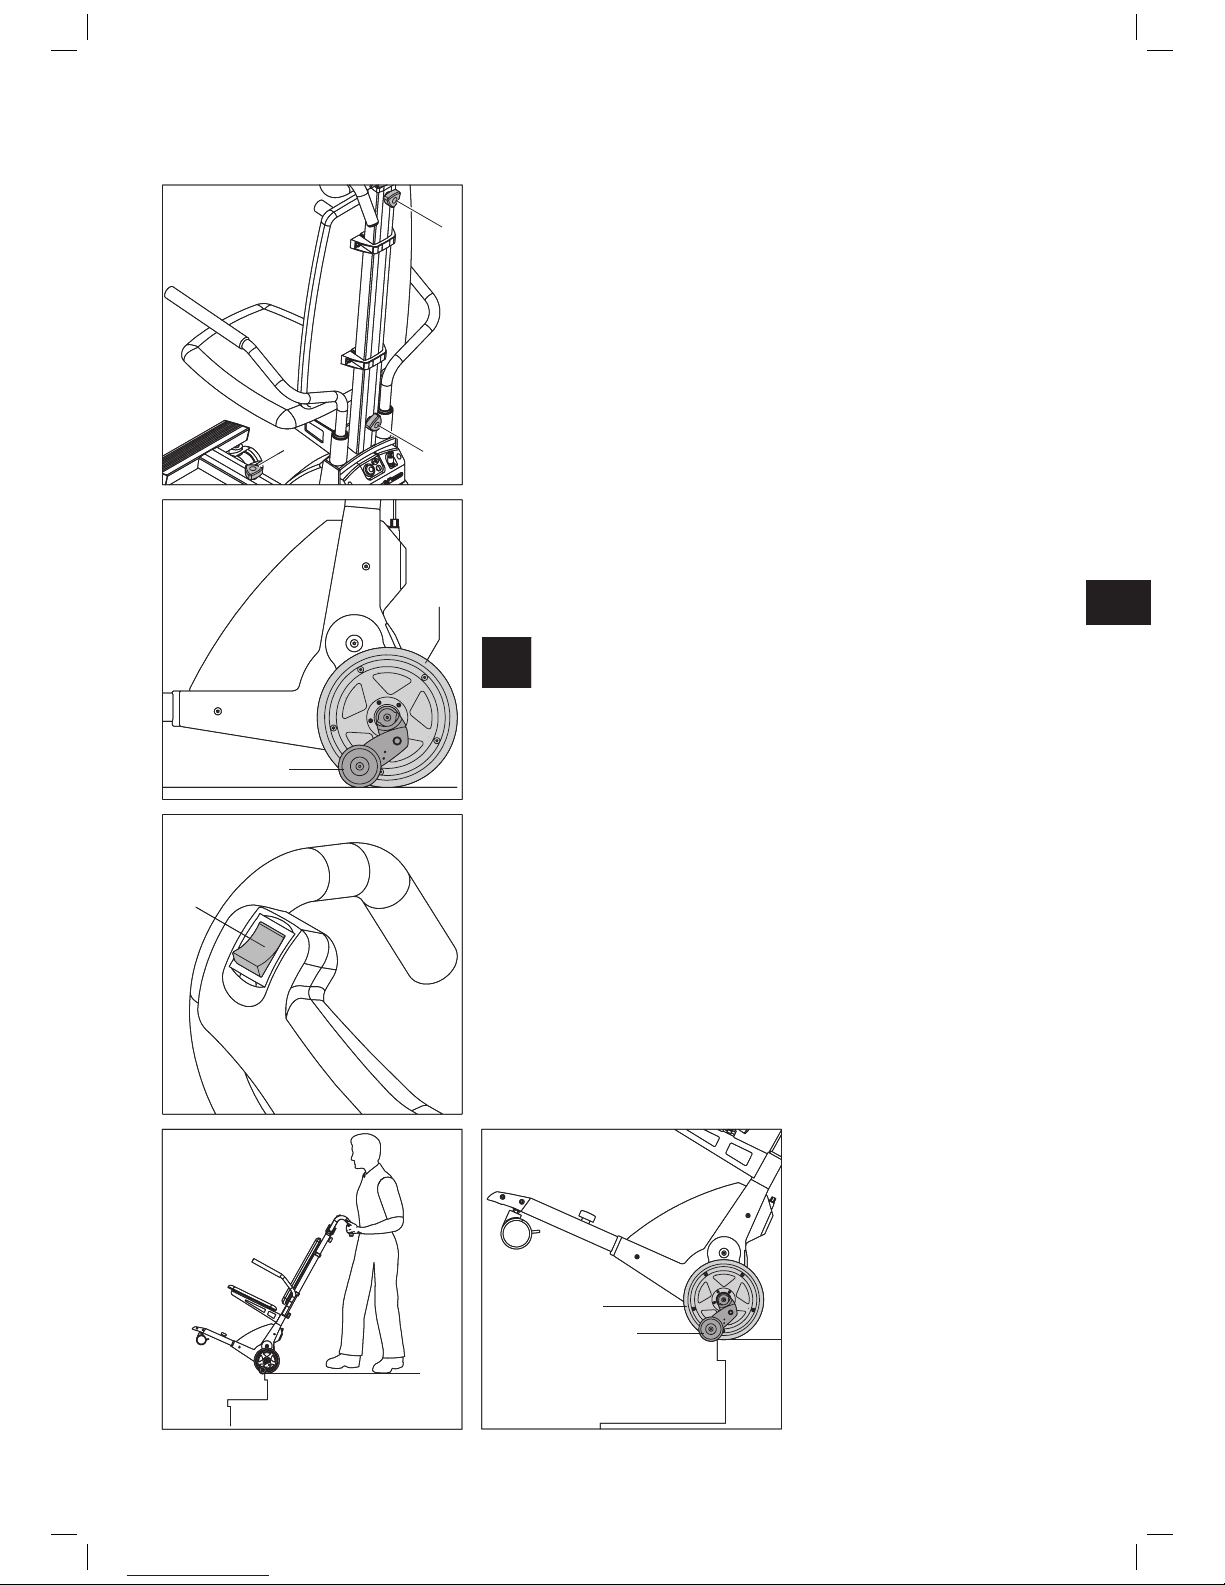
The scalacombi is a mobile stair climber with built-in seat.
For safety reasons, it must only be operated by persons who
have been instructed in its handling
who can climb stairs backwards
can lift at lest 20 % of their own bodyweight
have the physical and mental capacity to operate the device safely in all possible situations.
When purchasing a new device, the initial instruction in its use is part of the scope of delivery and is provided by your spe-
cialist dealer on appointment. The instruction is free of charge.
If you feel a little unsure how to handle your scalacombi, please contact your specialist dealer for advice.
In the event of a technical fault or failure, contact your specialist dealer or an agent of Ulrich Alber GmbH.
The performance of the scalacombi can be affected by electromagnetic fields, produced for example by mobile phones. There-
fore, switch off the scalacombi if a mobile phone is used in the vicinity of the wheelchair. Persons using the scalacombi and
accompanying persons must not use a mobile phone during stair climbing.
We generally recommend refraining from using the scalacombi in locations that are exposed to strong electric fields.
When in operation, the scalacombi might under certain circumstances interfere with other electrical equipment such as anti-
shoplifting barriers in department stores.
Therefore, do not start the scalacombi before you have been properly instructed in its operation by an
authorised specialist dealer!
1.2 Proper use of the scalacombi
The scalacombi has been designed exclusively for conveyance of persons with a walking disability over steps; note in this
regard that you should not convey a person with a walking disability on escalators or moving walkways. It is forbidden to
make any technical modifications to the device. Do not attach any parts other than accessories approved by Ulrich Alber
GmbH for operation. The scalacombi must only be operated under the following conditions:
Compliance with the information, instructions, and recommendations contained in this operating manual
The device is operated by a person who has been instructed in its use
No technical modifications have been made to the device by the user or by any third party
The person to be transported is able sit on the scalacombi without the need for assistance
The operator must check whether it is necessary to use a lap belt and/or the foot belt
During transportation, the arms of the person being conveyed may not project over the armrests of the scalacombi seat.
An instructed person is a person who has been instructed in the operation of the scalacombi and in his/her tasks and who
has been made aware of the possible hazards associated with improper use of the device. The instruction session is provided
by the authorized specialist dealer or by an agent of Ulrich Alber GmbH. The operation of the scalacombi by non-instructed or
unqualified persons is expressly prohibited.
The scalacombi must not be used for transportation tasks that contravene the intended use of the stair climber. This applies
in particular to all types of load transports such as the transport of household objects across steps or stairs.
The use of the scalacombi for any of the following purposes is deemed improper by Ulrich Alber GmbH:
Use of the device that contravenes the instructions and recommendations in this operating manual
Exceedance of the technical limits laid down in this operating manual
Technical modification to the stair climber
Use and/or attachment of parts and accessories that have not been supplied or approved by Ulrich Alber GmbH
Ulrich Alber GmbH shall not be liable for damage caused by improper use of the stair climber.
•
•
•
•
•
•
•
•
•
•
•
•
•
•
!!
GA_S34_GB.indd 2 31.01.2011 09:47:42

83
While being conveyed on stairs, the person sitting in the scalacombi must remain still. Please note that, when transporting persons with
certain disabilities, there might be uncontrolled body movements that can result in a shift of the centre of gravity of the scalacombi during
transportation.
The person operating the stair climber should therefore at all times be capable to react to such sudden movements of the person being
conveyed. The person operating the scalacombi must therefore decide whether the respective person can be safely transported on the
scalacombi.
1.3 Permissible operating conditions/locations of operation
The scalacombi must only be used for climbing stairs at ambient temperatures between -25 °C and +50 °C. The use of the stair climber as a
transfer system for short distances to and from a stair is permitted.
Never release the scalacombi when on a stair. Do not tilt the stair climber backwards, unless this is required in the event of an emergency.
Ensure that the surface on which the scalacombi is to be used is not wet, waxed or otherwise slippery. Carpets must be installed so that
they cannot slip.
The step height must not exceed 20 cm. The minimum step depth should not be below 14 cm.
Please always observe the safety and hazard information in chapter 10.
1.4 Standard scope of delivery
1 scalacombi stair climber, fully assembled and ready for operation
1 charger including operating manual
Key for anti-theft device
Operating manual
1.5 Optional accessories
Headrest
Lap belt
Foot belt
We recommend using only original accessories supplied by Ulrich Alber GmbH.
The scalacombi is designed in such a way that best performance is achieved when using Alber original accessories. Ulrich Alber GmbH shall
not be liable for damage to the product or damage caused by accidents (e.g. fires caused by explosion of the battery pack, leaks, etc.)
caused by a malfunction of non-original accessories or spare parts. The warranty does not cover repairs for damage caused by malfunction
of non-original accessories. Ulrich Alber GmbH will, however, carry out such repairs for you against a charge.
1.6 Stairs suitable for scalacombi
The scalacombi can climb stairs of the following dimensions:
Minimum step depth: 14 cm
Maximum step height: 20 cm
Minimum step width of straight stairs: 55 cm
Minimum landing size of U-shaped staircases: 1.35 m
Minimum radius of spiral staircases: 1.35 m
•
•
•
•
•
•
•
•
•
•
•
•
GA_S34_GB.indd 3 31.01.2011 09:47:42

4
1.7 Technical data
Floor clearance of drive unit: 46 cm
Width of drive unit: 36 cm
Overall height with attached handlebar: 136 cm
Overall width: 52 cm
Weight without handlebar: 26 kg
Weight with handlebar: 31 kg
Max. weight of person: 120 kg
Motor voltage: 24 V
Climbing speed: approx. 12 steps/minute
Range per battery charge (*): 200 steps (with person weighing 75 kg)
Battery pack (integrated in drive unit)
Battery type: Lead gel
Battery capacity: 3.4 Ah
Battery charger
Model / type: BC 2410LABC 2410LA
Input voltage: 100... 240V�, 50... 60Hz100... 240V�, 50... 60Hz
Rated output voltage: 24 V
Charging current: 1.0 A
Charging method: IU0U
Use: Designed exclusively for the recharging of the above battery pack
All electrical components of the scalacombi are protected against spray water and humidity.
(*) The range and climbing speed vary, depending on the prevailing travel conditions and the weight of the passenger. The specified range
is valid for optimum travel conditions (fully recharged batteries, ambient temperature around 20 °C, smooth travel, etc.).
The scalacombi complies with all applicable requirements of ISO 7676-23.
The scalacombi conforms to the European Directive 93/42/EEC on medical devices.
We reserve the right to modify the design and technology of our products to incorporate the latest developments.
Battery charger
For technical information and user instructions, please refer to the separate operating manual of the battery charger.
1.8 The main elements at a glance
(Fold open diagram of the scalacombi on the first inside pages of this manual)
Adjustment knob of the foot support 1 Receptacle for seat and armrest 14
Footrest 2 Standpipe 15
Foot support 3 Adjustment knob of handlebar 16
Brake 4 Driving switch UP/DOWN 17
Drive wheel 5 Handlebar 18
Drive unit 6 Backrest 19
Charger socket 7 Seat 20
ON/OFF button 8 Armrest 21
Sensor field of anti-theft device 9 Key for anti-theft device 22
LED display 10 Charging plug 23
Socket for spiral cable adapter 11 LED display of charger 24
Spiral cable adapter 12 Mains plug of charger 25
Adjustment knob of standpipe 13
GA_S34_GB.indd 4 31.01.2011 09:47:42

85
2. Commissioning
The scalacombi and all accessories ordered by you are delivered to you by Ulrich Alber
GmbH or your specialist dealer. All you need to do is adjust the handlebar to the size of
the operating person (see chapter 2.1).
The instruction session in the operation of the stair climber includes climbing up and
down a stairwell by the operator under the supervision of the instructor. You will quickly
become familiar with the correct operation of the scalacombi and will soon feel comfort-
able using it on stairs.
In addition, you can at all times refer to this operating manual that has been handed
over to you together with the stair climber. Apart from technical information, it contains
important instructions for the correct and safe use of the device. Before operating the
stair climber on your own, carefully read all instructions in this manual. If you have any
questions, please do not hesitate to contact your specialist dealer or an agent of Ulrich
Alber GmbH.
The instruction in the operation of the scalacombi must be provided
by an authorised specialist dealer or agent of Ulrich Alber GmbH.
Only persons instructed by an authorised specialist dealer or agent
of Ulrich Alber GmbH are authorised to operate the scalacombi.
The operation of the scalacombi without prior proper instruction is
prohibited.
During the instruction in the use of the stair climber, you will be
given a lot of useful information on how to operate the scalacombi
on stairs.
!!
!!
!!
!!
GA_S34_GB.indd 5 31.01.2011 09:47:43

6
2.1 Adjustment of the scalacombi
To ensure correct and comfortable handling of the scalacombi, you must adjust the
handlebar to approximately the shoulder or chest height of the operator. Normally, this
adjustment is made by the specialist dealer or agent of Ulrich Alber GmbH upon delivery
of the scalacombi.
If the height must be adjusted subsequently, please proceed as follows:
Loosen and remove the adjustment knob [16] while holding the handlebar [18] to
prevent it from dropping suddenly.
Slide the handlebar [18] up or down to the desired position (corresponding to the
shoulder height of the operator).
Screw the adjustment knob [16] into the next fitting bore in the handlebar.
Tighten the adjustment knob [16] properly.
•
•
•
•
18
16
18
16
GA_S34_GB.indd 6 31.01.2011 09:47:44

87
2.2 Functional check
As a rule, you should only climb stairs when the batteries are fully charged to avoid the
risk of becoming stuck on the stairs due to empty batteries. For safety reasons, always
test the brakes before climbing a staircase. This check must be performed without a per-
son sitting on the scalacombi and while the climber is switched off.
Check the two adjustment knobs [13] and [16] to ensure that they are properly tight-
ened.
Check the adjustment knob [1] of the foot support for proper tightening.
Check whether the two drive wheels [5] and the brakes [4] are in pushing position
(see diagram to the left for correct wheel position). If this is not the case, switch the
scalacombi on (see chapter 2.4). Press and hold the driving switch [17] until the two
wheels are in pushing position where they are automatically switched off.
Should the wheels fail to reach the correct pushing position despite switching the
climber on and off, refrain from using the scalacombi!
Switch the scalacombi off (see chapter 2.5).
Carefully drive the scalacombi to the edge of the first step.
Slowly slide the drive wheels [5] of the step edge. The two brakes [4] must now
engage to prevent further movement of the scalacombi over the edge.
If the two brakes [4] work properly, you can begin to operate the scalacombi.
If one or both brakes [4] do not work properly, do not operate the
scalacombi. First check whether a small object (small stone, or etc.)
has become caught in the brake system [4] causing the malfunction.
If this is not the case and if the malfunction persists after you have
removed the object, the stair climber is defective. Contact your spe-
cialist dealer or an agent of Ulrich Alber GmbH without delay. Do not
operate the scalacombi until a check has been performed success-
fully.
•
•
•
•
•
•
•
•
16
13
1
16
13
1
5
4
5
4
1717
5
4
5
4
!!
GA_S34_GB.indd 7 31.01.2011 09:47:45

8
2.3 Sitting down on the seat
To secure the scalacombi against inadvertent movement during the transfer of a person
to the stair climber, move the drive wheels a little backwards away from the pushing
position (see diagram to the left) so that the housing is properly placed on the floor.
To do this, switch the scalacombi on (see chapter 2.4) and then press the driving switch
[17] to its lower position (see chapter 3.1). Then switch the scalacombi off (see chapter
2.5).
Before allowing a person to sit down on the scalacombi, ensure that the stair climber is
switched off!
The passenger normally sits down on the stair climber seat [20] from the front. If this
cannot be done easily or is not possible at all, you can remove the two armrests [21] to
transfer the person to the stair climber, using for example a seating aid.
To do this, pull the two armrests [21] upwards from their receptacles.
Allow the person to sit down on the scalacombi and position his/her feet properly on
the footrest [2].
Insert the armrests [21] in the receptacles [14] of the scalacombi.
Ensure that the armrests [21] properly engage in the receptacles [14] and cannot be
turned.
When the person to be transported is properly seated on the scalacombi, switch the
device on and begin climbing the stairs.
If you have moved the drive wheels as described above towards a back position to facili-
tate sitting down on the climber, you should move them back to their pushing position.
To do this, switch the scalacombi on (see chapter 2.4) and then move the driving switch
[17] to its upper position until the climber is automatically switched off. The wheels are
now in pushing position (see chapter 3.2).
If necessary, secure the feet and legs of the person on the scalacom-
bi using the foot belt (optional accessory) and tighten the lap belt
(optional accessory) around the person‘s waist.
Ensure that the feet of the passenger are at all times placed on the
footrest [2].
•
•
•
•
•
21
2
21
2
14
14
14
14
!!
!!
GA_S34_GB.indd 8 31.01.2011 09:47:47

89
2.4 Switching on the scalacombi
To switch on the scalacombi, press the ON/OFF button [8].
After the stair climber has been switched on, a brief audible signal is generated and
the current operating status of the scalacombi is shown on the LED display (see chap-
ter 8).
Check whether the two drive wheels [5] and the brakes [4] are in pushing position.
Should this not be the case, press and hold the driving switch [17] until the two
wheels are in pushing position where they are automatically switched off.
The scalacombi is now ready to climb the stairs (see chapter 3).
If you do not begin climbing the stairs within the next 15 minutes, the scalacombi is
automatically shut down to save energy.
2.5 Switching off the scalacombi
To save energy, we recommend switching off the scalacombi when not in use, i.e. after
the last climbing operation.
Move the two drive wheels [5] and the brakes [4] while they are in their pushing
position by pressing the driving switch [17] (see chapters 2.2 and 2.4).
Press the ON/OFF button [8].
A continuous audible signal is generated and the scalacombi is fully switched off.
The scalacombi may only be switched off when standing on level
ground. Only in the event of a serious emergency may it be
halted during climbing operation. See also safety instruction in
chapter 3.4.
Always actuate the ON/OFF button [8] with your fingers and not
with your feet.
•
•
•
•
•
•
•
•
8
10
8
10
1717
5
4
5
4
!!
!!
GA_S34_GB.indd 9 31.01.2011 09:47:48

10
3. Operation on a staircase
During your initial instruction session, you have already learnt how to climb stairs with
the scalacombi. You also had the opportunity to complete your first climb under the
supervision of the authorised dealer or agent of Ulrich Alber GmbH. Before transporting a
person on the scalacombi, you should, however, read the instructions below and practice
the individual steps with the empty stair climber on a staircase.
To safely transport a person, you might need to use a lap belt or foot belt (optional
accessories). It is the responsibility of the operator to check whether such equipment is
necessary.
3.1 Climbing up a staircase
The passenger must take his/her place on the scalacombi while it is standing on firm
level ground.
Ensure that the two drive wheels [5] and the brakes [4] are in pushing position (see
chapter 2.2).
Check again that the person is properly seated on the scalacombi.
If the scalacombi is not yet switched on, do this by actuating the ON/OFF button [8]
(see chapter 2.4).
Tilt the scalacombi towards you until it is at an optimum angle so that the stair
climber with the passenger is well balanced. Maintain this angle during the entire
climb up the stairs.
To tilt the scalacombi, you can place a foot against the panel between the two wheels
(see diagram to the left).
Carefully move the scalacombi towards the stair until both wheels of the climber
touch the first step (see diagram to the left).
To move up one step, press the driving switch [17] into its upper position and hold
it there until the first step has been climbed. Simultaneously pull the scalacombi
slightly towards you.
After the first step has been climbed, the climbing function is automatically switched
off. You can now release the driving switch.
The scalacombi is now standing on the outer edge of the first step of the staircase
and must be pulled by you towards the next step.
Press the driving switch [17] again into its upper position and climb the next step.
Repeat the above steps until all steps of the staircase have been climbed.
After the last step has been climbed, move the scalacombi to a firm and level surface
(do not leave it at the edge of the step!).
To do this, place the two drive wheels [5] and the brakes [4] in their pushing position
(see chapter 2.2).
Switch the scalacombi off.
The person transported up the stairs can now exit the stair climber.
If the driving switch [17] is released during climbing operation, the
wheels are immediately stopped in their position.
Do not release the driving switch when climbing up a step, unless in
an emergency situation (see chapter 3.4).
Use the scalacombi only on staircases that are not wet, waxed or
otherwise slippery. Ensure that carpets are properly secured to the
floor. The step height may not exceed 20 cm. The minimum step
depth should not be below 14 cm.
•
•
•
•
•
•
•
•
•
•
•
•
•
•
•
•
1717
!!
!!
GA_S34_GB.indd 10 31.01.2011 09:47:49

811
Never release the handlebar when climbing up a staircase!
The person transported on the scalacombi must only exit the climber
after it has been placed on a firm surface away from the edge of the
top step.
3.2 Climbing down a staircase
The passenger must take place on the scalacombi while it is standing on firm level
ground. Do not allow the stair climber to be accessed when it is standing near the
upper staircase edge.
Ensure that the two drive wheels [5] and the brakes [4] are in pushing position (see
chapter 2.2).
Check again that the person is properly seated on the scalacombi.
If the scalacombi is not yet switched on, do this by actuating the ON/OFF button [8]
(see chapter 2.4).
Tilt the scalacombi towards you until it is at an optimum angle so that the stair
climber with the passenger is well balanced. Maintain this angle during the entire
climb down the stairs.
To tilt the scalacombi, you can place a foot against the panel between the two wheels
(see diagram to the left).
Carefully move the scalacombi towards the edge of the top step of the staircase until
the brakes of both wheels engage (see diagram to the left).
To move down one step, press the driving switch [17] into its lower position and hold
it there until the stair climber has been lowered to the next step. Simultaneously
move the scalacombi slightly forward.
After the stair climber has been lowered down the step, the climbing function is auto-
matically switched off. You can now release the driving switch.
The scalacombi is now positioned on the next lower step of the staircase and must be
moved again carefully towards the edge (see diagram on next page).
Press the driving switch [17] again into its lower position and lower the stair climber
down one step.
Repeat the above steps until you reach the bottom of the stairs.
After the stair climber has been lowered down the last step, move the scalacombi to a
firm and level surface.
To do this, place the two drive wheels [5] and the brakes [4] in their pushing position
(see chapter 2.2).
Switch the scalacombi off.
The person transported down the stairs can now exit the stair climber.
If the driving switch [17] is released during climbing operation, the
wheels are immediately stopped in their position.
Do not release the driving switch when climbing down a step, unless
in an emergency situation (see chapter 3.4).
Use the scalacombi only on staircases that are not wet, waxed or
otherwise slippery. Ensure that carpets are properly secured to the
floor. The step height may not exceed 20 cm. The minimum step
depth should not be below 14 cm.
•
•
•
•
•
•
•
•
•
•
•
•
•
•
•
•
!!
!!
1717
!!
!!
GA_S34_GB.indd 11 31.01.2011 09:47:50

12
Never release the handlebar when climbing a staircase!
The person transported on the scalacombi must only exit the climber
after it has been placed on a firm surface away from the edge of the
top step.
When climbing down a staircase, always push the scalacombi slightly
forward.
3.3 Climbing a spiral staircase
To use the scalacombi on a spiral staircase, follow the operating instructions in chapters
3.1 and 3.2.
Please note, however, that the wheel at the inside of the spiral staircase needs to travel
a shorter distance than that on the outside. The scalacombi must therefore be aligned
accordingly to the edges of the steps.
Never release the handlebar when climbing a staircase!
3.4 Climbing metal grid stairs
Special caution is required when using the scalacombi on stairs whose steps are made of
metal grids!
On metal grid stairs with wide grid
the brakes of the scalacombi might not work properly
the rubber feet of the scalacombi might become jammed in the grid when the stair
climber is placed on a step
Before transporting a person over such stairs, complete a test run
with the empty scalacombi.
If the feet become jammed or the brakes fail to function properly,
do not use the scalacombi on the stairs.
Never use the scalacombi on wet or slippery metal grid stairs. When
using the stair climber on outdoor staircases, ensure that the grids
are not covered in wet leaves or pieces of paper, as they make the
steps slippery. Never use the scalacombi on stairs that are obviously
slippery.
Never use the scalacombi to climb stairs covered in ice.
•
•
!!
!!
!!
!!
!!
!!
!!
!!
GA_S34_GB.indd 12 31.01.2011 09:47:51

813
3.5 Halting the scalacombi while climbing a staircase
When climbing stairs, do not interrupt the operation of the scalacombi. In other words,
keep the driving switch [17] pressed until the scalacombi has fully climbed a step and is
automatically switched off.
In general, interrupting the operation is only permitted in an emergency situation, for
example if the person sitting on the scalacombi requires medical attention.
If you need to call for assistance, the scalacombi can be lowered onto the steps as shown
in the diagram to the left.
Do not leave the person sitting on the scalacombi alone, and always remain in visual
contact.
In such an emergency situation, the person sitting on the scalacombi must remain calm,
as sudden movements induced by panic might dislodge the stair climber from its position.
If the scalacombi is not equipped with a headrest, we strongly recommend that the head
of the person on the stair climber is brought into a comfortable resting position. To do
this, you might need to place the head on a cushion made from pieces of clothing.
Please note that the scalacombi is automatically shut down when it is not in use for more
than 15 minutes.
4. Anti-theft device
The scalacombi is equipped with an anti-theft device to secure it against unauthorised
use or removal. It is operated with the enclosed key [22].
4.1. Activating anti-theft device
Switch the scalacombi on (see chapter 2.4).
Place the key [22] onto the sensor field marked with a key symbol [9]. A long
audible signal is generated, the LED display [10] is switched off and the stair climber
is automatically shut down.
If the scalacombi is switched on after the anti-theft device has been activated,
4 audible signals are generated at 30-second intervals. The LED display [10] flashes in
green. The stair climbing function is disabled, and the wheels are blocked.
4.2. Deactivating anti-theft device
Switch the scalacombi on (see chapter 2.4).
Place the key [22] onto the sensor field marked with a key symbol [9]. A brief audible
signal is generated.
After the stair climber has been switched on, the LED display [10] shows the operat-
ing status of the scalacombi (see chapter 8).
The anti-theft device can only be activated and deactivated if the
scalacombi is switched on.
•
•
•
•
•
•
22
9
10
22
9
10
!!
GA_S34_GB.indd 13 31.01.2011 09:47:52

14
5. Automatic shut-down
If the scalacombi is not used to climb stairs within 15 minutes after it has been switched
on, it is automatically shut down to save energy. The two wheels remain in the posi-
tion in which they were when the climber was shut down. When starting the scalacombi
again, you might need to move them into pushing position by pressing the driving
switch [17].
6. Batteries
6.1 Charging the batteries
Your scalacombi is equipped with a powerful battery pack that allows you to climb up to
200 steps without recharging. To prevent that the scalacombi runs out of power while
climbing a staircase, we recommend, however, to recharge the batteries after each use of
the scalacombi.
Switch the scalacombi off (see chapter 2.5).
Insert the plug of the charger [23] into the charger socket [7] located below the con-
trol unit.
Then connect the mains plug [25] of the charger to a mains socket.
Please note: Depending on the country in which you are operating the scalacombi,
you might need the enclosed adapter to connect the mains plug [25] to the mains
socket.
During the charging process, the LED display of the charger [24] is lit in orange.
After the charging process has been completed, the LED display on the charger [24] is
lit in green.
After the batteries have been charged, first disconnect the plug [23] from the charger
socket [7], and then disconnect the charger [25] from the mains socket.
The scalacombi cannot be switched on while it is being charged. Switching on is only
possible after the plug of the charger [23] has been pulled.
Ensure that the batteries of the scalacombi are recharged after each
use of the stair climber. When the batteries are fully recharged, the
charger automatically switches to charge conservation mode. Please
also observe the instructions in the operating manual enclosed with
the charger.
To save energy, do not leave the charger connected to the mains for
more than 24 hours.
Before using the scalacombi, always check the charge status of the
batteries to ensure that they are fully charged.
6.2 Information on the batteries used in the scalacombi
The batteries of the scalacombi require no maintenance and are rechargeable. Their serv-
ice life depends heavily on the number of charging/discharging cycles. Lead batteries can
for example be partially charged more than 1000 times and are able to reach their full
capacity more than 200 times, provided that deep discharging is prevented. The electron-
ics built into your scalacombi constantly monitor the charge status and thus prevents
deep discharging.
Prevent the batteries from becoming completely discharged. Recharge the batteries of
the scalacombi after each partial discharge, i.e. after each use of the stair climber.
•
•
•
•
•
•
•
•
23
7
23
7
!!
GA_S34_GB.indd 14 31.01.2011 09:47:52

815
If the batteries are stored (without charging) for a prolonged period of time, they will
suffer a loss of capacity. After a few charging/discharging cycles, the batteries will,
however, regain their full capacity.
The full capacity of the batteries is only reached after about 3 to 4 charging and dis-
charging cycles.
If the batteries are handled incorrectly, there is a risk of liquid electrolyte spilling out.
This liquid can cause injury to skin and damage to clothing.
In the event of contact of the electrolyte with eyes or skin, immediately rinse the
affected area with clean water and consult a doctor.
Do not burn batteries and protect them against naked flames as they can explode
when exposed to heat.
Do not short-circuit the batteries. Short-circuits result in high currents, which can
cause damage to the batteries and/or the scalacombi.
When the batteries have reached the end of their service life, return them to Ulrich
Alber GmbH or your authorised specialist dealer for proper disposal.
We recommend using only batteries supplied by Ulrich Alber GmbH. The scalacombi is
designed in such a way that best performance is achieved when using original batter-
ies from Ulrich Alber GmbH.
The batteries of your scalacombi can be recharged in any chosen
position. As regards their safety, they are classified in the same
group as dry cell batteries and approved for transport by air by DOT
(United States Department of Transportation) and IATA (Interna-
tional Air Transport Association).
7. Transport and storage
7.1 Disassembling and assembling individual components
For transport purposes, your scalacombi can be dismantled into individual components
without the need for tools. It is entirely up to you to decide which components you wish
to remove. This might depend for example on the available stowing space. Therefore, only
dismantle the components that must be removed. The diagrams on this and the next page
show how components of the scalacombi can be dismantled step by step.
First remove the spiral cable connected to the handlebar. To do this, hold and press
together the release sleeve of the adapter [12] and then pull the adapter [12] from
the socket [11] on the control unit.
Pull the two armrests [21] upwards from their receptacles.
(Continued on next page)
•
•
•
•
•
•
•
•
•
•
!!
12
11
12
11
21
21
21
21
GA_S34_GB.indd 15 31.01.2011 09:47:53

16
Loosen and remove the upper adjustment knob [16] and pull then handlebar [18] from
the standpipe [15].
Loosen and remove the lower adjustment knob [13] and pull the standpipe [15]
together with the attached backrest [19] from the drive unit.
Pull the seat [20] upwards and remove it.
Loosen and remove the adjustment knob [1] and pull the foot support [3] from the
drive unit.
After these simple steps, the scalacombi is dismantled for easy stowing and transporta-
tion.
To facilitate loading, the drive unit can be lifted by the protruding rectangular tube sec-
tions. To prevent hands and clothing becoming dirty, clean the tubes with a moist cloth.
To assemble the scalacombi, complete the above steps in reverse order. Please note that
the three adjustment knobs [1], [13] and [16] must be firmly tightened. Readjust the
handlebar to the shoulder height of the operating person (see chapter 2.1).
When transporting the scalacombi never touch or reach into the
wheels of the stair climber. To transport the scalacombi, hold the
device as described above by the protruding rectangular tubes. To
prevent inadvertent switching on of the stair climber during trans-
port, disconnect the plug [12] from the socket [11] on the control
unit.
7.2 Instructions for storage and transportation
During transport, the scalacombi or its dismantled parts must be properly secured so
that they do not pose a risk to the driver or passengers in the event of a sudden brake
manoeuvre. To secure the scalacombi in the car, we recommend tying the individual com-
ponents with suitable straps to the vehicle. Please note that it is the responsibility of
the owner to ensure that all components are properly secured and that Ulrich Alber GmbH
shall not be held liable for any damage caused by unsecured parts.
Please check whether there are specific regulations regarding the transport of the scala-
combi or its components in your jurisdiction and strictly adhere to these regulations.
Ulrich Alber GmbH and its agents shall not be liable for any damage resulting from non-
compliance with these instructions.
•
•
•
•
20
15
13
20
15
13
18
15 16
18
15 16
2020
1
3
1
3
!!
GA_S34_GB.indd 16 31.01.2011 09:47:54

817
8. LED display and error messages
LED display Acoustic signal Description What to do
Continuously on in green No signal Batteries charged to more than 60 %. The scalacombi is ready for use
without restrictions.
Continuously on in yellow No signal The battery is charged to between 30 %
to 60 %.
The scalacombi is ready for use
without restrictions.
Flashing yellow 4 short audible
signals every
60 seconds
The battery is charged to between 10 %
and 30 %.
The scalacombi is ready for operation
but must be recharged as soon as
possible.
Flashing alternately red /
yellow
4 short audible
signals every
60 seconds
The battery is charged to less than
10 %.
The scalacombi can only be used to
climb down steps as there is insuffi-
cient power to climb upwards.
Flashing red Continuous audible
signal
The battery is empty. The battery is empty and operation
of the scalacombi is not possible.
Immediately charge the battery
(see chapter 6).
Flashing green 4 short audible
signals every 30
seconds
The anti-theft device is activated;
operation is not possible.
Deactivate the anti-theft device
(see chapter 4).
Continuously on in red Continuous audible
signal
Serious device fault, scalacombi cannot
be operated.
Contact your specialist dealer or an
agent of Ulrich Alber GmbH.
OFF Long audible signal The scalacombi has been switched off.
After short audible signal:
one of the above visual
signals
Short audible
signal followed by
visual signal
The scalacombi has been switched on.
9. First remedies in the event of a malfunction
What should I do if ... Remedy Contact ...
the brakes fail to engage properly during the
function text?
Clean the wheels and the brake drums with
spirit.
the brakes fail to engage properly even after
cleaning?
Do not operate the scalacombi under any
circumstances.
your specialist dealer or an agent of
Ulrich Alber GmbH
the battery cannot be recharged? This defect can only be repaired at the
manufacturer‘s plant.
your specialist dealer or an agent of
Ulrich Alber GmbH
the scalacombi cannot be switched on? If connected, disconnect the charger.
the scalacombi cannot be switched on,
although the charger has been disconnected?
This defect can only be repaired at the
manufacturer‘s plant.
your specialist dealer or an agent of
Ulrich Alber GmbH
the scalacombi stops working while climbing a
staircase?
Lower the scalacombi backwards to place it
on the steps. The automatic safety brakes
prevent it from slipping over the edge of
the step.
Engage a second person to help lift-
ing and moving the scalacombi step
by step upwards or down.
the driving switch [17] or the ON/OFF button
[8] are jammed?
Do not operate the scalacombi under any
circumstances.
your specialist dealer or an agent of
Ulrich Alber GmbH
GA_S34_GB.indd 17 31.01.2011 09:47:55
Table of contents
Other Alber Wheelchair manuals

Alber
Alber E-Motion M25 User manual

Alber
Alber erivo R10 User manual

Alber
Alber twion User manual

Alber
Alber viamobil Series User manual

Alber
Alber e-fix E35 User manual

Alber
Alber Viaplus User manual

Alber
Alber Twion Mobility Plus Paket User manual

Alber
Alber e-motion M15 User manual

Alber
Alber e-fix E36 User manual

Alber
Alber Adventure A10 User manual

Alber
Alber Adventure A10 User manual

Alber
Alber twion User manual

Alber
Alber ESPRIT User manual

Alber
Alber viamobil V15 User manual

Alber
Alber E-Motion M25 Operating instructions

Alber
Alber twion User manual

Alber
Alber viamobil eco V14 User manual

Alber
Alber e-fix User manual

Alber
Alber e-fix E35 User manual

Alber
Alber e-fix E35 User manual