manuals.online logo
Brands
  1. Home
  2. •
  3. Brands
  4. •
  5. Aluprof
  6. •
  7. Transmitter
  8. •
  9. Aluprof DC 448 Owner's manual

Aluprof DC 448 Owner's manual

1
We reserve the right to any technical change.
Valid on 2022.02.09
INSTRUKCJA PROGRAMOWANIA NADAJNIKA DC448
1. TECHNICAL SPECIFICATIONS
PROGRAMMING MANUAL OF THE DC 448 TRANSMITTER
Power supply:
Operating temperature:
DC448 - 5-channels:
3 V (1xCR2430)
~ -20°C - ~ +55°C
Average range: 200 meters (in open space), 35 meters (inside buildings)
Frequency: 433.92 MHz
Company reserves the tolerance of catalog data due the different conditions usage.
In accordance with the provisions of the Directive of the European Parliament and of the Council 2012/19 / EU of 4 July 2012
on waste electrical and electronic equipment (WEEE), it is prohibited to place of used equipment together with other wastes,
marked with crossed out wheeled bin symbol. The users are obliged to transfer their used equipment to a designated collection
point for proper processing. The marking means, at the same time, that the equipment was put on the market after 13 August
2005. These legal obligations have been introduced to reduce the amount of waste generated from waste electrical and
electronic equipment and to ensure an appropriate level of collection, recovery and recycling. The equipment does not contain
any dangerous components, which would have any particularly negative impact on the environment and human health.
It is compatible with all the DM series radio controlled motors and DC series control units from ALUPROF S.A. offer.
Possible of control of 5 motors or 5 groups of motors.
2. DIAGRAM OF THE FRONT PANEL
UP
STOP
DOWN
MODE / K- OK / K+
Roller shutter move - UP
Roller shutter move - down
Clock
Week days
Discharged battery
P2 Active channel
Active channel
Operating mode
2
We reserve the right to any technical change.
Valid on 2022.02.09
INSTRUKCJA PROGRAMOWANIA NADAJNIKA DC448
4. ACTIVE CHANNEL SELECTION
Switch to automatic or random
mode.
Select the chosen channel.
Hold down the “OK / K +”
button for 3 seconds, the digit
Holding the “K-” button
again for 3 seconds turns on the
of the disabled selected channel.
3. OPERATING MODE CHANGE
Press and hold the“P2”
button for 3 seconds. The
By reapitting procedure
will change mode between:
“Manual”,
“Automatic”,
“Random”.
Manual mode - without time control function,
Automatic mode - with time control function,
Random mode - with time control function with a random selected time within ± 15 minutes to the set automatic time.
5. SETTING OF THE CURRENT TIME
Switch to manual mode
Press and hold the“MODE / By pressing the ”UP” or “DOWN”
buttons, you can
Press the“MODE / K-” button.
Minutes digits will flash.
K-”button for 5 seconds. Hour digits
will flash. change the hour settings.
By pressing the ”UP” or “DOWN”
buttons, settings of the
minutes can by change.
mode will be changed.
channel will flash.
Press the“MODE / K-” button.
Week day will flash.
By pressing the ”UP” or “DOWN”
buttons, settings of the
To approve entered changes
press “OK/K+”.
week days can by change.
3
We reserve the right to any technical change.
Valid on 2022.02.09
INSTRUKCJA PROGRAMOWANIA NADAJNIKA DC448
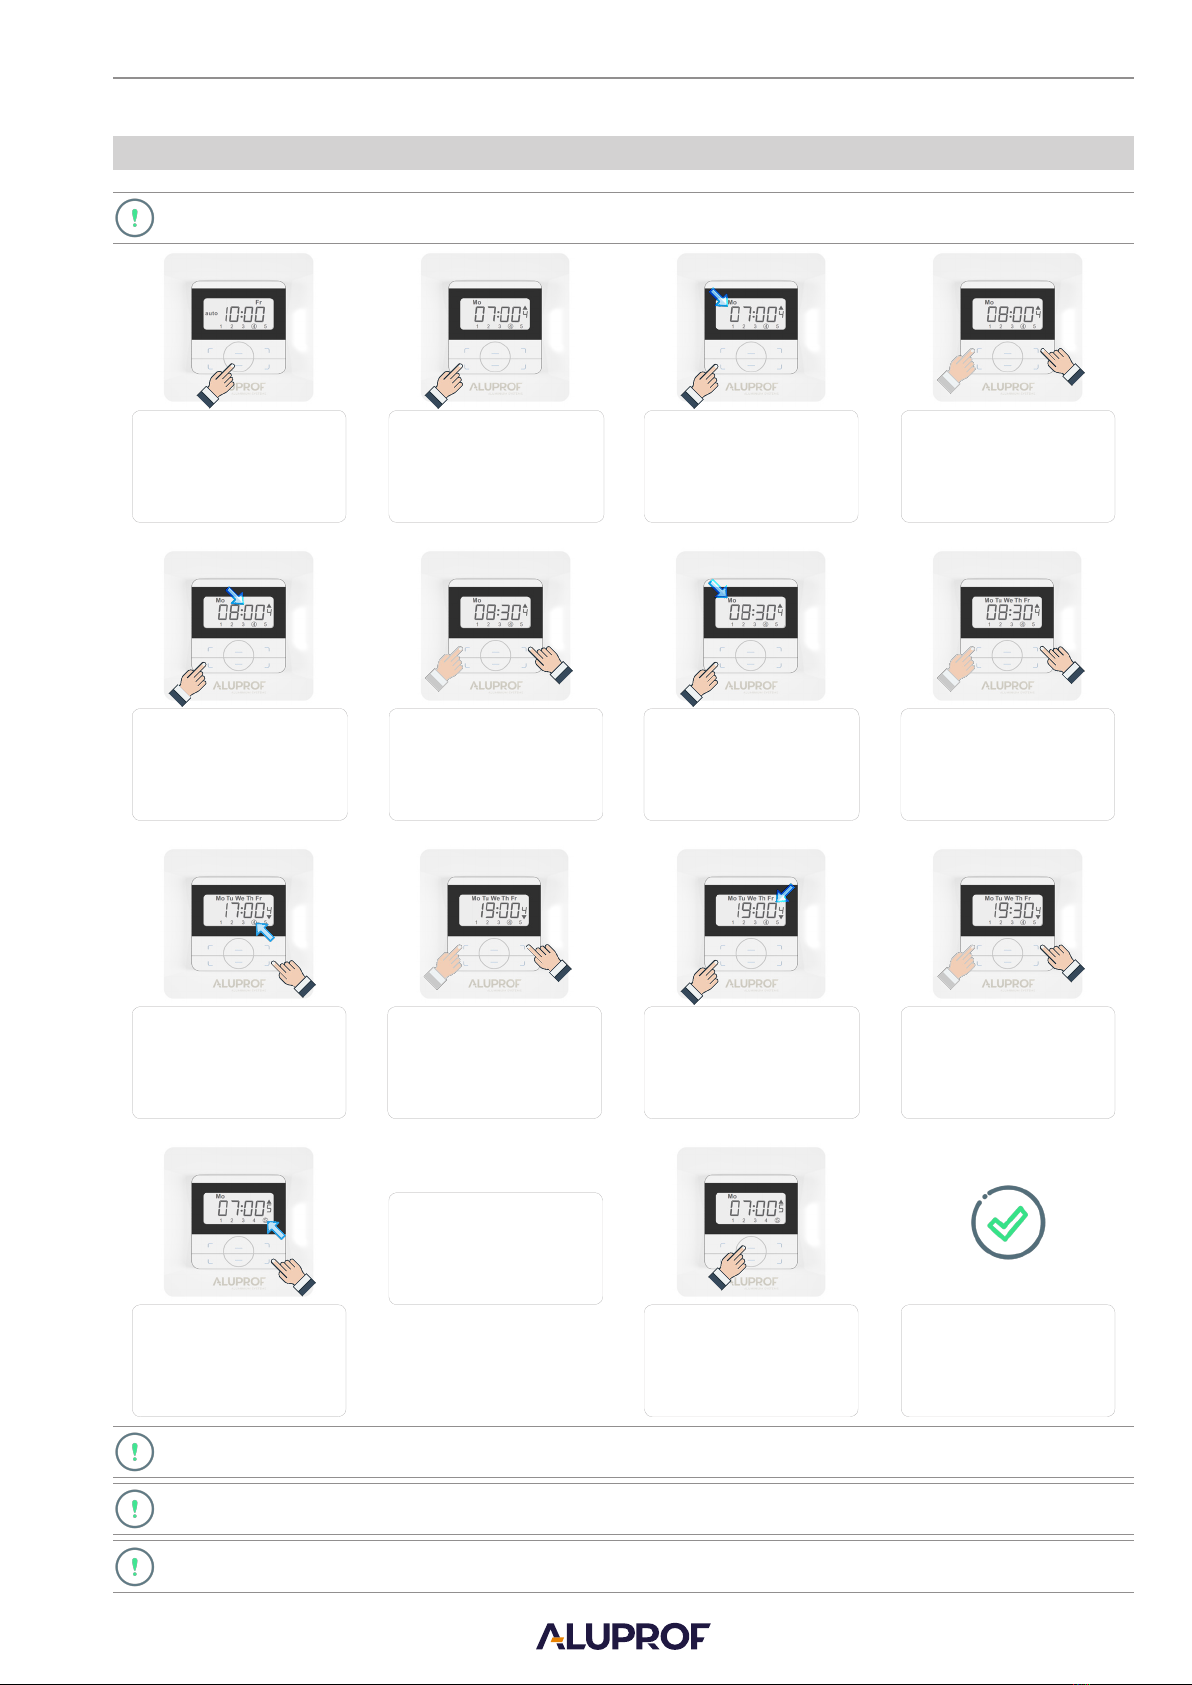
6. SETTING OF THE AUTOMATIC CONTROL TIME
Switch to automatic or Press and hold“MODE/K -” Press the“MODE/K -” button again.
Hour digits will flash.
button for 5 seconds. The lifting hour
will be displayed.
Press the“MODE / K-” button. By pressing the ”UP” or “DOWN”
buttons, settings of the
Press the“OK/OK+” button. The
lowering hour will be displayed.
Minutes digits will flash. minutes can by change.
Hour digits will flash.
random mode.
Press the“MODE / K-” button.
Press the“OK / K +” button
to confirm the settings and
Minutes digits will flash.
switch to the next channel.
Press the“STOP” button
to save the
changes made.
Repeat the above steps to
set the hours for other
channels.
Changes have been saved.
The display shows the current
time
The symbol “- - : - -” in the automatic control time settings means that the control is not active.
To automatically control receivers from all the channels seting up a group channel on the transmitter is required.
Group channel is active when all channels numbers are highlighted.
In the auto mode interval between lifting and lowering time cannot be less than 32 minutes, otherwise the display will
show “ER:01” error.
By pressing the ”UP” or “DOWN”
buttons, settings of the
minutes can by change.
By pressing the ”UP” or “DOWN”
buttons, you can
change the hour settings.
By pressing the ”UP” or “DOWN”
buttons, you can
change the hour settings.
Press the“MODE / K-” button. By pressing the ”UP” or “DOWN”
buttons, settings of the
Week days will flash. week days can by change.
It is possible to set the days of the week in automatic control in three modes:
1. Selected day of the week, 2. Working days, 3. Working days and Saturday, 4. The whole week
4
We reserve the right to any technical change.
Valid on 2022.02.09
INSTRUKCJA PROGRAMOWANIA NADAJNIKA DC448
7. LOCKING OF THE BUTTONS
Holding the “MODE / K-”and “OK / K
+” buttons simultaneously for 3
For active key lock function,
seconds will lock the buttons of the
transmitter.
“LOCK” will any press of the
transmitter buttons will show the
information “LOCK” on the display.
“LOCK” will be display for active key lock function if any of the transmitter buttons will be press.

Other Aluprof Transmitter manuals

Aluprof DC 661 Owner's manual

Aluprof

Aluprof DC 661 Owner's manual

Aluprof DC920 Owner's manual

Aluprof

Aluprof DC920 Owner's manual

Aluprof DC 920 Owner's manual

Aluprof

Aluprof DC 920 Owner's manual

Aluprof DC1675 Installation manual

Aluprof

Aluprof DC1675 Installation manual

Aluprof DC 448 Owner's manual

Aluprof

Aluprof DC 448 Owner's manual

Aluprof AC226-01 Owner's manual

Aluprof

Aluprof AC226-01 Owner's manual

Aluprof AC151-06 Owner's manual

Aluprof

Aluprof AC151-06 Owner's manual

Popular Transmitter manuals by other brands

Honeywell oneWireless XYR 6000 user manual

Honeywell

Honeywell oneWireless XYR 6000 user manual

trafag 8252 instructions

trafag

trafag 8252 instructions

Knick Stratos Multi E401N user manual

Knick

Knick Stratos Multi E401N user manual

E+E Elektronik EE310 Operation manual

E+E Elektronik

E+E Elektronik EE310 Operation manual

Mueller Systems Mueller Cellular Node installation manual

Mueller Systems

Mueller Systems Mueller Cellular Node installation manual

FMUser ST-1A instruction manual

FMUser

FMUser ST-1A instruction manual

M-system M6SVS instruction manual

M-system

M-system M6SVS instruction manual

Seac GURU HP user manual

Seac

Seac GURU HP user manual

Axcera Innovator CU10BT/CU0T-1 instruction manual

Axcera

Axcera Innovator CU10BT/CU0T-1 instruction manual

ATEN VE2812AUST user manual

ATEN

ATEN VE2812AUST user manual

i3-TECHNOLOGIES i3SYNC quick start guide

i3-TECHNOLOGIES

i3-TECHNOLOGIES i3SYNC quick start guide

Nautel VS300 troubleshooting manual

Nautel

Nautel VS300 troubleshooting manual

Listen LP-3CV-072 installation guide

Listen

Listen LP-3CV-072 installation guide

Burkert 8022 Series operating instructions

Burkert

Burkert 8022 Series operating instructions

PR 2914 manual

PR

PR 2914 manual

M-system Mini-M M2XR2 instruction manual

M-system

M-system Mini-M M2XR2 instruction manual

TLV MBS33M Installation

TLV

TLV MBS33M Installation

E+E Elektronik EE23 series user manual

E+E Elektronik

E+E Elektronik EE23 series user manual

manuals.online logo
manuals.online logoBrands
  • About & Mission
  • Contact us
  • Privacy Policy
  • Terms and Conditions

Copyright 2025 Manuals.Online. All Rights Reserved.