manuals.online logo
Brands
  1. Home
  2. •
  3. Brands
  4. •
  5. Aluprof
  6. •
  7. Transmitter
  8. •
  9. Aluprof DC 661 Owner's manual

Aluprof DC 661 Owner's manual

1
We reserve the right to any technical change. Valid on 2019.04.12
DC 661 PROGRAMMING MANUAL
Company reserves the tolerance of catalog data due the
differentconditions usage.
In the auto mode interval between rollup and roll down time
cannotbe less than 32 minutes, otherwise the display will show
“ER:01”
In the automatic settings, it is possible to deactivate one or more
channels from the automatic mode by placing the cursor on the
specified channel and holding down the„OK / K +” button for
approx. 3 seconds, which causes the channel symbol to flash.
The control changes are made only in automatic or random
transmission mode.
If the operation distance of the transmitter will drop you should
replace the battery.
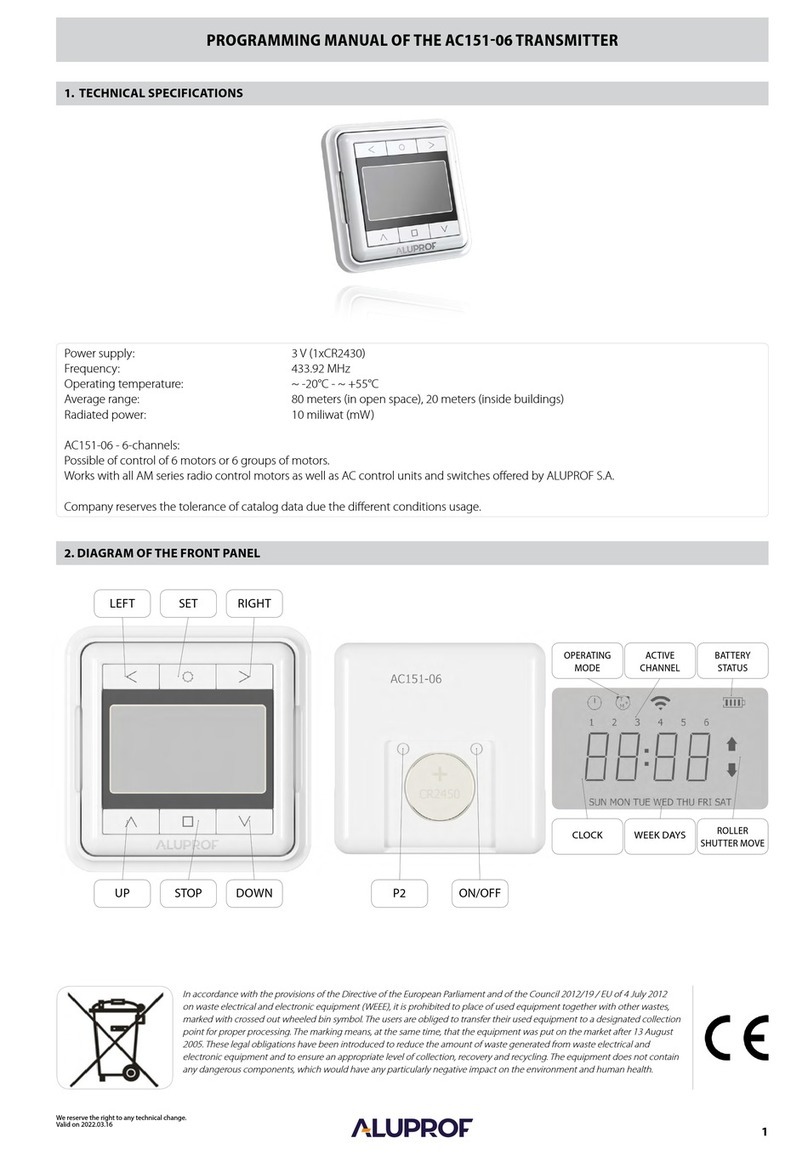
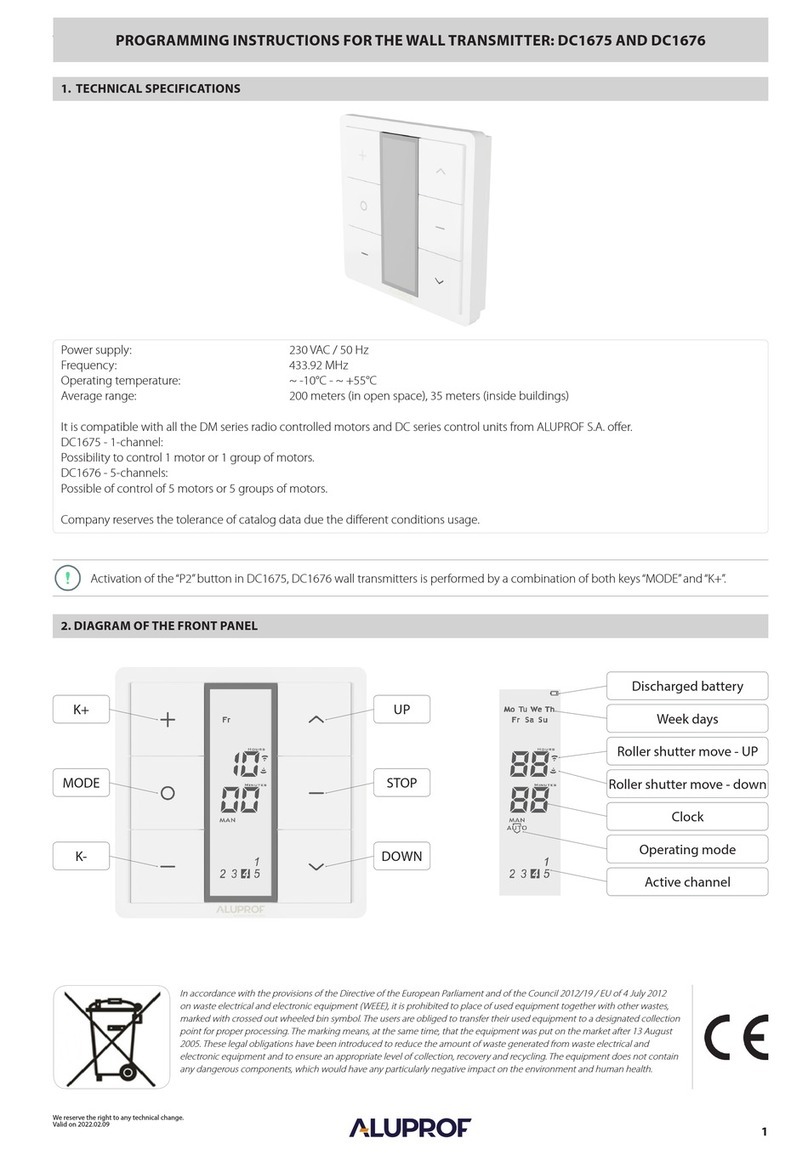
1. TECHNICAL SPECIFICATIONS
DC 661 PROGRAMMING MANUAL
OK / K+ OK / K+
STOP
P2 SET OK / K+
MODE / K-
433 MHz AC
230V / 50Hz
- Individual 5 channel control
- E
ach channel can control maximum 20 receive
rs
- Key lock function
- LCD display
- Dimensions: 80x80 mm
- Power supply: 2 x 3V (CR2430)
- Frequency: 433.92 Mhz
- Radiated power: 10 miliwat (mW)
- Operating temperature: ~ -20°C ~ +55°C
- Average range: 200 meters (in open space)
35 meters (inside buildings)
In accordance with the provisions of the Directive of the European Parliament and of the Council 2012/19 / EU of 4 July 2012 on wasteelectrical and
Works with tubular motor`s DM35R, DM45R, DM45RM,
DM55RM,DM59RM, DM35EV/Y, DM45EV/Y
Operation of the„UP” or„DOWN”key in the automatic control
mode allows the display of the currently programmed raising or
lowering time as well as displaying the symbol of the executed
command
ClockBattery Active channel
Number of
The Directions
of movement
Control:
- Manual
- Auto
- Random
electronic equipment (WEEE), it is prohibited to place of used equipment together with other wastes, marked with crossedout wheeled bin symbol.
The users are obliged to transfer their used equipment to a designated collection point for proper processing.The marking means, at the same
time, that the equipment was put on the market after 13 August 2005. These legal obligations have beenintroduced to reduce the amount of waste
generated from waste electrical and electronic equipment and to ensure an appropriate levelof collection, recovery and recycling. The equipment
does not contain any dangerous components, which would have any particularlynegative impact on the environment and human health.
Active days in
auto mode
the automatic
control mode
2
We reserve the right to any technical change. Valid on 2019.04.12
DC 661 PROGRAMMING MANUAL
2.1. Operating mode change
2. PROGRAMMING THE TRANSMITTER
1. The manual control mode„MAN”: without time control function
2. The automatic control mode„AUTO”: with time control function
3. The random control mode: Timer function with a randomly selected time in the range of ± 15 minutes from the set
automatic time.
0 - Manual operating mode
1 - The automatic or random control mode (programming of the automatic working hours for each day of the week)
2 - The automatic or random control mode (programming of the automatic working hours for the whole week)
3 - The automatic or random control mode (programming of the automatic working hours individually Mo.-Fr., Sat., Sun.)
Then press the„P2” button for 3
Pressing the button again switches
Then press the„P2” button for 3
The next press of the„ P2 ” button for
Then press the„P2” button for 3
The next press of the„” P2 ”” button
Press and hold the„P2”
The next press of the„„ P2 ””
seconds. The transmitter switches to
between consecutive modes.
seconds. The transmitter switches to
3 seconds will switch the transmitter
seconds. The transmitter switches
for 3 seconds will switch the
button for 3 seconds to switch the
button for 3 seconds will switch the
the third automatic control mode
the second automatic control mode
to third random control mode
to the first automatic control mode
transmitter to second random
transmitter to MAN manual control
transmitter to firstrandom control
„AUTO”
control mode
mode
mode
3
We reserve the right to any technical change. Valid on 2019.04.12
DC 661 PROGRAMMING MANUAL
2.2. Clock setting
Programming of the timer can be performed only in ‘MAN’ mode.If there will be a bigger interval during the
programming than 60 seconds the timer will go from the setting mode out.
The operation of the„UP”
By pressing the„OK / K +” button for
Press the„MODE / K -” button
The operation of the„UP”
Press the„MODE/K-” to confirmthe
The operation of the„UP”
Use the„MODE / K -” button
Hold the„SET P2” button for Hold the„MODE/K-” button for
and„DOWN” keys changes
approx. 3 seconds we confirm all
to start the clock.
and„DOWN” keys changes
minute.
and„DOWN” keys changes
to go to the minute settings
3second will switch the 5seconds till the hour will blink
the hour settings
entered changesthe day of the week settings
the minute settings
transmitterto the ‘MAN’ mode.
4
We reserve the right to any technical change. Valid on 2019.04.12
DC 661 PROGRAMMING MANUAL
2.3. Settings days and hours for automatic controls
We only change the lifting and lowering time in the automatic control mode.
The difference between lifting and lowering must not be less than 32 minutes.
If the pause between each key press is longer than 10 seconds, the transmitter exits the setting mode. Leaving the time change
mode without saving is carried out by pressing the STOP key
Press and hold the„MODE / K„
By pressing the„MODE / K-” -button
By pressing the„MODE / K-” key, you
Press the„MODE / K-” button again.
By pressing the„P2” button, you go
By pressing the„OK / K +” button in
Press and hold the„MODE / K”
The operation of the ”UP” and
The operation of the„UP” and
The operation of the„UP”
After setting all operating
button for 3 seconds to switch on
you can change to the
go to the minute settings of the
The lift time will flash
to the hour settings of the reduction
1 or 3 mode you change the days of
button for 3 seconds.
„DOWN” keys changes
„DOWN” keys changes
and„DOWN” keys changes
times you should keep the
the automatic control
minutes settings
reduction times. The minute symbol
times.
the week. We repeat these activities
The lowering time appears on
the minute settings
the minute settings
the hour settings
„OK / K +” - button pressed for about
will blink to set the time
the display
3 seconds to confirm the changes

Other Aluprof Transmitter manuals

Aluprof DC 920 Owner's manual

Aluprof

Aluprof DC 920 Owner's manual

Aluprof DC1675 Installation manual

Aluprof

Aluprof DC1675 Installation manual

Aluprof AC151-06 Owner's manual

Aluprof

Aluprof AC151-06 Owner's manual

Aluprof AC226-01 Owner's manual

Aluprof

Aluprof AC226-01 Owner's manual

Aluprof DC920 Owner's manual

Aluprof

Aluprof DC920 Owner's manual

Aluprof DC 448 Owner's manual

Aluprof

Aluprof DC 448 Owner's manual

Aluprof DC 448 Owner's manual

Aluprof

Aluprof DC 448 Owner's manual

Popular Transmitter manuals by other brands

Turnigy 9XR-PRO manual

Turnigy

Turnigy 9XR-PRO manual

Advent ADVW791 Installation and operation manual

Advent

Advent ADVW791 Installation and operation manual

Dwyer Instruments 616WL-2 Installation and operating instructions

Dwyer Instruments

Dwyer Instruments 616WL-2 Installation and operating instructions

Becker Centronic SunWindControl SWC241 Assembly and operating instructions

Becker

Becker Centronic SunWindControl SWC241 Assembly and operating instructions

Minebea CSA-562B instruction manual

Minebea

Minebea CSA-562B instruction manual

Endress+Hauser RMA 422 operating instructions

Endress+Hauser

Endress+Hauser RMA 422 operating instructions

Honeywell OELD operating instructions

Honeywell

Honeywell OELD operating instructions

Reflexion AD3 user manual

Reflexion

Reflexion AD3 user manual

PCS Electronics CyberMax FM+ 15W manual

PCS Electronics

PCS Electronics CyberMax FM+ 15W manual

Bailey Platinum standard Series Product Instruction

Bailey

Bailey Platinum standard Series Product Instruction

Ametek 851 Series Instructions for installation, operation and service

Ametek

Ametek 851 Series Instructions for installation, operation and service

Jamara CCX Pro 2,4 GHz instructions

Jamara

Jamara CCX Pro 2,4 GHz instructions

RIDGID KD-4000 Line user manual

RIDGID

RIDGID KD-4000 Line user manual

WisyCom MTH410 user manual

WisyCom

WisyCom MTH410 user manual

Elpas 5-LW200037-1 user guide

Elpas

Elpas 5-LW200037-1 user guide

AFi MT-91P589C-SL instruction manual

AFi

AFi MT-91P589C-SL instruction manual

M-system TM instruction manual

M-system

M-system TM instruction manual

Bosch CRS-NC-S37L operating instructions

Bosch

Bosch CRS-NC-S37L operating instructions

manuals.online logo
manuals.online logoBrands
  • About & Mission
  • Contact us
  • Privacy Policy
  • Terms and Conditions

Copyright 2025 Manuals.Online. All Rights Reserved.