AMQ Amobi Desk One Safety guide

Amobi Desk set up and user guide
This device complies with part 15 of the FCC rules. Operation is subject to the following two
conditions: (1) This device may not cause harmful interference, and (2) this device must accept any
interference received, including interference that may cause undesired operation.
Note: This equipment has been tested and found to comply with the limits for a Class A digital
device, pursuant to part 15 of the FCC Rules. These limits are designed to provide reasonable
protection against harmful interference when the equipment is operated in a commercial
environment. This equipment generates, uses, and can radiate radio frequency energy and, if not
installed and used in accordance with the instruction manual, may cause harmful interference to
radio communications. Operation of this equipment in a residential area is likely to cause harmful
interference in which case the user will be required to correct the interference at his own expense.
Important: Changes or modifications to this product not authorized by AMQ could void your authority
to operate the product.
CAUTION
Do NOT unpack with only one person.
Desk is heavy and can tip over causing serious injury.
Always use two or more people to unpack and set up desk.
Immediately rotate feet to 45 degrees or more.
2 person

AMOBI DESK SET UP AND USER GUIDE | 2 amqsolutions.com
SAFETY
Important Safety Instructions .............. 3-5
UNPACKING
Opening the Packaging Box ............. 6-10
SETTING UP
Understanding Amobi Desk Positions ..... 12-13
Rotating the Feet ..................... 14-15
Connecting to Power .....................16
Adjusting the Height......................16
Opening the Worksurface .................17
Closing the Worksurface ..................18
Front Handset Adjustment.............. 19-21
Troubleshooting .........................22
Product Specifications ....................23
COLLABORATION BOARD
How to Interchange Whiteboard &
Felt Tackboard ....................... 25-27
MAGNETIC SIDE PANELS
Opening the Magnetic Side Panels
(If equipped)............................29
Repositioning the Magnetic Side Panels ......30
Magnetic Side Panels Different Work Modes...31
MAGNETIC SIDE PANELS CLIP
Components............................32
How to Attach Magnetic Side Panels Clip
to Magnetic Side Panels ..................33
The Magnetic Side Panels Clip Instructions 33-34
The Functions of Magnetic Side Panels Clip ...35
MAGNETIC ACCESSORY CLIP
Components............................36
How to Attach it to Amobi Desk .............37
The Functions of Magnetic Accessory Clip . 37-38
CONTENTS

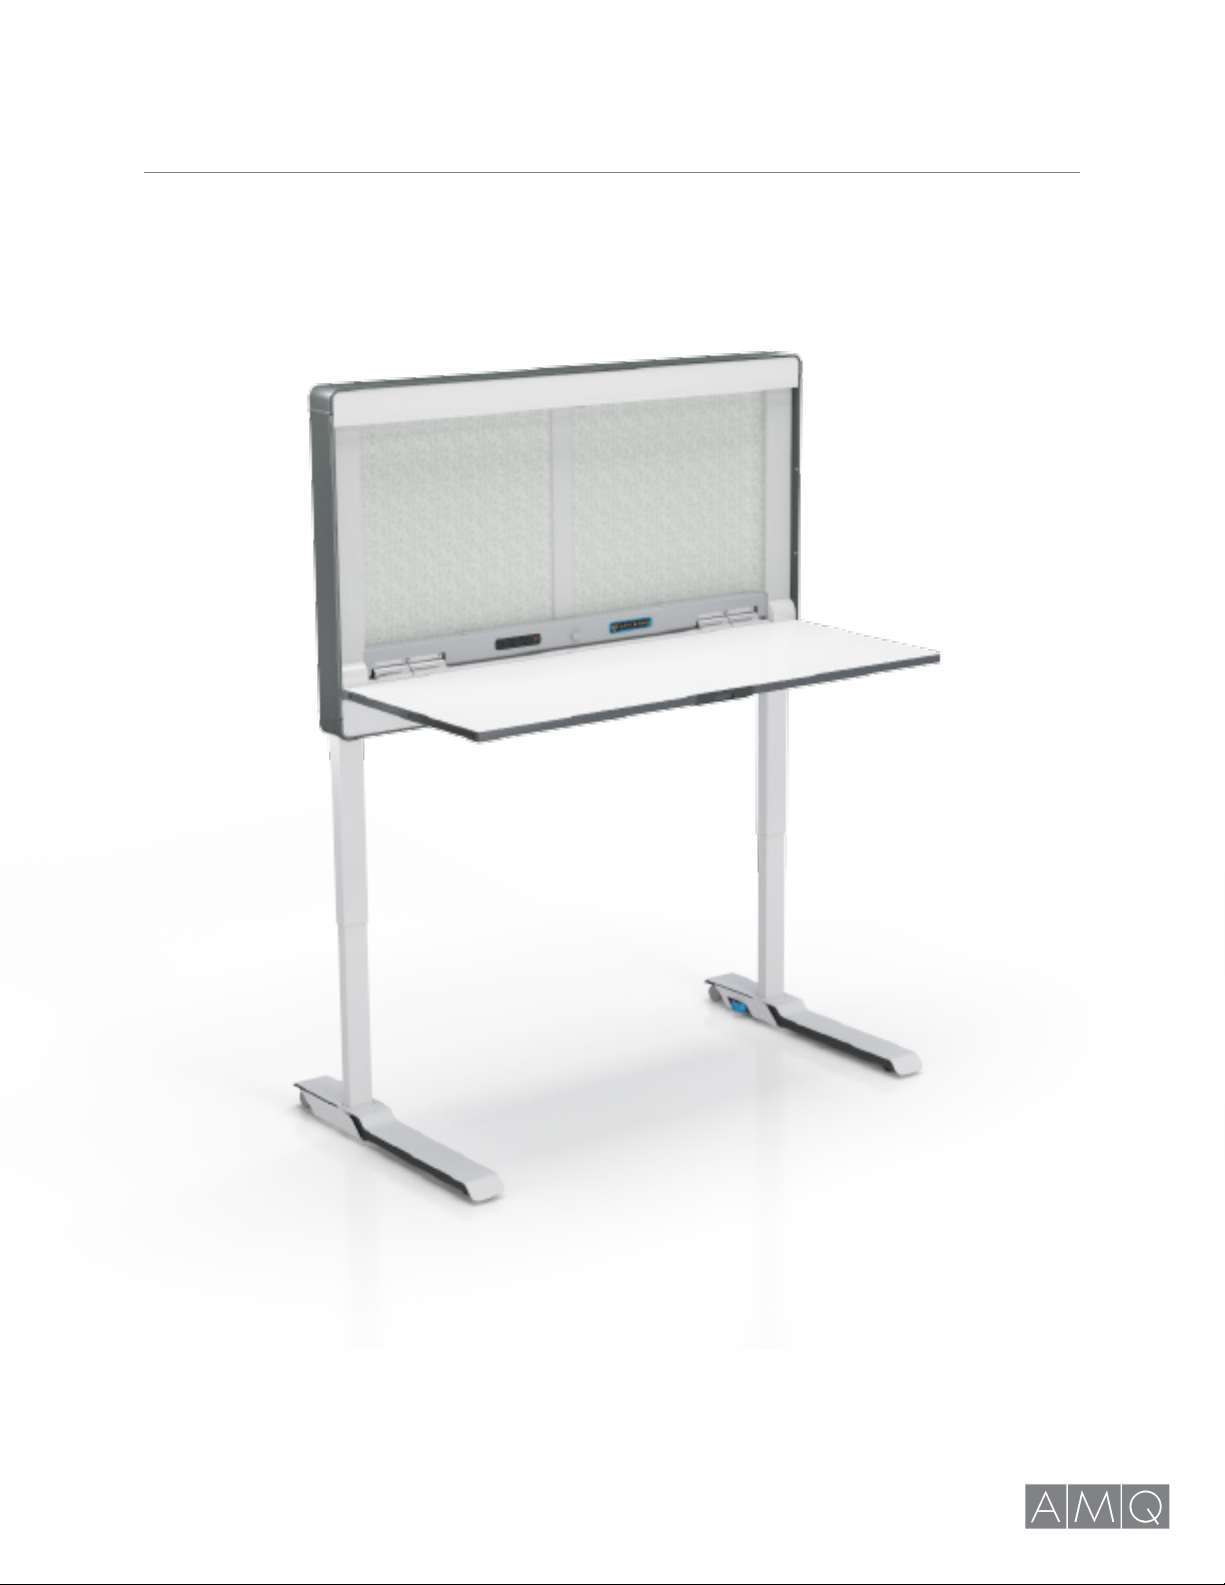
AMOBI DESK SET UP AND USER GUIDE | 3 amqsolutions.com
IMPORTANT SAFETY INSTRUCTIONS
READ ALL INSTRUCTIONS BEFORE USING THIS FURNISHING.
PLEASE SAVE THESE INSTRUCTIONS IN AN OBVIOUS PLACE FOR THE END USER AFTER
ASSEMBLY.
When using an electrical furnishing, basic precautions should always be followed,
including the following:
WARNING – To reduce the risk of burns, fire, electric shock, or injury to persons:
Always unplug this furnishing from the electrical outlet before cleaning or servicing.
1. Close supervision is necessary when this furnishing is used by, or near children, invalids, or disabled
persons.
2. Use this furnishing only for its intended use as described in these instructions. Do not use attachments
not recommended by the manufacturer.
3. Never operate this furnishing if it has a damaged cord or plug, if it is not working properly, if it has been
dropped or dam- aged, or dropped into water. Return the furnishing to a service center for examination
and repair.
4. Keep the cord away from heated surfaces.
5. Do not use outdoors.
6. To disconnect, turn all controls to the off position, then remove plug from outlet.
7. MAX Loading - 10Amps. Do not overload integrated sockets.
8. For continued protection against risk of fire, replace only with same type and rating of fuse 250V, 10A.
WARNING
WARNING
WARNING
RISK OF INJURY. Do not sit or stand on product. Use only as intended.
Inspect regularly. STOP using if product is damaged or has loose parts.
Only repair with AMQ authorized parts and methods.
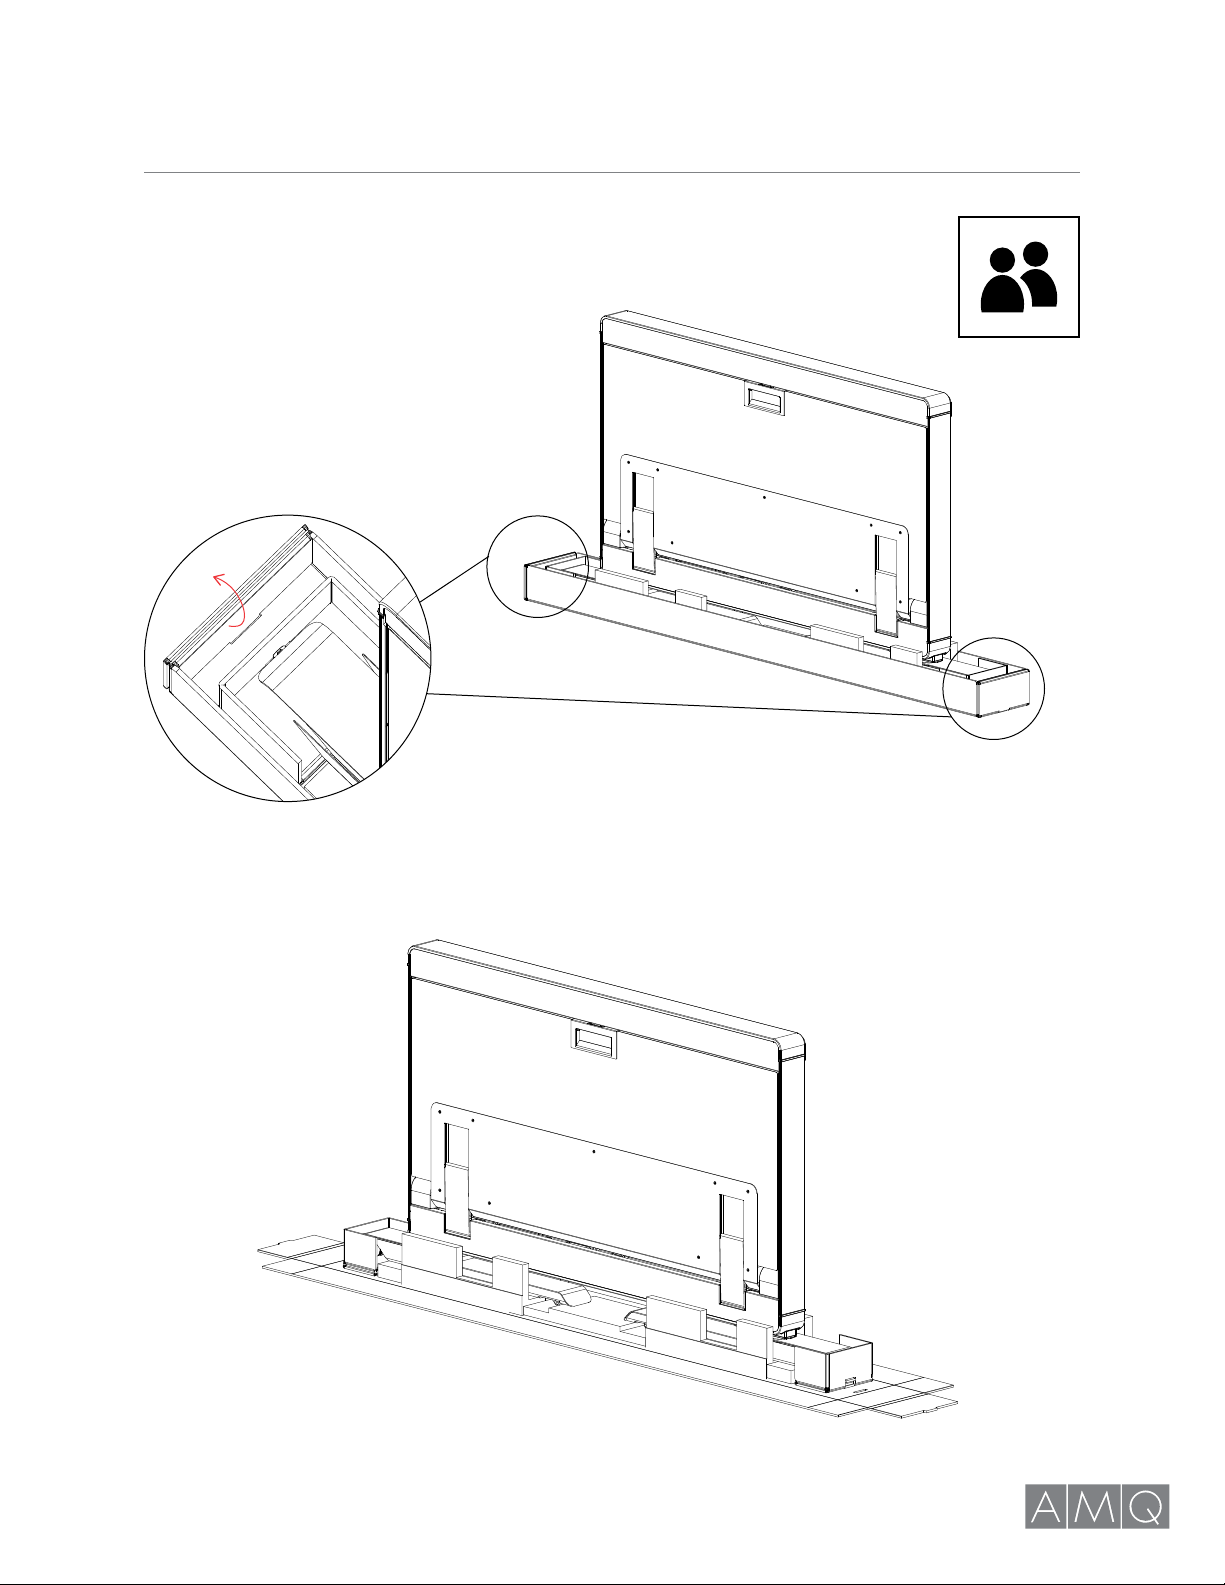
Do not adjust feet parallel with frame (0 degrees), desk may fall causing injury.
To move or store desk:
1. Adjust desk to lowest height position.
2. Keep feet at 90 degrees for improved stability
3. Feet may be adjusted to 45 degrees for moving through doors, or for storage

AMOBI DESK SET UP AND USER GUIDE | 4 amqsolutions.com
Requires minimum of 2 person for removing Amobi Desk from its packaging & feet deployment.
CAUTION
2 person
X
No children
176 lb
80 kg
WARNING
Crush Hazard - Keep Clear
Locate desk, accessories and nearby objects to allowmovementof desktop throughfull range without pullingcords,
trapping body partsor colliding with anything (shelves,electricalplugsandcords,doorknobs, windowsills, storage
cabinets,etc.).
RISK OF DEATH OR SERIOUS INJURY. Raising or lowering deskcan trap, pinchor crush body parts or property.
Not to be used in locations where children, or people with cognitive disabilities are anticipated to be present and not
supervised.
DO NOT ALLOW USE BY CHILDREN
or people unabletounderstand the risks andto safelyadjust the deskheight.
Maintain > 1" (25mm) gap above objects on desk at max. height and between the desk and adjacent objects.
CRUSH HAZARD - DO NOT PLACE FEET, LEGS OROTHER BODY PARTS ONOBJECTS PLACED UNDER
TABLE TOP OR BELOW MODESTY PANEL.
DO NOT OPERATE THIS EQUIPMENT Unless Properly Trained.
>1"
(25mm)
>1"
(25mm)
X
Max.
Min.
X
X
>1"
(25mm)
(877) 801-0370
AMQSolutions.com
?
Read Directions and Manual first
CAUTION
Do NOT unpack with only one person.
Desk is heavy and can tip over causing serious injury.
Always use two or more people to unpack and set up desk.
Immediately rotate feet to 45 degrees or more.
2 person
WARNING

AMOBI DESK SET UP AND USER GUIDE | 5 amqsolutions.com
CAUTION
CAUTION
Do NOT install any kind of equipment like wire-tray, wire management systems,
baskets and storage on or below the desk worksurface. FAILURE TO FOLLOW THESE
INSTRUCTIONS COULD RESULT IN PROPERTY DAMAGE OR PERSONAL INJURY.
Crush Hazard - Keep hands and fingers away when closing or opening desk worksurface.
The desk must be positioned near an easily accessible power outlet.
GROUNDING INSTRUCTIONS (for grounded products only)
For products sold in North America and other 120V regions: the product
is for use on a nominal 120-V circuit. These products use a grounded plug
that looks like the plug illustrated in sketch A in Figure 1. Make sure that the
product is connected to an outlet having the same configuration as the plug.
No adapter should be used with this product.
GROUNDED
OUTLET
GROUNDED
OUTLET BOX
GROUNDING PIN
Figure 1
Grounding methods
Products with Grounded Plugs

AMOBI DESK SET UP AND USER GUIDE | 6 amqsolutions.com
UNPACKING

AMOBI DESK SET UP AND USER GUIDE | 7 amqsolutions.com
UNPACKING
Step 1
Remove the 5 plastic straps
from the packaging box.
Step 2
Remove the packaging box 1-7.
1: Top cover
2: Outer side protection
3: Inner side protection
4: Top protection
5: Side cushion
6: ‘B’ carton pieces
7: PE bag
OPENING THE PACKAGING BOX
1
3
5
2
5
7
6
4
CAUTION
Do NOT unpack with only one person.
Desk is heavy and can tip over causing serious injury.
Always use two or more people to unpack and set up desk.
Immediately rotate feet to 45 degrees or more.
2 person

AMOBI DESK SET UP AND USER GUIDE | 8 amqsolutions.com
UNPACKING
Step 3
Unfold the flap on each side of the base carton.
Step 4
Flatten the base carton.
OPENING THE PACKAGING BOX (CONT.)
2 person

AMOBI DESK SET UP AND USER GUIDE | 9 amqsolutions.com
UNPACKING
Step 5
Remove the packaging box 8-9.
8: Corner guards
9: Side positioners
Step 6
Remove the side padding on both sides.
OPENING THE PACKAGING BOX (CONT.)
2 person
8
8
9
9

AMOBI DESK SET UP AND USER GUIDE | 10 amqsolutions.com
UNPACKING
Step 7
Slightly lift up the Amobi Desk on one side to remove the middle padding.
Step 8
Before pushing the Amobi Desk out of the base carton, rotate the Feet to 45 or 90 degrees for better stability.
See how to rotate the feet at Amobi Desk Setting Up Guide.
OPENING THE PACKAGING BOX (CONT.)
2 person
1
2
1
2

AMOBI DESK SET UP AND USER GUIDE | 11 amqsolutions.com
SETTING UP

AMOBI DESK SET UP AND USER GUIDE | 12 amqsolutions.com
SETTING UP
UNDERSTANDING AMOBI DESK POSITIONS
Rear view
Front view
Power cord
Amobi Desk will be in this state out of the box:
0 degree – for shipping only.
After removing box, using 2 people to maintain stability, rotate feet to 45 degrees.
CAUTION
Do NOT unpack with only one person.
Desk is heavy and can tip over causing serious injury.
Always use two or more people to unpack and set up desk.
Immediately rotate feet to 45 degrees or more.
2 person

AMOBI DESK SET UP AND USER GUIDE | 13 amqsolutions.com
SETTING UP
UNDERSTANDING AMOBI DESK POSITIONS (CONT.)
45 degrees – for moving and storing at a collapsed height. The base should be adjusted to its lowest
position when using this foot position.
90 degrees - for working and primary use of the desk. This mode allows for full functionality of the desk.

AMOBI DESK SET UP AND USER GUIDE | 14 amqsolutions.com
SETTING UP
Step 1
Turn and hold the rotation lock to an upright position.
Step 2
Push the rotation lock forward while holding it at an upright position to engage the rotating mechanism.
Step 3
Rotation lock in this position will unlock the rotating foot.
ROTATING THE FEET
2 person
Rotation Lock
Foot Swivel
Mechanism WARNING
Desk is not stable when the feet are in a
0-degree position and must be supported
by 2 people until both feet are rotated.

AMOBI DESK SET UP AND USER GUIDE | 15 amqsolutions.com
SETTING UP
Step 4
Turn the feet to 90 Degree position while holding the rotation lock in an upright forward
position.
Step 5
Releasing the rotation lock will return it to its original position and the rotating foot is now locked.
Step 6
Repeat step 1 to 5 to rotate the other foot.
ROTATING THE FEET (CONT.)
2 person

AMOBI DESK SET UP AND USER GUIDE | 16 amqsolutions.com
SETTING UP
Step 1
Remove the Power Plug from the Cable Clip
and pull it down to the desired length.
Step 1
Use the Rear Handset
to adjust Amobi Desk
to the desired height.
Step 2
Connect to power scource.
CONNECTING TO POWER
ADJUSTING THE HEIGHT
Cable Clip
Power Plug
Rear Handset
WARNING
Ensure full path of travel
is free of obstructions.

AMOBI DESK SET UP AND USER GUIDE | 17 amqsolutions.com
SETTING UP
Step 1
Press and hold the Handle Button (1) and pulll down the Worksurface (2).
OPENING THE WORKSURFACE
Step 2
Press down the Worksurface until a “click” can be felt when the Worksurface is rotated to a
horizontal position.
NOTE: It is recommended to perform
a reset before use. Refer to Resetting
the Amobi Desk on page 19.
Press the Handle Button
1
2
Press down
the Worksurface

AMOBI DESK SET UP AND USER GUIDE | 18 amqsolutions.com
SETTING UP
NOTICE: Quick Connect VESA Plate and Monitor Display must be removed to close the Worksurface. Please
refer to AMOBI DESK-Monitor Arm Installation Guide under “Removing the Monitor Display for stowing”
section.
NOTE: To close the Worksurface, first press the Worksurface Lock Button, then lift the Worksurface to close it.
A ‘click’ can be felt when the Worksurface is properly locked and secured.
CLOSING THE WORKSURFACE
Worksurface
Lock Button

AMOBI DESK SET UP AND USER GUIDE | 19 amqsolutions.com
SETTING UP
Programming Memory Presets
1. Press the UP or DOWN arrow button to set the Worksurface to the desired height.
2. Press the “M” button followed by one of the preset number button (1 or 2 ) on the Handset.
3. After the memory preset is completed, simply press and hold the number button (1 or 2) and the
Worksurface will go to the preset height.
Power Saving Mode - Waking up the Handset
1. Press any button to wake up the Handset.
Resetting the Amobi Desk
Note: Make sure there is nothing under the base before setting to its lowest height 9.9”. If the desk is
obstructed it will not reset properly.
1. Press and hold the DOWN arrow button and the desk will begin to go down.
2. Once the desk reaches its lowest height, continue to press the DOWN arrow button for 5 seconds, until
the LED Display shows “RST”.
3. Release and then press the DOWN arrow button again, the recalibration process will now begin.
4. When reset is completed, the LED Display will show 9.9”.
FRONT HANDSET ADJUSTMENT
36.8
On/Off
LED Light
Variable
Dimmer
LED Light
Button
LED Display
Memory
Position
Buttons
Memory
Setting
Button
Height
Adjustment
Buttons

AMOBI DESK SET UP AND USER GUIDE | 20 amqsolutions.com
SETTING UP
To Lock the Handset
Press and hold the “M” button (about 8 seconds) until the LED Display switches to “S -” and then “LOC”.
Release the button.
To Unlock the Handset
Press and hold the “M” button (about 8 seconds) until the LED Display switches from “LOC” to the height
number.
Release the button.
Changing Anti-collision Sensitivity
When the desk is obstructed during height adjustment, with the anti-collision function, the desk will go back
for a distance to avoid an accident.
1. Press the DOWN button on the Handset until the base reaches its lowest position. Press and hold the
DOWN button again until the LED Display reads “RST”.
2. Press and hold the UP button (about 5 seconds) while the LED flashes “RST” and then switches to
either:
10.5 = 22 lbs (10 kg) most sensitive setting
10.6 = 33 lbs (15 kg) middle setting
10.7 = 44 lbs (20 kg) least sensitive setting
3. Release the UP button. Press and hold the UP button again until the desired setting is reached. Once
the chosen setting is displayed, release the button and wait about 5 seconds for the display to return to
“RST”.
4. Finish the reset process by pressing and holding the DOWN button until the desk lowers a little bit more,
slightly rises and stops. Release the button. The new anti-collision sensitivity setting is saved and your
desk is now ready to use.
Setting a Custom Height Range
1. This base is designed to go to its minimum and maximum heights, allowing for the widest possible
range. If you prefer to change the settings to a more narrow range, follow these steps:
Setting a Custom Maximum Height
1. Use the UP/DOWN buttons to move the base to the desired maximum-height position.
2. Press the “M” button and release. Then press the UP button and release. The LED Display will flash “S
-”.
3. Press and hold the “M” button (about 2 seconds) until the LED Display changes to “999”. The display
will automatically return to the selected height. The new Maximum limit is now set.
Setting a Custom Minimum Height
1. Use the UP/DOWN buttons to move the base to the desired minimum-height position.
2. Press the “M” button and release. Then press the DOWN button and release. The LED Display will flash “S -”.
3. Press and hold the “M” button (about 2 seconds) until the LED Display changes to “000”. The display
will automatically return to the selected height. The new Minimum limit is now set.
FRONT HANDSET ADJUSTMENT (CONT.)
Other manuals for Amobi Desk One
1
This manual suits for next models
1
Table of contents
Other AMQ Office Equipment manuals
Popular Office Equipment manuals by other brands

hushoffice
hushoffice hushwork HUS-BX-009 Maintenance and safety manual

Formax
Formax CT-20 Assembly, operation and parts manual

GBC
GBC Coilbind C100 Nstruction manual

PrePRESS
PrePRESS PANTHER PRO/46 Technical manual

Framery Q
Framery Q Maggie installation instructions

Vicoustic
Vicoustic VicBooth Office installation manual