Anatomic SITT Zitzi Seabass Pro User manual

User Manual
Seabass Pro
EN
2018-10-25

2User manual Zitzi Seabass Pro www.anatomicsitt.com | +46 11 16 18 00

3User manual Zitzi Seabass Pro www.anatomicsitt.com | +46 11 16 18 00
Introduction
In order to use the Zitzi Seabass PRO in its full extent, it is important that you read
this manual. This applies to everyone close to the user.
Adaptation/fitting the Zitzi Seabass Pro must be done by a medically qualified
person. If you need additional information, please contact Anatomic SITT AB.
Field of application
The product is only intended for use as a chassi together with a seating system
together produced by Anatomic SITT AB. If other uses are desired, please contact
Anatomic SITT AB.
Correspondence
Zitzi Seabass Pro and its accessories are CE marked products. A unique serial
number is located on a label placed under the activation housing. This serial
number should be quoted in any correspondence regarding the product.
Crash tested
Zitzi Seabass Pro is crash tested and approved according to 7176-19 for 135 kg in
car. It is also tested according to ISO 10542. For more information see page 46.
Check the checkbox if the product
is CUSTOMIZED.
The CE Mark is no longer valid and
should be removed.
Place of label
This product is manufactured by Anatomic SITT AB
Postal address Anatomic SITT AB, Box 6137, SE-600 06 Norrköping
Street address Anatomic SITT AB, Terminalgatan 1, SE-603 61 Norrköping
Phone +46 11-161800
Fax +46 11-162005
Email info@anatomicsitt.com
Webb anatomicsitt.com
Instructions movies youtube.com/anatomicsitt
Follow us on facebook.com/anatomicsitt
Safety precautions
Note that a risk assessment always should be done by a medically
qualified person, before use or adaptation as well as before a
customization of the product. The product must never become
dangerous to use and the patient should never be left unattended
in the product if there is a risk of serious injury.

4User manual Zitzi Seabass Pro www.anatomicsitt.com | +46 11 16 18 00
Safety precautions ������������������������������ 3
Seat part ���������������������������������������������6
Mounting the seatplate................................................. 6
Adjusting the seat depth.............................................. 6
Tilting the seat����������������������������������� 8
Tilting the seat....................................................................8
Armrests from seat������������������������� 10
Installation of armrests from the seat...................10
Width adjustment ...........................................................10
Height adjustment..........................................................10
Angle adjustment up / down....................................10
Angle adjustment laterally..........................................10
Armrest from back pipes ���������������12
The foldable function .................................................... 12
Height adjustment.......................................................... 12
Width adjustment ........................................................... 12
Angle adjustment up / down.................................... 12
Angle adjustment laterally.......................................... 12
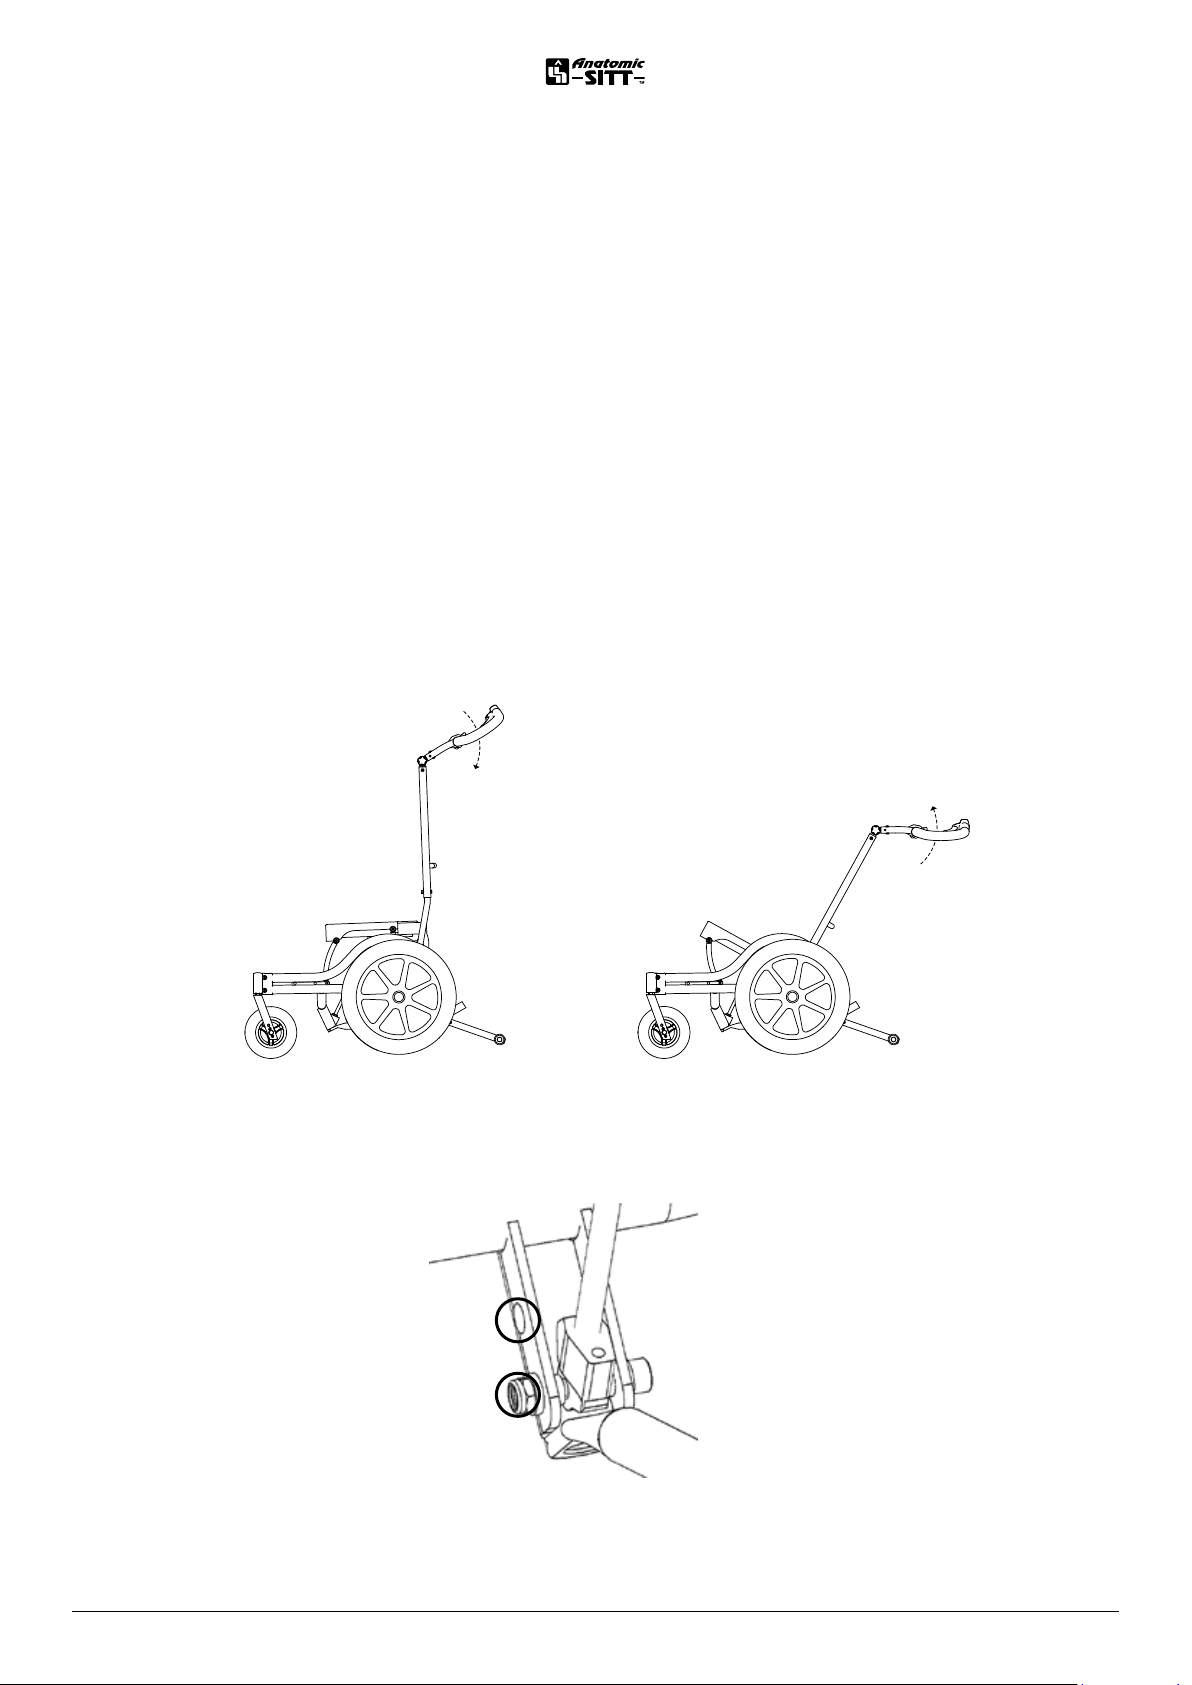
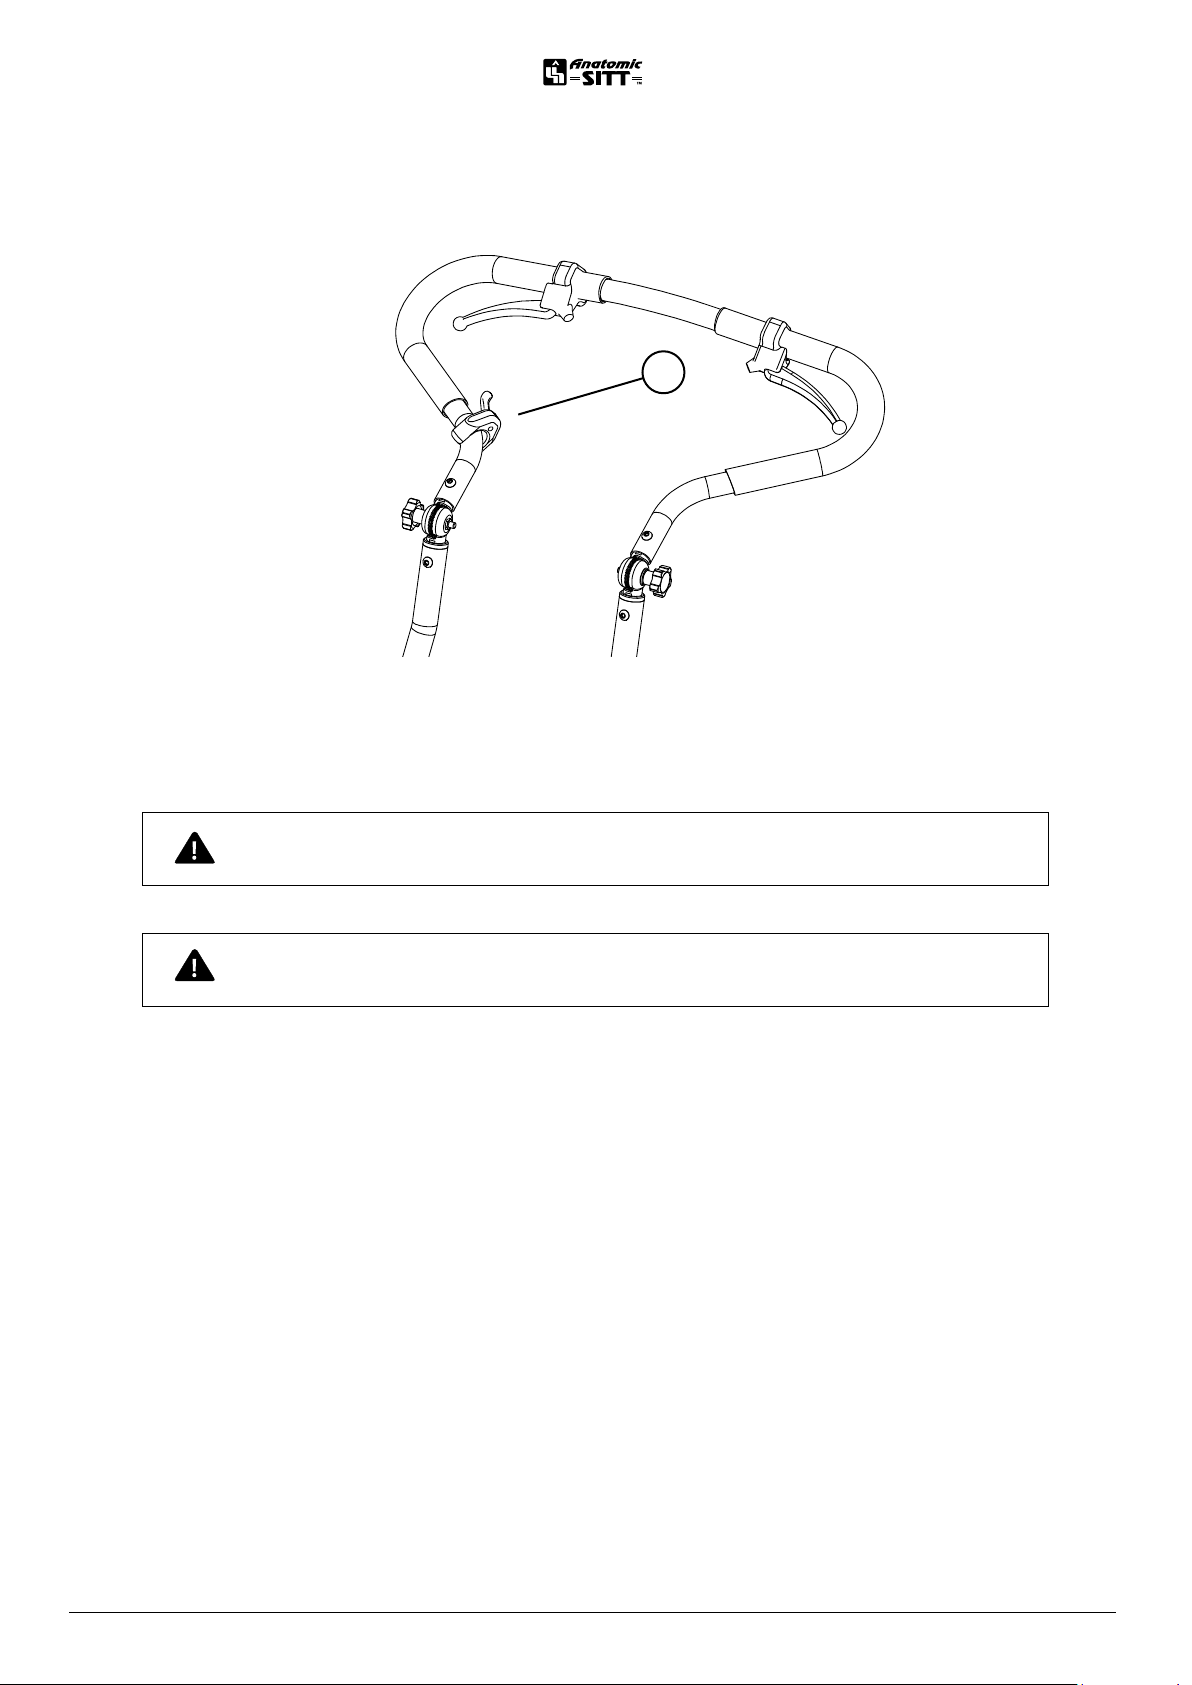
Driving bow�������������������������������������� 14
Mounting of driving bow.............................................14
Height adjustment of the driving bow ................14
Depth adjustment of the driving bow ..................14
Angle adjustment of driving bow ...........................14
Angle adjustment of bow handle............................14
Foldable driving bow��������������������� 16
Mounting of the foldable driving bow ..................16
The foldable function ....................................................16
Height adjustment of foldable driving bow .......16
Depth adjustment of foldable driving bow ........16
Angle adjustment of foldable driving bow.........16
Angle adjustment of bow handle............................16
Driving handles ��������������������������������18
Mounting of driving handles...................................... 18
Height adjustment of driving handles ..................18
Depth adjustment of driving handles ................... 18
Angle adjustment of driving handles.................... 18
Wheels���������������������������������������������� 20
Mounting driving wheel with quick-release ......20
Release driving wheel with quick-release..........20
Wheel positions .............................................................. 22
Caster�������������������������������������������������24
Installation of caster .....................................................24
Mounting of the caster on caster house fork...24
Caster positioning..........................................................24
Adjustment of caster fork..........................................24
Angle adjustment of caster fork.............................24
Brakes ������������������������������������������������26
Using drum brake...........................................................26
Setting the brakes..........................................................26
Releasing the brakes ....................................................26
If the brakes does not work ......................................26
Installation of drum brake..........................................28
Parking brakes�������������������������������� 30
Mounting parking brake for 12-16’’ wheel ...........30
To use the parking brake............................................30
Mounting parking brake for 20-24’’ wheel ......... 31
To use the parking brake............................................. 31
Footrest���������������������������������������������������32
Mounting of footrest ....................................................32
Safety stop ........................................................................32
Adjusting the angle of the knee-joint ..................32
Adjusting the height of the footrest.....................32
Footrest brackets����������������������������������34
Fixt footrest brackets...................................................34
Suspended footrest adapter ....................................34
Turn-up footrest..............................................................34
Ball joint adapter............................................................34
Calf support �������������������������������������������36
Mounting calf support .................................................36
Adjusting the height.....................................................36
Adjusting the width ......................................................36
Table of contents

5User manual Zitzi Seabass Pro www.anatomicsitt.com | +46 11 16 18 00
Anti-tip device���������������������������������������38
Mounting of anti-tip protection ..............................38
Using the anti-tip device ............................................38
Step bar�������������������������������������������������� 40
Mounting the step bar................................................ 40
Using the step bar ........................................................ 40
Transportation kit ��������������������������������� 41
Mounting of the front bracket ..................................41
ounting of the rear bracket........................................41
Using transportation brackets..................................41
Direction lock ����������������������������������������43
Installation direction lock ...........................................43
Activate direction lock.................................................43
Releasing direction lock..............................................43
Mudguards��������������������������������������������� 44
Mounting of mudguards............................................ 44
Adjusting the mudguards ......................................... 44
E-drive �����������������������������������������������������45
E-drive together with Seabass Pro .......................45
Mounting of E-drive......................................................45
Using E-drive....................................................................45
Transportation in a vehicle ���������������� 46
Guidelines for transportation in a vehicle ..........46
Crashtested and approved ........................................46
Service and maintenance��������������������48
Service intervals..............................................................48
Cleaning and washing instructions .......................48
Gas piston..........................................................................48
Battery care ......................................................................48
Warranty.............................................................................49
Combinations...................................................................49
Spare parts........................................................................49
Marking ...............................................................................49
Recycling............................................................................49
Reconditioning ������������������������������������� 50
Introduction ......................................................................50
Cleaning..............................................................................50
Finishing .............................................................................50
Marking ...............................................................................50
Wheels.................................................................................50
Paint......................................................................................50
Stability ................................................................................ 51
Tubular frame and details ........................................... 51
Forks...................................................................................... 51
Driving bow and push-handle .................................. 51
Brakes ................................................................................... 51
Folding mechanism and tilt ....................................... 51
Function control .............................................................. 51
Adaptation and customization����������52
Guidelines and recommendations ......................... 52
Allowed adaptations of the Seabass.................... 52
Risk analysis...................................................................... 52
Marking ............................................................................... 52
Terms of sale������������������������������������������53
Warranty.............................................................................53
Warranty claims..............................................................53
Returning products....................................................... 53
Technical data����������������������������������������54
Product data.....................................................................54

6User manual Zitzi Seabass Pro www.anatomicsitt.com | +46 11 16 18 00
Seat part
Mounting the seatplate
The seat systems mounting plate is easily mounted on the chassis lower seat
plate by use of four (4) screws, washers and nuts in marked tracks (A).
Place the seat systems mounting plate (B) on the bottom seat plate (C) by use of
the supplied screw (D). Then meet with the washer and nut beneath the bottom
seat plate. Tighten the screws (D) properly.
Adjusting the seat depth
In order to get the right weight distribution and a well balanced chassi, the
driving bow of the chassi can be deep adjusted. A well-balanced chassi allows
easier operation.
To adjust the seat depth of the base, loosen the screws (F) below the rear part of
the seat plate and then move the driving bow to the desired depth. Then tighten
the screws (F) again.
Depending on the size of the seat system, the footrest depth should also be
adjusted when adjusting the driving bow. To adjust the footrest depth on the
base, loosen the screws (E) under the front part of the seat plate slightly and
then move the footrest to the desired depth. Then tighten the screws (E) again.
The seat depth adjustment is fitted with a safety stop, which means that you can
never adjust the footrest / driving bow too far, or in any other way that involves
danger of use.
TIP! The picture only shows mounting instructions for one type of
mounting plate. For further information about other mounting plates,
see user manuals for the selected seating system.
Note! You don’t need to loosen the screws (E) and (F)
completely to adjust the seat depth.

7User manual Zitzi Seabass Pro www.anatomicsitt.com | +46 11 16 18 00
E
A
C
D
B
Seat depth adjustment
(from behind)
F
Washer
M6/16x1 mm
Locker nut
M6
4 pcs 4 pcs
Allen screw M6x20
Countersunk (D)
4 pcs

8User manual Zitzi Seabass Pro www.anatomicsitt.com | +46 11 16 18 00
Tilting the seat
Seabass has two dierent tilt positions, which are set using holes at the bottom
of the gas piston. If the piston is attached to the standard hole at the bottom (as
shown below) tilt is obtained at 0° to 35°. If the piston is attached to the hole
above, a tilt of -7° to 28° is obtained.
To tilt the seat, push the lever (A) while holding the driving bow with one hand and
push it down / forward.
Release the slider (A) when you have reach the desired tilt.
To reset the seat angle to the original position, press the slider (A) and drag
the driving bow up / to behind.
Tilting the seat
Full tilt
No tilt
Montering av negativ tilt Seabass
Seabass har två olika lägen för tilt vilket ställs in med hjälp av hål vid nedre gaskolvsinfästningen. Om
kolven fästs in i hålet längst ned (som på bild nedan) erhålls tilt på 0-35O. Om kolven fästs in i hålet
ovanför erhålls en tilt på -7-28O.
Negative tilt
Standard tilt

9User manual Zitzi Seabass Pro www.anatomicsitt.com | +46 11 16 18 00
Note! Be careful to avoid risk of pinching
Note! When tilting the seat, the center of gravity is shifted down-
wards / forward, which means reduced tipping danger.
A

10User manual Zitzi Seabass Pro www.anatomicsitt.com | +46 11 16 18 00
Armrests from seat
Installation of armrests from the seat
Mount the attached profile (A) under the front of the seat plate with the
supplied screw (B), washer (C) and nut (D) in the intended groove. Insert screw
(B) from below and put the washer (C) and nut (D) on top and tighten.
Mount the armrests by inserting the rail pins (I) in the profile tracks on the
armrest bracket (J). Adjust the width of the armrests to suite the width of the
seat system.
Tighten the screws (E) properly.
Width adjustment
To change the width of the armrest, loosen screw (E) and move the
armrest to desired positon. Tighten screw (E).
Height adjustment
To change the height of the armrest, loosen screw (F) and move the
armrest to desired height. Tighten screw (F).
Angle adjustment up / down
To adjust the angle of the armrest, loosen the hand lever (G) and move the
armrest to the desired angle. Tighten the hand lever (G).
Angle adjustment laterally
To adjust the armrest plate sideways and in angle, loosen the screws (H) and
move then armrest to desired position. Tighten the screws (H).
Note! Be careful to avoid risk of pinching.

11User manual Zitzi Seabass Pro www.anatomicsitt.com | +46 11 16 18 00
A
C
D
B
E
F
J
G
I
Armrest plate
(from below)
H

12User manual Zitzi Seabass Pro www.anatomicsitt.com | +46 11 16 18 00
The foldable function
To fold the armrest aside, pull the locking mechanism (A) downwards and then fold
the armrest away. Ensure you hear a click sound when folding back the armrest.
It is possible to angle the armrest with the three-hole position of the locking
mechanism (A).
Height adjustment
To change the height of the armrest, loosen screws (B) and move the
armrest to desired height. Tighten screws (B).
Width adjustment
To change the width of the armrest, loosen screw (C) and move the
armrest to desired positon. Tighten the screw.
Angle adjustment up / down
To adjust the angle of the armrest, loosen the hand lever (D) and move the armrest
to the desired angle. Tighten the hand lever (D).
Angle adjustment laterally
To adjust the armrest plate sideways and in angle, loosen the screws (E) and move
then armrest to desired position. Tighten the screws (E).
Armrest from back pipes
Note! Ensure you hear a click sound when folding back the armrest.
It indicates that the locking mechanism has become locked.

13User manual Zitzi Seabass Pro www.anatomicsitt.com | +46 11 16 18 00
A
D
C
B
A
A
1 : 3
E
Three-holes position
For angleadjusting the armrests
A
A
1 : 2
Armrest plate
(from below)

14User manual Zitzi Seabass Pro www.anatomicsitt.com | +46 11 16 18 00
Driving bow
Mounting of driving bow
When mounting the driving bow, you must first mount the driving bow bracket (A).
Insert the bracket (A) into the intended hole (B) in the rear part of the seat plate,
and then tighten the screws (C).
Then put the driving bow (D) over the vertical support (A1) of the bracket and then
tighten the screws (E).
Height adjustment of the driving bow
To height adjust the driving bow, loosen the screws (E) and then move the bow to
any of the three dierent (3) height positions. Tighten the screws (E).
Depth adjustment of the driving bow
To deep adjust the driving bow (extending the seat depth), loosen the screws (C)
slightly, under the rear part of the seat plate. Move the driving bow bracket to the
desired depth. Tighten the screws (C).
Angle adjustment of driving bow
The driving bow can be adjusted steplessly according to seating system. Release
the locking of the bow by loosening both levers (F) and adjust to the desired angle.
Then tighten both lever handles (F).
Angle adjustment of bow handle
To angle adjusting the bow handle loosen the knobs (G) and adjust to desired
angle. Tighten the knobs (G).
Note! The driving bow should always rest against the back of the
seat system during transportation in a vehicle.
Note! The driving bow bracket is equipped with a safety stop, which
ensures that you can’t compromise with the safety of the driving bow.

15User manual Zitzi Seabass Pro www.anatomicsitt.com | +46 11 16 18 00
G
A
B
E
F
CA1

16User manual Zitzi Seabass Pro www.anatomicsitt.com | +46 11 16 18 00
Foldable driving bow
Mounting of the foldable driving bow
When mounting the foldable driving bow, you must first mount the bracket (A).
Insert the bracket (A) into the intended hole (B) under the rear part of the seat
plate. Tighten the screws (C).
The foldable function
To fold down the driving bow, unlock the cam levers (D) and fold the bow forwards.
Depth adjustment of the foldable driving bow
To deep adjust the driving bow (extending the seat depth), loosen the screws (C)
slightly, under the rear part of the seat plate. Move the driving bow bracket to the
desired depth. Tighten the screws (C).
Angle adjustment of bow handle
To angle adjusting the bow handle loosen the knobs (F) and adjust to desired angle.
Tighten the knobs (F).
Switch to cam lever
The knobs can be replaced by cam levers, you order the cam levers separately and
install them by unscrew the knobs and replace them with the cam levers. Be careful,
so you don’t tighten the handle too hard for operate.
Note! The driving bow bracket is equipped with a safety stop, which
ensures that you can’t compromise with the safety of the driving bow.
Note! The driving bow should always rest against the back of the seat
system during transportation in a vehicle.
Angle adjustment of foldable driving bow
The driving bow can be adjusted steplessly according to seating system.
Release the locking of the bow by loosening both cam levers (E) and
adjust to the desired angle. Then tighten both cam lever handles.

17User manual Zitzi Seabass Pro www.anatomicsitt.com | +46 11 16 18 00
B
A
DETAIL
A
SCALE
2 : 5
D
F
D
C
E
A

18User manual Zitzi Seabass Pro www.anatomicsitt.com | +46 11 16 18 00
Driving handles
Mounting of driving handles
When mounting the driving handles, you must first mount the bracket (A). Insert
the bracket (A) into the intended hole (B) under the rear part of the seat plate.
Tighten the screws (C).
Slide the driving handles (D) over the brackets vertical stay (A1).
Tighten the screws (E).
Height adjustment of driving handles
To height adjust the driving handle, loosen the screws (E) and then move the
handles to any of the three dierent (3) height positions. Tighten the screws (E).
Depth adjustment of driving handles
To deep adjust the driving handles (extending the seat depth), loosen the screws
(C) slightly, under the rear part of the seat plate. Move the driving bow bracket
to the desired depth. Tighten the screws (C).
Angle adjustment of driving handles
To angle adjust the driving handle loosen the levers (F) and adjust the handles to
desired angle. Tighten both lever handles (F).
Note! The driving handles bracket is equipped with a safety stop,
which ensures that you can’t compromise with the safety of the
driving bow.
Note! The driving bow should always rest against the back of
the seat system during transportation in a vehicle.

19User manual Zitzi Seabass Pro www.anatomicsitt.com | +46 11 16 18 00
E
B
A
A1
C
F
D

20User manual Zitzi Seabass Pro www.anatomicsitt.com | +46 11 16 18 00
Wheels
Mounting of driving wheel with quick-release
The driving wheels can easily be mounted and removed from the chassis with
quick-release. This can be very useful during transport purposes.
To mount the driving wheels (A), press and hold the button (B) in the wheel center,
while you stick the axle into the chassis until it stops. Release the press button (B).
Secure that the wheel is installated properly by trying to pull it outwards without
pressing the quick-release button (B).
Release the driving wheel with quick-release
To release the whhel, press and hold the button (B) in the wheel center as you pull
o the wheel from the chassis.
When you change drum brakes or quick-release axle you might need to adjust the
axle to lock correctly.
To adjust the axle, you adjust the nut (C) in or out on the axle. It shall be adjusted
so the two locking balls (D) is located exactly outside the sleeve. Make sure it is
locked by checking that the locking pin (E) is recessed.
Note! Make sure that the wheels are in locked position after using the
quick-release function.
Table of contents
Other Anatomic SITT Wheelchair manuals

Anatomic SITT
Anatomic SITT Zitzi Starfish Pro User manual

Anatomic SITT
Anatomic SITT Zitzi Flipper Pro User manual

Anatomic SITT
Anatomic SITT Zitzi Flipper Pro Flex User manual

Anatomic SITT
Anatomic SITT Zitzi Sharky Pro User manual

Anatomic SITT
Anatomic SITT Zitzi Delfi Pro User manual

Anatomic SITT
Anatomic SITT Zitzi Active User manual