ANCEL EU510 User manual

USER’S MANUAL
EU510
OBDII/EOBD+CAN
EU510

1. Safety Precautions and Warnings
To prevent personal injury or damage to vehicles and/or the
scan tool, read this instruction manual first and observe the
following safety precautions whenever working on a vehicle:
Turn the ignition off first,then connect 16-pin to plug,then turn the
ignition on.
Always perform automotive testing in a safe environment.
Do not attempt to operate or observe the tool while driving a vehicle.
Operating or observing the tool will cause driver distraction and
could cause a fatal accident.
Wear safety eye protection that meets ANSI standards.
Keep clothing, hair, hands, tools, test equipment, etc. away from all
moving or hot engine parts.
Operate the vehicle in a well ventilated place: Exhaust gases are
Poisonous.
Put blocks in front of the drive wheels and never leave the vehicle
unattended while running tests.
Use extreme caution when working around the ignition coil,
distributor cap, ignition wires and spark plugs. These components
create hazardous voltages when the engine is running.
Put the transmission in PARK (for automatic transmission) or
NEUTRAL (for manual transmission) and make sure the parking
brake is engaged.
Keep a fire extinguisher suitable for gasoline/chemical/electrical
fires nearby.
Don't connect or disconnect any test equipment while the ignition is
on or the engine is running.
Keep the scan tool dry, clean, free from oil/water or grease. Use a
mild detergent on a clean cloth to clean the outside of the scan tool,
when needed.
1EN

The first generation of On-Board Diagnostics (called OBD I) was developed by
the California Air Resources Board (CARB) and implemented in 1988 to monitor
some of the emission control components on vehicles. As technology evolved
and the desire to improve the On-Board Diagnostic system increased, a new
generation of On-Board Diagnostic system was developed. This second
generation of On-Board Diagnostic regulations is called "OBD II".
The OBD II system is designed to monitor emission control systems and key
engine components by performing either continuous or periodic tests of specific
components and vehicle conditions. When a problem is detected, the OBD II
system turns on a warning lamp (MIL) on the vehicle instrument panel to alert
the driver typically by the phrase “Check Engine” or “Service Engine Soon”. The
system will also store important information about the detected malfunction so
that a technician can accurately find and fix the problem. Here below follow
three pieces of such valuable Information:
OBD II Diagnostic Trouble Codes are codes that are stored by the on-board
computer diagnostic system in response to a problem found in the vehicle.
These codes identify a particular problem area and are intended to provide you
with a guide as to where a fault might be occurring within a vehicle. OBD II
Diagnostic Trouble Codes consist of a five-digit alphanumeric code. The first
character, a letter, identifies which control system sets the code. The other four
characters, all numbers, provide additional information on where the DTC
originated and the operating conditions that caused it to be set. Below is an
example to illustrate the structure of the digits:
2. General Information
2.1 On-Board Diagnostics (OBD) II
2.2 Diagnostic Trouble Codes (DTCs)
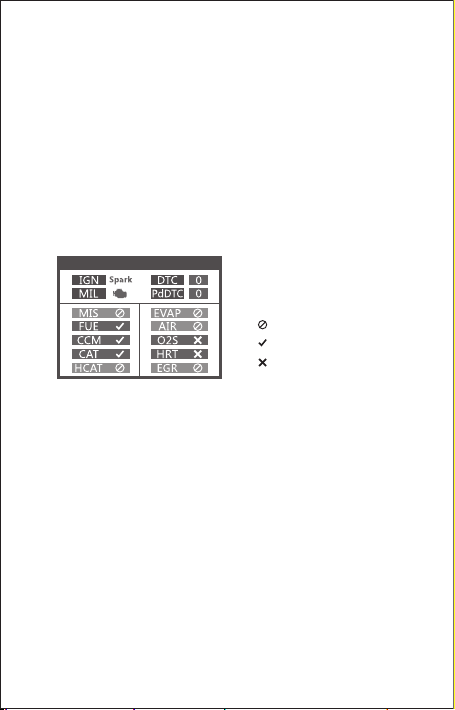
1) Whether the Malfunction Indicator Light (MIL) is commanded 'on' or 'Off';
2) Which, if any, Diagnostic Trouble Codes (DTCs) are stored;
3) Readiness Monitor status.
2EN

The DLC (Data Link Connector or Diagnostic Link Connector) is the
standardized 16-pin connector where diagnostic scan tools interface with the
vehicle's on-board computer. The DLC is usually located 12 inches from the
center of the instrument panel (dash), under or around the driver's side for most
vehicles. If the Data Link Connector is not located under the dashboard, a label
should be there revealing its location. For some Asian and European vehicles,
the DLC is located behind the ashtray and the ashtray must be removed to
access the connector. If the DLC cannot be found, refer to the vehicle's service
manual for the location.
DTC Example
P 0 5 2 0
System s
B = Body
C = Chassis
P = Powertr ain
U = Network
Last two digits identify individual
component within the system
Code Type
Generic (SAE):
P0
B0
C0
U0
Man u f acturer Sp ecific:
P1, P2
B1, B2
C1, C2
U1, U2
Su b -syst em s
1 = Fuel and air metering
2 = Ignition system or engine misfire
3 = Auxiliary emissions controls
4 = Vehicle speed control and idle controls
5 = Computer output circuits
6 = Transmission controls
Figure 1-2: Explanation of a diagnostic trouble code.
2.3 Location of the Data Link Connector (DLC)
Figure 1-3: The DLC connector (left) can be found in the
area of the car interior seen at right (black arrow).
3EN

3. Using the Scan Tool
3.1 Tool Description - ANCEL EU510
1. OBDII Connector- Connect the tool to the vehicle’s Data Link
Connector(DLC).
2. OK BUTTON- Confirm a selection (or action) from a menu.
3. ESC BUTTON- Cancel a selection (or action) from a menu or returns to
the menu.
4. UP BUTTON - Moves up through menu and submenu items in menu
mode.
OBDII/EOBD+CAN
EU510
1
3
2
4
5
7
6
8
9
4EN

5.DOWN BUTTON- Moves down through menu and submenu items in
menu mode.
6. LEFT BUTTON- When looking up datastream, if the datastream display
more than one screen, or turn page up or down when more than one page
is displayed.
7. RIGHT BUTTON- When looking up datastream, if the datastream
display more than one screen, or turn page up or down when more than
one page is displayed.
8. “I/M” BUTTON- Quick State Emissions readiness check and drive cycle
verification.
9. HELP BUTTON- Provides help information ,Press the help button will
obtain more the fault code explanation.
1) Display: 2.8” TFT 262K true color
2) Operating Temperature: 0 to 50℃(32 to 140 Fº)
3) Storage Temperature: -20 to 70℃(-4 to 158 Fº)
4) External Power: 8 to 36 V power provided via vehicle battery
5) Dimensions: 155.30 x 97.60 x 31.80 mm
6) Weight: 0.45kg
Remarks:
MIL Yellow- Dashboard MIL ON
MIL Gray-Dashboard MIL OFF
-not support
-complete
-not complete
I/M Readiness
3.2 Specifications
1) User's Manual -- Instructions on tool operations.
2) USB cable - Used to upgrade the scan tool.
3.3 Accessories Included
5EN

I/M Readiness
A snapshot of the emission systems operations for all OBD II vehicles -
i.e., misfire monitor, evap systems monitor and more. Choose [I/M] and
it displays as follow:
3.4 I/M
BAT Check
Turn off engine
OBDII I/M BAT
Lookup Review Setup
OBDII I/M BAT
Lookup Review Setup
The function is used to read real time battery voltage. From the Main
Menu, use the left / right scroll button to select the BAT menu and press
the OK button. the screen will display the interface as shown below:
Please turn off the engine.
3.5 BAT Check
6EN

OBDII I/M BAT
Lookup Review Setup
When press [OK] button and Start detection, it’s display interface:
For manufacturer specific codes , you'll need to select a vehicle make
on an additional screen to look for DTC definitions.
If definition could not be found (SAE or Manufacturer Specific), the
scan tool displays "DTC definition not found! Please refer to vehicle
service"manual !"
2) To exit to the Main Menu, press the ESC button.
The DTC Lookup function is used to search for definitions of Code
stored in the built-in Code library.
1) From the Main Menu, use the LEFT /DOWN scroll button to select
the Code Lookup and press the OK button.
3.6 DTC Lookup
DTC Lookup
Please input DTC:
The 1st range : P , C , B , U
The 2nd range : 0 , 1 , 2 , 3
The others from : 0 to F
Changing Data: [ ] or [ ]
Moving Cursor: [ ] or [ ]
Confirmation: OK
P0000
Current voltage: 11.80V
Min: 0 mS End: 2731 mS
Off: 11.80V
Min: 7.26V
Max: 12.46V
7EN

1) Select Language: Selects the desired language.
2) Unit of Measure: Set measure to English or Metric.
3) Beep Set: Turns ON/OFF beep.
4) Record: ON/OFF the Record.
5) Feedback.
6) About: Product information.
Tool Setup
Language
Unit of Measure
Beep
Record
Feedback
About
OBDII I/M BAT
Lookup Review Setup
OBDII I/M BAT
Lookup Review Setup
Review
Review DTC
Delete DTC Date
Delete All DTC Date
This function is used to review the recorded DTC. Select Review in the
Main Menu and press OK and the screen will display the interface as
shown below:
3.7 Review
The scan tool allows you to make the following adjustments and
settings:
3.8 Tool Setup
8EN

Choose [About] and it displays as follow:
Tool Information
Software Version:
Hardware Version:
Serial Number:
Supported:
01.62.000
01.10.000
ANCEL20180300000001
OBD-II/EOBD
4. Click ”Review&Print” and automatically generate diagnostic reports.
1. Download upgrade file from ANCEL website.
2. The device is connected with computer through USB cable.
3. Open the “update” application.
3.9 Review&Print diagnostic reports
Welcome to ANCEL’s vehicle diagnostic tool !
9EN

1.When the device read the fault codes, the screen will display the
codes as shown below:
3.10 Help Function
2. if users view the help icon picture in the menu, please press the help
function key , it can read more about the codes information, and why
this fault codes occurred. the screen will display the help information as
shown below:
Read Codes
P0123
Throttle/Pedal Position Sensor/
Switch A Circuit High"
1/2
General
DTC HELP
P0123 1/2
General
Possible Cause:
1.Faulty throttle position sensor
2.Throttle position sensor harness
is open or shorted
3.Throttle position sensor circuit poor
electrical connection
10 EN

CAUTION: Don't connect or disconnect any test equipment with
ignition on or engine running.
1) Turn the ignition off.
2) Locate the vehicle's 16-pin Data Link Connector (DLC).
3) Plug the scan tool cable connector into the vehicle's DLC.
4) Turn the ignition on. Engine can be off or running.
5 ) Press OK to enter Main Menu . UP /DOWN button to select
Diagnostics from the menu.
4. OBD II Diagnostics
OBDII I/M BAT
Lookup Review Setup
6) Press OK to confirm.
If "LINKING ERROR!" message shows on the display.
- Verify that the ignition is ON;
- Check if the scan tool's OBD II connector is securely connected to
the vehicle's DLC;
- Turn the ignition 'off' and wait for about 10 seconds. Turn the
ignition back to 'on' and repeat the procedure from step 5.
View Data
JI850 VPW
J1850 PWM
ISO 15765-4 CAN11Bit
ISO 15765-4 CAN29Bit
ISO 14230 KWP
ISO 14230 KWP5BPS
ISO 9141-2
×
×
×
×
×
...
...
Entering system please wait...
1. Vehicles that comply with the OBD2 protocols support these features:
[Read codes], [Erase codes], [Data stream], [Vehicle information].
Diagnostic Menu
Read Codes
Erase Codes
I/M Readiness
Data Stream
Freeze Frame
O2 Sensor Test
Diagnostic Menu
On-Board Monitioring
Evap System Test
Vehicle Information
11 EN

When the vehicle has no fault code, the device displays the following menu
prompts:
For example 2:[Evap System Test]Function: The Evaporative Emission
Control System (EVAP) is used to prevent gasoline vapors from escaping into
the atmosphere from the fuel tank and fuel system. OBDII monitors the
vehicle’s EVAP system, the device sends a signal, different vehicles will
respond differently.
2. Whether the menu function can read the relevant data, the situation of
different brand vehicles is different, subject to actual test.[IM Readiness,
Freeze frame、O2 Sensor test, On-Board monitoring, Evap system test ]
For example 1:Freeze frame refers to the moment when the fault occurs,
some of the most important parameter values of the engine .When the vehicle
has a fault code, the device displays the following menu prompts:
2.1 When the vehicle supports the EVAP test, the device displays the following
menu prompts:
Freeze Frame
LONGFT1
MAP
RPM
VSS
SPARKADV
IAT
0.0%
0.0kPa
0/min
0km/h
5.0°
-40℃
Datastream
The vehicle does not have
freeze frame data.
12 EN

1) Select OBDII in Main Menu and press OK, shown as follow :
stored emission-related codes is hard codes which illuminate
malfunction indicator lamp(MIL).
pending codes is current codes or historical codes which will not
illuminate malfunction indicator(MIL).
4.1 Diagnostic Menu
MIL Status
DTCs in this ECU
Readiness Supported
Readiness Completed
Readiness Not Supported
Datastream Suppored
Ignition
Protocol Type
ON
3
8
5
3
66
Spark
VPW
Monitor Status
2.2 When the vehicle does not support the EVAP test, the device displays the
following menu prompts:
Evaporative system leak
test passed
Evap System Test
Evaporative system leak
test not supported
Evap System Test
13 EN

1) Select Read Codes and press OK in Diagnostic Menu. If there are
some codes, the screen will display the codes as shown below:
4.2 Read Codes
Read Codes
Current DTCs ($03)
Pending DTCs ($07)
Permanent DTCs ($0A)
2) Press OK to the Diagnostic Menu, screen will display as follow :
Diagnostic Menu
Read Codes
Erase Codes
I/M Readiness
Data Stream
Freeze Frame
O2 Sensor Test
2) According to the above figure to select different item by pressing UP
or DOWN and press OK to confirm.
3) After viewing all the codes, you can press ESC to return to the
previous menu.
Read Codes
P0107
Manifold Absolute
Pressure/Barometric
Pressure Circuit Low
1/2
General
14 EN

2) According to the above figure to press OK and the screen will display
the interface as shown on the next page:
1) Select Erase Codes, the screen will display the interface as shown
below. Press OK to erase DTC's, and the screen will display the
interface as shown below:
4.3 Erase Codes
Erase DTC
Clear/Reset Emission-
Related Diagnostic
Information,Are you sure?
Erase DTC
Please Turn lgnition ON
with Engine Off Press
enter key to continue!
Erase DTC
Emission-Related
Diagnostic Information has
been Cleared!
Before performing this function, make sure to retrieve and record the
trouble codes.
After clearing, you should retrieve trouble codes once more or turn
ignition on and retrieve codes again. If there are still some trouble
codes in the system, please troubleshoot the codes using a factory
diagnosis guide, then clear the codes and recheck.
Notes:
Select I/M Readiness and press OK, the screen will display the
interface as shown below:
4.4 I/M Readiness
15 EN

I/M readiness is to test Misfire / Fuel system / Comprehensive
component, You can use UP or DOWN button to select and press OK
shown as follow :
Diagnostic Menu
Read Codes
Erase Codes
I/M Readiness
Data Stream
Freeze Frame
O2 Sensor Test
Since DTCs Were Cleared
This Drive Cycle
I/M Readiness
N/A means not available on this vehicle, INC means incomplete or not
ready, OK means Completed or Monitor Ok.
Press UP or DOWN button to select Data Stream in Main Menu
interface and then press OK button to confirm, the screen will display
the interface as shown below:
4.5 Data Stream
Diagnostic Menu
Read Codes
Erase Codes
I/M Readiness
Data Stream
Freeze Frame
O2 Sensor Test
I/M Readiness
Misfire monitor
Fuel system monitor
Comprehensive component monitor
Catalyst monitor
Heated catalyst monitor
Evaporative system monitor
Secondary air system monitor
Oxygen sensor monitor
Oxygen sensor heater monitor
EGR and/or VVT syetem monitor
N/A
N/A
OK
N/A
N/A
N/A
N/A
INC
INC
INC
View All Items
Select Items
View Graphic Items
Datastream
16 EN

Select [ View All Items ] and press OK button, the screen will display
the interface as shown below:
Datastream
PID07
Get supported data
stream.Loading...
All Datastream
FUELSYSA
FUELSYSB
LOAD_PCT
ECT
SHRTFT1
LONGFT1
OL
N/A
0.0%
53℃
32.8%
0.0%
After selected items and press ESC, the screen will display as follow:
Choose [ select items ] and press OK button. After that, press OK
button again, shown as follow:
FUELSYSA
FUELSYSB
LOAD_PCT
ECT
SHRTFT1
OL
N/A
0.0%
53℃
32.8%
Selected Datastream
[ ]
[ ]
[ ]
[ ]
[ ]
Select Datastream
Fuel system 1 status
Fuel system 2 status
Calculated LOAD Value
Engnie Coolant Temperature
Short Term Fuel Trim-Bank1
√
√
√
√
√
17 EN

FUELSYSA
Fuel system 1 status
[ ]
[ ]
[ ]
[ ]
[ ]
Select Datastream
√
Engine Coolant Temperature
Short Term Fuel Trim-Bank2
Short Term Fuel Trim-Bank4
Intake Manifold Absolute Pressure
Intake Air Temperature
Data Stream
max 0.0 95 0.0
min
LOAD_PCT=0.0%
SHRTFT1=0.0%
ECT=95℃
0.0 95 0.0
Press OK to select [ View Graphic Items ] in Data stream menu, after
selected items, the screen will display the interface as shown below:
Press ESC to return to display :
Max lines is 3.
Press ESC to return to previous menu.
You can view all data stream items or select a certain item of live data
with a graph.
If you want to know means of the abbreviation data, you can press the
OK Button, the screen will display the interface as shown below:
18 EN

When an emission-related fault occurs, a snapshot of current vehicle
parameter are recorded by the ECU.
Note: if DTCs were erased, Freeze Data may not be stored in vehicle.
4.6 View Freeze Frame
OBD II regulations set by the SAE require that relevant vehicles
monitor and test the oxygen (O 2) sensors to identify problems related
to fuel efficiency and vehicle emissions. These tests are not on-demand
tests and they are done automatically when engine operating
conditions are within specified limits. These test results are saved in the
on-board computer's memory.
The O2 Sensor Test function allows retrieval and viewing of O2 sensor
monitor test results for the most recently performed tests from the
vehicle's on-board computer.
The O2 Sensor Test function is not supported by vehicles which
communicate using a controller area network (CAN). For O2 Sensor
Test results of CAN-equipped vehicles, see chapter "On-Board Mon.
Test".
4.7 O2 sensor test
Diagnostic Menu
Read Codes
Erase Codes
I/M Readiness
Data Stream
Freeze Frame
O2 Sensor Test
Select Freeze Frame in main menu interface, the screen will display the
interface as shown below:
You can use UP/ DOWN button to view the data. Press ESC to return
to Diagnostic Menu.
Freeze Frame
LONGFT1
MAP
RPM
VSS
SPARKADV
IAT
0.0%
0.0kPa
0/min
0km/h
5.0°
-40℃
19 EN
Table of contents
Other ANCEL Diagnostic Equipment manuals