manuals.online logo
Brands
  1. Home
  2. •
  3. Brands
  4. •
  5. Anthro
  6. •
  7. Indoor Furnishing
  8. •
  9. Anthro AnthroCart User manual

Anthro AnthroCart User manual

Other Anthro Indoor Furnishing manuals

Anthro Steve's Station Advanced User manual

Anthro

Anthro Steve's Station Advanced User manual

Anthro FAJ60zz/xx3 Series User manual

Anthro

Anthro FAJ60zz/xx3 Series User manual

Anthro Zido ZHKzz User manual

Anthro

Anthro Zido ZHKzz User manual

Anthro Steve's Bench RTS90DGM Series User manual

Anthro

Anthro Steve's Bench RTS90DGM Series User manual

Anthro eNook II User manual

Anthro

Anthro eNook II User manual

Anthro GT03 Series User manual

Anthro

Anthro GT03 Series User manual

Anthro FCCzz/xx3 Series User manual

Anthro

Anthro FCCzz/xx3 Series User manual

Anthro Elevate Adjusta Series User manual

Anthro

Anthro Elevate Adjusta Series User manual

Anthro Zido Cart User manual

Anthro

Anthro Zido Cart User manual

Anthro Elevate II User manual

Anthro

Anthro Elevate II User manual

Anthro TAB16 User manual

Anthro

Anthro TAB16 User manual

Anthro FAJ30zz/xx3 Series User manual

Anthro

Anthro FAJ30zz/xx3 Series User manual

Anthro GT12 User manual

Anthro

Anthro GT12 User manual

Anthro Elevate Original Corner User manual

Anthro

Anthro Elevate Original Corner User manual

Anthro 298 series User manual

Anthro

Anthro 298 series User manual

Anthro fit 24 User manual

Anthro

Anthro fit 24 User manual

Anthro Elevate II Adjusta User manual

Anthro

Anthro Elevate II Adjusta User manual

Anthro Elevate ELTA136 4 Series User manual

Anthro

Anthro Elevate ELTA136 4 Series User manual

Anthro Steve's Station Standard User manual

Anthro

Anthro Steve's Station Standard User manual

Anthro Space Pal User manual

Anthro

Anthro Space Pal User manual

Popular Indoor Furnishing manuals by other brands

Regency LWMS3015 Assembly instructions

Regency

Regency LWMS3015 Assembly instructions

Furniture of America CM7751C Assembly instructions

Furniture of America

Furniture of America CM7751C Assembly instructions

Safavieh Furniture Estella CNS5731 manual

Safavieh Furniture

Safavieh Furniture Estella CNS5731 manual

PLACES OF STYLE Ovalfuss Assembly instruction

PLACES OF STYLE

PLACES OF STYLE Ovalfuss Assembly instruction

Trasman 1138 Bo1 Assembly manual

Trasman

Trasman 1138 Bo1 Assembly manual

Costway JV10856 manual

Costway

Costway JV10856 manual

moss DESIGN Caisson Credenza Assembly instructions

moss DESIGN

moss DESIGN Caisson Credenza Assembly instructions

Aquaglide FULL DECK 15.0 owner's manual

Aquaglide

Aquaglide FULL DECK 15.0 owner's manual

AREBOS AR-HE-SW30 user manual

AREBOS

AREBOS AR-HE-SW30 user manual

Till-Hilft Fulda 87005.330 Assembly instructions

Till-Hilft

Till-Hilft Fulda 87005.330 Assembly instructions

Twoey Outside 2010 quick start guide

Twoey Outside

Twoey Outside 2010 quick start guide

Hettich Easys 200 operating instructions

Hettich

Hettich Easys 200 operating instructions

The bedboss RELAX 404 Series owner's manual

The bedboss

The bedboss RELAX 404 Series owner's manual

Oeseder Möbelindustrie Bern 991 720 Assembly instructions

Oeseder Möbelindustrie

Oeseder Möbelindustrie Bern 991 720 Assembly instructions

Costway HW68469 user manual

Costway

Costway HW68469 user manual

Next ALIX A27743 Assembly instructions

Next

Next ALIX A27743 Assembly instructions

BROSA Hans Assembly guide

BROSA

BROSA Hans Assembly guide

Prodigg MINIKA PBA015T-FUR installation manual

Prodigg

Prodigg MINIKA PBA015T-FUR installation manual

manuals.online logo
manuals.online logoBrands
  • About & Mission
  • Contact us
  • Privacy Policy
  • Terms and Conditions

Copyright 2025 Manuals.Online. All Rights Reserved.

TECHNOLOGY FURNITURE®
60” Wide AnthroCart
Assembly Instructions
01– Insert Screws ........................... Qty. 6 .......................... 325-5052-00
02– 1.75” Large End Caps............... Qty. 2 ............................ 175-5021-xx
03– Caster Inserts .......................... Qty. 6 ..........................525-1000-00*
04– 2 3/8” Locking Casters............... Qty. 2 .........................150-5003-03*
05– 2 3/8” Non-Locking Castors ...... Qty. 4 .........................150-5002-03*
06– Base Tube Screws.........................Qty. 4 ........................... 325-5000-00
07– 60” Wide Base Tube.....................Qty. 1 ..........................125-5177-xx
08– 23.875” Vertical Legs ..................Qty. 4 ..........................125-5020-xx
09– 3/4” Wood Screws..........................Qty. 21..........................325-5106-00
10– 56” Handle Lip...............................Qty. 1 ............................225-5347-xx
11– Support Screws.............................Qty. 16..........................325-5010-00
12– 58” Wide Bridge Pan ...................Qty. 1 ..........................225-5341-xx
13– Bracket Screws..............................Qty. 4 ............................325-5149-00
14– 4.75” Pan End Bracket ................Qty. 2 ............................225-5344-xx
15– Clamp Screws................................Qty. 4 ........................... 325-5086-00
Enclosed Parts List
Detailed views of all Hardware are provided with each Assembly Step.
16– Shelf Supports...............................Qty. 4 ............................175-5060-xx
17– Shelf Clamps..................................Qty. 4 ..........................175-5059-xx
18– 60” Wide Shelf..............................Qty. 1 ............................ 100-6337-xx
19– 1.5” Small End Caps................. Qty. 4 ............................ 175-5020-xx
20– 18” Bridge Side Gussets........... Qty. 2 ............................225-5337-xx
All fastener quantities listed here are the minimum needed for your
cart assembly. Your shipment may include a few extras.
Cable Management Components
Cable Alley, 9”....................Qty 1 ................................................175-5061-03
Cable Alley, 3”....................Qty 1 ................................................175-5062-03
Cord Handler......................Qty 1 ................................................175-5001-03
Self-threading Screws ....Qty 6................................................325-5010-00
Anthro® Corporation Technology Furniture®10450 SW Manhasset Drive Tualatin, Oregon 97062
SAVE THESE INSTRUCTIONS! anthro.com
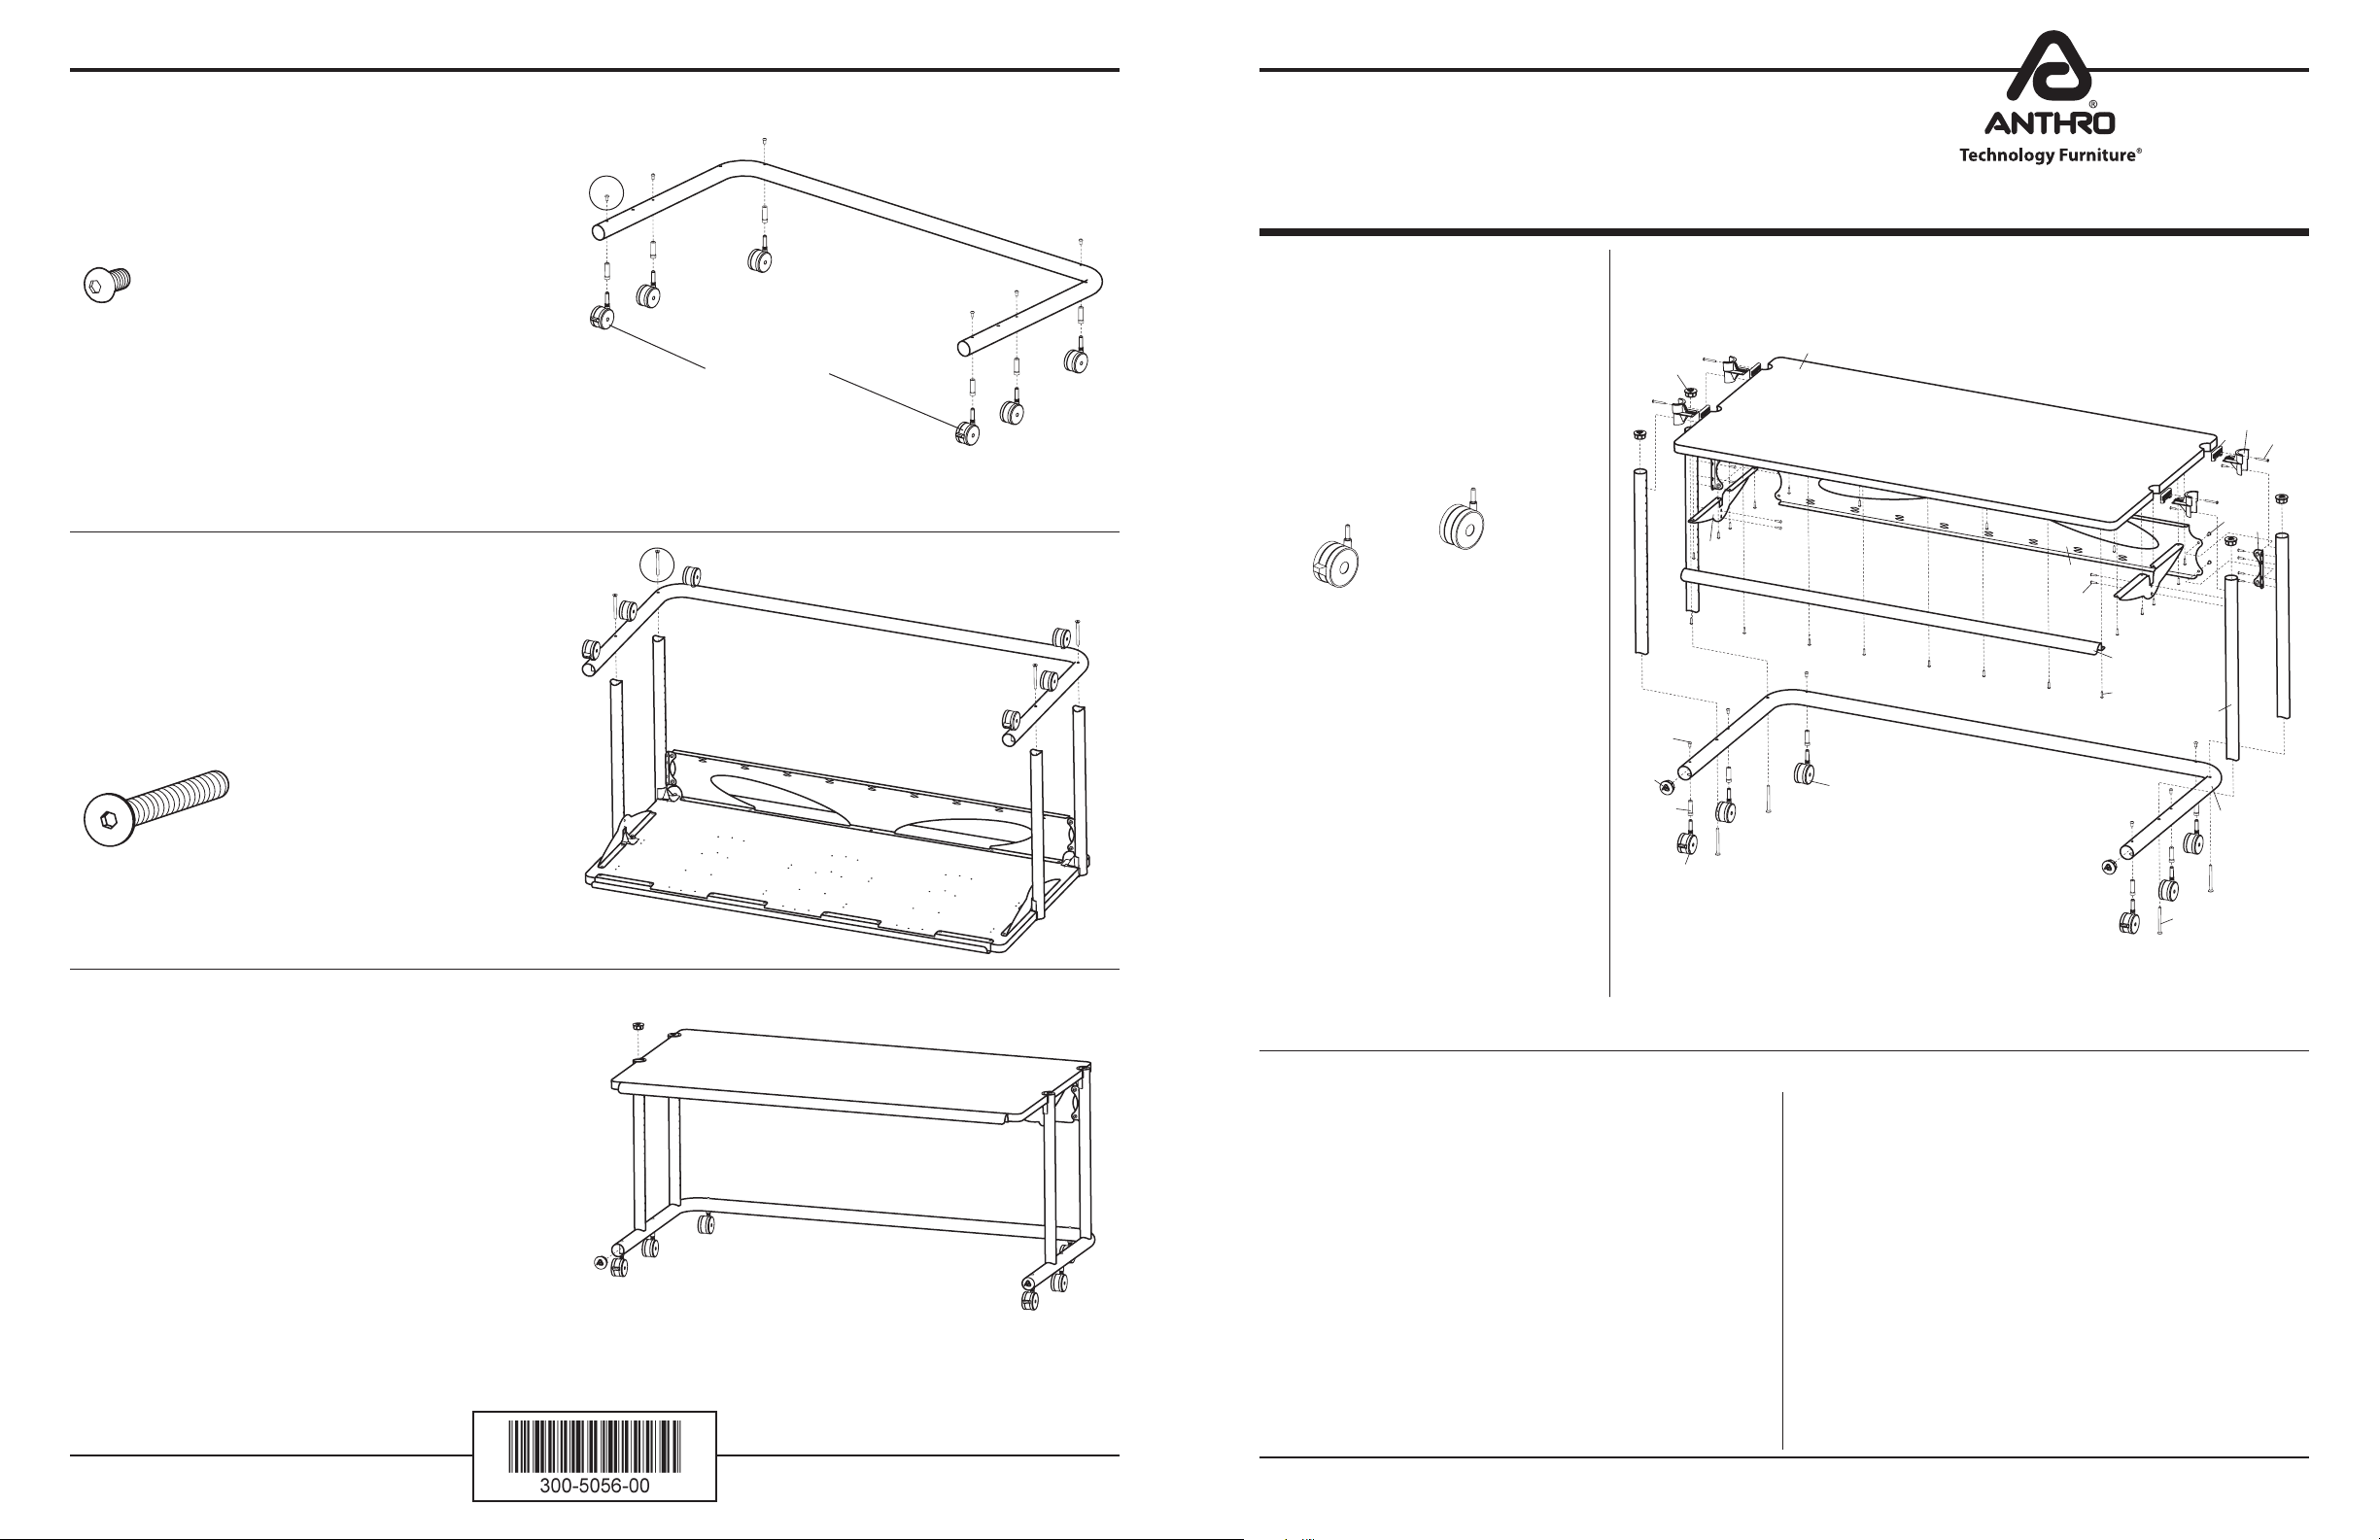
Step 8
Install all six caster inserts into the base tube and secure
with one Caster Insert Screw per insert.
Push the casters, (locking ones in front) into the caster
inserts.
Step 9
Place the base tube assembly (from Step 8) onto the
vertical legs of the shelf assembly (from Step 7).
Attach the base tube to the legs using a total of four
3-1/2” bolts.
TIGHTEN ALL SCREWS AND BOLTS.
Step 10
Carefully, rotate your cart over onto the casters.
Pop the 1.5” small end caps into the vertical legs and the
1.75” large end caps into the base tube.
After you add your equipment to the cart, select the cable
management components that suit.
To install the Cable Alleys, expand each sleeve and fit it over
a cart leg. Align the mounting hole(s) in the sleeve with the
holes on the leg, then install with self-threading screws.
To install the Cord Handler, snap the large end around any
cart leg, then route cables through the small end.
Congratulations! Your assembly is complete.
Please return the enclosed Registration Card to receive our
product updates, new catalogs, and sale flyers.
Thank you for choosing Anthro!
Rev C, January 2015
These Assembly Instructions are for
the H24xx.
Before beginning assembly of your 60”
Wide AnthroCart, please take a moment
to review the parts listed below to verify
that your shipment is complete.
Does your Cart have 4” Casters?*
(Such as an H24xx4. Your Caster Part
Numbers are given here.)
4” Locking Caster
150-5011-03
4” Non-Locking Caster
150-5010-03
04
06
07
03
02
09
12
05
01
08
13
Questions? 1-800-325-3841
14
15
16
17
19
20
11
1.5” Small End Cap
1.75” Large End Cap
18
Locking Casters
10
TOOLS
To make the assembly of your cart even
easier, we have included all of the required
tools . Use the handy Hex Driver Bit in your
electric drill in place of the Hex Driver.
Hex Driver 5/32”.................. 375-5000-00
Hex Driver Bit 5/32”........... 375-5003-00
8 oz. Rubber Mallet............ 375-5022-00
1/2” Caster Insert Screw
325-5052-00
3-1/2” Bolt
325-5000-00
Self-threading Screw
325-5010-00
Anthro® Corporation Technology Furniture®10450 SW Manhasset Drive Tualatin, Oregon 97062
Step 1
This instruction describes assembly of the H24xx 60” wide
AnthroCart. Before proceeding, please review the Assembly
Instructions of all Anthro products you purchased and plan
to include in this installation.
These instructions will place your shelf 28” from the floor
using the standard 2 3/8” casters.
Step 3
Attach all four shelf supports to the shelf.
Begin by first installing a shelf clamp into the shelf notch.
Be sure the pointed barbs face towards the outer shelf
edge.
Next, slide a shelf support into the recesses of the shelf
clamp and shelf. Push in as far as possible.
Finally, secure with a 1-5/8” Screw (325-5086-00).
anthro.com
Step 4
Position both Bridge Side Gussets onto the shelf underside
as shown. Align the predrilled holes on the underside of the
shelf with those on the gussets and secure into place using
a total of four Wood Screws (325-5106-00) per gusset.
Next, place the 56” lip onto the front of the shelf, aligning
the predrilled holes of the lip with those on the front of the
shelf. Secure the lip using a total of eight Wood Screws.
Step 5
Attach the front vertical legs by loosely installing one
Self-threading Screw (325-5010-00) through a front shelf
support into hole 2 from the top (non-coped end) of a leg.
These fasteners are cutting threads into the leg, so the first
few turns will require some force.
Next, loosely install two Self-threading Screws through a
side gusset into a corresponding leg.
Repeat for remaining front vertical leg and side gusset.
Step 7
Place the Bridge Pan onto the shelf between the rear
vertical legs. Secure the pan to the shelf by first
installing five Wood Screws (325-5106-00) through the
pan flange into the shelf.
Next, insert a 3/8” Screw (325-5149-00) from the rear of
the cart through the pan and carefully thread into a Pan
End Bracket. Finally, repeat for the remaining 3/8” Screws
and Pan End Bracket.
Questions? 1-800-325-3841
Step 2
Determine the best height for your shelf. Generally, a
28” high work surface works well for most people and
equipment.
For a final shelf height that is higher or lower than 28”,
refer to the illustration shown at right to determine which
holes to attach your shelf.
Your shelf locations may be changed after your cart has
been completely assembled by repeating Steps 5 and 6.
H24xx with 2 3/8” Casters
H24xx4 with 4” Casters
Hole 2=28”
Hole 3=27” (measured from the non-coped end)
Hole 4=26”
Hole 2=29”
Hole 3=28”
Hole 4=27”
Coped end
28”
29”
First
Next
Finally
Barbs
H24xx
60”Wide AnthroCart shown with 23/8” Casters
Add 1” to overall height for 4” Casters
28” High Shelf
60” Wide AnthroCart
Assembly Instructions
NOTE: Make certain the Bridge Side
Gussets are oriented so the flanges face
toward the inside of the cart.
Predrilled holes
NOTE: tighten all Wood and Bracket Screws after they
have ALL have been successfully installed.
Step 6
Attach the rear vertical legs by loosely installing one Self-
threading Screw through the rear shelf supports into hole 2
of each leg.
Next, position a Pan End Bracket against a rear vertical leg.
Secure into place by loosely installing four Self-threading
Screws through the Bracket into holes 3, 4, 6 and 7 from the
top of a rear leg. Repeat for remaining Pan End Bracket.
Front Shelf Support
Hole 2
Top
(non-coped)
end
Hole 2
Bottom
(coped)
end
Rear
Shelf Support
NOTE: make certain the Pan End Brackets are
oriented so the PEM Nuts are facing the front of
the Cart & both Brackets are LOOSELY installed.
Pan Flange
Bracket Screw
Wood Screw
Bridge Pan
56” Handle Lip
18” Side Gusset
Hole 2=28” using the 2 3/8” Casters
Hole 2=29” using the 4” Casters
Hole 2=25” using the Glides
LOOSELY install
the rear Legs
1-5/8" Screw
325-5086-00
3/4" Wood Screw
325-5106-00
Self-threading Screw
325-5010-00
3/4" Wood Screw
325-5106-00
3/8" Screw
325-5149-00