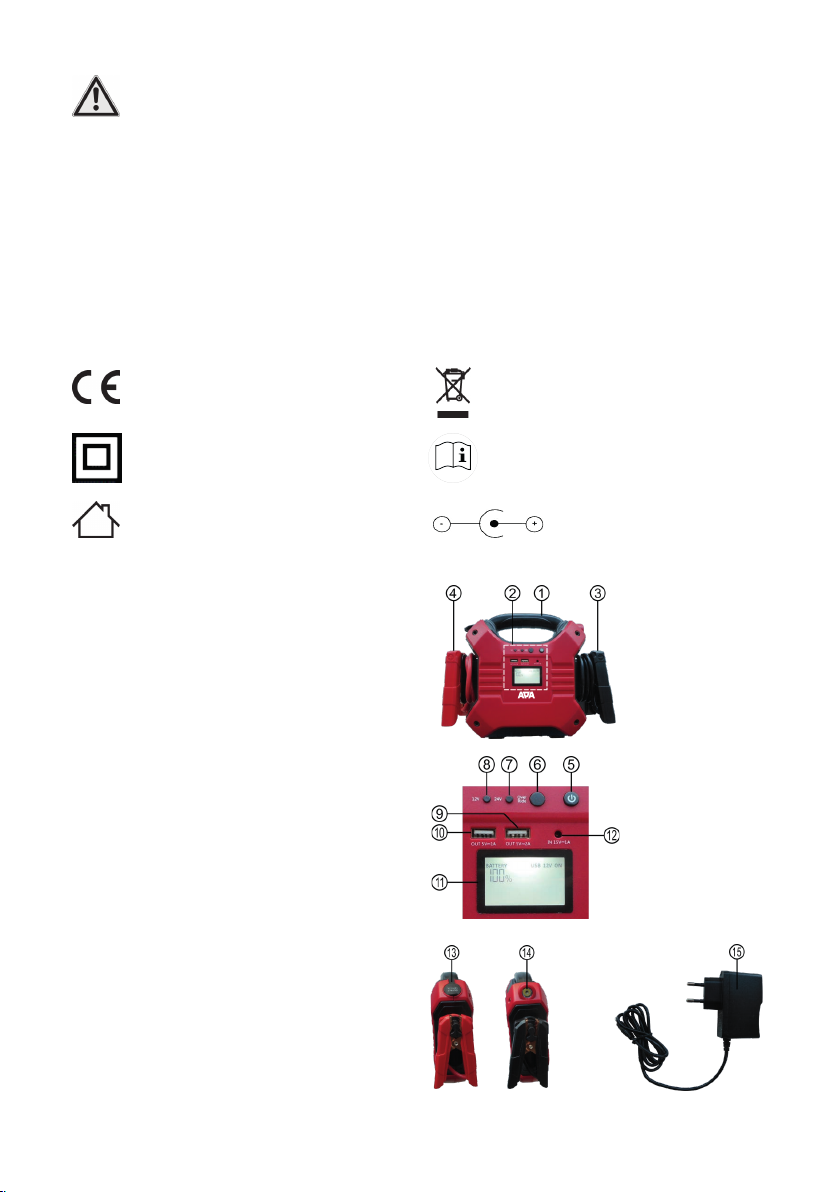
APA 16473 User manual

1
DE Lithium-Powerpack 35.000 mAh mit Starthilfe 12/24 V
Art.-Nr. 16473
WARNUNG
Lesen Sie die Bedienungsanleitung vor Inbetriebnahme sorgfältig durch und beachten Sie alle Sicher-
heitshinweise!
Nichtbeachtung kann zu Personenschäden, Schäden am Gerät oder Ihrem Eigentum führen!
Bewahren Sie die Originalverpackung, den Kaufbeleg sowie diese Anleitung zum späteren Nachschla-
gen auf! Bei der Weitergabe des Produkts geben Sie auch diese Anleitung weiter.
Prüfen Sie vor Inbetriebnahme den Inhalt der Verpackung auf Unversehrtheit und Vollständigkeit!
1. Bestimmungsgemäßer Gebrauch
Das Lithium-Powerpack dient zur Starthilfe für 12 / 24 V Kraftfahrzeuge mit maximal 6,0 L Motor. Zusätzlich gibt es noch die
Möglichkeit zum Auaden der Akkus von Mobiltelefonen, Smartphones,Tablets, MP3-Playern und ähnlichen Geräten, die über
ein USB-Kabel oder mit einem Kabel mit 12V-Kfz-Stecker aufgeladen werden können.
Dieses Gerät ist nicht dafür bestimmt, durch Kinder und Personen mit eingeschränkten geistigen Fähigkeiten oder ohne erfor-
derliches Fachwissen benutzt zu werden. Kinder sind von dem Gerät fernzuhalten.
Inhalt
1. Bestimmungsgemäßer Gebrauch 1
2. Lieferumfang 2
3. Spezikationen 2
4. Sicherheitshinweise 2
5. Symbolerklärung 3
6. Bedienungsanleitung 3
6.1 Übersicht 3
6.2 Laden des Powerpacks 4
6.3 Starthilfe mit dem Powerpack 4
6.4 Laden von USB-Geräten 5
6.5Verwenden des 12 V-Ausgangs 5
6.6 Benutzung der LED-Leuchte / Signalleuchte 5
6.7 Fehlersuche / Fehlerbehebung 6
7.Wartung und Pege 6
7.1 Reinigung 6
7.2 Aufbewahrung 6
7.3Wartung 6
8. Hinweise zum Umweltschutz 6
9. Kontaktinformationen 6

2
Das Gerät ist nicht für den gewerblichen Einsatz bestimmt.
Zum bestimmungsgemäßem Gebrauch gehört auch die Beachtung aller Informationen in dieser Anleitung, insbesondere die
Beachtung der Sicherheitshinweise. Jede andere Verwendung gilt als nicht bestimmungsgemäß und kann zu Sach- oder Per-
sonenschäden führen. Die EAL GmbH übernimmt keine Haftung für Schäden, die durch nicht bestimmungsgemäßen Gebrauch
entstehen.
Dimensionen
T x B x H [cm] 7,9 x 29,2 x 23,3
Länge Starthilfekabel, [cm] ca. 54
Gewicht, [kg] 2,690
Powerpack
Batterietyp Lithium-Eisen-Phosphat
Betriebsspannung, [V] 12/24
Batteriekapazität, [mAh] 35000 (8 x 4375)
Energie, [Wh] 112
Starthilfestrom 12/24V, [A] 600/300
max. Stromspitze 12/24V, [A] 1200/600
Kfz-Steckdose 12V DC, 10 A
USB-Ausgang 5V DC, 1 x 1 A, 1 x 2 A
LED-Leuchte 3W / 250 lm, Dauerlicht/Blinken/SOS
Ladegerät
Eingang 100-240V AC, 50/60 Hz
Ausgang 15V DC, 1 A
• Das Warndreieck kennzeichnet alle für die Sicherheit wichtigen Anweisungen. Befolgen Sie diese immer,
anderenfalls könnten Sie sich verletzen oder das Gerät könnte beschädigt werden.
• Kinder dürfen nicht mit dem Gerät spielen.
• Reinigung und Benutzerwartung dürfen nicht von Kindern ohne Beaufsichtigung durchgeführt werden.
• LassenSie dasVerpackungsmaterialnichtachtlosliegen.Dieses kann fürKinderzu einem gefährlichen Spielzeug
werden!
• Benutzen Sie dieses Produkt nur für die dafür vorgesehene Verwendung!
• Manipulieren oder zerlegen Sie das Gerät nicht!
• Verwenden Sie zu Ihrer eigenen Sicherheit ausschließlich Zubehör oder Ersatzteile, die in der Anleitung
angegeben sind, oder derenVerwendung durch den Hersteller empfohlen wird!
• Lesen Sie vor demVersuch einer Starthilfe im Handbuch Ihres Fahrzeugs nach, wie ein Starthilfevorgang
durchzuführen ist.
• Tragen Sie beim Umgang mit Blei-Akkus stets eine Schutzbrille und Schutzkleidung.
• Blei-Akkus enthalten aggressive ätzende Säuren.Vermeiden Sie Haut- und Augenkontakt mit Flüssigkeiten aus
dem Blei-Akku! Zerlegen Sie Blei-Akkus niemals!Waschen Sie betroene Hautpartien gründlich mit Wasser und
Seife ab. Ist Säure ins Auge gelangt, spülen Sie dieses sofort für mindestens 10 Minuten unter ießendem,
klarem, lauwarmemWasser aus! Suchen Sie danach sofort einen Arzt auf!
• Ist Säure auf Ihre Kleidung gelangt, so waschen Sie diese sofort mit viel Wasser und Seife aus!
1 x Lithium-Powerpack 1 x Steckerladegerät 1x Gebrauchsanleitung
2. Lieferumfang
3. Spezikationen
4. Sicherheitshinweise

3
entspricht den EG-Richtlinien
Schutzisoliertes Gehäuse
(Schutzklasse II)
Geräte mit diesem Zeichen dürfen nur im
Haus (trockene Umgebung) betrieben werden
1 Tragegri
2 Bedienfeld und Anschlüsse
3 Polzange schwarz (-)
4 Polzange rot (+)
13 12V-Steckdose
14 LED-Arbeitsleuchte
15 Steckerladegerät
5 EIN-Schalter
6 Over Ride-Schalter
7 Schalter für 24V -Starthilfe
8 Schalter für 12V -Starthilfe
9 USB-Ausgang 2 A
10 USB-Ausgang 1 A
11 Display
12 Ladebuchse
Gebrauchsanleitung lesen
Polarität des Ladesteckers
gekennzeichnetes Elektroprodukt darf
nicht in den Hausmüll geworfen werden
5. Symbolerklärung
6. Bedienungsanleitung
6.1 Übersicht
• Tragen Sie niemals Ringe, Halsketten, Uhren o.ä. beim Umgang mit Akkus oder Ladegeräten. Durch das
Kurzschließen der Akkukontakte bestehtVerbrennungs- und Explosionsgefahr!
• Das Powerpack ist nur vorgesehen für Starthilfe eines Kraftfahrzeugs mit eigenem Akku. Das Powerpack kann
den Fahrzeug-Akku nicht ersetzten.
• Benutzen Sie das Powerpack nicht, während es aufgeladen wird.
• Versuchen Sie nicht, den Akku des Powerpacks auszubauen und zu ersetzen. Sollte die Lebensdauer des Akkus
einmal beendet sein, entsorgen Sie das gesamte Powerpack gemäß den örtlichen Richtlinien.
• Laden Sie den Akku des Powerpacks nicht mit einem beschädigten Ladegerät auf.
• Lassen Sie das Powerpack während des Ladevorgangs nicht unbeaufsichtigt.
• Benutzen Sie nur das mitgelieferte Zubehör zum Auaden des Powerpacks.
• Versuchen Sie niemals eine Starthilfe bei eingefrorener Batterie durchzuführen, es besteht Explosionsgefahr.
Bild 1: Ansicht Front
Bild 2: Ansicht
Bedienfeld und
Anschlüsse
Bild 3: Ansicht Seiten Bild4: Steckerladegerät

4
6.2 Laden des Powerpacks
6.3 Starthilfe mit dem Powerpack
SteckenSiedenLadesteckerdesSteckerladegeräts(Position15 in der Übersicht)in
die Ladebuchse (Position 12 in der Übersicht) des Powerpacks. Danach stecken Sie
das Steckerladegerät in eine 230 V Netzsteckdose. Der Ladevorgang startet jetzt.
Sie können den Ladezustand auf dem Display des Powerpacks (Position 11 in der
Übersicht) ablesen, Bild 5. Sollte es einmal vorkommen, dass Sie das Powerpack
auaden müssen, ohne es beaufsichtigen zu können, stellen Sie es während des
Ladevorgangs auf eine feuerfeste Unterlage (Stein, Fliesen oder Metallplatte).
Entfernen Sie alle brennbaren Gegenstände im Umkreis von einem Meter.
Stellen Sie sicher, dass das Powerpack voll aufgeladen ist. Laden Sie das Powerpack gegebenenfalls voll auf. Schalten Sie an
Ihrem Fahrzeug die Zündung und alle Verbraucher, wie Licht, Radio, Sitzheizung etc. aus. Kontrollieren Sie, ob die Batteriepole
Ihrer Fahrzeugbatterie frei vonVerschmutzungen oder Oxidation sind.Verbinden Sie das rote (+) Pluskabel des Powerpacks mit
dem Pluspol Ihrer Fahrzeugbatterie. Das schwarze (-) Minuskabel verbinden Sie mit dem Minuspol der Fahrzeugbatterie.Wenn
das Powerpack korrekt angeschlossen ist, erscheint auf dem Display die Meldung„12 V JUMP START READY“ oder„24 V JUMP
START READY“, siehe Bild 6 und Bild 7.
Starten Sie den Motor Ihres Fahrzeugs. Lassen Sie den Anlasser nicht länger als 5 - 8 Sekunden arbeiten. Sollte der Startversuch
nicht erfolgreich gewesen sein, warten Sie mindestens drei Minuten, bis Sie den nächsten Versuch starten. Unternehmen Sie
nach dem dritten, fehlgeschlagenen Startversuch keinen weiteren, sondern überprüfen Sie Ihr Fahrzeug auf Fehler.
Nachdem der Motor läuft entfernen Sie als erstes das schwarze (-) Minuskabel von Ihrer Fahrzeugbatterie und danach das rote
(+) Pluskabel.
Bevor Sie einen Starthilfevorgang an Ihrem Fahrzeug durchführen, lesen Sie im Handbuch Ihres Fahrzeugs nach, wie die
Starthilfe durchzuführen ist.
Bild 6: 12V Starthilfe Bild 7: 24V Starthilfe
Bild 5: Ladezustand
WARNUNG:
Benutzen Sie das Powerpack nicht, wenn die Kabel oder die Polzangen beschädigt sind.
WARNUNG:
Betätigen Sie nicht den„Over Ride“ Schalter. Es können Bauteile Ihrer Fahrzeugelektrik beschädigt werden.
ACHTUNG:
Halten Sie immer diese Reihenfolge beim Entfernen der Starthilfekabel ein.
Es besteht die Gefahr von Funkenschlag.
Laden Sie das Powerpack nach jeder Starthilfe wieder auf.

5
Verwendung der„Over Ride“-Funktion
6.4 Laden von USB-Geräten
6.5 Verwenden des 12 V-Ausgangs
6.6 Benutzung der LED-Leuchte / Signalleuchte
Wenn die Fahrzeugbatterie tiefentladen ist, kann das Powerpack die Batteriespannung nicht automatisch erkennen. Sie müssen
in diesem Fall die Spannung am Powerpack einstellen.
Lesen Sie im Handbuch Ihres Fahrzeugs nach mit welcher Spannung Sie die Starthilfe durchführen müssen.
Stellen Sie sicher, daß das Powerpack voll aufgeladen ist. Laden Sie das Powerpack gegebenenfalls voll auf. Schalten Sie an
Ihrem Fahrzeug die Zündung und alle Verbraucher, wie Licht, Radio, Sitzheizung etc. aus. Kontrollieren Sie, ob die Batteriepole
Ihrer Fahrzeugbatterie frei von Verschmutzungen oder Oxidation sind. Verbinden Sie das rote (+) Pluskabel des Powerpacks
mit dem Pluspol Ihrer Fahrzeugbatterie. Das schwarze (-) Minuskabel verbinden Sie mit dem Minuspol der Fahrzeugbatterie.
Stellen Sie sicher, dass alle Anschlüsse korrekt sind. Drücken Sie den„Over Ride“ Schalter (Position 6 in der Übersicht) und danach
für mindestens 2 Sekunden den Schalter für die, zu Ihrem Fahrzeug passende Batteriespannung, 12 V-Schalter (Position 8 in
der Übersicht), 24 V-Schalter (Position 7 in der Übersicht). Das Display zeigt jetzt„JUMP START READY“ in der ausgewählten
Spannung, Bild 8.
Schließen Sie Ihr USB-Gerät an den für Ihr Gerät geeigneten USB-Ausgang (Position 9 oder 10 in der Übersicht) des Power Packs
an. Drücken Sie den EIN-Schalter (Position 5 in der Übersicht) um den Ladevorgang zu starten. Nach Beenden des Ladevorgangs
entfernen Sie das USB-Gerät vom USB-Ausgang des Powerpacks. Das Powerpack schaltet sich nach ca. 30 Sekunden aus.
Schließen Sie Ihr 12 V-Gerät mit einem 12 V-Kfz-Stecker an den 12 V-Ausgang (Position 13 in der Übersicht) an das Powerpack
an. Drücken Sie den EIN-Schalter (Position 5 in der Übersicht) um den Betrieb zu starten. Nach dem Gebrauch schalten Sie Ihr
12 V-Gerät aus und entfernen den Stecker aus dem 12 V-Ausgang des Powerpacks. Das Powerpack schaltet sich nach ca. 30
Sekunden aus.
Um das Dauerlicht der LED-Leuchte (Position 14 in der Übersicht) einzuschalten, halten Sie den EIN-Schalter (Position 5 in der
Übersicht) des Powerpacks für ca. 3 Sekunden gedrückt. Danach können Sie durch erneutes Drücken des Schalters die folgenden
Lichtfunktionen hintereinander einschalten: Blinken, SOS, aus.
Starten Sie den Motor Ihres Fahrzeugs innerhalb von 30 Sekunden. Lassen Sie den Anlasser nicht länger als 5 - 8 Sekunden
arbeiten. Sollte der Startversuch nicht erfolgreich gewesen sein, warten Sie mindestens drei Minuten, bis Sie den nächsten
Versuch starten. Unternehmen Sie nach dem dritten, fehlgeschlagenen Startversuch keinen weiteren, sondern überprüfen Sie
Ihr Fahrzeug auf Fehler.
Nachdem der Motor läuft entfernen Sie als erstes das schwarze (-) Minuskabel von Ihrer Fahrzeugbatterie und danach das rote
(+) Pluskabel.
Laden Sie das Powerpack nach jeder Starthilfe wieder auf.
WARNUNG:
Im„Over Ride“ Modus liegt an der Polzangen immer eine Spannung ohne Sicherung an.
Bild 8 Starthilfe„Over Ride“, 12 V

6
6.7 Fehlersuche / Fehlerbehebung
7. Wartung und Pege
7.1 Reinigung
7.2 Aufbewahrung
7.3 Wartung
8. Hinweise zum Umweltschutz
9. Kontaktinformationen
Problem Ursache Abhilfe
AkustischesWarnsignal
Displayanzeige:
OUTPUT LOCKED
Vertauscht angeschlossene
Polzangen
Kurzschluss
Polzangen korrekt anschließen,
Kontakt zwischen den Polzangen entfernen
Keine Starthilfe möglich
1. Polzangen oder Kabel defekt
2. Interne Batterie schwach
3. Interne Bauteile defekt
1. Polzangen oder Kabel reparieren oder ersetzen
2. Powerpack voll auaden
3. Kontakt mit dem Händler aufnehmen. Eine Reparatur darf
nur von einer Fachwerkstatt durchgeführt werden.
Blinkende Displayan-
zeige:
OUTPUT LOCKED
Es wurden mehr als drei
Starthilfeversuche mit einer zu
kurzen Pause durchgeführt
Die interne Batterie des Powerpacks ist überhitzt. Lassen
Sie das Powerpack abkühlen. Starten Sie erst danach einen
neuen Starthilfeversuch.
Keine Displayanzeige
1. Der USB- oder 12 V-Ausgang
ist überlastet und die Kurz-
schlusssicherung hat ausgelöst.
2. Schwache Batterie
1. Drücken Sie den EIN-Schalter
2. Powerpack voll auaden
Reinigen Sie das Lithium-Powerpack nur mit einem weichenTuch und benutzen Sie keine scharfen Reinigungs- oder Lösemittel.
Lassen Sie niemals Flüssigkeiten in das Innere des Gehäuses gelangen.
Laden Sie bei Nichtbenutzung das Powerpack alle drei Monate auf.
Entsorgen Sie Elektrogeräte nicht mit dem Hausmüll! Elektro- und Elektronik-Altgeräte müssen getrennt
gesammelt und einer umweltgerechten Wiederverwertung zugeführt werden. Über Entsorgungsmöglichkeiten
für Elektro- und Elektronik-Altgeräte informieren Sie sich bei Ihrer Gemeinde- oder Stadtverwaltung
DieMaterialiensindrecycelbar.DurchRecycling,stoicheVerwertungoderandereFormenderWiederverwendung
von Altgeräten leisten Sie einen wichtigen Beitrag zum Schutz unserer Umwelt!
EAL GmbH / Otto-Hausmann-Ring 107 / 42115 Wuppertal / Deutschland
Telefon: +49 (0)202 42 92 83 0 /Telefax: +49 (0)202 42 92 83 160
Internet: www.eal-vertrieb.com / E-Mail: info@eal-vertrieb.com
Bei Nichtbenutzung bewahren Sie das Lithium-Powerpack an einem trockenen Ort auf. Setzen Sie das Powerpack weder
Feuchtigkeit, Öl, Staub, Schmutz, hohen Temperaturen, starker Vibration noch mechanischer Belastung aus. Bewahren Sie das
Powerpack immer mit aufgewickelten Starthilfekabeln auf, damit es nicht zu Kurzschlüssen zwischen den Polzangen kommen
kann.

7
GB Lithium power pack 35,000mAh with jump-start 12/24V
Product no. 16473
WARNING
Please read the operating instructions carefully prior to use and observe all safety instructions.
Non-compliance can lead to personal injury, damage to the device or to your property.
Keep the original packaging, the purchase receipt as well as these instructions for future reference.
When passing on this product, pass on these instructions as well.
Before operating, check that the contents of the package are intact and complete.
1. Proper use of the product
The lithium power pack serves as a jump-start for 12/24V vehicles with a maximum 6.0 l engine. In addition, it oers the pos-
sibility to recharge the batteries of mobile phones, smartphones, tablet computers, MP3 players and similar devices that can be
charged via a USB cable or with a 12V car plug cable.
This device is not designed to be used by children or persons with limited mental capacities or without experience and/or lack of
required specialist knowledge. Always keep children away from the device.
This device is not intended for commercial use.
Proper use also includes observing all the information in these instructions, especially observance of the safety notes. Any other
use is considered improper and can lead to property damage and personal injury. EAL GmbH accepts no liability for damages
that occur due to improper use.
Contents
1. Proper use of the product 7
2. Scope of delivery 8
3. Specications 8
4. Safety precautions 8
5. Explanation of symbols 9
6. Operating manual 9
6.1 Overview 9
6.2 Charging the power pack 10
6.3 Jump-start with the power pack 10
6.4 Charging USB devices 11
6.5 Using the 12V output 11
6.6 Using the LED lights / signal lights 11
6.7 Error search/troubleshooting 12
7. Maintenance and care 12
7.1 Cleaning 12
7.2 Storage 12
7.3 Maintenance 12
8. Notes regarding environmental protection 12
9. Contact information 12

8
Dimensions
L x B x H [cm] 7.9 x 29.2 x 23.3
Jump lead length, [cm] approx. 54
Weight, [kg] 2.690
Power pack
Battery type lithium iron phosphate
Operating voltage, [V] 12/24
Battery capacity, [mAh] 35000 (8 x 4375)
Energie, [Wh] 112
Jump-start electricity 12/24V, [A] 600/300
max. current spike 12/24V, [A] 1200/600
vehicle socket 12V DC, 10A
USB output 5V DC, 1 x 1A, 1 x 2A
LED light 3W/250lm, continuous light/ashing/SOS
Charger
Input 100-240V AC, 50/60 Hz
Output 15V DC, 1A
• The warning triangle sign indicates all instructions which are important for safety. Always follow these,
otherwise you could injure yourself or damage the device.
• Children may not play with the device.
• Cleaning and user maintenance may not be carried out by children without supervision.
• Do not leave packaging material carelessly lying around.This may become a dangerous toy for a child.
• Only use this product for its intended purpose.
• Do not manipulate or disassemble the device.
• For your own safety, only use accessories or spare parts that are stated in these instructions, or that are
recommended by the manufacturer.
• Before trying to jump-start a motor vehicle, read the manual for your vehicle to nd out how to jump-start it.
• When using lead batteries, always wear protective goggles and clothing.
• Lead batteries contain aggressive, corrosive acids. Prevent skin and eyes from coming into contact with the
lead battery uids. Never dismantle lead batteries. Wash aected skin thoroughly using soap and water. If
acid has entered an eye, rinse immediately for at least 10 minutes under clean, running, lukewarm water. Then
immediately consult a doctor.
• If your clothing has acid on it, rinse immediately with plenty of soap and water.
• Never wear rings, necklaces, watches or similar when handling batteries or chargers.The short-circuiting of the
battery contacts brings a risk of burns and explosion.
• The power pack is only designed as a starting aid for a vehicle that has a battery of its own. The power pack
cannot replace the vehicle battery.
• Do not use the power pack while it is charging.
• Do not attempt to remove and replace the battery pack of the power pack. If the battery comes to the end of its
useful life, dispose of the entire battery in accordance with local policy.
3. Specications
4. Safety precautions
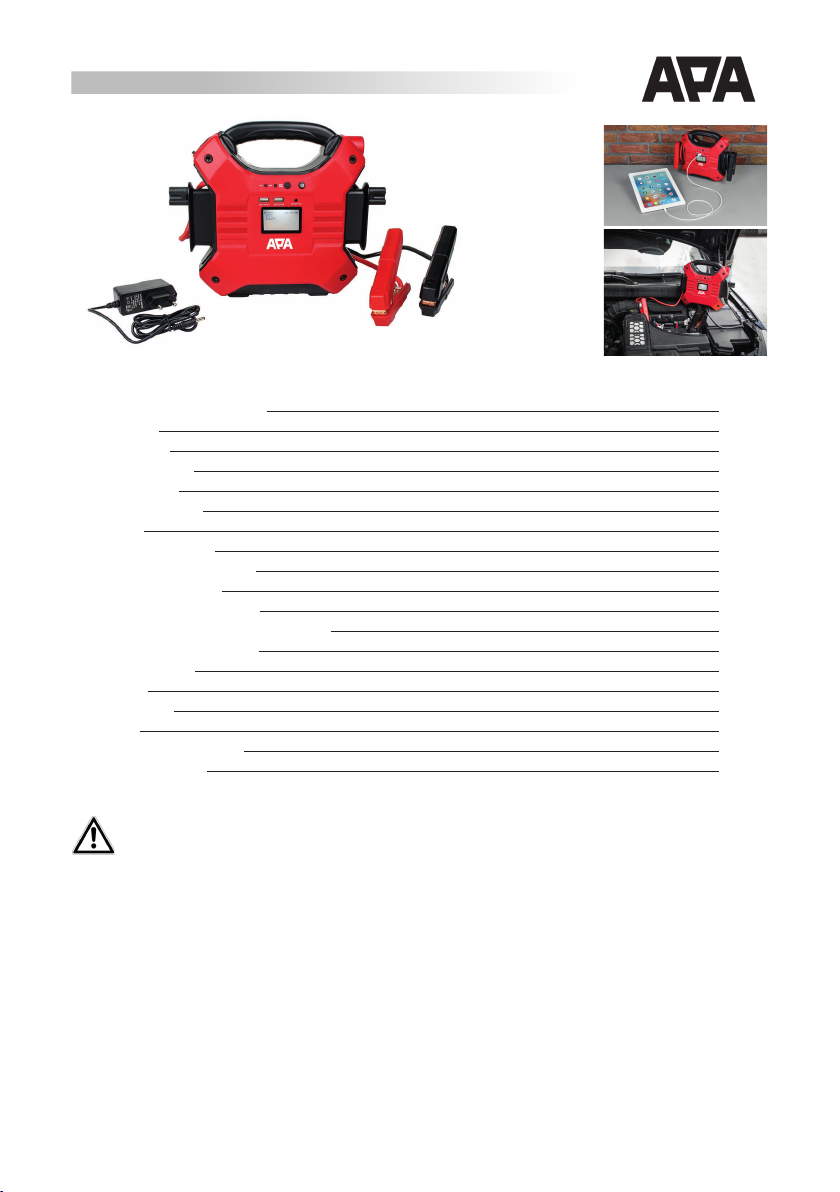
1 x Lithium power pack 1 x Plug-in charger 1x Instructions for use
2. Scope of delivery

9
• Never charge the power pack using a damaged charger.
• Do not leave the power pack unattended during charging.
• Only used the supplied accessories to charge the power pack.
• Never attempt to jump-start a vehicle when the battery is frozen, as this brings a risk of explosion.
Store these instructions carefully and, if necessary, pass them on to other users.
complies with EC directives
Insulated housing (protection class II)
Devices with this symbol may only be operated
indoors (dry environment)
1 Carry handle
2 Control panel and connections
3 Pole callipers, black (-)
4 Pole callipers, red (+)
13 12V socket
14 LED working light
15 Plug-in charger
5 ON switch
6 Override switch
7 Switch for 24V jump-start
8 Switch for 12V jump-start
9 USB output 2A
10 USB output 1A
11 Display
12 Charging socket
Read the operating instructions
Polarity of the plug connector
labelled electrical products may not be
disposed of in the household waste
5. Explanation of symbols
6. Operating manual
6.1 Overview
Fig. 1: Front view
Fig. 2: View of
control panel and
connections
Fig. 3: Side view Fig. 4: Plug-in charger

10
6.2 Charging the power pack
6.3 Jump-start with the power pack
Use of the“Override”function
Plug the charging plug of the plug-in charger (position 15 in the overview) into
the charging socket of the power pack (position 12 in the overview). Next, plug
the charger into a 230V power socket.The charging process starts now. You can see
the charging status on the power pack display (position 11 in the overview), Fig.
5. If you have to charge the power pack but are unable to supervise it, place it on a
reproof surface while charging (stone, tile or metal plate). Remove all ammable
objects within a one metre radius.
Make sure that the power pack is fully charged. Recharge the power pack if necessary. Switch o the vehicle ignition and all
electrical consumers, such as lights, radio, seat heating, etc. Check if the battery poles of your vehicle battery are free from
contamination or oxidation. Connect the red (+) positive cable of the power pack to the plus pole of your vehicle battery.
Connect the black (-) minus cable to the minus pole of the vehicle battery. When the power pack is correctly connected, the
display message will read“12V JUMP START READY”or“24V JUMP START READY”, see Fig. 6 and Fig. 7.
Start the motor of your vehicle. Do not operate the starter for longer than 5-8 seconds. If the start attempt is not successful,
wait for at least three minutes before the next attempt. After the third failed attempt, do not attempt again. Instead, check your
vehicle for faults.
After the engine is running rst remove the black (-) minus cable from your vehicle battery and then the red (+) positive cable.
Before you start to jump-start your vehicle, refer to the vehicle manual to nd out how to jump-start it.
When the vehicle battery is completely discharged, the power pack cannot automatically detect the battery voltage. In this case
you will need to adjust the voltage on the power pack.
Fig. 6: 12V jump-start Fig. 7: 24V jump-start
Fig. 5: Charging status
WARNING:
Do not use the power pack if the cables or the pole callipers are damaged.
WARNING:
Do not use the“Override”switch. Parts of your vehicle electrics could be damaged.
ATTENTION:
Always follow this order when removing jump-start cables. There is a risk of sparks.
Recharge the power pack after each jump-start.

11
6.4 Charging USB devices
6.5 Using the 12V output
6.6 Using the LED lights / signal lights
Read the vehicle manual to nd out what voltage you need to use for a jump-start.
Make sure that the power pack is fully charged. Recharge the power pack if necessary. Switch o the vehicle ignition and all
electrical consumers, such as lights, radio, seat heating, etc. Check if the battery poles of your vehicle battery are free from
contamination or oxidation. Connect the red (+) positive cable of the power pack to the plus pole of your vehicle battery.
Connect the black (-) minus cable to the minus pole of the vehicle battery. Ensure that all connections are correct. Press the
„Override“ switch (position 6 in the overview) and then the switch for the battery voltage suitable for your vehicle for at least 2
seconds: 12V switch (position 8 in the overview), 24V switch (position 7 in the overview). The display now shows“JUMP START
READY”at the selected voltage, Fig. 8.
Connect the USB device to the USB output on the power pack which suits your device (position 9 or 10 in the overview). Push the
ON switch of the power pack (position 5 in the overview) to start charging.When charging is complete, remove the USB device
from the power pack’s USB output.The power pack will switch o after approx. 30 seconds.
Connect your 12V device to the 12V power output (position 13 in the overview) with a 12V vehicle plug. Push the ON switch
(position 5 in the overview) to start charging. After use, switch o your 12V device and remove the plug from the 12V output of
the power pack.The power pack will switch o after approx. 30 seconds.
Um das Dauerlicht der LED-Leuchte (Position 14 in der Übersicht) einzuschalten, halten Sie den EIN-Schalter (Position 5 in der
Übersicht) des Powerpacks für ca. 3 Sekunden gedrückt. Danach können Sie durch erneutes Drücken des Schalters die folgenden
Lichtfunktionen hintereinander einschalten: Blinken, SOS, aus.
Start the motor of your vehicle within 30 seconds. Do not operate the starter for longer than 5-8 seconds. If the start attempt
is not successful, wait for at least three minutes before the next attempt. After the third failed attempt, do not attempt again.
Instead, check your vehicle for faults.
After the engine is running rst remove the black (-) minus cable from your vehicle battery and then the red (+) positive cable.
Recharge the power pack after each jump-start.
WARNING:
There is always a voltage without fuse on the pole callipers in the„Override“ mode.
Fig. 8 Jump-start“Override”, 12V

12
6.7 Error search/troubleshooting
7. Maintenance and care
7.1 Cleaning
7.2 Storage
7.3 Maintenance
8. Notes regarding environmental protection
9. Contact information
Problem Cause Remedy
Acoustic warning signal
Display screen:
OUTPUT LOCKED
Connected pole callipers switched
short circuit
Connect pole callipers correctly,
remove contact between the pole callipers
No jump-start possible
1. Pole calliper or cable is defective
2. Internal battery is weak
3. Internal components are defective
1. Repair or replace pole calliper or cable
2. Fully charge power pack
3. Contact the dealer. Repairs may only be carried out
by a specialist workshop.
Flashing display
message:
OUTPUT LOCKED
More than three jump-start attempts
were made with too short a break
The internal battery of the power pack is overheated.
Let the power pack cool down. Only then can you start
a new jump-start attempt.
No display message
1.The USB or 12V output is overloa-
ded and the short-circuit protection
has tripped.
2.Weak battery
1. Push the ON switch
2. Fully charge power pack
Only clean the lithium power pack with a soft cloth and do not use any aggressive cleaning agents or solvents. Never allow
liquids to get into the housing.
Charge the power pack every three months when not in use.
Do not dispose of electrical devices with household waste. Electrical devices and electronic scrap must be collected
separatelyand disposed of in anenvironmentallyresponsiblemanner forrecycling.Please contact your community
or city administration regarding disposal options for electrical and electronic scrap.
The materials are recyclable. You make an important contribution to protecting our environment by recycling,
material utilisation or other forms of reusing waste equipment.
EAL GmbH / Otto-Hausmann-Ring 107 / 42115 Wuppertal / Germany
Telephone: +49 (0)202 42 92 83 0 /Telefax: +49 (0)202 42 92 83 160
Website: www.eal-vertrieb.com / E-Mail: info@eal-vertrieb.com
When not in use, store the lithium power pack in a dry place. Do not expose the power pack to moisture, oil, dust, dirt, high
temperatures, strong vibrations, or mechanical load. Always store the power pack with the jump lead unplugged, to prevent
short circuits between the cable callipers.

13
FR Bloc d’alimentation 32 000mAh au lithium avec aide au démarrage 12/24V
Réf. 16473
AVERTISSEMENT
Lisez attentivement la notice d‘utilisation avant la mise en service et respectez toutes les consignes
de sécurité !
Tout non-respect de ces consignes peut entraîner des dommages corporels, endommager l‘appareil
ou vos biens !
Conservez l‘emballage d‘origine, le justicatif d‘achat et la présente notice pour vous y référer ultéri-
eurement ! Si vous revendez ou remettez l‘appareil à des tiers, veuillez également leur remettre cette
notice d‘utilisation. Avant la mise en service, veuillez contrôler le contenu de l‘emballage quant à l‘ab-
sence de dommages et vérier si toutes les pièces sont présentes !
1. Utilisation conforme
Le bloc d’alimentation au lithium sert d’aide au démarrage pour les véhicules de 12/24V équipés d’un moteur de 6,0 l max. Il est
également possible de charger la batterie de téléphones portables, smartphones, tablettes, lecteurs MP3 et appareils similaires
pouvant être chargés par câble USB ou par câble de véhicule de 12V.
Cet appareil n‘est pas destiné à être utilisé par des enfants ou des personnes aux capacités mentales limitées ou ne disposant pas
de l‘expérience ou des connaissances nécessaires. Les enfants doivent rester à distance de cet appareil.
L‘appareil n‘est pas destiné à une utilisation industrielle ou commerciale.
L‘utilisation conforme aux prescriptions implique également le respect de toutes les informations contenues dans cette notice
d‘utilisation, en particulier le respect des consignes de sécurité. Toute autre utilisation est considérée comme non conforme et
peut entraîner des dommages matériels ou corporels. La société EAL GmbH décline toute responsabilité en cas de dommages
découlant d’une utilisation non conforme à l’emploi prévu.
Sommaire
1. Utilisation conforme 13
2.Matériel fourni 14
3. Spécications 14
4. Consignes de sécurité 14
5. Explication des symboles 15
6. Notice d‘utilisation 15
6.1Vue d‘ensemble 15
6.2 Chargement du bloc d’alimentation 16
6.3 Aide au démarrage avec le bloc d’alimentation 16
6.4 Chargement d’appareils USB 17
6.5 Utilisation de la sortie 12 V 17
6.6 Utilisation de la lampe LED / lampe de signalisation 17
6.7 Recherche d’erreurs / Dépannage 18
7.Maintenance et entretien 18
7.1 Nettoyage 18
7.2 Rangement 18
7.3 Entretien 18
8. Remarques relatives à la protection de l‘environnement 18
9.Données de contact 18

14
1 x Bloc d’alimentation 1 x Chargeur 1 x Mode d‘emploi
2.Matériel fourni
Dimensions
P x L x H [cm] 7,9 x 29,2 x 23,3
Long câble d’aide au démarrage, [cm] env. 54
Poids, [kg] 2,690
Bloc d’alimentation
Type de batterie Lithium-phosphate ferrique
Tension de service, [V] 12/24
Capacité de la batterie, [mAh] 35000 (8 x 4375)
Énergie, [Wh] 112
Courant d’aide au démarrage12/24V, [A] 600/300
Pointe de courant max. 12/24V, [A] 1200/600
Prise véhicule 12 V DC, 10 A
Port USB 5V DC, 1 x 1 A, 1 x 2 A
Lampe LED 3W / 250 lm, lumière continue/Clignotement/SOS
Chargeur
Entrée 100-240V AC, 50/60 Hz
Sortie 15V DC, 1 A
• Le triangle de signalisation indique toutes les instructions relatives à la sécurité. Respectez-les à tout moment
car vous risqueriez sinon de vous blesser ou l‘appareil risquerait d‘être endommagé.
• Les enfants ne doivent pas jouer avec l‘appareil.
• Les tâches de nettoyage et d‘entretien à eectuer chez soi ne doivent pas être exécutées par des enfants qui ne
sont pas sous surveillance.
• Ne laissez pas traîner le matériel d‘emballage. Il pourrait devenir un jouet dangereux pour les enfants !
• N‘utilisez cet appareil qu‘aux ns pour lesquelles il a été prévu !
• Ne pas manipuler ni démonter l‘appareil !
• Pour votre propre sécurité, utilisez exclusivement les accessoires ou pièces de rechange qui sont indiqué(e)s dans
la notice d‘utilisation ou dont l‘utilisation est recommandée par le fabricant !
• Avant d’essayer l’aide au démarrage, lisez le manuel de votre véhicule pour savoir comment procéder à une aide
au démarrage.
• Portez toujours des lunettes de protection et des vêtements de protection lorsque vous manipulez la batterie au
plomb.
• Les batteries au plomb contiennent des acides corrosifs. Évitez tout contact de la peau et des yeux avec les
liquides de la batterie au plomb ! Ne démontez jamais la batterie au plomb ! Lavez soigneusement les zones de
la peau concernées à l‘eau et au savon. Si l‘acide est entré au contact d‘un œil, rincez-le immédiatement pendant
au moins 10 minutes sous de l‘eau claire courante tiède ! Consultez ensuite immédiatement un médecin !
• Si les vêtements sont entrés en contact avec de l‘acide, lavez-les immédiatement avec beaucoup d‘eau et du
savon !
• Ne portez jamais de bagues, de colliers, de montres, etc. lorsque vous manipulez des batteries ou des chargeurs.
3. Spécications
4. Consignes de sécurité

15
Un court-circuit au niveau des contacts de la batterie entraîne un risque de brûlure et d‘explosion !
• Le bloc d‘alimentation est uniquement prévu comme aide au démarrage pour les véhicules automobiles équipés
de leur propre batterie. Le bloc d‘alimentation ne remplace pas la batterie du véhicule.
• N’utilisez pas le bloc d’alimentation lorsqu’il est en cours de chargement.
• N‘essayez pas de démonter et de remplacer la batterie du bloc d’alimentation. Lorsque la batterie ne fonctionne
plus, jetez le bloc d’alimentation complet conformément aux prescriptions locales.
• Ne rechargez pas la batterie du bloc d‘alimentation à l‘aide d‘un chargeur endommagé.
• Ne laissez pas le bloc d’alimentation sans surveillance lors du chargement.
• Utilisez uniquement les accessoires fournis pour recharger le bloc d’alimentation.
• N‘essayez jamais d‘eectuer une aide au démarrage lorsque la batterie est gelée, car cela présente un risque
d‘explosion.
Rangez cette notice d‘utilisation en lieu sûr et remettez-la à tout utilisateur tiers.
Correspond aux directives de la CE
Boîtier avec isolation
(classe de protection II).
Les appareils portant ce symbole ne
peuvent être utilisés qu‘à l‘intérieur
(environnement sec))
1 Poignée
2 Panneau de commande et raccordements
3 Pince crocodile, noire (-)
4 Pince crocodile, rouge (+)
13 Prise de 12V
14 LED de service
15 Chargeur
5 Interrupteur d’allumage
6 Interrupteur Over Ride
7 Interrupteur d’aide au démarrage 24V
8 Interrupteur d’aide au démarrage 12V
9 Port USB 2 A
10 Port USB 1 A
11 Achage
12 Connecteur de chargement
Lire le mode d‘emploi
Polarité de la che de chargement
Un produit électrique/électronique marqué avec ce symbo-
le ne doit pas être jeté dans les ordures ménagères.
5. Explication des symboles
6. Notice d‘utilisation
6.1 Vue d‘ensemble
Figure 1 :Vue avant
Figure2:VuePanneau
de commande et
raccordements
Figure 3 :Vues latérales Figure 4 : Chargeur

16
6.2 Chargement du bloc d’alimentation
6.3 Aide au démarrage avec le bloc d’alimentation
Utilisation de la fonction « Over-Ride »
Insérez la che du câble de chargement pour du chargeur (position 15 sur la vue
d‘ensemble) dans le connecteur de chargement (position 12 sur la vue d‘ensemble)
bloc d‘alimentation. Insérez ensuite le chargeur dans une prise secteur de 230 V.
L‘opération de chargement démarre.Vous pouvez consulter l’état de charge sur l’écran
du bloc d’alimentation (position 11 dans la vus d’ensemble, Fig. 5). Si vous devez
recharger le bloc d’alimentation sans pouvoir le garder sous surveillance, placez-le
alors sur une surface résistante au feu lors du processus de recharge (pierre, carrelage
ou plaques de métal). Retirez tous les objets inammables dans un rayon d’un mètre.
Assurez-vous que le bloc d‘alimentation est totalement rechargé. Rechargez le bloc d‘alimentation complètement si nécessaire.
Éteignez votre véhicule ainsi que tous les consommateurs électroniques de votre véhicule, tels que la lumière, la radio, le
chauage des sièges, etc. Assurez-vous que la borne de batterie de votre véhicule ne présente pas de salissures ou d’oxydation.
Branchez le câble positif (+) rouge du bloc d’alimentation à la borne positive de la batterie de votre véhicule. Branchez le câble
négatif (-) noir à la borne négative (-) de la batterie de votre véhicule. Lorsque le bloc d’alimentation est connecté, le message «
12V JUMP START READY » ou « 24V JUMP START READY » apparait à l’écran, voir Fig. 6 et Fig. 7.
Démarrez le moteur de votre véhicule. Ne laissez pas travailler le démarreur pendant plus de 5 à 8 secondes. Si la tentative de
démarrage n‘a pas réussi, patientez au moins pendant trois minutes avant d‘eectuer une nouvelle tentative. Si vous avez essayé
trois fois sans y parvenir, cessez les tentatives de démarrage et contrôlez si votre véhicule est défectueux.
Une fois que le moteur tourne, commencez par retirer le câble négatif (-) noir de la batterie et ensuite le câble positif (+) rouge.
Avant de commencer le processus d’aide au démarrage sur votre véhicule, lisez le manuel de votre véhicule pour découvrir
comment l’eectuer.
Si la batterie de votre véhicule est complètement déchargée, le bloc d’alimentation n’a aucun moyen de connaître la tension de
la batterie. Dans ce cas, vous devez régler la tension du bloc d’alimentation
Figure 6: Aide au démarrage 12V Figure 7: Aide au démarrage 24V
AVERTISSEMENT : N’utilisez pas le bloc d’alimentation si le câble ou les pinces sont endommagés.
AVERTISSEMENT : N’actionnez pas l’interrupteur « Over Ride ». Certains composants électriques de
votre véhicule peuvent être endommagés.
ATTENTION: Respectez toujours cet ordre lorsque vous retirez les câbles d’aide au démarrage.
Il existe un risque d’étincelles.
Rechargez le bloc d‘alimentation après chaque aide au démarrage.
Figure 5 : État de charge

17
6.4 Chargement d’appareils USB
6.5 Utilisation de la sortie 12 V
6.6 Utilisation de la lampe LED / lampe de signalisation
Lisez le manuel de votre véhicule pour savoir avec quelle tension eectuer l’aide au démarrage.
Assurez-vous que le bloc d‘alimentation est totalement rechargé. Rechargez le bloc d‘alimentation complètement si nécessaire.
Éteignez votre véhicule ainsi que tous les consommateurs électroniques de votre véhicule, tels que la lumière, la radio, le
chauage des sièges, etc. Assurez-vous que la borne de batterie de votre véhicule ne présente pas de salissures ou d’oxydation.
Branchez le câble positif (+) rouge du bloc d’alimentation à la borne positive de la batterie de votre véhicule. Branchez le câble
négatif (-) noir à la borne négative (-) de la batterie de votre véhicule. Assurez-vous que tous les raccords sont corrects. Appuyez
sur l‘interrupteur « Over-Ride » (position 6 dans la vue d’ensemble) et maintenez ensuite l’interrupteur qui convient à la tension
de votre batterie, soit l’interrupteur 12 V (position 8 dans la vue d’ensemble), soit l’interrupteur 24 V (position 7 dans la vue
d’ensemble), pendant au moins 2 secondes. L’écran ache maintenant « JUMP START READY » dans la tension sélectionnée,
Fig. 8.
Branchez votre périphérique USB à la sortie USB adaptée (position 9 ou 10 sur la vue d‘ensemble) du bloc d’alimentation.
Appuyez sur l‘interrupteur MARCHE (position 5 dans la vue d’ensemble) pour démarrer le processus de charge. Une fois le
processus de charge terminé, retirez le périphérique USB du port USB du bloc d’alimentation. Le bloc d’alimentation s’éteint
après env. 30 secondes.
Branchez votre périphérique 12V avec une che 12V à la sortie 12 V (position 13 dans la vue d’ensemble) du bloc d’alimentation.
Appuyez sur l‘interrupteur MARCHE (position 5 dans la vue d’ensemble) pour démarrer le processus. Après utilisation, éteignez
votre périphérique 12V et retirez la che de la sortie 12 V du bloc d’alimentation. Le bloc d’alimentation s’éteint après env. 30
secondes.
Pour activer la lampe LED en continu (Position 14 dans la vie d’ensemble), maintenez l’interrupteur MARCHE (position 5 dans
la vue d’ensemble) du bloc d’alimentation enfoncé pendant env. 3 sec. Vous pouvez activer les autres fonctions d’éclairage en
appuyant à nouveau sur l’interrupteur. Clignotement, SOS, éteinte.
Démarrez le moteur de votre véhicule dans les 30 secondes qui suivent. Ne laissez pas travailler le démarreur pendant plus de
5 à 8 secondes. Si la tentative de démarrage n‘a pas réussi, patientez au moins pendant trois minutes avant d‘eectuer une
nouvelle tentative. Si vous avez essayé trois fois sans y parvenir, cessez les tentatives de démarrage et contrôlez si votre véhicule
est défectueux.
Une fois que le moteur tourne, commencez par retirer le câble négatif (-) noir de la batterie et ensuite le câble positif (+) rouge.
Rechargez le bloc d‘alimentation après chaque aide au démarrage.
AVERTISSEMENT : En mode « Over-Ride », les pinces reçoivent toujours une tension sans fusibles.
Fig. 8 Aide au démarrage « Over-Ride », 12V

18
6.7 Recherche d’erreurs / Dépannage
7.Maintenance et entretien
7.1 Nettoyage
7.2 Rangement
7.3 Entretien
8. Remarques relatives à la protection de l‘environnement
9.Données de contact
Problème Cause Remède
Avertissement sonore
Achage à l’écran :
OUTPUT LOCKED
CInversion pinces branchées
Court-circuit
Connecter les pinces correctement,
Éliminer tous contact entre les pinces
Aide au démarrage
impossible
1. Bornes ou câbles défectueux(ses).
2. Batterie interne faible
3. Composants internes défectueux
1. Faites réparer ou remplacer les bornes ou les câbles.
2. Recharger le bloc d’alimentation complètement
3. Prenez contact avec le revendeur. Les réparations ne
peuvent être entreprises que par un atelier spécialisé.
Achage à l’écran
clignotant
OUTPUT LOCKED
Plus de trois tentatives d’aide au
démarrage ont été eectuées avec
des pauses trop courtes.
La batterie interne du bloc d’alimentation est surch-
auée. Laissez le bloc d’alimentation refroidir. Faites
ensuite une nouvelle tentative d’aide au démarrage.
Aucun achage à l’écran
1. Le port USB ou la sortie 12V
est surchargé(e) et le fusible anti
court-circuit s’est déclenché.
2. Batterie faible
1. Appuyez sur le bouton d’allumage
2. Recharger le bloc d’alimentation complètement
Nettoyez exclusivement le bloc d’alimentation lithium avec un chion doux et sans nettoyants agressifs ni solvants. Ne laissez
jamais de liquides entrer à l‘intérieur du boîtier.
En cas de non utilisation, rechargez le bloc d’alimentation tous les trois mois.
Nejetezpas lesappareilsélectriquesdanslesorduresménagères ! Lesappareilsélectriques et électroniquesusagés
doivent être collectés séparément et être remis aux services de recyclage. Renseignez-vous quant aux possibilités
d‘élimination d‘appareils électriques et électroniques usagés auprès de votre administration communale ou
municipale. Les matériaux sont recyclables. Par le recyclage, la récupération des matières ou d’autres formes de
réutilisation d’appareils usagés, vous contribuez activement à la protection de notre environnement !
EAL GmbH / Otto-Hausmann-Ring 107 / 42115 Wuppertal / Allemagne
Téléphone: +49 (0)202 42 92 83 0 /Telefax: +49 (0)202 42 92 83 160
Internet : www.eal-vertrieb.com / E-Mail: info@eal-vertrieb.com
Lorsque le bloc d’alimentation lithium n‘est pas utilisé, rangez-le dans un endroit sec. Protégez le bloc d’alimentation de
l‘humidité, de l‘huile, de la poussière, de la boue, des températures élevées, des fortes vibrations et des surcharges mécaniques.
Rangez toujours le bloc d’alimentation avec les câbles d’aide au démarrage enroulés an d’éviter les courts-circuits entre les
bornes.

19
NL Lithium-powerpack 35.000mAh met starthulp 12/24V
Art.nr. 16473
WAARSCHUWING
Lees voorafgaand aan de ingebruikname de gebruiksaanwijzing aandachtig door en neem alle veilig-
heidsvoorschriften in acht!
Het niet-naleven hiervan kan letsel, schade aan het product of aan uw eigendom veroorzaken!
Bewaar de oorspronkelijke verpakking, het aankoopbewijs en deze gebruiksaanwijzing om later te
kunnen raadplegen! Geef bij doorgeven van het product eveneens deze gebruiksaanwijzing door.
Controleer voor de ingebruikname eerst de inhoud van de verpakking op beschadigingen en volle-
digheid!
1. Reglementair gebruik
Het lithium-powerpack dient als starthulp voor 12/24 V-voertuigen met een motor van maximaal 6,0 l. Daarnaast kunt u hier-
mee de batterijen opladen van mobiele telefoons, smartphones, tabletcomputers, MP3-spelers en vergelijkbare apparaten die
kunnen worden opgeladen via een USB-kabel of een 12V-autolaadkabel.
Dit product mag niet worden gebruikt door kinderen, personen met beperkte geestelijke vermogens of personen zonder de
vereiste deskundigheid. Kinderen moeten uit de buurt van het product worden gehouden.
Het product is niet bedoeld voor bedrijfsmatig gebruik.
Tot het reglementair gebruik behoort ook het in acht nemen van alle informatie in deze gebruiksaanwijzing, in het bijzonder
van de veiligheidsvoorschriften. Elk ander gebruik geldt als niet-reglementair en kan materiële schade of persoonlijk letsel
veroorzaken. EAL GmbH is niet aansprakelijk voor schade als gevolg van niet-reglementair gebruik.
Inhoud
1. Reglementair gebruik 19
2.Leveringsomvang 20
3. Specicaties 20
4.Veiligheidsinstructies 20
5. Uitleg bij de symbolen 21
6. Gebruiksaanwijzing 21
6.1 Overzicht 21
6.3 Starthulp met het powerpack 22
6.4 USB-apparaten opladen 23
6.5 Gebruik van de 12V-uitgang 23
6.6 Gebruik van de LED-lamp/signaallamp 23
6.7 Problemen oplossen 23
7.Onderhoud en verzorging 24
7.1 Reiniging 24
7.2 Opslag 24
8. Informatie over de bescherming van het milieu 24
9.Contactinformatie 24

20
1 x Lithium-powerpack 1 x Stekkerlader 1 x Gebruiksaanwijzing
2.Leveringsomvang
Afmetingen
D x B x H [cm] 7,9 x 29,2 x 23,3
Lengte startkabel, [cm] ca. 54
Gewicht, [kg] 2,690
Powerpack
Accutype lithiumijzerfosfaat
Bedrijfsspanning, [V] 12/24
Accucapaciteit, [mAh] 35.000 (8 x 4375)
Energie, [Wh] 112
Starthulpstroom 12/24V, [A] 600/300
Max. stroompiek 12/24V, [A] 1200/600
Autostopcontact 12V DC, 10 A
USB-uitgang 5V DC, 1 x 1 A, 1 x 2 A
LED-lamp 3W/250 lm, continu/knipperen/SOS
Laadapparaat
Ingang 100-240V AC, 50/60 Hz
Uitgang 15V DC, 1 A
• Deze waarschuwingsdriehoek geldt als aanduiding van alle voor de veiligheid belangrijke aanwijzingen. Neem
deze te allen tijde in acht, anders kan lichamelijk letsel of schade aan het apparaat het gevolg zijn.
• Kinderen mogen niet met het apparaat spelen.
• Reiniging en onderhoud mogen niet zonder toezicht door kinderen worden uitgevoerd.
• Laat het verpakkingsmateriaal niet achteloos rondslingeren. Dit kan voor kinderen gevaarlijk speelgoed worden!
• Gebruik dit product uitsluitend voor het beoogde doel!
• Manipuleer of demonteer het apparaat niet!
• Gebruik voor uw eigen veiligheid uitsluitend toebehoren of reserveonderdelen die in de gebruiksaanwijzing
staan vermeld of waarvan het gebruik door de fabrikant wordt aanbevolen!
• Lees eerst in de handleiding van uw voertuig hoe een jumpstart moet worden uitgevoerd.
• Draag bij het hanteren van loodaccu‘s altijd een veiligheidsbril en beschermende kleding.
• Loodaccu‘s bevatten agressieve bijtende zuren.Vermijd huid- en oogcontact met vloeistoen uit de loodaccu!
Haal een loodaccu nooit uit elkaar!Was de getroen huid grondig met water en zeep. Als u zuur in de ogen krijgt,
spoel het dan onmiddellijk uit gedurende minimaal 10 minuten onder stromend, helder, lauw water! Consulteer
daarna onmiddellijk een arts!
• Als er zuur op uw kleding komt, spoelt u het uit met veel water en zeep!
• Draag nooit ringen, kettingen, horloges etc. bij het hanteren van accu‘s en opladers. Kortsluiting van de
accupolen kan brandwonden of een explosie veroorzaken!
• Het powerpack is uitsluitend bedoeld als starthulp voor motorvoertuigen met een eigen accu. Het powerpack
kan niet als vervanging dienen voor de accu van het voertuig.
• Gebruik het powerpack niet terwijl het wordt opgeladen.
3. Specicaties
4. Veiligheidsinstructies
Table of contents
Languages:
Other APA Power Pack manuals
Popular Power Pack manuals by other brands

Chicago Pneumatic
Chicago Pneumatic PAC P18 Safety and operating instructions

Atlas Copco
Atlas Copco LP 13-30 P Original instructions

Cramer
Cramer 40V110 manual

HYCON
HYCON HPP18E FLEX operating manual

Liteplan
Liteplan ELV/12A Series installation instructions

Socket
Socket Mobile Power Pack quick start guide