APPA 91 User manual

DIGITAL MULTIMETER
OPERATOR’S MANUAL
APPA 91

1
WARNING
THESE SERVICING INSTRUCTIONS ARE FOR USE BY QUALIFIED PERSONNEL ONLY. TO AVOID
ELECTRIC SHOCK, DO NOT PERFORM ANY SERVICING OTHER THAN THAT CONTAINED IN THE
OPERATING INSTRUCTIONS UNLESS YOU ARE QUALIFIED TO DO SO.
Also, the complete duty cycle for the 20A measurement should be stated as on for 30 seconds max, and off for
3 minutes min.

2
INTRODUCTION
1-1 Unpacking and Inspection
Upon removing your new Digital Multimeter from its packing, you should have the following items:
1. Digital Multimeter.
2. Test lead set (one black, one red).
3. Operators Manual.
4. Protective holster.
1-2 Meter Safety
Terms marked on Equipment
ATTENTION — Refer to Manual.
DOUBLE INSULATION — Protection Class II.
DANGER — Risk of electric shock

3
Symbols in this Manual
This symbol indicates where cautionary or other information is found in the manual.
Fuse
Battery
1-3 Front Panel
Refer to Figure 1 and the following numbered steps to familiarize yourself with the meter's front panel controls and
connectors.
1. Digital Display — The digital display has a 3-1/2 LCD readout (maximum reading 1999) with automatic polarity,
overrange and low battery indicators.
2. Rotary Switch — Select the Function and Range desired.
3. COM Input Terminal — Ground input connector.
4. V Ω:Input Terminal — Positive input connector for Volts, Ohms and Diode.
5. mA µA Input Terminal — Positive input connector for mA and µA measurements (up to 200mA).
6. 20A Input Terminal — Positive input connector for Amp measurements (up to 20A).

4
1
2
4
3
5
6
Figure 1

5
SPECIFICATIONS
2-1 General Specifications
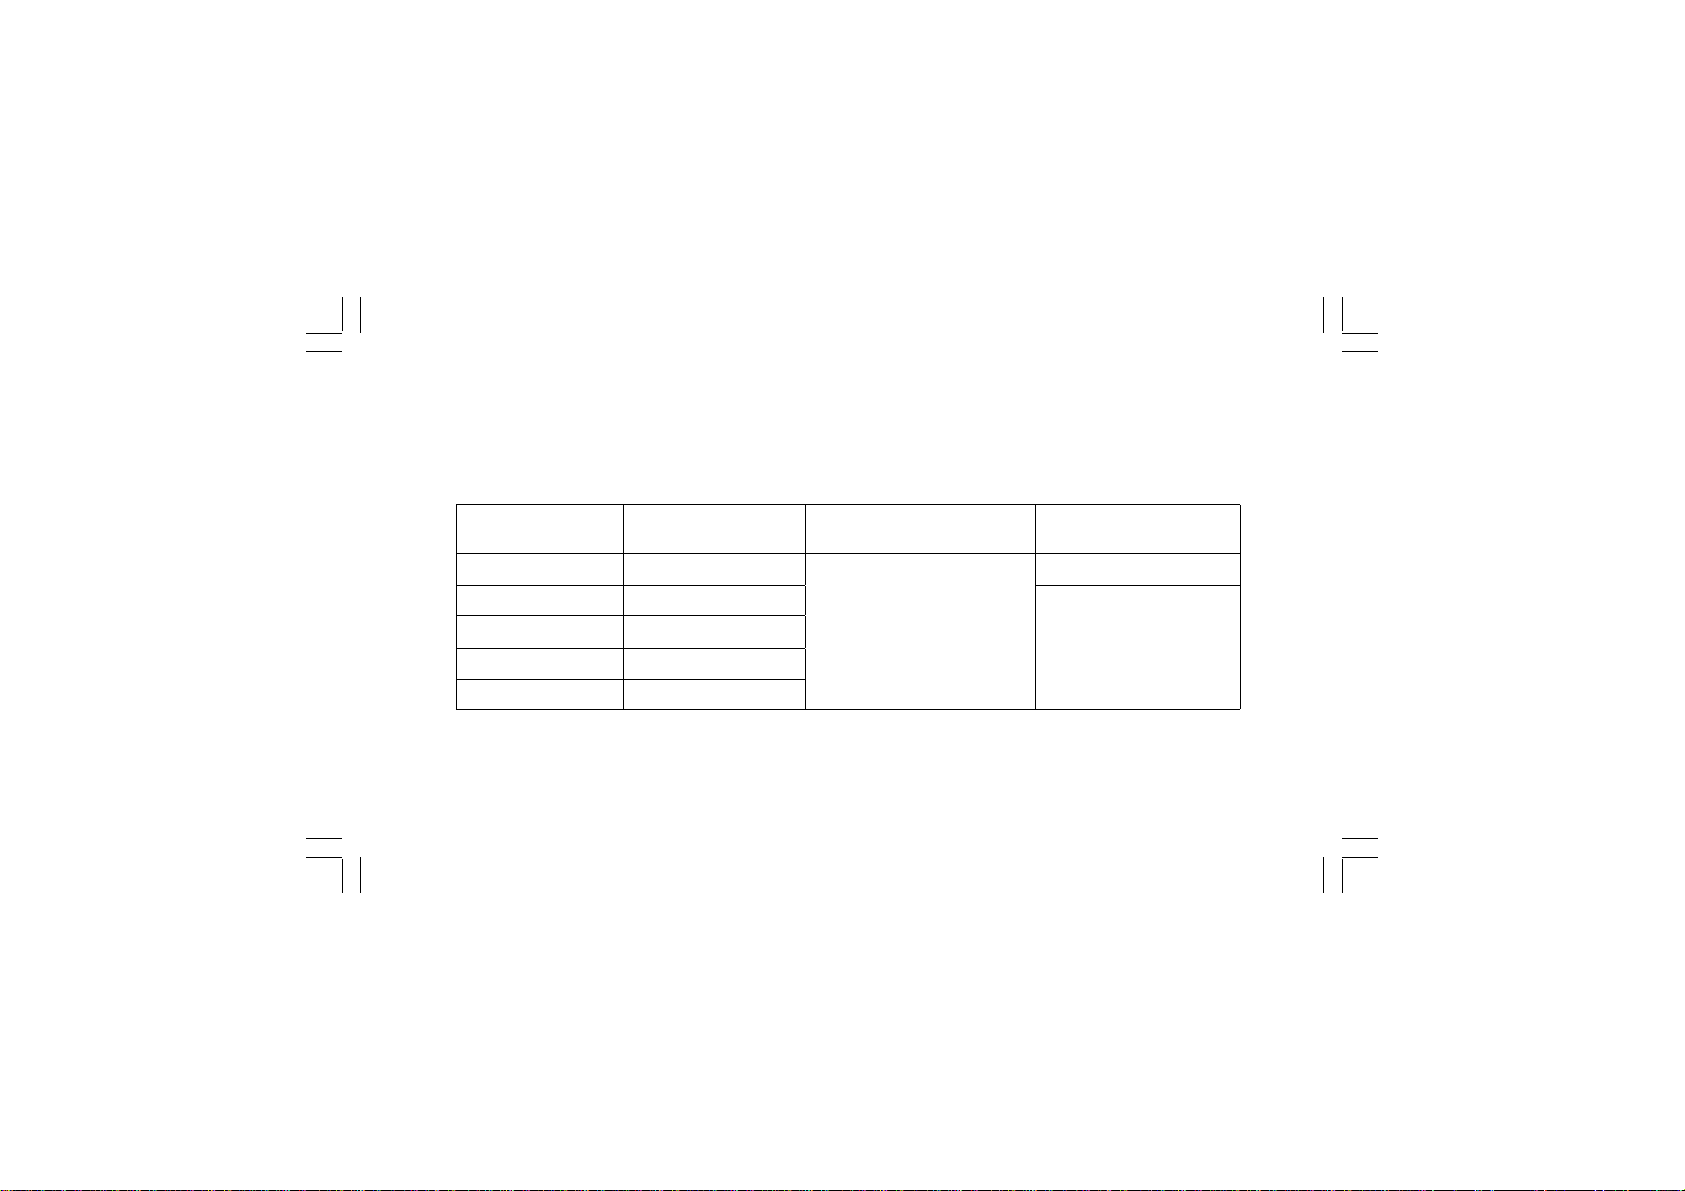
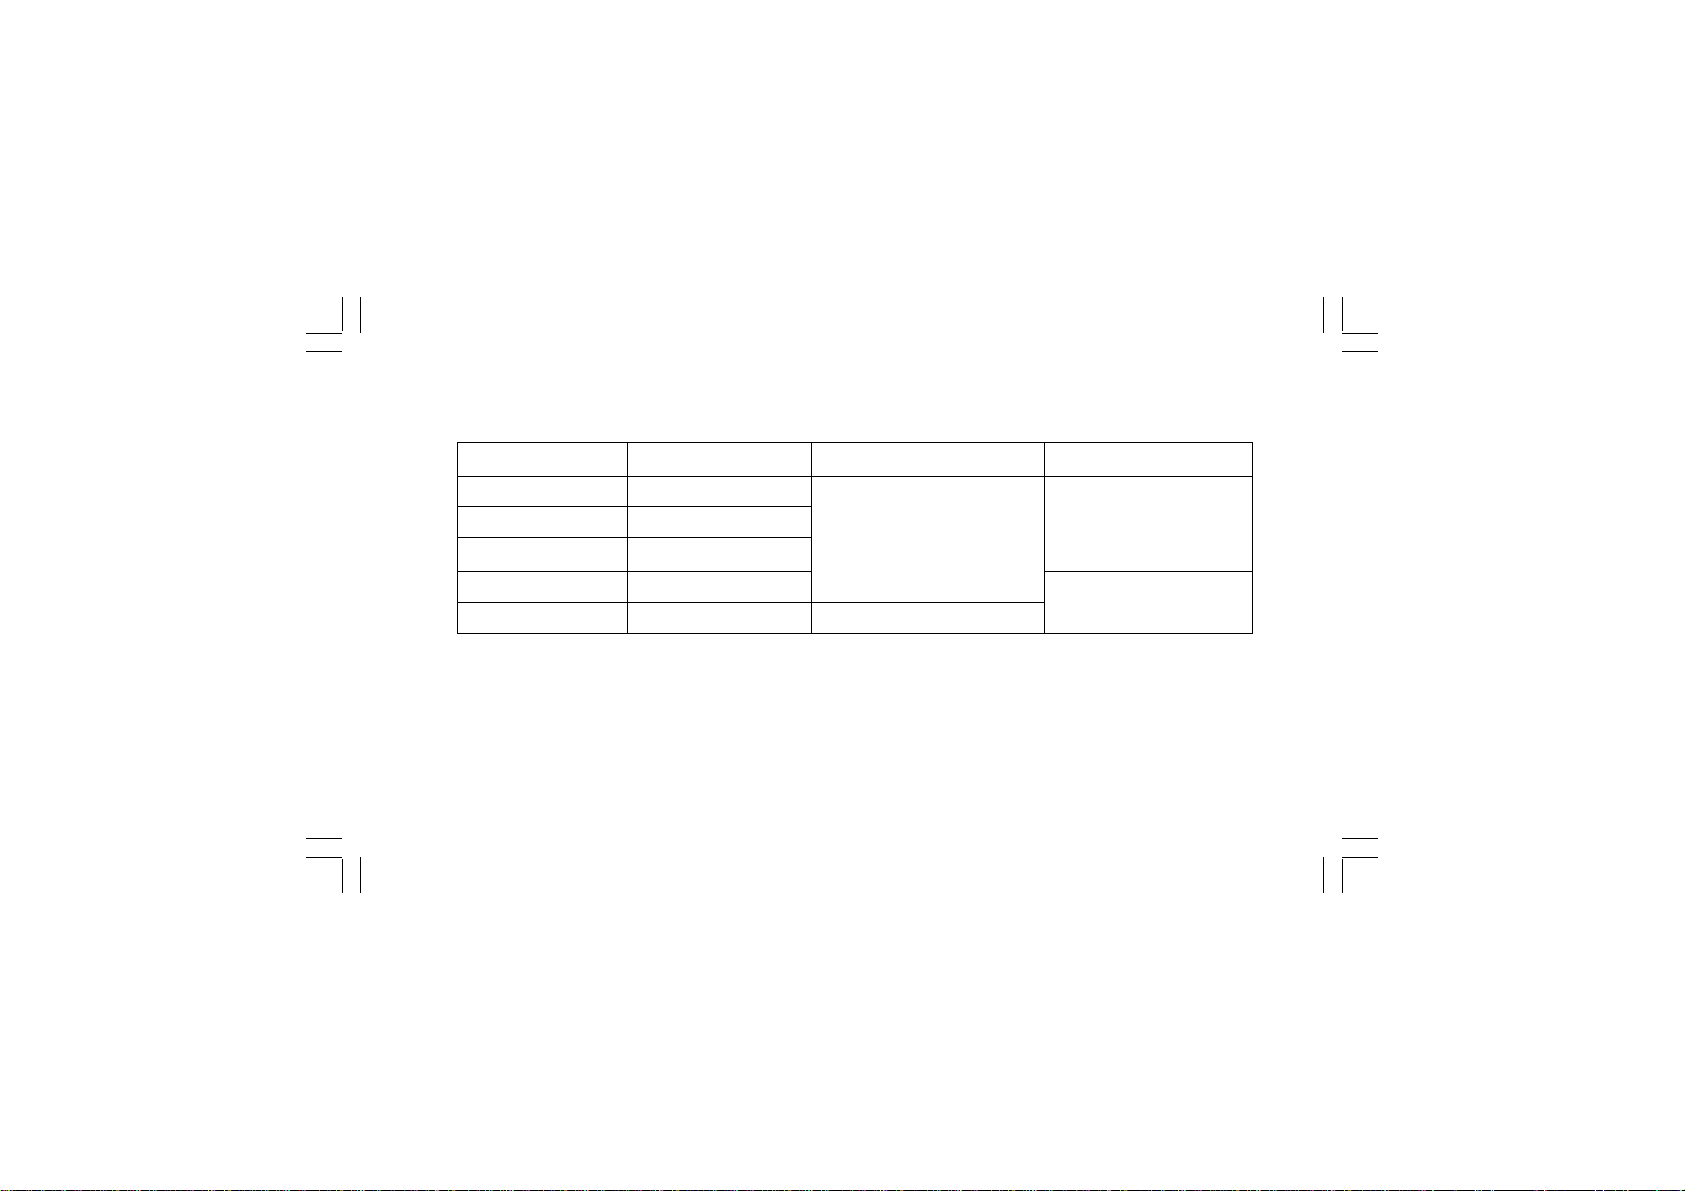
Display : 3-1/2 digit Liquid Crystal Display (LCD) with a maximum reading of 1999.
Polarity Indication : Automatic, positive implied, negative indicated.
Zero Adjustment : Automatic.
Overrange Indication : "1" or "-1".
Low Battery Indication: "" is displayed when the battery voltage drops below operating voltage.
Measuring Rate: 2.5 times per second, nominal.
Auto Power Off: Approx. 30 minutes.
Temperature Coefficient : 0.15 x (Specified accuracy) / °C, <18°C or >28°C.
Power Requirements : Standard 9V battery, NEDA 1604, JIS 006P, IEC 6LF22.
Battery Life : Alkaline 300 hours.

6
Dimensions (WxHxD) : 84mm x 175mm x 31mm, without holster
95mm x 192 mm x 50 mm, with holster.
Weight (including battery) : 340 gms, without holster
550 gms, with holster.
Accessories : Protective Holster, Battery (installed) and Instruction Manual.
2-2 Environmental Conditions:
Indoor use.
Maximum Altitude : 2000m
Installation Category : IEC 1010 CAT .Ⅱ. 1000V, 600V CAT .Ⅲ.
CAT.Ⅱis for measurements performed on circuits directly connected to the low-voltage installation.
CAT .Ⅲ. is for measurements per formed in the building installation.
Pollution Degree : 2
Operating Temperature : 0°C to 45°C (below 75% R.H.)
Storage Temperature : -20°C to 60°C (below 80%R.H.)

7
2-3 Electrical Specifications
Accuracy is ± (% reading + number of digits) at 23°C ± 5°C, less than 75% R.H.
(1) DC Volts
Range Resolution Accuracy Over voltage
protection
200mV 100 µV
±(0.5%rdg + 1dgt)
DC 500V / AC 350V
2V 1mV
20V 10mV
200V 100mV
1000V 1V
DC 1200V
AC 850V
Input Impedance : 10MΩ.

8
(2) AC Volts
Range Resolution Accuracy Over voltage
protection
200mV 100 µV
±(1.25%rdg + 4dgt)
40Hz — 500Hz
DC 500V / AC 350V
2V 1mV
20V 10mV
200V 100mV
750V 1V
DC 1200V
AC 850V
Input Impedance : 10MΩ, less than 100pF

9
(3) DC Current
Range Resolution Accuracy Voltage Burden
200 µA 0.1 µA
±(1.0% rdg + 1dgt) 600mV max.
2mA 1 µA
20mA 10 µA
200mA 100 µA
20A 10mA ±(2.0%rdg + 3 dgt) 900mV max.
* 20A Range : 30 seconds maximum above 10A.
Overload Protection : 1A/500V fast blow fuse for mA, µA input.
16A/500V fast blow fuse for 20A input.

10
(4) AC Current
Range Resolution Accuracy Voltage Burden
200 µA 0.1 µA
±(1.5% rdg + 3 dgt)
40Hz — 500Hz 600mV rms max.
2mA 1 µA
20mA 10 µA
200mA 100 µA
* 20A 10mA ±(2.5% rdg + 3 dgt)
40Hz — 500Hz 900mV rms max.
* 20A Range : 30 seconds maximum above 10A.
Overload Protection : 1A/500V fast blow fuse for mA, µA input.
16A/500V fast blow fuse for 20A input.

11
(5) Resistance
Range Resolution Accuracy Max.Test
Current Max.Open
Circuit Voltage
200Ω0.1Ω±(0.75% rdg + 4 dgt) 2.5mA 3.2V
2KΩ1Ω
±(0.75% rdg + 1 dgt)
200 µA
20KΩ10Ω40 µA
200KΩ100Ω4 µA
20MΩ10KΩ±(1.5% rdg + 5 dgt) 40nA
0.5V
2MΩ1KΩ400nA
Overload Protection : 500V d.c/a.c max.

12
(6) Diode Check
Range Resolution Accuracy Max.Test
Current Max.Open
Circuit voltage
1mV ±(1.5% rdg+ 5 dgt) 1.5mA 3.2V
* Overload Protection: 500V d.c/a.c max.
Instant Continuity Description:
Built – in buzzer sound when resistance is less than 50Ω.
(7) Auto Power Off:
The meter will automatically shut itself off after approximately 30 minutes when the rotary switch is not changed.
The meter can be turned back on by switching to another range.
(8) Beep Guard
The beeper will sound if the test lead is connected to the mA/µA (20A) input terminal while the rotary function
selector is not in mA/µA (20A) position. There is no beep guard at 20mA/20A range of DC and AC function.

13
OPERATION
This instrument has been designed and tested in accordance with IEC Publication 1010, Safety Requirements of
Electronic Measuring Apparatus and has been supplied in a safe condition. This instruction manual contains some
information and warnings which have to be followed by the user to ensure safe operation and to retain the
instrument in safe condition.
3-1 Precautions and Preparations for measurement
1. Make sure that the battery is properly connected.
2. The instrument should only be operated between 0°C ~ 50°C and at less than 75% R.H.
3. Do not use or store this instrument in a high temperature or high humidity environment and do not store the unit in
direct sunlight.
4. Do not replace battery with power on condition.
5. If the unit is not to be used for a log period of time , remove the battery.
6. Do not forget to turn off after use.
7. If the meter is used near equipment that generates electro-magnetic interence, the display may be unstable or indicate
incorrect measurement values.
8. Maximum rated voltage to earth for voltage and current measurements terminals is 1000V AC/DC Cat.II.

14
3-2 Voltage Measurements
1. Set the rotary switch at the required position.
2. Connect black test lead to "COM" terminal and red lead to "VΩ:" input terminal.
3. Connect test leads to measuring points and read the display value.
3-3 Current Measurements
1. Set the rotary switch to the required position.
2. Connect black test lead to "COM" terminal.
3. Connect red test lead to "mA/µA" terminal for measurement up to 200mA.
For measuring current between 200mA and 20A, connect test lead to "20A" terminal.
4. Connect test leads to measuring points and read the display value.

15
3-4 Resistance Measurement
1. Set the rotary switch to the required position.
2. Connect black test lead to "COM" terminal and read lead to "VΩ:" input terminal.
3. Connect test leads to measuring points and read the display value.
3-5 Diode Check
1. Set the rotary switch to the ":" position.
2. Connect the black test lead to the "COM" terminal and the red test lead to the "VΩ:" input terminal.
3. Connect the test lead to the diode. Normally the forward voltage drop of good silicon diode is shown
between .500V and .900V. If the diode under test is defective, "000" (short circuit) or "1" (non-conductance) is
displayed. Reverse check of diode: If the diode under test is good "1" is displayed. If the diode under test is
defective "000" or other values are displayed.

16
3-6 Continuity Check by sounder
1. Set the rotary switch at the ":" position.
2. Connect the black test lead to "COM" terminal and the red test lead to "VΩ:" input terminal.
3. Connect test leads to the circuit under test.
4. Built-in sounder operates if the resistance in the circuit under test is below 50Ω.
MAINTENANCE
WARNING
TO AVOID ELECTRICAL SHOCK REMOVE TEST LEAD BEFORE OPENING THE COVER.
4-1 General Maintenance
1. Repairs or servicing not coveted in this manual should only be performed by qualified personal.
2. Periodically wipe the case with a dry cloth and detergent do not use abrasives or solvents.

17
4-2 BATTERY INSTALLATION OR REPLACEMENT
The meter is powered by a single 9V battery. Refer to Figure 2A and use the following procedure to replace the
battery:
1. Disconnect the test leads and turn the meter off. Remove the test leads from the front terminals.
2. Position the meter face down. Remove the three screws from the case bottom.
3. Lift the end of the case bottom gently until it unsnaps from the case top at the end nearest the LCD.
4. Lift the battery from the case top, and carefully disconnect the battery from battery connector leads.
5. Fit the battery connector leads to the terminals of a new battery and reinsert the battery into the case top. Make
sure that the battery leads to not become pinched between the case bottom and case top.
6. Replace the case top and case bottom. Make sure that all gaskets are properly seated and the two snaps on the
case top are engaged. Reinstall the three screws.

18
4-3 FUSE REPLACEMENT
Refer to Figure 2B and use the following procedure to examine or replace the meter's fuse:
1. Perform steps 1 through 3 of the battery replacement procedure.
2. Lift the circuit board from the case top. Do not remove the screws from the circuit board.
3. Remove the defective fuse by gently prying one end of the fuse loose and sliding the fuse out of the fuse holder.
4. Install a new fuse of the same size and rating. Make sure the new fuse is centered in the fuse holder.
5. Make sure that the case top rotary switch and circuit board switch both are in the OFF position.
6. Replace the case top and case bottom. Make sure that all gaskets are properly seated and the battery leads do
not become pinched between the case halves, and the two snaps on the case top are engaged. Reinstall the
three screws.

19
Case Bottom
Case Top
9V Battery
Battery Connector
Fuse 2
Fuse 1
Figure 2A Figure 2B
Battery Replacement
Table of contents
Other APPA Multimeter manuals