Aquatic HS Sport Plus Kit Guide

InstructionDisclaimer
Dennis Kirk provides instructions to help our customers better understand how to install the
products we sell. The instructions are exact copies of what the manufacturer includes with the
product being sold.
That means the quality and accuracy of the instructions is solely dependent on what the
manufacturer produces. We do our best to make the text legible and the pictures viewable.
However, the end result depends largely on the quality of instructions the manufacturer
provides.
Therefore, you will find that some instructions are not of the highest quality. Sometimes text is
hard to read and pictures are not easy to see. At times you will find the overall look of the
instructions to be less than professional. However, we feel it is better to provide what we have
rather than provide nothing at all.
To the best of our knowledge the instructions and application information contained in the
instructions is accurate. However, Dennis Kirk assumes no liability related to any errors that
may be contained in the copy of the manufacturer’s instructions we provide. Buyers are solely
responsible to insure that product use is consistent with their application.
800-969-7501 so we can further assist you regarding additional product information or any other
business related questions.
Thank you for doing business with Dennis Kirk.

USER / INSTALLATION MANUAL
PLEASE READ THIS INSTRUCTION MANUAL BEFORE
INSTALLATION AND OPERATION
AQ-MP-5UBT-HS - WATERPROOF MEDIA PLAYER
for SiriusXM, iPhone, iPod, USB, Bluetooth & MP3 devices
Replaces Factory Radio on Harley-Davidson®Motorcycles
(Models 1998-2013)

1 Getting Started.........................................................................................................................
1.1 Contents.............................................................................................................................
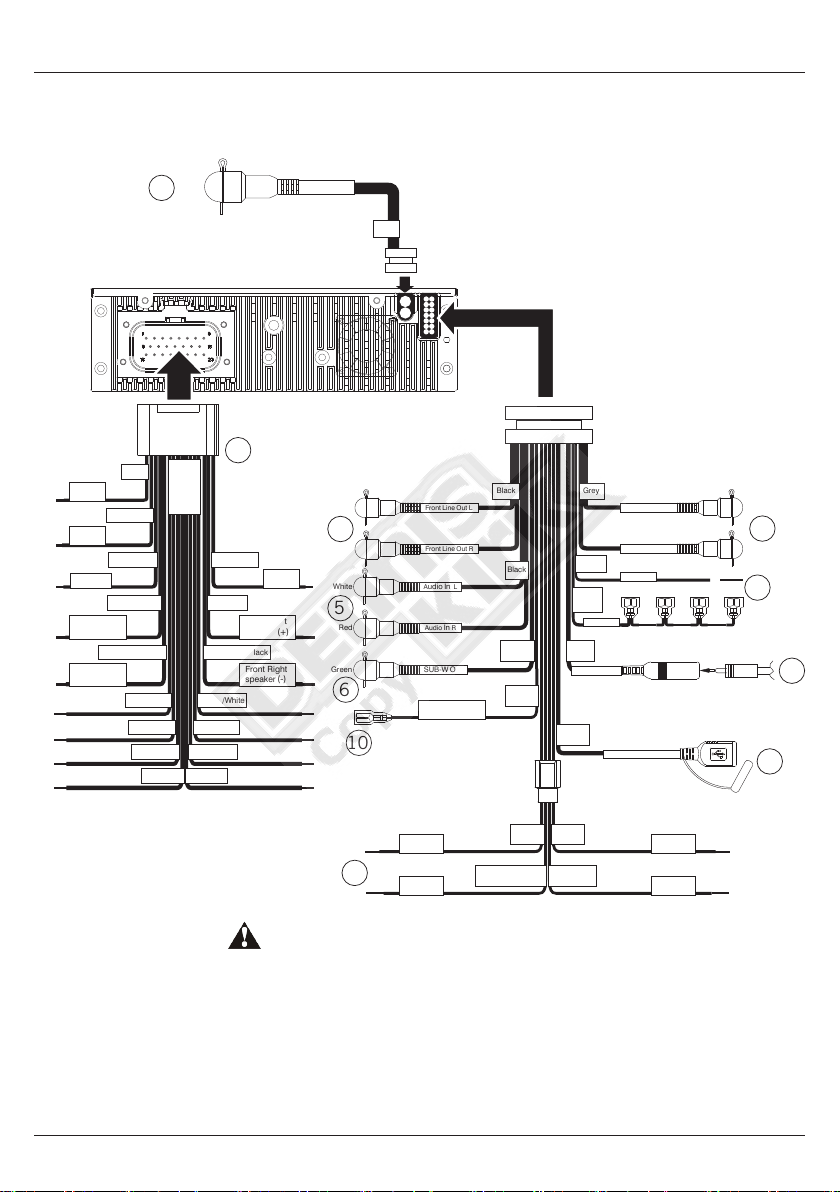
1.2 Connections........................................................................................................................
1.3 Wiring Diagram...................................................................................................................
1.4 Mounting Precautions.........................................................................................................
1.5 Installing the Media Player if no stereo is already installed................................................
1.6 Installing the Media Player if an existing factory stereo is already installed......................
1.7 Connecting Rear Speakers..................................................................................................
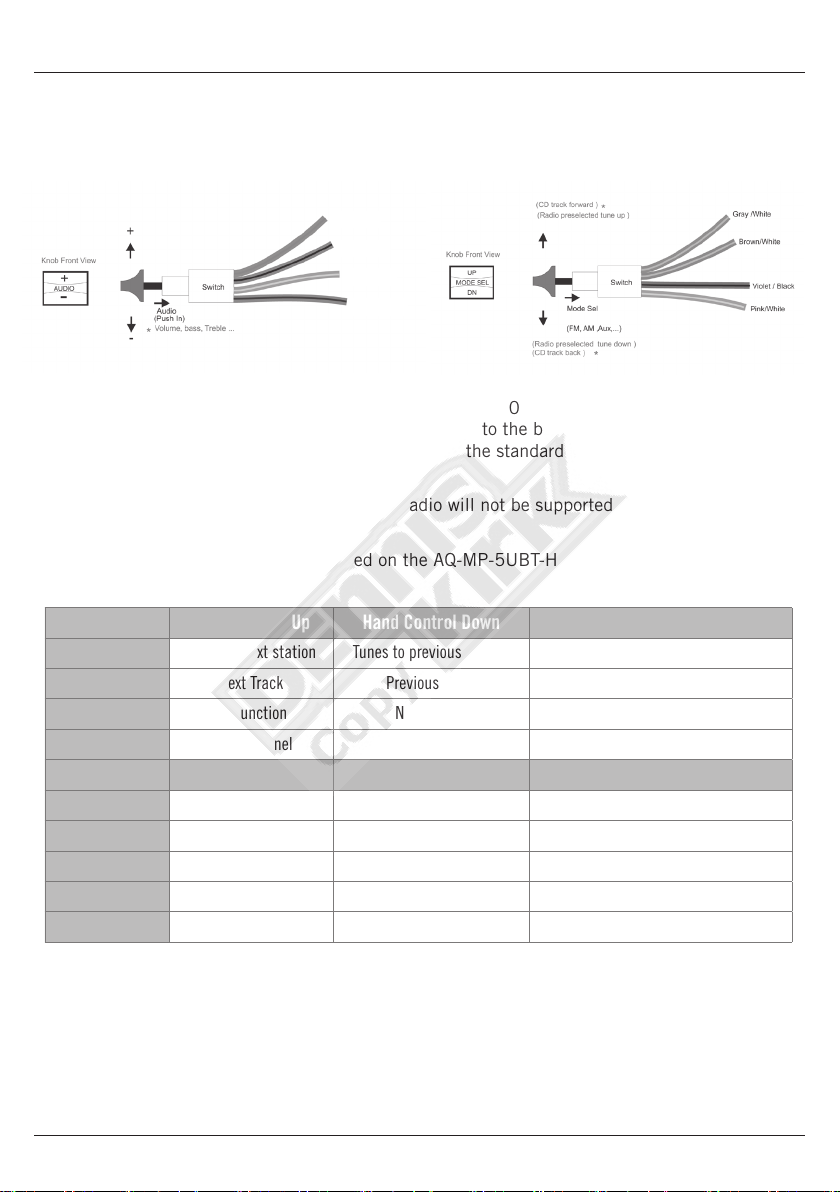
1.8 Handle Bar Controls............................................................................................................
1.9 Power On............................................................................................................................
2 Location of Controls.................................................................................................................
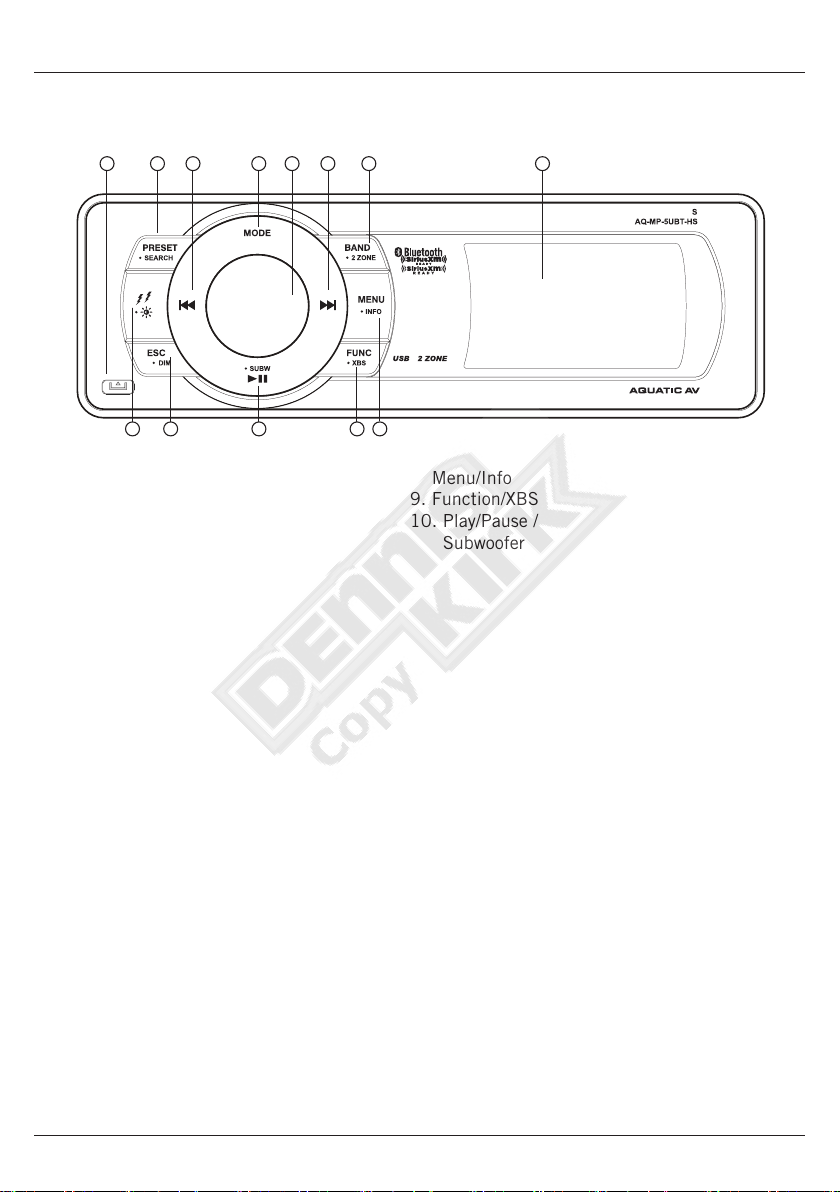
2.1 Media Player Controls..........................................................................................................
2.2 Media Player Control Functions...........................................................................................
3 Listening to Devices..................................................................................................................
3.1 Listening via Bluetooth.......................................................................................................
3.1.1 Pair with Bluetooth Device...........................................................................................
3.1.2 Listening via Bluetooth Device.....................................................................................
3.2 Listening via USB...............................................................................................................
3.2.1 Listening via USB (Apple Devices)...............................................................................
3.2.2 Listening via USB Flash Drives....................................................................................
3.2.3 USB Search..................................................................................................................
3.2.4DeviceCharging...........................................................................................................
3.3 Listening via Auxiliary Input (3.5mm Jack).........................................................................
3.4 Adjusting Volume Level.......................................................................................................
4 Listening to SiriusXM®Satellite Radio......................................................................................
4.1 What is SiriusXM Satellite Radio?.......................................................................................
4.2 Activating SiriusXM Satellite Radio....................................................................................
4.3 Storing Channel Presets......................................................................................................
4.4 Tuning to Channel Presets...................................................................................................
4.5 Removing Channel Presets..................................................................................................
4.6 REPLAY Playback.................................................................................................................
4.7 Parental Control..................................................................................................................
4.8 Reset / Restore Factory Defaults.........................................................................................
4.9 Direct Tune..........................................................................................................................
4.10 Channel Tune....................................................................................................................
4.11 Category Tune...................................................................................................................
4.12 Troubleshooting.................................................................................................................
5 Listening to FM/AM Radio..........................................................................................................
5.1 Enter FM/AM Radio Mode....................................................................................................
5.2 Scan or Seek FM/AM Radio Channels...................................................................................
5.3 Saving Radio Channel to Memory.......................................................................................
5.4 Listening to Saved Radio Memory.......................................................................................
5.5 Switching between FM Tuning Areas...................................................................................
4
4
4
5
6
6
7
7
8
8
9
9
10
11
11
11
11
11
11
12
12
12
12
12
13
13
13
13
14
14
14
14
14
15
15
15
15
16
16
16
16
16
16
Table of Contents Media Player AQ-MP-5UBT-HS
2www.aquaticav.com/harley

6 Settings Menu...........................................................................................................................
6.1 Audio Menu.........................................................................................................................
6.2 Clock Settings.....................................................................................................................
6.3 Local/Distant Tuning...........................................................................................................
6.4 Stereo/Mono........................................................................................................................
6.5 FM Tuning Area...................................................................................................................
6.6 Beep Tone...........................................................................................................................
6.7 Day/Night Mode..................................................................................................................
6.8 Dimmer High/Low...............................................................................................................
6.9 System Reset......................................................................................................................
7 Additional Features..................................................................................................................
7.1 External 12V Triggers.........................................................................................................
7.2 Connecting Multiple Amplifiers or High Current Draw Lighting Systems..................................
8 Specifications & Dimensions....................................................................................................
8.1 Specifications.....................................................................................................................
8.2 Dimensions........................................................................................................................
9 Warranty Information...............................................................................................................
17
17
17
17
17
18
18
18
18
18
19
19
19
20
20
20
21
Table of Contents Media Player AQ-MP-5UBT-HS
3www.aquaticav.com/harley

• AQ-MP-5UBT-HS Media Player
• Dummy Faceplate/Dust Cover
• AQ-USB-1 USB Input Socket
• Four-pin Speaker Wiring Harness
• User / Installation Manual
1.1 Contents
1. 23-pin Harley-Davidson®Standard Harness Connection
The 23-pin harness supplies power and ground connections to the Media Player and two
speaker channel output connections from the Media Player.
2. FM/AM Radio Antenna Jack
Allows connection of FM/AM radio antenna. For best FM/AM performance make sure the
antenna is extended to the highest achievable position.
3. Front Auxiliary RCA Outputs
RCA pre-outputs allow connection to an external amplifier to power additional speakers on
front channels.
4. Rear Auxiliary RCA Outputs
RCA pre-outputs allow connection to an external amplifier to power additional speakers on
rear channels.
5. Auxiliary RCA Inputs
Allows an additional RCA input from a standalone unit or another source.
6. Subwoofer Output
Allows powered (active) subwoofer to be connected via RCA connector.
7. 12V DC External Trigger (x2)
Allows for external lighting or relays to be triggered (350mA max load).
8. USB Charging Input
Charges USB devices when connected.
9. SiriusXM Satellite Radio Input
Allows the connection of the SiriusXM-Connect Vehicle Tuner (sold separately).
10. Power Antenna / Amplifier Remote Wire
Provides 12V+ signal to turn on an external amplifier.
11. Rear Channel High-Level (Speaker) Output
High-level rear channel speaker output (refer to 1.7).
1.2 Connections (see also ‘1.3 Wiring Diagram’)
Getting Started Media Player AQ-MP-5UBT-HS
4www.aquaticav.com/harley

Antenna Jack
Front Line Out LRear Line Out L
Front Line Out RRear Line Out R
Audio In L
Audio In R
Black
DC12V_2
DC12V_1
SUB-W Out Radio Antenna
Black
Black
Brown
Brown
/White
11 Din SiriusXM
Black
Red/Orange
Black
Front Right
speaker (+)
Front Right
speaker (-)
White/Orange Gray/Red
Light Green/White Light Green/Black
Pink/White
Gray/Green Brown/White
Green/Blue Violet/Black
Brown/Black Gray/White
Pink/White
Handle
Bar
Control
23 PIN CONNECTOR
Ground
Accessory
Front left
speaker (+)
Front left
speaker (-)
Battery
Rear right
speaker (+)
Power Antenna/
Amplifier Remote
Rear right
speaker (-)
Brown
White/Brown
Rear left
speaker (+)
Rear left
speaker (-)
Green
Light Green/Brown
Red/Orange
Orange/Blue
Battery
Blue
Black
White
Red
White
Red
White
Red
Grey
Black
Green
White
For 1A Charging Only
1.3 Wiring Diagram
5
1
2
3
No lower than a 2 Ohm load should be used
or damage may occur to the Media Player.
Make sure the polarity of speakers are
connected correctly.
4
6
7
9
8
10
11
Getting Started Media Player AQ-MP-5UBT-HS
5www.aquaticav.com/harley

1. Install the unit where it does not interfere with driving.
2. Check clearances on both sides of a planned installation before drilling any holes or
installing any screws.
3. When routing RCA cables, keep them away from power cables and speaker wires.
A common source of noise in the audio system is the motorcycle ignition system. This is usually
due to the radio being located close to the ignition system (engine). This type of noise is detect-
able by a varying pitch with the speed of the engine.
Ignition noise can be removed using a high voltage radio suppression type ignition wire and a
suppressor resistor. Your motorcycle may already use this wire and resistor but it may be neces-
sary to check them to ensure they are operating correctly. Alternatively, a noise suppressor could
be installed.
1.4. Mounting Precautions
Please observe the following precautions:
1.5 Installing the Media Player if no stereo is already installed
Use the existing Harley-Davidson®factory side mounting brackets and hardware to mount the
Media Player.
1. Position the Media Player in front of the fairing opening so the wiring can be passed
through the opening.
2. Follow the wiring diagram and ensure all connections are secure and insulated with crimp
connectors to ensure proper operation.
3. Turn the Media Player on
to confirm operation (motor-
cycle ignition switch must
be on) and once correct
operation is achieved turn the
motorcycle ignition switch off
before proceeding with the
final mounting of the chassis.
4. Ensure that the unit is
supported and secured on
the sides using the existing 4
factory screws; failure to do
so may allow the unit to move
during while riding, causing
damage to the mounting area.
Getting Started Media Player AQ-MP-5UBT-HS
6www.aquaticav.com/harley

1.6 Installing the Media Player if an existing factory stereo is already installed
If replacing an existing Harley-Davidson®factory stereo
use the existing Harley-Davidson®factory side mounting
brackets and hardware to mount the Media Player.
1. Disconnect the radio harness and FM/AM radio
antenna from the factory stereo.
2. Remove the factory stereo and replace with the AQ-
MP-5UBT-HS Media Player using the existing factory
mounting hardware.
3. Plug the 23-pin radio harness plug and FM/AM radio
antenna into the AQ-MP-5UBT-HS Media Player. Only
the 23-pin harness plug is utilized by the media player.
Any additional harness plugs will hang loose in your fairing.
4. Turn the Media Player on to confirm operation (motorcycle ignition switch must be on) and
once correct operation is achieved turn the motorcycle ignition switch off before proceeding
with the final mounting of the chassis.
5. Ensure that the unit is supported and secured on the sides using the existing 4 factory
screws; failure to do so may allow the unit to move during while riding, causing damage to
the mounting area.
1.7 Connecting Rear Speakers
Rear speakers are usually installed on the following Harley-Davidson®Motorcycle models: Electra
Glide Ultra Classic, Road Glide Ultra, Ultra Limited. To continue using these speakers with your
Aquatic AV Media Player follow the instructions below.
1. Locate the rear channel high-level output (4-pin molex connector with four speaker wires). The
pigtail itself is labelled with Color Code, Function and Description.
2. Locate the rear channel speaker lines in the 35-pin radio harness plug. This plug will not be
connected to your Aquatic AV head unit. Cut the 4 speaker wires for the rear channels at pins 1
and 24(for the right side) and pins 2 and 25(for the left side)
3. Strip the 4-pin pigtail wires 1/4” exposing bare wires. Strip the 4 wires that you cut from the
35-pin harness 1/4” exposing bare wires.
4. Connect and crimp using crimp caps or solder the connection, cover the soldered wires with
non conductive heat shrink tube.
After following the installation instructions above test your rear speakers for sound. If you do not have output from your
rear speakers make sure to check your rear speaker setting in the settings menu and select rear speakers ‘ON’.
Getting Started Media Player AQ-MP-5UBT-HS
7www.aquaticav.com/harley

Hand Control Up Hand Control Down Mode Select
AM/FM Tunes to next station Tunes to previous station Switches Mode
Bluetooth/USB Next Track Previous Track Switches Mode
AUX No function No function Switches Mode
SiriusXM Next Channel Previous Channel Switches Mode
( + ) ( - ) Audio
AM/FM Turns volume up Turns volume down Accesses Audio Menu adjustments
Bluetooth/USB Turns volume up Turns volume down Accesses Audio Menu adjustments
AUX Turns volume up Turns volume down Accesses Audio Menu adjustments
SiriusXM Turns volume up Turns volume down Accesses Audio Menu adjustments
The AQ-MP-5UBT-HS requires 12V DC to pins 10,20, and 12 in the 23-pin radio harness plug in
order to power up. Ground should be connected to pin 11.
Once all connections are made press the rotary knob and the stereo will turn ON.
1.9 Power On
The AQ-MP-5UBT-HS is a plug and play solution for 1998-2013 Harley-Davidson®Motorcycles.
Plug the standard Harley-Davidson®23-pin connector in to the back of the AQ-MP-5UBT-HS and
your speakers and hand controls will work the same as the standard factory install (some Harley-
Davidson®models may require additional steps).
Some stock Harley-Davidson®features e.g. CB radio will not be supported through the AQ-MP-
5UBT-HS.
Below is a matrix of what can be controlled on the AQ-MP-5UBT-HS via the stock Harley-David-
son®hand controls.
1.8 Handle Bar Controls
Mode switch (right hand side)Audio switch (left hand side)
Green/Blue
Violet/Black
Brown/Black
Gray/Green
Getting Started Media Player AQ-MP-5UBT-HS
8www.aquaticav.com/harley

2.1 Media Player Controls
1. Front face release
2. Preset/Search
3. Previous/Rewind
4. Next/Fast Forward
5. Mode
6. Band/2-Zone
7. LCD screen
8. Menu/Info
9. Function/XBS
10. Play/Pause /
Subwoofer
11. ESC/Dimmer
12. 12V Trigger /
Day/Night Mode
13. Rotary Select Knob
8
101112 9
73 652
1413
Location of Controls Media Player AQ-MP-5UBT-HS
9www.aquaticav.com/harley

If your music player is connected via the Auxiliary input you will not be able to control track or receive track informa-
tion.
Turn off DSP to access control of Bass and Treble
* iPod & iPhone only
2.2 Media Player Control Functions
Button AM/FM Mode Aux In Bluetooth USB SiriusXM®
Satellite Radio
Rotary Select
Knob
Short Press Mute
Long Press Power Off
Short Press When system is Off, this will power back On
In MENU: Select
Mode Short Press Enter mode select screen or switches to next source
Long Press No Function
Rotary Knob
Clockwise
Volume increases
In MENU: Next/Down
Rotary Knob
Counter
Clockwise
Volume decreases
In MENU: Previous/Up
Next
Short Press
Scans to the next station No Function Changes to next
song
Changes to next
song
Next Station
Skip forward in
Replay Mode
Long Press
Switches into manual seek mode No Function No Function No Function Rapid Channel
Fast Forward Fast Forward in
Replay Mode
Previous
Short Press
Scans to the previous station No Function Changes to previ-
ous song
Changes to previ-
ous song
Previous Station
Skip Back in Replay
Mode
Long Press
Switches into manual seek mode No Function No Function No Function Rapid Channel
Fast Rewind Fast Rewind in
Replay Mode
Play/Pause/
Subwoofer
Short Press No Function No Function Toggles Play/Pause Toggles Play/Pause Play/Pause SiriusXM
Long Press Displays Subwoofer volume
Band/2 Zone Short Press Switches between AM/FM Bands No Function No Function No Function SXM1, SXM2, SXM3
Long Press Toggles 2 Zone selection menu
12V Trigger/
Day/Night Mode
Short Press Toggles 12V Trigger menu
Long Press Toggles Day/Night Mode
FUNC/XBS Short Press Access AM/FM Tuner Options No Function No Function Access USB
Options
Access SiriusXM
Options
Long Press Toggles XBS ON/OFF
ESC/DIM Short Press Returns you to the Previous Screen
Long Press Enables the Two Stage Dimmer
PRESET/SEARCH Short Press Displays your presets No Function No Function Toggles Search
feature*
Displays your presets
Long Press Auto Store station preset No Function No Function No Function No Function
MENU/INFO Short Press Toggles system menu
Long Press No Function No Function No Function No Function
Location of Controls Media Player AQ-MP-5UBT-HS
10www.aquaticav.com/harley

1. Open the Bluetooth settings on your Bluetooth enabled device.
2. Turn on Bluetooth on device.
3. Select ‘AQUATIC AV’ from the list of available devices to pair (no password is needed).
4. A Bluetooth logo will illuminate on the Media Player LCD to verify Bluetooth is activated.
3.1.1 Pair with Bluetooth Device
Only one Bluetooth device can be paired with the Media Player at any time.
3.1.2 Listening via Bluetooth Device
1. After pairing a Bluetooth enabled device, switch the media player to Bluetooth Mode.
2. Media played on your paired device, will be transmitted to the Media Player.
3. The Play/Pause, Next, and Previous buttons will control their appropriate functions on
your device
4. A paired Bluetooth device can be controlled through the controls on the device, the
faceplate controls, or using the handle bar controls.
1. Remove the faceplate and press the lever in the lower right corner of the unit to release
the tray mechanism.
2. Set the iPod/iPhone in the mechanism and adjust the clamps to hold it secure.
3. Plug the iPod/iPhone cable into the USB input, and tuck the cable in so the faceplate can
be reattached.
4. Replace the faceplate. If the stereo was previously on it will come back on. If not press
the Rotary Knob to power the unit on.
5. Press the Mode button and select USB Mode.
3.2 Listening via USB
3.2.1 Listening via USB (Apple Devices)
Listening to Devices Media Player AQ-MP-5UBT-HS
11www.aquaticav.com/harley

3.4 Adjust Volume Level
1. Turn the rotary knob clockwise increase the volume.
2. Turn the rotary knob counter clockwise to reduce the volume.
3.3 Listening via Auxiliary Input (3.5mm Jack)
1. Remove the faceplate from the stereo.
2. Connect your MP3 device to the 3.5mm connector.
3. Re-attach the faceplate.
4. Press the rotary knob to power the Media Player ON (if the faceplate was removed with the
stereo still powered on, it will power on by itself).
5. Press (MODE) on the Media Player or remote control to select ‘AUX -1’ mode.
Always ensure to connect and disconnect your Media Player with dry hands!
When specified USB devices are connected to either the internal USB input or the rear USB
charging cable, the device battery will charge.
3.2.4 Device Charging
3.2.3 USB Search
1. When using an iPhone, iPod or USB flash drive press SEARCH to enter USB searching
mode.
2. Once in searching mode the menu will display ‘Playlist’. Use the Rotary Knob to scroll
through the search modes below:
1) Playlist 2) Artist 3) Album 4) Song 5) Genre 6) Composer 7) Audio Book
(USB flash drives will display the names of your folders)
3. Press the Rotary Knob to select the desired search mode and continue in this manner to
navigate the menu sub-folders.
4. Use and FAST REWIND/FAST FORWARD to navigate through your menu page by page.
1. Remove the faceplate and press the lever in the lower right corner of the unit to release
the tray mechanism.
2. Plug the USB drive in the USB port.
3. Replace the faceplate. If the stereo was previously on it will come back on. If not press
the Rotary knob to power it on.
4. Press the Mode button and select USB Mode.
3.2.2 Listening via USB Flash Drives
Listening to Devices Media Player AQ-MP-5UBT-HS
12www.aquaticav.com/harley

4.2 Activating SiriusXM Satellite Radio
The SiriusXM Radio ID is required for activation and can be found by tuning to Channel 0 as well
as on the label found on the SiriusXM-Connect Vehicle tuner and its’ packaging. The Radio ID
does not include the letters I,O,S or F.
After installing your SiriusXM-Connect Vehicle Tuner and antenna, power on the Media Player,
press the MODE button and select SiriusXM mode.
You should be able to hear the SiriusXM preview channel on Channel 1. If you cannot hear the
preview channels, please check the installation instructions to make sure your SiriusXM-Connect
tuner is properly installed.
After you can hear the Preview channel, tune to Channel 0 to find the Radio ID of your tuner.
4.3 Storing Channel Presets
1. Select the channel you would like to store.
2. Press the FUNC button, then select ‘Add Preset’ to select one of the 6 presets.
3. When in the main screen, press BAND to select between SXM1, SXM2 & SXM3.
4. Repeat steps above to store up to 18 total stations within SiriusXM mode.
A total of 18 channels can be stored in the preset memory.
4.1 What is SiriusXM Satellite Radio?
Only SiriusXM® brings you more of what you love to listen to, all in one place. Get over 140
channels, including commercial-free music plus the best sports, news, talk, comedy and enter-
tainment. Welcome to the world of satellite radio.
A SiriusXM-Connect Vehicle Tuner and subscription are required.
For more information,visit www.siriusxm.com
In the USA, you can activate online or by calling SiriusXM Listener care:
• Visit www.siriusxm.com/activatenow
• Call SiriusXM Listener Care at 1-866-635-2349
For Canadian Subscriptions, please contact:
• Visit www.siriusxm.ca/activatexm
• Call XM customer Care at 1-877-438-9677
As part of the activation process, the SiriusXM satellites will send an activation message to your
tuner. When your radio detects that the tuner has received the activation message, your radio will
display: “Subscription Updated”.
Once subscribed, you can tune to channels in your subscription plan. Note, the activation process
usually takes 10 to 15 minutes, but may take up to an hour. Your radio will need to be powered
on and receiving the SiriusXM signal to receive the activation message.
For more information on how to install the SiriusXM Connect Vehicle tuner, consult the installation guide included with
the tuner
Listening to SiriusXM®Satellite Radio Media Player AQ-MP-5UBT-HS
13www.aquaticav.com/harley

4.8 Reset / Restore Factory Defaults
1. Short press MENU then select ‘SYSTEM’ using the rotary encoder.
2. Select ‘RESET’ and press the rotary encoder to ‘Enter’.
3. Select ‘SXM RESET’ and press the rotary encoder to ‘Enter’.
1. Press FUNC then select ‘Parental Controls’.
2. To select Parental Controls On/Off press the encoder to ‘Enter’.
3. Using the Encoder rotate to select the default code “1111”.
4. To lock channels press FUNC then select ‘Parental Controls’ then ‘Lock Channels’.
5. Use the encoder to rotate to selected channels and press ‘Enter’.
6. To remove channels from the lock list follow steps 1 to 5 above, but select Unlock instead
of Lock.
7. To change Pass Code, Press FUNC then select ‘Parental Controls’ then select ‘Change My
Code’.
4.7 Parental Control
Parental Control allows you to prevent unauthorized access to selected channels you select. When
enabled, the Parental Control feature requires you to enter a passcode to unlock any locked chan-
nels.
If you forget your passcode, press MENU, select SYSTEM, then select RESET. Understand that when you perform a
RESET, all previously stored preset channels and audio settings in memory will be cleared. Once a RESET is performed,
the Parental Control pass code will be reset to the default code (1111).
4.6 REPLAY Playback
• Play/Pause: Using the Play/Pause button will allow the user to Play/Pause live audio.
• Skip Track Backward: Short press the Fast Rewind button.
• Skip Track Forward: Short press the Fast Forward button.
• Fast rewind: Press and hold the Fast Rewind button.
• Fast forward: Press and hold the Fast Forward button.
• Press FUNC then select ‘Jump to Live’ to resume back to live audio.
4.5 Removing Channel Presets
1. Press BAND to select the SXM1, SXM2 or SXM3.
2. Press FUNC, then select ‘Remove Preset’.
3. Select the desired preset to be removed.
1. Press BAND to select the SXM1, SXM2 or SXM3.
2. Press PRESET then use the rotary knob and rotate to the desired station.
4.4 Tuning to Channel Presets
Restoring the factory default settings will reset the last channel tuned, preset stations, display settings, locked
channels, parental control code and disable parental control. The parental control pass code will be reset to ‘1111’.
Listening to SiriusXM®Satellite Radio Media Player AQ-MP-5UBT-HS
14www.aquaticav.com/harley

4.11 Category Tune
1. Press FUNC and select ‘Category’.
2. Using the encoder rotate to select the category desired
3. Press Enter, then select the channel desired.
4.12 Troubleshooting
Message Description
Check Antenna The radio has detected a fault with the SiriusXM antenna. The antenna cable may be either discon-
nected or damaged. Verify that the antenna cable is connected to the SiriusXM Connect Vehicle
Tuner. Inspect the antenna cable for damage and kinks. Replace the antenna if the cable is damaged.
SiriusXM products are available at your local car audio retailer or online at www.shop.siriusxm.com.
Check Tuner The radio is having difficulty communicating with the SiriusXM Connect Vehicle Tuner. The tuner
may be disconnected or damaged. Verify that the SiriusXM Connect Vehicle Tuner cable is securely
connected to the radio.
No Signal The SiriusXM Connect Vehicle Tuner is having difficulty receiving the SiriusXM satellite signal. Verify
that your vehicle is outdoors with a clear view of the sky. Verify that the SiriusXM magnetic mount
antenna is mounted on a metal surface on the outside the vehicle. Move the SiriusXM antenna
away from any obstructions. Inspect the antenna cable for damage and kinks. Consult the SiriusXM
Connect Vehicle tuner installation manual for more information on antenna installation. Replace the
antenna if the cable is damaged. SiriusXM products are available at your local car audio retailer or
online at www.shop.siriusxm.com.
Subscription Updated The radio has detected a change in your SiriusXM subscription status. Press the ENTER button to
clear the message. Visit www.siriusxm.com or call 866-635-2349 if you have questions about your
subscription.
Channel Not Available The channel that you have requested is not a valid SiriusXM channel or the channel that you were
listening to is no longer available. You may also see this message briefly when first connecting a new
SiriusXM Connect Vehicle tuner. Visit www.siriusxm.com for more information about the SiriusXM
channel lineup.
Channel Not Subscribed The channel that you have requested is not included in your SiriusXM subscription package or the
channel that you were listening to is no longer included in your SiriusXM subscription package. Visit
www.siriusxm.com or call 866-635-2349 if you have questions about your subscription package or
would like to subscribe to this channel.
Channel Locked The channel that you have requested is Locked by the radio Parental Control feature. See the section
on Parental Control, page 16 for more information on the Parental Control feature and how to access
locked channels.
Tuning to a specific channel can be done in three ways:
4.10 Channel Tune
1. Short press the NEXT button to go up to the next available station.
2. Short press the PREVIOUS button to go down to the next available station.
3. Press FUNC, CHANNEL then using the rotary knob, rotate counter clock wise to go down
to the next available channel or clockwise to go up to the next available channel.
4. Long press the NEXT button for Rapid Channel function.
5. Long press the PREVIOUS button for Rapid Channel function.
4.9 Direct Tune
Press FUNC then select ‘Direct Tune’, using the rotary knob. Rotate to select each number you
would like to access (e.g. for channel 101; rotate first digit to 1 then press Enter, rotate second
digit to 0 then press Enter, rotate last digit to 1 and press Enter. Channel 101 is now selected).
Listening to SiriusXM®Satellite Radio Media Player AQ-MP-5UBT-HS
15www.aquaticav.com/harley

5.5 Switching between FM Tuning Areas
1. When in ‘RADIO’ mode.
2. Press the FUNC button to enter the Function menu.
3. Scroll to ‘AREA’ then press the rotary knob.
4. Use the Rotary Knob to scroll to the desired tuning Area and select by pressing the Rotary
Knob.
5.2 Scan or Navigate FM/AM Radio Channels
1. Press the NEXT or PREVIOUS buttons to scan for the strongest radio signals in your area.
2. Press and hold the NEXT or PREVIOUS buttons to mannually tune the radio to desired
station.
5.3 Saving Radio Channel to Memory
1. Tune to the station you would like to be saved as a preset.
2. Press the FUNC button to enter the Function menu.
3. Select ‘Manually Save Preset’.
4. Using the rotary knob you can select which preset slot you would like to save the current
station to.
5. Press the rotary knob to confirm your selection.
6. Upon successfully saving a preset, the screen will display SAVED and the preset number
selected will be shown in the right corner of the display.
5.4 Listening to Saved Radio Memory
1. Once the presets have been set either manually or using Auto Scan press the ‘Preset’ but-
ton to display your presets.
Presets are only for the current band you are on. Each band FM1, FM2, FM3, AM1 and AM2 has six presets for a
total of 30 (18x FM & 12x AM).
5.1 Enter FM/AM Radio Mode
1. Press the MODE button to switch your Media Player to Radio Mode.
US mode will increase and decrease the FM frequency in steps of 0.2 MHz, e.g. 88.1, 88.3, 88.5 MHz.
EUR mode will increase and decrease the FM frequency in steps of 0.05 MHz, e.g. 88.25, 88.30, 88.35 MHz.
RUSS mode will increase and decrease the FM frequency in steps of 0.05 MHz, e.g. 88.25, 88.30, 88.35 MHz.
LAT mode will increase and decrease the FM frequency in steps of 0.1 MHz, e.g. 88.2, 88.3, 88.4 MHz.
ASIA mode will increase and decrease the FM frequency in steps of 0.1 MHz, e.g. 88.2, 88.3, 88.4 MHz.
JAPAN mode will increase and decrease the FM frequency in steps of 0.1 MHz, e.g. 88.2, 88.3, 88.4 MHz.
MID E mode will increase and decrease the FM frequency in steps of 0.05 MHz, e.g. 88.25, 88.30, 88.35 MHz.
AUS mode will increase and decrease the FM frequency in steps of 0.1 MHz, e.g. 88.2, 88.3, 88.4 MHz.
Listening to FM/AM Radio Media Player AQ-MP-5UBT-HS
16www.aquaticav.com/harley

6.1 Audio Menu
From the ‘Audio Menu’ you are able to change the bass, treble, balance, and fader.
Any changes made in the ‘Audio Menu’ are system wide so it will affect all modes.
1. To enter the ‘Audio Menu’ press the ‘AUDIO/MENU’ button.
2. In the ‘Audio Menu’ press the ‘AUDIO/MENU’ to scroll through all options.
3. To change the parameters use the rotary knob to adjust settings.
6.2. Clock Settings
The clock can be adjusted from the clock settings menu in the system settings.
1. To change the time press MENU then use the rotary knob to navigate to SYSTEM settings
then CLOCK SETTINGS. Use the rotary knob to adjust and set the time.
2. To switch the clock on or off press MENU then use the rotary knob to navigate to SYSTEM
settings then CLOCK PRIORITY. Use the rotary knob to select either ON or OFF.
6.3 Local/Distant Tuning
When ‘Local’ is turned on the Media Player seeks to only the radio channels with strong signal
strength. When ‘Local’ is turned off the Media Player will seek to all radio channels it receives signal
from.
When local is turned on the word ‘Local’ will appear in the upper right hand corner of the Media Player LCD.
1. When in AM/FM mode press FUNC to access the ‘Local/Distant Tuning’ settings.
2. Use the rotary knob to adjust settings.
6.4 Stereo/Mono
Change the output mode between stereo and mono. Some applications only accept a mono input.
1. When in AM/FM mode press FUNC to access the ‘Stereo/Mono’ settings.
2. Use the rotary knob to adjust settings.
17www.aquaticav.com/harley
Settings Operation Media Player AQ-MP-5UBT-HS

6.7 Day/Night Mode
Adjust the screen display for better visibility in day or night time operation.
To switch between Day and Night modes long press the 12V Trigger / Day/Night Mode button.
Clock display will always be Night mode regardless of the Day/Night Mode settings.
6.6 Beep Tone
Beep tone plays when any button is pressed, it can be toggled on and off from this selection.
6.9 System Reset
Restores all factory settings.
6.5 FM Tuning Area
There are seven different tuning areas: USA, EUR, LAT, ASIA, MIDDLE EAST, AUSTRALIA,
RUSSIA.
1. When in AM/FM mode press FUNC to access the ‘AREA’ settings.
2. Use the rotary knob to select your area.
6.8 Dimmer High/Low
Adjust the display brightness from 100% for normal operation to 30% brightness to reduce
screen glare during night time operation.
18www.aquaticav.com/harley
Settings Operation Media Player AQ-MP-5UBT-HS

In any operational mode, press the 12V Trigger button to activate. Press again to deactivate.
Aquatic AV understands the need for more flexible remote applications. With the AQ-MP-5UBT-
HS Media Player Aquatic AV has provided two independent 12V ‘accessory’ trigger, activated from
the RF wireless remote. These could activate any 12V based device such as LED lighting.
7.1 External 12V Triggers
Load on External Trigger should not exceed 350mA.
Aquatic AV strongly recommend you speak to our technical service staff or your local Aquatic AV dealer if you are
considering using this feature.
Wiring a Single Pull Single Throw (SPST) Relay
The SPST is necessary to protect the stereo in systems
with multiple amplifiers. The AQ-MP-5UBT-HS remote
and trigger wire provide 350mV. While this enough to
power a single amplifier, complex systems with multiple
amplifiers will require a SPST relay.
Position 30: requires 12VDC from the main power
source (12V battery, power supply etc). This should be
the same power source that is powering your stereo.
Position 85: this is where you connect your ground from
your power source (12V battery, power supply, etc.) This
should be the same ground reference as your stereo.
Position 86: position 86 is triggered 12V, and is sent when your stereo is powered on.
For Aquatic AV stereos position 86 can be connected to either the blue remote wire in the harness
or the brown 12V trigger on the rear of the unit. The differences are below:
Blue (recommended): The blue (remote wire) provides a 12VDC output when the stereo is pow-
ered on. Meaning as soon as the stereo is powered on the blue wire sends 12VDC through the
relay powering on the amplifier.
Brown: the brown (12V Trigger) provides 12VDC output when it is triggered via the lightning
bolt icon on the faceplate or handheld remote. This setup is more advantageous is a more com-
plex system with several zones, as it gives you control of when an amp is on or off.
Position 87: this is the 12VDC output that you will provide 12VDC to the remote turn on to the
amplifiers in your system.
7.2 Connecting Multiple Amplifiers or High Current Draw Lighting Systems
87
87
85
30
86
Triggered
12V DC from
stereo (Blue or
Brown wire)
Main 12V DC
input (fused)
Common
Ground
12V DC output for amplifier
19www.aquaticav.com/harley
Additional Features Media Player AQ-MP-5UBT-HS
This manual suits for next models
2
Table of contents
Other Aquatic Media Player manuals

Aquatic
Aquatic AQ-DVD-3 User manual

Aquatic
Aquatic AQ-BC-6BT User manual

Aquatic
Aquatic AQ-MP-5UBT-S Guide

Aquatic
Aquatic AQ-BC-6UBT Guide

Aquatic
Aquatic AQ-MP-5BT-H User manual

Aquatic
Aquatic BLUECUBE6 BC6 MINI Guide

Aquatic
Aquatic AQ-BC-5UBT Manual

Aquatic
Aquatic AQ-BC-6UBT Guide

Aquatic
Aquatic 6500-915 User manual

Aquatic
Aquatic AQ-MP-5UBT-H Troubleshooting guide