Aquatic AQ-MP-5UBT-H Troubleshooting guide

products with a watertight reputation
®
USER / INSTALLATION MANUAL
PLEASE READ THIS INSTRUCTION MANUAL BEFORE
INSTALLATION AND OPERATION
AQ-MP-5UBT-H - WATERPROOF MEDIA PLAYER
for iPhone, iPod, USB, Bluetooth & MP3 devices
Replaces Factory Radio on Harley-Davidson®Motorcycles
(Models 1996-2013)

1 Getting Started.........................................................................................................................
1.1 Contents.............................................................................................................................
1.2 Connections........................................................................................................................
1.3 Wiring Diagram...................................................................................................................
1.4 Mounting Precautions.........................................................................................................
1.5 Installing the Media Player if no stereo is already installed................................................
1.6 Installing the Media Player if an existing factory stereo is already installed......................
1.7 Handle Bar Controls............................................................................................................
1.8 Power On............................................................................................................................
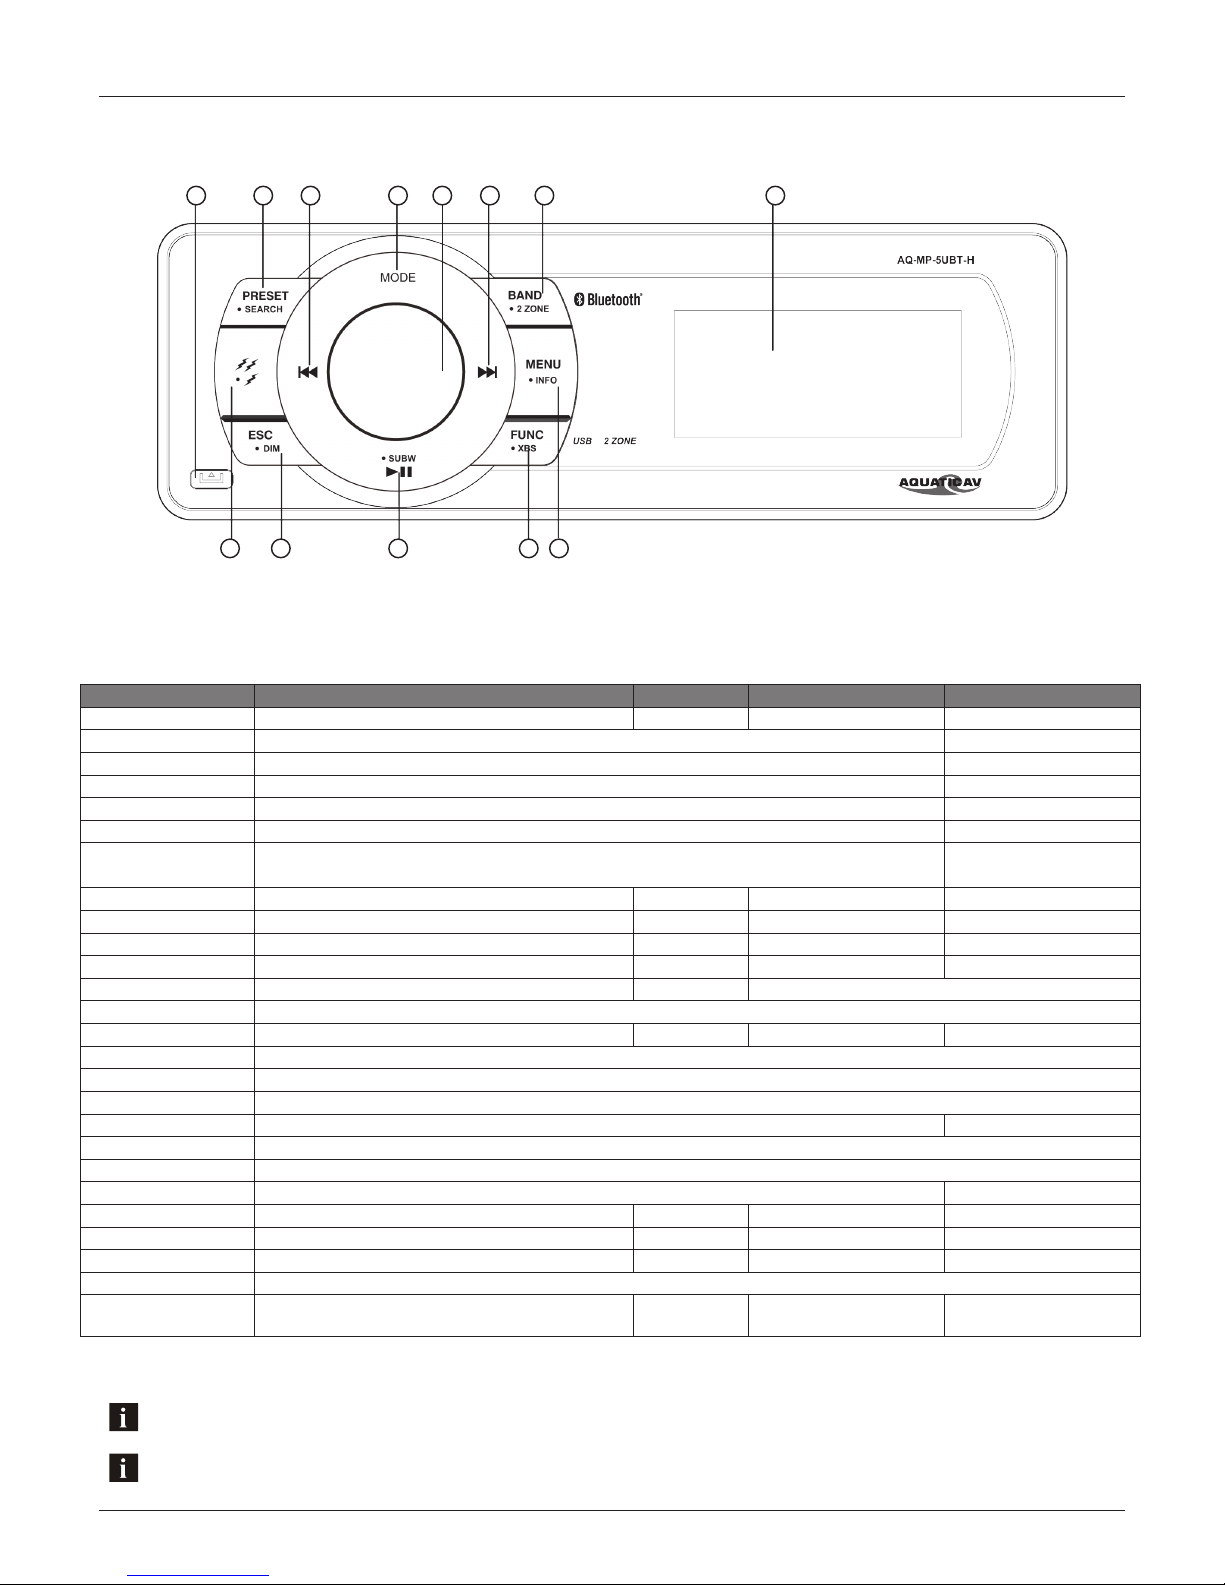
2 Location of Controls.................................................................................................................
2.1 Media Player Controls..........................................................................................................
3 Listening to Devices..................................................................................................................
3.1 Listening via Bluetooth.......................................................................................................
3.1.1 Pair with Bluetooth Device...........................................................................................
3.1.2 Listening via Bluetooth Device.....................................................................................
3.2 Listening via USB...............................................................................................................
3.2.1 Listening via USB (Apple Devices)...................................................................................
3.2.2 Listening via USB Flash Drives........................................................................................
3.2.3 USB Search......................................................................................................................
3.2.4 Device Charging...............................................................................................................
3.3 Listening via Auxiliary Input (3.5mm Jack).........................................................................
3.4 Adjusting Volume Level.......................................................................................................
4 Listening to FM/AM Radio.........................................................................................................
4.1 Enter FM/AM Radio Mode....................................................................................................
4.2 Scan or Seek FM/AM Radio Channels...................................................................................
4.3 Saving Radio Channel to Memory.......................................................................................
4.4 Listening to Saved Radio Memory.......................................................................................
4.5 Switching between U.S. and European FM Modes................................................................
5 Settings Menu...........................................................................................................................
5.1 Audio Menu.........................................................................................................................
5.2 AS/PS (Auto Scan/Preset Scan)...........................................................................................
5.3 Local/Distant Tuning...........................................................................................................
5.4 Stereo/Mono........................................................................................................................
5.5 FM Tuning Area...................................................................................................................
5.6 Beep Tone...........................................................................................................................
5.7 System Reset......................................................................................................................
6 Specifications & Dimensions....................................................................................................
4.1 Specifications.....................................................................................................................
4.2 Dimensions........................................................................................................................
7 Warranty Information...............................................................................................................
3
3
3
4
5
5
6
7
7
8
8
9
9
9
9
9
9
10
10
10
10
10
11
11
11
11
11
11
12
12
12
12
12
12
12
12
13
13
13
14
Table of Contents Media Player AQ-MP-5UBT-H
2www.aquaticav.com

• AQ-MP-5UBT-H Digital Media Player
• Four-pin Speaker Wiring Harness
• Owner’s Manual
1.1 Contents
1. 23-pin Harley-Davidson®Standard Harness Connection
The 23-pin harness supplies power and ground connections to the Media Player and two
speaker channel output connections from the Media Player.
2. FM/AM Radio Antenna Jack
Allows connection of FM/AM radio antenna. For best FM/AM performance make sure the
antenna is extended to the highest achievable position.
3. Auxiliary Outputs
Allows external amplifiers to be connected to power additional speakers.
4. Auxiliary Inputs
Allows an additional RCA input, from a standalone unit or another stereo source.
5. 8-pin DIN Cable
Allows connection of the wired Remote Control (AQ-WR-5F sold separately) or wireless
Remote Control (AQ-RF-34 sold separately) RF receiver.
6. Bluetooth Antenna
Allows a Bluetooth device to wirelessly connect to the unit.
7. Subwoofer Output
Allows powered (active) subwoofer to be connected via RCA connector.
8. 12V DC External Trigger (x2)
Allows for external lighting or relays to be triggered (350mA max load).
9. USB Input
USB for connection of Apple devices USB flash drives. Charges USB devices when
connected.
1.2 Connections (see also ‘1.3 Wiring Diagram’)
Getting Started Media Player AQ-MP-5UBT-H
3www.aquaticav.com

1.3 Wiring Diagram
4
5
1
2
3
6
No lower than a 2 Ohm load should be used
or damage may occur to the Media Player.
Make sure the polarity of speakers are
connected correctly.
3
7
8
Getting Started Media Player AQ-MP-5UBT-H
4www.aquaticav.com

1. Install the unit where it does not interfere with driving.
2. Check clearances on both sides of a planned installation before drilling any holes or
installing any screws.
3. When routing RCA cables, keep them away from power cables and speaker wires.
A common source of noise in the audio system is the motorcycle ignition system. This is usually
due to the radio being located close to the ignition system (engine). This type of noise is detect-
able by a varying pitch with the speed of the engine.
Ignition noise can be removed using a high voltage radio suppression type ignition wire and a
suppressor resistor. Your motorcycle may already use this wire and resistor but it may be neces-
sary to check them to ensure they are operating correctly. Alternatively, a noise suppressor could
be installed.
1.4. Mounting Precautions
Please observe the following precautions:
1.5 Installing the Media Player if no stereo is already installed
Use the existing Harley-Davidson® factory side mounting brackets and hardware to mount the
Media Player.
1. Position the Media Player in front of the fairing opening so the wiring can be passed
through the opening.
2. Follow the wiring diagram and ensure all connections are secure and insulated with crimp
connectors to ensure proper operation.
3. Turn the Media Player on
to conrm operation (motor-
cycle ignition switch must
be on) and once correct
operation is achieved turn the
motorcycle ignition switch off
before proceeding with the
nal mounting of the chassis.
4. Ensure that the unit is
supported and secured on
the sides using the existing 4
factory screws; failure to do
so may allow the unit to move
during while riding, causing
damage to the mounting area.
Getting Started Media Player AQ-MP-5UBT-H
5www.aquaticav.com

1.6 Installing the Media Player if an existing factory stereo is already installed
If replacing an existing Harley-Davidson® factory stereo use the existing Harley-Davidson® factory
side mounting brackets and hardware to mount the Media Player.
1. Unplug the 23-pin harness and FM/AM radio antenna from the factory stereo.
2. Remove the factory stereo and replace with the AQ-MP-5UBT-H Media Player using the exist-
ing factory mounting hardware.
3. Plug the 23-pin harness and FM/AM radio antenna into the AQ-MP-5UBT-H factory stereo.
4. Turn the Media Player on to conrm operation (motorcycle ignition switch must be on) and
once correct operation is achieved turn the motorcycle ignition switch off before proceeding with
the nal mounting of the chassis.
4. Ensure that the unit is supported and secured on the sides using the existing 4 factory screws;
failure to do so may allow the unit to move during while riding, causing damage to the mounting
area.
Getting Started Media Player AQ-MP-5UBT-H
6www.aquaticav.com

Hand Control Up Hand Control Down Mode Select
AM/FM Tunes to next station Tunes to previous station Switches Mode
Bluetooth/USB Next Track Previous Track Switches Mode
AUX Switches Mode
( + ) ( - ) Audio
AM/FM Turns volume up Turns volume down Accesses Audio Menu adjustments
Bluetooth/USB Turns volume up Turns volume down Accesses Audio Menu adjustments
AUX Turns volume up Turns volume down Accesses Audio Menu adjustments
The AQ-MP-5UBT-H requires +12V DC to both the red and yellow wires. When both of these wires
have power the AQ-MP-5UBT-H is powered on. Ground is connected to the black wire.
Once all connections are made press the rotary knob and the stereo will turn ON.
1.8 Power On
The AQ-MP-5UBT-H is a plug and play solution for 1996-2013 Harley-Davidson® Motorcycles.
Plug the standard Harley-Davidson® 23-pin connector in to the back of the AQ-MP-5UBT-H and
your speakers and hand controls will work the same as the standard factory install (some Harley-
Davidson® models may require additional steps).
Some stock Harley-Davidson® features e.g. CB radio will not be supported through the AQ-MP-
5UBT-H.
Below is a matrix of what can be controlled on the AQ-MP-5UBT-H via the stock Harley-Davidson®
hand controls.
1.7 Handle Bar Controls
Audio switch (left hand side) Mode switch (right hand side)
Getting Started Media Player AQ-MP-5UBT-H
7www.aquaticav.com

2.1 Media Player Controls
If your music player is connected via the Auxiliary input you will not be able to control track or receive track informa-
tion.
Turn off DSP to access control of Bass and Treble
1. Front face release
2. Preset/Search
3. Fast Rewind/Forward
4. Mode button
5. Band/2-Zone
6. LCD screen
7. Menu/Info
8. Function/XBS
9. Play/Pause/Subwoofer
10. ESC/Dimmer
11. 12V Triggers
12. Rotary Select Knob
Button AM/FM Mode Aux In Bluetooth USB
Rotary Select Knob Short Press: Mute
Long Press: Power Off
In menu: Select
Mode Short Press: Enter mode select screen
Long Press: No Function
Rotary Knob Clockwise When turned clockwise the volume increases
Rotary Knob Counter
Clockwise When turned counter clockwise the volume decreases
Fast Forward Short Press: Scans to the next station No Function Changes to next song Changes to next song
Long Press: Switches into manual seek mode No Function No Function No Function
Fast Rewind Short Press: Scans to the previous station No Function Changes to Previous Song Changes to Previous Song
Long Press: Switches into manual seek mode No Function No Function No Function
Play/Pause/Subwoofer Short Press: Toggles between Play and Pause No Function Short Press: Toggles between Play and Pause
Long Press: Displays subwoofer volume
Band/2 Zone Short Press: Switches between AM/FM Bands No Function No Function No Function
Long Press: Toggles 2 Zone selection menu
12V Trigger Short Press: Toggles 12V Trigger menu
Func/XBS Short Press: Toggles applicable functions for each mode
Long Press: Toggles XBS ON/OFF
ESC/DIM Short Press: Returns you to the previous screen
Long Press: Toggles between dimmer modes
ESC/Info Short Press: Returns you to the Default Screen
Long Press: Displays info if any available No Function No Function
Preset/Search Short Press: Displays your presets No Function Toggles Search feature* Toggles Search feature*
Long Press: Autosets presets No Function No Function No Function
Menu/Info Short Press: Toggles system menu
Long Press: Changes the information displayed on
screen
Changes the information
displayed on screen*
Changes the information
displayed on screen*
6
35
42
13
7
91011 8
12
* iPod & iPhone only
Location of Controls Media Player AQ-MP-5UBT-H
8www.aquaticav.com

1. Enable Bluetooth mode by pressing MODE and selecting Bluetooth.
2. Switch on your Bluetooth device.
3. Select ‘AQUATIC AV’ from the list of available devices to pair (no password is needed).
4. A Bluetooth logo will illuminate on the Media Player LCD to verify Bluetooth is activated.
3.1.1 Pair with Bluetooth Device
Only one Bluetooth device can be paired with the Media Player at any time.
3.1 Listening via Bluetooth
3.1.2 Listening via Bluetooth Device
1. Bluetooth mode will be activated once a Bluetooth device is linked.
2. Play the song from device and the sound will play through the Media Player.
3. Press PLAY/PAUSE to play/pause the song.
4. Press FAST REWIND/FORWARD buttons to play previous/next song le.
5. Previous/next track and volume up/down can be controlled directly from your Bluetooth
device or directly from the Media Player controls.
The Bluetooth menu is accessible via the in the ‘Menu/Info’ button and is used to connect or
disconnect a Bluetooth device that has already been paired.
IAP (Information Apple Protocol) Bluetooth connectivity allows device information, such as
song, playlist and album titles, to be streamed wirelessly and viewable on the AQ-MP-5UBT-
H screen. This feature is available for Apple devices only.
1. Remove the faceplate and press the lever in the lower right corner of the unit to release
the mechanism.
2. Set the iPod/iPhone in the mechanism and adjust the clamps to hold it secure.
3. Plug the iPod/iPhone cable into the USB input, and tuck the cable in so the faceplate can
be reattached.
4. Replace the faceplate. If the stereo was previously on it will come back on. If not press
the Rotary Knob to power the unit on.
5. Press the Mode button and select USB Mode.
3.2 Listening via USB
3.2.1 Listening via USB (Apple Devices)
Listening to Devices Media Player AQ-MP-5UBT-H
9www.aquaticav.com

3.4 Adjust Volume Level
1. Turn the rotary knob clockwise increase the volume.
2. Turn the rotary knob counter clockwise to reduce the volume.
3.3 Listening via Auxiliary Input (3.5mm Jack)
1. Remove the faceplate from the stereo.
2. Connect your MP3 device to the 3.5mm connector.
3. Re-attach the faceplate.
4. Press the rotary knob to power the Media Player ON (if the faceplate was removed with the
stereo still powered on, it will power on by itself).
5. Press (MODE) on the Media Player or remote control to select ‘AUX IN-1’ mode.
Always ensure to connect and disconnect your Media Player with dry hands!
When specied USB devices are connected to the USB input the device battery will charge.
3.2.4 Device Charging
3.2.3 USB Search
1. When using an iPhone, iPod or USB ash drive press SEARCH to enter USB searching
mode.
2. Once in searching mode the menu will display ‘Playlist’. Use the Rotary Knob to scroll
through the search modes below:
1) Playlist 2) Artist 3) Album 4) Song 5) Genre 6) Composer 7) Audio Book
3. Press the Rotary Knob to select the desired search mode and continue in this manner to
navigate the menu sub-folders.
4. Use and FAST REWIND/FAST FORWARD to navigate through your menu page by page.
1. Remove the faceplate and press the lever in the lower right corner of the unit to release
the mechanism.
2. Plug the USB drive in the USB port.
3. Replace the faceplate. If the stereo was previously on it will come back on. If not press
the Rotary knob to power it on.
4. Press the Mode button and select USB Mode.
3.2.2 Listening via USB Flash Drives
Listening to Devices Media Player AQ-MP-5UBT-H
10www.aquaticav.com

4.5 Switching between US and European FM Modes
1. When in ‘RADIO’ mode.
2. Press the FUNC button to enter the Function menu.
3. Scroll to ‘AREA’ then press the rotary knob.
4. Use the Rotary Knob to scroll to the desired tuning Area and select by pressing the Ro-
tarey Knob.
Available Areas USA, OIRT, LATIN, ASIA, JAPAN,MID E, AUS, EURO.
4.2 Scan or Navigate FM/AM Radio Channels
1. Press FAST REWIND/FAST FORWARD to seek another station.
2. Press and hold either FAST REWIND/FAST FORWARD for manual tuning back or forward.
4.3 Saving Radio Channel to Memory
1. Tune to the station you would like to be saved as a preset.
2. Press the FUNC button to enter the Function menu.
3. Select ‘Manually Save Preset’.
4. Using the rotary knob you can choose which preset slot you would like to save the current
station to.
5. Upon successfully saving a preset, the preset number that was chosen will be shown in
the left corner.
4.4 Listening to Saved Radio Memory
1. Once the presets have been set either manually or using AS/PS press the ‘Preset’ button
to display your presets.
Presets are only for the current band you are on. Each band FM1, FM2, FM3, AM1 and AM2 has six presets for a
total of 30 (18x FM & 12x AM).
4.1 Enter FM/AM Radio Mode
1. Press MODE on the unit keypad and select RADIO mode.
US mode will increase and decrease the FM frequency in steps of 0.1 MHz, e.g. 88.5, 88.6,88.7 MHz. EUR mode will
increase and decrease the FM frequency in steps of 0.05 MHz, e.g. 88.25, 88.30, 88.35 MHz.
Listening to FM/AM Radio Media Player AQ-MP-5UBT-H
11www.aquaticav.com

5.6 Beep Tone
Beep tone plays when any button is pressed, it can be toggled on and off from this selection.
5.7 System Reset
Restores all factory settings.
5.1 Audio Menu
From the ‘Audio Menu’ you are able to change the bass, treble, balance, and fader.
Any changes made in the ‘Audio Menu’ are system wide so it will affect all modes.
1. To enter the ‘Audio Menu’ press the ‘AUDIO/MENU’ button.
2. In the ‘Audio Menu’ press the ‘AUDIO/MENU’ to scroll through all options.
3. To change the parameters use the rotary knob to adjust settings.
5.2. AS/PS (Auto Scan/Preset Scan)
Scans through the current frequency band, and assigns presets to the radio stations that have the
strongest signal strength. Press and hold PRESET button to swicth between AS and PS modes.
Only does this for one AM/FM band at a time.
1. When in AM/FM mode press FUNC to access the ‘AS/PS’ settings.
2. Use the rotary knob to adjust settings.
5.3 Local/Distant Tuning
When ‘Local’ is turned on the Media Player seeks to only the radio channels with strong signal
strength. When ‘Local’ is turned off the Media Player will seek to all radio channels it receives
signal from.
When local is turned on the word ‘Local’ will appear in the upper right hand corner of the Media Player LCD.
1. When in AM/FM mode press FUNC to access the ‘Local/Distant Tuning’ settings.
2. Use the rotary knob to adjust settings.
5.4 Stereo/Mono
Change the output mode between stereo and mono. Some applications only accept a mono input.
1. When in AM/FM mode press FUNC to access the ‘Stereo/Mono’ settings.
2. Use the rotary knob to adjust settings.
5.5 FM Tuning Area
The FM tuning can be set to different areas, using the rotary knob to scroll through to select the
desired tuning area.
There are seven different tuning areas: USA, EUR, LAT, ASIA, MIDDLE EAST, AUSTRALIA,
RUSSIA.
1. When in AM/FM mode press FUNC to access the ‘FM Tuning Area’ settings.
2. Use the rotary knob to adjust settings.
12www.aquaticav.com
Settings Operation Media Player AQ-MP-5UBT-H

36.6mm
210.8mm
104.9mm
188.6mm
178mm
48.8mm
104.9mm
69.8mm69.8mm
214.4mm
52.2mm
Media
Supported media....................................
Supported media max. dimensions...........
Device charging......................................
Inputs
Auxiliary................................................
Outputs
Pre-Out..................................................
Subwoofer..............................................
12V Trigger............................................
Power
Output voltage @ 2 Ohm.........................
Output voltage @ 4 Ohm.........................
Operation voltage....................................
Max current draw....................................
Standby current draw..............................
Multi-Environment Certifications
Waterproof / Dustproof............................
Conformal PCB coating...........................
UV protection.........................................
Salt/Fog protection.................................
Stainless Steel mountings.......................
Bluetooth/USB/MP3/FM/AM
107 x 184mm (WxH)
via USB
1x 3.5mm stereo Jack socket, 1x stereo pair RCA
2x stereo pair RCA (4V)
1x RCA (4V)
2x 12V triggers (350mA)
4x 72W
4x 45W
9.6V - 14.4V DC
7A
6mA
Yes - IP55
Yes
500 hours stable, ASTM D4329 compliant
500 hours stable, ASTM B117 compliant
Yes
6.1 Specifications
6.2 Dimensions
Specifications & Dimensions Media Player AQ-MP-5UBT-H
13www.aquaticav.com

Aquatic AV offers a limited warranty of our products on the following terms:
Length of warranty
2 years on audio systems, electronics, speakers, and accessories (receipt required).
Coverage
This warranty covers only the original purchaser of an Aquatic AV product purchased from an
authorized Aquatic AV dealer. In order to receive service, the purchaser must provide Aquatic AV
with a copy of the receipt stating the customer name, dealer name, product purchased and date
of purchase.
Defective products
Products found to be defective during the warranty period will be repaired or replaced (with a
product deemed to be equivalent) at Aquatic AV’s discretion.
What is not covered
Damage caused by accident, abuse, improper operations or theft. Any cost or expense related to
the removal or reinstallation of product. Service performed by anyone other than an authorized
Aquatic AV service center. Any product with the serial number or tamper labels defaced, altered,
or removed. Subsequent damage to other components. Any product not purchased from an
authorized Aquatic AV dealer.
Limit on implied warranties
Any implied warranties including warranties of tness for use and merchantability are limited
in duration to the period of the express warranty set forth above. Some states do not allow
limitations on the length of an implied warranty, so this limitation may not apply. No person is
authorized to assume for Aquatic AV any other liability in connection with the sale of the product.
How to obtain service
You must obtain a return material authorization number (RMA) to return any product to Aquatic
AV. You are responsible for shipping charges of returned products to Aquatic AV.
Please record the model and serial number[s] of your equipment in the space provided below as
your permanent record and will assist us with your factory warranty coverage. These numbers can
be found on the rear of the Digital Media Player.
Model number[s]: Serial number[s]:
Warranty Information Media Player AQ-MP-5UBT-H
14www.aquaticav.com

FCC ID:
MADE IN CHINA
This device complies with Part 15 of the FCC Rules. Operation is subject to the following
two conditions: (1) this device may not cause harmful interference, and (2) this device
must accept any interference received, including interference that may cause undesired
operation.
NOTE:
The equipment has been tested and found to comply with the limits for a Class B digital
device, pursuant to Part 15 of the FCC Rules. These limits are designed to provide
reasonable protection against harmful interference in a residential installation. This
equipment generates, uses and can radiate radio frequency energy and, if not installed
and used in accordance with the instructions, may cause harmful interference to radio
communications. However, there is no guarantee that interference will not occur in a
particular installation.
If this equipment does cause harmful interference to radio or television reception, which
can be determined by turning the equipment off and on, the user is encouraged to try to
correct the interference by one or more of the following measures:
• Reorient or relocate the receiving antenna.
• Increase the separation between the equipment and receiver.
• Consult the dealer or an experienced radio/TV technician for help.
The manufacturer is not responsible for any radio or TV interference caused by unauthorized
modications to this equipment. Such modications could void the user authority to operate
the equipment.
iPhone and iPod are trademarks of Apple Inc., registered in the U.S. and other countries.
Made for iPod and Made for iPhone mean that an electronic accessory has been designed to connect specifically to iPod or iPhone respectively, and has been
certified by the developer to meet Apple performance standards. Apple is not responsible for the operation of this device or its compliance with safety and
regulatory standards. Please note that the use of this accessory with iPod or iPhone may affect wireless performance.
Product design and specification subject to change without notice. E&OE.
Doc V1.1
Patent: 7,831,756 & 8,578,081
FCC Statement Media Player AQ-MP-5UBT-H
15www.aquaticav.com

E-mail: info@aquaticav.com
US & Canada: 1 877 579 2782
International: +1 408 559 1668
Fax: +1 408 559 0125
www.aquaticav.com
Aquatic AV
282 Kinney Drive
San Jose, CA 95112, USA
products with a watertight reputation
®
This manual suits for next models
1
Table of contents
Other Aquatic Media Player manuals

Aquatic
Aquatic BLUECUBE+ AQ-BC-6UBT-X Guide

Aquatic
Aquatic AQ-BC-6BT Guide

Aquatic
Aquatic AQ-MP-5UBT-S Guide

Aquatic
Aquatic HS Sport Plus Kit Guide

Aquatic
Aquatic AQ-BC-6BT-X Guide

Aquatic
Aquatic AQ-DVD-3 User manual

Aquatic
Aquatic 6500-915 User manual

Aquatic
Aquatic AQ-BC-6BT User manual

Aquatic
Aquatic AQ-MP-5UBT Guide

Aquatic
Aquatic AQ-MP-5BT User manual