ARB 6173952 User manual

28/02/2020 Page 1 of 41 ARB Copyright 2018 3789452
If you have any queries regarding the installation of this product please contact the distributor from whom it was purchased, or alternatively the ARB office in your state.
Head Office –ARB Corporation Ltd VIC: 42-44 Garden Street, Kilsyth, Victoria, 3137 Tel: (03) 9761 6622 Fax: (03) 9761 6807
WA:(08) 9244 3553 NSW: (02) 9821 3633 ACT: (02) 6280 7475 SA: (08) 8244 5001 QLD: (07) 3872 3872 NT: (08) 8947 2262 TAS: (03) 6331 4190
DUAL CAB CENTRAL LOCKING CANOPY
Ascent Canopy AC06 –Hilux “A” Dual Cab Deck
(2015 Vehicle Production Onwards)
FITTING KIT: 6173952 Carton Kit and 668PD067 Front Mount Rail
! PLEASE PROVIDE A COPY OF THESE INSTRUCTIONS TO THE CUSTOMER !
IMPORTANT:
•Vehicle bodies and vehicle specific installation can vary, so please read the following
instructions as they refer to important information, which could affect the quality of the
final installation.
•It is advisable to have the canopy fitted by an authorised dealer.
•The majority of installation can be completed by one person, (however 4 people will be
required to lift the canopy onto the vehicle).
FITMENT:
•For Bed Liners additional time for fitting is required and trimming of bed liners is
required. Fitting with under rail bed liners is recommended (ARB part number
KUL2664). Tailgate liners must have the tailgate over rail portion trimmed off.
•Cabin Guards and Sports bars and bed liners must be removed prior to canopy fitment.
These sports bars can be returned to the customer if required.

28/02/2020 Page 2 of 41 ARB Copyright 2018 3789452
If you have any queries regarding the installation of this product please contact the distributor from whom it was purchased, or alternatively the ARB office in your state.
Head Office –ARB Corporation Ltd VIC: 42-44 Garden Street, Kilsyth, Victoria, 3137 Tel: (03) 9761 6622 Fax: (03) 9761 6807
WA:(08) 9244 3553 NSW: (02) 9821 3633 ACT: (02) 6280 7475 SA: (08) 8244 5001 QLD: (07) 3872 3872 NT: (08) 8947 2262 TAS: (03) 6331 4190
CARE OF YOUR CANOPY:
Please refer to the “owner’s manual supplement” to be given to the purchaser on
installation, and to details referred to in the second last page of these fitting instructions.
HAVE AVAILABLE THESE SAFETY ITEMS WHEN FITTING PRODUCT:
Protective eyewear
Hearing protection
NOTE: ‘WARNING’ notes in the fitting procedure relate to OHS situations, where to avoid a potentially
hazardous situation it is suggested that protective safety gear be worn or a safe work procedure be
employed. If these notes and warnings are not heeded, injury may result.
TOOL LIST FOR FITMENT:
•Torque Wrench 0-25Nm
•Sockets 10 & 13mm, extension bar and
driver
•Spanners, ratchet type, 10 and 13mm.
•300mm ruler
•150mm ruler
•T30, T40, Torx Drive screwdriver and bits
for socket drives and screw drivers
•Power or pneumatic drill
•Pneumatic rivet gun.
•Drill bits, 5.2, 6.5mm
•12mm deep drill stops for 5.2 & 6.5mm bits
•Jig saw
•Knife/Box cutter
•Scissors
•Plastic de-burring tool or sander with disc
•File or sheet metal de-burring tool
•Engineer’s scribe
•Sheet metal vice grip clamp
•Quicklock G clamp
•Centre punch
•Silicon Caulking Gun
•Neutral cure Non Acetic Silicon
•Phillips head screwdrivers
•Flat blade screwdrivers
•Side Cutters
•Squeegee
•Non-permanent marker
•Masking tape
•Cleaning cloths / rags
•Cable ties 9 x 600mm long
•Cable ties 2 x 200mm long
28/02/2020 Page 3 of 41 ARB Copyright 2018 3789452
If you have any queries regarding the installation of this product please contact the distributor from whom it was purchased, or alternatively the ARB office in your state.
Head Office –ARB Corporation Ltd VIC: 42-44 Garden Street, Kilsyth, Victoria, 3137 Tel: (03) 9761 6622 Fax: (03) 9761 6807
WA:(08) 9244 3553 NSW: (02) 9821 3633 ACT: (02) 6280 7475 SA: (08) 8244 5001 QLD: (07) 3872 3872 NT: (08) 8947 2262 TAS: (03) 6331 4190
FITTING THE CANOPY IS UNDERTAKEN IN 6 STAGES:
1. Removing any sports bars, cabin guards and bed liners.
2. Fitting the tub mounting brackets. (Note details of fitting with bed liners refer to
Section 6)
3. Fitting vehicle wiring.
4. Fitting the canopy to the vehicle
5. Operational checks and adjustment options for doors and windows.
6. Fitting the tub mounting brackets with bed liners.
7. Recording of key code and owner’s manual supplement.
8. Check list and sign off.
NOTE: DURING THE INSTALLATION IT IS NECESSARY TO DRILL SOME HOLES THROUGH
THE VEHICLE’S TUB SHEET METAL. IT IS RECOMMENDED THAT THESE ARE DE-
BURRED AND THE RUST INHIBITOR THAT IS PROVIDED BE USED TO AVOID RUST
& ANY SWARF LEFT OVER SHOULD BE CLEANED FROM TUB.
!! IMPORTANT !! other than specifically specified in this instruction
REQUIRED SCREW TORQUES: M6=9Nm M8=22Nm
Screw torques must be adhered to avoid warranty issues and should be checked at
vehicle service intervals.
THE FITTING KIT CONTAINS:
Packed under the canopy are:
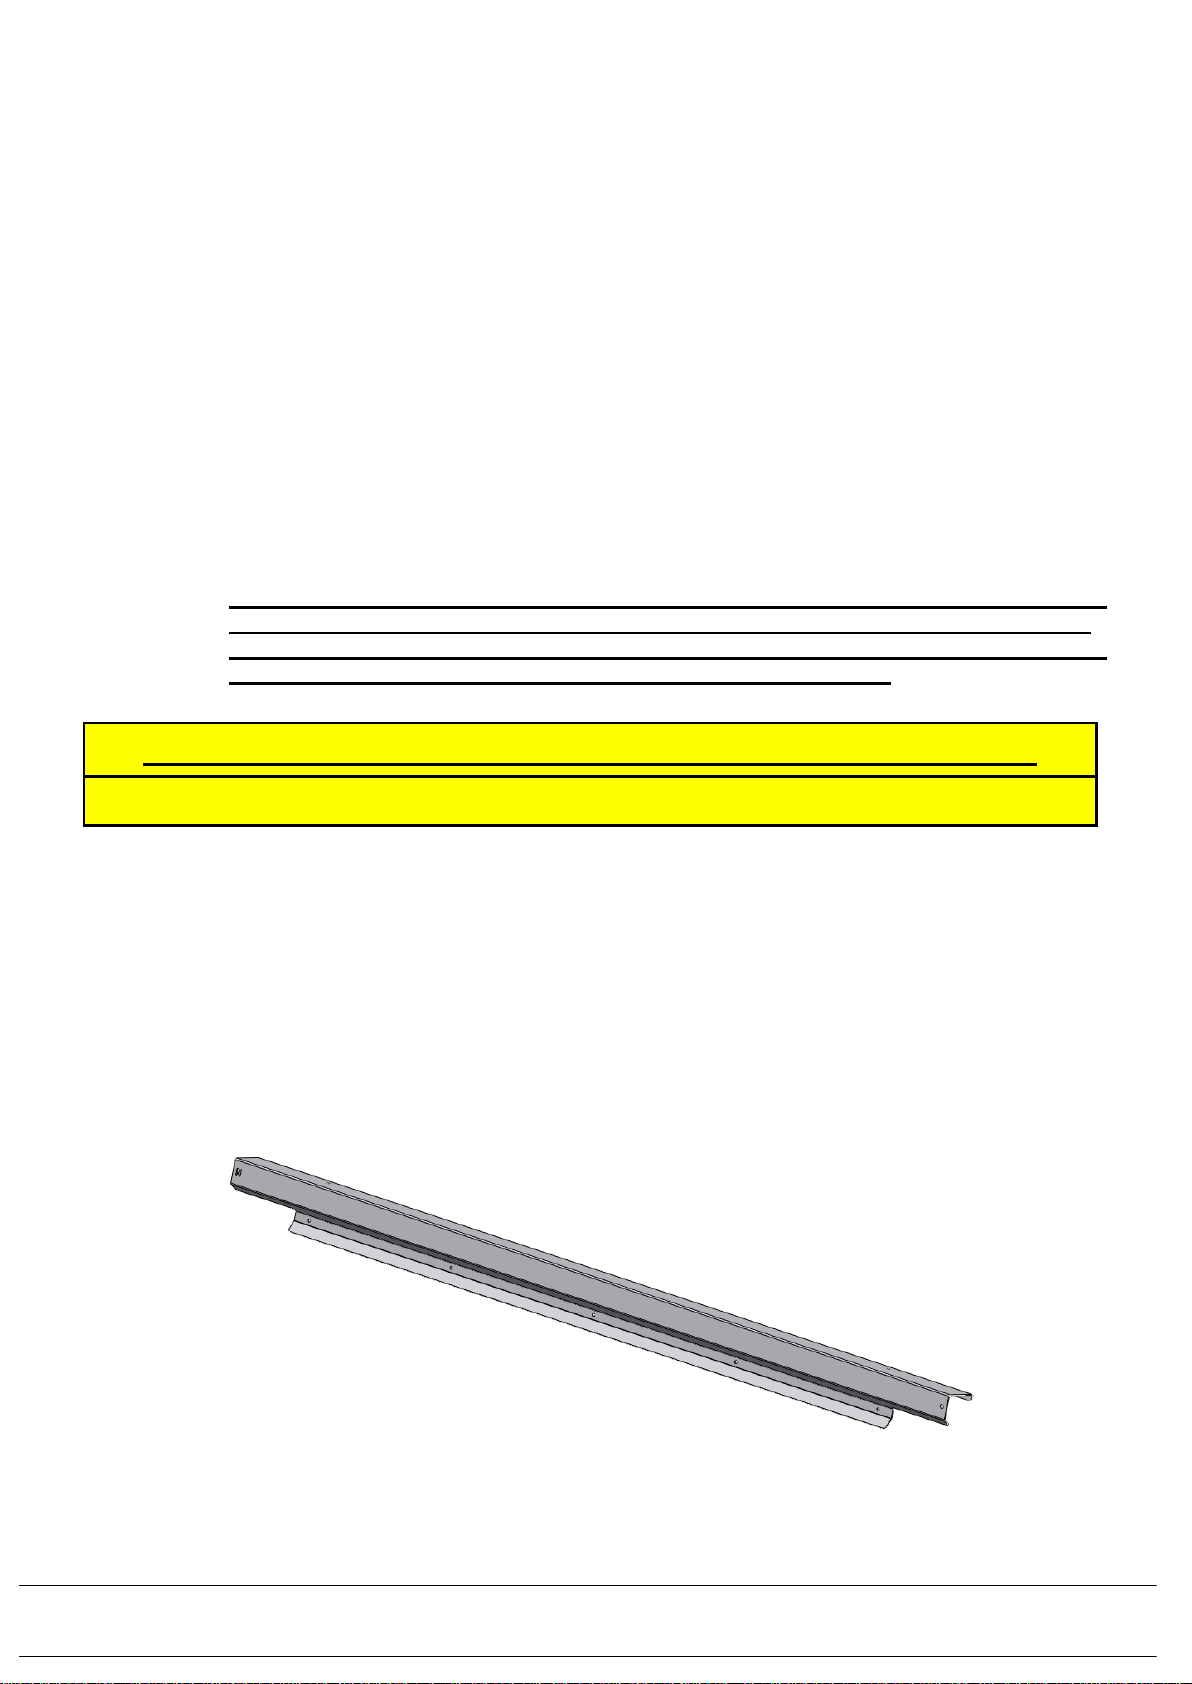
Qty 1 Front Head Board Mount Rail (Part no 668PD067):
28/02/2020 Page 4 of 41 ARB Copyright 2018 3789452
If you have any queries regarding the installation of this product please contact the distributor from whom it was purchased, or alternatively the ARB office in your state.
Head Office –ARB Corporation Ltd VIC: 42-44 Garden Street, Kilsyth, Victoria, 3137 Tel: (03) 9761 6622 Fax: (03) 9761 6807
WA:(08) 9244 3553 NSW: (02) 9821 3633 ACT: (02) 6280 7475 SA: (08) 8244 5001 QLD: (07) 3872 3872 NT: (08) 8947 2262 TAS: (03) 6331 4190
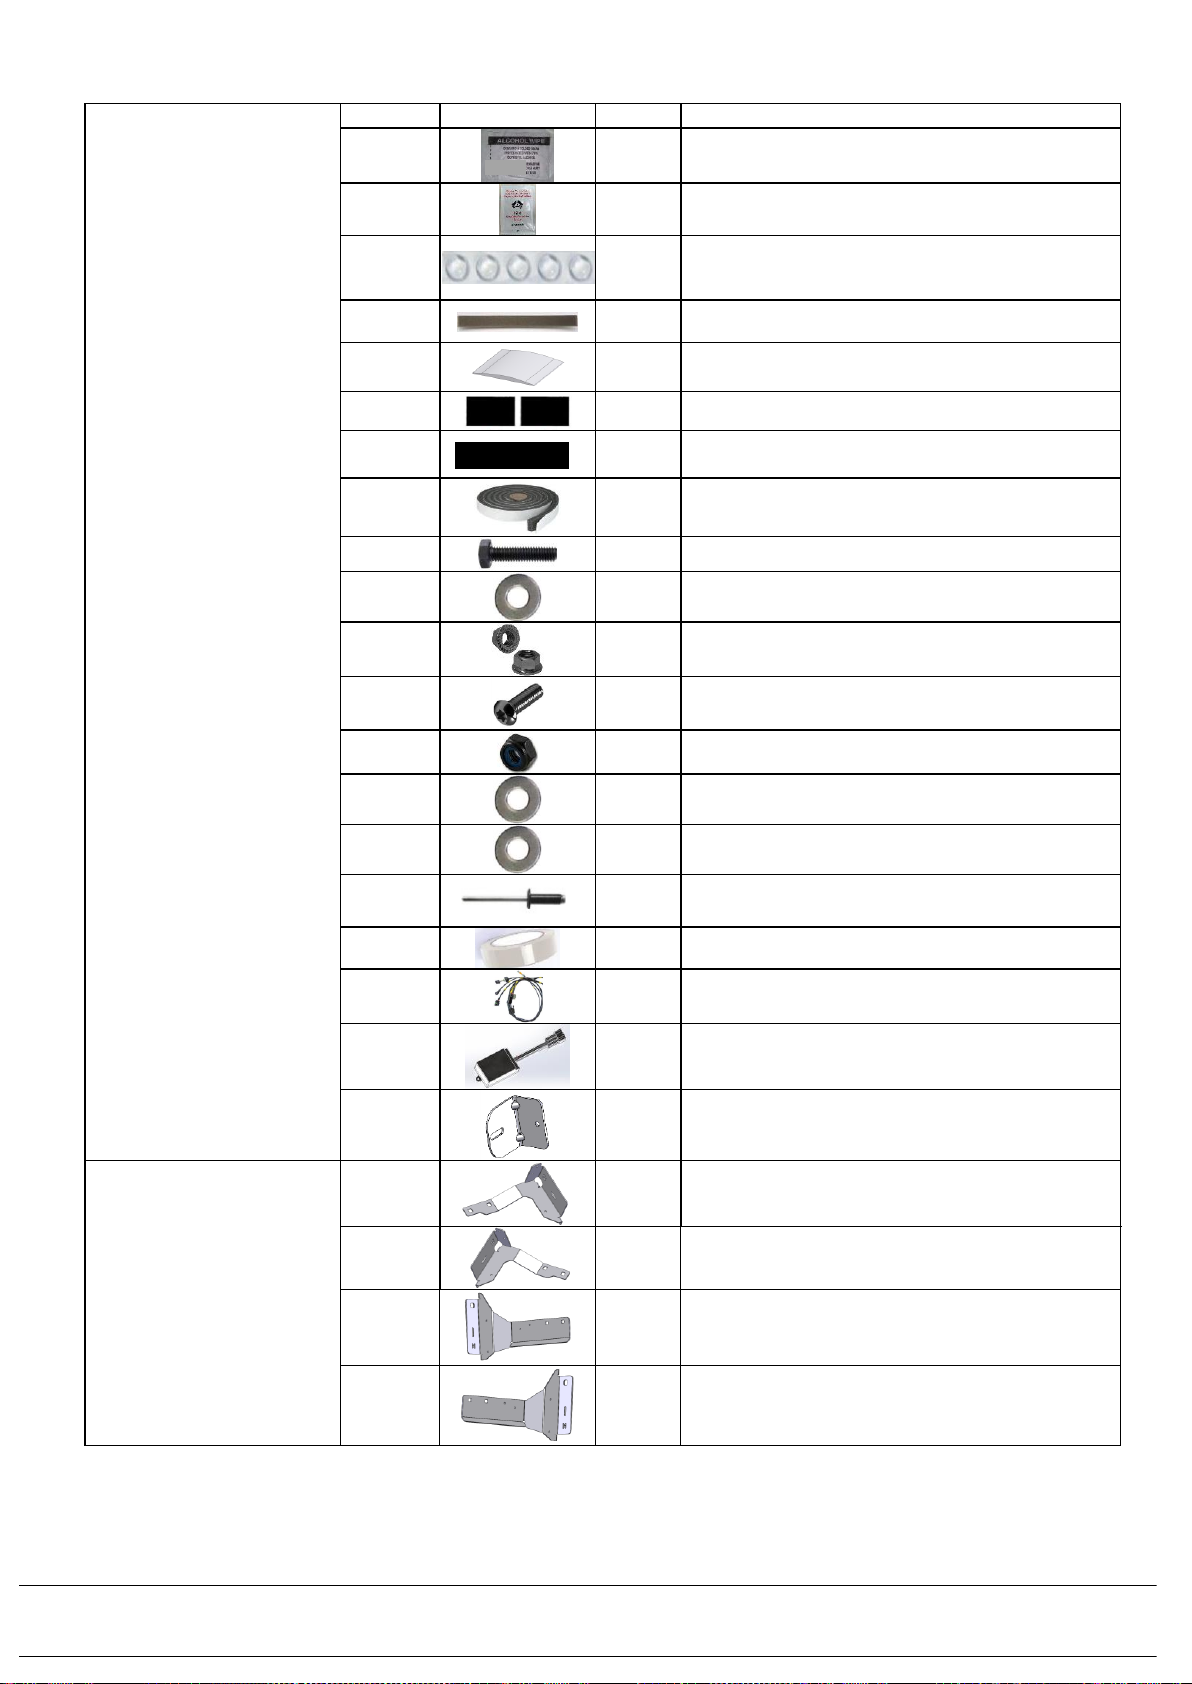
And Qty 1 Carton containing hardware (Part no 6173952) which contains the following:
1. SMALL PARTS BAG
Part No
Picture
Qty
Description
6602018
2
ALCHOL WIPES
665505
1
RUST INHIBITOR SACHET
665076
2
BUMPON STRIP OF 5 PIECES
668PB015
3
FOAM ANTI RATTLE 30MMX150MM STRIPS
668PM005
1 PAIR
FRONT TUB CONER SEAL BRIDGE
668PB006
1 PAIR
PAIR OF DIE CUT BLACK STICKERS
665046
1
BLACKOUT STICKER
668PB018
1
ROLL - SOFT FOAM 2MM THICK X 26MM WIDE X 1.65
METERS
6151213
8
M6X20MM BLACK HEX HEAD SCREWS GD 8.8
4584310
8
M6 X 25MM X 2.8MM THICK BLACK FLAT WASHERS
6151173
9
M6 WIZZLOCK FLANGE NUTS - BLACK
6151625
14
M8 X 25 TORX PAN HEAD SCREW - BLACK
6151212
6
M8X1.25 BLACK NYLOC NUT
4581303
6
M8 X 25.4MM X 3MM THICK BLACK FLAT WASHERS
4581307
6
M8 X 20MM X 2MM THICK BLACK FLAT WASHERS
6609087
16
RIVET POP 3/16" DIA GRIP 4.8-11.1
665037
1
ROLL- CLEAR TAILGATE PROTECTION TAPE 30MM
WIDE
668PJ019
1
ELECTRICAL LOOM- VEHICLE HARNESS
668PJ015
1
ELECTRICAL RELAY BOX
668PD070
2
BRACKET CENTRE TUB MOUNT
2. TUB MOUNT BRACKETS IN
CARTON
668PD061R
1
RH- FRONT CORNER TUB MOUNTING BRACKET
668PD061L
1
LH- FRONT CORNER TUB MOUNTING BRACKET
668PD062R
1
RH- REAR TUB MOUNTING BRACKET
668PD062L
1
LH- REAR TUB MOUNTING BRACKET
28/02/2020 Page 5 of 41 ARB Copyright 2018 3789452
If you have any queries regarding the installation of this product please contact the distributor from whom it was purchased, or alternatively the ARB office in your state.
Head Office –ARB Corporation Ltd VIC: 42-44 Garden Street, Kilsyth, Victoria, 3137 Tel: (03) 9761 6622 Fax: (03) 9761 6807
WA:(08) 9244 3553 NSW: (02) 9821 3633 ACT: (02) 6280 7475 SA: (08) 8244 5001 QLD: (07) 3872 3872 NT: (08) 8947 2262 TAS: (03) 6331 4190
SECTION 1: PREPARING THE VEHICLE TUB –REMOVAL OF SPORTS BARS & CABIN GUARDS.
1.1) Remove any sports bars or cabin guards fitted on the front bed rail of the vehicle’s tub.
1.2) Bed liners fitted to the vehicle should also be removed and hardware retained for refitting.
SECTION 2: FITTING THE CANOPY TUB MOUNTING BRACKET SYSTEM AND TUB SEALING.
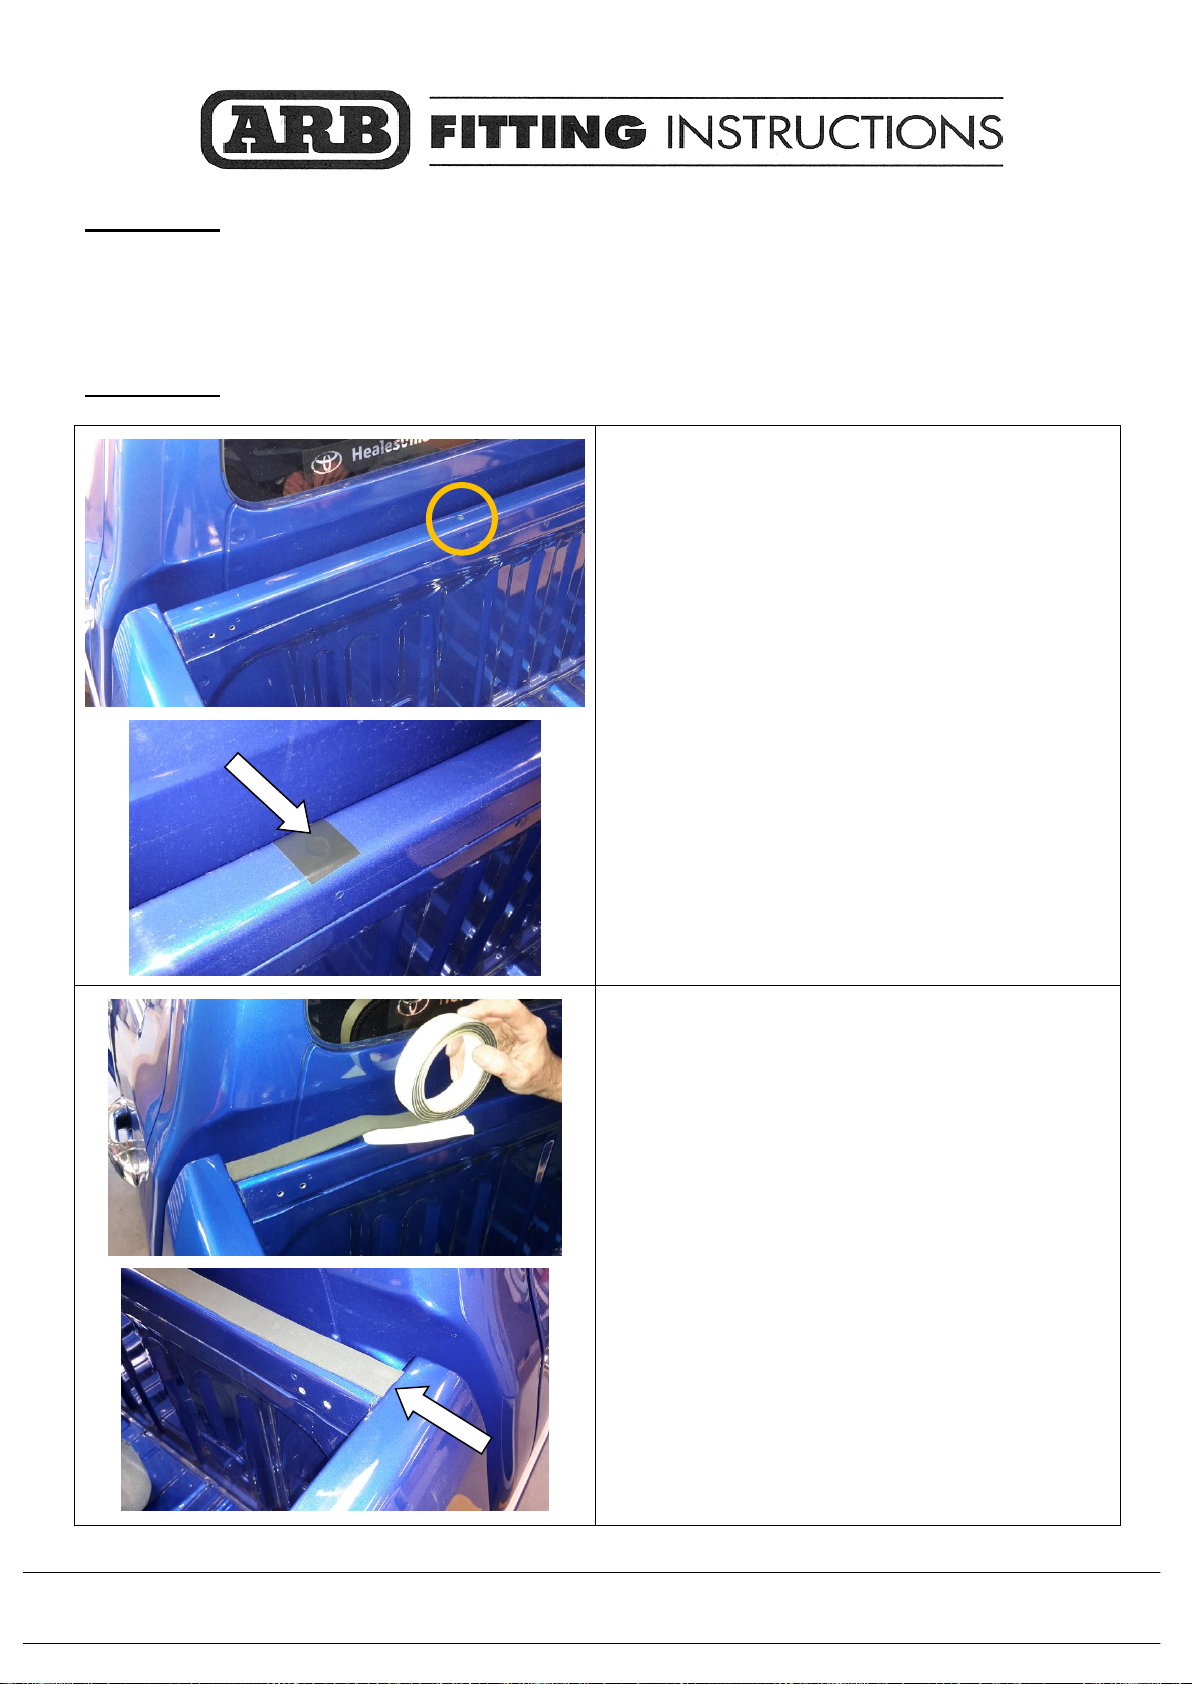
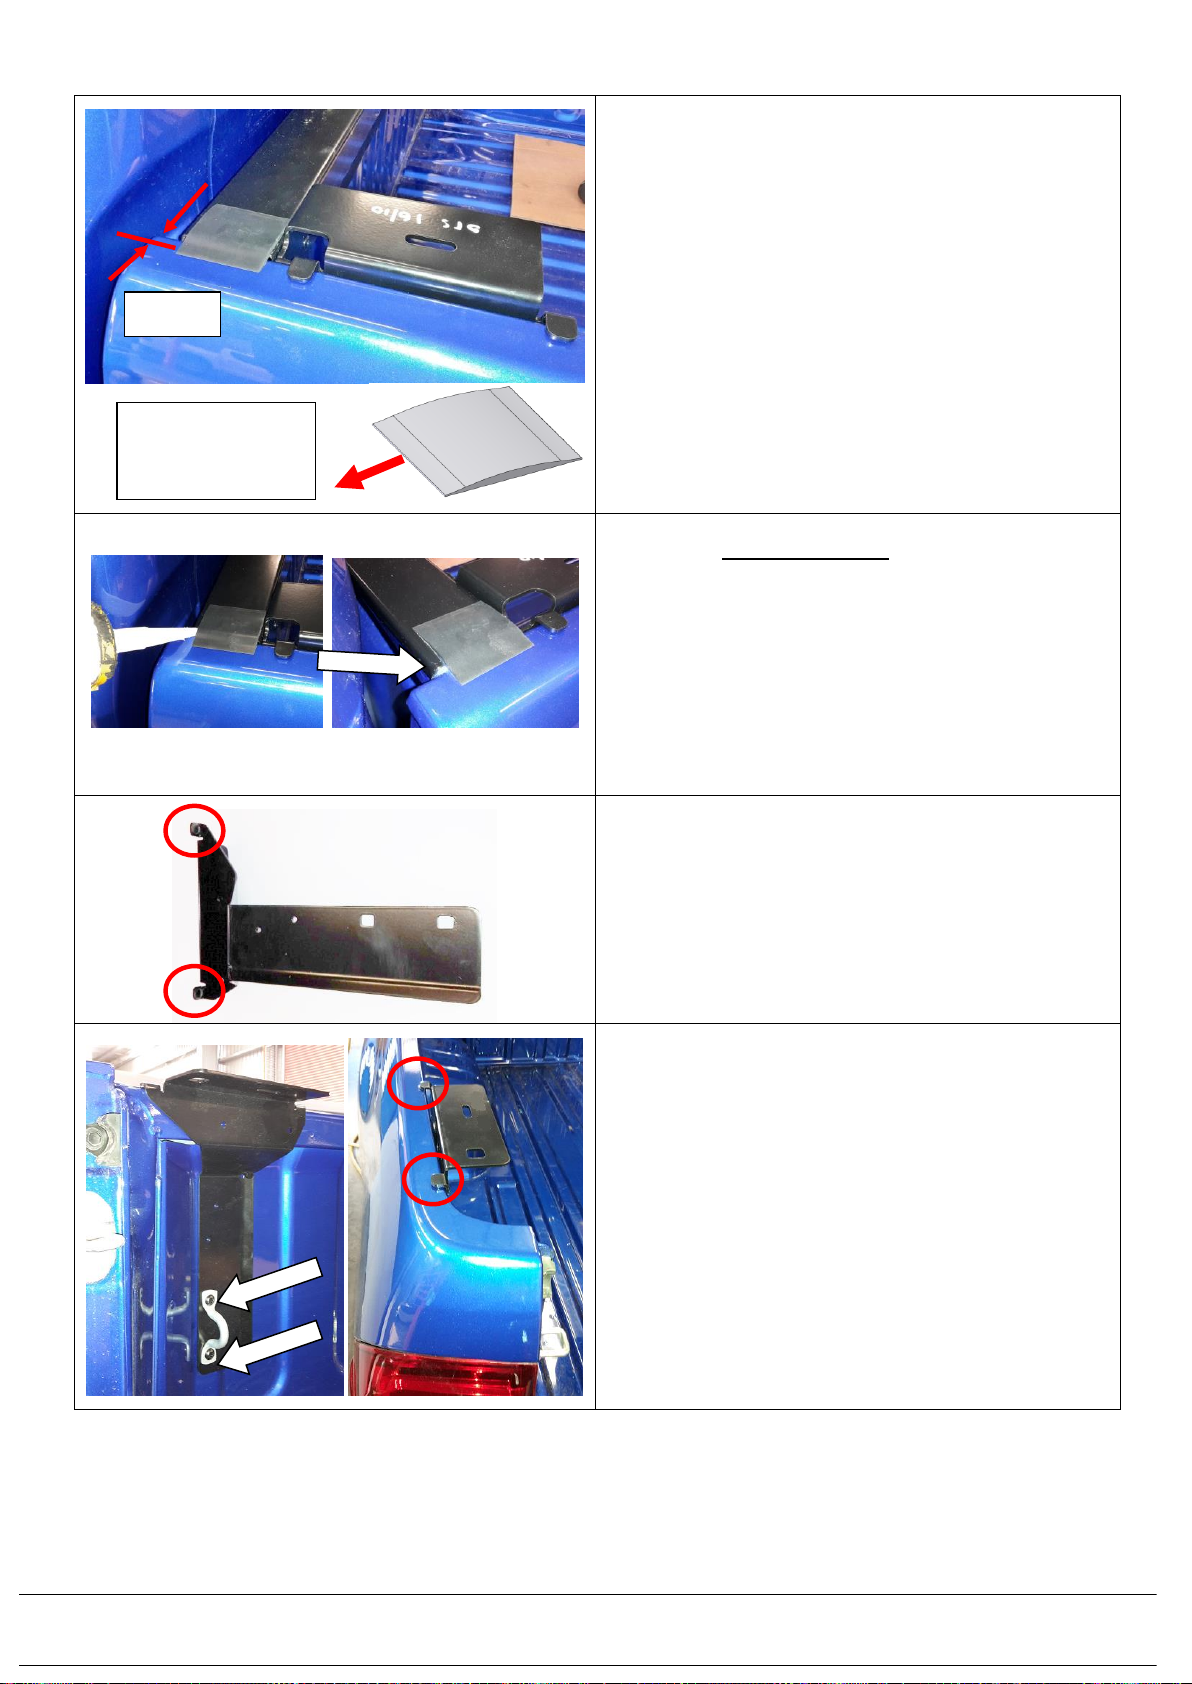
2.0) Clean the front tub rail at the back of the vehicle’s
cabin with Isopropyl Alcohol (Use the wipes
provided 6602018) and a lint free rag.
Apply black stickers (668PB006) over the 2 open
holes in the top of the front tub panel as shown, to
provide a water seal.
2.1) Starting from the inside edge of the side tub rails,
apply soft foam tape (668PB018) along the top face
of the front of the vehicle’s tub. Align this to the
centre of the top face. Trim tape level to butt up to
the inside of the side tub rail on the opposite side.

28/02/2020 Page 6 of 41 ARB Copyright 2018 3789452
If you have any queries regarding the installation of this product please contact the distributor from whom it was purchased, or alternatively the ARB office in your state.
Head Office –ARB Corporation Ltd VIC: 42-44 Garden Street, Kilsyth, Victoria, 3137 Tel: (03) 9761 6622 Fax: (03) 9761 6807
WA:(08) 9244 3553 NSW: (02) 9821 3633 ACT: (02) 6280 7475 SA: (08) 8244 5001 QLD: (07) 3872 3872 NT: (08) 8947 2262 TAS: (03) 6331 4190
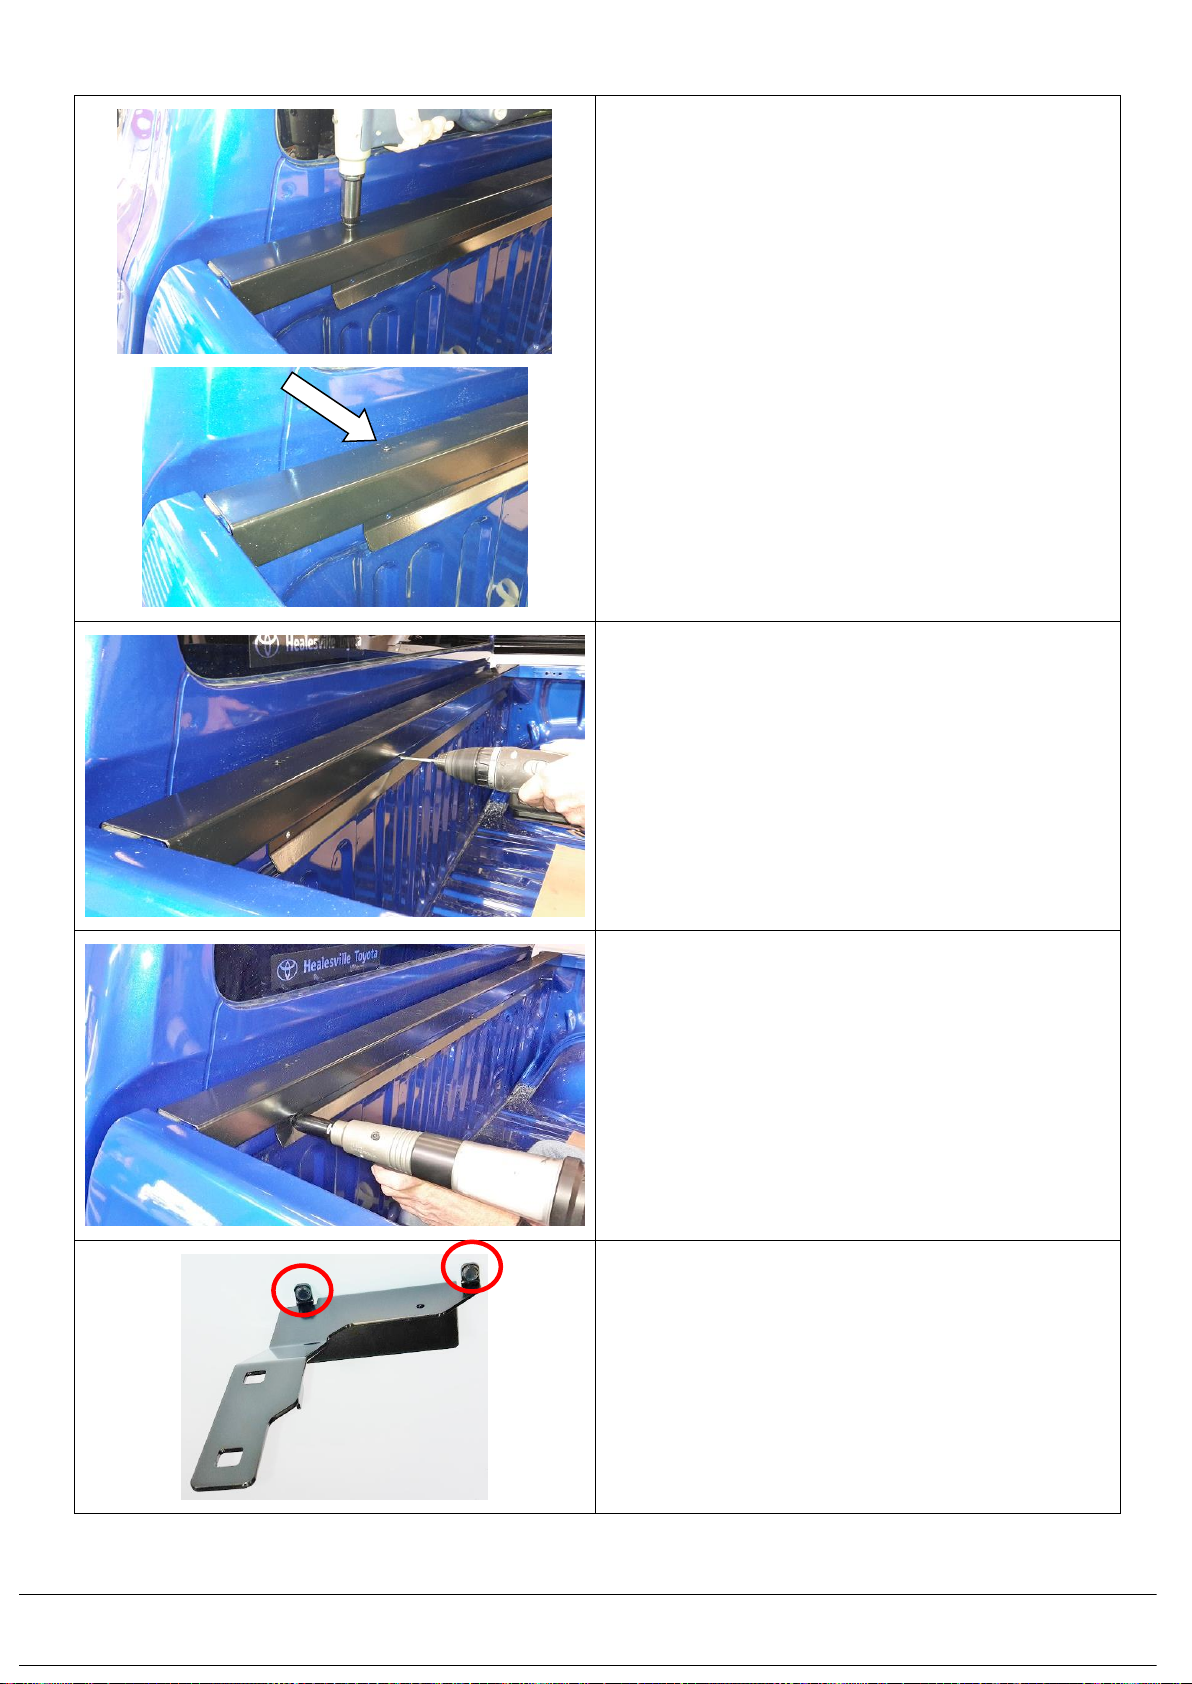
2.2)With Toyota Hilux Rugged, Rugged X and Rogue
Hilux models released in June 2018, once the sports
bar is removed there will be holes left in the front
head board of the tub. Cover the holes by using the
black sticker 665046, cut into two pieces to cover
the holes.
2.3) Fit the front head board rail bracket (668PD067)
down onto the front of the vehicle’s tub front panel.
Ensure the ends of this bracket align with an even
gap at the ends to the sides of the tub and the long
flange is facing inwards.
2.4) Drill down through the top side of the front head
board rail bracket through the 2 existing holes in
the bracket, to 5.2mm with a 12mm deep drill stop
fitted. Remove any swarf. Apply rust inhibitor
(665505) to the holes.
28/02/2020 Page 7 of 41 ARB Copyright 2018 3789452
If you have any queries regarding the installation of this product please contact the distributor from whom it was purchased, or alternatively the ARB office in your state.
Head Office –ARB Corporation Ltd VIC: 42-44 Garden Street, Kilsyth, Victoria, 3137 Tel: (03) 9761 6622 Fax: (03) 9761 6807
WA:(08) 9244 3553 NSW: (02) 9821 3633 ACT: (02) 6280 7475 SA: (08) 8244 5001 QLD: (07) 3872 3872 NT: (08) 8947 2262 TAS: (03) 6331 4190
2.5) Install 2 rivets (6609087) down into the 2 holes,
through the front head board rail bracket and into
the front tub panel.
2.6) Drill through the 5 existing holes on the lower inside
flange of the front head board rail bracket with a
5.2mm drill with a 12mm deep drill stop fitted.
Remove any swarf. Apply rust inhibitor (665505) to
the holes.
2.7) Install 5 rivets (6609087) into the 5 holes drilled
through the front head board rail bracket into the
front tub panel.
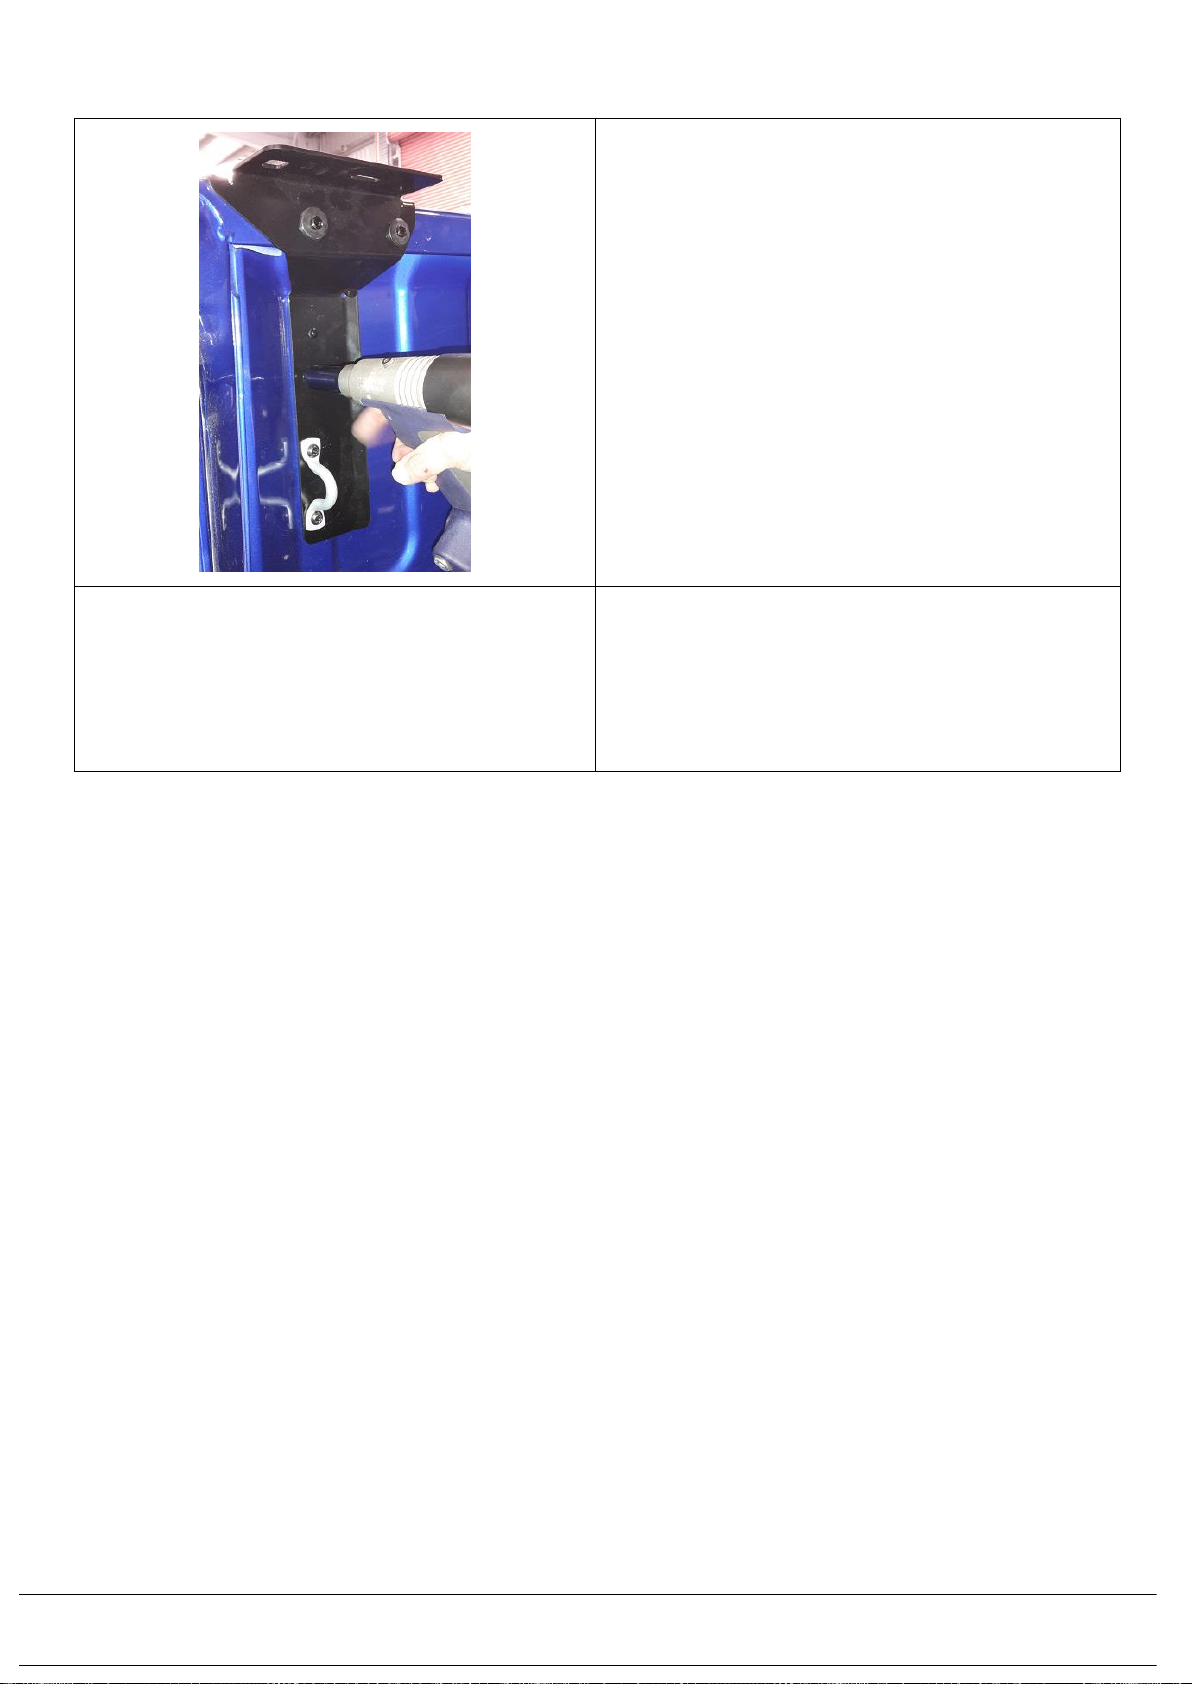
2.8) To a pair of front corner tub mounting brackets
(668PD061R&L), apply self-adhesive bumpons
(665076) to the two tags on each bracket.

28/02/2020 Page 8 of 41 ARB Copyright 2018 3789452
If you have any queries regarding the installation of this product please contact the distributor from whom it was purchased, or alternatively the ARB office in your state.
Head Office –ARB Corporation Ltd VIC: 42-44 Garden Street, Kilsyth, Victoria, 3137 Tel: (03) 9761 6622 Fax: (03) 9761 6807
WA:(08) 9244 3553 NSW: (02) 9821 3633 ACT: (02) 6280 7475 SA: (08) 8244 5001 QLD: (07) 3872 3872 NT: (08) 8947 2262 TAS: (03) 6331 4190
2.9) Bolt the front corner brackets (668PD061L shown)
to the lower tie down hook mounting points in the
tub. Insert 2 off M8x25mm Torx bolts (6151625)
through the retained tie down hook and through the
bracket into the tub mounting points. Ensure the
top bracket tags engage to top of the sides of the
vehicle tub and push the bracket forwards to meet
up to the front head board rail bracket. Do bolts up
to 22Nm.
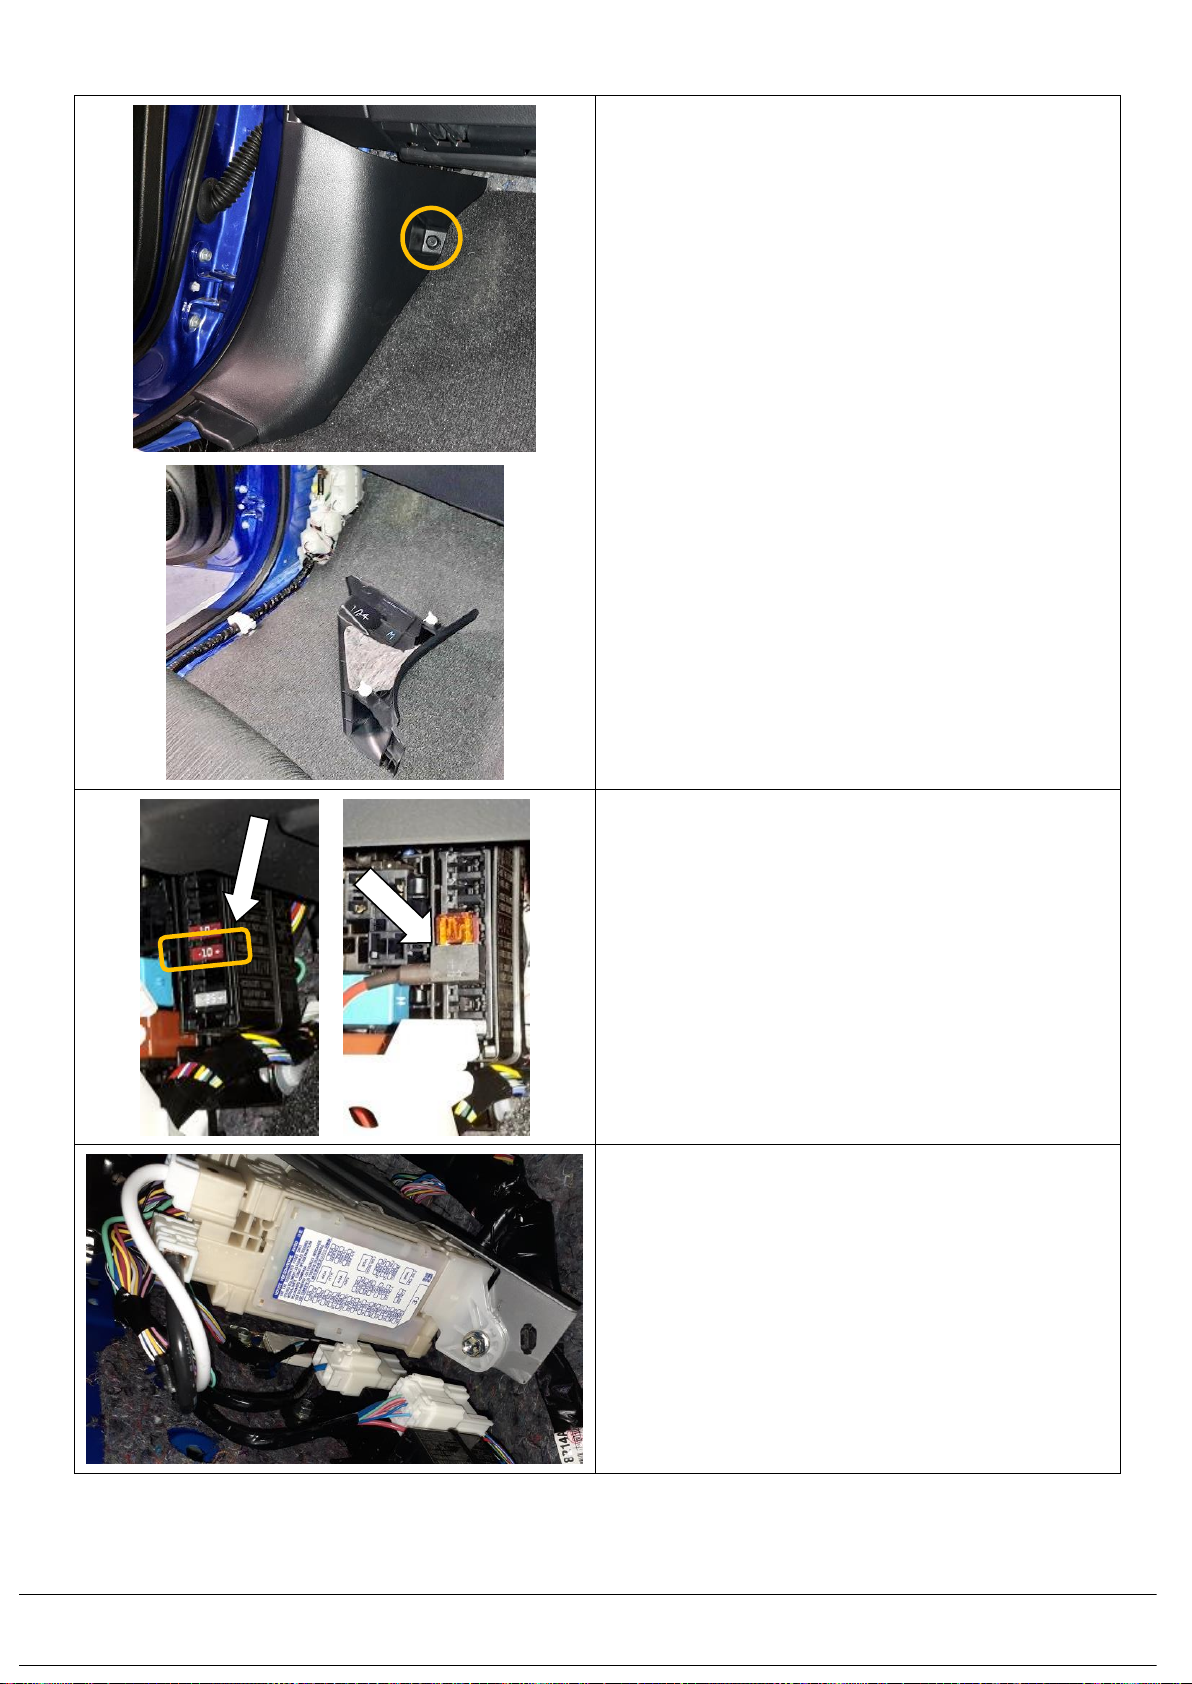
2.10) Clamp the front corner bracket (LH shown) to
the side of the vehicle’s inner tub lip channel in the
front corner. Ensure the bracket is pushed down
so the bumpons on the underside of the bracket
engage to top of the side vehicle tub rails. Drill a
6.5mm hole through the exiting hole in the bracket
rear corner that rests against the side tub wall with
a 12mm deep drill stop fitted. Remove any swarf.
Apply rust inhibitor (665505) to the drilled hole.
Repeat on other side of tub for the opposite
bracket.

28/02/2020 Page 9 of 41 ARB Copyright 2018 3789452
If you have any queries regarding the installation of this product please contact the distributor from whom it was purchased, or alternatively the ARB office in your state.
Head Office –ARB Corporation Ltd VIC: 42-44 Garden Street, Kilsyth, Victoria, 3137 Tel: (03) 9761 6622 Fax: (03) 9761 6807
WA:(08) 9244 3553 NSW: (02) 9821 3633 ACT: (02) 6280 7475 SA: (08) 8244 5001 QLD: (07) 3872 3872 NT: (08) 8947 2262 TAS: (03) 6331 4190
2.11) Fit an M6 x 20 mm hex bolt (6151213) with M6 x
25mm flat washer (4584310) under its head
through the bracket holes and inside the tub lip,
secure these in place with M6 wizzlock flange
nuts (6151173). Do these up to 9Nm on both
sides of the tub.
2.12) Drill through the 2 existing holes in the front
corner brackets in the face that rests against the
front head board rail bracket. Drill these 2 holes
out to 5.2mm drill with a 12mm deep drill stop
fitted. Remove any swarf. Apply rust inhibitor
(665505) to the holes.
2.13) Install 2 rivets (6609087) into the 2 holes drilled
through the front corner bracket into the front
head board rail bracket.
Repeat on the opposite corner of the tub.
28/02/2020 Page 10 of 41 ARB Copyright 2018 3789452
If you have any queries regarding the installation of this product please contact the distributor from whom it was purchased, or alternatively the ARB office in your state.
Head Office –ARB Corporation Ltd VIC: 42-44 Garden Street, Kilsyth, Victoria, 3137 Tel: (03) 9761 6622 Fax: (03) 9761 6807
WA:(08) 9244 3553 NSW: (02) 9821 3633 ACT: (02) 6280 7475 SA: (08) 8244 5001 QLD: (07) 3872 3872 NT: (08) 8947 2262 TAS: (03) 6331 4190
2.14) After removing the backing paper to expose the
adhesive, place on the tub bridge rubber self-
adhesive ramps (668PM005) at either end of the
front tub rail bracket, aligning them centrally to the
width of the front head board rail bracket. The
bridge should lip over onto the side tub rails
by 10mm only.
2.15) Apply neutral cure silicon to the ends of the
rubber bridge extrusions and seal down the front
side of the corner of the tub between the tub and
the front head board rail bracket. Clean off the
excess carefully with a rag applied sparingly with
silicon remover or wax and grease remover. The
bridge seal provides a transition from the front tub
head board rail bracket to the top of the side tub
walls to provide a sealing surface to the seal that
is mounted on the underside of the canopy.
2.16) To a pair of rear corner tub mounting brackets
(668PD062R&L), apply self-adhesive bumpons
(665076) to the two tags on each bracket.
2.17) Bolt the rear corner brackets (L is shown) to the
lower tie down hook mounting points in the tub.
Insert 2 off M8x25mm Torx bolts (6151625)
through the retained tie down hook, through the
bracket and into the tub. Ensure the top bracket
tags engage to top of the sides of the vehicle tub.
Do bolts up to 22Nm.
This side to
outside of tub
sides
10mm

28/02/2020 Page 11 of 41 ARB Copyright 2018 3789452
If you have any queries regarding the installation of this product please contact the distributor from whom it was purchased, or alternatively the ARB office in your state.
Head Office –ARB Corporation Ltd VIC: 42-44 Garden Street, Kilsyth, Victoria, 3137 Tel: (03) 9761 6622 Fax: (03) 9761 6807
WA:(08) 9244 3553 NSW: (02) 9821 3633 ACT: (02) 6280 7475 SA: (08) 8244 5001 QLD: (07) 3872 3872 NT: (08) 8947 2262 TAS: (03) 6331 4190
]
2.18) Drill 6.5mm holes with a 12mm deep drill stop
fitted through the existing holes at the top of the
rear brackets where they mate up to the channel
lip on the vehicle’s tub. Remove any swarf. Apply
rust inhibitor (665505) to the holes.
2.19) Fit M6 x 20 mm hex bolts (6151213) with M6 x
25mm flat washers (4584310) under their heads
through the bracket holes and on the inside of the
tub lip, secure these in place with M6 wizzlock
flange nuts (6151173). Do these up to 9Nm.
2.20) With a 8mm drill stop fitted (! IMPORTANT !
DO NOT EXCEED THIS LENGTH, TO AVOID
DRILLING THROUGH THE TUB OUTSIDE), drill
5.2mm holes through the 2 holes in the middle of
the rear brackets. Remove any swarf. Apply rust
inhibitor (665505) to the holes.
28/02/2020 Page 12 of 41 ARB Copyright 2018 3789452
If you have any queries regarding the installation of this product please contact the distributor from whom it was purchased, or alternatively the ARB office in your state.
Head Office –ARB Corporation Ltd VIC: 42-44 Garden Street, Kilsyth, Victoria, 3137 Tel: (03) 9761 6622 Fax: (03) 9761 6807
WA:(08) 9244 3553 NSW: (02) 9821 3633 ACT: (02) 6280 7475 SA: (08) 8244 5001 QLD: (07) 3872 3872 NT: (08) 8947 2262 TAS: (03) 6331 4190
2.21) To the rear brackets, assemble 2 rivets
(6609087). Repeat on other side of tub for the
opposite bracket.
2.22) If a bed liner is now to be refitted, do this after
measuring off bracket positions on the tub and
measuring these out on the bed liner and cut
away sections of the bed liner to suit the canopy
mounting brackets. ARB bed liners have scribe
marks marked on the back where to cut them.

28/02/2020 Page 13 of 41 ARB Copyright 2018 3789452
If you have any queries regarding the installation of this product please contact the distributor from whom it was purchased, or alternatively the ARB office in your state.
Head Office –ARB Corporation Ltd VIC: 42-44 Garden Street, Kilsyth, Victoria, 3137 Tel: (03) 9761 6622 Fax: (03) 9761 6807
WA:(08) 9244 3553 NSW: (02) 9821 3633 ACT: (02) 6280 7475 SA: (08) 8244 5001 QLD: (07) 3872 3872 NT: (08) 8947 2262 TAS: (03) 6331 4190
SECTION 3: FITTING THE VEHICLE WIRING
The diagram below offers a reference to assist the routing of wires
3.0) The vehicle electrical patch wiring loom (668PJ019)
has 3 parts. The main patch loom, vehicle brake
light patch loom and the blade fuse adaptor.
Ensure the blade fuse adaptor is fitted with a
7.5 Amp and 10 Amp blade fuse as shown
opposite.
Main
patch
loom
Brake
light
patch
loom
Blade fuse adaptor
7.5A
10A

28/02/2020 Page 14 of 41 ARB Copyright 2018 3789452
If you have any queries regarding the installation of this product please contact the distributor from whom it was purchased, or alternatively the ARB office in your state.
Head Office –ARB Corporation Ltd VIC: 42-44 Garden Street, Kilsyth, Victoria, 3137 Tel: (03) 9761 6622 Fax: (03) 9761 6807
WA:(08) 9244 3553 NSW: (02) 9821 3633 ACT: (02) 6280 7475 SA: (08) 8244 5001 QLD: (07) 3872 3872 NT: (08) 8947 2262 TAS: (03) 6331 4190
3.1) Connect the assembled blade fuse adaptor to the
connector on the main patch loom as shown.
3.2) Go to the LH (passenger’s) side of the vehicle.
Open the front and rear doors and remove the
lower scuff plate plastic mouldings by prising them
upwards.
28/02/2020 Page 15 of 41 ARB Copyright 2018 3789452
If you have any queries regarding the installation of this product please contact the distributor from whom it was purchased, or alternatively the ARB office in your state.
Head Office –ARB Corporation Ltd VIC: 42-44 Garden Street, Kilsyth, Victoria, 3137 Tel: (03) 9761 6622 Fax: (03) 9761 6807
WA:(08) 9244 3553 NSW: (02) 9821 3633 ACT: (02) 6280 7475 SA: (08) 8244 5001 QLD: (07) 3872 3872 NT: (08) 8947 2262 TAS: (03) 6331 4190
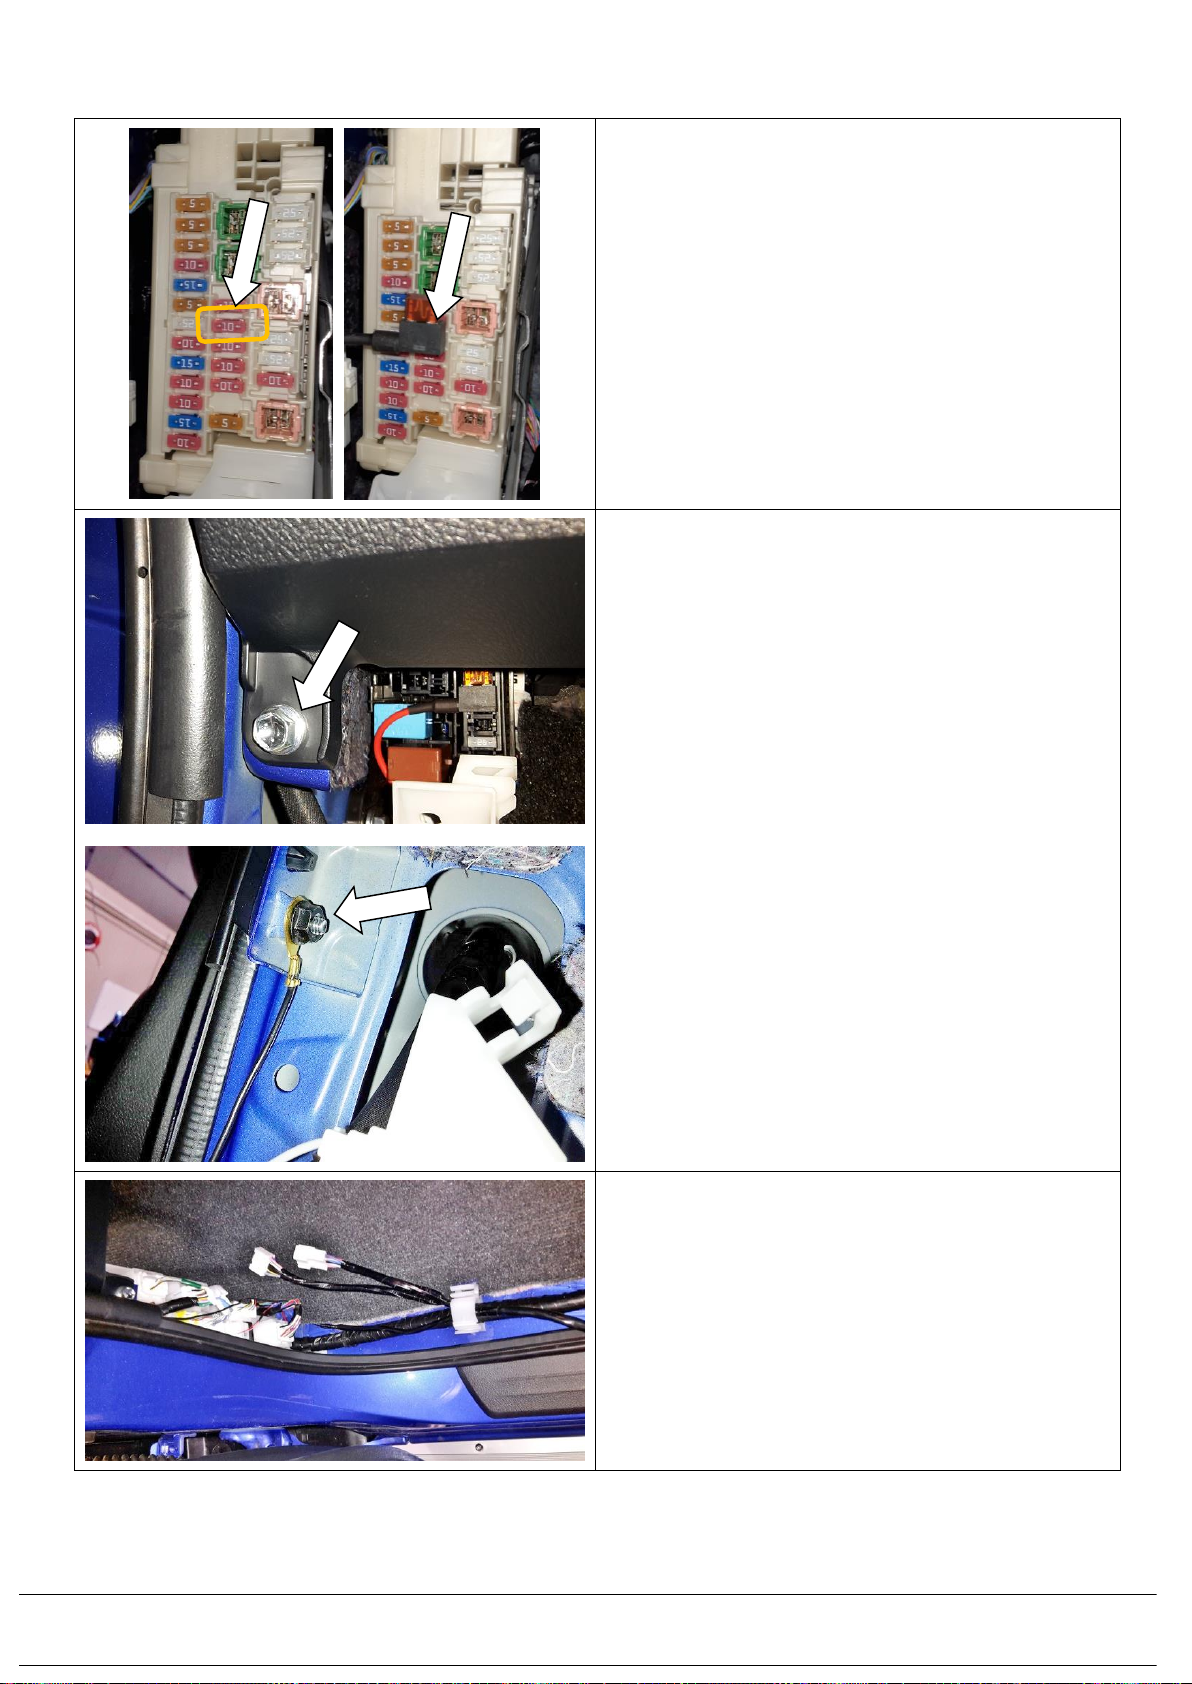
3.3) Undo the retaining nut on the passenger side front
kick panel and pull the kick panel rearwards, at an
angle towards the foot well, to release the trim
clips.
3.4) Beneath the glove box is a fuse box. If there is a
pair of 10A fuses, remove the lower 10 Amp fuse.
3.5) Insert the loom blade fuse adaptor assembly into
the location where the 10 Amp fuse was removed.
IF THERE ARE NO 10A FUSES, REFER TO
NEXT STEP
IF THERE ARE NO 10A FUSES, REFER TO THIS
STEP. OTHERWISE CONTINUE BELOW.
3.6) Find fuse box above vacant one from above and
remove cover. (place cover in glovebox when
complete as it will no longer fit over fuses)
28/02/2020 Page 16 of 41 ARB Copyright 2018 3789452
If you have any queries regarding the installation of this product please contact the distributor from whom it was purchased, or alternatively the ARB office in your state.
Head Office –ARB Corporation Ltd VIC: 42-44 Garden Street, Kilsyth, Victoria, 3137 Tel: (03) 9761 6622 Fax: (03) 9761 6807
WA:(08) 9244 3553 NSW: (02) 9821 3633 ACT: (02) 6280 7475 SA: (08) 8244 5001 QLD: (07) 3872 3872 NT: (08) 8947 2262 TAS: (03) 6331 4190
IF THERE ARE NO 10A FUSES, REFER TO THIS
STEP. OTHERWISE CONTINUE BELOW.
3.7) Remove the 10A fuse second down in the middle
column.
3.8) Insert the loom blade fuse adaptor assembly into
the location where the 10 Amp fuse was removed.
3.9) Locate the mounting bolt for the dash board near
the fuse box. From the main vehicle patch loom,
locate the eye terminal on the black wire. Place it
over the back of the dash board bolt on the inside
and secure it in place with an M6 flange nut
(6151173).
3.10)Route the main patch loom behind the existing
vehicle connectors in the kick panel area down to
the clips in the scuff plate area. Clip the main patch
loom into the clips leaving the 2 large connectors
on the main patch loom free.

28/02/2020 Page 17 of 41 ARB Copyright 2018 3789452
If you have any queries regarding the installation of this product please contact the distributor from whom it was purchased, or alternatively the ARB office in your state.
Head Office –ARB Corporation Ltd VIC: 42-44 Garden Street, Kilsyth, Victoria, 3137 Tel: (03) 9761 6622 Fax: (03) 9761 6807
WA:(08) 9244 3553 NSW: (02) 9821 3633 ACT: (02) 6280 7475 SA: (08) 8244 5001 QLD: (07) 3872 3872 NT: (08) 8947 2262 TAS: (03) 6331 4190
3.11)Disconnect the original vehicle connector from the
receptacle in the kick panel area as shown.
3.12)Connect the vehicle’s loom connector to the patch
loom and plug the canopy main patch loom into the
female socket in the car.
3.13) At the “B” pillar, at the rear of the front door, feed
the 4 pin rear end connector of the main patch
loom under the floor area of the inner “B” pillar
plastic trim panel and pull it out at the bottom of
the rear passenger door.

28/02/2020 Page 18 of 41 ARB Copyright 2018 3789452
If you have any queries regarding the installation of this product please contact the distributor from whom it was purchased, or alternatively the ARB office in your state.
Head Office –ARB Corporation Ltd VIC: 42-44 Garden Street, Kilsyth, Victoria, 3137 Tel: (03) 9761 6622 Fax: (03) 9761 6807
WA:(08) 9244 3553 NSW: (02) 9821 3633 ACT: (02) 6280 7475 SA: (08) 8244 5001 QLD: (07) 3872 3872 NT: (08) 8947 2262 TAS: (03) 6331 4190
3.14) Pull the rest of the canopy vehicle patch harness
through into the LH rear passenger foot well area.
3.15) Release the lower portion of the “C” pillar trim at
the rear of the LH rear door.
3.16) Remove the Xmas tree clip holding the floor
carpet down under the rear seat.
3.17) Slide the 6 pin black/yellow connector from the
patch harness into the sheetmetal hole under the
floor carpet, aiming it towards the storage
compartment under the seat.

28/02/2020 Page 19 of 41 ARB Copyright 2018 3789452
If you have any queries regarding the installation of this product please contact the distributor from whom it was purchased, or alternatively the ARB office in your state.
Head Office –ARB Corporation Ltd VIC: 42-44 Garden Street, Kilsyth, Victoria, 3137 Tel: (03) 9761 6622 Fax: (03) 9761 6807
WA:(08) 9244 3553 NSW: (02) 9821 3633 ACT: (02) 6280 7475 SA: (08) 8244 5001 QLD: (07) 3872 3872 NT: (08) 8947 2262 TAS: (03) 6331 4190
3.18) Open the storage compartment lid and pull the
connector through into the storage compartment.
3.19) Prepare the (668PJ015) relay box by applying
the foam tape (668PB015) cut in half to the
underside of the box as shown.
3.20) With 2 off 200mm long cable ties, tie off the relay
box to the hole in the sheetmetal panel in the
storage compartment. Connect the connectors
and wrap the second piece of foam tape around
them to aid in the prevention of rattling noise.
28/02/2020 Page 20 of 41 ARB Copyright 2018 3789452
If you have any queries regarding the installation of this product please contact the distributor from whom it was purchased, or alternatively the ARB office in your state.
Head Office –ARB Corporation Ltd VIC: 42-44 Garden Street, Kilsyth, Victoria, 3137 Tel: (03) 9761 6622 Fax: (03) 9761 6807
WA:(08) 9244 3553 NSW: (02) 9821 3633 ACT: (02) 6280 7475 SA: (08) 8244 5001 QLD: (07) 3872 3872 NT: (08) 8947 2262 TAS: (03) 6331 4190
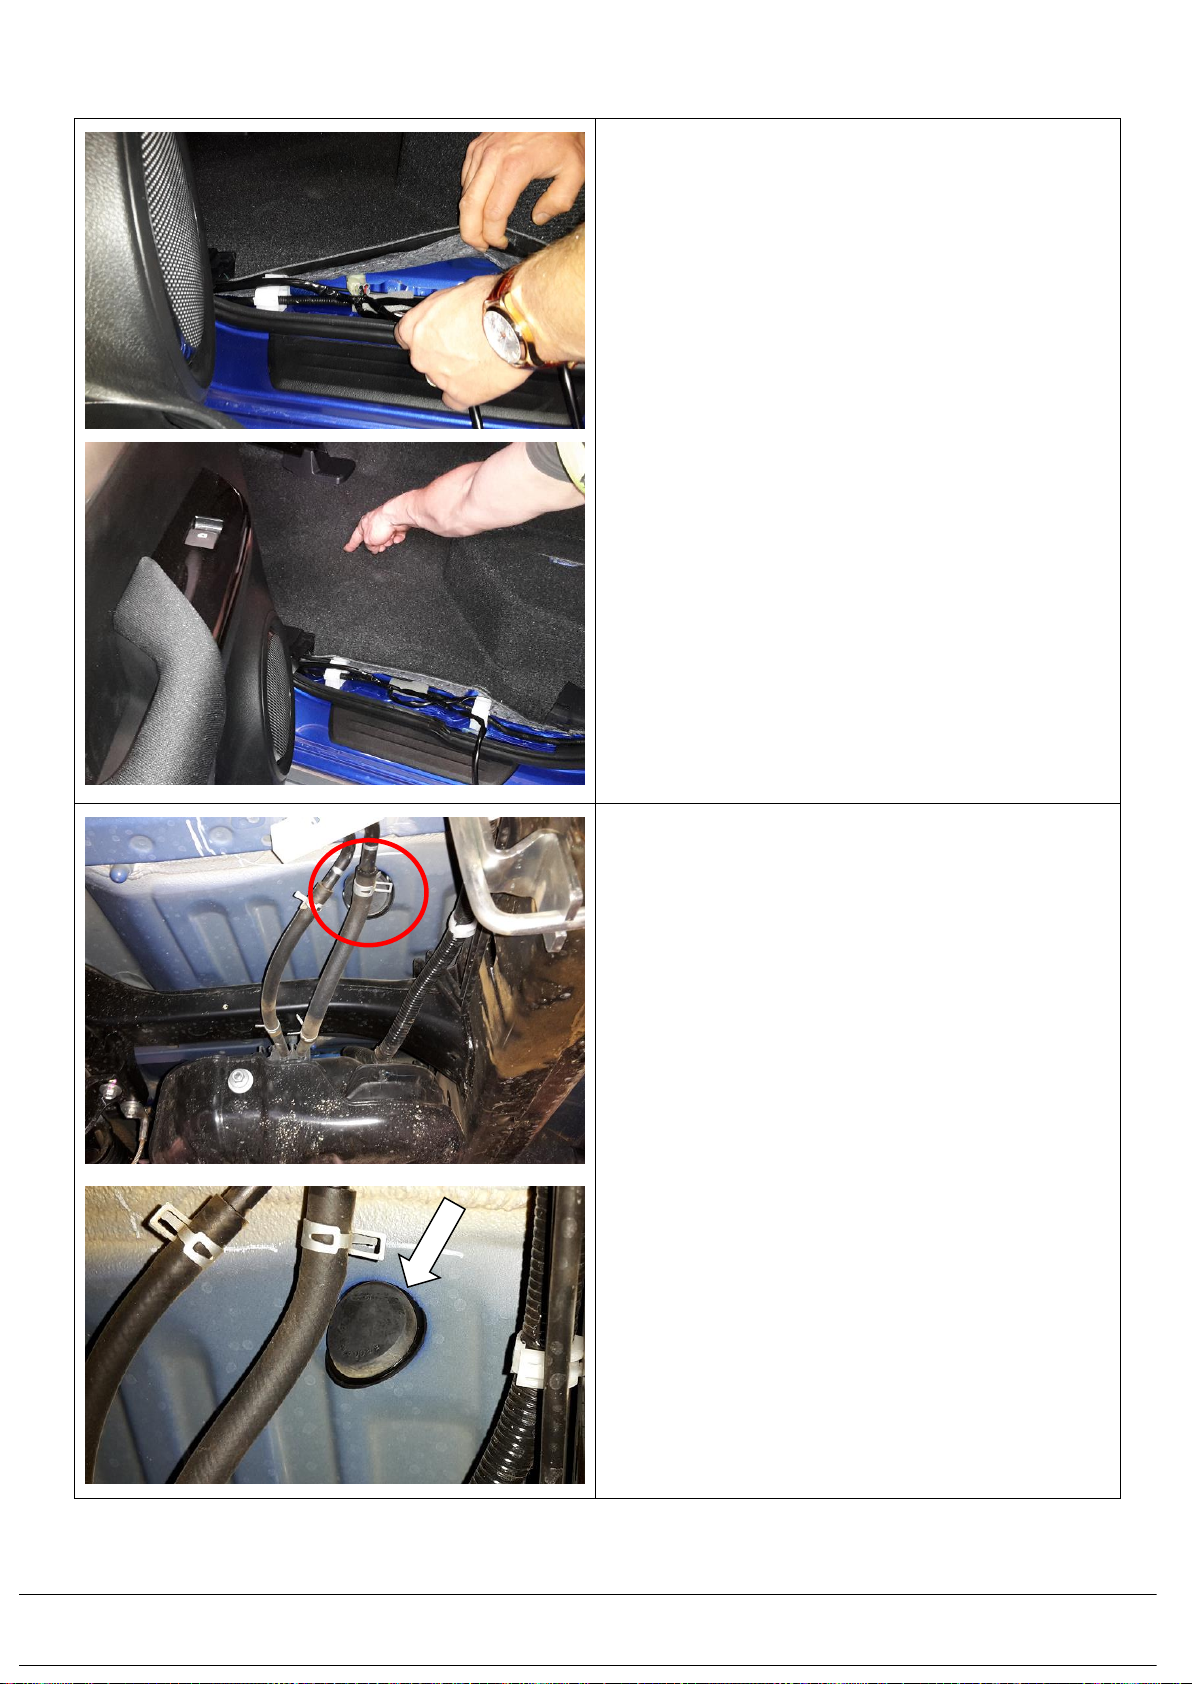
3.21) Take the 4 pin connector on the branch with the
grommet on the main patch harness and feed this
through under the floor carpet towards the
passenger front seat area.
3.22) Push out the grommet under the vehicle’s floor
from the inside. This is located under the front
passenger seat.
This manual suits for next models
1
Table of contents
Other ARB Automobile Accessories manuals

ARB
ARB AIRLOCKER RD168 User manual

ARB
ARB 3414020 User manual

ARB
ARB RD101 User manual

ARB
ARB AIRLOCKER RD189 User manual

ARB
ARB 3444070 User manual

ARB
ARB AIR LOCKER RD135 User manual

ARB
ARB AIRLOCKER RD136 User manual

ARB
ARB AIRLOCKER RD132 User manual

ARB
ARB 3424010 User manual

ARB
ARB DELUXE BULL BAR User manual


Popular Automobile Accessories manuals by other brands


ULTIMATE SPEED
ULTIMATE SPEED 279746 Assembly and Safety Advice

SSV Works
SSV Works DF-F65 manual

ULTIMATE SPEED
ULTIMATE SPEED CARBON Assembly and Safety Advice

Witter
Witter F174 Fitting instructions

WeatherTech
WeatherTech No-Drill installation instructions

TAUBENREUTHER
TAUBENREUTHER 1-336050 Installation instruction