ARCBRO Stinger Series User manual

1
StinGEr SERIES
CNC Plate Cung Machine
User’s Manual
Reference: AM
Revision: 3
Date of issue: May, 22nd, 2017
Beijing ARCBRO LTD, Xinfang Industrial Park NO.218, ChaoYang District 100024, Beijing China
Tel: +86 10 65798995 Fax: +86 10 65790867
hp://www.ARCBRO.com

2
◆Changes may be made periodically to the informaon in this manual without obligaon to nofy any
person of such revisions or changes. Such changes will be incorporated in new edions of this manual
or supplementary documents and publicaons. This company makes no representaons or
warranes, either expressed or implied, with respect to the contents hereof and specically disclaims
the implied warranes of merchantability or tness for a parcular purpose.
◆No parts of this manual may be reproduced, stored in a retrieval system, or transmied, in any form
or by any means, electronically, mechanically, by photocopy, recording or otherwise, without the
prior wrien permission of ARCBRO Company.
◆This User’s Manual is only available for Snger CNC Plate Cung Machine.
◆Ensure that the operator has read and understood this User’s Manual before any operaon on Sng-
er CNC Plate Cung Machine.
◆There may be few dierences between the pictures in this User’s Manual and the machine you re-
ceived.
◆Never hesitate to contact us for on-line technical service when you have any quesons or you need
help, and it's our pleasure to be there for help. Our E-mail is : [email protected]

3
Technical Support
Thank you very much for choosing ARCBRO products, our whole engineer team would love to work for you since the day
you have received the machine. Whenever you have any questions during the process of assembling or operating, please feel
free to contact us via Call, Email, or Online help 7x24.
May you enjoy a wonderful CNC cutting experience.
ARCBRO CNC Technical Support & Solutions
7x24 Hours
Call +86-10-65798995
Email [email protected]m
Help Online www.arcbro.com/help

4
Technical parameter
Type Snger 6060 Snger 1010 Snger 1313 Snger 1325 Snger 1530
Eecve area
(mm) 600x600 1000x1000 1300x1300 1300x2500 1500x3000
Thickness Range 0.3~35mm (Depends on your order and plasma power source capability)
Input power
supply 1 phase, 110V, 220V, 50Hz/60Hz
Input power 460W
Cung mode Plasma Cut
Driver Motor Smart servo motor
Max travel
speed 10000mm/min
THC Arc Voltage Torch Height Controller (Pneumac THC Oponal)
CNC SYSTEM
Display 7’’ color LCD screen
Internal library 24 kinds of shape
External format TXT or NC format
Language English, Chinese, Spanish, Russian, French, Japanese, Czech and Slovenia
Temperature 1-40℃ (34-104 ℉)
Notes
Note 1: Nesng soware of ARCBRO Plate is not included in standard package.
Note 2: The machine must be grounded reliably when it is working. (Connect the plate and the earth)
Note 3: Clean dust regularly to keep the rail and rack clean for smooth movement.
Note 4: Avoid damage for the LED display screen of CNC system.
Note 5: Equipment use environment:
Ambient temperature: -10℃—+50℃
Environment humidity: 90﹪RH below
Storage temperature: -20℃—+65℃
Sea level elevaon: An altude of 1000 m below

5
Stinger Description
1.1. What is Snger?
Stinger is a bench structure automac CNC cuer, specially designed for various plate cung with the
following specialies:
1. Fast assembling and easy plate loading mechanical design;
2. Split structure: gantry frame and water table can be ordered separately;
3. Adaptable THC and water table design for dierent thickness cung needs;
4. Quick-react computer numerical control;
5. Advanced technology assures high precise & stably fast cung performance;
6. High eciency CNC system for both me and money;
With the help of our nesng soware, various fast auto nesng, high accurate drawing, or any shape
proling can be achieved eciently by Stinger.
1.2. Applicaon
Stinger is an ideal CNC Plate Cung Machine widely used in industry eld, such as shipbuilding indus-
try, metallurgic industry, petrochemical industry and water resources & electric power. It can cut vari-
ous metal plates in seconds, for instance: carbon steel (ame cung), stainless steel, copper and alu-
minum (plasma cung).
1.3. Programming and Nesng
Using ARCBRO plate nesng soware, you can edit and do the nesng process for your paern de-
signed by CAD, then generate a G-code cung le in txt format. This txt cung le can be recognized
and carried out by our CNC system when you import it by a USB drive.Now, running Stinger , you can
achieve accurate proling of this paern automacally.

6
Safety Information
Informaon for your safety
The operator must read and understand the contents of this user’s manual before any operaon on
Snger.
Never hesitate to contact us for assistance when you have any quesons or you need help, and you can
reduce the account of me your troubles takes and solve your problem eciently.
Note: Each of the following descripon must be veried before any operaon on Snger.
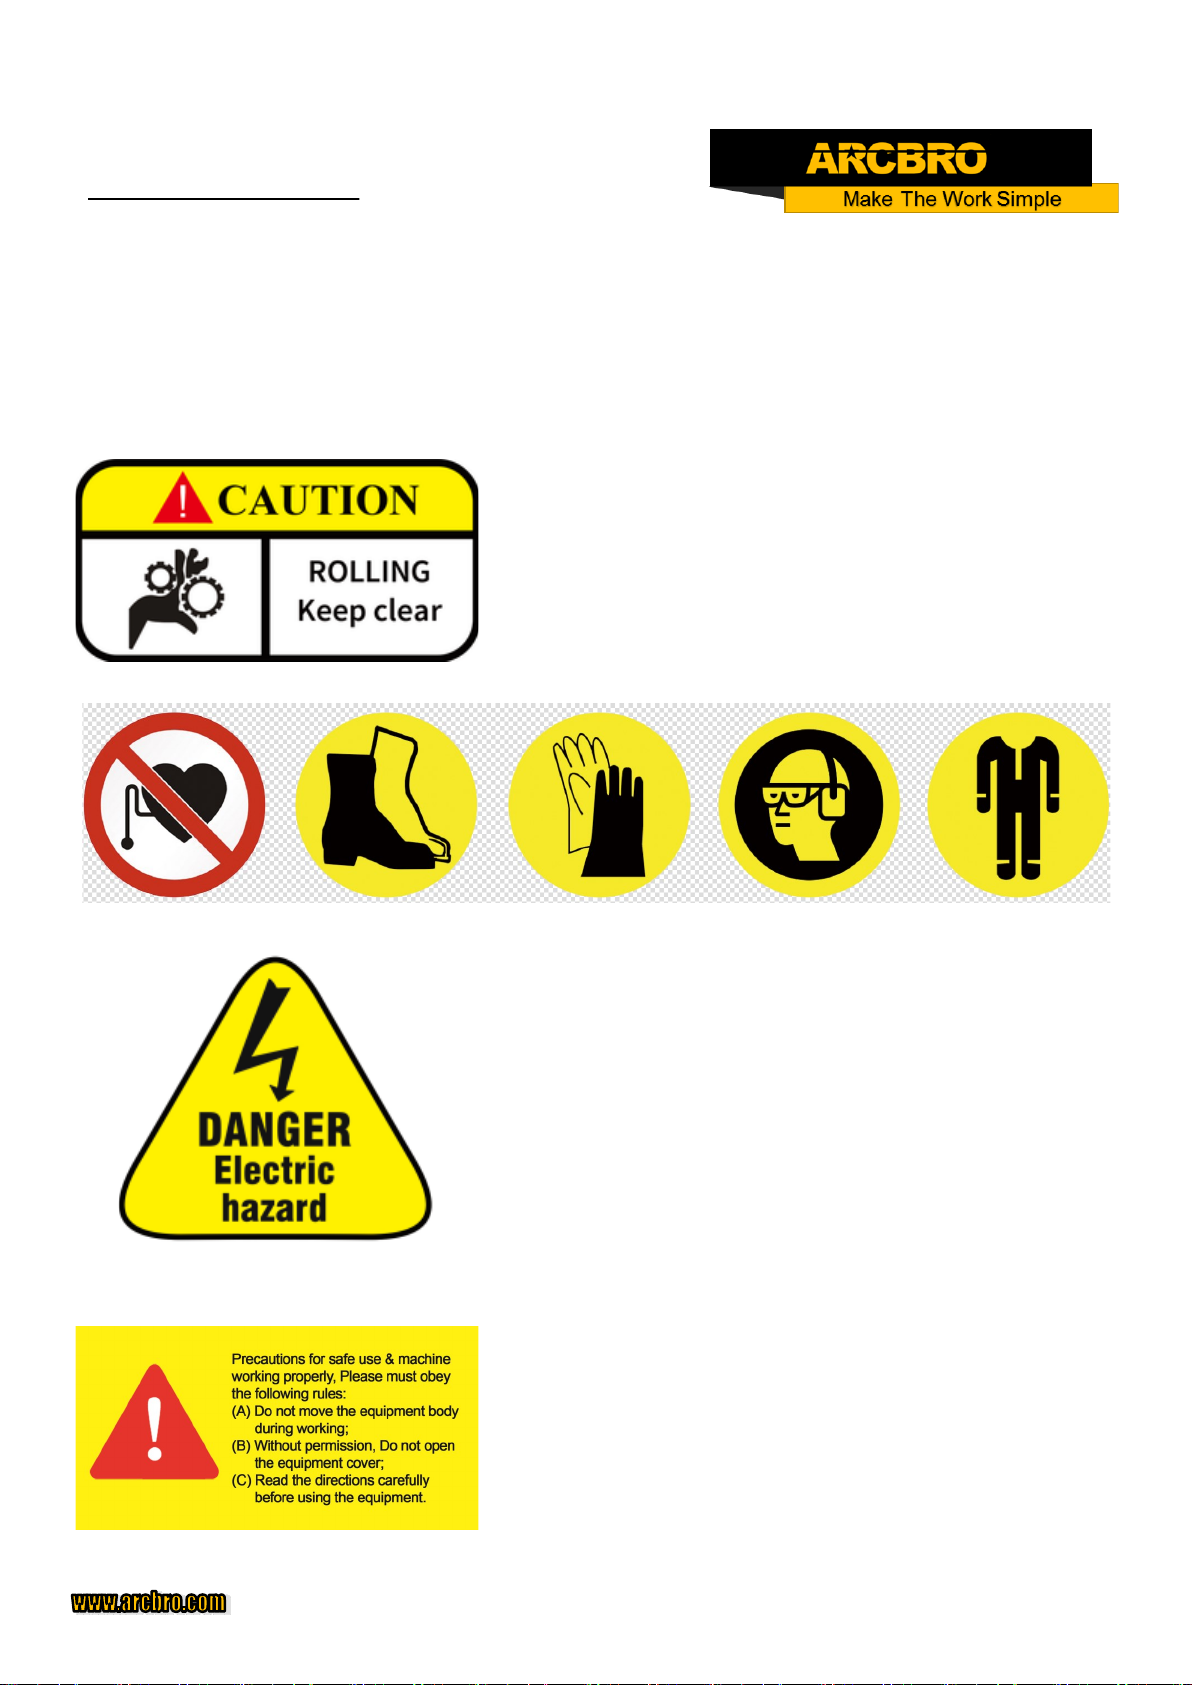
1. The operator should wear face shield, welding gloves,
caps, membrane lter dust mask and sound insulaon
earmu. It is strictly forbidden to observe directly or ap-
proach to the plasma arc with exposed skin.
2. The operator can’t load external program in internal stor-
age of the machine in case of the virus. Only the special
soware recognized by ARCBRO can be applied.
3. During cung period, when the oang voltage is too
high, the operator should check the ground connecon,
neutral connecon and insulaon of the torch handle.
Then isolate the workbench from the ground, or install
no-load open-circuit relay in the electrical control system.
4. The cung operator and assistant must wear labor protec-
on arcles by regulaon and take safety measures to
prevent electric shock, high-altude falling, gas poison-
ing, re or any other accidents.
5. The site should build rain-proof, damp-proof and sun-
proof machine shed, and install corresponding re equip-
ment. The machine should keep away from ammable
and combusble materials.
6. As the operaon and maintenance has potenal danger-
ous, operator should be careful in case geng injured.
It’s forbidden to wear loosen cloths or coon ropes in
case being entangled by the machine.
7. The high voltage of plasma CNC cuer is fatal, so operator
should install the machine step by step as the manufac-
turer spulate.
8. Only trained personnel can be allowed to operate the
equipment. Any maintenance should obey the user’s
manual and before that the power should be cut o. Only
experience technicist is allowed to change assemblies

7
Receive your package
Thank you very much for choosing ARCBRO CNC Plate Cutting Machine Stinger. You will enjoy our considerate after-sale
service for the whole life of using the machine. We try our best to provide you a long term excellent performance and great
experiences. ARCBRO CNC make you work simple and fast.
Type of shipping
Ocean transportation, Land transportation, Air transportation
Types of packing
One wooden boxes, machine and accessories are wrapped by thin film and bubble sheet, fix internal part with plank/angle
iron.
• Before signing the package, please check if the packing wooden case is in good condition. If there is breakage, trace of
damage or opened, please take clear photos on file. Then contact the transport company and ARCBRO technical sup-
port department.
• Do not sign when situation above happened, try to contact ARCBRO technical support team in the first place.
• By signing the bill, you are deemed to accept the damage during transportation, and take whole responsibility for any
further action to cover the potential risk caused by the breakage of the parcel.
The shipping list is in package, please check the part and quantity according to the list. Any damage or loss, please take pho-
to and contact ARCBRO technical support department. The sooner you contact us, the better any problems can be resolved.
Any questions or concerns, please contact us immediately.
ARCBRO CNC Technical Support & Solutions
Call +86-10-65798995
Email [email protected]
Help Online www.arcbro.com/help

8
Mechanical
Assembling
Steps

9
Assembling Step
Assemble the legs of the Gantry Frame and the Water Table:
Step 1: Unpacked the box, take out all assembles and leave the whole body (gantry frame with drag chain & wa-
ter table) together;
Step 2: Lift the whole body from the opposite of the drag chain by Forklift( Mind the drag chain with cables);
Step 3: Connect and fix all legs onto the Water Table (each leg fixed by 2 bolts);
Step 4: Connect and fix all legs onto the Gantry Frame by top screw(M16):
Hold the top screw firmly to enter the lower hole of the top leg, Connect the lower leg to the top leg and fix
the screw (detail check the picture below):
Frame leg detail:
Note: Hold the M16 screw firmly before you enter it into the small frame leg hole.
each leg fixed by 2 bolts
Beam
the Water
Table

10
Assembling Step
Assemble the legs of the Gantry Frame and the Water Table:
Step 5: Assemble 【Beam】
Note: Pls fix the machine frame on the water table first, then install the cross beam ;
Step 5: Fix each Side Board onto the frame leg by screws;

11
Assembling Step
Connect the machine Base to the Ground:
Step 7: Fix each Side Board onto the frame leg by screws;
Step 8: Adjust the [Level Bolts] according to the measurement of Level Gauge, to make sure:
a- the Water Table level; b- the 2 track on same horizontal level [The level precision request: ±1mm]
Step 9: Fix all the screws( Fix Bolt) to the Ex-
pansion Bolt tightly.

12
Assembling Step
Wire connection:
Step 9: Connect the all cables accordingly:
—Power Supply cable,
—Ground wire to cutting plate,
—ARC START cable to plug of the plasma power source,
—DIV ARC+/- cable to Original Arc Voltage ports inside of the plasma power source.
Note: Ref. your plasma power source handbook for recommended Torch Height for
different thickness.

13
Assembling Step
Air Pressure connection for THC Lifter:
Step 10: Connect the air pressure tube to the air compressor.
Note:
Both the Arc voltage and the Pneumatic THC mode need air pressure to keep the THC Lifter of Stinger on the proper
position.
Torch loading:
Step 12: Load the plasma torch to the holder.
IHS wire Connection:
Step 13: Connect the IHS wire to the shield of the plasma torch.
Plate loading:
Step 11: Turn on the power supply of the Controller, Go to
Manual interface and Move the gantry to the other end of the
tracks. Load the thick plate onto the water table.

14
CNC System Instruction
THC Switch—Push up=turn on the Auto Pneumatic THC for thin plate cut; Push Down=turn off Pneumatic THC;
ARC VOLTAGE screen—Display the real Arc Voltage instantly:
THC Control Panel Note:
【IHS HEIGHT 】decides the torch height before arc Plasma generation;
【ARC VOLTAGE】 decides the torch height after arc flame generation, the ACTUAL arc voltage value will dis-
play instantly on the screen according to the SET values once the practical cutting started.
【ARCON TEST】 for test of manually arc flame generating.
【UP】 for torch going up, 【DOWN】 for torch going down.
【ESC】--- function exit key Green button【1】green--- START running
【F1】--【F7】--- function key Red button 【 0】--- Stop running
【shift/[ ]】 --- up selection/blank 【S↑】--- torch up
【 】 --- line feed/ enter key 【S↓】--- torch down
【F↑】 --- manual speed +/ to the top of the line 【PIERCE】 --- Arc flame generating button
【END/F↓】--- manual speed -/ to the end of the line 【IGNITING】 --- for oxygen cut
【X+】【X--】 --- left / right in the X axis 【PREHEAT】--- for oxygen cut
【Y+】【Y--】--- up / down in the Y axis 【GAS】 --- for oxygen cut
【INS】--- forward in the Z axis / insert 【CUTOXY】 --- for oxygen cut
【DEL】--- Delete 【OFF】--- switch off all oxygen cut button above
1. Control Panel Unit Instruction:
(1) System Control (Top left side)
(2) Machine Control (Top right side)
Emergency Button — Press for emergency stop;
GREEN Indicator — Light up=Power Supply is on;
Power Supply Key — Turn right =power supply on,
Turn left=power supply off.
(3) THC Control — bottom panel
ON(Light)/OFF button— Pneumatic THC on/off
Pneumatic THC Switch
AUTO Arc-
Voltage THC
On/Off

15
Parameter Set for
Thick Plate Cut
(Arc Voltage THC mode)

16
[PLASMA ] interface set:
a. Press [F4] to enter [PLASMA] interface, Set each parameter according to pho-
to shows below(2 pages):
DO NOT change it randomly.
b. Then press [F7] to save this set.
Note:
1- Row 8th and Row 9th can be adjusted according to different thickness of plate.
2- Row 8th for the necessary time of piercing process;
3- Row 9th for the necessary time of first piercing process. The torch is cold at the begin-
ning, so we set it a little bit longer than Row 8th.

17
[CONTROL] interface set-
Auto Plasma Cut Mode
a. Press [F5] to enter [CONTROL] interface.
b. Then press [F7] to save this set.
Note: DO NOT change it randomly.
.

18
Auto Plasma Cutting Practice
a. Back to the Main interface, Press [F6] to enter [LIBRARY] interface.
b. Select a shape, press [ ] to enter the edit interface.
c. Set dimension of the selected shape.
d. Set the lead-in line length=ENGRY L; Lead-out ling length=DROP L
e. Press [F6] [APPLY], and then press [F7] [OK] to save this set and enter the [AUTO] interface.
f. Press F4[VIEW], to display the whole route of the shape.
g. Press [F2] to enter [Manual] interface:
—Move the torch manually to the reference point, (red cross on shape file),
—Press [F6] to Clear the X & Y axis Coordinates (displaying in bottom left area);
h. Press [F1] back to [AUTO] interface:
—Press F to input a proper cutting speed ;In the cutting process, you can adjust the speed according
by [F↑] or [[F↓],
—Press button X to do the simulative torch movement for practical whole route double check.
i. Press the AUTO button on THC Control Panel, Set a proper IHS HEIGHT, SET VOLTAGE, and
PIERCING DELAY for this plate.
j. Turn on the plasma power source and air compressor;
k. Press the GREEN button to start the ARC flame and do Piercing process, then auto cutting move-
ment started.

19
Note:
1- Press the ARCON TEST button to double check the arc Plasma generating function;
2– During cutting, you can turn the screw of the “ARCVOLTAGE” to adjust the torch height.
3- Usually, 120 is the proper value of SET ARCVOLTAGE for 3-5mm thickness of carbon steel.
Ref. your plasma power source handbook for recommended Torch Height (proper value of
SET VOLTAGE) for different thickness.
Pneumatic THC Switch
AUTO Arc-
Voltage THC
On/Off

20
Import G-code(txt) Cutting
File from USB flash drive
a. Go to main interface, Press [F3] to
enter [EDIT] interface.
b. Press F6 [USB], then Press F1
[LOAD] to view the files in USB;
c. Select the file and press [Enter] but-
ton;
d. Press F2 [LOAD] & F3 [SAVE],
Now the file in USB flash drive is loaded
and saved to the system storage for any-
time usage.
Load the txt file for Auto cut:
e. Go EDIT interface:
—press F2 [LOAD] to select a txt file
stored in system and press [Enter](or
press F6 [USB] to select a txt file);
f. Press [ESC] to the enter the main in-
terface.
g. Press F1 enter [AUTO] interface and
you can view the shape.
Other manuals for Stinger Series
2
This manual suits for next models
5
Table of contents
Other ARCBRO Cutter manuals
Popular Cutter manuals by other brands

Norge
Norge ME-230 Operation manual

GRAPHTEC
GRAPHTEC CUTTING PRO FC3100-60 Service manual

Alpha Professional Tools
Alpha Professional Tools PSC-150 instruction manual

DeWalt
DeWalt Impact Connect DWAPVCIR instruction manual

Farm King
Farm King I Series Operator and parts manual

CRAIN
CRAIN 008 instruction manual

Weber mt
Weber mt SM 57-2 Operating and maintenance manual

Current Tools
Current Tools RotaBoom 77-22 Operating, Maintenance, Safety and Parts Manual

Holmatro
Holmatro PCU50 manual

Varan
Varan SPT-15103 user manual

Bush Hog
Bush Hog 4815RR1 Operator's manual

Brother
Brother 891-Z05 WIRELESS NETWORK SETUP GUIDE