ASCOM Eurit 4000 User manual

Operating instructions
ascom The world in your hands
Ascom Eurit 4000

I20324744en_ba_a0
Safety instructions
Follow these instructions to avoid physical injury:
➭Never take the telephone apart yourself.
➭Never touch electrical contacts with pointed or metallic objects.
➭Never lay the connecting leads in such a way that they might cause someone to trip
over.
Be sure to follow these instructions when installing, connecting and using the
telephone:
➭The Ascom Eurit 4000 is for voice communication via the ISDN telephone network as
well as for information access on the Internet via WAP. The device must not be used
for any other purpose.
➭The telephone is intended only for normal use in dry areas of the home or office. Do
not install or use the telephone in wet areas (e.g. bathroom) or in explosion-
endangered rooms.
➭Install the telephone away from sources of heat, direct sunlight and other electrical
appliances. Operate the telephone only in the temperature range from +5 °C to +45 °C.
➭Connect the connecting leads only to the designated sockets. Do not install or use
the telephone with damaged connecting leads. If you discover damage, have it
repaired by authorized service centers.
➭Use only genuine accessories.
➭Protect the telephone from wet, excessive dust, aggressive liquids and vapors.
➭
Clean the telephone with a soft, damp cloth or antistatic cloth. Do not use a dry cloth
or cleaning or scouring agents. Strong cleaning agents or solvents are not suitable.
➭The telephone may be repaired only by authorized service personnel.
➭Do not carry the telephone by the connecting leads.
➭Do not drop the telephone.
➭Place the telephone on a non-slip surface.
➭The legs of the telephone may leave marks.

II
20324744en_ba_a0
1Display with backlighting
for menu functions, information, texts and graphics
2Minus key
Press the minus key to reduce the volume (handset and loudspeaker).
3Plus key
Press the plus key to increase the volume (handset and loudspeaker).
4Microphone mute key
Press the microphone mute key to
–switch the microphone on or off (handset microphone, handsfree microphone).
– stop your own phone number being notified to the person you are calling.
Overall view and control panel
28
27
12345 6789
10 11 12 13 14
15
1617181920212223242526

III 20324744en_ba_a0
Overall view and control panel
5Loudspeaker key
Press the loudspeaker key to
–follow the connection status when dialing.
–switch open listening/handsfree talking on or off during a call.
6key
Press the key to
–launch the WAP browser, establish an Internet connection and go to the WAP
home page.
–terminate the Internet connection (if the WAP browser has already been
launched) and return the telephone to its basic state.
7Fox key
The available functions are shown on the bottom line of the display and are
activated by pressing the Fox key directly below the corresponding text.
8User key
Press the user key to change the user profile on the telephone.
9 LED
The LED tells you the status of your telephone.
LED off – telephone answering machine off
LED lit – telephone answering machine on
–Call forwarding always
–if there is a call with volume = 0 or do not disturb
LED blinking slowly – at least one message received
LED blinking quickly – capacity of telephone answering machine exhausted
10 Telephone answering machine key
Press the telephone answering machine key to switch your telephone answering
machine on or off.
11 Redial key
Press the redial key to open the redial memory. The redial memory stores the phone
numbers which were last dialed (up to 1000 entries).
12 LOG key
Press the LOG key to open the LOG memory. The LOG memory stores all incoming
and outgoing calls, SMSs, UUSs, incoming voice messages for the telephone
answering machine, info messages as well as WAP addresses entered using the
keypad (1000 entries).
13 PARK key
Press the PARK key to park the existing call.
14 key
Key, freely assignable for each user, for phone numbers, email addresses, WAP
addresses or functions.
15 Dial keypad
Use the dial keypad to enter numbers and the characters * and #.
16 Alphanumeric keypad
Use the alphanumeric keypad to enter letters as well as special characters such as
full stop (period), comma, brackets etc. (by simultaneously pressing the CONTROL
key and letter key).

IV
20324744en_ba_a0
Overall view and control panel
17 Backspace key
Press the backspace key to delete letters, special characters, digits etc. you have
entered.
18 RETURN key
Press the return key to
–move to the next line.
–enter corresponding menus.
–confirm or execute functions.
19 Arrow keys
Press an arrow key to
–move the cursor horizontally or vertically for entering text.
–move the display vertically.
– move the menu vertically and select the corresponding menu.
–select WAP pages.
20 BACK key
Press the BACK key to return from a submenu to the associated menu. When
surfing, press the BACK key to go back one level to the previous WAP page. Press
the BACK key for a long time to reload the home page of the WAP browser or to
return the telephone to its normal display.
21 Wheel navigator
Turn the wheel navigator to
–move the cursor vertically for entering text.
–move the display vertically.
–move the menu horizontally and select the corresponding menu.
22 OK key
Press the OK key to
–enter corresponding menus.
–confirm or execute functions.
–move the menu horizontally and select the corresponding menu.
–dial WAP links.
23 Space key
Press the space key to enter spaces.
24 CONTROL key
The keys of the alphanumeric display can also be used to enter special characters.
To enter special characters, simultaneously press the CONTROL key with a
corresponding key on the alphanumeric keypad.
25 SHIFT key
Simultaneously press the Shift key to enter letters in upper case.
26 Special character key
Press the special character key to display a one-line list with special characters,
which you can select with the wheel navigator, the arrow keys or the alphanumeric
keypad.
27 Loudspeaker
28 Handset cradle

120324744en_ba_a0
Contents
Safety instructions........................................................................................................ I
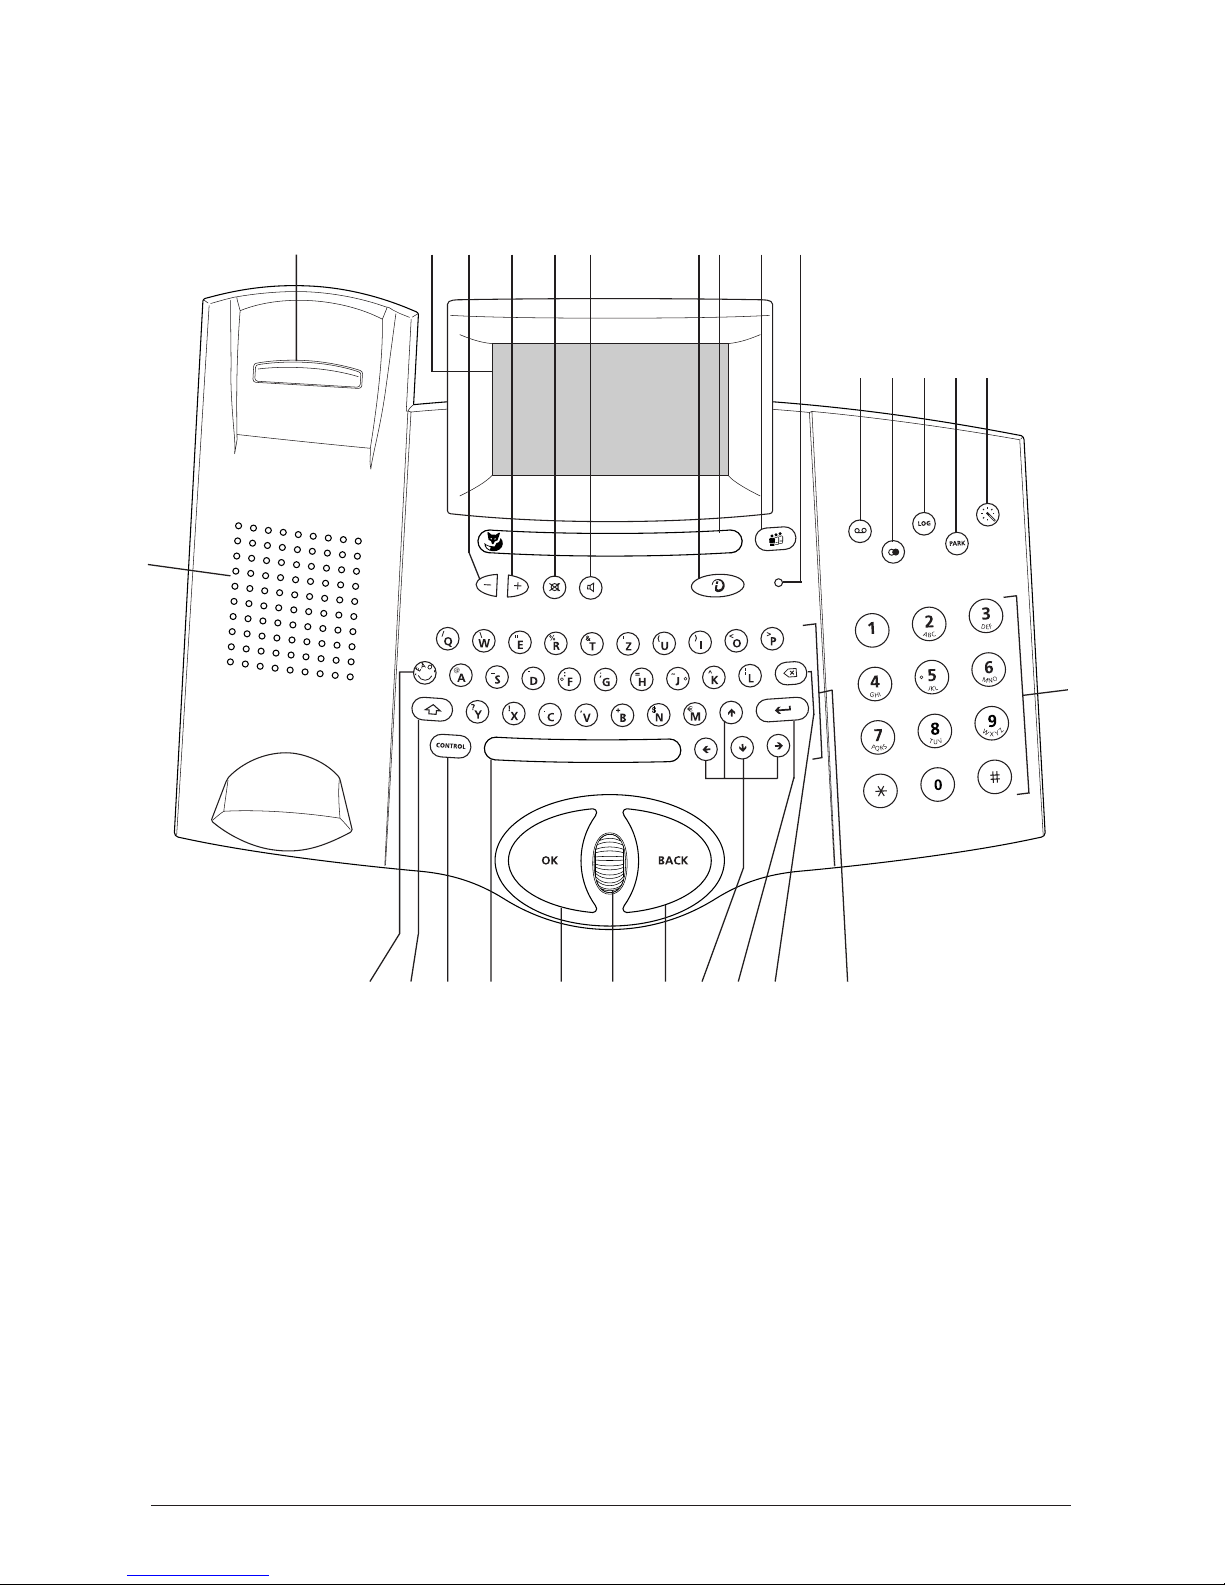
Overall view and control panel .................................................................................. II
Introduction ................................................................................................................. 4
The telephone .......................................................................................................... 4
The operating instructions ........................................................................................ 5
Getting started ............................................................................................................ 7
Unpacking ................................................................................................................ 7
Choosing a location.................................................................................................. 8
Connecting the telephone ........................................................................................ 8
The display ............................................................................................................. 10
Key assignment ...................................................................................................... 12
First steps (brief instructions)................................................................................... 13
WAP ............................................................................................................................ 16
Definitions .............................................................................................................. 16
Status symbols in the WAP browser ........................................................................ 19
Launching the WAP browser (going online)............................................................. 19
Quitting the WAP browser (going offline)................................................................ 19
Surfing the Internet (surfing through WAP pages) ................................................... 20
Surfing and making a phone call at the same time.................................................. 22
Saving WAP pages .................................................................................................. 23
Settings for WAP access .......................................................................................... 25
Error messages........................................................................................................ 27
Phone calls ................................................................................................................. 28
User concept .......................................................................................................... 28
Handsfree talking.................................................................................................... 29
Open listening ........................................................................................................ 30
Mute ...................................................................................................................... 30
Adjusting the volume.............................................................................................. 30
Manual dialing........................................................................................................ 31
Suppressing your phone number (making an anonymous call)................................. 32
Callback on busy/no answer ................................................................................... 33
Automatic redial on busy ........................................................................................ 34
Scheduled call (reminder to call back)...................................................................... 34
Dialing from the phonebook................................................................................... 35
Dialing from the redial memory............................................................................... 36

2
20324744en_ba_a0
Contents
Dialing from the LOG memory ................................................................................ 36
Dialing from the inbox ............................................................................................ 37
Dialing from the VIP display .................................................................................... 37
Incoming calls......................................................................................................... 38
Anonymous callers.................................................................................................. 39
While making a phone call...................................................................................... 40
Sending keypad information ................................................................................... 42
Sending DTMF ........................................................................................................ 42
Phonebook ................................................................................................................. 43
Creating a new entry .............................................................................................. 43
Changing an entry.................................................................................................. 46
Deleting an entry .................................................................................................... 46
Checking the phonebook info ................................................................................ 46
Telephone answering machine................................................................................. 47
Switching the telephone answering machine on/off................................................ 47
Accepting a call in mid-recording ............................................................................ 48
Recording/playing back/changing/deleting a greeting.............................................. 48
Associating a greeting with a user........................................................................... 50
Setting the recording length ................................................................................... 51
Switching call screening on/off................................................................................ 51
Number of rings before answer/remote access toll save function............................. 52
Recording quality .................................................................................................... 52
Playing back/deleting voice messages...................................................................... 53
Remote access............................................................................................................ 54
Settings for remote access ...................................................................................... 54
Operating the telephone remotely .......................................................................... 56
Operation on a PBX ................................................................................................... 62
Switching on/off operation on a PBX....................................................................... 62
Trunk access code (TAC) for outgoing calls.............................................................. 62
Trunk access code (TAC) for incoming calls.............................................................. 63
Length of internal phone numbers .......................................................................... 63
On-hook transfer .................................................................................................... 64
Setting the method of transfer................................................................................ 65
Automatically sending keypad information ............................................................. 65

320324744en_ba_a0
Contents
Advanced features .................................................................................................... 66
Timers .................................................................................................................... 66
ETV®Online ............................................................................................................ 68
Messages (SMS, UUS, info message) ....................................................................... 70
Message waiting notification .................................................................................. 73
Call forwarding....................................................................................................... 75
Call charges............................................................................................................ 75
Do not disturb ........................................................................................................ 76
Providers................................................................................................................. 78
Ringing tone........................................................................................................... 80
Games.................................................................................................................... 81
Locking the telephone with security PIN.................................................................. 81
key ..................................................................................................................... 82
Renumbering (prefix) .............................................................................................. 83
Appendix.................................................................................................................... 84
Headset .................................................................................................................. 84
Reset ...................................................................................................................... 84
Software update ..................................................................................................... 85
Self-help in case of trouble...................................................................................... 86
Care ....................................................................................................................... 87
Function list ............................................................................................................ 87
Eurit Office Tool ...................................................................................................... 87
Technical data ......................................................................................................... 88
Terms of guarantee ................................................................................................. 89
Disposal.................................................................................................................. 89
Approval and CE marking ....................................................................................... 89
Liability ................................................................................................................... 90
Declaration of conformity ....................................................................................... 91
Key words .................................................................................................................. 92

4
20324744en_ba_a0
Introduction
With your Ascom Eurit 4000 you have purchased a quality product from Ascom.
This product is intended for office or home use.
The telephone
Type of line
Your telephone is intended for an ISDN standard line (protocol DSS1, Euro ISDN) and can
be connected to the ISDN bus (S0). The power supply is via the plug-in power supply unit.
WAP
Your telephone has an integrated WAP browser. Press the key to access information on
the Internet via WAP. With ISDN you have two telephone lines at your disposal, which
means you can surf and phone at the same time.
User profiles
Your Ascom Eurit 4000 can be used to set up 10 user profiles. All users can define their
own settings, such as ringer melodies, call forwarding, do not disturb etc. Press the user
key to cycle from one user to the next.
Details about the user concept can be found in the section entitled "Phone calls - User
concept".
Phonebook
The phonebook has space for up to 800 entries for names and addresses. Each individual
entry can hold up to 5 different phone numbers (home, office, mobile, fax, pager), email
addresses (home email, office email) or WAP addresses (URLs).
Telephone answering machine
The built-in digital telephone answering machine has a total capacity of around 28
minutes. A total of 10 greetings, 5 end messages and 2 memory – full messages can be
recorded. The recording length can be variably adjusted. The telephone answering
machine can be remotely accessed and configured using a PIN code.
➭Often, the telephone answering machine is abbreviated to TAM (Telephone
Answering Machine) in the operating instructions and in the text on the display.

520324744en_ba_a0
Introduction
Scope of functions
The Ascom Eurit 4000 provides you with virtually all ISDN advanced functions. For a
precise overview, see the table of contents to these instructions.
The operating instructions
These operating instructions will familiarize you with all the functions and features of your
telephone. Use the table of contents or the extensive index to find quick answers to any
questions you may have.
Online help is available from the Ascom Eurit 4000 WAP home page (wap.eurit.com),
where the operating instructions can be accessed in electronic form.
Structure of the operating instructions
Normally, the functions are described in full in the individual chapters. First, you are given
some general information about the particular function. Next, you are guided step by step
through the procedure. The left-hand column shows the keys you need to press or the
information in the display under which you need to press the Fox key. On the right you
will find information on what to do and you will be told what the display means.
The following, additional information panels may appear in the text:
This draws your attention to hazards or risks which may result in serious
damage to your telephone.
➭This provides you with information on general matters or in the form of tips and
tricks which may make it even easier for you to use your telephone.
Picture symbols (pictograms)
Normally, the instructions show the keys you need to press or the symbol under which
you need to press the Fox key. In the case of actions for which there are no keys or in
cases where the key covers two or more functions, use is made of the following
pictograms:
This symbol means you should enter any sequence of characters you wish
using the alphanumeric keypad.

6
20324744en_ba_a0
This symbol means you should enter any sequence of digits you wish using the
dial keypad.
This symbol means you should pick up the handset.
This symbol means you should replace the handset.
This symbol means you should press either the OK key or the BACK key or turn
the wheel navigator.
Or … You will see this if there are alternatives for what to do next.
… all You will see this when, after you have made a branch to one of the
continue alternatives after "Or ...", what follows in the instructions applies to all
alternatives whichever one you chose.
Recommended course of action
First read the section entitled "Getting started".
If you intend to operate your telephone as part of a PBX, you should read the section
entitled "Operation on a PBX".
Otherwise you can look up the required action or function in the table of contents or
index.
And now we hope you have a great time getting to know your Ascom Eurit 4000!
Introduction
0
7 9
4 65
1 32

720324744en_ba_a0
Getting started
Your Ascom Eurit 4000 can only deliver satisfactory results if you have met all the
requirements for setting up your telephone.
Unpacking
Contents of pack
1 Ascom Eurit 4000 telephone
1 handset
1 curly handset connecting lead
1 telephone connecting lead
1 operating instructions
1 plug-in power supply unit SNG 7 af
Checking the contents of the pack
Before getting started and connecting your Ascom Eurit 4000, you should check carefully
whether any damage
–
on the packaging indicates that the device has been damaged in transit.
–is visible on the handset or telephone.
– is visible on the connecting leads, e.g. on the connectors or cable sheathing.
Under no circumstances should you use the telephone if it is damaged. If in
doubt, consult the dealer where you bought the device. Be sure to keep the
original packaging. It may come in useful for transporting the telephone if you
move premises or if you need to ship the device.
Bedienungsanleitung
aTheworld in yourhands
AscomEurit 4000

8
20324744en_ba_a0
Choosing a location
Choose a flat, dry location in which to set up your Ascom Eurit 4000.
This telephone is intended for normal conditions of use. Present-day furniture is coated
with a very wide variety of different paints, lacquers and plastics and is treated with a
variety of care products. The possibility cannot be ruled out that some of these products
may contain substances which may attack or soften the plastic legs of your telephone.
Having been changed in this way by foreign substances, the legs of your telephone may
leave unpleasant marks on the surface of furniture. For understandable reasons, Ascom
cannot accept liability for such damage.
Never lay connecting leads in such a way that they might cause someone to
trip over.
Connecting the telephone
The connecting sockets for the handset and telephone connecting lead are on the
underside of your telephone. First connect the handset and then connect the telephone
to the telephone network.
Connecting the handset
First of all, plug the connector at the end of the
longer, non-curly part of the lead into the socket
on the underside of the telephone ➊which is
marked with a handset symbol.
Press the cable into the cable groove in order to
relieve the strain on the connector ➋. Use a thin,
flat object to press the cable under the retaining
lugs.
Plug the connector at the other end of the curly
lead into the socket on the handset ➌.
Getting started
➊
➋➌

920324744en_ba_a0
Connecting the telephone connecting lead and the plug-in power supply unit
Under no circumstances should you plug the connecting lead of the plug-in
power supply unit into the telephone connecting socket as this might damage
the telephone. Be sure to plug the telephone connecting lead and the plug-in
power supply unit into the correct sockets.
Plug the shorter of the two connectors on the telephone connecting lead into the socket
on the underside of the telephone
➊which is marked with a telephone symbol.
Press the cable into the cable groove in order to relieve the strain on the connector ➋. Use
a thin, flat object to press the cable under the retaining lugs.
Plug the connecting lead of the plug-in power supply unit into the socket on the
underside of the telephone ➍which is marked with a plug-in power supply unit symbol.
Press the cable into the cable groove in order to relieve the strain on the connector ➎. Use
a thin, flat object to press the cable under the retaining lugs.
Turn the telephone over and stand it on its legs. Place the handset on its cradle.
Plug the larger connector at the other end of the telephone connecting lead into the wall
socket ➌or NTBA.
Plug the plug-in power supply unit into the wall socket ➏.
Getting started
➊
➋
➌
➍
➎
➏

10
20324744en_ba_a0
The display
The display is always active. The display has backlighting, which is activated whenever you
press a key or turn the wheel navigator.
Normal display
The top two lines of the display show you the date, time, user (if applicable) and,
depending on the status of the telephone, the status symbols. The bottom line of the
display shows the available functions (depending on the status of the telephone) for the
Fox key. Press the Fox key directly below the corresponding text to activate the function.
1. Functions for the Fox key in the normal display
Menu Press the Fox key here to enter the menu.
Voice messages: Press the Fox key here to listen to both new and old voice
messages on the telephone answering machine as well as to info messages.
Inbox: Press the Fox key here to access a list showing messages which arrived
while you were away. The list includes unanswered calls, all voice messages
and unread text messages such as SMSs and UUSs.
2. Status symbols in the normal display
The status symbols show the current status of the telephone (e.g. if call forwarding has
been programmed).
Call forwarding always
Call forwarding on busy
Call forwarding on no reply
Telephone answering machine
Do not disturb
Phone number suppressed
Operation with headset
Timer activated
Automatic callback
Getting started

11 20324744en_ba_a0
Callback on no answer
Ringer tone volume = 0 (mute)
Phone lock
Message waiting notification
Refuse anonymous callers/directly to telephone answering machine
Automatic provider selection activated
VIP display
If the phonebook contains entries you require often, you can have them displayed on the
VIP display. Once an entry has been selected for the VIP display, the VIP display appears
instead of the normal display. Entries in the VIP display can be selected with the wheel
navigator and dialed with the OK key.
Functions for the Fox key when dialing
1. On hook dialing (dialing with handset still on cradle)
Add entry to phonebook
Read entry from phonebook
ETV ETV®Online (if supported by network operator)
Attribute Number attributes (see section entitled "Phonebook – Creating a new entry")
2. Off hook dialing (manual dialing)
Menu Activate available menus when manual dialing
disconnect
Offline
Keypad Send keypad information (see section entitled "Phone calls – Sending keypad
information")
WAP
1. Functions for the Fox key
Menu Menu
Reload current WAP page (refresh)
Stop
Save current WAP page as bookmark
Options Options (further interactive commands for a WAP page)
Getting started

12
20324744en_ba_a0
2. Status symbols
Display for loading a WAP page (animated)
Connection to ISP active
Connection to ISP interrupted
Key assignment
General
The Fox key is the wide key directly below the display. The function of the Fox key is
dependent on the bottom line of the display, which contains functions for the Fox key.
The functions differ depending on the current status of your telephone. To select such a
function, press the Fox key below the available function.
Text is entered using the alphanumeric keypad. Letters can be typed in upper case by
pressing the Shift key simultaneously with the corresponding letter key. The keypad can
also be used to enter the most important special characters. The special characters on
the letter keys can be obtained by pressing the CONTROL key simultaneously with the
corresponding letter key. Additional special characters and umlauts can be obtained by
pressing the special character key. If, for example, you wish to type the umlaut
character "ü", first press the special character key, then the letter key "u" (the cursor is
already on the umlaut for "u") and press the special character key once again.
Wheel navigator
The wheel navigator with OK and BACK keys makes it extremely easy for you to use the
telephone or to surf through WAP pages:
Wheel Turn the wheel navigator for optimum speed in viewing menus, positioning
navigator
the cursor or surfing the Internet with the WAP browser activated.
OK key The OK key is the confirmation key for executing commands and functions,
calling up menus, going to WAP links, confirming entries you have made or
selecting an option from a pop-up window.
BACK key
Press the BACK key briefly to make the telephone skip back one level
(e.g. from a submenu to the menu). If you press the BACK key and keep it
pressed for a long time, the display changes to the normal display.
key
Press the key to activate the WAP browser and load the WAP home page. To exit the
WAP browser, press the key once again. Your Internet connection will be terminated.
Getting started

13 20324744en_ba_a0
User key
Press the user key to cycle through the user profiles which have been programmed in the
telephone. The telephone settings (ringer melodies, greetings for the telephone answering
machine, etc.) also change depending on the selected user (the current user name is
always shown at the top right of the display).
Dial keypad
Use the dial keypad to dial phone numbers or to send keypad information.
Function keys
The function keys are located directly above the dial keypad. By simply pressing a key you
can:
–switch the telephone answering machine on or off.
–call up the redial memory.
–call up the LOG memory.
–park calls with the PARK key.
–select the function you have programmed on the key.
First steps (brief instructions)
Selecting the language
When you purchase your Ascom Eurit 4000 the display language has already been set to
your national language. However, you can select a different language from the
"Installation/Location" menu:
Select the "Language" line and press the OK key. From the pop-up window,
choose the required language and press the OK key.
save Press the Fox key below save.
Creating multiple subscriber numbers (MSNs) for the first time
When you applied for your ISDN line, your network operator issued you with several
phone numbers. You can assign these phone numbers to different devices or you can
define separate phone numbers (MSNs) on your Ascom Eurit 4000 for different users
(see section entitled "Phone calls – User concept").
Change the user on the telephone by pressing the user key. To make use of the full
potential of your Ascom Eurit 4000, you must define at least two users in the
"Installation/Define user" menu:
Getting started

14
20324744en_ba_a0
Getting started
Select a "not defined" line and press the Fox key below edit (or press the OK
key). The display shows the entry fields for the user data.
User
name Select the "User name" line and enter a name.
Phone Select the "Phone number" line and enter the multiple subscriber number
number (MSN) you wish to assign to that user. Enter the phone number without area
code (prefix).
save Press the Fox key below save.
➭If you do not define any MSN on your telephone, the telephone will ring when a call
is made to any of the possible phone numbers. If connecting to a PBX, enter the
number of the extension.
➭
If you have not entered a user name, the phone number is used as the user name.
Ringing tone
When you have defined several users, give them each a different ringing tone melody
from the "Ringing tone" menu. As soon as the telephone rings, you can tell which user
the call is for.
Press the user key until the display shows the user to whom you wish to assign
a specific ringing tone melody.
Select the "Melody" line and press the OK key. From the pop-up window,
select the required melody and then press the OK key.
save Press the Fox key below save.
Adjusting the date and time
Normally, you do not need to adjust the date or time, because the date and time are
automatically reset via the network every time an outgoing call is made. You can manually
adjust the date and time from the "Installation/Date and time" menu:
Date Select the "Date" line and overwrite the digits.
Time Select the "Time" line and overwrite the digits.
save Press the Fox key below save.

15 20324744en_ba_a0
Getting started
Display contrast
From the "Installation/Hardware" menu, you can set the display contrast as well as the
two display colors, light gray and dark gray, of your telephone in 32 different levels.
Select the line "Display contrast", "Display light gray" or "Display dark gray"
and press the OK key. To adjust the current settings, use the wheel navigator
or press the Fox key below "–" or "+". Press the OK key.
save Press the Fox key below save.
➭First set the two display colors light gray and dark gray to level 0. Then adjust the
level on the display contrast so that the display is completely black, but not
overmodulated. Select your preferred values for the two display colors light gray and
dark gray.
Display illumination
The display illumination is automatically activated (default setting of telephone) as soon as
you press a key on the telephone, pick up the handset or turn the wheel navigator.
However, from the "Installation/Hardware" menu you can set the illumination to always
on or always off.
Select the "Display illumination" line and press the OK key. You will see the
pop-up window with the options "OFF", "Auto" and "ON". Select your
preferred setting and press the OK key.
save Press the Fox key below save.
Confirmation beeps
Whenever you enter a wrong command or confirm a setting, you are made aware of this
by a short beep. This confirmation beep is set to ON as the default. However, if you find
the beep disturbing, you can switch it off from the "Installation/Hardware" menu.
Select the "Confirmation beeps" line and press the OK key. From the pop-up
window, select "OFF" and press the OK key.
save Press the Fox key below save.
Key sound
Key sound is a tone which is heard every time you press a key on your Ascom Eurit 4000.
Your phone is delivered with the key sound activated. If this disturbs you, you can
deactivate it under "Installation/Hardware".
Select the "Key sound" line and press the OK key. In the popup window, select
"OFF" and press the OK key.
save Press the Fox key below save.
Table of contents
Other ASCOM Telephone manuals

ASCOM
ASCOM OFFICE 10 User manual

ASCOM
ASCOM OFFICE T User manual

ASCOM
ASCOM Berkshire MR42 User manual

ASCOM
ASCOM ASCOTEL OFFICE TERMINALS-FEATURES User manual

ASCOM
ASCOM Ascotel Office 35 User manual

ASCOM
ASCOM Ascotel Office 30 User manual

ASCOM
ASCOM OFFICE 10 User manual

ASCOM
ASCOM Aura 15 User manual

ASCOM
ASCOM Eurit 22 User manual

ASCOM
ASCOM Eurit 33 Plus User manual

ASCOM
ASCOM OFFICE 25 User manual

ASCOM
ASCOM Eurit 25 User manual

ASCOM
ASCOM Eurit 30 User manual

ASCOM
ASCOM OFFICE 10 User manual

ASCOM
ASCOM ascotel 200 office 30 User manual

ASCOM
ASCOM OFFICE M User manual

ASCOM
ASCOM OFFICE 45 - User manual

ASCOM
ASCOM OFFICE 45 - User manual

ASCOM
ASCOM Eurit 20 User manual

ASCOM
ASCOM OFFICE 155PRO User manual