Asus J102 Assembly instructions

11
11
1
Getting to know your J102
Function keys
KeyKey
KeyKey
Key DescriptionDescription
DescriptionDescription
Description
Ends a call; turns the phone
ON or OFF
Answers a call; displays
dialed numbers
Displays the Camera menu
Displays the Fun menu
Displays your shortcuts
Displays the SMS/MMS inbox
Puts the phone in active
mode; selects an option;
enters data; long press to
launch WAP; shows the
wallpaper in full screen mode
Enters numbers,
alphanumeric characters,
and symbols
KeyKey
KeyKey
Key DescriptionDescription
DescriptionDescription
Description
Displays the phone book
when in idle mode; performs
various functions depending
on the menu level and
screen display
Launches the phone menu;
performs various functions
depending on the menu level
and screen display
Press once to launch the
camera. Long press to
launch the voice command
function.
Press this button to increase
the ring tone volume.
Press this button to decrease
the ring tone volume.
~
Front viewFront view
Front view Back viewBack view
Back viewBack view
Back view Side viewSide view
Side viewSide view
Side view
Antenna
Camera
Flash
External display
Speaker
LED indicator
I/O connector
(inside)
Camera/Voice dial
button
Volume up
button
Volume down
button
Battery
Battery latch
Strap holder
Open flip topOpen flip top
Open flip top
Earpiece
Main display
Flip top
Navigation/
Quicklaunch keys
Alphanumeric
keys
Microphone
Soft key (left)
Call key
Soft key (right)
On/Off/End call key

22
22
2
Initial installation and battery charging
Installing the SIM cardInstalling the SIM card
Installing the SIM card
1. Position the SIM card (A) over the SIM card slot with
the contacts (golden connectors) face down, and the
nicked corner (B) matching the notch (C) on the SIM
card slot.
2. Carefully press, then slide the SIM card into the slot
until it fits completely.
Installing the batteryInstalling the battery
Installing the battery
The battery comes uninstalled on the J102 mobile
phone. To install the battery:
1. Insert the battery hooks to the holes on the bottom
of the battery compartment.
2. Push the battery to the direction of the arrow until it
clicks in place.
A
B
C
11
11
1
22
22
2
Charging the batteryCharging the battery
Charging the battery
1. Connect the charger to an AC power source.
2 Flip the I/O connector cover to show the I/O
connector.
3. Insert the power cable plug to the I/O connector.
Initial battery charging may take about eight hours. You
can charge the battery when the phone is either on or off.
After initial use, it takes about three to four hours to fully
charge the battery.
11
11
1
22
22
2
11
11
1
22
22
2
33
33
3

33
33
3
Switching the phone ON or OFF
To turn the phone ONON
ONON
ON:
1 Open the phone flip top to access the keypad.
2. Press and hold for a few seconds until the display turns on.
3. Key-in the Personal Identification Number (PIN) when prompted,
then press . The main display shows the power on animation,
then the idle mode screen.
To turn the phone OFFOFF
OFFOFF
OFF:
1. Open the phone flip top.
2. Make sure that the phone is in idleidle
idleidle
idle mode, then press and hold for
a few seconds until the display turns off.
Getting fa iliar with the J102 displays
Text and graphic areaText and graphic area
Text and graphic area
In idleidle
idleidle
idle mode, this area shows
the name of the service
provider, date, time, manner,
and wallpaper (optional). In
either menumenu
menumenu
menu,
sub-menusub-menu
sub-menusub-menu
sub-menu, or
functionfunction
functionfunction
function modes, this area
displays text, graphics, or
both.
Icon/Title barIcon/Title bar
Icon/Title bar
In idleidle
idleidle
idle mode, this bar shows the
indicator icons. In either menumenu
menumenu
menu,
sub-menusub-menu
sub-menusub-menu
sub-menu, or functionfunction
functionfunction
function modes,
this bar shows the name of the
current menu, sub-menu, or
function.
Soft key barSoft key bar
Soft key bar
This bar shows the current functions of the left and right soft keys. The functions vary
depending on the selected menu. The soft key bar also displays the available functions of the
4-way navigation keys when in sub-menu or function display. The arrows (left/right/up/down)
appear or disappear depending on the current sub-menu, function, or application.
J102 idle mode screen

44
44
4
The indicator icons appear only after you
have installed a SIM card and turned on
the phone.
Indicator icons
The icons on the displays indicate the activated
phone features, notify you of a new SMS/MMS
message, and shows the battery power level and
network settings. Refer to the table below for icon
descriptions.
External displayExternal display
External display
Main displayMain display
Main display
IconIcon
IconIcon
Icon DescriptionDescription
DescriptionDescription
Description
Indicates the signal strength level;
permanently positioned on the top left
corner of both displays.
Appears when your receive a new SMS
message; blinks if the SIM card has
reached its maximum capacity*
Appears when you receive a new MMS
message
Appears when you download a new MMS
message
Appears if you set an alarm
Appears if you set the phone to silent mode
Appears if you set the ring mode to Vibrate
Appears if your phone has an activated
roaming feature**
IconIcon
IconIcon
Icon DescriptionDescription
DescriptionDescription
Description
Indicates the battery level; permanently
positioned on the top right corner of both
displays.
Appears if you activated the call
forwarding feature**
Appears when you are connected to a
GPRS network**
Appears if you activate the call filter
Ignore list
Appears if you activate the call filter
Privilege list
Main menu icon; permanently positioned
on the lower left corner of the main
display
Phonebook icon; permanently positioned on
the lower right corner of the main display
* The maximum SMS/MMS capacity of SIM cards vary. Refer to the SIM card documentation for details.
** Network-dependent or subscribed feature.

55
55
5
Main and sub enus
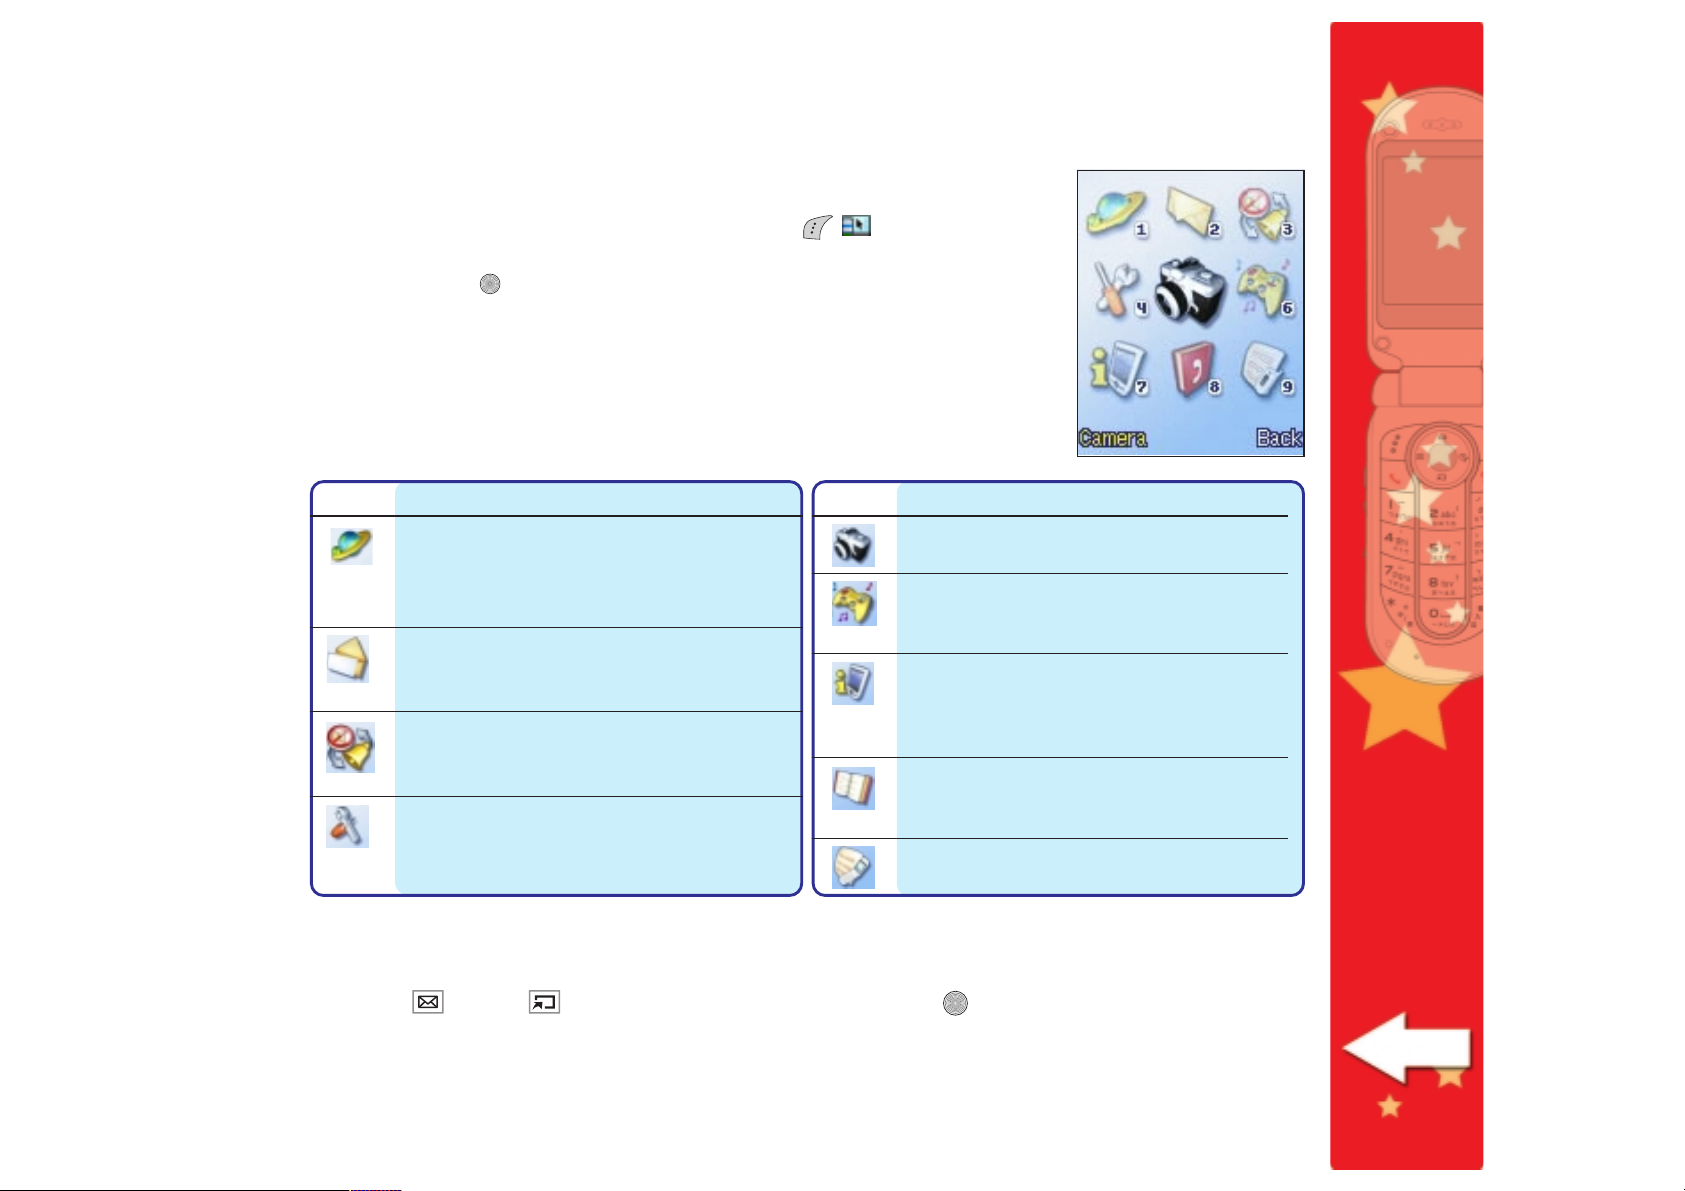
The main menu represents all the functions and features of your
mobile phone. Open the main menu by pressing [] when the
phone is in idle mode. Use the navigation buttons to select a menu
icon, then press , or press the corresponding menu icon number on
the keypad to launch the menu.
The table below gives a brief description of the menu icons. For
detailed information on the phone menus and their functions, refer to
the user guide that came with the phone package.
IconIcon
IconIcon
Icon DescriptionDescription
DescriptionDescription
Description
NetworkNetwork
NetworkNetwork
Network. Allows you to surf the Internet
using the WAP feature of the phone and
access other services offered by your
phone operator.
MessageMessage
MessageMessage
Message. Allows you to compose, edit,
send, and manage SMS and MMS messages
to almost any mobile phone.
MannerManner
MannerManner
Manner. Allows you to select from five
preset manners or to customize the
manner ring tone, volume, etc.
SettingsSettings
SettingsSettings
Settings. Allows you to adjust the phone
ringtone, display, security, connectivity,
memory, and network settings.
IconIcon
IconIcon
Icon DescriptionDescription
DescriptionDescription
Description
CameraCamera
CameraCamera
Camera. Allows you to capture,
manage, and share photos and videos.
FunFun
FunFun
F u n. Allows you to play Java games,
compose ring tones, and access the
Image Gallery.
OrganizerOrganizer
OrganizerOrganizer
Organizer. Allows you to organize your
daily schedule using the Calendar, Alarm,
World Clock, Text/Voice Memo, Currency
Exchange, and other features.
PhonebookPhonebook
PhonebookPhonebook
Phonebook. Allows you to add,
organize, and search contacts saved in
the phone and SIM memory.
CallsCalls
CallsCalls
Calls. Allows you to manage missed,
dialed, and answered call information.
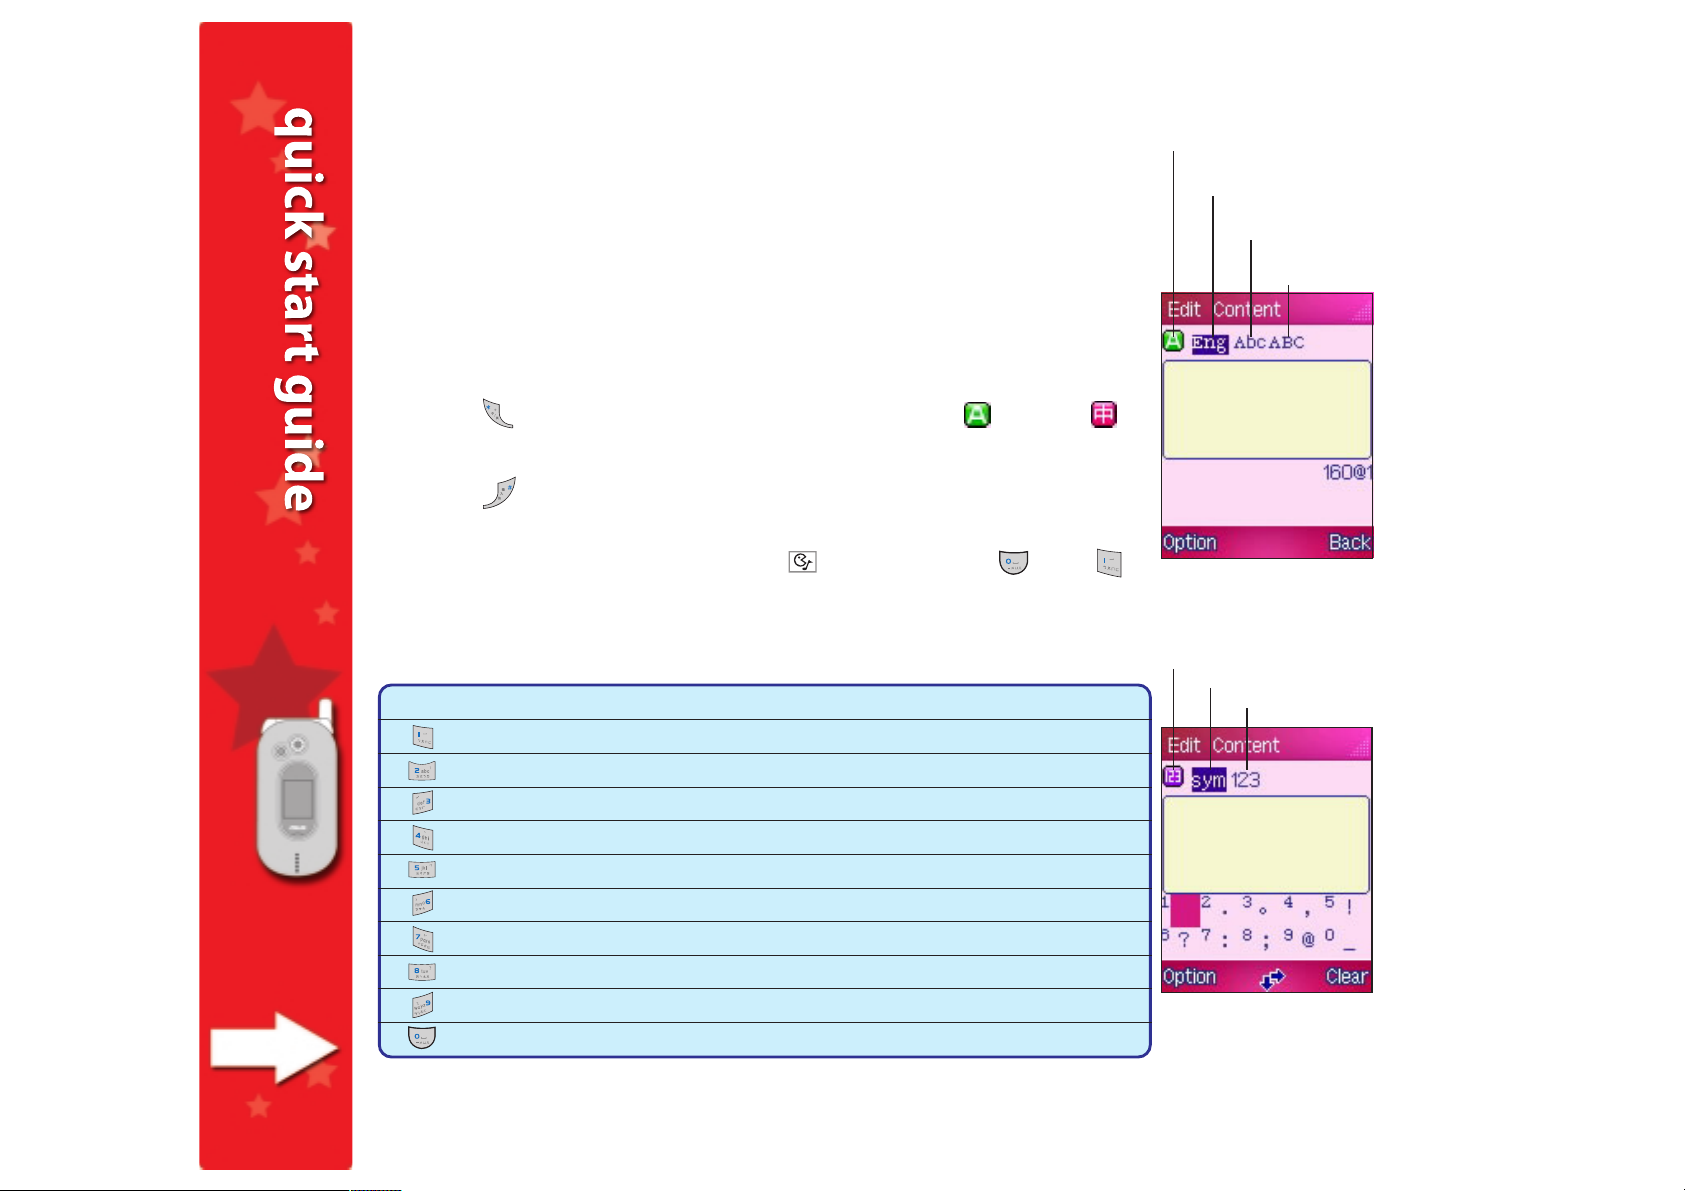
Each main menu item has a sub-menu that lists the specific functions of that menu. There are
two ways to open the sub-menu:
• Press (up) or (down) to select an item, then press .
• Press the corresponding item number on the keypad.

66
66
6
Entering text
You will need to enter text to use several phone functionalities. The text
editor has three input modes: English, Number/Symbol, and Chinese.
When entering textWhen entering text
When entering text
• Use the keypad to enter letters, numbers, and symbols.
• Press a key repeatedly until your desired character appears on the
screen. Refer to the Character chartCharacter chart
Character chartCharacter chart
Character chart below.
• Press to shift between the input modes: English , Chinese ,
and Number/Symbol.
• Press to shift between lowercase and uppercase letters, or
predictive text and normal text methods.
• To put a space after a word, press (right), or press , then .
• Press the available navigation keys on the soft key bar to select
characters or words.
English input mode
English mode
Predictive text
(initial CAPS)
Normal text
(initial CAPS)
Normal text
(all CAPS)
Character chartCharacter chart
Character chart Number/Symbol mode
Symbols
Numbers
Number/Symbol
input mode
KeyKey
KeyKey
Key Uppercase (ABC)Uppercase (ABC)
Uppercase (ABC)Uppercase (ABC)
Uppercase (ABC) Lowercase (abc)Lowercase (abc)
Lowercase (abc)Lowercase (abc)
Lowercase (abc)
. , ! ? 1 @ : ’ ” ( ) % &. , ! ? 1 @ : ’ ” ( ) % &
. , ! ? 1 @ : ’ ” ( ) % &. , ! ? 1 @ : ’ ” ( ) % &
. , ! ? 1 @ : ’ ” ( ) % & . , ! ? 1 @ : ’ ” ( ) % &. , ! ? 1 @ : ’ ” ( ) % &
. , ! ? 1 @ : ’ ” ( ) % &. , ! ? 1 @ : ’ ” ( ) % &
. , ! ? 1 @ : ’ ” ( ) % &
AA
AA
ABB
BB
BCC
CC
C22
22
2aa
aa
abb
bb
bcc
cc
c22
22
2
DD
DD
DEE
EE
EFF
FF
F33
33
3dd
dd
dee
ee
eff
ff
f33
33
3
GG
GG
GHH
HH
HII
II
I44
44
4gg
gg
ghh
hh
hii
ii
i44
44
4
JJ
JJ
JKK
KK
KLL
LL
L55
55
5jj
jj
jkk
kk
kll
ll
l55
55
5
MM
MM
MNN
NN
NOO
OO
O66
66
6mm
mm
mnn
nn
noo
oo
o66
66
6
PP
PP
PQQ
QQ
QRR
RR
RSS
SS
S77
77
7pp
pp
pqq
qq
qrr
rr
rss
ss
s77
77
7
TT
TT
TUU
UU
UVV
VV
V88
88
8tt
tt
tuu
uu
uvv
vv
v88
88
8
WW
WW
WXX
XX
XYY
YY
YZZ
ZZ
Z99
99
9ww
ww
wxx
xx
xyy
yy
yzz
zz
z99
99
9
displays other symbolsdisplays other symbols
displays other symbols 00
00
0

77
77
7
Using your phone
To make a local or international call:To make a local or international call:
To make a local or international call:
1. Open the flip top or set the phone in idle mode if the flip top is
already open.
2. Key-in the number of the party you want to call, then press . To
make an international call, key-in the correct country and area codes
before the phone number.
When available, the display shows the name and photo of the called
party. Refer to Chapter 5 “Managing your phone book” of the user
guide for details on customizing contact information.
3. When the call is received, the display shows the name and photo of
the called party, duration of the call, and audio status (Mute/Not
Mute). Talk to the party on the line.
4. Press to end the call. A Call SummaryCall Summary
Call SummaryCall Summary
Call Summary screen displays the call
duration and voice recording, if any. The phone then returns to idle mode.
To create and send an SMS message:To create and send an SMS message:
To create and send an SMS message:
1. Go to the idle mode screen, then press to display the main menu.
2. Press to display the MessageMessage
MessageMessage
Message menu.
3. Use the (up) or (down) button to select Edit SMSEdit SMS
Edit SMSEdit SMS
Edit SMS, then
press . The Edit SMSEdit SMS
Edit SMSEdit SMS
Edit SMS screen appears.
4. Highlight the To:To:
To:To:
T o : field, then press .
5. Key-in the phone number of the recipient, or press (Names), then
select the message recipients from the Phonebook. Press when done.

88
88
8
6. Highlight the ContentContent
ContentContent
Content field, press , then compose the message.
7. Press to return to the Edit SMSEdit SMS
Edit SMSEdit SMS
Edit SMS screen, press (Option),
select SendSend
SendSend
S e n d, then press . A Sent successfully!Sent successfully!
Sent successfully!Sent successfully!
Sent successfully! message
appears to indicate that the SMS message has been sent.
Refer to “Chapter 6: Messaging features” of the user guide for more
information on sending SMS and MMS messages. MMS messaging
requires a subscription to your phone operator’s MMS services.
To create and send an MMS message:To create and send an MMS message:
To create and send an MMS message:
1. From the SMSSMS
SMSSMS
SMS menu, press (MMS) to switch to MMS.
2. Press to display the Edit MMS screen.
3. In the Edit MMSEdit MMS
Edit MMSEdit MMS
Edit MMS screen, highlight the To:To:
To:To:
T o : field, then press to
display the Recipient ListRecipient List
Recipient ListRecipient List
Recipient List window.
4. Press (Option), select AddAdd
AddAdd
A d d, then press .
5. Use (up) or (down) to select the contact mode, then press .
6. Select the recipient(s) from the Phonebook, or key-in the phone
number or e-mail address, then press (Back) to return to the
Edit MMSEdit MMS
Edit MMSEdit MMS
Edit MMS screen.
7. Highlight the SubjectSubject
SubjectSubject
Subject field, press , then key-in the subject.
Press when done.
8. Highlight the ContentsContents
ContentsContents
Contents field, press (Option), select
Add Text/Add Image/Add AudioAdd Text/Add Image/Add Audio
Add Text/Add Image/Add Audio from the pop-up menu to
compose the MMS message, then press .
9. Press (Back) to return to the Edit MMSEdit MMS
Edit MMSEdit MMS
Edit MMS window, press (Option),
select SendSend
SendSend
S e n d, then press .
3

99
99
9
Changing the phone settings
To change the incoming ringtone:To change the incoming ringtone:
To change the incoming ringtone:
1. Go to the SettingsSettings
SettingsSettings
Settings menu, then press to display the RingtoneRingtone
RingtoneRingtone
Ringtone menu.
2. Select IncomingIncoming
IncomingIncoming
Incoming from the RingtoneRingtone
RingtoneRingtone
Ringtone menu, then press .
3. Highlight a ring tone to play using (up) or (down), then
press to select.
4. Click (Back) to return to the RingtoneRingtone
RingtoneRingtone
Ringtone menu, or (Option) to
rename, compose, or delete a ring tone.
The default PIN and PIN2 codes come with the SIM card package. You
must key-in the default codes before you can change them. Refer to
the SIM card documentation for information on the PIN codes and PIN
Unblocking Keys (PUK).
1. Go to the SettingsSettings
SettingsSettings
Settings menu, press to display the PhonePhone
PhonePhone
Phone
SettingsSettings
SettingsSettings
Settings menu.
2. Highlight SecuritySecurity
SecuritySecurity
Security from the Phone SettingsPhone Settings
Phone SettingsPhone Settings
Phone Settings menu, then press .
3. Highlight PINPIN
PINPIN
PIN from the SecuritySecurity
SecuritySecurity
Security menu, then press (Option).
4. Select ActivateActivate
ActivateActivate
Activate from the menu, then press .
5. When prompted, key-in the PIN, then press . A Set successfully!Set successfully!
Set successfully!Set successfully!
Set successfully!
message appears on screen to indicate that you have successfully
activated the PIN.
To activate your PIN:To activate your PIN:
To activate your PIN:

1010
1010
10
To set the date and time:To set the date and time:
To set the date and time:
1. From the Phone SettingsPhone Settings
Phone SettingsPhone Settings
Phone Settings menu, select Date/TimeDate/Time
Date/TimeDate/Time
Date/Time, then press .
2. Press (up) or (down) to select Set Date/TimeSet Date/Time
Set Date/TimeSet Date/Time
Set Date/Time.
The
current date and time is displayed above the soft key bar.
3. If the date or time is incorrect, press to display the SetSet
SetSet
Set
Date/TimeDate/Time
Date/TimeDate/Time
Date/Time screen.
4. On the date field, key-in the current date in DD.MM.YYYY format,
then press (down) to move to the time field.
5. On the time field, key-in the current time in HH:MM 24-hour format.
For example, key-in 1-1-3-1 to set the time to 11:31 AM.
6. When done, press . A Set successfully!Set successfully!
Set successfully!Set successfully!
Set successfully! message appears
indicating that you have successfully changed the date and time. The
display returns to the Date/TimeDate/Time
Date/TimeDate/Time
Date/Time menu.
To set the time zone:To set the time zone:
To set the time zone:
1. From the Phone SettingsPhone Settings
Phone SettingsPhone Settings
Phone Settings sub-menu, select Date/TimeDate/Time
Date/TimeDate/Time
Date/Time.
2. From the Date/TimeDate/Time
Date/TimeDate/Time
Date/Time functions, press (up) or (down) to
select Set Time ZoneSet Time Zone
Set Time ZoneSet Time Zone
Set Time Zone.
The current time zone is displayed above
the soft key bar.
3. If the time zone is incorrect, press to display the Set TimeSet Time
Set TimeSet Time
Set Time
ZoneZone
ZoneZone
Zone screen.
4. Press (up) or (down) to highlight the correct time zone, then
press to select.
The time difference of the selected time zone is
displayed above the soft key bar.
5. When done, press (Back) to return to the previous menu.

1111
1111
11
Capturing a photo
To capture a photo:To capture a photo:
To capture a photo:
1. Put the phone in idle mode, then press to display the main menu.
2. Press to display the CameraCamera
CameraCamera
Camera menu.
When the phone is in idle mode, you can press the capture button
on the side of the phone to launch the camera.
3. Select CaptureCapture
CaptureCapture
Capture from the CameraCamera
CameraCamera
Camera menu to show the capture
display.
4. Point the camera to your subject. Make sure your subject fits in the
capture display.
5. Hold the phone firmly, then press to capture. The screen displays
the captured photo.
6. Press (Save) to save the photo to the My AlbumMy Album
My AlbumMy Album
My Album folder;
otherwise, press (Back) to return to the capture display.
To change the photo capture settings:To change the photo capture settings:
To change the photo capture settings:
1. From the capture display, press (Option).
2. Use (up) or (down) to select SettingsSettings
SettingsSettings
Settings, then press .
The camera settings pop-up menu appears.
3. Use (up) or (down) to select a setting, then press (left)
or (right) to adjust.
You can adjust the photo sizephoto size
photo sizephoto size
photo size, qualityquality
qualityquality
quality,
capture modecapture mode
capture mode,
brightnessbrightness
brightness, and contrastcontrast
contrastcontrast
contrast. You can also use this menu to
customize special camera features such as multi-capture intervals or
flash settings.

1212
1212
12
Capturing videos
The AVI RecorderAVI Recorder
AVI RecorderAVI Recorder
AVI Recorder allows you to capture short video files using the
phone camera. The video files are saved in .AVI format and are stored in
the My VideosMy Videos
My VideosMy Videos
My Videos folder.
To capture videos:To capture videos:
To capture videos:
1. Select AVI RecorderAVI Recorder
AVI RecorderAVI Recorder
AVI Recorder from the CameraCamera
CameraCamera
Camera menu.
2. Point the camera to your subject. Make sure your subject fits in the
video capture display.
3. Hold the phone firmly, then press to start the video capture.
4. When video capturing is finished, press (Save) to save the video
capture to the My VideoMy Video
My VideoMy Video
My Video folder; otherwise, press (Cancel) to
ignore the recording, and return to the recorder mode display.
The phone automatically assigns a file name to the video. The file
name is usually a combination of the date and the sequence that
video was taken (e.g. AVI100705). You can rename the video file
name in the My VideoMy Video
My VideoMy Video
My Video folder.
To change the video capture settings:To change the video capture settings:
To change the video capture settings:
1. From the video capture display, press (Option).
2. Use (up) or (down) to select SettingsSettings
SettingsSettings
Settings, then press .
The camera settings pop-up menu appears.
3. Use (up) or (down) to select a setting, then press (left)
or (right) to adjust.
You can adjust the video capture brightness, contrast, and flash
settings using this menu. You can also add special effects to your
videos by selecting Preview EffectsPreview Effects
Preview EffectsPreview Effects
Preview Effects.
Table of contents
Other Asus Cell Phone manuals

Asus
Asus I007D User manual

Asus
Asus Padfone X mini Guide

Asus
Asus Max Pro ZB630KL User manual

Asus
Asus PadFone Station User manual

Asus
Asus V66 Handset Manager User manual

Asus
Asus X00ADC User manual

Asus
Asus P565 User manual

Asus
Asus ROG PHONE 07 User manual

Asus
Asus Zenfone 3 ZE520KL User manual

Asus
Asus P320 User manual

Asus
Asus P735 User manual

Asus
Asus Pasfone mini 4.3 User manual

Asus
Asus P535 User manual

Asus
Asus ZenFone 3 Zoom User manual

Asus
Asus M307 M307 User manual

Asus
Asus ROG Phone User manual

Asus
Asus ZenFone 4 User manual

Asus
Asus zenfone Go ZC500TG User manual

Asus
Asus ZenFone Max Plus User manual

Asus
Asus ZenFone V Live User manual